| |||||||

| Search Forums |
| Advanced Search |
| Go to Page... |
 |
| Search this Thread |  77,432 views |
 9th April 2020, 17:35
| #16 |
| Distinguished - BHPian  | Re: My Bicycle Hobby: Cleaning, Maintenance & Minor Repairs! I have been battling it our with my little Garmin Etrex GPS over the last week. It was increasingly more difficult to get it running properly. I spend many hours, updating the various maps, settings. I was on four calls with the support team from the shop where I bough it. In the end I decided to give up. I have had this GPS for almost 8 years. It helped me navigate more than 15000 kilometer in India on my 1974 Royal Enfield Bullet and back here in Europe I must have easily done 20-25K on my bicycle. Time for a new one. I went back to the same place I bought the Etrex: An outfit called Waypoint must be THE go to place for one’s personal navigation: https://www.gps.nl (sorry all Dutch). But these guys are really, really good. They started with one tiny shop some 15 -20 years ago an have 7 shops all over the Netherlands and an excellent webshop too. What these guys not know about GPS is not worth knowing. So I spoke to them about my requirements and we ended up with another Garmin. This time the Garmin Edge Explorer. Waypoint adds the fietsknopen I mentioned earlier, which is really convenient. I ordered it on Tuesday around noon and it was delivery Wednesday around noon. I spend all evening exploring it and setting it up properly. Took me hours and I had to call the support desk a few times this morning. They are very good. Knowledgeable staff and they will have all the devices handy. So when you tell them you have problems setting for instance a data field on your Edge, the first thing they tell you; hang on, just let me get my Edge and power it up to. Everything is running and I took a few quick tours in the neighbourhood to verify This is the main start up screen  I have created two main screen for when I am travelling. One showing the map, with the route in magenta, speed and distance to go till destination  The second screen shows a few more data fields I find useful, such as average speed, ETA at destination etc  Takes quite a bit of time and experimenting to set all the various auto- features. Mine is now to set up to recalculate the routes automatically, timer starts and stop automatically, auto zoom. Depending on zoom level it will also show the fietsknopen junction and routes in green superimposed on the regular map. And a whole bunch more stuff, I have already forgotten.  My Etrext ran on two penlight batteries. This one has a rechargeable battery. I will need to see how convenient that is. The screen on this unit is bigger than on the Etrex and is also much clearer. I have dialled down the back lit function completely and it was still very much eligible, even with the sun shining on it. It is also touch screen compared to a tiny joystick, cumbersome operation on the Etrex. Most importantly, it is lightning fast in calculating routes! This was really becoming a problem with the Etrex. As the maps become larger and more detailled it was really struggling calculating routes. I can still plan routes the same way on my MacBook and download them to the Edge Explores. This is a long weekend for us, Good Friday and Easter Monday. If all goes well four days off. So I dare say I will be putting my new Egde Explore through its paces!! Jeroen Last edited by Jeroen : 9th April 2020 at 17:37. |

|  (5)
Thanks (5)
Thanks
 |
| The following 5 BHPians Thank Jeroen for this useful post: | aah78, blackwasp, graaja, SnS_12, ysjoy |
| |
|
10th April 2020, 21:56
| #17 |
| Distinguished - BHPian | Re: My Bicycle Hobby: Cleaning, Maintenance & Minor Repairs! Today is Good Friday, so I have the day off. Actually, it is not an official holiday in the Netherlands, but it is in many other Western European Countries and a few other places too. So basically lots of colleagues were off, so I decided to take the day off as well. Long weekend as Monday is Easter Monday at that is an official holiday here. We are in lock down, but I can still ride my bicycle wherever I go, but keep your distance. They have also done research on the chances of cyclist infecting one another. Dont slip stream! and ride 5 meters apart. It was an absolute gorgeous day and I wanted to try out my new Garmin GPS. Last night I made two different route. One for a SE wind and one for a NE wind. This morning NE wind. A little over 94 kilometer.  I dont know quite why, but here in this region there are dozens and dozens of storks nest. You will find them everywhere. Apperently Storks tend to return to their old nest each year, so some of these nest have seen Storks nesting for a long time, with the same birds..  The dikes look, well, very yellow!  Very happy with my new Garmin. Really easy to use, read, adjust etc. Including stops I was out for about 5-5,5 hours. All the time the GPS was on. I started with it charged at 85% and when I got home it was down to 44%, so I guess that is good enough for my sort of cycling. There is something odd though. The time to destination is way off. My average speed was just under 20 km/h till then. With still 35 kilometers to go to destination, the time to destination should have been around 1 hour and 45 minutes. But it shows only 1 hour and 8 minutes. Some of these GPS use the average of the last few minutes only, rather than the total route average. But that would not work in this case. I did keep at around 20 km/h all the way till then, still heading into the wind. My max speed till this point did not exceed 25 km/hour. So something is amiss. I will need to figure out what is going on!  Jeroen |
|
| (4)
Thanks
|
| The following 4 BHPians Thank Jeroen for this useful post: | aah78, sleepyk, SnS_12, ysjoy |
|
13th April 2020, 15:02
| #18 | |
| Distinguished - BHPian | Re: My Bicycle Hobby: Cleaning, Maintenance & Minor Repairs! Today I will be talking about punctures. Or rather how to fix them. If you have a bicycle, at some point in time you will suffer from a puncture. It is an absolute certainty! My dad taught me how to fix punctures. In the Netherlands kids are taught to swim, ride a bicycle, fix a puncture, learn to walk. In that order. My dad was probably the most A-technical guy on the planet, but he knew how to fix a puncture. It was a major happening and not just involved our family, but everybody in the street would know. It would take him hours, he would mobilise everybody; Do this, go and get me that, lots of swearing. For those of you how know your classics; Jerome K Jerome in his classic Three men in a boat describes his uncle doing the odd DIY job. If you know that scene, apply it to my dad fixing a puncture and you will get the picture. For those who have not read this hilarious classic: Quote:
Anyway, back to punctures: I am not quite sure why, but as young boy I would have a puncture at least once a week. These days I rarely have a puncture at all. Not sure what causes the differences. It is probably a combination of elderly wisdom and better tyre quality. Kids just dont look where they are going. Adults do (one would hope). Also, I am pretty sure that these days tyres are much, much better. I use Schwelbe tires on my touring bicycle. They are not cheap, but they are known for running very light and being very puncture resistant. Again, the internet and Youtube are awash with a millionbillionzillion posts and videos about how to fix a puncture. Mostly made by Americans who discovered cycling only recently. I love Americans but they tend to go overboard to easily on any new topic. Putting a man on the moon was a walk in the park, compared to fixing a puncture. When we lived in Kansas City there were several bicycle tours organised locally. One of the nicest was the Tour de Bier. (https://bikewalkkc.org/tourdebier/) Just an easy tour, different distances up to 50 miles, around Kansas City. We used to participate with a bunch of colleagues from work. The first time I participated I could not believe me eyes; All of them were decked out as if they were going out on the toughest part of the Tour de France. On the other hand, all the other participants could not believe how I was decked out. A Dutch guy, with a regular tour bicycle, regular shorts and a T-shirts and loafers on his fee! Showed them up still! Why should you be able to fix a puncture? Well, punctures tend to happen at the oddest of times, always when you dont need an extra challenge. Say you are out on your bicycle. You decided to go out for an extra long ride. Just before the half way point in the middle of nowhere, your tyre goes flat. At this very moment your mobile will ring; Its your wife; her waters have broken, your kid fell and needs to go to the hospital and your house is on fire. If you know how to fix a puncture you will be on your way back in under 10 minutes! First thing when you notice your tyre going flat: Do a proper visual inspection of the outside of the tyre. Can you see anything stuck in the tyre? If not, pump it up (this does imply you need to have a bicycle pump with you at all times!). If it goes flat in 10 minutes again, you need to fix it! Obviously, if you have these drop out hubs, take the respective wheel out. Turn the bicycle upside down and let it rest on its steering bar and saddle. Should work fine, or maybe prop it up against a tree if necessary. I decided to show you on my old city bicycle. For two reason, not being able to drop the wheel means you need to be a bit more careful as I will show. Also, it give me an opportunity to show off my latest bicycle accessoire, a very cool, cleaning and fiddling stand!   Take the valve out, which might mean undoing one or two rings around the stem of the valve. (I will show you different kinds of valves later on as well)   Next, get your tyre levers out. Stick it under the rim of the outer tyre. Be careful not to get the inner tube caught in between! You are likely to rip it! Many of these tyre levers can be fixed on a spoke, so you have both hands free to move on.  Add another tyre lever in the same fashion  Next push a third tyre lever in and pull it along the rim and the outer tyre should pop off. With a little experience you can do this with just two tyre levers in under 10 seconds!  Next pry out the inner tube. Important, try to keep it roughly in the same orientation towards to the outer tube. Here you see the tricky bit if you dont have drop out hubs. You get the inner tube like this, if it gets hooked on the rusty bolt, you might tear it! So be careful   With the inner tube removed have another good look at the outer tube. Flatten/spread it. Run your fingers, carefully on the inside. You are trying to find whatever it was that caused the puncture. If you do find something, hold the inner tube alongside the outer tyre, still in its original position. That will give you an almost exact position of where the inner tube was punctured. Remove whatever it was that caused the puncture. Always check the complete tyre, you might find a second puncture!  If you cant find anything poking through the outside tyre, pump up the inner tube. Insert the valve, obviously. Jus listen if you can hear air hissing. Or run the the tube very close to your cheek. it will be close to your ear, also your cheek is very sensitive. You will feel the tiniest bit of air blowing by! If that still does not work, you will have to dunk the tube into water. At home a bucket, but if you are on the road, a large enough puddle might have to do. Fixing the actual puncture is straight forward. It will involve some sort of patch, special glue and a bit of sandpaper. There are a few variations these day and I will show you some of what I have been using further on. Obviously, carrying a spare inner tube is the quickest way. But you will need to have drop out hubs for that (or carry several spanners). Also, make sure you still check the outer tyre for foreign objects, or it will puncture your brand new inner tube almost immediately! Before putting everything back together again, do check the ribbon on the inside of the rim. This is an important, often overlooked component. If it is torn you really ought to replace it when you get back home. On the odd occossion a torn ribbon might indirectly, cause the puncture. It protects the back of the spokes poking and rubbing into your inner tube.   Push the valve through the rim again and put the two locking rings on, dont tighten the one nearest to the rim yet. You want to put a bit of air in the inner tube as you put it back under the outer tyre. But watch carefully the inner tube isnt stuck anywhere where it can gets damaged when you inflate it!   Watch those pesky rusty bolts like a hawk!  Close up  You want to put enough air into the inner tube, so it stretches out nicely with no or little kinks in it.   Gently does it. Make sure the inner tube goes back on without any undue pulling or tension.    Make sure the valve sticks out perpendicular to the rim!  Let a bit of air out before you start mounting the outer tyre again. Many people will find this the hardest part. Takes a bit of practice. I find this works well for me. Bend over the wheel, and use both hand. about 30-40 centimeters apart to pull the outer tyre back on the rim.  Hold one hand in place, securing the outer tyre in place. Work you way round the circumference of the rim pulling the outer tyre back on.  At some point it will look like this; About 70-80% is on, but the remainder is now overlapping the rim by a large margin. It becomes very difficult to pull this last stretch onto the rim.  Whatever you do, dont insert a tyre lever. That is almost a hundred percent guarantee of puncturing the inner tube I find. What you need to do, is run your hands along the circumference of the outer tyre and push the two sides of the outer tyre into the middle of the tim. This is where the rim is deepest and it should give a little extra room to pull the last stretch on the rim.  Next, have a look at the valve. Is it sticking out perpendicular to the rim? If not, it means the inner tube is not aligned properly. You should at this point be able to rotate the tyre a bit on the rim, till the valves is position correctly. If you dont fix this, it will cause additional stress on the inner tube right where the valve is positioned. Likely to tear and then you can throw away the inner tube. Cant be fixed! Push the valve inward (so the locking ring needs to up on the valve stem for some clearance. Then gently tug it down. This will secure the valve without any strain on it. All what is left is to inflate the tyre and you will be on your way again!   | |
|
| (5)
Thanks
|
| The following 5 BHPians Thank Jeroen for this useful post: | aah78, blackwasp, DaiusPitar, sleepyk, SnS_12 |
|
13th April 2020, 15:17
| #19 |
| Distinguished - BHPian | Re: My Bicycle Hobby: Cleaning, Maintenance & Minor Repairs! Lets have a more detailled look at some bits and details: The valve as shown on my town bicycle is the most common for these sort of bicycles. Here you see a modern day variant and an old one. Not sure what is still used in India?   On many more sporty bicycles you will find a different kind of valve. When I grew up, we called these French valve. In those days these valves were used exclusively on racing bicycle.  But over the years they have made their way to many other sorts of bicycles. Including the sort of touring bicycles I ride. The actual valve mechanism is all secured inside the valve. I am not quite sure why they evolved from the old fashioned valve to the new one. Maybe something to do with higher tyre pressures? They do have a very different shape and they require a different pump or an adapter. Here you see my two bicycle pumps. The one on the right is a very old one, the one of the left is relative new. I have one of these adapters that allow me to use the old pump onto the new valves too.     Inside my saddle bag I carry this little puncture repair kit.  it comes with everything you need. Tyre levers, spare bits for the valves, spare bulbs (very old school as most bicycle lights are LED these days!)     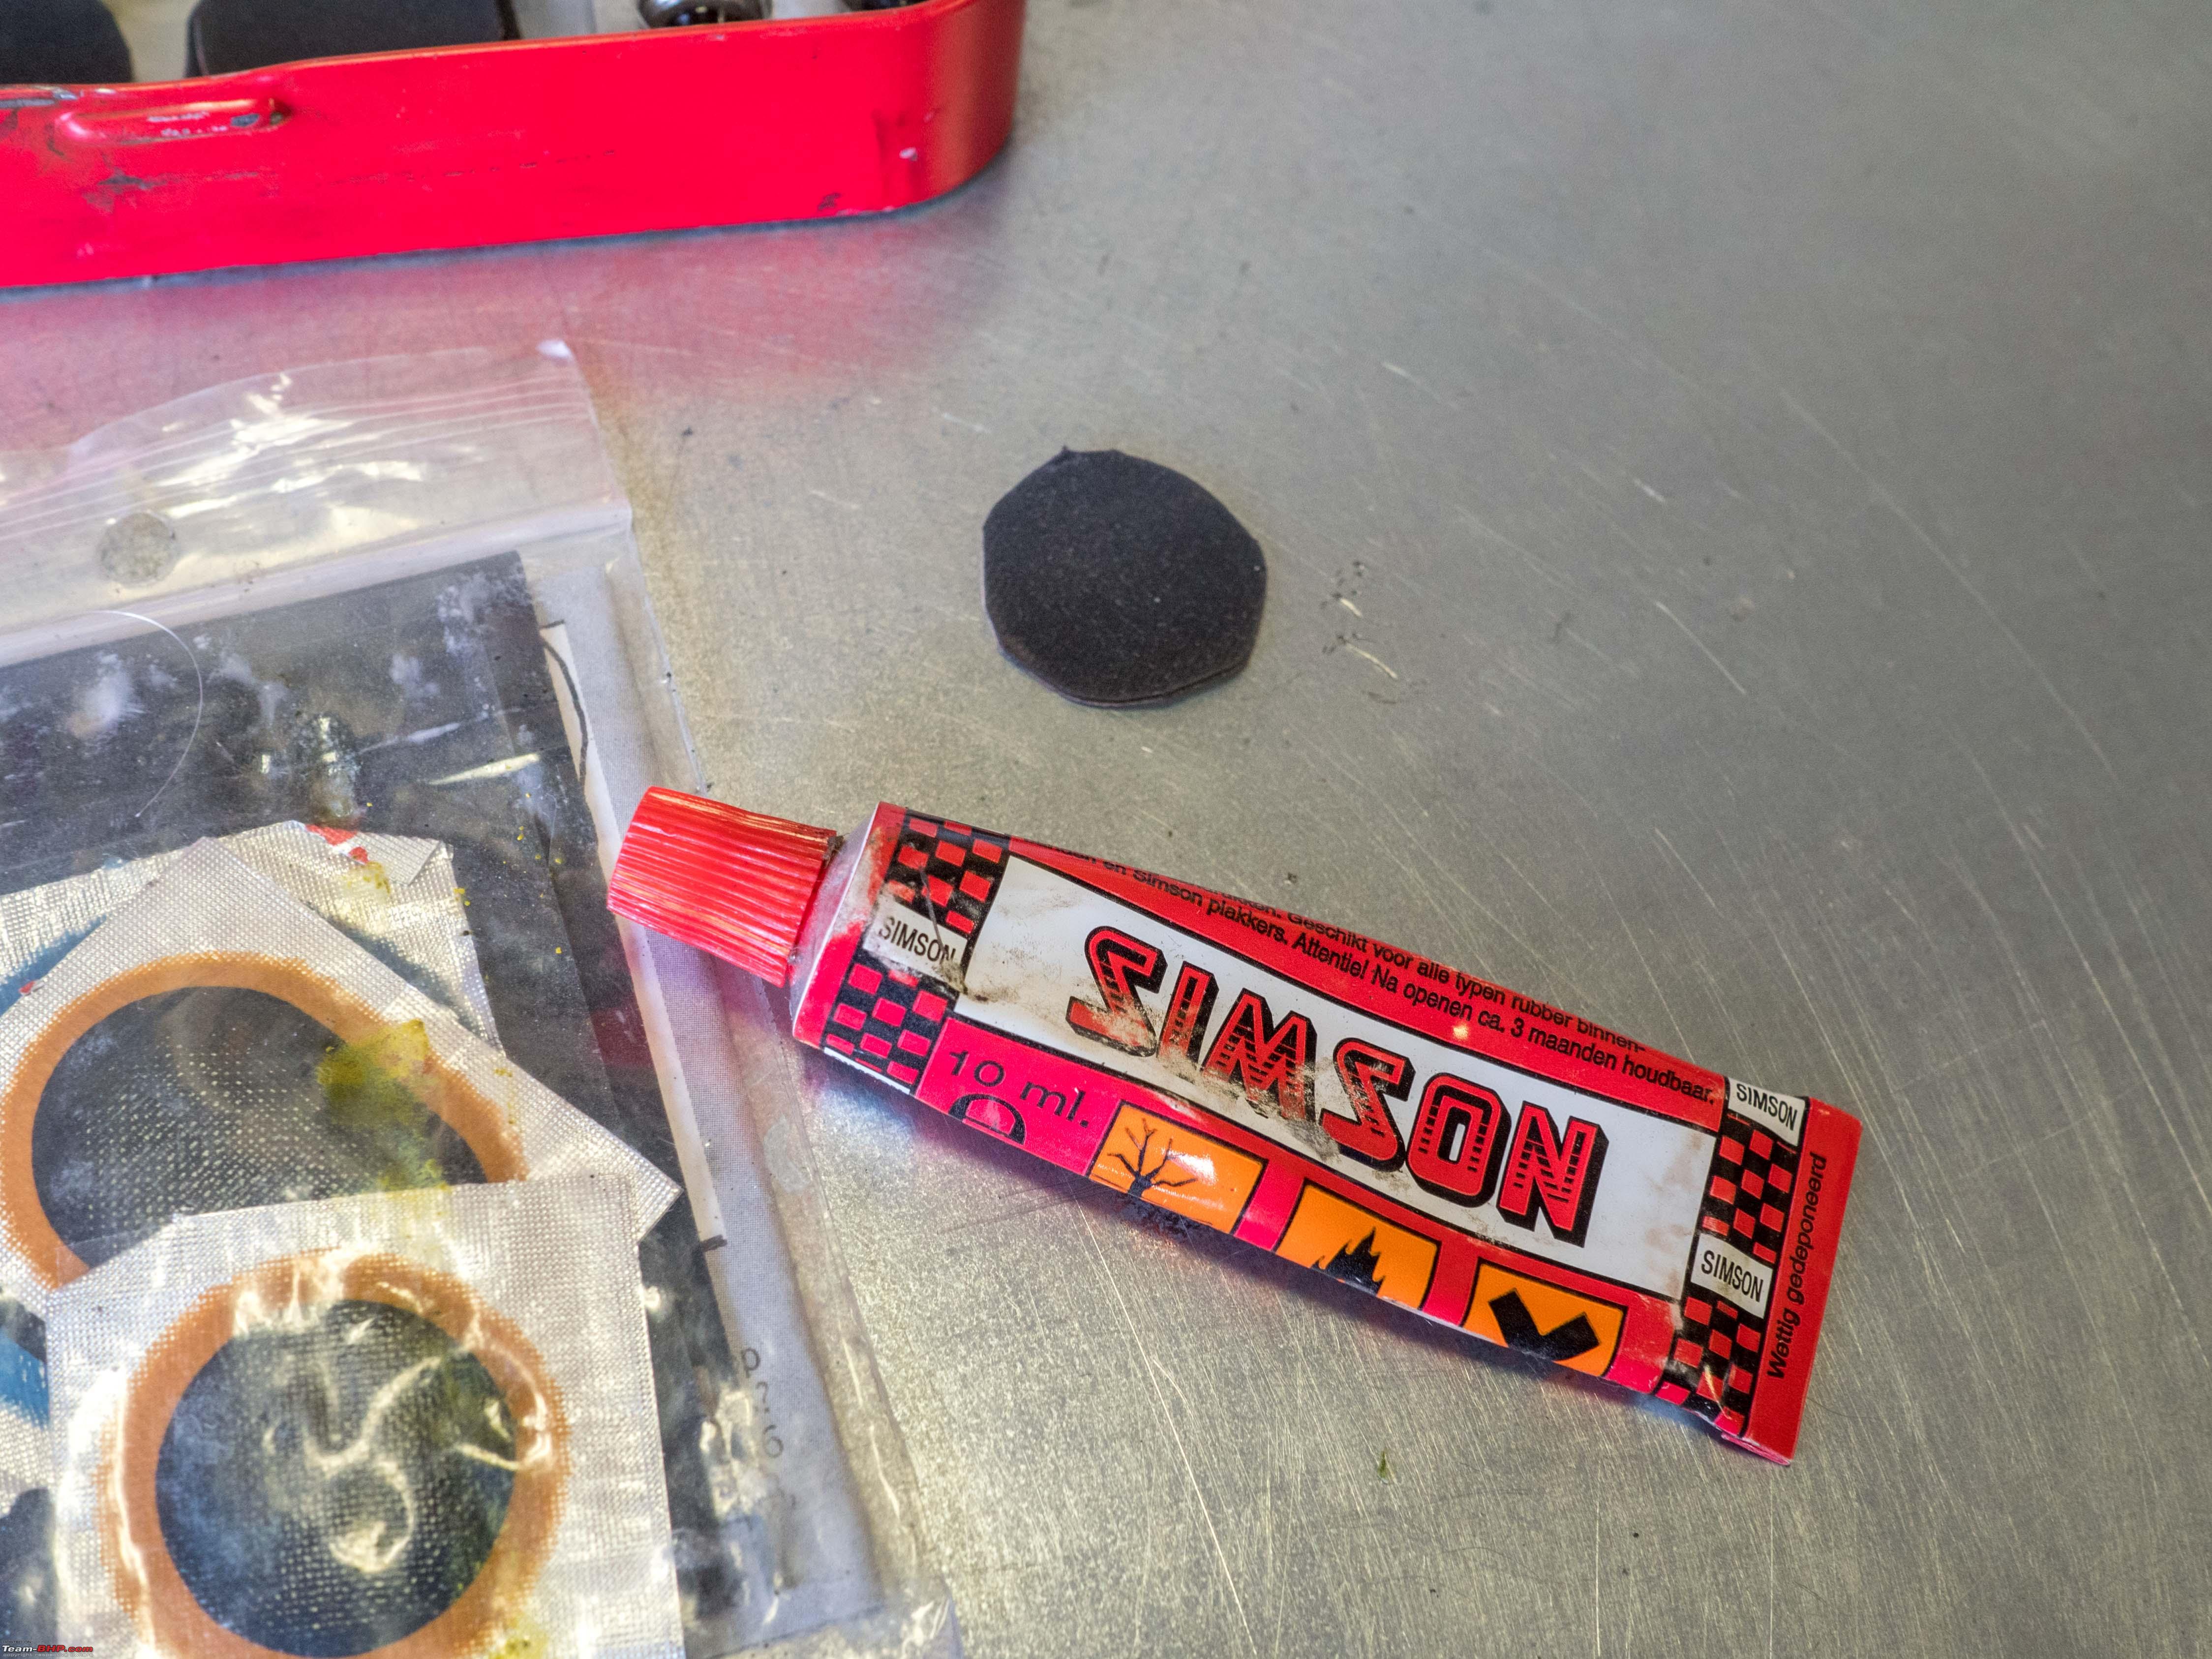 You will also see three different kind of repair patches. The traditional ones come as a square plaque rolled up. I pre-cut them in different sizes. It is always a good idea to round of the corners, dont leave them square as that might leave the corners coming unstuck. Then we have various modern ones. (Black with orange rim) They tend to be a lot thinner. I still carry them with me, but I dont like using them. Yesterday I also bought these pre-glued Super Patch. Have not used them either, so the jury is still out on those. Other than on the pre-glued one, you need special glue. We call it solution. You use the sandpaper lightly around the area of the puncture. Next you spread a bit of solution on both the patch and the inner tube. Wait for about a minute and then push them together. You need to apply some stretching motion as you push it on. Wait a few minutes and it should be could to go! Tyre levers come if different shapes, sizes and material too. I have no preference really. I use what is in my little puncture kit, for no other reason these are very light and take up very little room as they nest together.  As part of this little photo shoot I was rummaging though my bicycle part bins. I found a few more puncture kits I have somehow collected over the years.   My bicycle parts bin is actually no more than one tin. (A Quality street Tin, which means you get to eat a lot of delicious chocolate first and next you still have a cool and handy tin for collecting bits)  Found a few more bicycle tools in there too. The ring is to adjust spokes. Spokes come in different sizes, not just length but also the way they mount in the rim. This ring will fit most. But as I mentioned before, spoking is not a job I would do myself. You see the bicycle French valve adapter (there is also one in the first puncture kit I showed). And a special puller to get the main crank sprocket off .  A few more bits of chain showing the different locking mechanism I have been talking about.  Lastly, at the end of my first post I showed a special tool. Here I am showing you what is for. It is all to do with changing tyres on bicycles that have no drop out hubs. Getting the rear wheel out on this sort of bicycle is always a bit of a job. But with this easy spreader you can spread open the frame enough to quickly change an inner and or outer tyre without having to take the whole wheel out. You just undo one side and create sufficient clearance to get the tyres through!    Also, a little peek in my garden shed, I call this my bicycle corner!  I have not touched upon fixing tubeless tyres. I havent done that for forty years if not more. In those days it would involved cutting them open, fixing the puncture and stitching it all back together. Very tedious. But on racing bicycles with tubeless I dont think many cyclist would do a road side puncture fix. They always carry a spare and will fix the old one at home! Jeroen Last edited by Jeroen : 13th April 2020 at 15:19. |
|
| ()
Thanks
|
|
15th April 2020, 12:09
| #20 |
| Distinguished - BHPian | Re: My Bicycle Hobby: Cleaning, Maintenance & Minor Repairs! Yesterday I called the support desk of Waypoint, the supplier of my new Garmin Edge. I did not understand how this model calculates time to destination. As I showed earlier, it was calculating with a very high speed. They explained that the average speed showing on the display is not used, as I had already concluded. This unit uses an internal average speed to calcute how fast/long it will take to get to your destination. That internal average speed “learns” from all your rides. In the end it will be sort of an average speed of all your rides. You can not reset it or preset it. Not sure I quite like that, but it is what it is as they say. Last evening, after work I went out for another ride. Excellent cycling weather. Little wind (N 8km/H), dry and not too sunny. Time to see what my current condition is; I did 50,6 km in just under two hours. Which is 25,3 km/h average. Which for me is as good as it gets. I don’t need to go faster. This is a good work out a few times a week. I will do longer rides too, but average speed will come down a bit.  This is one of the many (circular) routes from our home. Not a single traffic light, I cross the motorway three times, on viaduct/tunnels. To get to this sort of speed you still find yourself peddling around 27 km/h all the time. It needs to make up for those stretches where you need to slow down. E.g. a steep incline up to a dike, a junction where you need to be careful, the odd rough patch of surface, and a few very narrow cycle lanes, where you might have to give way to others now and then. Still, I am very pleased. It is still very early in the season and I am already back on what I consider my standard level of fitness. Jeroen |
|
| (2)
Thanks
|
| The following 2 BHPians Thank Jeroen for this useful post: | aah78, blackwasp |
|
18th April 2020, 19:21
| #21 |
| Senior - BHPian | Re: My Bicycle Hobby: Cleaning, Maintenance & Minor Repairs! Hanging the bicycle from the roof was a great idea Jeoren. I did the same today.  I needed to give the chain and the sprockets a thorough cleaning, swap the front and rear tyres, overhaul the brakes and grease the hubs. Having the bicycle hung like this provided an opportunity to work standing up. My back thanks you for the tip. Will try to put up pictures of a different kind of brake setup I have on my bike if you permit the same on this thread. |

| (3)
Thanks
|
| The following 3 BHPians Thank Tgo for this useful post: | aah78, graaja, Jeroen |
|
18th April 2020, 21:21
| #22 | |
| Distinguished - BHPian | Quote:
Absolutely, the more is shown on this thread regarding various aspects of bicycle set and maintenance the better. Looking forward to your post. Jeroen | |
|
| (1)
Thanks
|

| The following BHPian Thanks Jeroen for this useful post: | Tgo |
|
20th April 2020, 14:19
| #23 |
| Distinguished - BHPian | Re: My Bicycle Hobby: Cleaning, Maintenance & Minor Repairs! Over the weekend I was browsing through some old photographs. Came across this one. I am about 3 or 4 years old here. Even so, according to my mum, this was my second tricycle already. I started on a hand me down from my two sisters and then my dad bought me this one. I mentioned all bicycles must have a bell, did I not?  |
|
| (7)
Thanks
|
| The following 7 BHPians Thank Jeroen for this useful post: | aah78, blackwasp, carthick1000, graaja, GutsyGibbon, rrsteer, Tgo |
|
27th April 2020, 12:46
| #24 |
| Distinguished - BHPian | Re: My Bicycle Hobby: Cleaning, Maintenance & Minor Repairs! We have a nice long weekend here in the Netherlands. This Monday is Kings day, the birthday of our king. In all honesty, I am not that much of a Royalty follower, but hey, it is an official holiday, so I have got the day off. Usually, all of the Netherlands is brimming with all sorts of activities on Kings day. Every village, every town will have tonnes of activities. Nothing this year due to the lock down. Even so, we are fortunate we can still go out for some fresh air. So my bicycle rides continue. And it is very nice weather too. I decided to clean my bicycle yesterday. I had done almost 900 km since the last time, I showed earlier in this thread. It was quite dusty, not as bad as last time, so just a quick job this time. First time I am using my new Bicycle maintenance stand on this bicycle. Works really really well. Very convenient.  I have decided to measure my chain every 1000 kilometer or so. Just to see how quickly it wears. Here you see my little tool. Compare it to when the chain was new as I showed earlier, virtually no wear yet!  On these quick clean jobs, I do not take the chain or any parts off. I have this nifty little chain cleaner. Fill it up with undiluted bicycle cleaner and whizz the pedals around!  I must admit, I use a tiny bit of my industrial strength degreaser on the sprockets. Next just hose it all down. The results are impressive!!    I spray the complete bicycle with this diluted cleaner and hose it down. The letter saddle I protect with the special rain protector I carry in the saddle bag.  Once you have used degreaser on the chain it is really important to properly lube the chain. I get one of my teflon chain lubes and I oil each and every link and roller. I leave it overnight. Tomorrow, before going out on the bicycle I will clean any excess oil of the chain. Just run it through a piece of cloth.  Dried the bicycle, sprayed it with my special bicycle polish, buffed it all up and voila. It looks like new. This bicycle has done well over 13.000 kilometers and I am very happy to report it does not have a scratch on it! I use it a lot, I ride it hard, but I am also very careful with it.  I went on a nice ride earlier. About 80 kilometers. Moderate North East wind.  Not so much a work out ride as a pleasure ride. It took in all about 6 hours. Mainly because I kept stopping to take photographs. I am working on an idea I have had for a while for a panel for one of the Royal Photographic Society distinctions. I would like to show how modern society is encroaching on Dutch landscapes. So I plan my route accordingly, load up all my photo gear and start peddling. Here are a few examples:     Last edited by Jeroen : 27th April 2020 at 12:48. |
|
| (3)
Thanks
|
| The following 3 BHPians Thank Jeroen for this useful post: | aah78, dmplog, rrsteer |
|
28th April 2020, 22:04
| #25 | ||
| Team-BHP Support  | Re: My Bicycle Hobby: Cleaning, Maintenance & Minor Repairs! Your threads are always a treat to read Jeroen. Always very informative & detailed. I love all the tools that you pull out in your various write-ups, not to mention the passion that you put into your hobbies! Quote:
The server in the restaurant was very polite in correcting us but we did receive an earful. Another time I got an earful was when we got "lost" in a tiny village around Barbados where the streets were just about big enough for one car w/houses on both sides. A lady was driving to work & was not very amused to see tourists make a hash of her commute.  Quote:
EDIT: Never mind. I see you already put the answer up in a previous post. Last edited by aah78 : 28th April 2020 at 22:05. Reason: Too late! | ||
|
| (1)
Thanks
|
| The following BHPian Thanks aah78 for this useful post: | Jeroen |
|
7th May 2020, 14:06
| #26 |
| Distinguished - BHPian | Re: My Bicycle Hobby: Cleaning, Maintenance & Minor Repairs! I had noticed a peculiar rattle on my bicycle the last couple of days. At first I could not figure out where it was coming from. When it comes to rattles on my cars or my bicycles I am very nerdy. No matter what, it has to be solved! So a more close up examination was required. I noticed, almost impossible to see, a tear in the front mudguard. Hardly noticeable as it appeared to be more underneath the front fork. So time to take the front wheel out and take a closer look:  The mudguard is attached with a single screw underneath the pivot point of the front fork. So very easy to take of and once it was off, the damage was obvious!    I found a little nylon washer from my various part kits:  Took it to my grinder to round it off, so it follows the contours of the inside of the mudguard.  Next I got one of my (many) different kinds of glues. I choose a two component gel version and glued the washer on the inside of the mudguard.  I was a bit conscious about this, no way telling if this particular glue will hold on the mudguard and or the nylon washer. Let it dry for a few hours. Re-installed the mudguard:  Looks good and I took the bike for a little test drive around the river. So far so good. I did order a new mudguard too. My experience with Koga is not too good when it comes to getting spares. Every year they update their line up of models. Twice before I could not get identical spares after only a few years. Found a bicycle shop that had a lot of Koga Spares on their website. Not my particular mudguard, so I gave them a call. The guy knew immediately which particular model I was looking for, gave me a part number so I could look it up and check. Looked fine, so I ordered it. I honestly don’t know how long this particular repair will last. Gluing two different kinds of plastic is always a bit tricky. We will see, if it breaks again, I will just put the new one on! I am very happy with my new bicycle stand. It was not cheap, but it is very handy and convenient. Much more versatile than hanging the bicycle on ropes from the rafters. (Having said that, the “hanging from the rafters” did me well for 61 years. I started doing that in the garden shed of my parents from very early on. And in fact, those hooks I have, are, as far as I can remember, from those very early fiddling with bicycle days! Jeroen Last edited by Jeroen : 7th May 2020 at 14:09. |
|
| (2)
Thanks
|
| The following 2 BHPians Thank Jeroen for this useful post: | carthick1000, Tgo |
| |
|
19th June 2020, 13:09
| #27 |
| Distinguished - BHPian | Re: My Bicycle Hobby: Cleaning, Maintenance & Minor Repairs! since my last major bicycle clean, including installing the new chain and sprocket I have done a little over 1200 kilometers. Twice I cleaned the chain on the bicycle. Just with a rag and re-applying oil. leave to soak/penetrate overnight and remove access next morning with a rag again. So this morning, prior to nice long bicycle tour I decided to check for chain wear with my fancy little tool:  I am actually quite please with this. Very little wear. I checked at several spots along the chain, but they all came up identical. So I am hopeful with this combination of chain, sprocket, lub oil and intermediate cleaning I can clock up another 5-6000 kilometres before having to replace them again. I have been taking a little holiday this week. Weather is nice, dry, sunny, 23-24oC, so perfect cycling weather. As always, holiday do tend to fill with some chores. But most of those I can do on my bicycle as well. Yesterday our daughter asked me to come over and help with a few odd jobs in her house. So I cycled over, about 40 kms. On the way to her I stopped at a new hardware store I have discovered only about 15 km north of us. It is really a store that caters for professional builders, but you can buy as a private person too. They are the only hardware shop that stocks HSS drill bits in 0,1mm increaments. Lately, I have had a great need for those in an endless variety of sizes. Check out my other hobby thread to see how my model steam engine is coming along Nice very pleasant ride and back again, slight different route, little over 44km. Part of this route looks as if it goes through rural build up area. Which it is, but it is an area with lots of parks, canals, bridges, boats etc. So lots to see, people about, riding their bicycles, enjoying a picnic along the waterfront, out on their boats, kids jumping into the canals. Very enjoyable.   Jeroen Last edited by Jeroen : 19th June 2020 at 13:13. |
|
| (2)
Thanks
|
| The following 2 BHPians Thank Jeroen for this useful post: | nikhn, Tgo |
|
25th August 2020, 14:52
| #28 |
| Distinguished - BHPian | Re: My Bicycle Hobby: Cleaning, Maintenance & Minor Repairs! I just came across this Youtube video. It makes for an interesting sight showing how busy bicycle traffic can be in the Netherlands. And how the Dutch cope with all these bicycles and other traffic on a busy junction. Nothing to get uptight about, poetry in motion! Last edited by Jeroen : 25th August 2020 at 14:53. |
|
| (1)
Thanks
|
| The following BHPian Thanks Jeroen for this useful post: | ringoism |
|
30th September 2020, 12:20
| #29 |
| Distinguished - BHPian | Re: My Bicycle Hobby: Cleaning, Maintenance & Minor Repairs! I have done well over 1000 km again, total 4000km since I changed the chain and sprocket in March earlier this year. I checked the chain with my little tool earlier this week and for the first time, I can see some minute wear. Nothing to worry about yet! I will be cleaning it later this week. I want to check if the wear, after proper cleaning and oiling is less, than with a dirty chain. As you might have noticed from some of the images of my bike, I have been using toe clips on my pedals. Very simple ones, just plastic. I have had these for a very long time. These were even fitted to my previous bike earlier. As I am doing quite a bit of riding these days, I thought I might want to upgrade to a proper clip-less pedals. Which means new pedals and new shoes! Most expensive bit of kit I ever bought for my bicycle!  Very smart looking shoes, my wife tells me the shouty green bits suits me!  Bit of DIY as you need to install the metal clips yourself. Not sure about the position, just went with centre position.  And the fancy new pedals:  When working on your pedals, always remember that the left pedal has left thread! So to undo it, you need to rotate the spanner anti clock wise! Also, on many pedals there is not that much room and you might find your spanner to thick to get it on properly. bike shops will sell you special pedal wrenches. Luckily, I have enough spanners in so many different sizes, I found one that did fit properly on the old panels. The new pedals have Allen bolts, So you tighten them from behind, which means you really need to think which way to rotate them. Just a small job, biggest challenge was undoing the old pedals. I went out for my first ride on these clip less pedals last night. I was so used to my toe clips. Did not even have to look at my feet, just came naturally, rotating them so my shoe would slide in. Not yet there, with this new system. But getting there. These are the ones, to undo, you rotate your heel away from the frame/crank. I have set them up at the lightest setting. The guy in the shop advised me too, to get used to them. bit early days to really say I like them. But I think I can feel a bit of a (positive) difference to my knees after riding about 60km at almost 25 km/h. More to come! Jeroen |
|
| (1)
Thanks
|
| The following BHPian Thanks Jeroen for this useful post: | carthick1000 |
|
3rd October 2020, 11:34
| #30 |
| Distinguished - BHPian | Re: My Bicycle Hobby: Cleaning, Maintenance & Minor Repairs! The other day whilst browsing the internet looking for some ideas for my next ride, I stumbled on something unusual. A route like an elephant!. So I created this in my Garmin Base Map program and uploaded it into my Garmin GPS. Yesterday I managed to ride it. First a short 7km ride to the translation in Gorinchem, then the train to Zaltbommel. About 2 km to peddle to the start of the route. Switch on Strave and keep pedalling. It was pretty hard going, not very nice weather and quite a bit of wind. But I am pretty pleased with the result:  The route ends again in Zaltbommel. I could have taken the train back home, but with an eastern wind I decided to peddle home along the river Waal. Only about 23 km with the wind in my back. In all I did about 123 km. Most on this route itself. Jeroen |
|
| ()
Thanks
|
|