| |||||||

| Search Forums |
| Advanced Search |
| Go to Page... |
 |
| Search this Thread |  77,264 views |
 28th March 2020, 10:34
| #1 |
| Distinguished - BHPian  | My Bicycle Hobby: Cleaning, Maintenance & Minor Repairs! We already have an excellent thread on bicycles. It deals with many aspects of cycling, a lot of information on new bicycles, what to look for etc. I thought it might be an idea to start a separate thread specifically on how we maintain and repair our bicycles. What is required depends a bit on the type of bicycle and how it is used of course. But in general, bicycle maintenance and repair is easy to do. Your average spanner and screwdriver tool set will be sufficient for most jobs and you only need a few simple, cheap specialist tools if you want to get into jobs such as changing out chains, sprockets and so. There are already a zillion/trillion website and YouTube videos out there on this very topic. And like car maintenance and repair, many opinions on what is the best/worse. Many opinions on how to clean, how to get that shine on your frame. What to use to clean your chain. Or, and here it becomes as controversial as with cars, which oil to use on your chain and running gear. More about this later. These days my wife and I live back in my home country the Netherlands. Bicycles are an integral part of Dutch society. They are the most used form of transport for distances up to 10-12 km. We have more bicycles than people in the Netherlands. Many people will have at least two bicycles. One, your typical what we call city bicycle; usually a pretty robust simple bike. It could be brand new, or 30 years old. You use it to go to work, do the shopping, go into town. Many people will also have another more “specialist” bicycle. That could be a touring, racing, ATB etc. Those are used for touring, racing, off roading, Duh! Between my wife and myself we currently own “only” three bicycles. One pretty new city bicycle for my wife. We bought it for my wife shortly after we returned from India in the summer of 2016. She had a bicycle, but it was old and rickety and she wanted a nice new one, with proper gears, drum brakes. My wife is not very tall, she is British / Bajan, not Dutch. And although she is quite used to riding a bicycle, she likes to sit quite low. She only feels comfortable when she can put both feet, flat on the ground, whilst sitting on the saddle. Still, like all the Dutch mummies, she would take our kids to school on the bicycle. Two child seats, one up front on the steering bar, (so called suicide position) one at the back on the rear carrier:  One 34 year old city bicycle for me:  This bicycle has some special meaning for me. In the early 80s my wife and I lived for four years in Brighton, the UK. In 1986 we moved to the Netherlands. I went ahead of my wife and our eldest son. To start work, find a house etc. My parents helped me a lot settling back into the Netherlands. One of the first things my dad did; he took me to the local bicycle shop to buy this very bicycle. At the time, this was quite an innovative design, the frame had some different measures and angles, which supposedly made it lighter and more stable. It was extremely well built and finished, with high quality brakes, gears light etc. It was his welcome home present from him to me. Some years ago, I stripped the paint and repainted it myself. Not one of my better jobs I hasten to say, but city bicycles are work bicycles. One 2,5 year old touring bicycle for me:  This is a gorgeous Koga semi custom bicycle. Although the name might suggest otherwise, this is a proper Dutch (Private) Bicycle brand. This is my second Koga. I smashed up the first one, unfortunately. Somehow managed to hit a pole in the road. The scar on my forehead still shows, and the frame was broken in two places! I decided to go the semi custom way as I could use a lot of parts from my old Koga bicycle on the new one. I have had done some 12000 kilometers on it. I ride all year round, although less so in the winter. Not so much because of the cold. I can dress for that. But I don’t like to ride in the dark and I don’t ride any more when it freezes. I am getting to old to fall again. Old bones are brittle and break. Also, I don’t like riding in the rain. The Netherlands is mainly flat, but we do get wind and parts of the Netherlands are very wide and open. So I will always check wind speeds and directions before I set off on a long tour. I want to make sure I have the wind in my back on the way home. Alternatively, I will cycle to our nearest train station and take a train that will take me somewhere “into the wind” and cycle home from there, wind in the back. During weekdays I usually do short tours 30-60km after work. During the weekend I could be doing 80-120km. The Netherlands has an excellent infrastructure for cycling. Most of our cycling roads are tarmac, some cobble stone. Of course, the ATB brigade will go off road on dirt tracks and so. But 99% of my tours is on tarmac and a bit of cobble stone, the odd gravel path. The type of bicycle, how often you use your bicycle in combination with the environment you find yourself in, will largely determine wear, tear and required maintenance. On our city bicycles I can be very short and quick: other than pumping up the tyres I do no maintenance at all. I don’t even clean them. We run them, until something breaks and that does not happen very often. It is usually the more specialist bicycle such as touring, race and ATBs that require much more attention. Most will have open type of gears, front/rear derailleurs, open brakes. And as they get used more and or in dirty environments and they are expensive we tend to like to clean and maintain them quite a bit. Cleaning your bicycle, like cleaning your car, is apart from getting a clean bicycle, also a good way to inspect your bicycle up close. There are website and YouTuber out there that will advise you to adhere to more complex maintenance schedules for your bicycle then for your car. Check this and that every time before you set off. This and that every week, this and that every month. Rubbish, I find. When something is really wrong with the bicycle I will notice immediately. More importantly, as I do clean my bicycle pretty regularly I get to touch and feel just about every part up close. But as with my car, I do keep note of the mileage at which I replace major items, such as new tyres, chain, sprocket, brakes etc. Undoubtedly, the parts that wear the most are open chain systems with derailleurs. In particular your rear sprocket and chain. Again, how quickly they wear is really dependent on many factors. The good news, it is easy to see, measure and even feel. When they start wearing down, your shift will become a little less smooth, when they are worn a lot, the chain might jump to occasional tooth. My latest set of sprocket and chain had done me almost 4500 kilometer. Which is similar to the previous set. I could make the sprocket last a bit longer if I would change out the chain at 2-2500 km. But I did not. So it was time to get a new sprocket and chain. Also, my bicycle was still on its original brake pads. There are at least 8-10 bicycle shops within a 7-8 kilometer radius from where we live. Just about the tiniest village in the Netherlands will have at least one very well equipped bicycle shop. We also have a few of these MEGA Bicycle Experience Centre. I usually go this one; the largest bicycle store in the Netherlands: https://www.12gobiking.nl/english As a bonus, next door is also the largest Toolshop: https://www.hbm-machines.com So you can imagine, with my hobbies and interests I spend a considerable amount of my time, and disposable income I might add, at these two shops! But my wife and I are in self isolation due to the Corona Virus. So I simply ordered everything online and it was delivered to our home the next day!  I will show you how I clean my bicycle and how I replace the chain, sprocket and brake pads. Again, there are probably as many opinions on how to do this as there are cyclist. This just happens to be my way. And I will try to explain why I choose to do it this way and what experiences I have had doing it differently. As I said, I am Dutch, I grew up in the Netherlands. I have always had a bicycle. From about 13 years onward I got into these touring bicycles and from that moment onward I have been maintaining and repairing them myself. Everything! There is only one job I will not do and that is spoking. That is just a highly specialised skill. Also, when not done properly, with my weight, mileage and speeds, the wheel will go wobbly very quickly if not done one hundred percent correctly. I have two different cleaning methods/modes. There is the full works and the intermediate cleaning. The intermediate cleaning involves only the running gear. These days I just run an old rag over the chain whilst moving the peddles, pluck away some of the mucky bits on the little wheels of the derailleurs. Next I oil the chain again. More on the oiling later. The intermediate cleaning of the running gear is triggered visually and to some extent by listening carefully on how smooth everything runs. Frequency varies, as discussed before on usage, weather etc. Next level up is the “full works”: it will involve a thorough cleaning of every bit of the bicycle and it involves taking the chain and wheels off! As we are also replacing some bit, this time it is the full works! Some stuff and tools at the ready: These are some of the more “specialised bicycle tools and I will be using every single one of them:  The various cleaning detergents. The little green plastic box can be filled with detergent and attached to the chain. Does a decent job of cleaning the chain and sprockets without having to remove anything. For many years if not decades cleaning my bicycle involved just some old rags and clean of the dust, dirt. These days I am using one of these special bike cleaners. I spray it all over the bicycle and then hose it down. I use it diluted for the frame and wheels and undiluted on the chain, sprockets, derailleurs.  As I will need to replace the chain and sprocket there is no use cleaning those, so I am taking them off before I start the cleaning process. Here you see me using the special pliers to open up the fast link in the chain. Easy peasy!  I took the chain off, I forgot to show you the use of the special chain wear measuring device. So I just put it in; as you will see the little pointy bit goes all the way in, meaning the chain is completely worn. I will show it on the new chain too later  Bicycle chains come with two different types, single of multiple speed. the multispeed are specified by the number of gears. Mine is a 10 speed gear, so is the chain. There are also two different kind of ways of opening up or closing a chain. A so called fast link or by punch. As it so happens my old chain has a fast link, and the new one requires a punch. There is much more to say and tell about bicycle chains, but these are the basics. How many speeds, what kind of locking mechanism. So here we go with cleaning the bicycle. When hosing it down, do take care not to spray water anywhere near bearings. Especially when using high pressure washers, you could easily ruin your bearings! They are completely watertight of course, but pointing a high pressure water stream onto it, will most definitely cause water ingress.  The little guide wheels on the derailleur, very mucky!  I also use special industrial degreaser on sprockets, chain wheel, derailleur. This is heavy duty stuff and it will remove not just dirt but also all lubrications oil and grease!. So you need to reapply on every part, watch and see. Once properly hosed down, I give the frame a quick once over with one of my towels. Next for easier access I hang up the bicycle in my garage  Next, take off both wheels. In my case I always deflate the tyres. They won’t fit through the narrow space between the brake pads otherwise. My bicycle has these very handy drop out hubs, One handle operation and they come out. You might have to adjust the brakes of deflate the tyres though!   Next a dry the entire frame, fenders etc. I also take off the two guidance wheels on the derailleur. Make sure you understand which one goes where. On these relatively simple derailleurs the top one tends to have a metal bush bearing and the lower one does not. Clean and dry all parts thoroughly  I am fortunate with a well equipped workshop, so I have one of these big degreaser tanks, which works a treat for getting these parts cleaned quickly.  Front wheel gets it own dedicated cleaning cycle, spoke by spoke, the hub, the rim etc. On the rear wheel I need to take the cassette off, but also the drop out mechanism comes out. Can not get the wheel out of the frame otherwise. To be honest, a bit of a design mistake by Koga! I also spend a lot of time on cleaning the front sprockets. I had to undo the various bolts that hold the cover and the three front sprockets in place.   if you are going to replace your casette yourself, invest in these very simple tools. Make a world of difference!  Clean the rear wheel, each and every spoke and the hub. By touching/cleaning every spoke you are effectively also checking each spoke. If one is becoming a bit loose, you will immediately notice! Here is my replacement sprocket and chain. All my running gear is Shimano. But the number of sprockets and chain available is absolutely staggering. And that is just from the Shimano range. I just stick to what I have. It gives me the gear ratio’s I am used to, so I just keep ordering / buying the same. But if you want to try different gear ratio’s, this is of course the time to do so.  Before putting the new cassette on I clean the hub on the wheel, dry it and put just a very thin film of white vaseline on. Just to make sure it does not seize up. Back on: 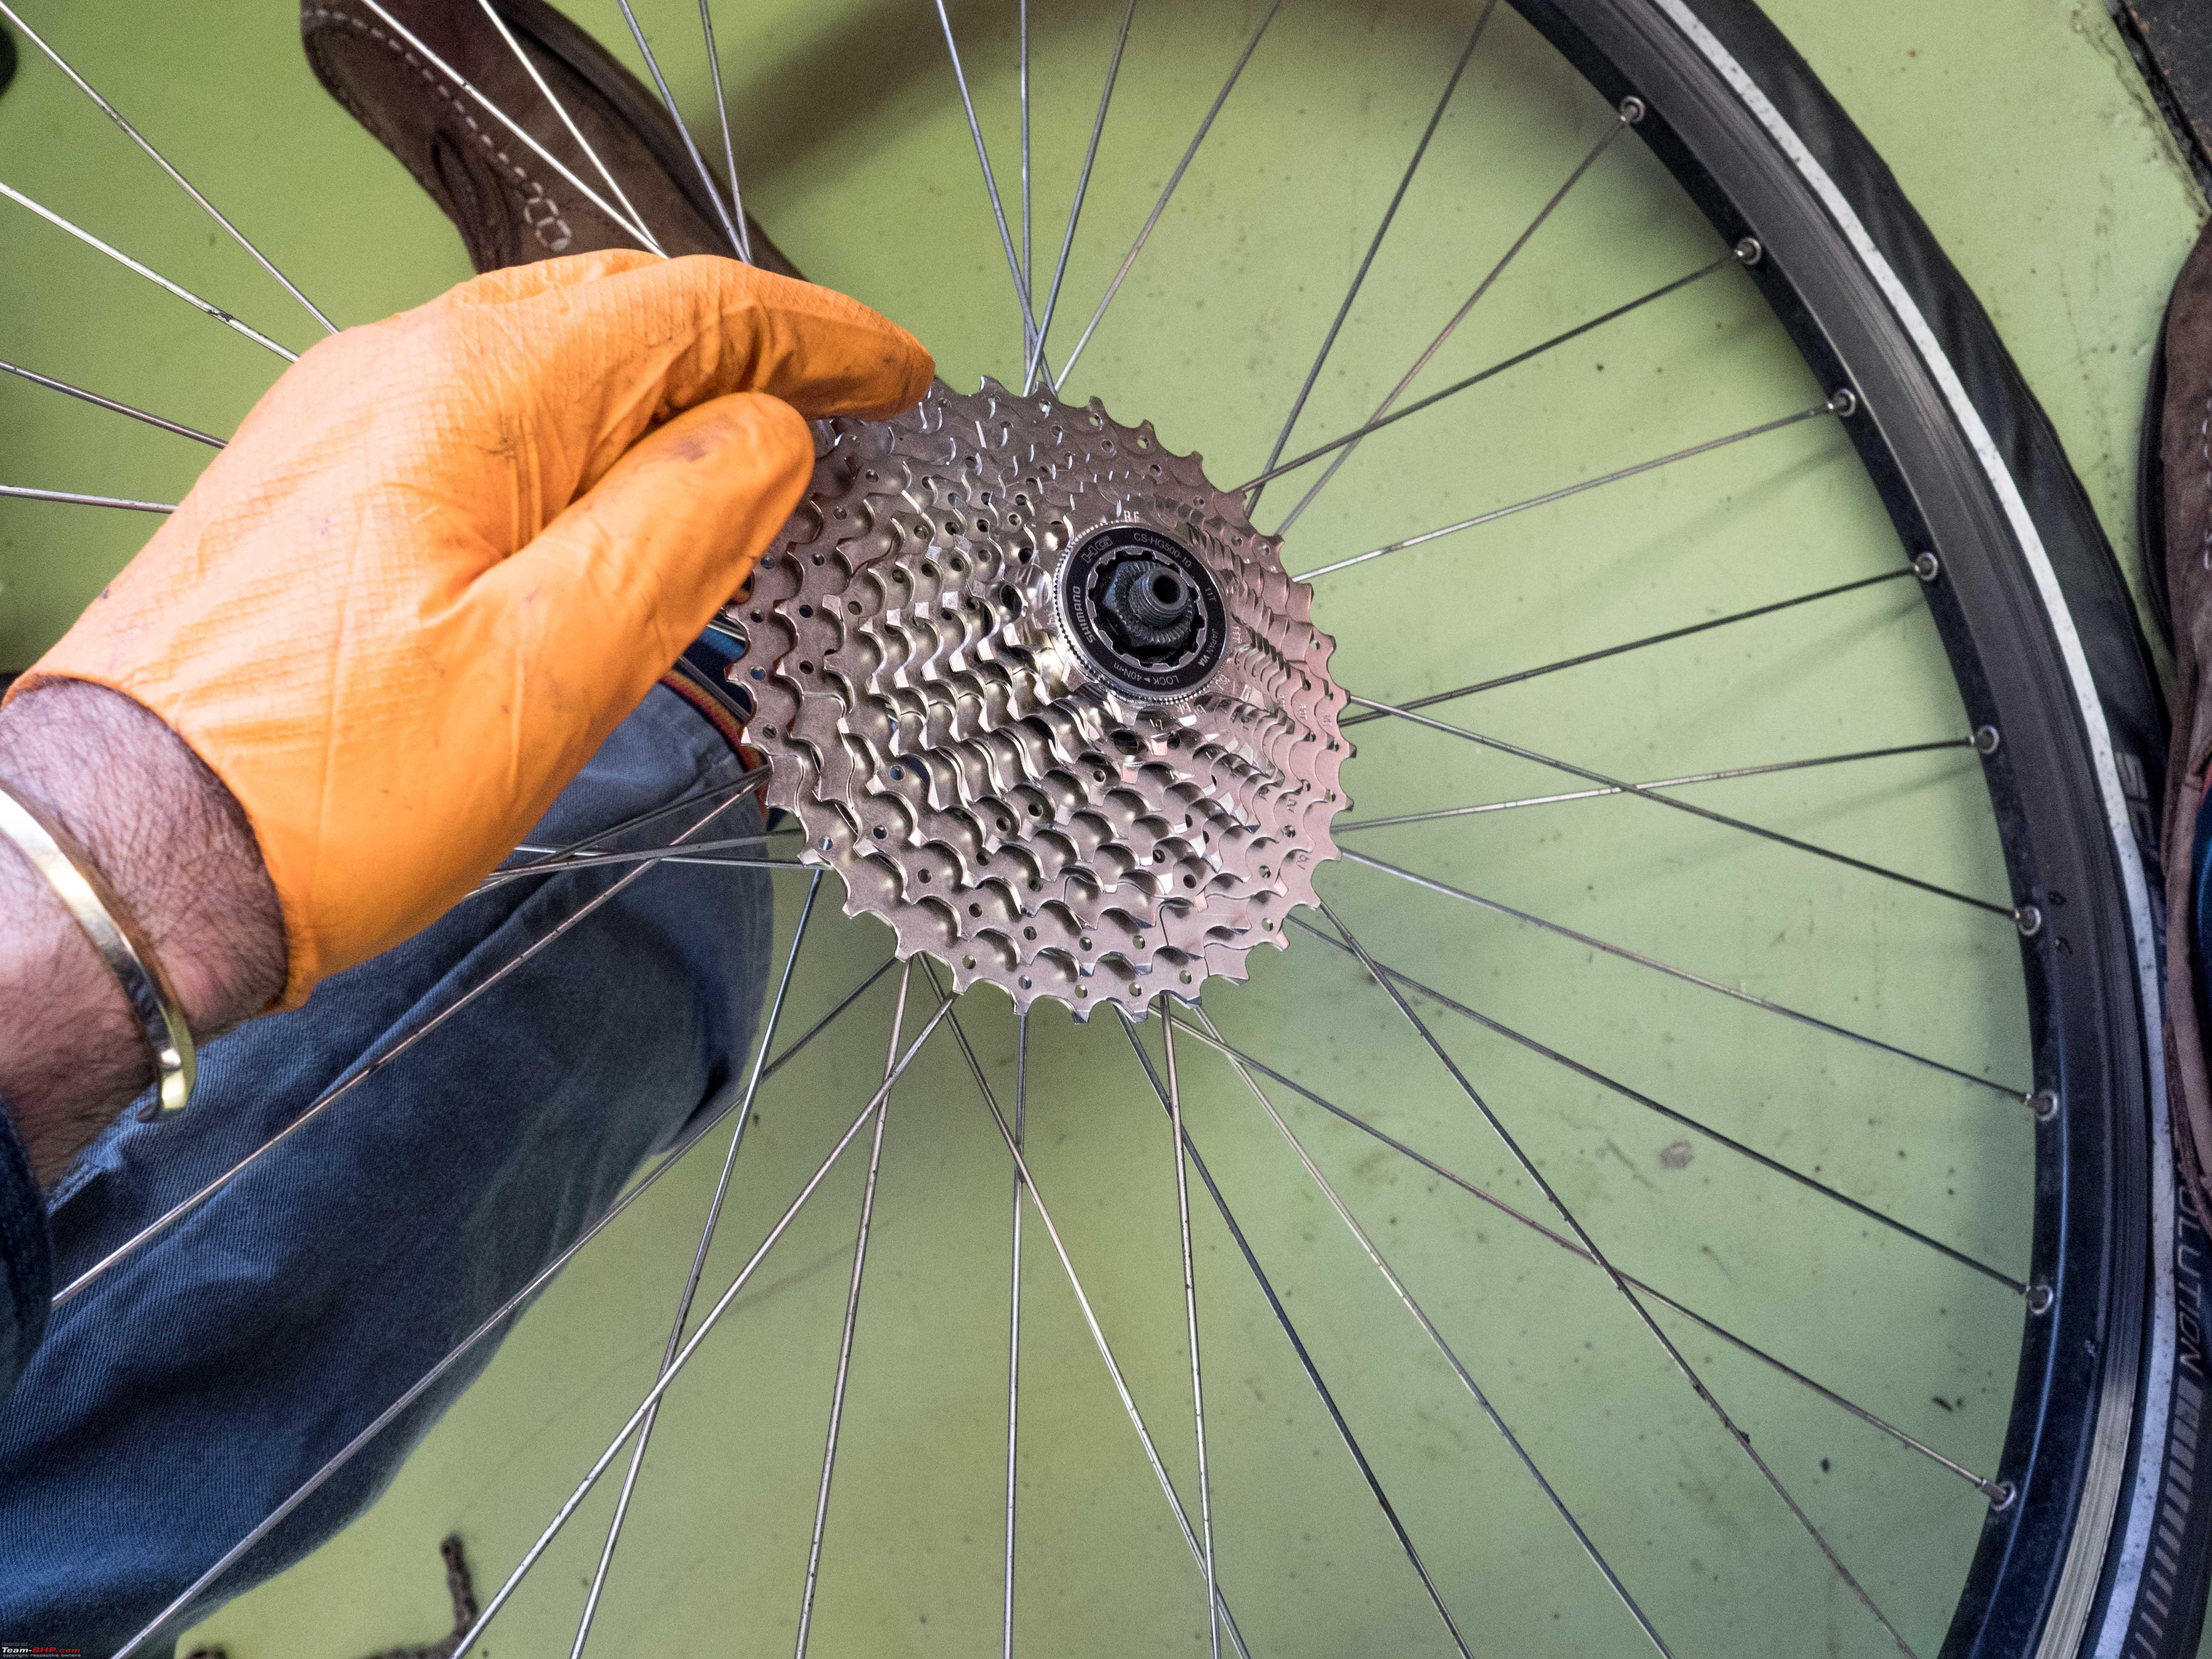 And spinning properly:  You use the same two tools putting the cassette back on. Don’t over tighten the central locking ring. You are likely to damage the thread! Very pleased on how clean I managed to get the front sprockets and the front derailleur;  Here also, go easy on the bolts holding the sprockets together. Easy to over tighten. Add the cover and it looks as new:  Next job to tackle are the replacement of the brake pads. This is my very first bicycle with hydraulic brakes! Never worked on these brakes before. But it is all dead easy.  Just grap the brake pad and pull it outwards  Bob’s your uncle!  Remember to dial the brake wear adjuster on the brake levers all the way back in or you might not be able to get the wheels back in!  Old and new brake pads. The new ones, just click back in place.  Other than the odd puncture I have had no repair jobs on my Koga bicycle. Just cleaning and maintenance. However, some time ago I was experiencing some problems with my old city bike. I took the rear wheel out and opened up the drum brake and the hub gear. I wrote about that in my other car maintenance thread; Here is where that story starts, you will have to scroll through some car maintenance as well to see the full story unfold. Opening up the combined brake drum / hub gear. Repairing and modifying the bearings and getting everything back together again. Nice little job! https://www.team-bhp.com/forum/diy-d...ml#post4535051 Last edited by Jeroen : 28th March 2020 at 21:22. |

|  (34)
Thanks (34)
Thanks
 |
| The following 34 BHPians Thank Jeroen for this useful post: | --gKrish--, aah78, aghate, ampere, arsudarsan, CrAzY dRiVeR, deepfreak15, defactorake, graaja, GTO, hondafanboy, Latheesh, maddyg, mh09ad5578, OPMaurya, rajesh1868, rrsteer, sanstorm, sayakc, skchettry, SmartCat, smuniswami, SnS_12, spdfreak, sukiwa, Sunny_team_bhp, Sutripta, Turbanator, V.Narayan, vaasu, VeluM, wheelguy, yesyeswe, zavegur |
| |
|
28th March 2020, 20:59
| #2 |
| Distinguished - BHPian | re: My Bicycle Hobby: Cleaning, Maintenance & Minor Repairs! Actually before putting the brake pads back, I spray the complete frame with this special stuff. It is sort of a wax/polish. You spray it on, leave it for a bit and then buff it out. But you do not want this stuff on the brake pads or the wheel rims where the brake pads touch! So now is the time to spray it on the frame!  This stuff works really well I find. It gives a beautiful finish and is real smooth so dust and dirt doesn’t attach easily. In the old days, more than just dry cleaning and a bit of polishing with this so called machine oil, or polishing oil. I still have some  Next is to put the guidance wheels of the derailleur back on. I had thoroughly cleaned them. And I use a bit of compressed air to blow them dry and blow away any remaining bits of dirt. Always careful when using compressed air like that! Safety goggles at the ready! But the result is quite impressive. Here you can also clearly see the difference between the two guidance wheels. The one with the steel bushing is the one that needs mounting closest to the cassettes. It takes a higher loading / more force than the one at the bottom.  I just stuff them with lots of bearing grease!  Attention to detail. The pedals show some corrosion, so I use some of my favourite metal polish on it:  Look at that!  Time to put the wheels back into the frame. Front one first. Mine has an integrated dynamo in the hub, that also means there is a little connector you need to undo before removing the wheel and re-attach when the wheel is installed again.  It is beginning to look like a proper bicycle again:  Last job is to install the new chain. Always check the length of your new chain with the length of the old one. (Assuming the old one had the correct length). If not adjust before installing. Always check if the chain needs to be installed in a certain orientation. Chain with fast links can only be installed one way. And my new chain also has one particular orientation. With the chain installed you should be able to read the letters on the chain, the right way up, on the top side  I adjust both derailleurs to the smallest gear. But even then the rear derailleur will still put tension on the chain. That will make installing it difficult. I have an old wire coat hanger I have bend so it hooks the two ends of the chains loosely together. But I could not find it. A piece of string to pull in the rear derailleur does the same job:   This was a new type of chain. I have been using these chains where you just punch in the pin for decades. But this one had a larger pin, half of it has slightly smaller diameter, so it allows you to easily push it through  Out comes the chain punch to drive it in properly! Once, properly in place, the smaller diameter part sticks out a bit and can be snapped off with pliers. I will be honest, I did not like it one bit, I prefer the old school chain, where the pin is already pushed into one link. Much easier and more precise.  Remove the piece of string so the derailleur takes up the slack and tension the chain normally. Last check with my little chain wear device. All is perfect. It looks like I, indeed, installed a brand new chain!!  Last job, inflate the tyres once again. I find these pumps with a good manometer very useful for these sort of bicycle tyres!  Of course, there is a bit of an aftermath that needs seeing to in the workshop:  Lastly, take the bicycle for a quick test drive. Run it through all gears, listen to it, feel how smooth it all goes. Try and find a quiet tunnel. Marvellous mechanical sound of a new, well oiled, chain running on a new cassette! A few more thoughts on cleaning and oiling of the chain. As I explained earlier, running a rag over your chain and adding a drop of oil now and then goes a long way I find. In the old days, we are talking 40 years ago, I used to take the chain off, clean it in petrol or diesel. In those days we had special chain wax. You would put the wax and the chain in a pot and heat them up on the stove. The wax would melt and would find its way inside all the rollers of the chain. it was quite the job. When my mum caught me with a pot of melting wax and bicycle chain on her stove in the kitchen there was trouble!! Deep cleaning the chain now and then makes a lot of sense. But you have to make sure you put enough oil back on. And it has to be an oil that really penetrates right into the rollers of the chain. Because the degreasers (or petrol/diesel) will remove all dirt but also all traces of oil. These days there are so many different kind of oils for chains it just beggars belief. Feel free to experiment a bit. You will quickly get the feel for what a particular oil does. You want it to last well, not be rained off, absorb a lot of muck and dirt before the next cleaning job. I have been using the Teflon based lubs for the last few years. After cleaning the chain, I will dry it. Usually by just swinging it around. Next I will install it and I usually oil it whilst it is installed on the bicycle. I will apply the oil quite liberally, but precisely. Roller by roller. One drop on each roller. Once all done, spin the pedals for a bit. Leave it overnight and the next morning run a rag over it to remove any acces oil. Chains, contrary to popular belief run quite dry. Too much oil attracts muck and dust. This whole exercise took about 2,5 hours. I am fortunate of having a proper workshop. But for many years/decades I did the very same in our garden. Bicycle upside down works just as well. As with cars, I like and enjoy fiddling with my bicycles. Very rewarding to have it all clean, shiny, new parts installed, running smoothly again. Other than the odd puncture I have had no repair jobs on my Koga bicycle. Just cleaning and maintenance. However, some time ago I was experiencing some problems with my old city bike. I took the rear wheel out and opened up the drum brake and the hub gear. I wrote about that in my other car maintenance thread; Here is where that story starts, you will have to scroll through some car maintenance as well to see the full story unfold. Opening up the combined brake drum / hub gear. Repairing and modifying the bearings and getting everything back together again. Nice little job! https://www.team-bhp.com/forum/diy-d...ml#post4535051 Please share your cleaning, maintenance and repair routines for your bicycle so others can learn. Jeroen Last edited by Jeroen : 28th March 2020 at 21:17. |
|
| (46)
Thanks
|
| The following 46 BHPians Thank Jeroen for this useful post: | 2himanshu, aah78, Aditya, aghate, ast.ggn, AZT, blackwasp, carthick1000, catchjyoti, CosmicWizard, deepfreak15, dileepcm, GladRagu, graaja, GTO, Jaggu, jnanesh, landcruiser123, mh09ad5578, mihir_m13, mohit, Nick_Wanderlust, pugram, samaspire, sandeepmohan, sayakc, Sherlocked, shipnil, skchettry, SmartCat, SnS_12, spdfreak, SS4, ST172, sukiwa, Sutripta, Tgo, Turbanator, V.Narayan, vaasu, VeluM, ventoman, wheelguy, yesyeswe, ysjoy, zavegur |
|
30th March 2020, 07:47
| #3 |
| Team-BHP Support  | Moving thread from Assembly Line to Shifting Gears forum. Thanks for sharing, Jeroen! |
|
| (1)
Thanks
|
| The following BHPian Thanks SmartCat for this useful post: | GTO |
|
30th March 2020, 16:24
| #4 |
| BHPian Join Date: Apr 2019 Location: Pune
Posts: 736
Thanked: 2,100 Times
| Re: My Bicycle Hobby: Cleaning, Maintenance & Minor Repairs! I enjoyed reading your repair guide a lot, i love all repair works and tinkering with my bicycle and breaking open every electronic device is how it all started. Heating the chain on stove that's something new which i learnt. But getting caught by mum has happened a lot  I am very intrigued by the inbuilt dynamo in the hub, wanted it so badly when i was a kid. During my school days(i was 13 years old) i wanted to install a headlight in my bicycle, which ran on bicycle energy, but dynamos were not available in a small Indian city at that time, but i had discovered that the motors found in the cassette player produced electricity when the axle was rotated. So i made a frame using the mechanix toy(it has nut bolts and metal plates of various lengths which you use to make various toys yourself) set for the motor, put a rubber wheel on the motor, installed it near the rim of the bicycle and connected the motor to the headlight contraption which i had made using on old flashlight. And just like that i had unlimited electricity on my bicycle. I am 25 years old now and my bicycle has been sitting idle for the last 7 years, but after reading your post i am gonna service it, put in New parts and cycle more  |

| (7)
Thanks
|
| The following 7 BHPians Thank yesyeswe for this useful post: | blackwasp, carthick1000, deep_bang, Jeroen, smuniswami, Turbanator, V.Narayan |
|
30th March 2020, 16:57
| #5 | |
| Distinguished - BHPian | Re: My Bicycle Hobby: Cleaning, Maintenance & Minor Repairs! Quote:
They were very supportive though. They bought me a little tool kit and my dad took me to a hardware/DIY shop. He bought me all kinds of stuff; doorbells, chimes, little light fittings, all kind of switches, wires, soldering gun, some little motors etc. All low voltage to be ran of a battery. That collection extended over the years as many friends and family brought over their old radio/mixer/TV for me to take apart. I did learn to repair and put things back together from there onwards. Occasionally I might still find the odd part from my very early tinkering days. I do have some of the tools my dad bought me! As I said, working on bicycles is not that difficult and it does not take much special tooling at all. If you have a racing bicycle or ATB it almost a given you need to do this yourself. (Or in India have your driver do it I guess?) i always find it very rewarding doing these little jobs! Jeroen | |
|
| (6)
Thanks
|

| The following 6 BHPians Thank Jeroen for this useful post: | aah78, blackwasp, smuniswami, V.Narayan, VeluM, yesyeswe |
|
30th March 2020, 17:24
| #6 | |
| BHPian Join Date: Apr 2019 Location: Pune
Posts: 736
Thanked: 2,100 Times
| Re: My Bicycle Hobby: Cleaning, Maintenance & Minor Repairs! Quote:
Like you i am also the repair guy in my circle, i love doing the work and they get their job done  After my college i got a job where we used to teach college students how to fabricate ATVs, go carts and various other vehicles in a 15 day workshop. I got this job because of all the electronics breaking and other tinkering jobs which i did while growing up After my college i got a job where we used to teach college students how to fabricate ATVs, go carts and various other vehicles in a 15 day workshop. I got this job because of all the electronics breaking and other tinkering jobs which i did while growing up I have a fixed speed racing cycle and repairing it would be an easy job for me, i'm just waiting for corona virus to die down so that i can purchase the spares. yashasvi | |
|
| (2)
Thanks
|
| The following 2 BHPians Thank yesyeswe for this useful post: | blackwasp, Jeroen |
|
30th March 2020, 17:36
| #7 |
| Senior - BHPian Join Date: Sep 2012 Location: Pune
Posts: 1,057
Thanked: 3,717 Times
| Re: My Bicycle Hobby: Cleaning, Maintenance & Minor Repairs! Excellent stuff Sir, I felt like going back in time when I used to do such things with my bicycle for hours during my junior college days, until one day some one stole my beloved bike :( After a long time, I did a similar cleaning of my bicycle which was sitting idle for good 6 years ! Though not as meticulous as yours, the outcome was more than pleasing. Got the tyres changed from a local shop but did the chain/sprocket cleaning myself. No squeaks or chain jumping gears in the test ride ! |
|
| (2)
Thanks
|
| The following 2 BHPians Thank NiInJa for this useful post: | blackwasp, Jeroen |
|
31st March 2020, 07:38
| #8 |
| BHPian Join Date: Feb 2015 Location: Punya Nagari
Posts: 189
Thanked: 551 Times
| Re: My Bicycle Hobby: Cleaning, Maintenance & Minor Repairs! Hi Jeroen, Never thought a simple Bicycle DIY would be so interesting and capturing. Kudos. And that Jag looks yummy and well maintained. Thank you for sharing. |
|
| (2)
Thanks
|
| The following 2 BHPians Thank DevilzzzzOwn for this useful post: | blackwasp, Jeroen |
|
31st March 2020, 21:07
| #9 |
| BHPian | Re: My Bicycle Hobby: Cleaning, Maintenance & Minor Repairs! Beautifully storied! Just nostalgic! My dad had a Raleigh in the 1970 and 80s which was imported from UK. It was one hell of a smooth bicycle in those days. I used to hate BSAs, Hercules, Atlas etc after riding my dad's cycle. It was so smooth and effortless. It used to have a big hub in both wheels, kind of drum brakes like mechanism. We couldn't find any spares after some time and had to sell it sadly. Some one came from nowhere and robbed it for 2000 rupees in those days which was like the same price we paid for it then when we purchased. I used to ride 12 kms of my school distance in 15-20 minutes as we race with all our friends, we used to time and had lots of fun. People always look at the big hubs and esquire about it! When I do a coconut oil polish, it shines like new and that satisfaction is priceless! I always had a liking for Raleigh bikes and bought one for my daughter and somehow she never got that taste! Its lying idle. Last edited by sgmuser : 31st March 2020 at 21:08. Reason: typo |
|
| (1)
Thanks
|
| The following BHPian Thanks sgmuser for this useful post: | blackwasp |
|
1st April 2020, 12:47
| #10 |
| Distinguished - BHPian | Re: My Bicycle Hobby: Cleaning, Maintenance & Minor Repairs! Many thanks for all the views and the comments. Very encouraging. This weekend I will ad a bit to this thread. I am thinking of some road repairs? If you have any suggestions for a particular topic, let me know. Jeroen |
|
| (1)
Thanks
|
| The following BHPian Thanks Jeroen for this useful post: | blackwasp |
|
2nd April 2020, 02:12
| #11 |
| BHPian Join Date: Sep 2004 Location: Toronto / Kurukshetra
Posts: 677
Thanked: 168 Times
| Re: My Bicycle Hobby: Cleaning, Maintenance & Minor Repairs! Thanks for this! Its super inspiring to see the amount of care you put into your bikes. I recently started dabbling in self repair after paying high amounts for mediocre service (Got suckered in by a special). Our family or 4 has 6 bikes among us so something or the other keeps happening and needs TLC. Mostly its changing tires from trainer to road or fixing flats but recently started some serious stuff. First up was changing the shifter on my daughter's bike from a revoshift to a proper mountain one to give her more control. The latest is a bent rear derailleur thanks to a bike trainer incident. I managed to change it using just a mini tool kit but I think a few proper tools are in order. Its difficult to manage things like breaking the chain etc. with a mini tool. |
|
| (1)
Thanks
|
| The following BHPian Thanks mohit for this useful post: | Jeroen |
| |
|
3rd April 2020, 00:52
| #12 |
| Senior - BHPian Join Date: Jun 2015 Location: Chicagoland
Posts: 2,985
Thanked: 6,857 Times
| Re: My Bicycle Hobby: Cleaning, Maintenance & Minor Repairs! Wonderful thread. I love my bicycle, but don't spend too much effort with DIY maintenance due to the lack of space. Roadbikes are truly wonderful ways to explore the landscape. @Jeroen: Are you on Strava? Please PM me your user ID. I'd love to follow your rides.  |
|
| (1)
Thanks
|
| The following BHPian Thanks landcruiser123 for this useful post: | Jeroen |
|
5th April 2020, 12:07
| #13 |
| Distinguished - BHPian | Re: My Bicycle Hobby: Cleaning, Maintenance & Minor Repairs! Today I will post two additions to this thread. First one about todays bicycle ride and secondly a little more insights about how to prepare for a ride. First, A little impression about cycling in the Netherlands: Today is Saturday, 4th of April and the Netherlands is in a semi lock down due to the Corona Virus. We are allowed to go out for a bit of fresh air. The Dutch way of battling the Corona Virus is primarily about social distancing and reducing human to human contact as much as possible. We live in a rural area of the Netherlands. Normally, during rush hour we might have a couple of dozens of cars that whizz pass our farm house on our dike. At present it would be a only handful. Even without the Corona virus this is a quite part of the Netherlands. I looked at the weather forecast last night. Sunny, not too warm, about 12oC in the afternoon and a moderate (20-25 km/h) wind from the SSE. Which meant I planned a nice circular route that will take me south east and then back home with the wind in my back mostly. I have a Garmin Etrex 30. I plan my routes on my Mac at home, using Garmin Basecamp and then download them in my Etrex. I am very familiar with just about any part of the Netherlands. Also, we are a small country and as you will see it is almost impossible to get lost. Even so, I like to plan my routes up front. Why? Well, for several reasons. As I explained before, wind can be a problem, so you want to cater for that in your planning. Distance, I have a certain distance and time spend in mind and it helps to have a planned route. Also, I am a bit of nerd and I like fiddling with programs, apps, GPS devices and so on. Also, as you will see, in this part of the Netherlands a tour will involved several ferry crossing and you need to ensure the ferries are running! Or you might end up doing a lot of extra mileage! So here is the route I cycled today, about 88 kilometres. In a little over 4 hours. I record my trips with Strava. It is still a little early in the season, I am not really in form yet. So taking things nice and easy!  I would like to show you some of the very specific Dutch aspects when it comes to cycling here in the Netherlands. Have a look at this, this is an official bicycle rest point. There will be a bench, picnic table and a tap to fill up your bidon!  The whole country has not only a lot of dedicated bicycle infrastructure, we also have dedicated bicycle road signage and special bicycle tour signage. This is a typical road sign; The blue sign with white letters are for cars and the white sign with red letters are for bicycles: The brown signs are all about local attractions, from pubs, restaurants, camping to gyms, swimming pools etc.  Are you on a electrical bicycle? Plenty of charging stations around, all sign posted, obviously!  All over the Netherlands you will find these maps. They indicate the local Fiets knooppunten or bicycle junctions. You can plan your trip from junction to junction. I have an app that does that for me and then uploads it to my Etrex! Very convenient. The interesting thing is that all the knooppunten ensure you are cycling through the pretties local parts!   And here is how these knooppunten signage look like along the route. You will notice one is a sign for knooppunt, the other is a so called LF route. We have some twenty LF routes. LF stands for Lange Fiets Route, long bicycle routes. They run all over the Netherlands, even into Belgium and Germany. You can pick them up anywhere and they use the same knooppunten! Lenth from about 150 to 350 km.  Of course, the hikers have their own signage, maps etc  In this part of our country there are a lot of rivers and canals. On this trip I crossed various rivers and canals. A few times by bridges, but also by means of four (4!) different Ferries. Ferries are part of Dutch DNA. It is something everybody enjoys. It slows you down, but in a very nice enjoyable way. There is nothing you can do but wait and look at the river, the boats, maybe have a little chat with the other waiting folks until the ferry makes it your side of the canal/river. Ferry crossing tend to be quite tranquil. Look on the first overview map. I have indicated the four ferry crossing and I will give you an impression what they look like. This is Ferry crossing 1. We are crossing the Bergse Maas.    This ferry is tethered, it pull itself across two steel wires:  This particular ferry is very typical in size. it can take a couple of dozens of cars and a whole lots of bicycles, motor bikes, pedestrians. This crossing is free of charge. Important: When going out for a long ride on your bicycle, make sure you had a decent meal to start with. And take some food and drinks along. My bicycle has two bisons and on a 90 km trip like this I will drink both. Make sure to start drinking before you get thirsty. A little a lot. Half the Internet is full of advise on what to eat when out cycling. I cant be bothered. I am on a high protein, low carb diet anyway. So I take some rye bread with chicken fillet, some nuts and an apple. Again, make sure you start eating before you start feeling peckish  Next we end up at ferry number 2. Here we will cross the Maas or Meuse as it is also known as in Belgium and France; This Ferry is very similar to the first one  The ANWB (Dutch automobile association) started with road signage very early on. Although initially a car association they quickly started catering for all sorts of public ways of transportation, including bicycles. They introduced in 1919 the paddestoel (mushroom). These gave specific directions for bicycles. Of course, pediastian and hikers could use them too. Due to the shortage of metal as a result of the first wold war, they were made of concrete.  A somewhat newer model:  All though we still have some of these paddestoelen/mushrooms they are being phased out by all the other signage. Here is a more modern bicycle speck signage. Note how one of the direction is green whereas all the other are red. The green ones denote specially nice (green) scenery!  Onto the third ferry. As you will see on the map, ferry number 2 and 3 are pretty close, less than 2 kilometre apart. We cross the afgedamde Maas. 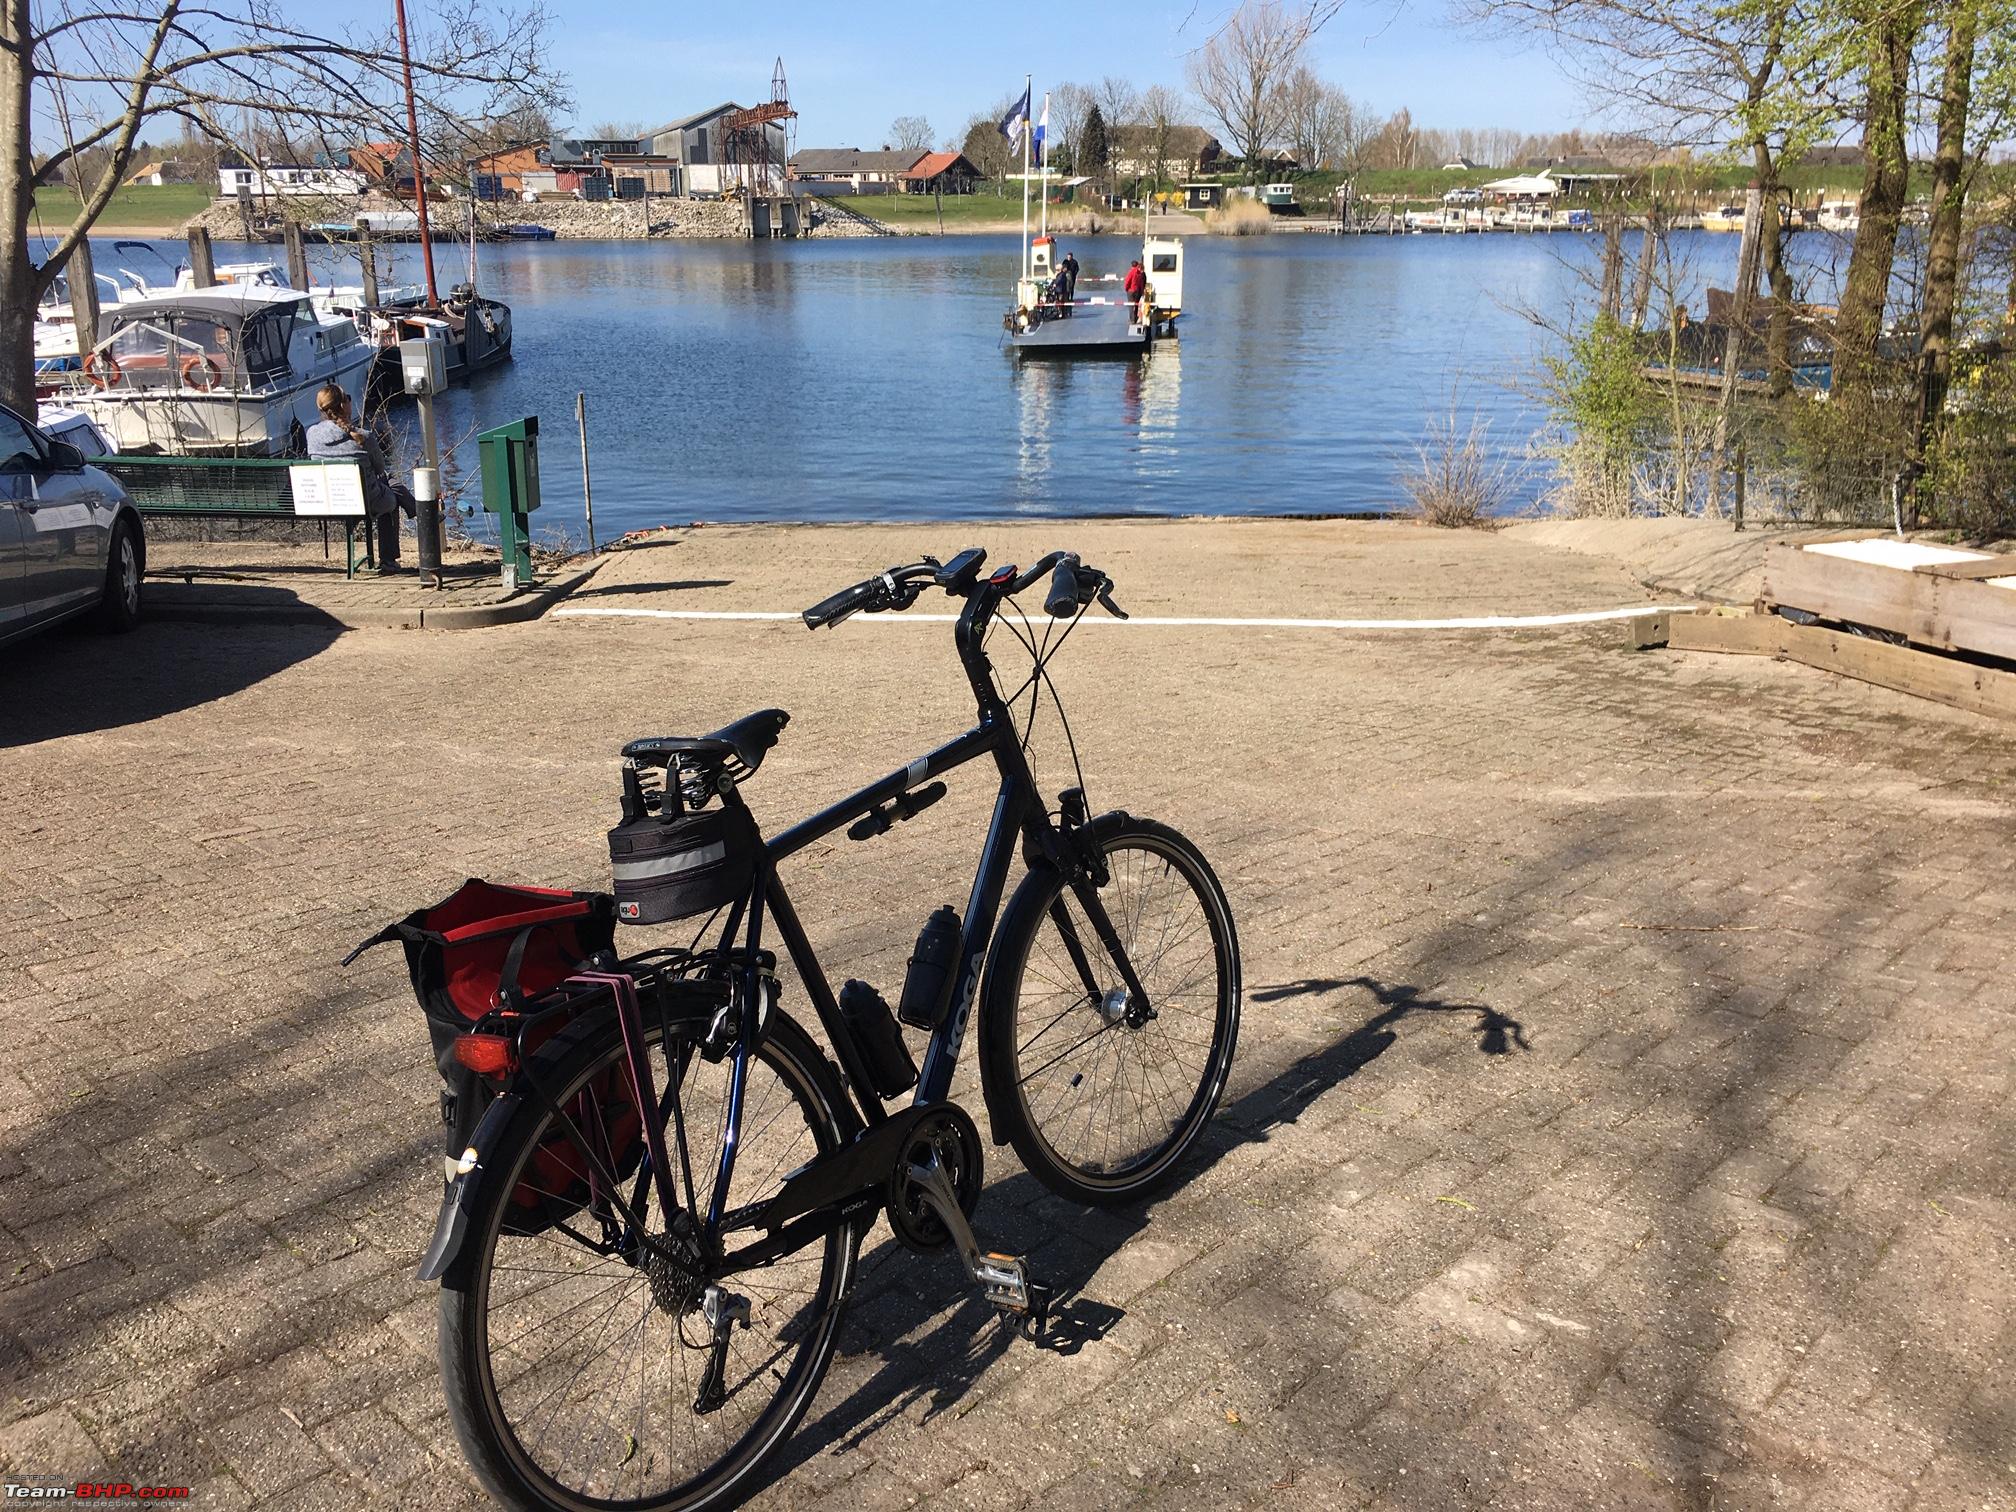 This is a very typical Dutch pedestrian/bicycle ferry. Although this one will actually also take cars or motor bikes. But cars will be one at a time as you can imagine.  Again, this little ferry is tethered. It has a modified outboard. They have taken the IC engine out and put a hydraulic motor in. The hydraulic motor and the ramps are electrically powered. The whole ferry is electrically powered and needs charging over night! This is the first ferry I needed to pay for, Euro 1,10. Lets say less than half the price of a cup of coffee. This is probably also the last place in the Netherlands that takes cash. Nobody takes cash during this Corona virus episode. All contact less. But this is a very simple low cost outfit. This ferry is owned and operated by a society and volunteers. It does run 6 days of the week from March to October. Sunday always closed. (Remember we are in the bible belt / Roman Catholic part of the Netherlands.)  It is really important to check which ferries are running before you set off. You find yourself at a ferry that for whatever the reason isnt running you might find yourself having to cycle another 10-20 kilometers! High water, ice, off season are all reasons the ferry might not be operating! Onto ferry number 4: We are crossing the river Waal. The Waal is one of busiest rivers in all of Europe. 24/7 you will have ships ploughing up and down the river and the ferry must weave through them. So this is a big, powerful ferry, twin engines, not tethered!    You have to pay for this one as well. This ferry is part of a ferry company that operates from Gorinchem. The little provincial town near our village. The ferry company is owned by the council and they operate several ferries along the river Maas and Merwede. I use all of them frequently. They have a simple and very useful app. You buy your tickets with discount via the app. Love the river Waal! Always so much to see. Endless ships going back and forth:  Here are the usual tariffs. 10% discount for buying online.  I hope this gives a bit of an impression on how you make your way though a typical Dutch landscape. Not all of the Netherlands is like this of course. We have some very build up areas and even some hilly bits. One of my other hobbies is photography and I will show some Dutch landscape photography later on. I love combining the two. I can take all my camera equipment with me on my bicycle! You will see how in the next post Jeroen Last edited by Jeroen : 5th April 2020 at 12:14. |
|
| (7)
Thanks
|
| The following 7 BHPians Thank Jeroen for this useful post: | aah78, carthick1000, graaja, nikhn, SnS_12, Turbanator, ysjoy |
|
5th April 2020, 14:40
| #14 |
| Distinguished - BHPian | Re: My Bicycle Hobby: Cleaning, Maintenance & Minor Repairs! I thought I would talk a bit about repair and dealing with bicycle problems whilst out on the road. Whether you are into road repairing your bicycle or not, is of course entirely up to each of us. Fact is that bicycles, even well maintained ones, sometimes develop problems. Whether that will actually stop you dead in your tracks or otherwise remains to be seen. Even so, there are quite a few simple solutions to various mishaps. I will talk you through by looking at various details on my bicycle and talk a bit about what has happened to me over the years and how I dealt with it. There are likely to be very different solutions and ways of going about these. Would love to hear from others too. First thing though; you need to think through what you will take with you. That will determine to a large extent what you can fix on the road. Obviously, if you are going on an "around the world bicycle tour", it is likely to be somewhat different, compared to taking your bicycle to buy some bread from the bakery on the other side of the village. Over the years, I have developed a certain “kitting out” of my bicycle. I will always take these items with me. So lets get started. Obviously, the place to start with is the steering handle, effectively your cockpit!  You will be staring at this for every second on your bicycle. It’s shape, size and mounting position, together with the handles will determine to a large extent how comfortable you are likely to be. As I mentioned before, I don’t like racing bikes. Looking at them hurts my back and butt. I really like the shape of my handle bar. Very comfortable, with leather grips The shape and the way I have adjusted it to, means I sit pretty much straight up. I don’t like those very straight handle bars you see on many ATBs. I always think riders look uncomfortable on those as well. Look at how awkward they hold their arms. Their elbows sticking out! It is probably the best way if your are going off road, but for my kind of cycling it doesn’t make sense. Another advantage of this shape of steering bar: If I do encounter a heavy wind, I can hunker down on it. I will put my elbows on the leather grips and lock my fingers of my two hands in front of the steering bar. Works fine for me. Not much that can go wrong here, you would think. Not really. Although many decades ago, I was in my teens, I once managed to break the handle bar! I had stopped for a traffic light. When the light turned green, I wanted to accelerate away quickly. Got up on the peddles, which also means you pull hard on the steering bar. The right side simply snapped! I fell over, luckily I was not hurt. The left side was still attached, so I did manage to make it back home, with only half a steering bar! Let us take a closer look at some of the various accessories on the handle bar.  I always have my trusted little cycle computer with me. It is a pretty simple one. It shows total distance, total time, trip distance, trip time, average speed, temperature and time. That is all! Here you see the sensor and the little magnet on the respective front fork and front wheel.  You will notice my cycle computer has a wire running to the sensor. Most of these cycle computers have a simple wireless connection these days. My previous cycle computer on my previous Koga bicycle was a wireless too. As I mentioned, unfortunately, I totalled that bicycle and one of the reason I choose this particular model was it allowed me to use lots of parts from my totalled bicycle. So the cycle computer with its wireless sensor was mounted on this bicycle initially. But it would never work properly. Together with the cycle shop that build this bicycle we spend considerable time trying to get it going. It just would not work reliable. So in the end, we gave up trying and I got this one. Which has been working very well so far. The sensor is a very simple reed relay. Actually, when I took this image I was thinking about that. Is that still true? That is pretty old school technology. So my trusted multimeter to the rescue!  I took two measurements from the contact on the mount of the cycle computer. One with the magnet a few inches away from the sensor and one with it facing the sensor. Sure enough I got a reading of infinite and zero ohms. A reed relays is just a little glass tube, inside a vacuum there are two little electrical contacts. When you bring a magnet close to the relays the contacts close. It is that simple. I rummaged through a few of my part bins to show reed relays I have used in the past.  Here you can see (hopefully) the two little contacts inside the vacuum glass tube. I used these reed relays to automate my model trains!  I would place the reed relays underneath the track and attach a little magnet to a carriage. I used to buy these little reed relays in packages of twenty from a store called Tandy. Not sure if they ever made it to India. An American electronic chain. In the 70s they were in Europe too. They sold HiFi equipment, but more importantly, the also sold electrical and electronic components! I can tell you, I was a platinum customers within weeks of them opening. Since they have gone bust. (I think) I like my cycle computer. I like to keep track on my running total for maintenance purpose and I like to check speed/distance/average speed during my cycling. Those of you who own one, will know that you need to set it up for your individual bicycle. You need to insert the correct wheel circumference. The manuals will usually have little tables that will give you an approximate size for say a 28 inch wheel. Or, more precisely, you can wind a measuring tape around your tyre and insert that number. Better yet, calibrate it against your GPS! I usually start with measuring the circumference of the tyre and enter that number into the computer. Next I will take the bicycle for a spin. At the start I will zero the cycle computer and the counters in my little GPS. I will cycle for a few kilometers, preferably a straight road with not to much foliage and or tunnels, so I can be ensured my GPS has good satellite coverage. I will record both the cycle computer and the GPS distance travelled. Then i world out the percentage difference and apply that same ratio to the wheel circumference I had entered earlier. This ensures your cycle computer is calibrated as precisely as possible! Write down that number and remember where you write it down. All cycle computers I have owned tend to loose their settings when replacing batteries! Did I mention I like gadgets and I am a bit nerdy? Especially when it comes to navigation! Here a close up of my trusted Garmin Etrex 30.  It is the second Garmin device I have owned. I started with the original Garmin Etrex. Which did not have maps, only bread crump trails. I bought it early 90s whilst visiting friends of ours in Texas, USA. In those days, GPS device had not made it to Europe yet. Really enjoyed it. I upgraded to the newer model in 2012. I had this Etrex with me during our years in India. I had a mount for it on my Royal Enfield Bullet and used it extensively! Actually, I am thinking of upgrading again. The Etrex has been given me some problems. Also, it is a bit slow and these days the more recent models have much better displays and battery endurance. Eight years usage for a little device like this is not bad, I would think Dutch bicycles need to comply with various legal requirements. One is they have to have a bell!  You can, and people are, fined for not having a bell. I bought this one some time ago. I did post about it in our other bicycle thread. I don’t think people were very impressed. This is the Rolls Royce under the bicycle bells. You can buy whole bicycles for less than this bell costs!. It is probably the most outrageously expensive and decadent item I have ever bought in my entire life. The image does not do it justice. It is beautifully made and has a fantastic ring to it. A few more Dutch mandatory legal requirements. All bicycles must have a white reflector at the front and a red reflector at the rear.   If you ride your bicycle at night you must have a proper white light up front and red at the rear. Also, all bicycles tyres must have this reflective white stripe on it. Very effective at night! Even thought the light at night are mandatory and the police will fine you for it, when you don’t, many bicycles suffer from poor lightening arrangement. I never understood bicycle manufacturers. To date they will use the frame as earth/ground and have just one single wire running from the dynamo to the lights up front and rear. Recipe for disaster. On some bicycles these days the front and rear are just LED running of a battery. Which is very effective and reliable, until your battery dies out on you My previous Koga had this arrangement. It is also an extremely light solution. What else can go wrong with your bicycle. Well, at some point you might snap one of your brake cables. As you will have two, it is usually easy enough to get home with just one brake. Just make sure you take a little bit more care approaching junctions and so. A rear brake on itself provides a whole lot less braking power than the front one. Let alone using both rear and front simultaneously. Give it a try sometime. Get up to a good speed and brake with front only and then redo it with only rear brake and apply about the same pressure on the brake handle. You will experience a noticeable difference in stopping power/distance. Same thing happens on your car too! Although most brake systems on cars are diagonally separated for this very purpose. The other cable that might snap is your derailleur one! You might not carry a spare, but if you carry a simple screw driver or can borrow one, you can simply fix the derailleur in one particular speed / gear by means of these adjustment screws.  Similar on the front derailleur. Might not be ideal, but it will get you home. Most Dutch bicycle will be equipped with one of these special bicycle locks.  This one is very difficult to tamper with. Most people will insure their new bicycle, certainly for the first 3-6 years, against theft and damage. The insurance companies will demand you have one of these theft proof cycle locks fitted. So just about every new bicycle comes standard fitted with these safety locks. In order to make a claim you also have to be able to hand over the two original keys! Bicycle theft is a real problem in the Netherlands. Everybody will at some point have his/her bicycle stolen. So most people will carry at least two locks. One of these safety locks and usually another lock to attach the bicycle to for instance a lamp post. Here you see the secondary lock on my wife’s bicycle.  It is a massive, specially hardened, chain lock. The chain is covered as not to damage the bicycle. As you can imagine, it weighs a tonne. In all honesty, bicycle theft is a whole lot worse in the big cities, compared to where we live now. The insurance premium halved when we moved! That is saying some! Foreigners and tourist are often surprised to see old, beat up, rusty bicycles in towns such as Amsterdam. And still they have these fancy, expensive locks on them. Remember, for the Dutch a bicycle in town is your means of transportation. If it gets nicked, you might not be able to get home. So everybody locks down their bicycle, even the old crappy bicycles! The elastic band on my safety lock is one of my personal modifications. These locks rattle, when open. So I put an elastic band on it, so it doesn’t rattle! I can not relax when anything rattles on my bicycle, bike, car, plane! I love my Brooks leather saddle!  It requires little maintenance. Now and then a bit a special leather wax to be applied on the inside and occasionally very careful tightening of it.  The little green wire is another anti-rattle device. (Did I mention I can’t relax if anything rattles?) The Brooks leather saddles are still sold as traditional British ingenuity and craftsmanship. They certainly were. But Brooks has been sold to an Italian company many years ago. They are still sold and marketed as the quintessential British part. A bit like the MG story, other than current MGs have nothing to do with the original MG. The Brooks saddles remain identical to the early ones. They can break though! typically after a couple of years of riding the springs might break, always one at a time. Not a huge problem. The saddle will just sit a bit awkward, tilting about 1-1,5 cm lopsided. But you can still ride it home. In all these years of riding I have probably suffered from 5-6 broken springs. I always replace them by pair. A few years ago, I suffered a very different kind of breakage on my Brooks Saddle: Have a look a this.  Normally you can get all this parts individually. I can’t quite remember, but somehow I could not get them, on back order or whatever and I decided to order a new saddle and keep this one for parts, although sentiment is probably closer to the truth. I probably rode 30-40.000 kilometers in all on this saddle! Lets have a look at what I keep in the little saddle bag dangling underneath the Brooks saddle  Sort of left to right: My secondary lock, a hefty wire lock. A tyres repair set, two spare batteries for my Garmin GPS, various tools. The little black cylinder is one of these compact tools. it contains a few sockets and various sizes screwdrivers. The other tools came with the bicycle. A piece of rag, a pair of gloves and a saddle cover. The one thing which will ruin a leather saddle is rain. So if I have to park my bicycle somewhere and it might rain a bit, this cover goes over the saddle. Not hundred percent sure, but I think it comes provided by Brooks when you buy your leather saddle. As you will have noticed I also, always, carry a red side bag on my bicycle. This is an Ortlieb cycle bag.  I have had it for many years. Ortlieb specialises in bicycle bags. They carry hundred and hundred of different kinds. But they all come in very bright colours, are all made of the same very thick hard wearing, completely water proof material and most have this roll up type of closure feature.  This little cycle bag is very convenient. It allows me to carry a few things with me such as my wallet, keys, mobile phone and so on. But in it I also keep permanently a few items,  From left to right: I love maps. So I always carry some 1;50.000 scale bicycle maps. The little Atlas is 1:100.000 and covers all of the Netherlands. It shows all the knooppunten and LF routes I showed earlier. Very detailed.  A cap to protect my head from too much sun. Or, rain getting onto my glasses. What is missing is suntan lotion. I need to restock! Be careful out there. In the sun, riding, working up some nice cool wind to cool you down is a sure way to get sunburned. Next you see the spare chain I bought earlier. The plastic bag contains two spare tyres, some more rags and paper towels and batteries for my GPS. On that spare chain. Occasionally you might experience problems with your chain when out riding. It could just snap, has happened to me once or twice. Or it could get bended, because you fell or something hit you. There are really two options to repair a chain on the go. Carry a chain punch or carry a spare with a quick link (no punch required). I have another side bag.   I spend quite a bit of time finding this one. Because it needed to be big enough so it could hold my complete camera rug sack with all its accessories attached. I found this one. It also comes in handy if I take my city bike for a bit of shopping! The rear carrier has these nice looking bungee cords.  Your typical bicycle shop will offer at least 400-500 different bungee cords. Different colours, materials. There are also various ways of attaching them permanently to your bicycle. I use them mainly to keep pieces of clothes. E.g. I might set off early whilst it is still relatively cold. A few hours into my trip I might take my coat of, or a shirt. Also, when out on photography expeditions, it holds my tripod. A few more details. Two very handy and useful accessories. A pump and two bidons. On longer rides make sure to take and drink sufficient water!  I will be doing a separate post, whole dedicated to puncture repair. Probably next weekend or so. I have done about 230 kilometre since cleaning my bicycle. Look at the amount of dust already.  I probably picked up most of this dirt earlier today whilst out riding. Out of the 88 kilometres, I found myself on a dusty sand track for about 400-500 meters. I hope you found this information useful. Please share your own thoughts and or images about what you take along on your rides. Finally a little quiz question. Who can identify this and knows how to use it?  Last edited by Jeroen : 5th April 2020 at 14:44. |
|
| (6)
Thanks
|
| The following 6 BHPians Thank Jeroen for this useful post: | aah78, carthick1000, graaja, mohit, SnS_12, ysjoy |
|
8th April 2020, 09:39
| #15 |
| Distinguished - BHPian | Re: My Bicycle Hobby: Cleaning, Maintenance & Minor Repairs! I use Strava when I am out cycling. Not always, I often forget. But it is an interesting little app that lets you track your route, distance, time etc. And you can share the results easily on for instance Facebook. My wife always like to see where I have been and I use the Strave route to talk her through my routes. Last evening I did one of my typical after work tour. That is usually around 45-60 kilometer. Summertime has started here. Which means if I stop working between 16-1700 hours, I will still ride in full daylight for another two hours. Sun doesnt start setting till 20.00 hours and every day it will be a few minutes later. Love it! This is one of my favourite routes. I takes me along the river Linge. I stay close to the river on the Southbank heading east until I get to Geldermalsen, a small provincial town. There I cross the river and cycle back on the North bank. Last evening there was a steady 15 km/h easterly wind. That shows in my average speeds. On the return leg, going west my average speed is consistently a lot higher. Doing 28-29 km/h, maxing out at over 33 km/h. You can see my speed dropping considerably just prior the half way point. I got a phone call from a friend. I took the call, whilst still continuing to cycle. It really eats into your average speed. Look at the vertical profile! Just about flat. On these sort of trips the total elevation difference is rarely more than 9-10 meters. That is mostly going up and down dikes!  Next a trip I did some time ago. I took my bicycle on the train and headed out way west. The green dot is where my cycling route started. I headed out further east. I wanted to explore the full length of our river Linge. It actually starts at the most easterly point of this route. I had planned a route to follow it all the way back, trying to stick to one its banks as closely as I could. This is a tiny river, some of it actually more a canal (i.e. very straight) than a bendy river. But it goes through one of the prettiest parts of the Netherlands. My route takes me all the way back to Geldermalsem. From there it would have been another 25 km cycling to get home. Similar to the western leg of the previous shown route. But for some reason I took the train home on that last leg. And I forgot to switch of Strava! Look at those speeds, well over 100 km/h. You can see the train stopped at a few other stations too! Again the vertical profile is just about flat!  It is very convenient taking your bicycle on the train. All trains have special bicycle priority places. Depending with which train operator you are travelling, it will be free of charge or you might have to pay for a bicycle day pass, about Euro 6 per bicycle per day.   Jeroen Last edited by Jeroen : 8th April 2020 at 09:48. |
|
| (5)
Thanks
|
| The following 5 BHPians Thank Jeroen for this useful post: | aah78, carthick1000, graaja, SnS_12, ysjoy |
|