| |||||||

| Search Forums |
| Advanced Search |
| Go to Page... |
 |
| Search this Thread |  251,229 views |
 2nd April 2018, 00:48
| #121 | |
| Team-BHP Support  | Re: 2018 Kawasaki Ninja 1000 - The Comprehensive Review Quote:
 | |

|  ()
Thanks ()
Thanks
 |

| |
|
2nd April 2018, 12:23
| #122 | |
| Senior - BHPian | Re: 2018 Kawasaki Ninja 1000 - The Comprehensive Review Quote:
 I presume he is charging 1199/- bucks for the same but if you and other members of your group are interested, I will tell him to give you the same on a 'No Profit Basis' for around 7-800/- bucks/piece for 5+ pieces including all courier and handling charges. No commercial interest here. PM me for details. This is a direct replacement for the Kawasaki original power socket part # 99994-0485 and fits all our Kawasaki bikes including the Versys and the Ninjas, for which they were previously charging Rs. 7140/- and which they have now increased to around 14000/- bucks with some metal contraption to attach on the Z900 - 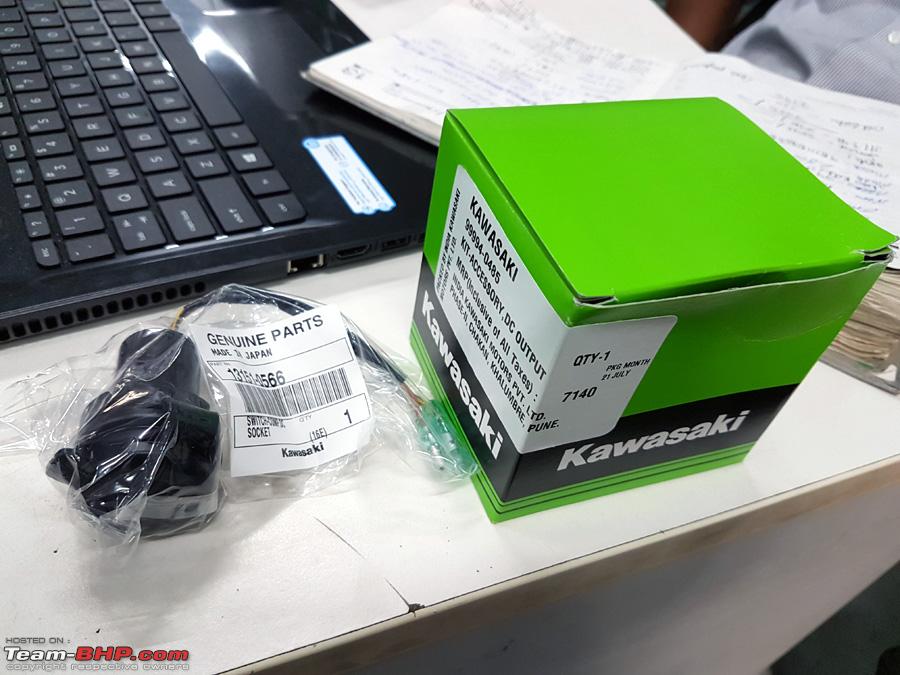 Cheers... Last edited by dkaile : 2nd April 2018 at 12:30. | |
|
| (3)
Thanks
|
| The following 3 BHPians Thank dkaile for this useful post: | hiren.mistry, Red Liner, v12 |
|
2nd April 2018, 16:13
| #123 |
| Senior - BHPian | Re: 2018 Kawasaki Ninja 1000 - The Comprehensive Review Received some more goodies for the bike - First item was a thread-locker that I was waiting to get since long, Loctite 243. It's a medium strength thread locker and prevents any rattle and loosening of the nuts. But it's damn costly at 600/- bucks for 50ml from Amazon - https://www.amazon.in/gp/product/B01...?ie=UTF8&psc=1 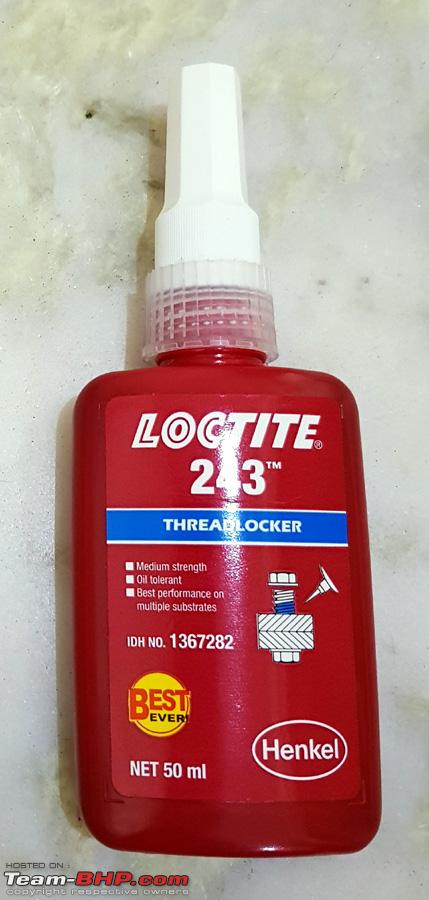 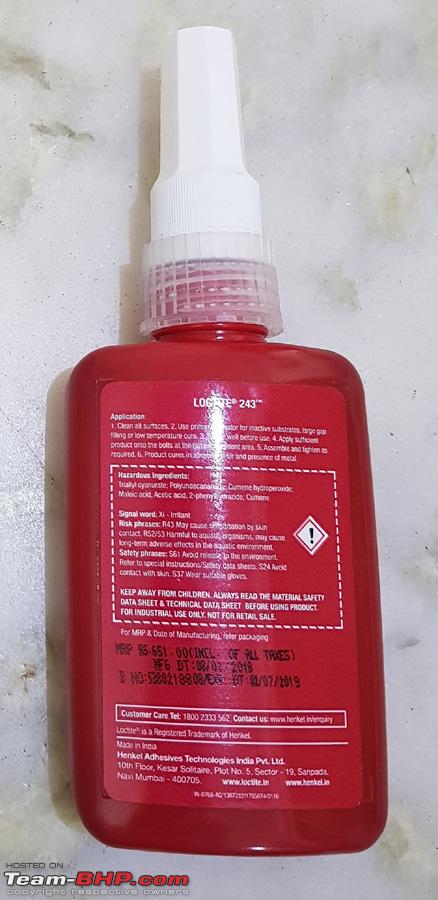 Then I found a very economical Indian alternative to Loctite and it's the Anabond Blue for just 45/- bucks for 10ml at my local hardware store.  Found another great alternative to WD40 at my local store, the German brand Groz G20 lubricating spray. It's RoHS certified and CO2 based and it supposedly has better lubrication properties than WD40 and is especially recommended for cleaning and lubricating O-ring based motorcycle chains. Will test it further. 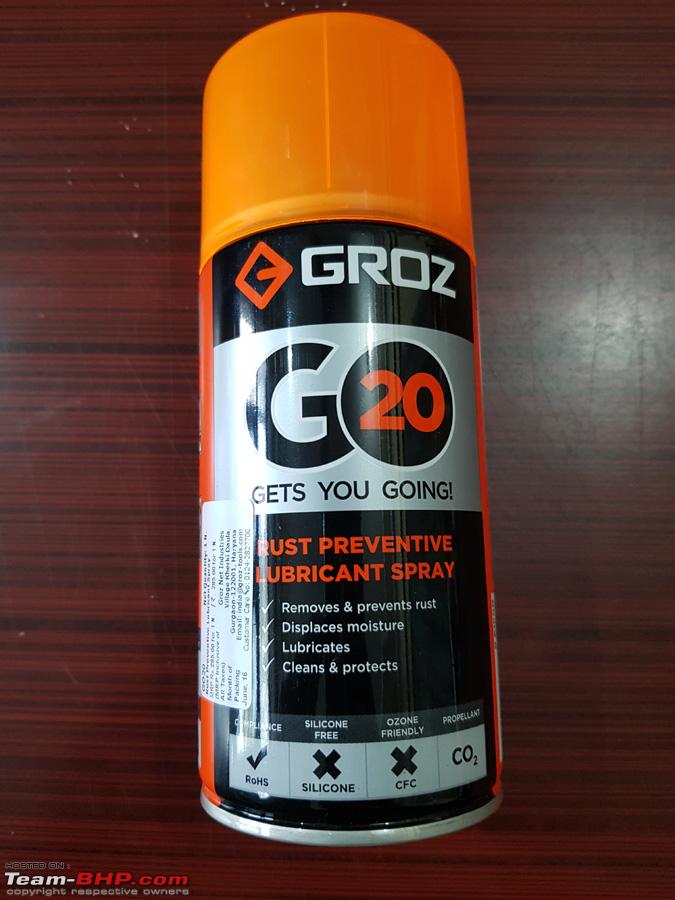 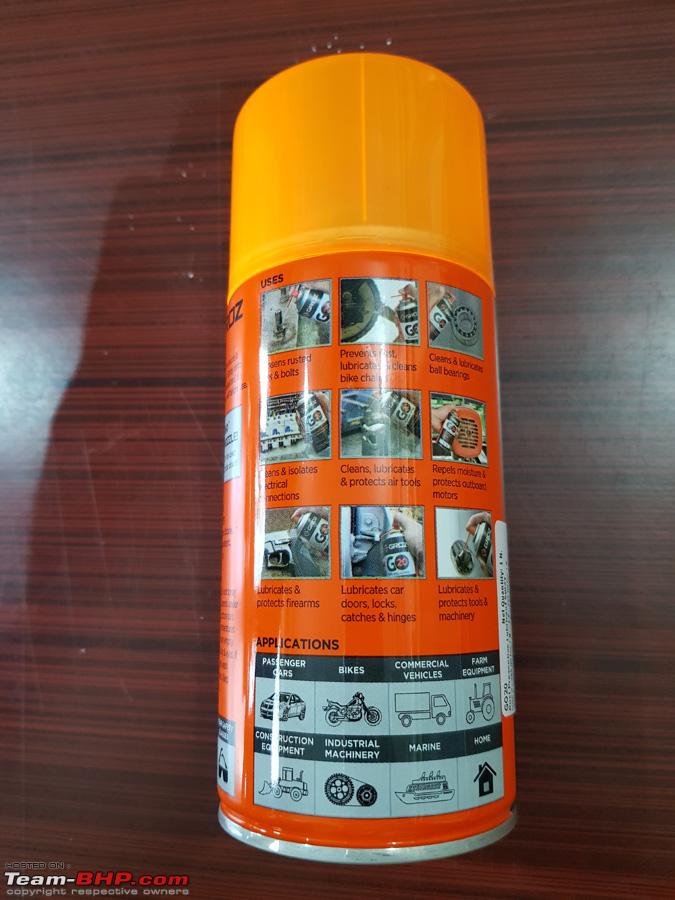 I found a small pin attached to my front tyre after my last ride and I found it had caused a minute puncture. Air pressure loss was around 1 psi a week, so it was not immediate cause for worry but it got me thinking about the best puncture solution for high speed superbikes. 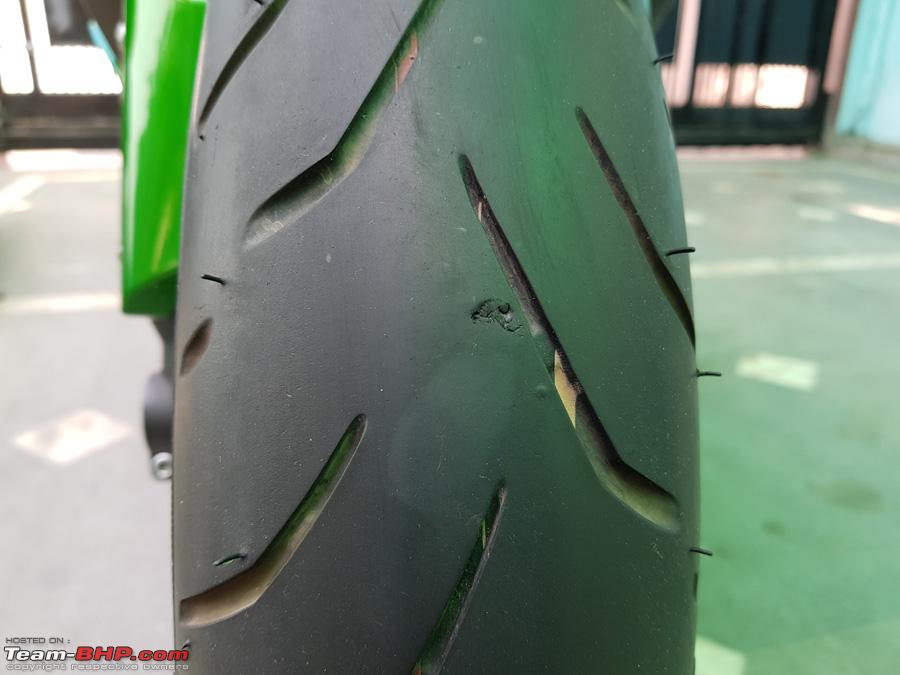 I found that one of the solutions is a mushroom tyre puncture repair which come in various sizes and styles. Here is one such alternative from Grand Pitstop that I received called the Mini Plug puncture repair kit (get 30% off on their site for all their products by using our group code "NINJA1000" while check out) - https://www.grandpitstop.com/product...-kit-mini-plug . The kit is of very high quality and well worth the price. I have heard good things about their Rear Paddock Stand too.  This is the silicon coated mushroom plug that does the job  Further research showed that the only 'real' puncture repair solution for superbikes is a Mushroom Patch from the inside of the tyre MRF has started this kind of puncture repair solution officially in it's exclusive shops and has even started providing the mushroom patches officially as shown below. The official rate for the repair is 150/- bucks only but the only problem is that the wheel needs to be removed and taken to them for repairs 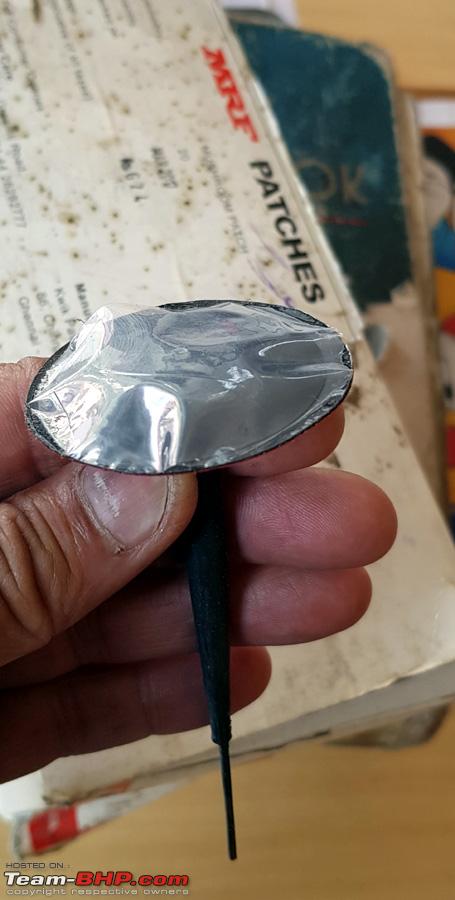 I also received another heavy duty puncture repair kit for 200/- bucks from a local shop with some mushroom patches being used in the market (for a extra 100 bucks) 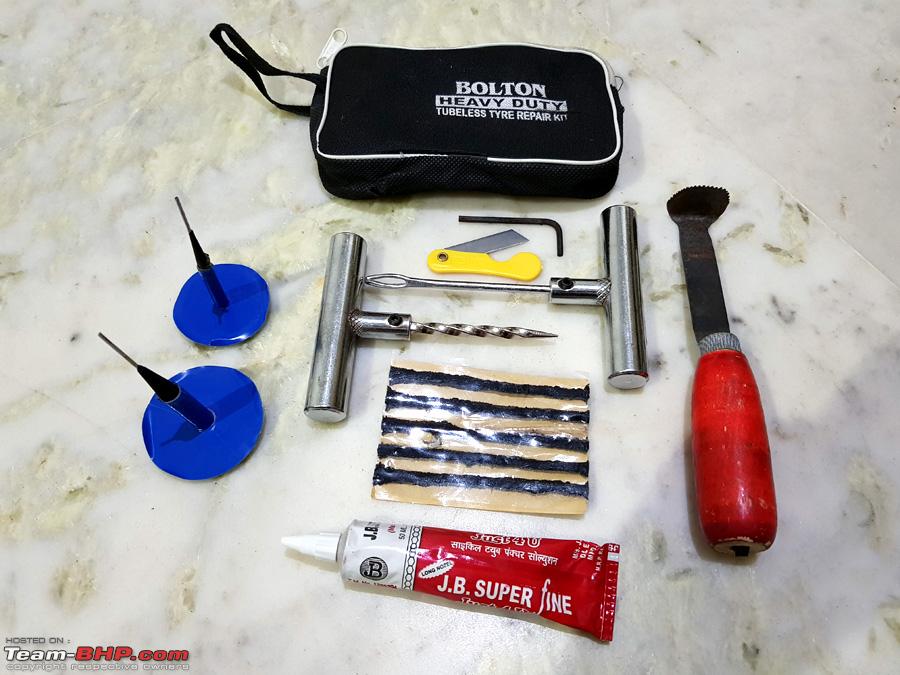 Then I got thinking about the proper way of lifting the front tyre. The normal paddock type fork lift used has been know to disturb the suspension settings on the Ninja 1000 and is therefore not suitable as per discussion with the head mechanic at Aurum Kawasaki. The proper solution is a underbody jack (which is cumbersome to put up) or a Triple T Stand. I had heard about such a stand for the first time and this is how it is supposed to work - The Triple T diameter on our Ninja 1000 is 27 mm. Researching on this further.  Also procured the Hex 14 socket needed to remove the Front Tyre  And some more high quality socket sets 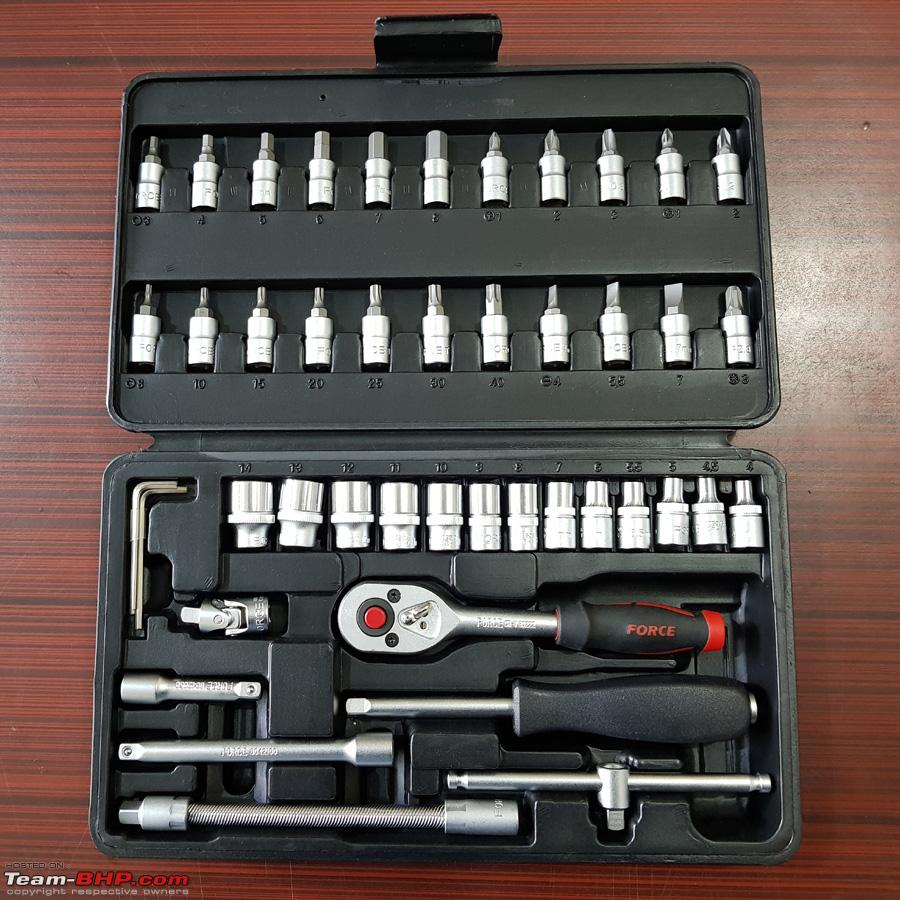 ------------------ Also received the currently popular air cushion seat - Fego Float @ Rs. 1979/- from - https://www.fueladream.com/home/campaign/2230  Comes with a foldable rain cover which can be tucked away nicely in a pocket inside the seat 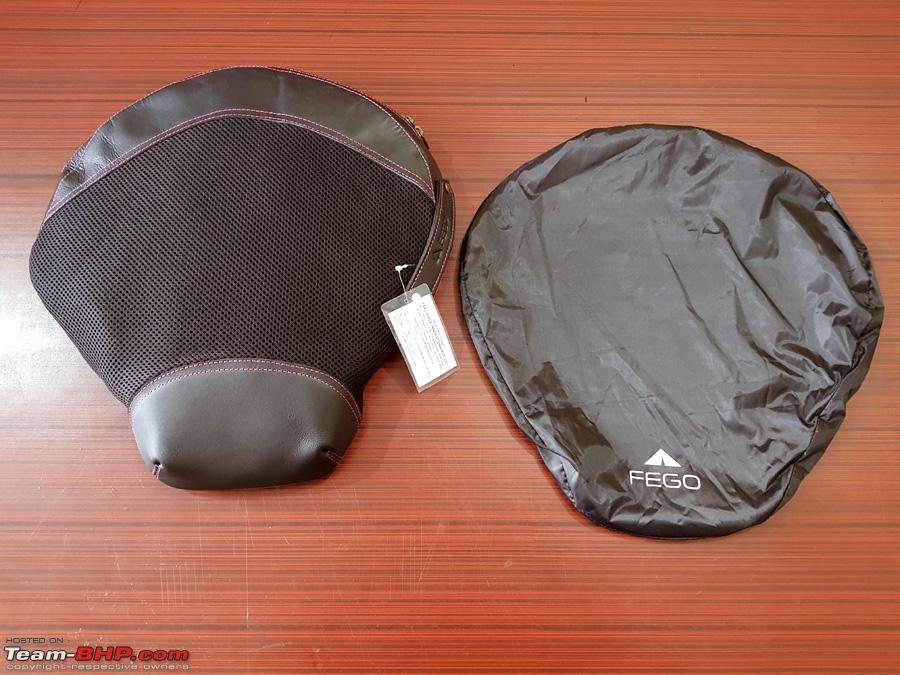 Straps to attach to your existing seat  It supposedly uses real leather. The fit and finish seem quite good. Though I have yet to test it personally, I have heard good things from other Ninja 1000 owners in our group who are currently using it - 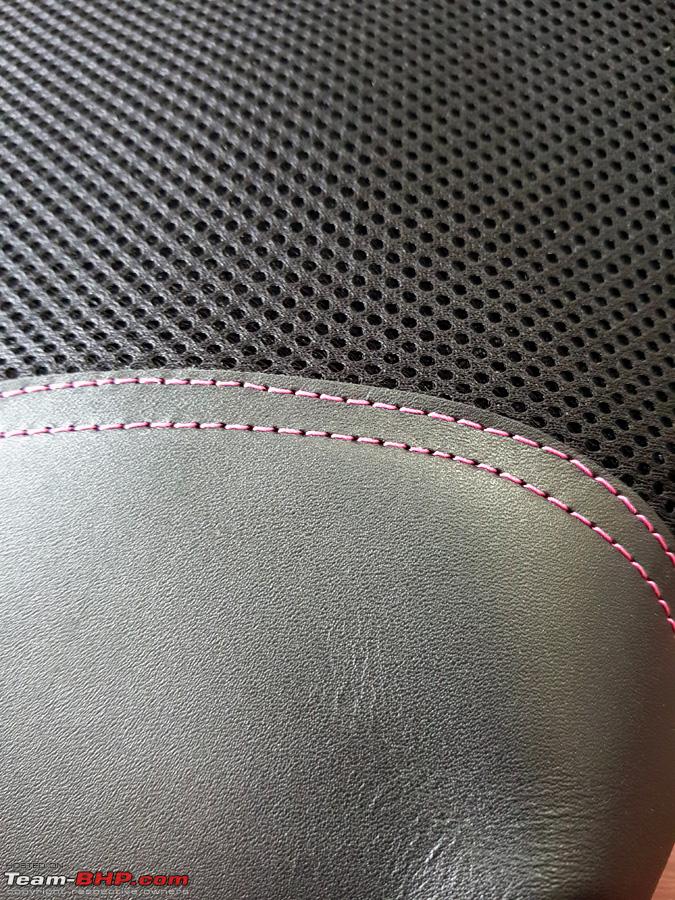 ---------------------------- Also planning to replace the rear and front indicator bulbs with LED. Here's a video detailing how - Opened up the rear indicators to know the bulb type 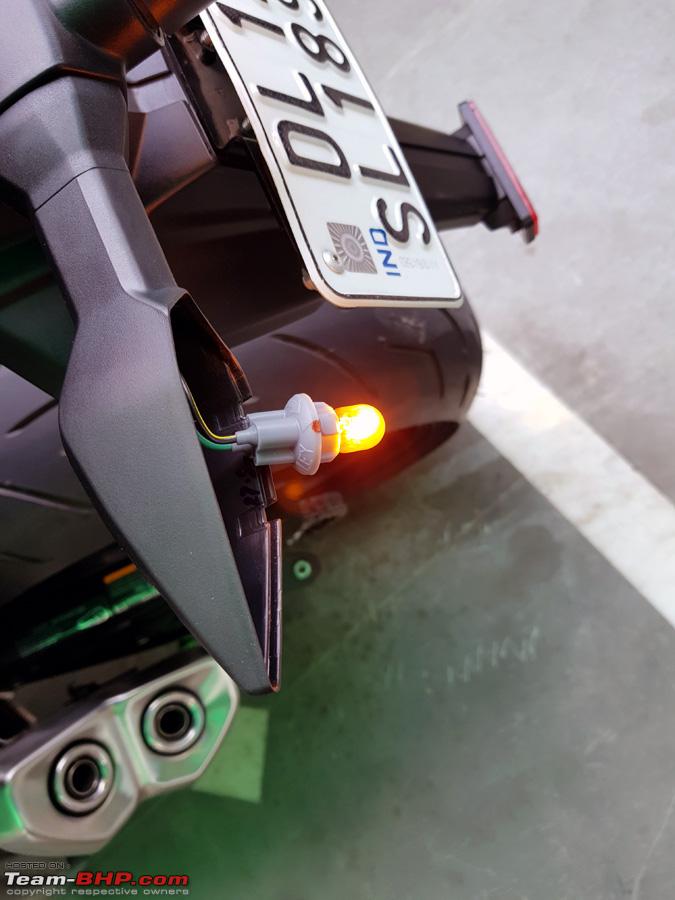 The rear indicator housing  The T10/15 socket  The bulb 12V WY10W 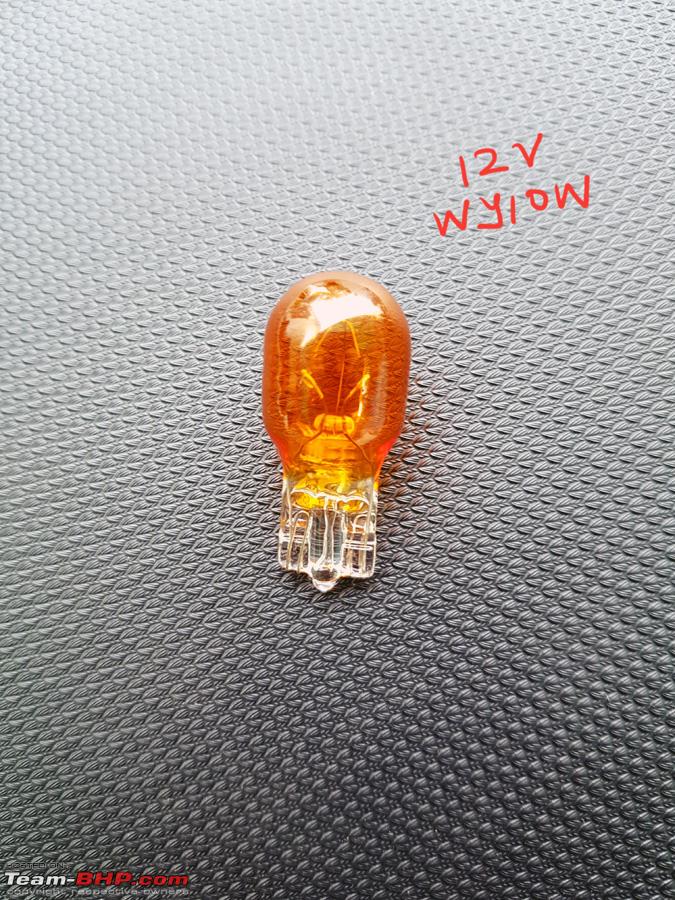 The compatible T10 LED bulbs for the rear that I ordered from AliExpress - https://www.aliexpress.com/item/2PCS...311.0.0.eTzE7w The RY10W LED Bulbs for the front indicators - https://www.aliexpress.com/item/2pcs...311.0.0.eTzE7w The plug and play Flasher Relay for our bike that is compatible with these LEDs - https://www.aliexpress.com/item/2-Pi...311.0.0.eTzE7w That's all for now  Cheers... Last edited by dkaile : 2nd April 2018 at 16:21. |
|
| (10)
Thanks
|
| The following 10 BHPians Thank dkaile for this useful post: | Cyborg, hiren.mistry, narula123, PM - B, Red Liner, sukiwa, Turbanator, udainxs, unk9ja, vaasu |
|
2nd April 2018, 17:40
| #124 | |
| Team-BHP Support | Re: 2018 Kawasaki Ninja 1000 - The Comprehensive Review Quote:
Since many Versys owners follow your thread as well - and few have already seen your post - asking here itself if anyone is interested. Mobike008, Red Liner, v12, atul.ktm etc? I'll also ping and check with the guys. Else I'll go ahead and get it for myself at 1199/- itself. For the Versys, i think we might need an additional relay to enable the power sockets. People have been successfully using Maruti 800 radiator fan relay for this purpose. | |
|
| ()
Thanks
|
|
2nd April 2018, 18:45
| #125 | |
| Senior - BHPian | Re: 2018 Kawasaki Ninja 1000 - The Comprehensive Review Quote:
Cheers... | |
|
| (1)
Thanks
|
| The following BHPian Thanks dkaile for this useful post: | CrAzY dRiVeR |
|
3rd April 2018, 17:19
| #126 |
| Senior - BHPian | Re: 2018 Kawasaki Ninja 1000 - The Comprehensive Review Moto Trailers Triple Tree Front Paddock Stand I was looking for a front paddock stand for removing my front wheel to repair any punctures which may occur and to fit a proper mushroom patch from the inside of the tyre, which is the only recognised method worldwide of puncture repair on high speed bikes. Now as I had discussed earlier, normal front fork based paddock stands can cause alignment issues while refitting the front wheel and so it was very important not to put any weight on the suspension. This type of stand is also essential for any repairs to be carried out on the front forks like oil seal replacement etc. So I searched and found very few manufacturers of the same in India and one of them was Moto Trailers. This is the link to this product - https://moto-trailers.com/collection...-paddock-stand . TeamBHP members can also contact Udaiveer on +91 9987381283 and ask for further 15% discount on list price of all their products and take my reference (no commercial interest here please). And this is what I received - With the revised 27mm longer pin  With the normal 27mm pin especially fabricated for my bike. Also comes with a assortment of pins for smaller bikes. 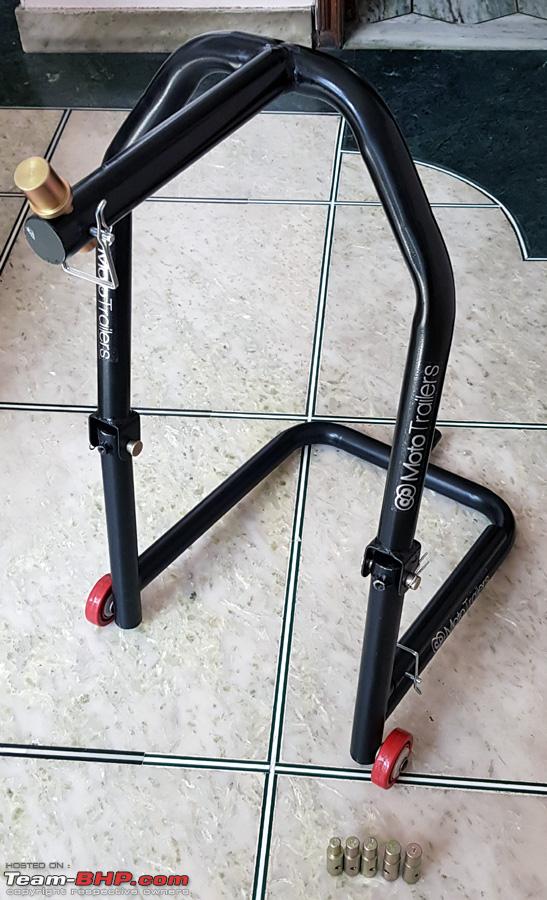 Now initially, they fabricated a special 27mm required for my specific bike (as shown in the 2nd picture above) and sent it free of cost with the bike. But somehow that too made the stand hit the fairing from below. They again custom made a 'longer' pin of the same size (1st picture above) and voila, it now fits and raises the bike perfectly. The rear paddock must first be attached and then this Triple T front paddock -  No more touching the fairing from below 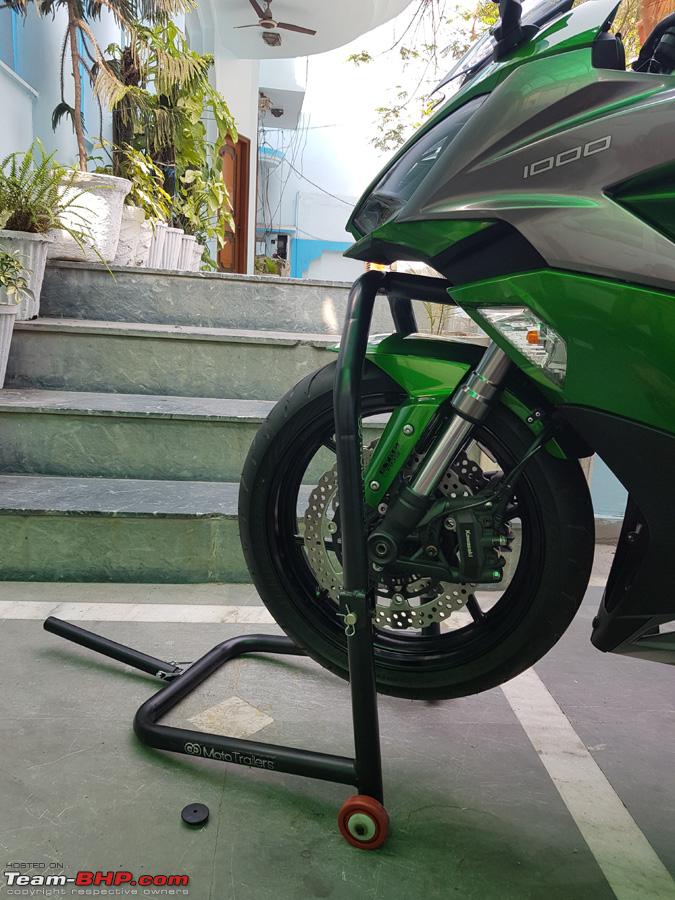 Ample clearances on all sides 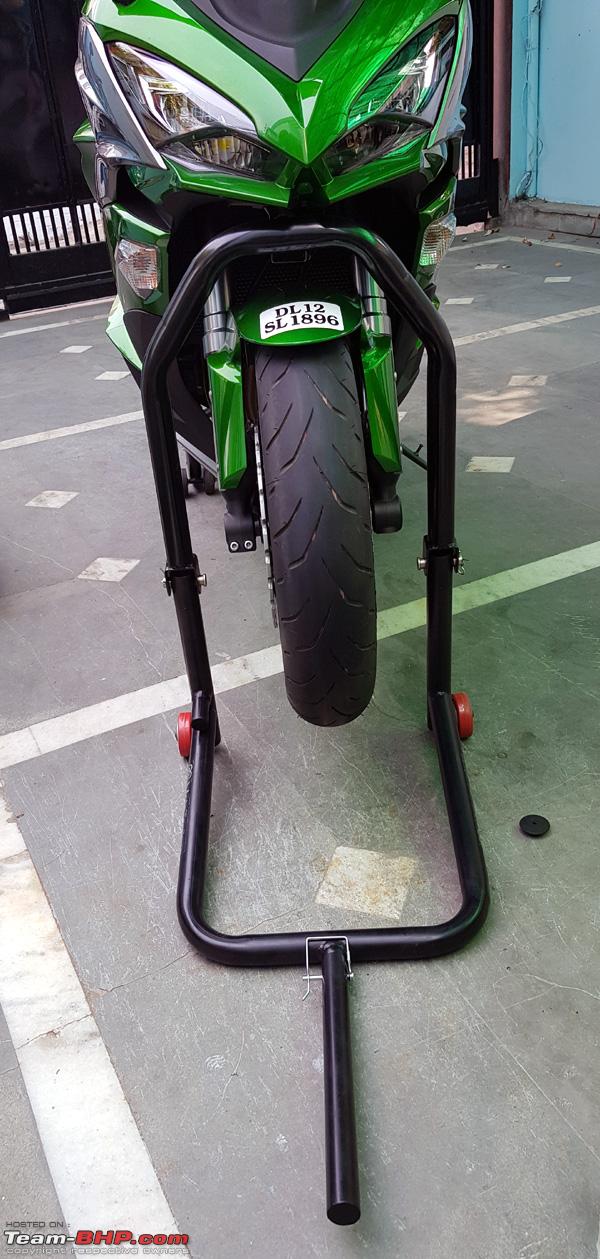 Ample clearance below the headlight fairing  All load only on one specific point on the Triple Tree of the bike, nowhere else, as is properly mandated by manufacturers.  Does not touch any brake lines or other fittings  Raises the bike by 5-6" above the ground  In the process found another nail in the rear tyre now... Uff  Though no noticeable loss of air pressure till now. Though no noticeable loss of air pressure till now.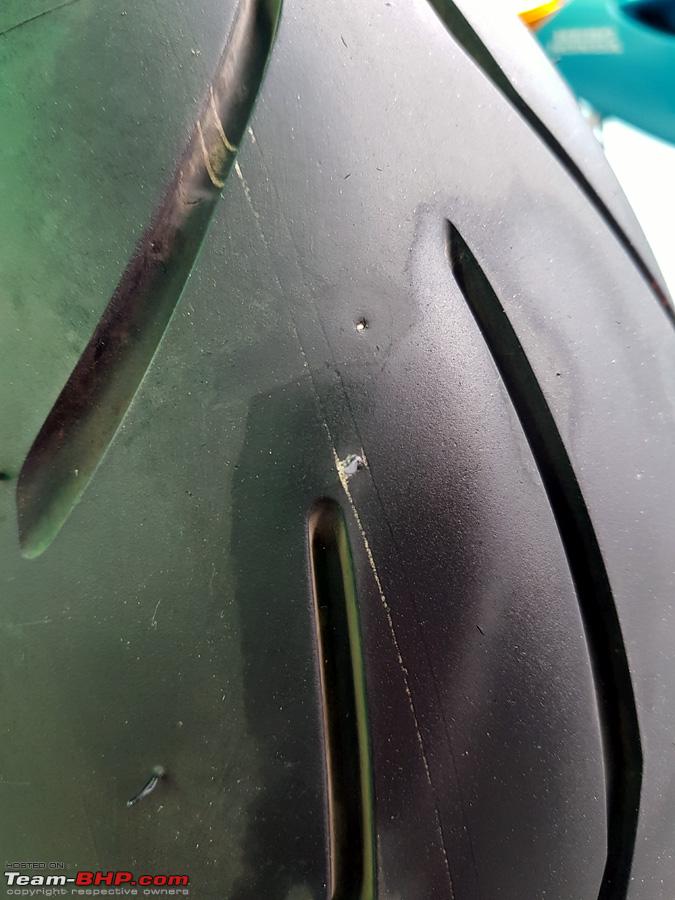 Next process should be the mushroom patch repair, when I get the time. Cheers and Ride Safe... Last edited by dkaile : 3rd April 2018 at 17:24. |
|
| (6)
Thanks
|
| The following 6 BHPians Thank dkaile for this useful post: | hiren.mistry, PM - B, Red Liner, sukiwa, Turbanator, vaasu |
|
3rd April 2018, 22:19
| #127 | |
| BHPian | Re: 2018 Kawasaki Ninja 1000 - The Comprehensive Review Quote:
| |
|
| ()
Thanks
|
|
3rd April 2018, 22:44
| #128 | |
| Team-BHP Support | Re: 2018 Kawasaki Ninja 1000 - The Comprehensive Review Quote:
| |
|
| (1)
Thanks
|
| The following BHPian Thanks CrAzY dRiVeR for this useful post: | dkaile |
|
19th April 2018, 09:30
| #129 |
| Senior - BHPian | Re: 2018 Kawasaki Ninja 1000 - The Comprehensive Review DUMMIES GUIDE FOR "HOW TO PERMANENTLY REPAIR A SUPERBIKE's PUNCTURE & BALANCE YOUR WHEELS MANUALLY" (Mods may copy these subsequent posts into a separate Topic also, if necessary, as I feel it can help many Superbike Owners as well as Motorcycle owners in general) As I had mentioned in my previous posts, that I had found a very minor puncture in the front tyre. And Today I found this embedded in the rear tyre as well... yikes! 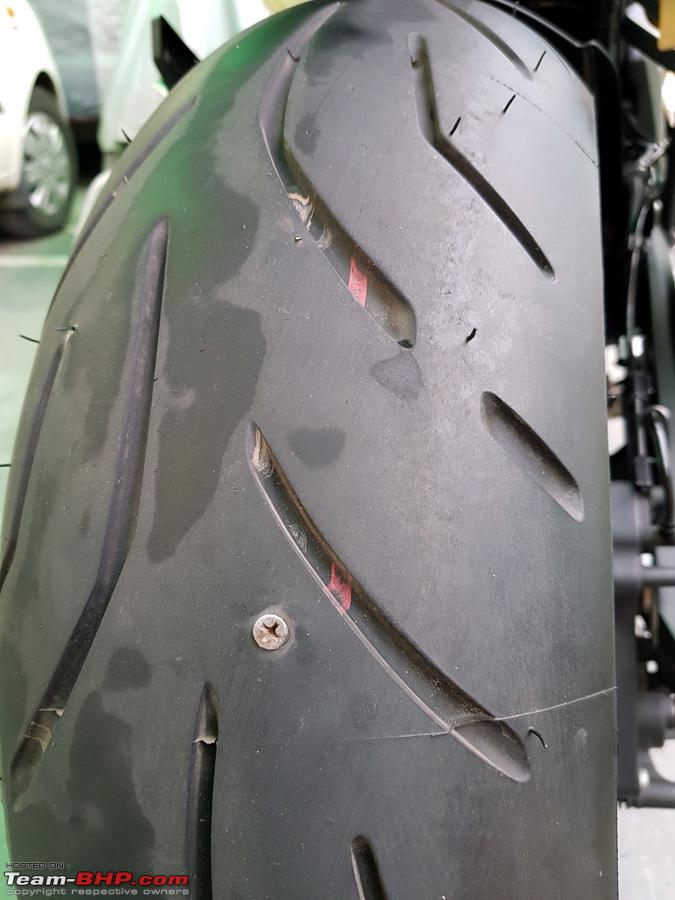 ------------------- Edit : The Mods have created a new topic about this dummies guide which may be followed here - http://www.team-bhp.com/forum/superb...balancing.html Hope that helps many. Cheers for now! |
|
| (4)
Thanks
|
| The following 4 BHPians Thank dkaile for this useful post: | anandpadhye, Cyborg, hiren.mistry, v12 |
|
3rd June 2018, 19:44
| #130 |
| Senior - BHPian | Re: 2018 Kawasaki Ninja 1000 - The Comprehensive Review Teaser.... of what happened in the meantime  Cheers... |
|
| (6)
Thanks
|
| The following 6 BHPians Thank dkaile for this useful post: | anandpadhye, Cyborg, Haroon, hiren.mistry, mobike008, neerajdan |
|
3rd June 2018, 20:03
| #131 |
| Distinguished - BHPian  | Re: 2018 Kawasaki Ninja 1000 - The Comprehensive Review Wowww - these are the OE Kawasaki panniers, right? They look lovely Dkail Sir! Could you share more details on it please - size, fitting, price etc. I am sure you would have fitted them all by yourself and would be putting up a detailed thread. I also just had a look at your post (sorry missed it earlier) where you changed the indicator bulbs to LED ones. I am thinking of doing the same - but want to try out the Duke 390 indicataors instead of bulbs. I couldn't figure out how to take off the rear indicators - would you know? |
|
| (1)
Thanks
|
| The following BHPian Thanks v12 for this useful post: | dkaile |
| |
|
5th June 2018, 00:47
| #132 | |
| Distinguished - BHPian | Re: 2018 Kawasaki Ninja 1000 - The Comprehensive Review Quote:
| |
|
| (1)
Thanks
|
| The following BHPian Thanks v12 for this useful post: | dkaile |
|
5th June 2018, 21:04
| #133 |
| Senior - BHPian | Re: 2018 Kawasaki Ninja 1000 - The Comprehensive Review Overnighter to Lansdowne; 05/06-05-2018; 361 kms With Summers setting in full earnest in North India, had a small overnighter to Lansdowne to check the cornering abilities of the bike on the twisties. And what a lovely last stretch of twisties and pine forest did we find 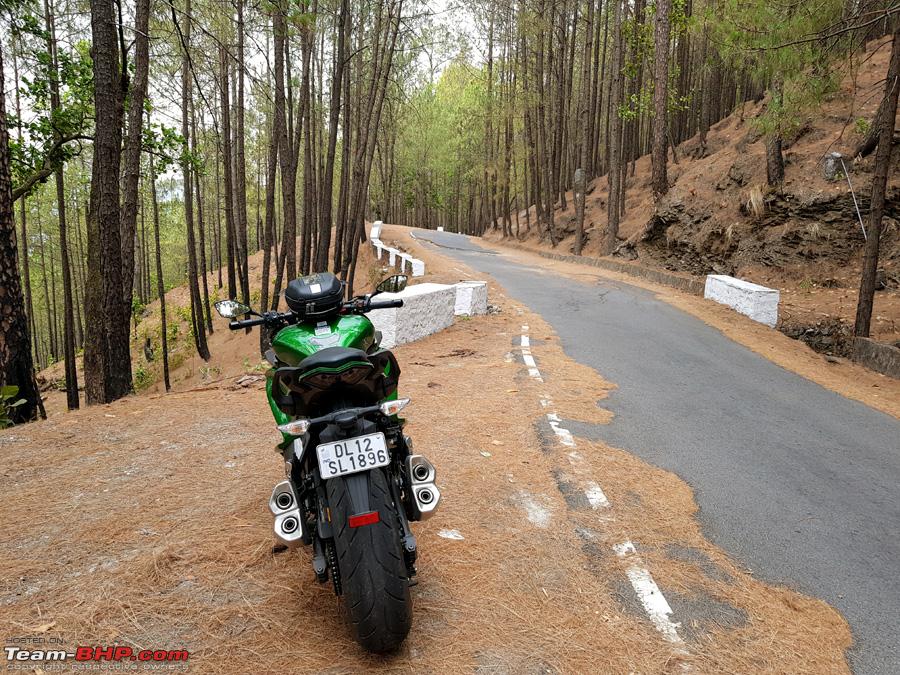 3 bikes, all different. Iron 883, the beautiful Triumph Thruxton and the in line 4 Kwaker 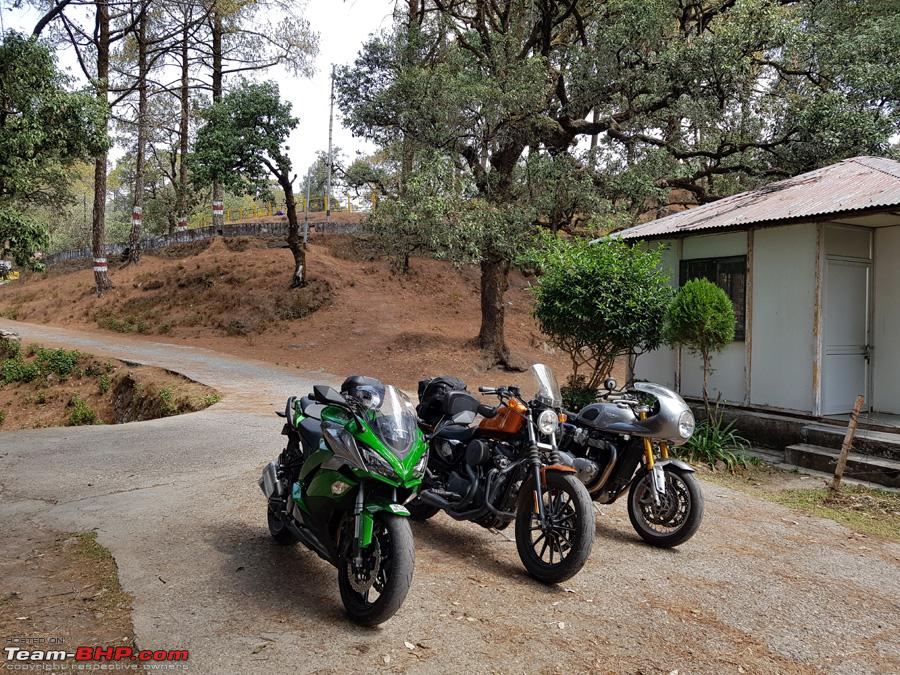 The Ninja performed flawlessly and really came in it's elements on the straights as well as on the twisties. It is indeed a perfect all-rounder. 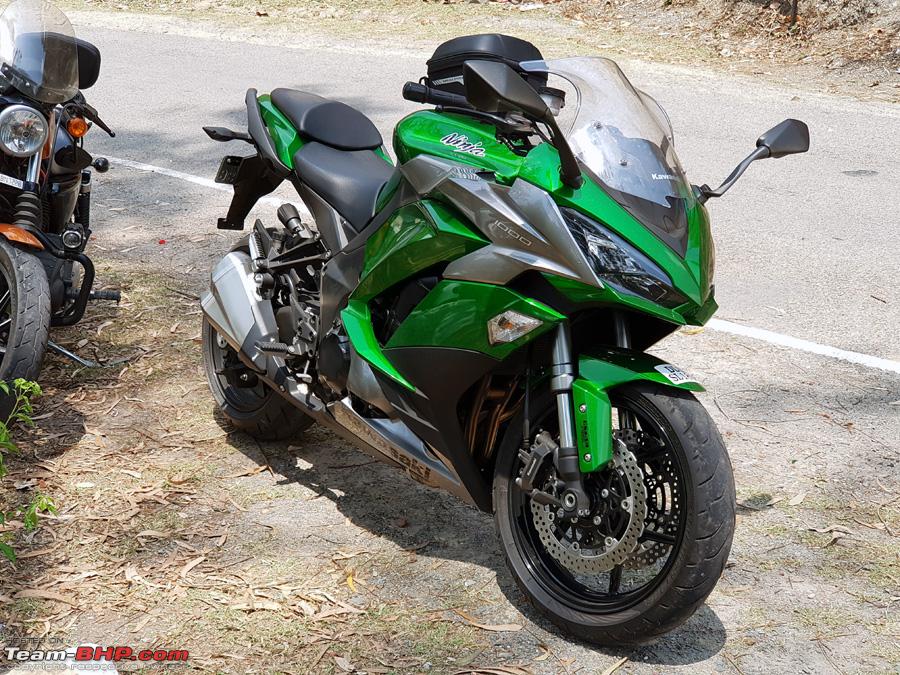 Yours truly trying out the Live Focus on the Note 8... lolz 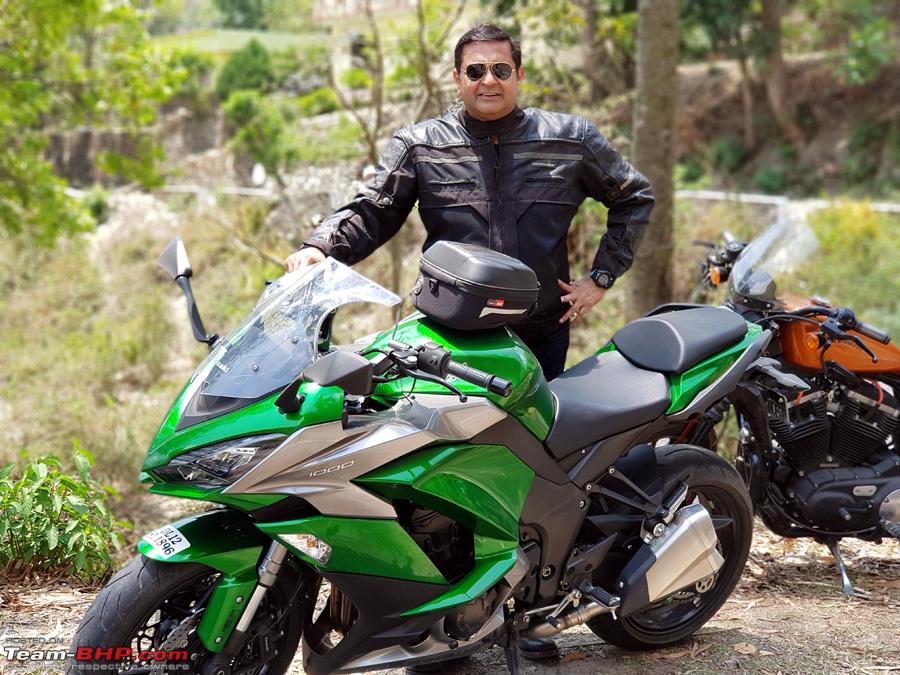 Reached the GMVN Tourist Bungalow at Lansdowne which was a abode of peace and ample parking along with good food, although the rooms left a lot to be desired 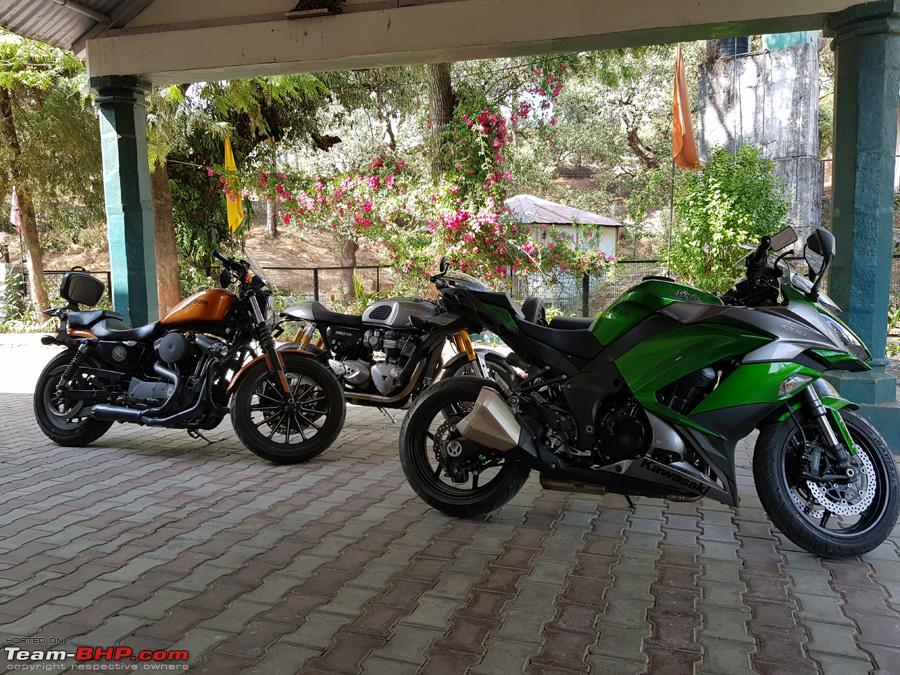 Basking on the twisties  Ready to depart the next day  The last 40kms to Lansdowne after Kotdwara are the best. The rest of the road could even be called a off-road track in long patches. But the Ninja and me took everything in it's stride. Though I can't say the same about the backbones of my fellow riders. 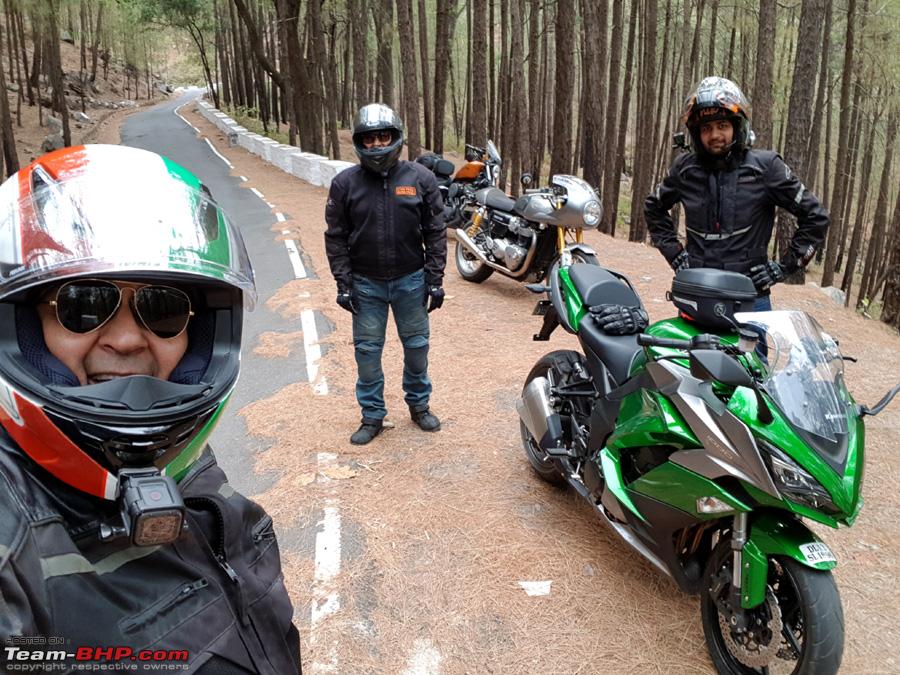 Time to bid adieu 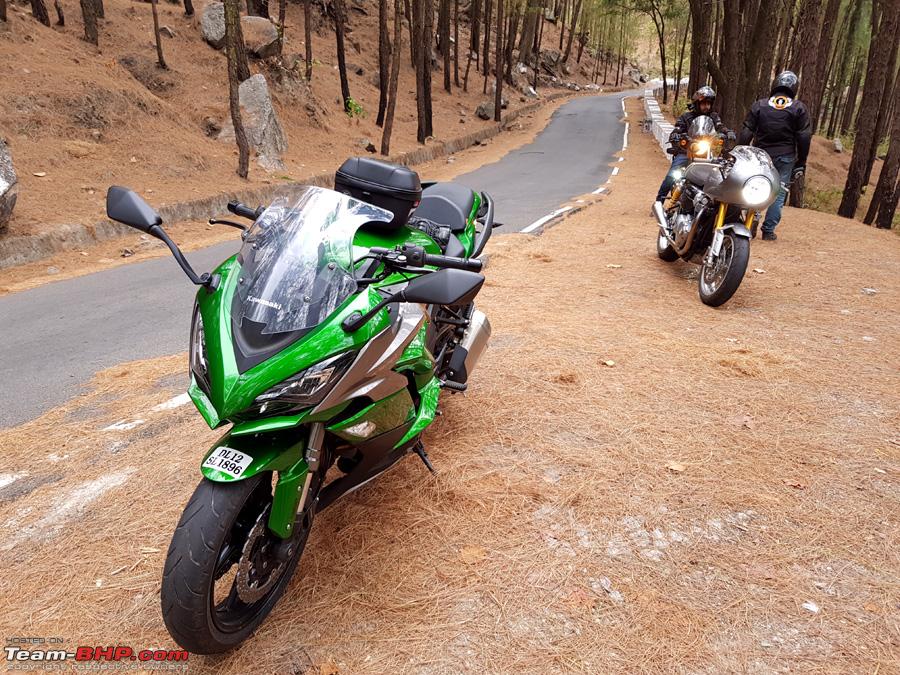 Total distance covered was 361.9 kms and average FE was 19.3 kmpl. Quite good I would say. 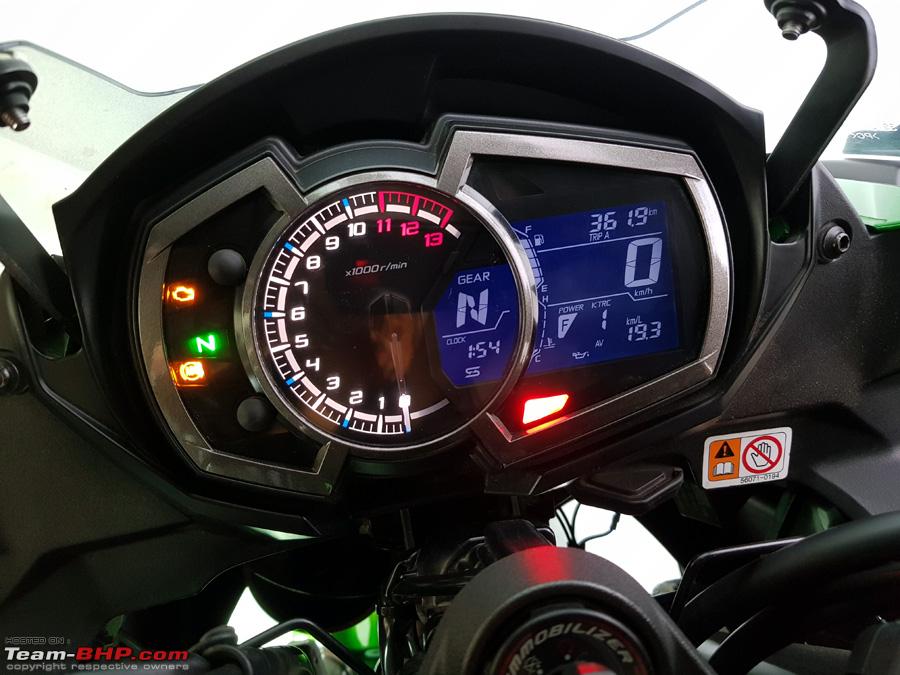 Yes, yes, I have done very few miles till date. Blame it on multiple bikes, some business obligations and this heat... But finally crossed the 2k mark. 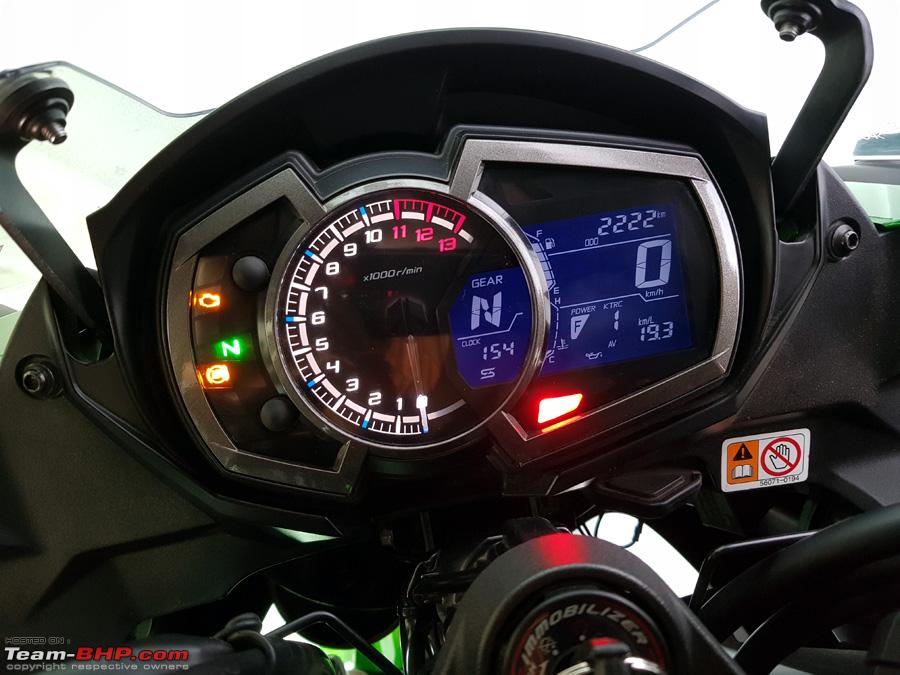 Cheers... Last edited by dkaile : 5th June 2018 at 21:08. |
|
| (8)
Thanks
|
| The following 8 BHPians Thank dkaile for this useful post: | anandpadhye, Cyborg, Full_Minchingu, Hudson, mobike008, Red Liner, Turbanator, v12 |
|
6th June 2018, 11:32
| #134 |
| Senior - BHPian | Re: 2018 Kawasaki Ninja 1000 - The Comprehensive Review Few Goodies picked up for the bike and me - Apr/May'18 Frame Sliders - My Thoughts One of our mates Ninja 1000 somehow fell down while parked on the side stand on a steep incline. He cracked his fairings and dented his exhausts. The insurance claim was a princely sum of 1.5+ Lacs out of which more than 70k was for the dented exhaust and that too of just one side. That started me thinking about frame sliders. Though I have always debated the utility of the same in a crash, perhaps they can even turn more harmful than good. But eventually it is the quality and design of the frame sliders that most experts say is important. Rightly designed frame sliders can really save your bacon on a bad day, is what I finally inferred. So NO COMPROMISE on the quality part of the frame sliders, please. IF you go for it, it should be a thoroughly well designed product and preferably from a reputed manufacturer. This and some similar videos helped Now there are 2 major companies, besides 10's of other smaller ones, making high quality frame sliders for our bike, namely SW Motech (Germany) and PUIG (Spain). SW Motech is also the OE supplier to Kawasaki which then rebrands and is selling it's product here in India for 20+K which is definitely not good value. On the other hand, and I say this after comparing both side by side, PUIG Pro sliders are of much better build quality, heavier build, have high finish quality and are much better value. My dealer, Aurum, had both but he offered the PUIG Pro's to me for just 13k with free fitting (that is another story) and I picked up the same without a blink of the eye. Here they are - Well designed box  Compatible Model no. with 2017/18 bike is 9400N and it is Made in Spain!  The box is opened to reveal a great foam packaging to protect it in transit 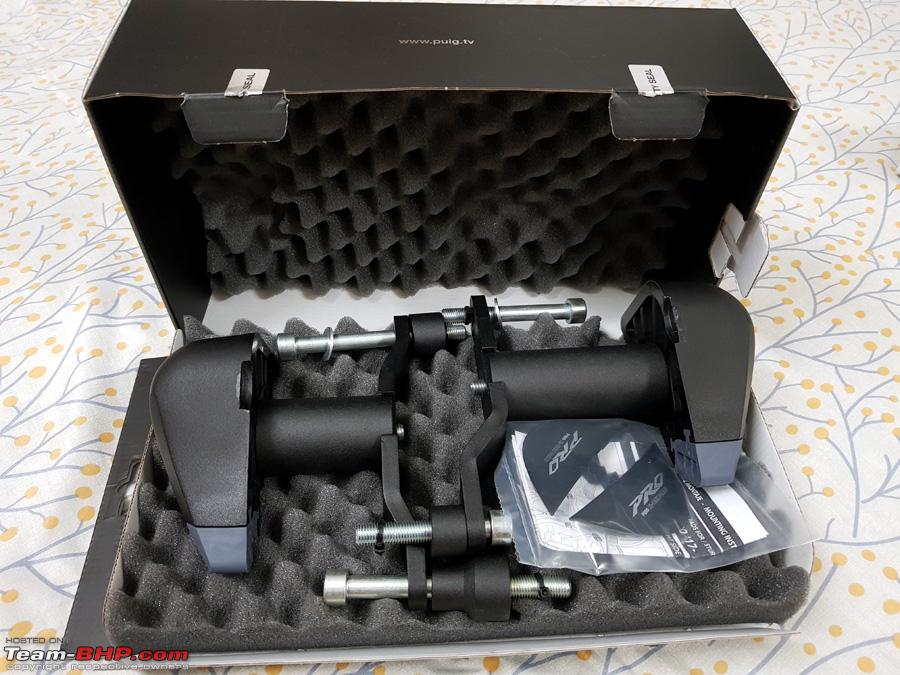 Very high build quality  Left and Right Parts come fully assembled to avoid any confusion as to what part goes where. Though they need to be disassembled while fitting. 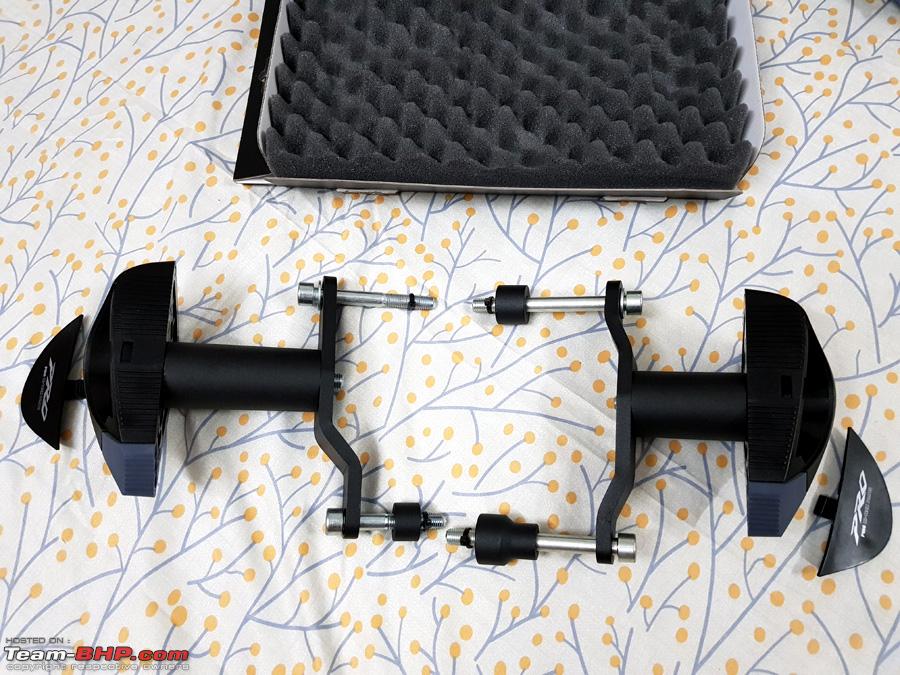 Will be fitting these soon. ------------------------------------ I was not very satisfied with the Roots Smartone Horns that I had fitted, so I picked up two sets from my local shop (on returnable basis) of trumpet horns to see which I will be able to fit when I open up the fairings the next time to fit the frame sliders. I basically liked the sound of the Single Low Tone Horn from Minda but as the horn was too wide, I also picked up the higher priced but thinner Bosch Symphony Horns. Lets see which single horn I will be able to fix.  Also received this STP Heavy Duty Brake Cleaner from Amazon for 450/- bucks - https://www.amazon.in/gp/product/B00...?ie=UTF8&psc=1 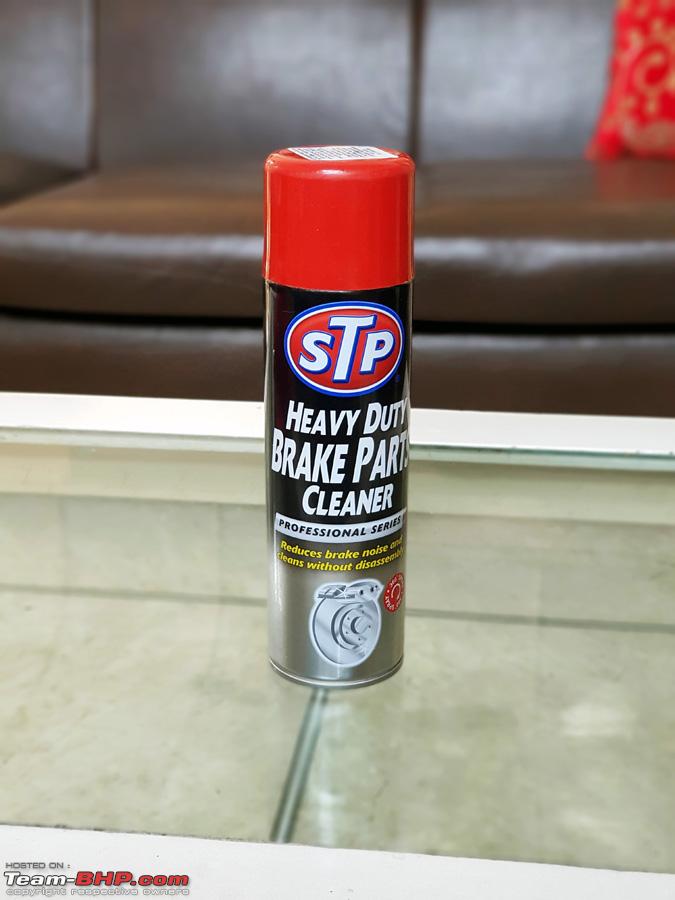 I had already picked up the front and rear LED Indicator Bulbs from AliExpress, the link for buying I had already posted in my previous post here - http://www.team-bhp.com/forum/superb...ml#post4380511 , for anyone interested. 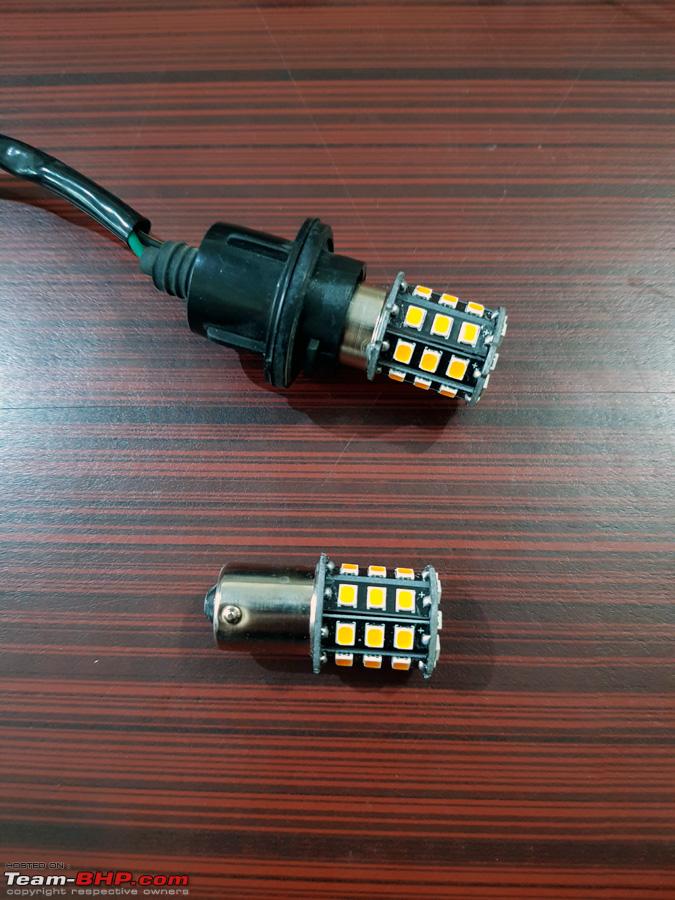 Now the Flasher Relay I had ordered previously (mentioned in that post), never arrived. So I had to order one from another seller here for around 600 bucks - https://www.aliexpress.com/item/2Pin...430a4c4diGb2jI , which arrived very promptly 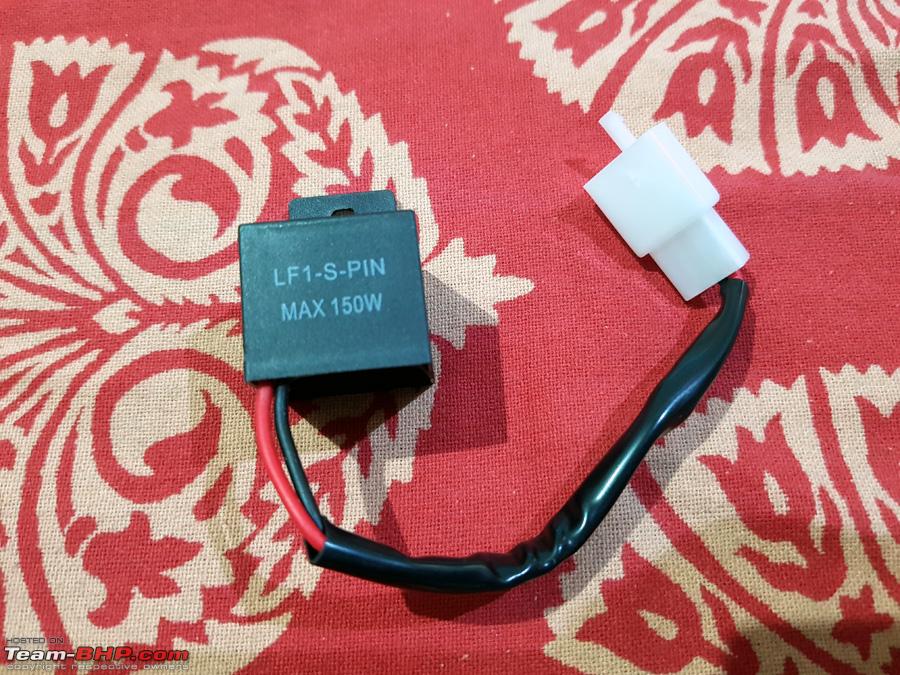 Socket is exactly as needed for plug and play attachment in our bike 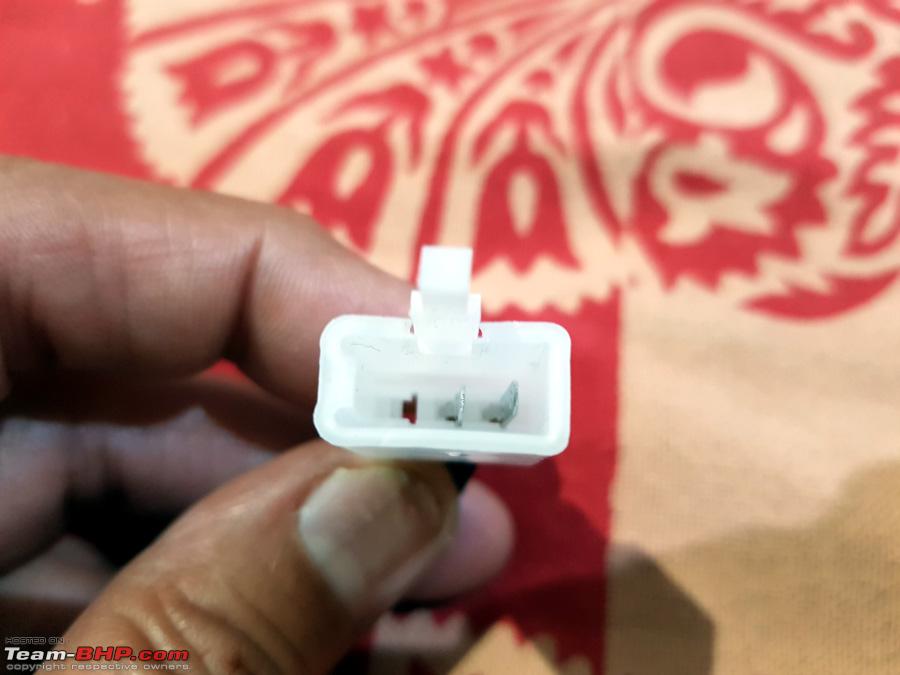 Will be going for the complete LED Indicator and License plate lights upgrade soon when I open up the fairings. As the headlights and tail lights are already LEDs, this will make the bike ALL LED! ----------------------------------- K&N High Flow Air Filter - KA-1111 Now upgrading to high flow Air Filters is a no brainer to increase the horsepower and acceleration of your bike and along with it if the convenience of re-usability and lifetime usage is thrown in, it becomes a great value proposition. This has a claimed cleaning interval of 50,000 miles (80,000 kms!!), though I would definitely like to clean it every 30-40k kms, it is supposed to work at full efficiency even as it gets dirty. Though some skeptics will tell you that these oiled air filters will mess up your MAF sensor over time, it is more to do with how you clean and re-oil your filter than the actual new filter itself. If you follow the instructions fully and do not over oil your filter, no such MAF fouling issue occurs. That cleaning process is anyways few years down the line. Here's a video explaining the same - Also our original air filter, even though made of paper mesh is also red in colour and oiled slightly. It costs 2400/- per filter and needs to be changed every 12k kms or even sooner in our dusty conditions. This K&N filter we got directly from the sole authorised importer in India, M/s Methods Automotives, Bangalore, MRP is 4990/- and we got it at a group deal price of 4600/- including shipping. So this should recover our cost in maximum 2 air filter changes. So this is what we received - 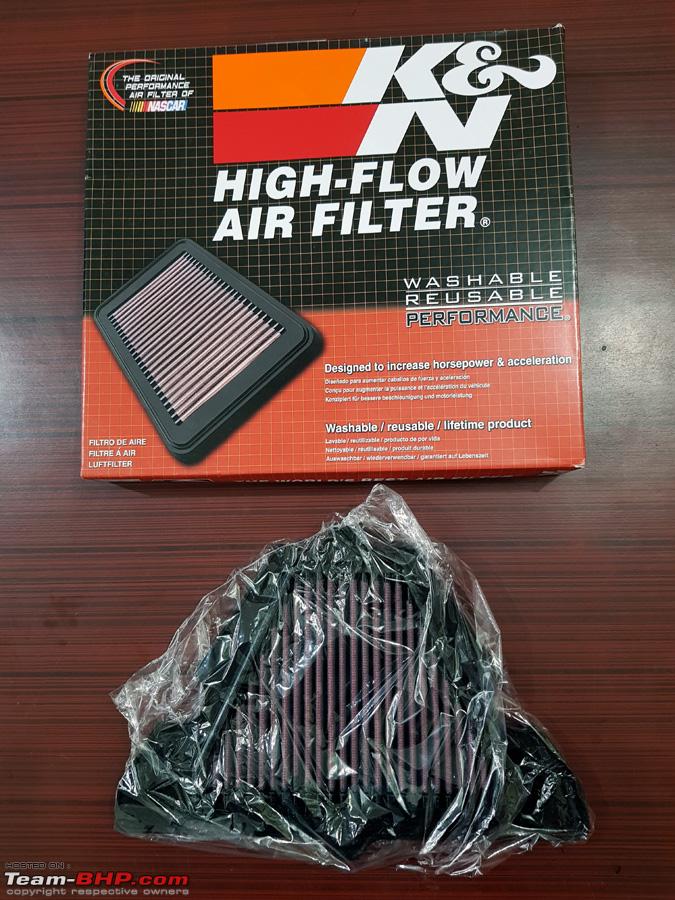 They claim it to be the World's Best air filter  Made in the U.S.A. 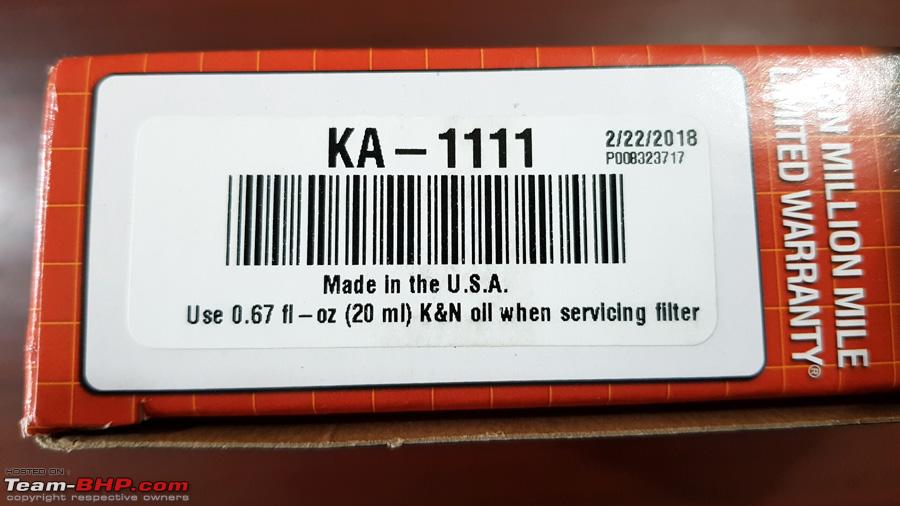 The top view of the filter with the SS mesh. This is the outflow face you are seeing 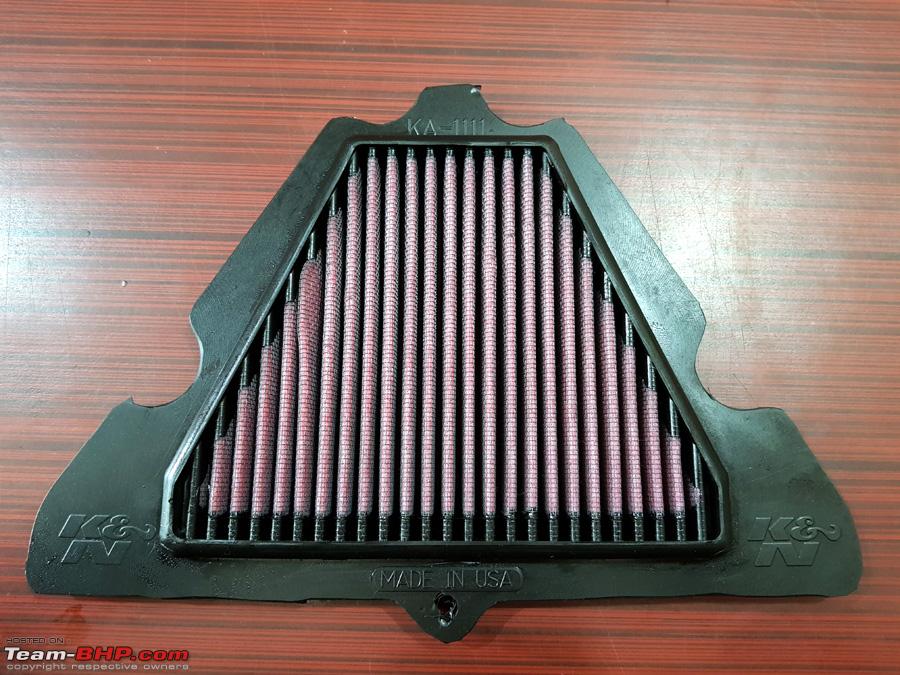 The bottom view (inflow face), also steel meshed for longevity 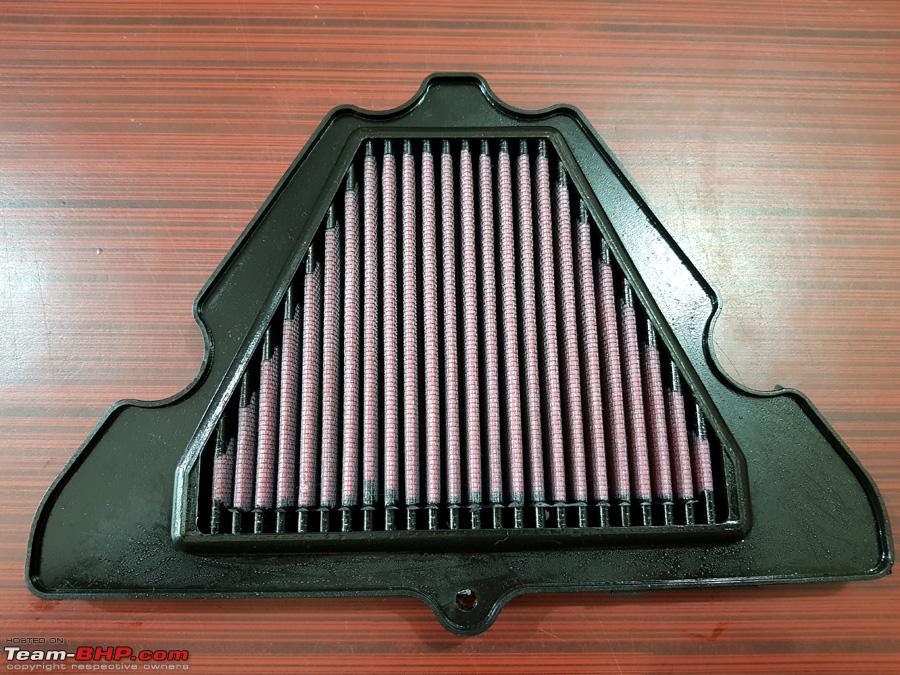 A close up of the steel mesh and oiled cotton gauge element below 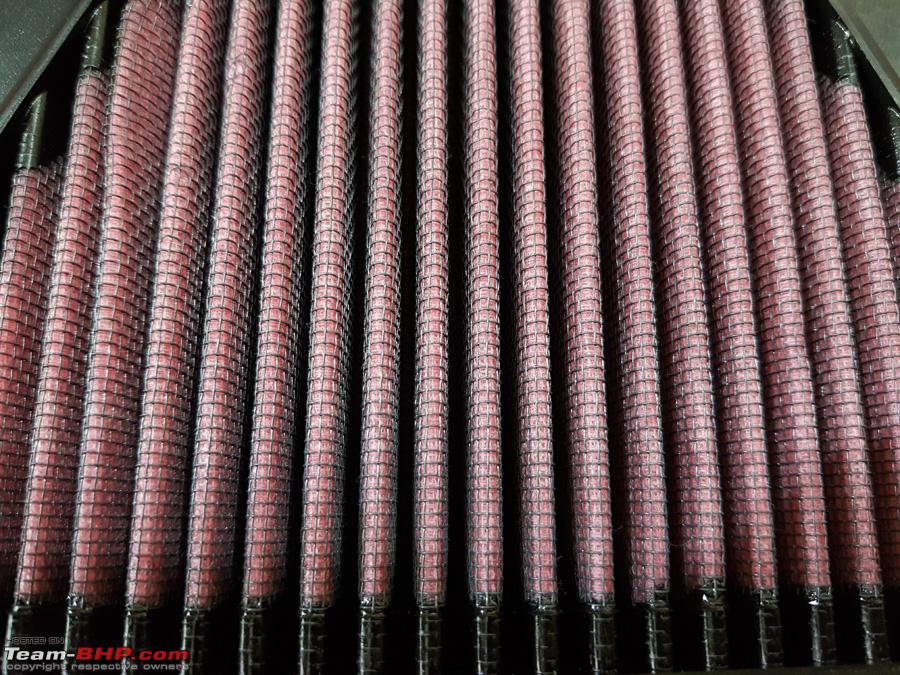 This again will be installed soon after I open up the fairings...lolz ------------------------------------- SHIMA STRADA MOTORCYCLE BOOTS purchased on 26-05-2018 and REVIEW Shima Strada is a Made in Poland product (actually designed in Poland and Made in Pakistan from where the world's best leather products come) and a Polish company and I had met with the Shima India guys at IBW last year and was impressed with the product quality they had managed to rake up vis' a vis the price. It received some rave reviews in Bike India magazine also recently. At just 7500/- bucks, at which many India companies are selling their Made in China wares, this was truly a bang for it's buck product. Moto Ignite is the official importer and distributor in India located at Pune - http://www.motoignite.com/product/sh...rada-men-boot/ . No wonder their entire first batch (from which I received these boots) got lapped up and sold out in days. This is what I received - Securely delivered through free shipping to Meerut. I usually wear a UK10 (44). Though this runs true to size, I went for half a size up for a UK 10.5 (45) and it fitted me perfectly.  Waterproof mumbo jumbo (NextDRY). The quality of leather and stitching is high. 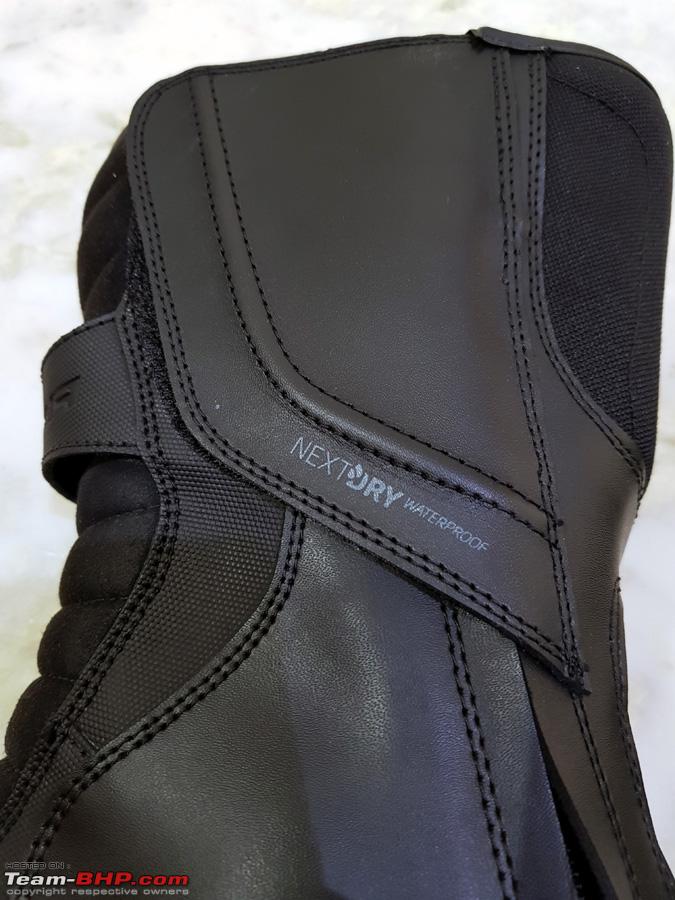 Poron Xrd Double Compound Protection. Also has reinforced toe, ankle and heel protection. Made with multiple layers of materials including leather. 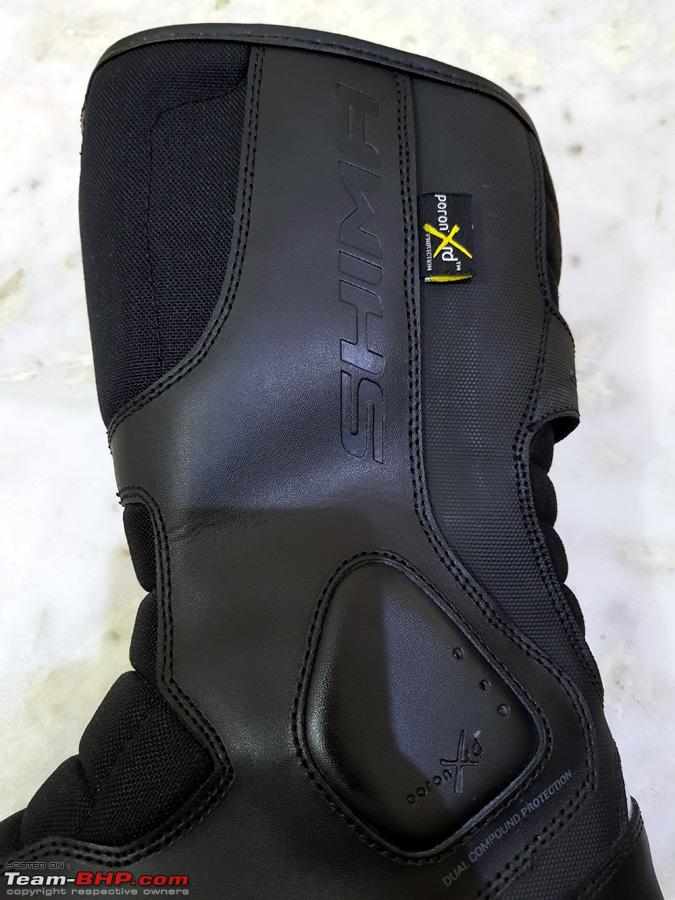 The sole is anti-slip 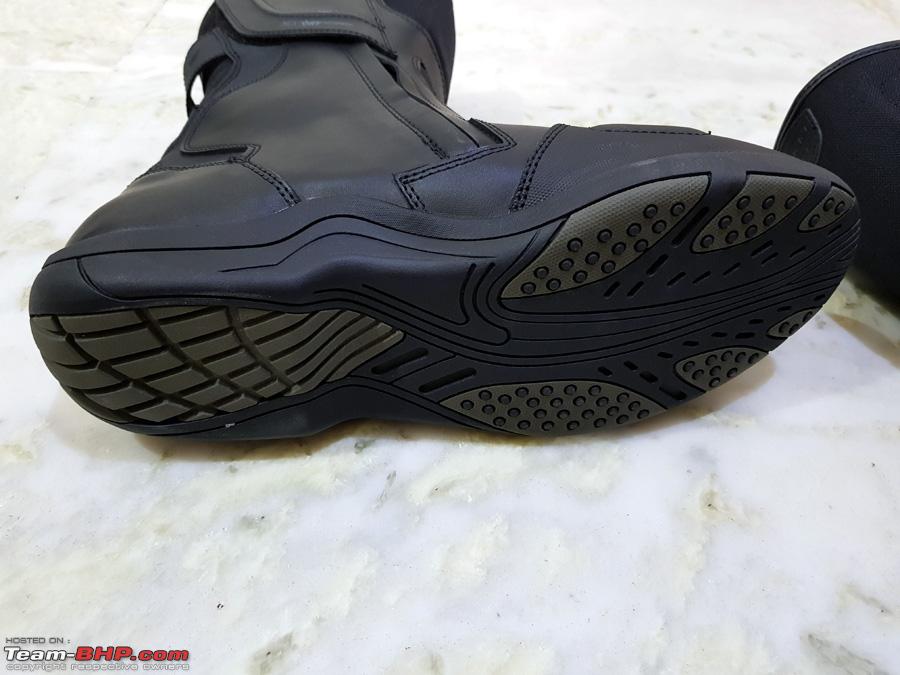 Single Zipper opening with a velcro flap for added protection and convenience. Notice even the zipper handle is velcro for quick attachment.  Waterproof inside flap 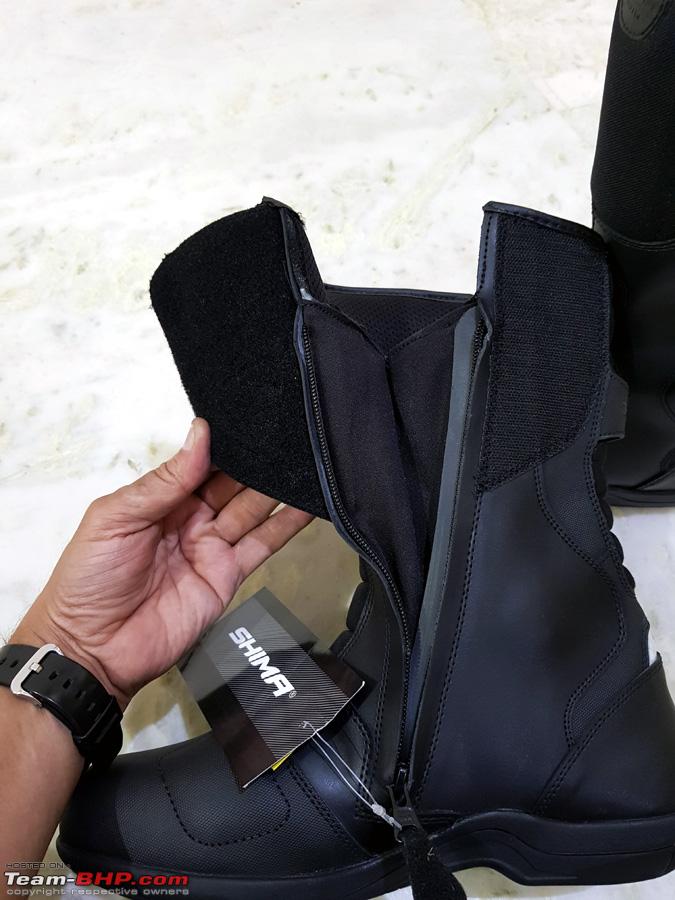 Very well finished. One of the other matt based materials used upfront.  Perfect height and comfort for touring orientation 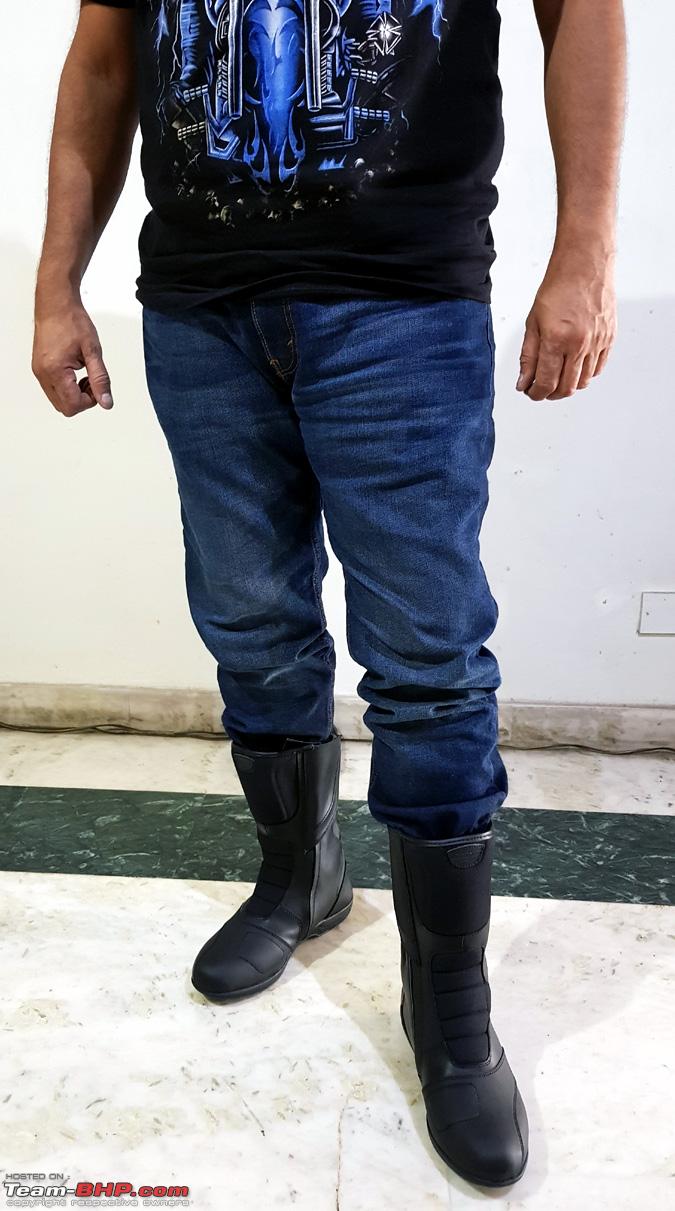 I had compared and checked out various boots closely and personally like the TCX Airtech Evo and Sidi Aria, all in the 20k range, and this boots gives them a serious run for it's money at less than half the cost. I would highly recommend these for touring duties. Coming up soon - installation of all these parts Cheers for now... Last edited by dkaile : 6th June 2018 at 11:46. |
|
| (9)
Thanks
|
| The following 9 BHPians Thank dkaile for this useful post: | audioholic, Cyborg, Full_Minchingu, hiren.mistry, Nicky4WD, Red Liner, swiftnfurious, unk9ja, vishy76 |
|
7th June 2018, 13:17
| #135 |
| Senior - BHPian | Re: 2018 Kawasaki Ninja 1000 - The Comprehensive Review Kawasaki OE Panniers for Ninja 1000 - 28-05-2018 and REVIEW Warning - long detailed post/s follow (only for enthusiasts) Kawasaki original panniers (saddle bags) had been on my radar since I had bought the bike. Because the bike looks complete only with the OE Panniers. But you had to plan to sell one kidney to get them in your garage, they were that exorbitant. Currently they are priced at Rs. 1,08,410/- for the entire kit!! You could buy 2x100cc bikes or a nice 200cc bike for that price. But then so is the market for these Superbike accessories and you can call this the Superbike Tax! I had looked at many other options in the past few months like Hepco Becker semi rigid bags, soft bags, Aftermarket hard bags from Givi etc. etc. BUT none fitted so seamlessly as the original ones. Even though these OE ones are Made in Italy by GIVI but they are not available off market in this one key system which retains the original silhouette of the bike while making the procedure of putting on and taking off of the panniers a one minute job. My dealer finally relented on the MRP and gave our group a 10% off (10,000/- rupees approx), taking the final pricing to be around 98k, still quite a princely sum. They finally reached the dealership 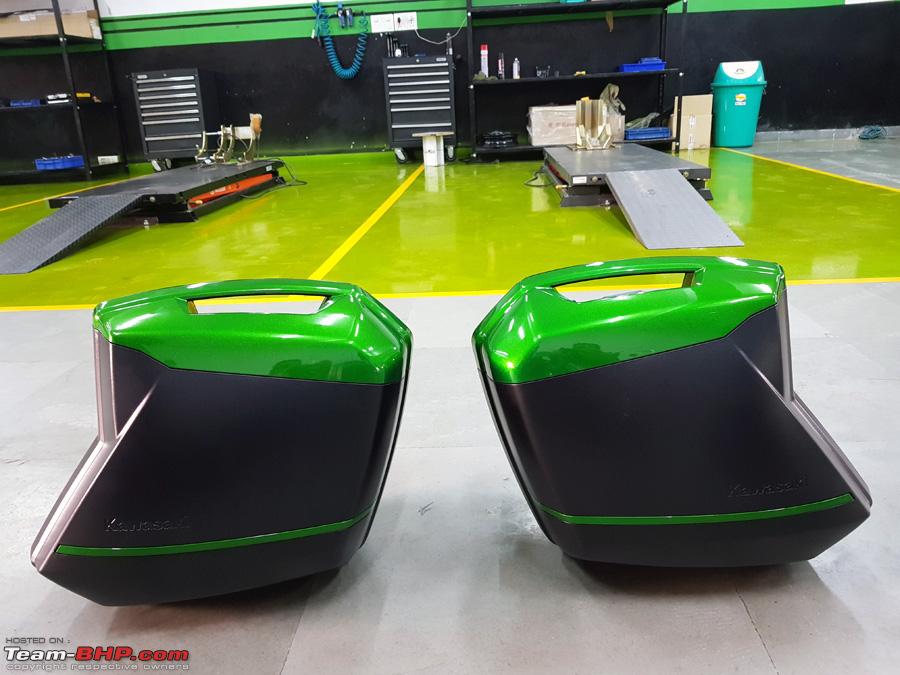 Got all the panels and single key lock system fitted in my presence. The setup of the single key system and synchronizing both the locks to your original key requires some care. This video helped - The quotation received from the dealership was of 1.08L along with the discount and the part numbers needed for Emerald Blazed Green bike. The 2x color panel on the pannier covers and the deco strip kit part numbers for the Black variant, will be the only ones which are slightly different. 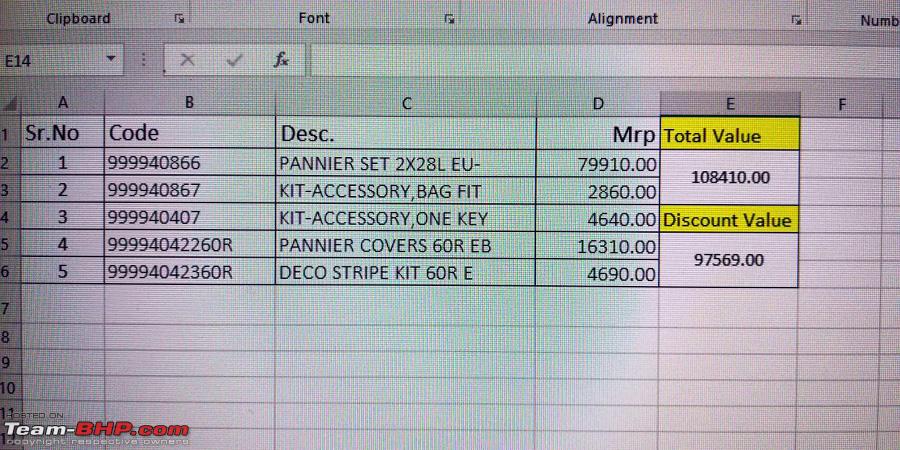 Finally got them home 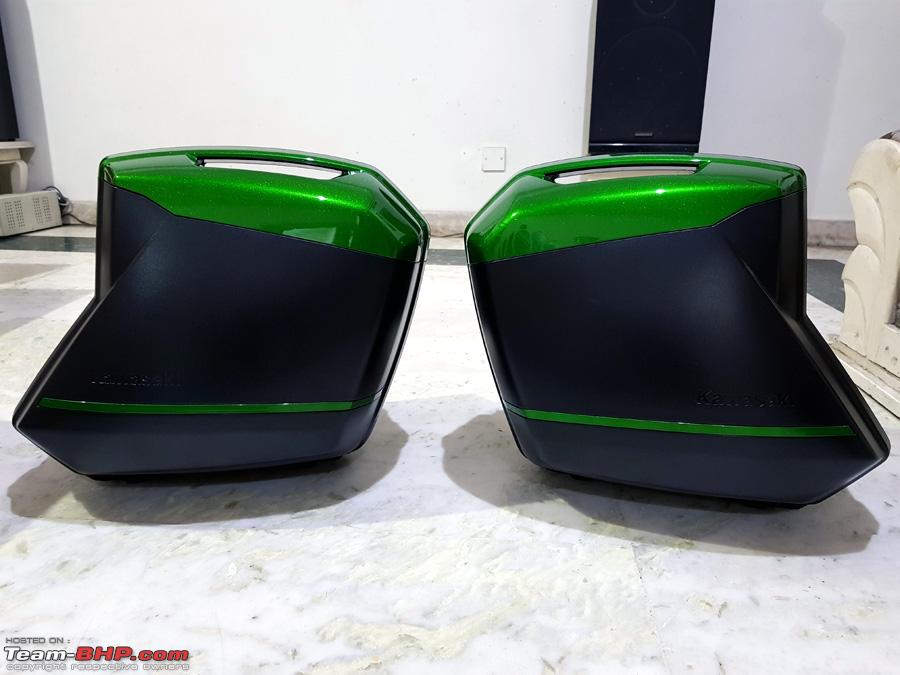 A closer look at the Pannier. Notice the color matched panels exactly as per the shade of my bike i.e. Blazed Emerald Green. Same shade is now seen on the H2SX-SE and these same panniers are fitted on it too. 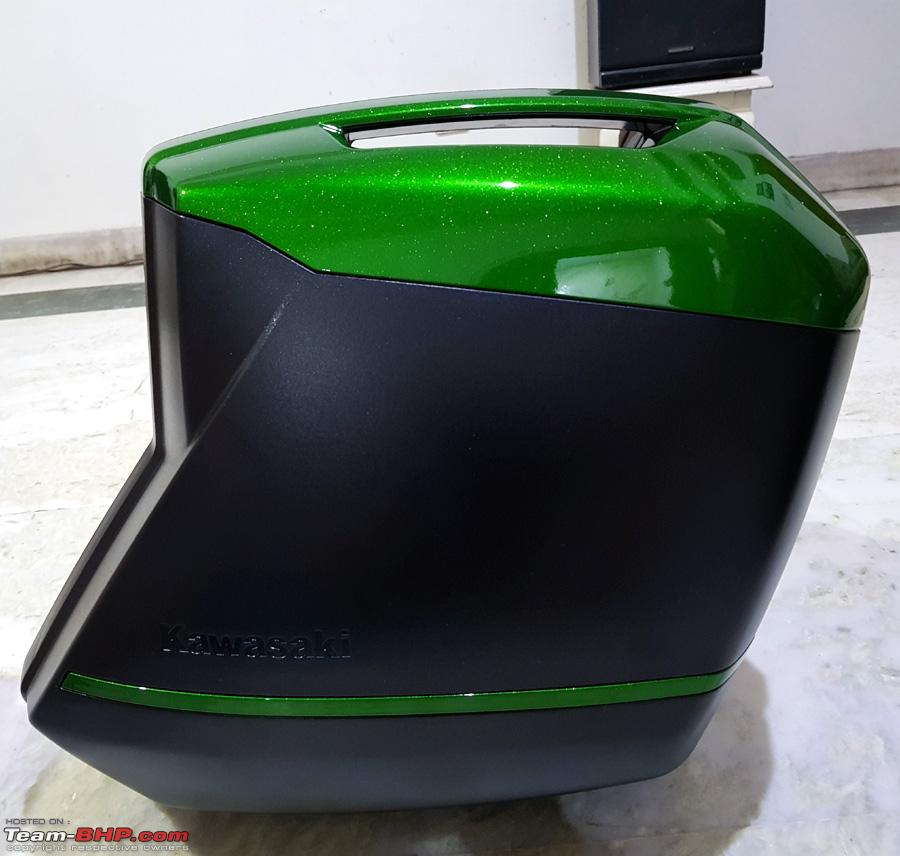 A view from the back, highlighting the locking mechanism 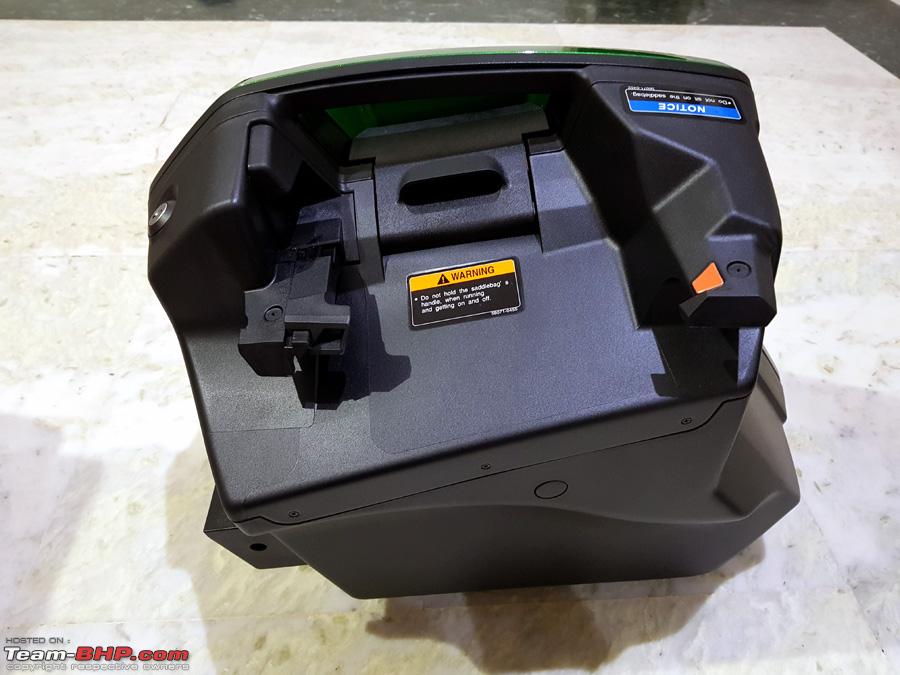 A view from the bottom showing the HEAT SHIELD. Though the panniers on the Versys 650/1000 are also exactly same, those lack this heat shield as the exhausts of the Ninja 1000 are more upwardly inclined and located on both sides. So kindly take care while ordering the specific part number. 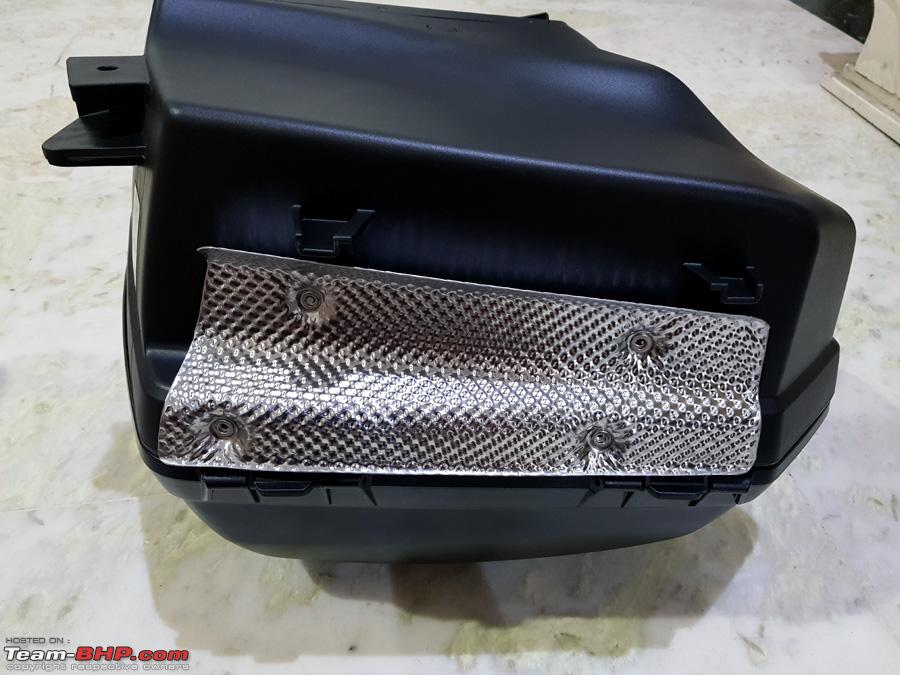 Side view. Notice the Kawasaki embossing and the deco strip also matched in exact shade. 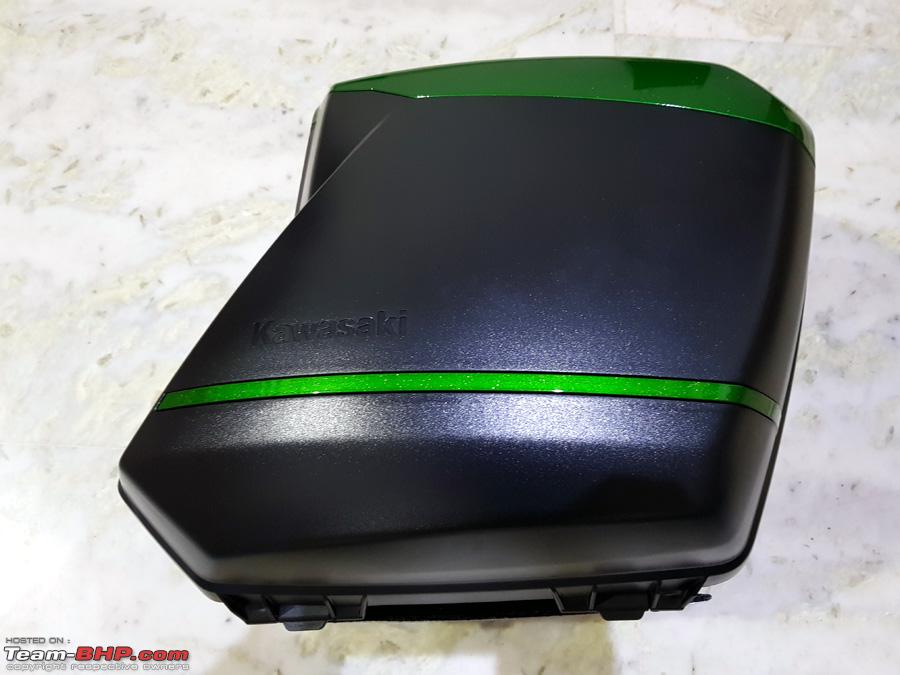 The Single Key system uses your original keys. No need for a separate key for the panniers. The key here is shown in the locked position. 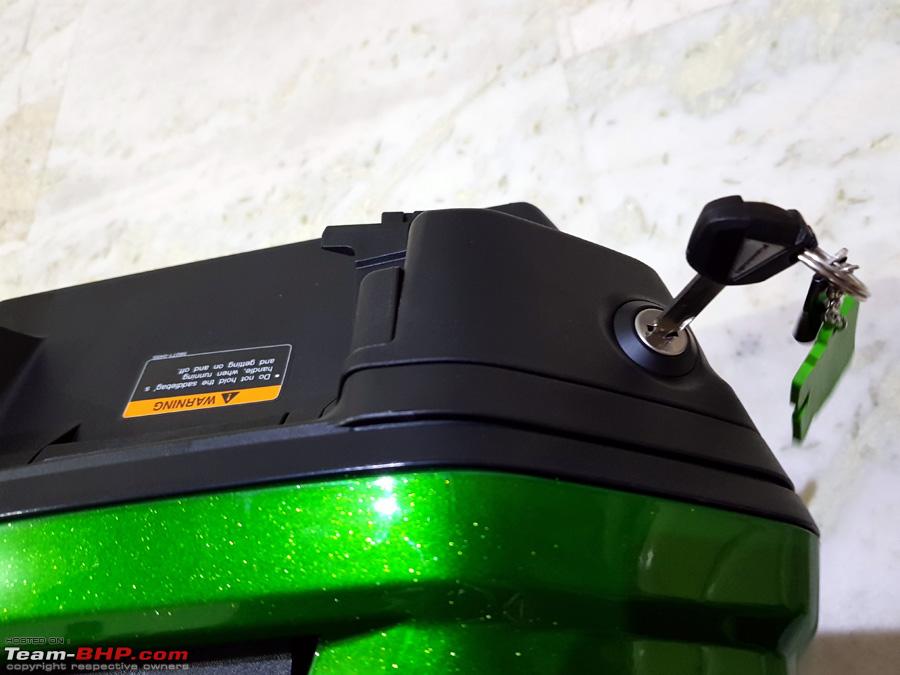 The key in unlocked position, which also facilitates the pannier attachment system to be unlocked (red mark) and pulled up 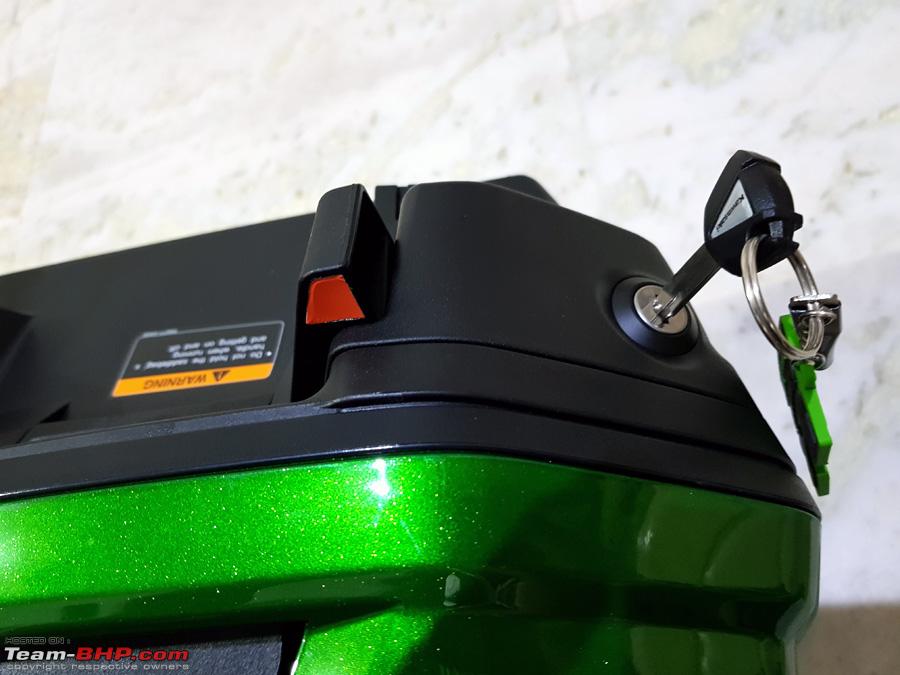 The Pannier opened up to reveal it's 28 L capacity (each) along with elastic straps to hold on to your luggage. 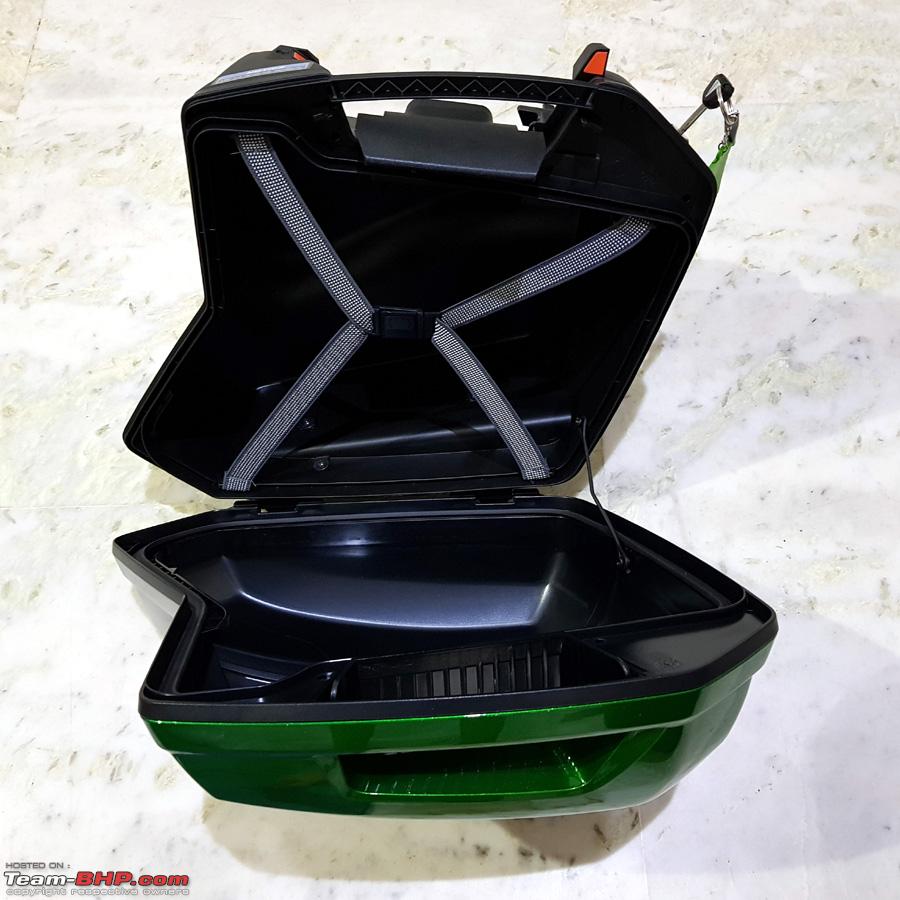 The Panniers also come with a optional set of inner bags which can be purchased separately at ... wait for it ... 14k bucks!! So I decided to get them locally fabricated instead. Here's how those look.  The Panniers can hold a normal Full Face Helmet, though oversized one's could create a issue. 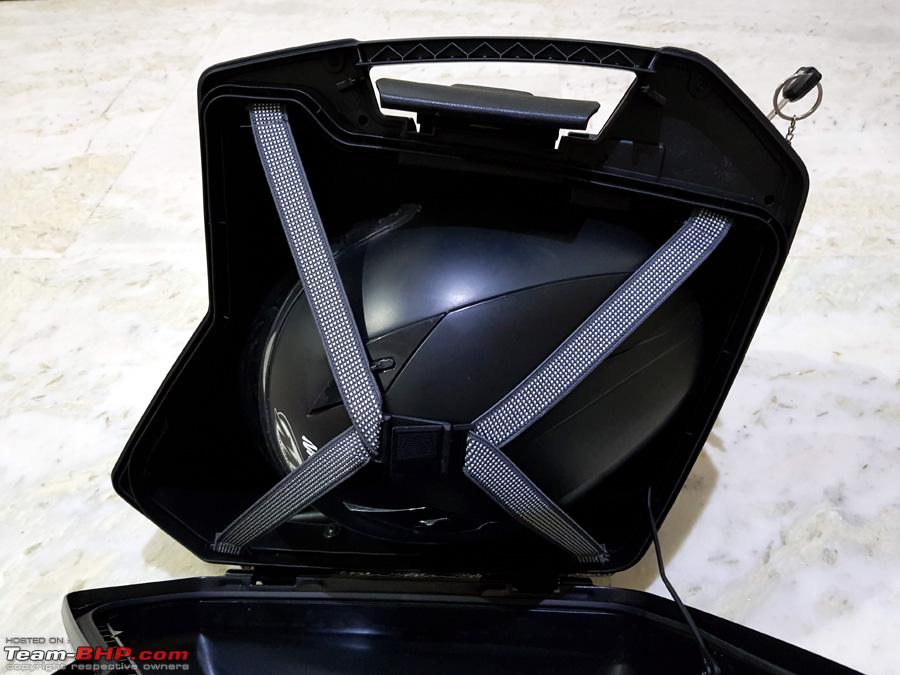 Statutory Warnings about load capacity and speed ratings. But these are just those - statutory. As you will read on this and many such other forums - http://www.riderforums.com/4th-gen-z...addlebags.html , this is just a liability issue of the company. Riders on the aforementioned forum have exceeded 200+ speeds in the US along with the Panniers without any issue.  Clearly marked Made in Italy by GIVI on the inside 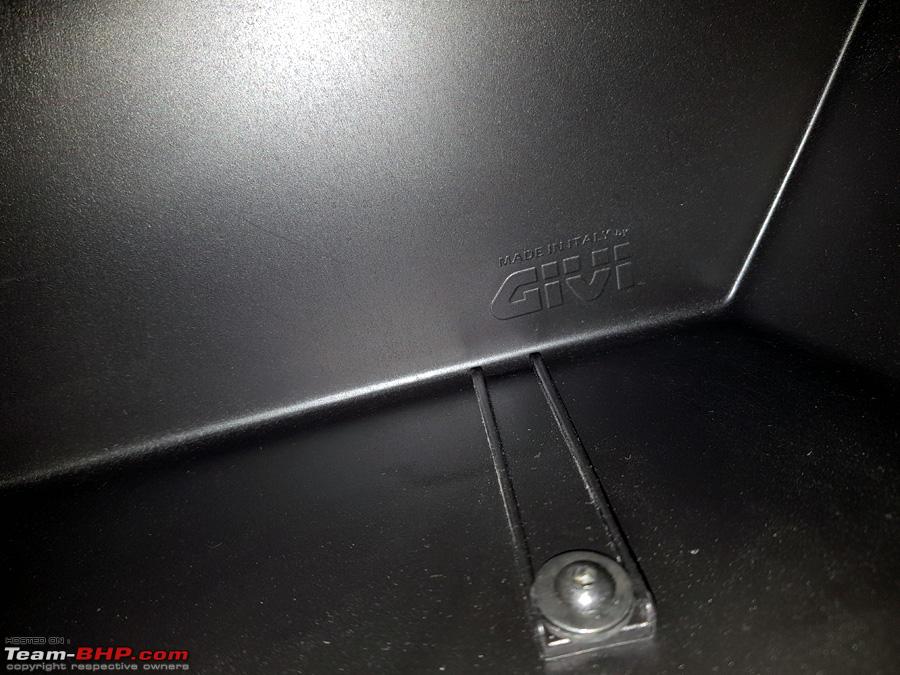 Nicely sealed by interlocking rubber gasket to make them 100% waterproof 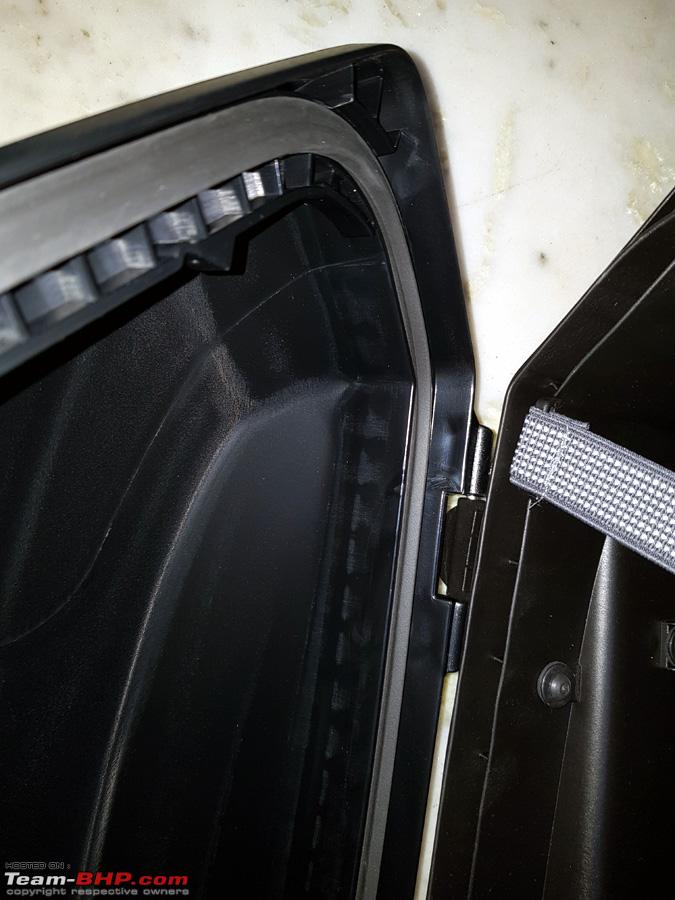 A closer look on the paint quality on the matched colour panels  A closer look at the 'KAWASAKI' embossing and the color matched deco strip. The US variants also come with a round reflector on the side which the UK/EU spec don't and these are the one's we get. 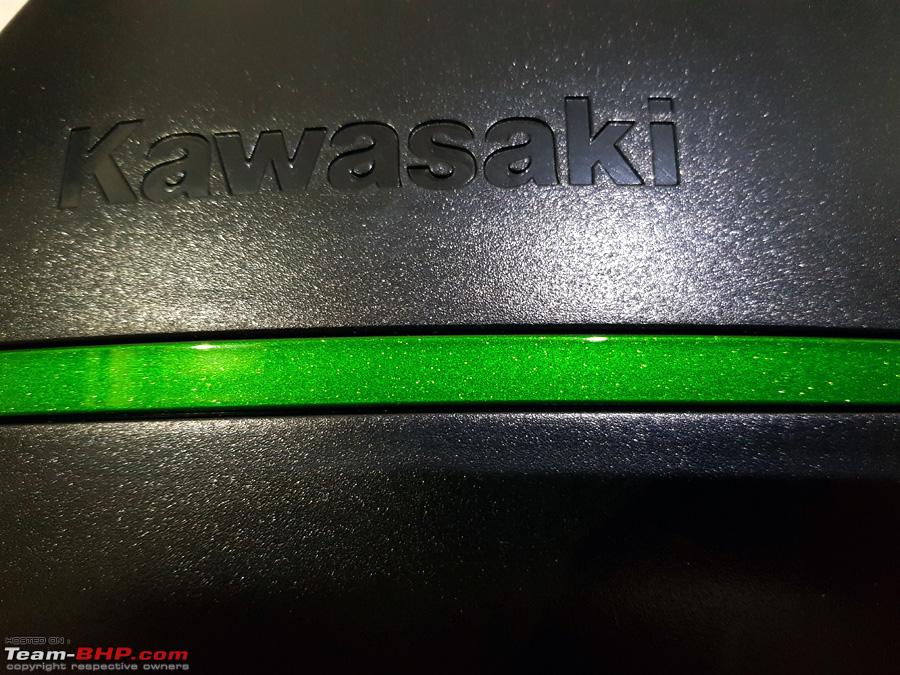 Imported from the Netherlands by Kawasaki India 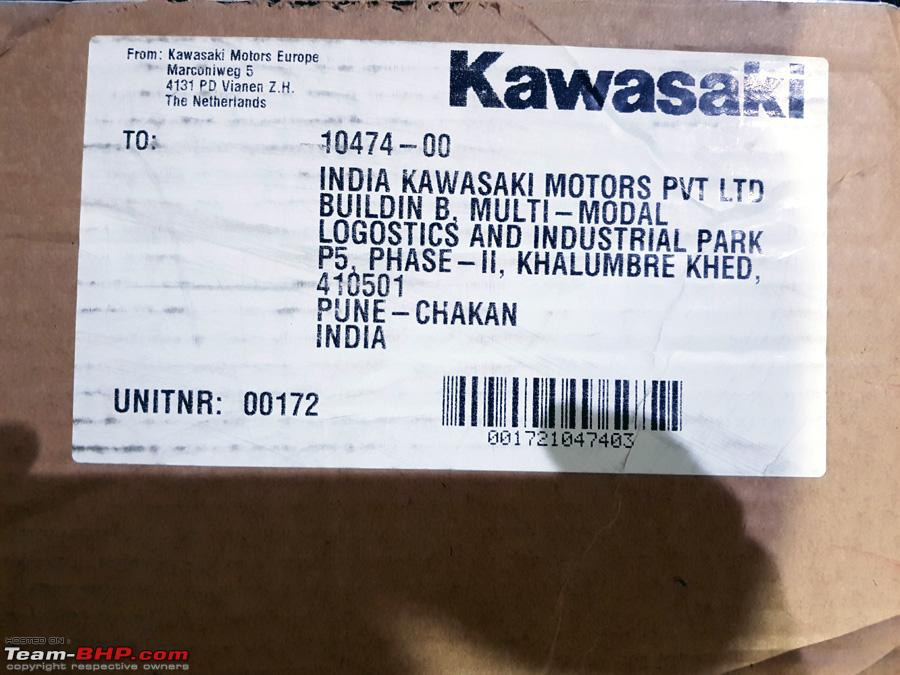 View from the top  Now the Fitting of the Panniers requires this Fitting Kit. A set of 2 Rubber Pads and 4 rubberised stickers which go into the relevant slots. NONE of the parts are interchangeable and one needs to be careful while attaching the same.  Clear instructions as to how to attach these parts on the bike 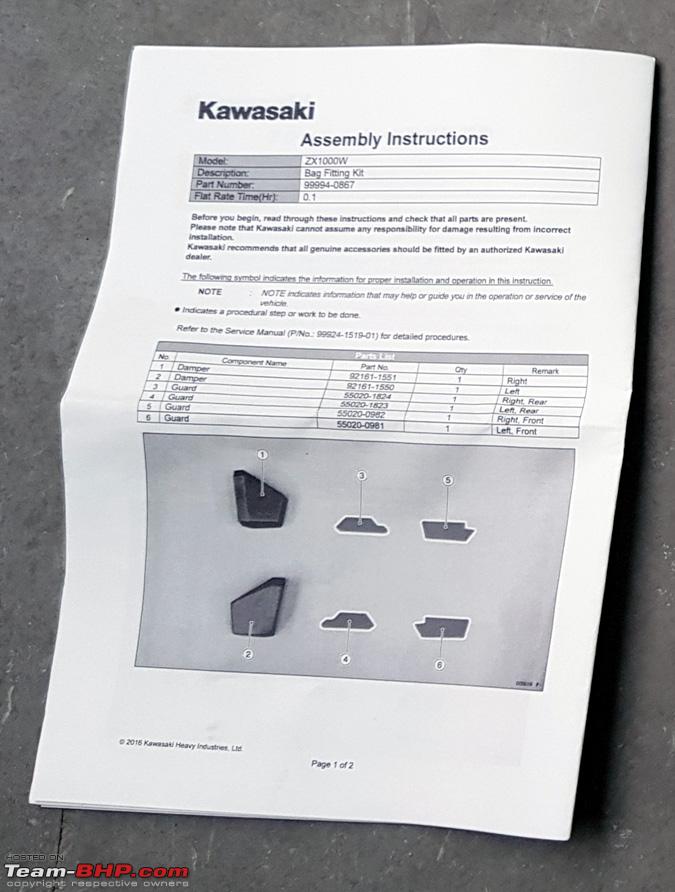 Starting with the Right Back Sticker Slot on the grab handles. Shown here is the slot without any sticker in them. Needs to be nicely cleaned with ipa for proper adhesion. 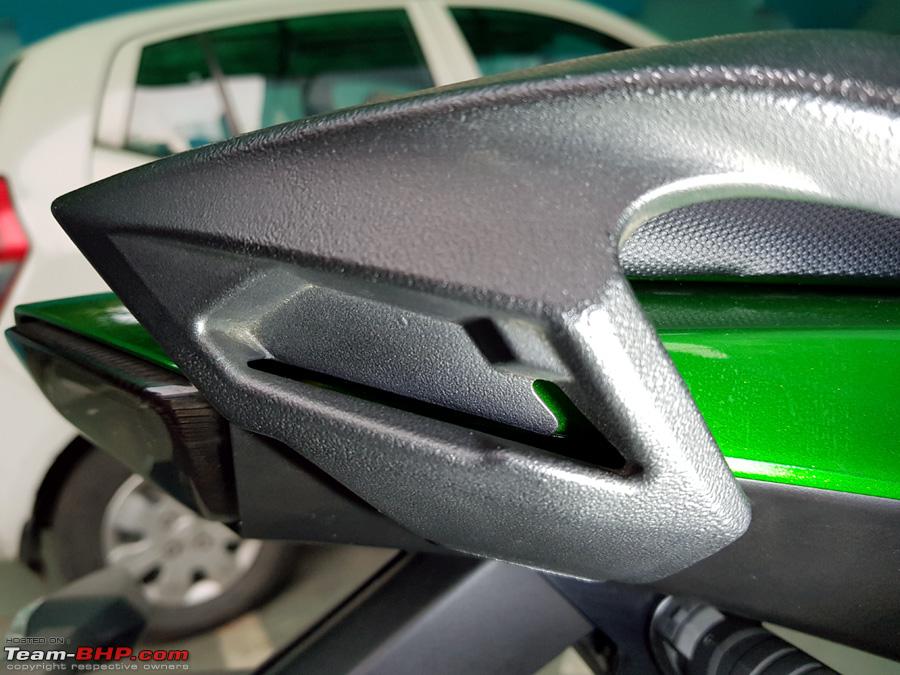 And now with the sticker attached. Hope you can spot the sticker attached. 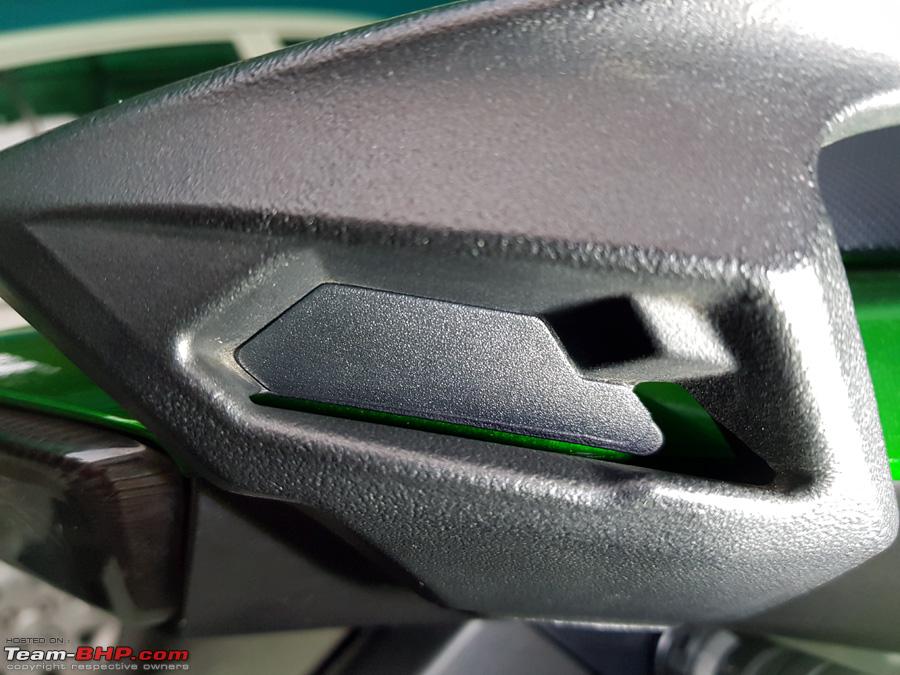 Next the Right front slot without any sticker, nicely cleaned  and now with the sticker attached precisely 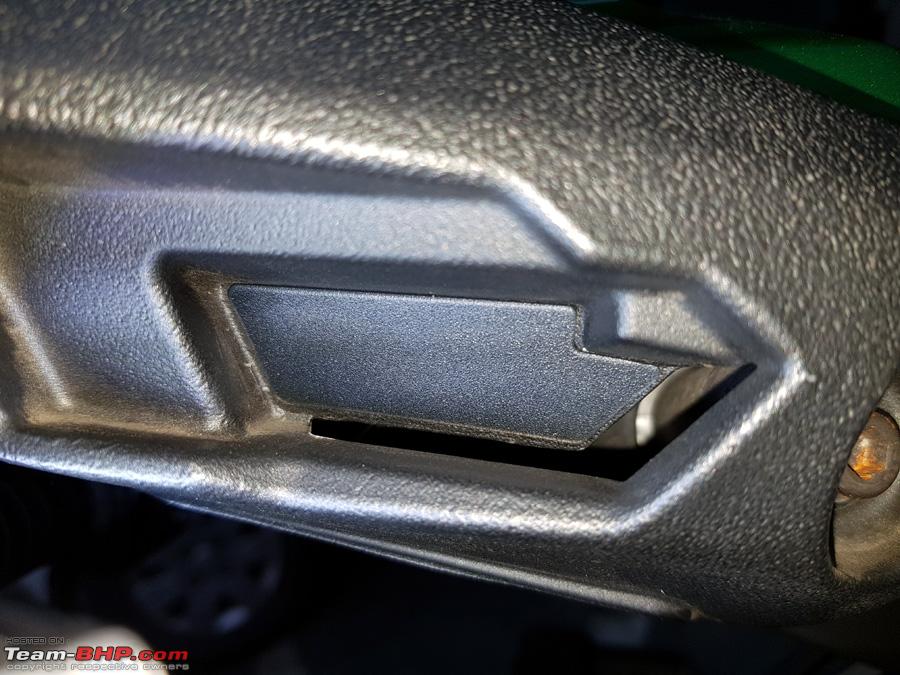 The Right side rubber Pad attached. Once pulled fully it has grooves on the inside which locks it into place and will not detach without brute force. 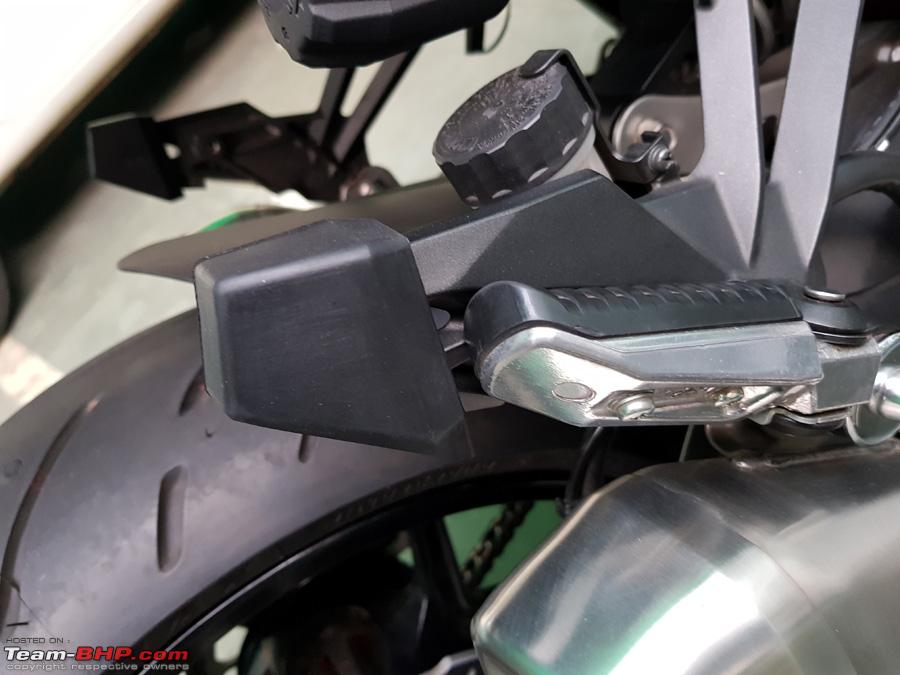 The same procedure is continued on the left side of the bike. Next the Left side rubber Pad attached and locked into place.  Left rear slot on the grab rails with sticker attached  and finally left front slot with sticker attached 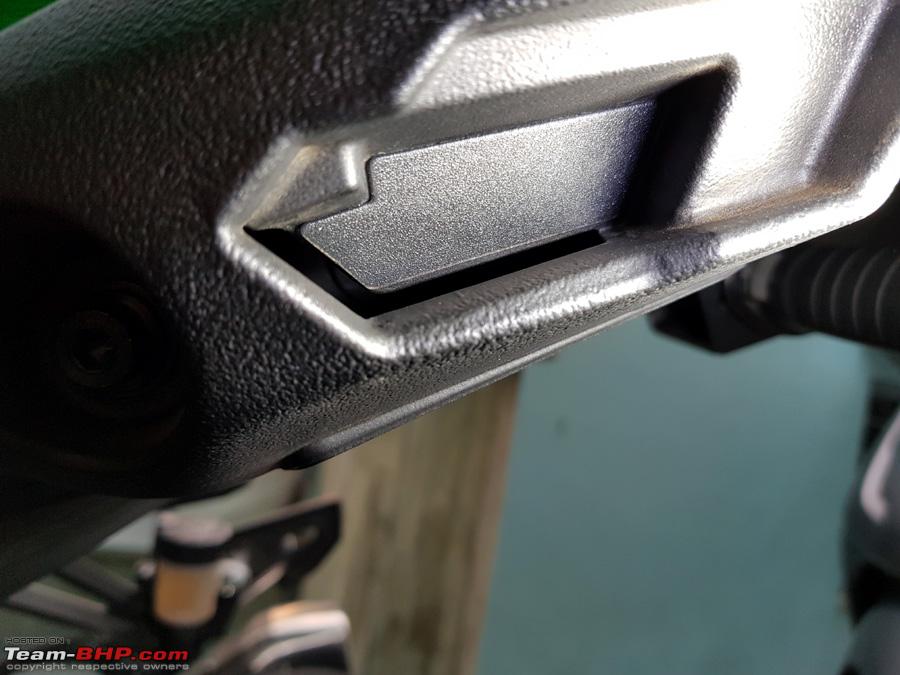 This is how you take the Panniers off the bike. Attach them in the reverse order. Made this short amateur video, please bear with it - And finally the installation is complete 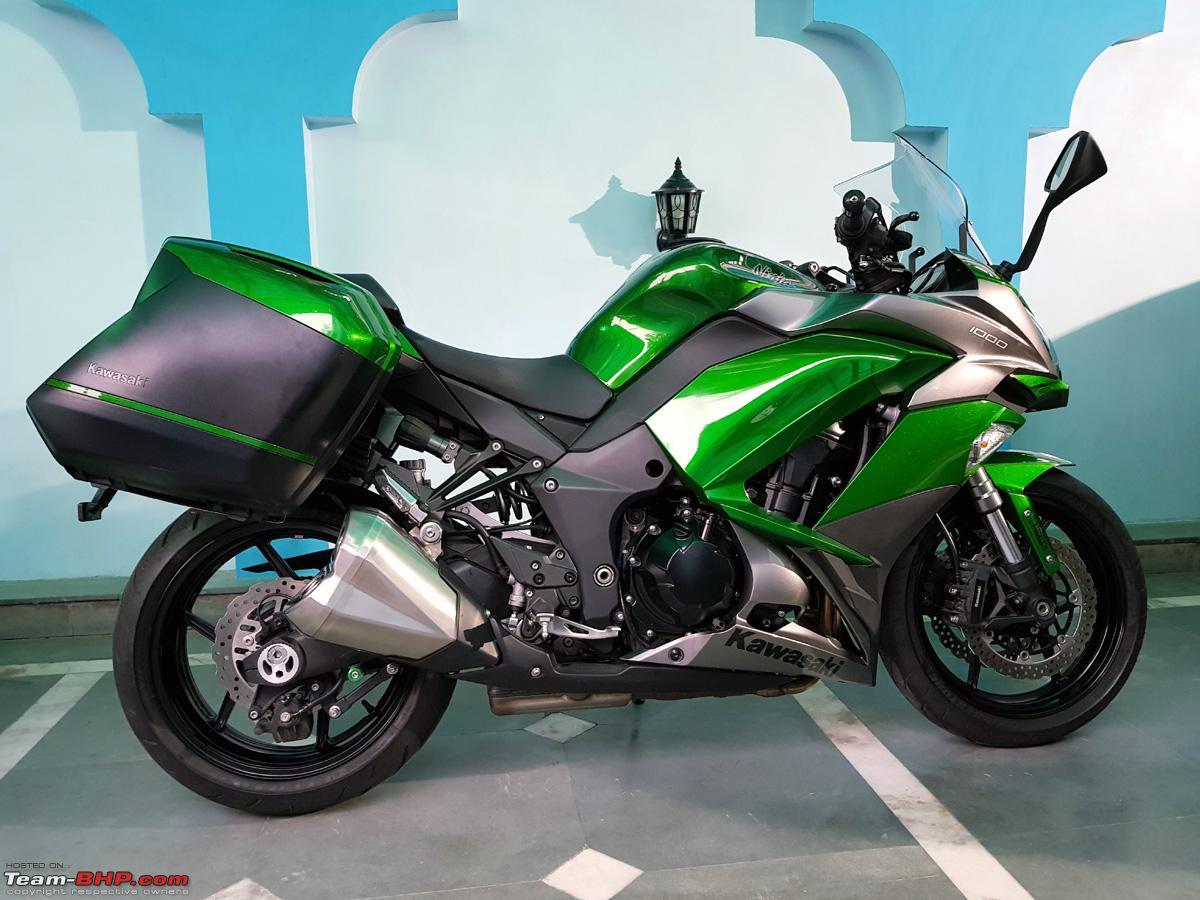 More photos with Panniers on, to follow shortly. I did a short test ride with them on, at 100+ speeds with zero issues. Fantastic piece of engineering. Cheers... Last edited by dkaile : 7th June 2018 at 13:28. |
|
| (18)
Thanks
|
| The following 18 BHPians Thank dkaile for this useful post: | anandpadhye, audioholic, Cyborg, hiren.mistry, MadRasTan4986, nikhn, Nilesh5417, PM - B, Red Liner, Shome, Shubhendra, sukiwa, The Great, unk9ja, v12, vaasu, Vasuki, vishy76 |
|