Team-BHP > Motorbikes > Superbikes & Imports
Register New Topics New Posts Top Thanked Team-BHP FAQ


Reply
  Search this Thread
152,996 views
Old 21st November 2010, 07:13   #196
BHPian
 
luky_13's Avatar
 
Join Date: Nov 2008
Location: Bangalore
Posts: 580
Thanked: 156 Times

Quote:
Originally Posted by navpreet318 View Post
Now that is AWESOME! you finally managed to pull it off! the mock up looks amazing.Hats off to you buddy.Only detail now i would like to know actually is that how much did you spend on this monetarily and how much time wise.

Respect man! Deep Respect!
Quote:
Originally Posted by BIG SARAN View Post
Man o man. Thats a thing of beauty. All the 'blood, sweat and tears' is finally seeing fruition. Can't wait to see the complete 'babe' ON THE ROAD roaring off.........

We want pics, vids and detailed ride report and ownership experience. Don't you keep us waiting.

Mark my words - this thread is gonna be legendary.

I am very happy to see your passion and hard work triumph. In a way you do inspire me a lot. On that note LIVE TO RIDE.
Thank you all.

Quote:
Originally Posted by Latheesh View Post
Wow, amazing work there. What's the diameter of handle bar? It looks bit small (I may be wrong).

Hope to see the end result very soon, we admire your dedication and hard work.
The diameter of the bars is stock.

Quote:
Originally Posted by prashanth_benz View Post
Your technical knowledge astounds me!! Well done on a great build..! Just one question. Would you be able to register this as a project or a one off? Does Indian regulations have a provision for something like that?

Again kudos on a fantastic build!
Cheers
The registration is a project in itself, we will see about that later.

Quote:
Originally Posted by aargee View Post
Something just fluttered in my chest when I saw the motorcycle assembled. But till now you never told me anything on the most important part that I kept asking you about, hope you'll share some info.

BTW, did you fire up the engine?
Will dive into the primary and clutch arrangement shortly, believe me you will not be disappointed. This is just a mock setup, electricals are tricky need to sort out a few issues before actually firing it up.

Quote:
Originally Posted by Jeep View Post
Not sure how I missed this thread for so long.
Your passion and dedication are highly appreciated. All the best!
I bet you would do anything to get it registered once it is done. You too know that!
Thanks.
luky_13 is offline   (1) Thanks
Old 21st November 2010, 14:27   #197
BHPian
 
luky_13's Avatar
 
Join Date: Nov 2008
Location: Bangalore
Posts: 580
Thanked: 156 Times
To do list

After admiring and lusting at the bike for a day, time to move on. Despite a successful mock up, critical things that still need attention and work:
  • Electric starter - The starter has been with me for more than 2 years, tried to jump start last week but no luck. Didn't budge. Have to teardown and check. First on my priority list.
  • Ignition control module - This one hit me hard ! Stock harley ICM's IF CHANGED need to go back to the dealership for re-programming (and they yap about democracy and freedom in America), I need to break my head trying to figure out on how to get around this one. For breaking into the ICM firmware I will have to crimp a interface cable, USB to 4 pin Deutsch connector, connect using a PC and some fancy software. There are after market ignition control options available that do the job, but I want to try my hands on this one before making a switch to others like Dynatek or Daytona Twin-Tec.
  • Wiring harness - Quite complex for starters like me, will need to devote a lot of hours deciphering the wiring diagrams. I almost flunked basic electronics is first year engineering and it comes back to haunt me after so many years. Nervous.
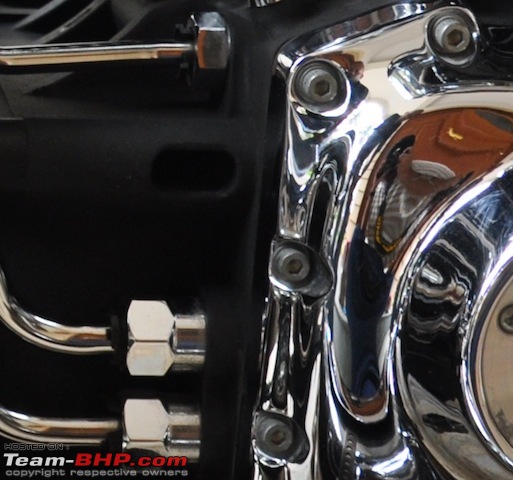
  • Oil lines - This one's giving me sleepless nights, originally softail engines come with larger dia fittings for oil lines. I'm using a touring motor which accepts smaller dia fittings. Tried to make adapters but they wont fit as it changed the distance between the oil holes, pipes being rigid won't fit. Thinking of going with flexible braided steel pipes from Russell Performance Plumbing - An Edelbrock Company. It will change the looks from this...
    Dreamweaver build-off: HD Fatboy-dsc_0135.jpg to this... Name:  Screen shot 20101121 at 2.05.08 PM.png
Views: 3043
Size:  278.5 KB
    Contemplating, not decided yet. Suggestions are welcome.
  • Ground clearance - Bangalore being the speed-breaker capital of India, this harley will need to cope with tomb-stone type speed breakers. Stock ground clearance is 130mm, target - 170mm. To save the engine from scraping. Fortunately the shocks have an adjustment mechanism + during design we shifted the mounting bracket by 15mm. The GC stands at 158mm as of now, another 12mm to go.
  • Primary drive - I believe I have everything in place for the primary drive/clutch, having mocked up this setup almost half a dozen times earlier. But, the only thing consistent with this build (or rather any other) has been surprise. So I'm expecting a few. The last on this list, the bike won't fire up without this.
luky_13 is offline   (1) Thanks
Old 21st November 2010, 22:28   #198
Senior - BHPian
 
Scorcher's Avatar
 
Join Date: Apr 2009
Location: Trivandrum, KL
Posts: 4,918
Thanked: 7,124 Times

Been following this thread for quite a while now. Just didn't find it necessary to comment simply cos all the questions in my mind have been asked by someone or the other. Trust me on this, I've slept some days reading this fairytale in my mobile.

Now that I see your dream about to fulfill, I was hardly left with an option but to stop by and pat your back for all the effort you've put in, for all the sleepless nights and all the spirit that has gone into this epic build.

Congrats brother. May God Bless You and all those who have become a part of this build.

As HD is now officially made an appearance in India, wont it be worth it to notify them of such a feat from a hardcore fan.

At the end of the day, you truly deserve this -

This happens to the the FIRST ever thread on Team-BHP that I rate 5 stars!

Last edited by Scorcher : 21st November 2010 at 22:30.
Scorcher is offline  
Old 23rd November 2010, 13:41   #199
BHPian
 
luky_13's Avatar
 
Join Date: Nov 2008
Location: Bangalore
Posts: 580
Thanked: 156 Times

Quote:
Originally Posted by Scorcher View Post
Been following this thread for quite a while now. Just didn't find it necessary to comment simply cos all the questions in my mind have been asked by someone or the other. Trust me on this, I've slept some days reading this fairytale in my mobile.

Now that I see your dream about to fulfill, I was hardly left with an option but to stop by and pat your back for all the effort you've put in, for all the sleepless nights and all the spirit that has gone into this epic build.

Congrats brother. May God Bless You and all those who have become a part of this build.

As HD is now officially made an appearance in India, wont it be worth it to notify them of such a feat from a hardcore fan.

At the end of the day, you truly deserve this -

This happens to the the FIRST ever thread on Team-BHP that I rate 5 stars!
Thank you for the appreciation, I'm honoured. Thankfully, there is this platform called Team-BHP where all this knowledge can be shared and is open source to anyone else who wants to do something similar, without making all the mistakes that I made.
luky_13 is offline   (1) Thanks
Old 23rd November 2010, 14:36   #200
Senior - BHPian
 
download2live's Avatar
 
Join Date: Feb 2010
Location: -
Posts: 1,147
Thanked: 1,144 Times

Oh My God!!!
You managed to pull it off.

A big round of applause to you guys.
Keep the up the good work.
And please finish it fast. I cant wait to see it on roads.

Regards.
Deep Regards.
download2live is offline  
Old 23rd November 2010, 15:06   #201
BHPian
 
luky_13's Avatar
 
Join Date: Nov 2008
Location: Bangalore
Posts: 580
Thanked: 156 Times
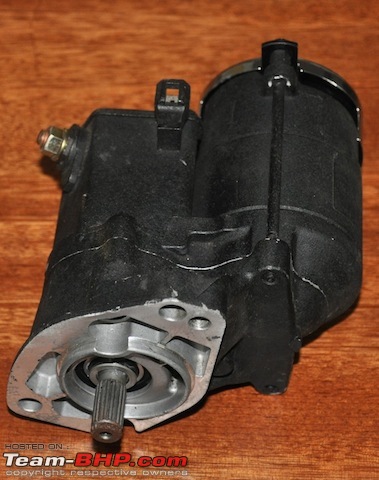
Electric Starter

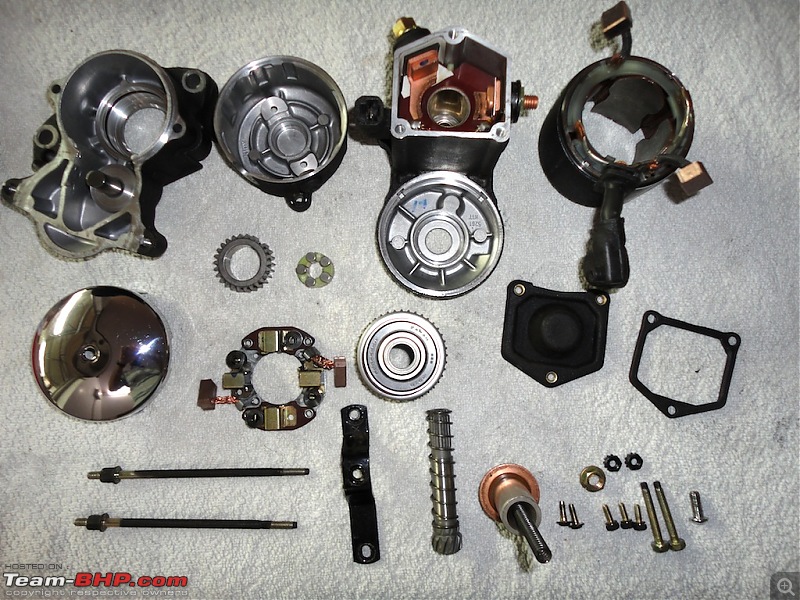
Electric Starter: Troubleshooting, Teardown & Inspection

Dreamweaver build-off: HD Fatboy-0.jpg Dreamweaver build-off: HD Fatboy-1.jpg

As mentioned earlier this stubborn starter wouldn't start, had to figure out why. The HD service manual suggests multiple ways of checking the starter components but only a few of them can be used with the starter in an assembled state. Flagged off with the Current draw test, we found the results to be normal. No money in the pocket for a new starter, no choice. Took about 20 minutes to disassemble the complete thing.

Dreamweaver build-off: HD Fatboy-2.jpg

ARMATURE
1. Shorted Armature Test using a Growler - prior to this, I was clueless about Growlers!! Refer http://en.wikipedia.org/wiki/Growler_(electrical_device) for more info. Checked with a friend who deals in power tools, fortunately he had a Growler. Armature placed on the growler and a thin steel strip held against its core, armature slowly turned. If short would cause the steel strip to vibrate and attract towards the core. It didn't. TEST PASS.

2. Grounded Armature Test - Multimeter used. Touch one probe to any commutator segment, the other one to the armature core. There should be no continuity. There wasn't. TEST PASS.

3. Open Armature Test - Multimeter used. Checked for continuity between all commutator segments, there should be continuity at all points. There was. TEST PASS.

FIELD COIL
4. Grounded Field Test - Multimeter used. Touched one probe to the frame and the other one to each of the brushes attached to the field coil. There shouldn't be any continuity. There wasn't. TEST PASS.

5. Open Field Test - Multimeter used. Touched one probe to the field wire, the other one to each of the brushes attached to the field coil. There should be continuity. There was. TEST PASS.

BRUSH HOLDER
6. Brush Holder Insulation Test - Multimeter used. Touched one probe to holder plate, the other one to each of the positive brush holders. There should be no continuity. There wasn't. TEST PASS.
Dreamweaver build-off: HD Fatboy-6.jpg

SOLENOID PLUNGER
The solenoid was tested against the Pull-In, Hold-In and Return test just before disassy. All turned out POSITIVE.
Dreamweaver build-off: HD Fatboy-4.jpg

THE CULPRIT
After lot of frustration and head-banging I decided to slowly and carefully go over all the parts once more and then... Gotcha ! Eventually boiled down to a broken tooth on the Idler gear. The broken piece was obstructing the movement of the gear in the cramped space. Cleaned all parts, oiled, greased, re-assembled and jump started with nervous hands and voilą, Whirr! Started without any fuss this time. Mission accomplished.
Dreamweaver build-off: HD Fatboy-3.jpg
luky_13 is offline   (1) Thanks
Old 23rd November 2010, 15:21   #202
Senior - BHPian
 
aargee's Avatar
 
Join Date: Jan 2010
Location: TSTN
Posts: 6,236
Thanked: 9,641 Times

I was waiting patiently & going through this thread, but the broken gear provoked me to ask, how? How did it break in first place at all? I simply find it hard to believe that you'd a manufacturing defect & it should be something else? Did you find out?

PS - I'm going through your oil lines & understanding them.
aargee is offline  
Old 23rd November 2010, 15:29   #203
BHPian
 
luky_13's Avatar
 
Join Date: Nov 2008
Location: Bangalore
Posts: 580
Thanked: 156 Times

Quote:
Originally Posted by aargee View Post
I was waiting patiently & going through this thread, but the broken gear provoked me to ask, how? How did it break in first place at all? I simply find it hard to believe that you'd a manufacturing defect & it should be something else? Did you find out?
This was a used one bought off eBay, had about 7000 miles on it. Probably sold because it was defunct. When I bought these I was clueless on how to check for defects.
luky_13 is offline   (1) Thanks
Old 23rd November 2010, 15:49   #204
BHPian
 
luky_13's Avatar
 
Join Date: Nov 2008
Location: Bangalore
Posts: 580
Thanked: 156 Times

Quote:
Originally Posted by aargee View Post
PS - I'm going through your oil lines & understanding them.
To help you understand better. These are the Oil line adapter i was referring to

Dreamweaver build-off: HD Fatboy-e0.jpg.

This is a stock adapter and next to it is the kind of adapter that is required.

Dreamweaver build-off: HD Fatboy-e1.jpg

and this is how the Stock adapter fits into the ones that we machine.

Dreamweaver build-off: HD Fatboy-e2.jpg

This creates an offset or more simply put it increases the overall length of the oil fitting. The oil lines are stiff and cannot cope with this change in length, would entail bending the lines again. If we do, we might end up destroying the chrome and the line itself. We need to come out with another solution !
Attached Thumbnails
Dreamweaver build-off: HD Fatboy-expl.jpg  

luky_13 is offline   (1) Thanks
Old 23rd November 2010, 16:06   #205
BHPian
 
konjaril's Avatar
 
Join Date: Oct 2009
Location: Pune
Posts: 282
Thanked: 63 Times

Quote:
Originally Posted by luky_13 View Post
To help you understand better. These are the Oil line adapter i was referring to

Attachment 458181.

This is a stock adapter and next to it is the kind of adapter that is required.

Attachment 458207

and this is how the Stock adapter fits into the ones that we machine.

Attachment 458208

This creates an offset or more simply put it increases the overall length of the oil fitting. The oil lines are stiff and cannot cope with this change in length, would entail bending the lines again. If we do, we might end up destroying the chrome and the line itself. We need to come out with another solution !
What about making new lines in brass and get them chromed?? just a quick thought..
konjaril is offline  
Old 23rd November 2010, 16:18   #206
BHPian
 
luky_13's Avatar
 
Join Date: Nov 2008
Location: Bangalore
Posts: 580
Thanked: 156 Times

Quote:
Originally Posted by konjaril View Post
What about making new lines in brass and get them chromed?? just a quick thought..
We are trying to redesign the oil fittings, this is what we came up with, next they need polishing and off they go for chrome.

Dreamweaver build-off: HD Fatboy-e11.jpg
luky_13 is offline   (1) Thanks
Old 23rd November 2010, 16:54   #207
Senior - BHPian
 
Latheesh's Avatar
 
Join Date: Dec 2007
Location: CNN/BLR
Posts: 4,243
Thanked: 10,090 Times

Putting adapters will lead to additional stress on oil lines. Is it braided tubing/solid tube?

Are you going to do something like 3rd pic in your previous post - Means exposed O-ring between adapters?
Latheesh is offline  
Old 23rd November 2010, 19:06   #208
BHPian
 
Join Date: Nov 2008
Location: Chennai
Posts: 51
Thanked: 18 Times

Luky_13:

I've just spent the last hour going through every post in this thread. I'm simply awestruck. I can imagine how many months of your time must've gone into researching for this project. Reading through your experience of building the machine over the last few months, I can see how much tougher it must've been when you were doing the research for this project.

In my experience, building something is a team effort and your mates are always around to keep pushing you, but research, is mostly done in front of a computer, a lonely lonely place to be. Social life takes a backseat, food and sleep rarely get the time they deserve, and though you do find helpful members on the various forums, most of the time, like you said, they're nothing more than forums-with-attitude. Can't blame them though can we? We've still got a long way to go as a biking nation.

Here's wishing you luck so you may ride around town on your custom, one in a kind, HD. The preview of the bike with the wheels and the tank mounted.. awesome!

I'd also appreciate some pointers for others aspiring to build their custom motorcycle frames. You must have access to a wealth of reading material by now. Can you name some specific to jig designing?
theslayer is offline  
Old 23rd November 2010, 19:09   #209
BHPian
 
luky_13's Avatar
 
Join Date: Nov 2008
Location: Bangalore
Posts: 580
Thanked: 156 Times

Quote:
Originally Posted by Latheesh View Post
Putting adapters will lead to additional stress on oil lines. Is it braided tubing/solid tube?

Are you going to do something like 3rd pic in your previous post - Means exposed O-ring between adapters?
These are solid tubes. Currently we are experimenting with both solid tubes and braided oil lines, the brass oil fittings in my previous post are for braided lines.
luky_13 is offline  
Old 26th November 2010, 12:09   #210
BHPian
 
luky_13's Avatar
 
Join Date: Nov 2008
Location: Bangalore
Posts: 580
Thanked: 156 Times

We were still trying to find a solution to the oil line problem... when plans for a final attempt to tackle the primary and clutch ghost started brewing. We found it convenient to split the task into 2 parts, Divide and Rule -

1. Transmission sprocket install
2. Primary drive install

Transmission sprocket tooling
The process of installing the sprocket on the tranny drive shaft involves installation of a sprocket nut, torquing it to spec (81 nm) and then installation of the bearing inner race. This process requires the use of 3 specialized tools

a) Locknut wrench, $155 - due to the length of the tranny drive shaft, standard spanners and tools cannot be used.
b) Sprocket locking tool, $130 - this is required to arrest the sprocket while torquing
d) Bearing race installer, $170
--------------------------------------------------------------
Total, $ 455 + $ 185 (shipping) + $ 190 (customs duty)
Finally = Rs. 38,180.00 ... can't afford
--------------------------------------------------------------

In-house production was started on a lazy Friday with the Locknut wrench. Material bought - MS rod, the blank was machined on lathe. Because of the hex pattern on the wrench we had to get it sparked on an EDM (Electrical Discharge Machining). To do that we had to make tool-electrodes, one for the Locknut in the front and the other a slot for the torque wrench.
Dreamweaver build-off: HD Fatboy-electrodes.jpg

Made them out of copper. By Tuesday all the machining was over and both the electrodes and machined rod were given out. Wednesday afternoon the tool was given for galvanizing and by evening we had this.

Name:  LockWrench1.jpg
Views: 2426
Size:  47.3 KB Dreamweaver build-off: HD Fatboy-lockwrench2.jpg
Time taken 3 days, cost Rs. 2200 (material + labour).

Moving on, Sprocket locking tool. The design was done on a Aluminum bar with a marker, we had to machine and hand polish teeth onto it which went and locked into the sprocket. This was accomplished on our milling. Next component of the locking tool, the gripper was also machined and the tool assembled. A mock up on the sprocket, perfect fit.

Dreamweaver build-off: HD Fatboy-locker1.jpg
Dreamweaver build-off: HD Fatboy-locker2.jpg
Dreamweaver build-off: HD Fatboy-locker3.jpg
Time taken 1 day, cost Rs. 1500 (material + labour)

Finally, the bearing race installer. We had some cues from the user manual
Name:  BRI0.png
Views: 2411
Size:  201.8 KB

Machined, threaded and blackened all in 1 day.

Dreamweaver build-off: HD Fatboy-bri1.jpg
Time taken 1 day, cost Rs. 1350 (material + labour). Total spent on all tools Rs. 5050, savings Rs. 33,130 (85%).
luky_13 is offline   (1) Thanks
Reply

Most Viewed


Copyright ©2000 - 2024, Team-BHP.com
Proudly powered by E2E Networks