Team-BHP > Technical Stuff
Register New Topics New Posts Top Thanked Team-BHP FAQ


Reply
  Search this Thread
81,807 views
Old 13th December 2013, 22:44   #16
GTO
Team-BHP Support
 
GTO's Avatar
 
Join Date: Feb 2004
Location: Bombay
Posts: 70,512
Thanked: 300,689 Times
Re: Let the Restoration Begin - Mercedes W124

Thread moved from the Assembly Line to the Technical Section. Thanks for sharing!
GTO is offline  
Old 14th December 2013, 14:17   #17
BHPian
 
DeepakMenon's Avatar
 
Join Date: Nov 2008
Location: Mumbai
Posts: 278
Thanked: 180 Times
Re: Let the Restoration Begin - Mercedes W124

Left Hand Side C-Pillar


Well my car always sported a bit of bubble rust and pitting under the Deflector on the Roof Just around the C-Pillar. This used to always baffle me as this is not a place that is rust prone. You cannot see the pitting unless you lift the water deflector on the roof. And knowing me in my two years I had lifted it many times on sunday afternoon when I had nothing to do


Rust and Pitting in the Channel of Water Deflector on Roof
Let the Restoration Begin - Mercedes W124-img20130518wa0000.jpg


Obviously this meant that we started removing the paint around this area, and we found the worst repair I have ever seen in my Life.

It seems that the C-Pillar has seen a dent, and some nasty inexperienced welder welded a piece of metal and applied a ton of body filler.

The thickness of the body filler was close to a Inch..I joke you Not


Body Filler and Bad Weld Job
Let the Restoration Begin - Mercedes W124-img20131205wa0006.jpg


Now for Obvious Reasons my Heart Sank, C-Pillar is a integral to a the structure a damage there??

After a lot of discussion and looking at the Pillar from inside, I realized that C-Pillar is actually intact and in good Nick, the damage is to the outer skin which is not really structural

However we had a choice to make..do we also use body filler or gtry and repair the bad repair done previously, after a some talking and thinking, we decided the only way we can get the repair done properly and get the lines of the car to match is if we change the entire Skin...

The welder seemed confident, and I trusted his confidence, so the entire outer skin was removed


Outer Skin Removed
Let the Restoration Begin - Mercedes W124-img20131209wa0007.jpg


Another View of after the Skin removed
Let the Restoration Begin - Mercedes W124-img20131209wa0009.jpg


There was a bit of surface Rust on the Inside C-Pillar and Piece of metal was welded on top to allow the skin to be tack welded in place, a marker basically


I was tensed, so I left the panel beater to himself as me standing around with my heart in my mouth wont help the cause, Late in the night he send me the following Pictures


Sorry not the best pictures, he does not have a Android :(


Inside C-Pillar POR-15 Coated

Let the Restoration Begin - Mercedes W124-img20131209wa0014.jpg


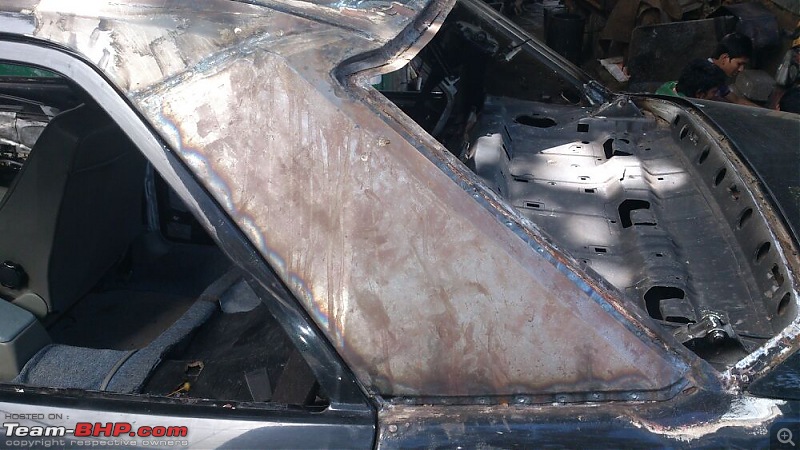
New Skin, Test Fitted
Let the Restoration Begin - Mercedes W124-img20131209wa0016.jpg


By Next day, The the new C-Pillar skin was fitted properly after coating the inside of the new skin also with POR-15, we did not the coat the outside as it will be better to epoxy primer and paint rather than working with POR-15 which is a pain to level and get the right cosmetic results


I am personally quite pleased with the New Skin, and the line, I never had such sharp lines of on this pillar and now both sides look perfect. A little bit of body filler will be used to get perfection


New Skin
Let the Restoration Begin - Mercedes W124-img20131212wa0017.jpg


Another Angle
Let the Restoration Begin - Mercedes W124-img20131212wa0020.jpg


The real test will be when the roof weather strip, reveal moulding will be test fitted to see all gaps are being perfect; however that will take time

As the moment the gap from the door is perfect

Personally I am quite relieved that it was done perfectly and have taken all precautions to ensure that no I never have ever have to worry about this part

After this, I am so confident with my choice of people who are helping with this restoration


Next to Come, All the rust getting sorted in Boot, few more days and then the positive side of the restoration should start
DeepakMenon is offline   (4) Thanks
Old 16th December 2013, 12:04   #18
BHPian
 
Join Date: Jan 2011
Location: Pune
Posts: 360
Thanked: 121 Times
Re: Let the Restoration Begin - Mercedes W124

Quote:
Originally Posted by DeepakMenon View Post
New Skin
Another Angle
Deepak, I'm curious to know whether any specific choices you had for the skin metal sheet? I mean are there any options regarding the gauge or quality of it, or there's one standard sheet-metal product for the job you required irrespective of the car/manufacturer?

BTW, it looks horrible to see underneath the skin.
iSpoke is offline  
Old 16th December 2013, 13:44   #19
BHPian
 
DeepakMenon's Avatar
 
Join Date: Nov 2008
Location: Mumbai
Posts: 278
Thanked: 180 Times
Re: Let the Restoration Begin - Mercedes W124

Quote:
Originally Posted by iSpoke View Post
Deepak, I'm curious to know whether any specific choices you had for the skin metal sheet? I mean are there any options regarding the gauge or quality of it, or there's one standard sheet-metal product for the job you required irrespective of the car/manufacturer?

BTW, it looks horrible to see underneath the skin.

Well they always say it look worse before it starts looking better

On the metal, OEM was galvanized inside out [At least that's what the manual says]. We in this case matched the gauge and used POR-15 inside the skin. The good part is that this panel does not see water holding, so whatever precaution we have taken is a over-kill


I think the worse is finished, the car is getting prepred for Primer, will upload those in a while.

However I am super stuck with Carpet, I will post pictures so that you guys know what I am up against, and I need Help
DeepakMenon is offline  
Old 16th December 2013, 14:36   #20
BHPian
 
stormsearcher's Avatar
 
Join Date: Feb 2011
Location: Bangalore
Posts: 86
Thanked: 13 Times
Re: Let the Restoration Begin - Mercedes W124

A fantastic thread Deepak. I will be keenly following this. I am looking for an interior upgrade too and maybe a paint job for my 124.
Where in gods name are u getting the parts? Pls share the link if u are buying online. I have some small bits on the car that need replacing.
stormsearcher is offline  
Old 16th December 2013, 15:34   #21
BHPian
 
DeepakMenon's Avatar
 
Join Date: Nov 2008
Location: Mumbai
Posts: 278
Thanked: 180 Times
Re: Let the Restoration Begin - Mercedes W124

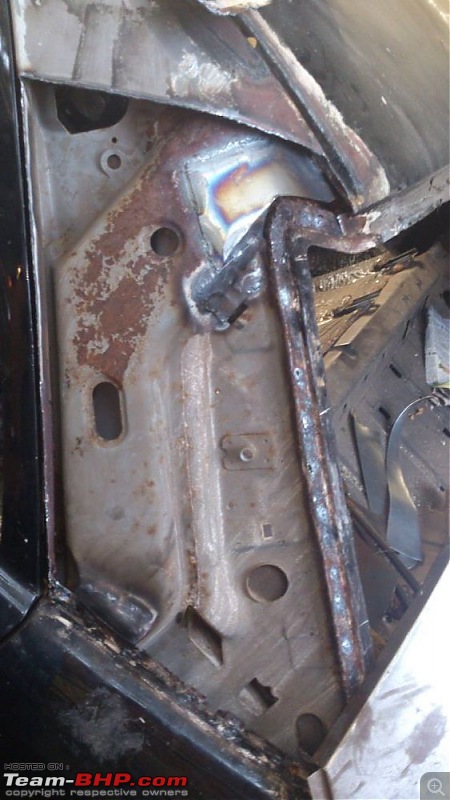
Body Work Over.. Time for the Positive Side


In the earlier Post I had mentioned about the rust inside the boot caves on either side, or whatever that is called technically. All that has been restored and POR-15 under the watchful pair of eyes of Jatin and Must I say it looks like it will last another two decades without a worry


Rust Sorted with New panel;
Let the Restoration Begin - Mercedes W124-img20131205wa0008.jpg


Application of POR-15
Let the Restoration Begin - Mercedes W124-img20131205wa0012.jpg


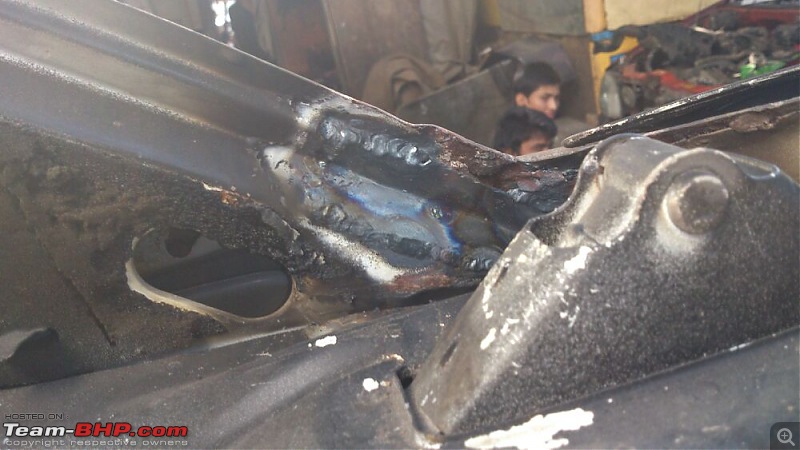
New Drain Hole for the Boot Cave
Let the Restoration Begin - Mercedes W124-img20131211wa0020.jpg


Front Fender Big Hole Fixed and POR-15
Let the Restoration Begin - Mercedes W124-img20131212wa0014.jpg


Tiny Rust Sorted
Let the Restoration Begin - Mercedes W124-img20131212wa0019.jpg


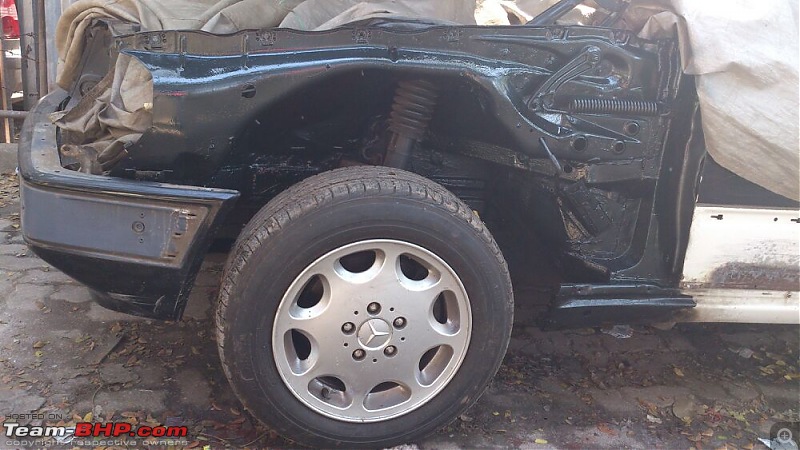
The Inner fender area rust has been sorted and as a precaution the entire inside of the fender has been brush coated with POR-15; One thing that always amazes me is that this chemical has such a nice finish


Inner Fender POR 15 after Sorting RUST
Let the Restoration Begin - Mercedes W124-img20131215wa0004.jpg


A fresh Coat of POR-15; as Paint / Primer Does not adhere to Dried POR-15
Let the Restoration Begin - Mercedes W124-img20131215wa0007.jpg


Now the entire car will be painted in a Booth, however the painter wants the Fender fixed back to get the finish right, So the inner Fender is getting painted now outside as it is not cosmetic, Just protection and color matching


Fender inside Getting Epoxy Primer
Let the Restoration Begin - Mercedes W124-img20131215wa0009.jpg


Inner Fender Get a coat on Non-Metallic 154
Let the Restoration Begin - Mercedes W124-img20131215wa0016.jpg


Fender Inside gets a coat of Non-Metallic 154
Let the Restoration Begin - Mercedes W124-img20131215wa0024.jpg


Dont worry boys, the actual exterior of the car will get metallic 154 and it will be much darker


Now the first lot of parts have arrived, In all there are more than 30 parts in various quantify ordered, the First few are here and as promised parts details below


This Clip Holds the Water Deflector tight on A-Pillar
Let the Restoration Begin - Mercedes W124-pillar.jpg


The Main Water deflector clips for roof, they come in 3 colors; No difference just different part numbers [ colors, Green, White, Red]
Let the Restoration Begin - Mercedes W124-clip.jpg


Same clip as above, only difference it goes in the rear as is the locking type. Notice the Black insert
Let the Restoration Begin - Mercedes W124-lock.jpg


Clips for the Chrome strip on Top of Windscreen
Let the Restoration Begin - Mercedes W124-chrome.jpg


The Clips that Hold the Rubber Strip at the bottom of the Rear Windscreen [ New Rubber awaited ]
Let the Restoration Begin - Mercedes W124-rear.jpg


Boot / Dicki Seal
Let the Restoration Begin - Mercedes W124-boot.jpg


Door Seals / Door Weather Strip
Let the Restoration Begin - Mercedes W124-door.jpg


Fender Partition in front, I have never seen a W124 with this part [Every one has this missing]; makes the wheelhouse in front look complete
Let the Restoration Begin - Mercedes W124-fender.jpg


Cant wait for the rest of bunch of parts to arrive that include, Blower weatherstrips, rear weather strips, Outer window garnish strip, lots of clips and many more


This week the car will be taken to the booth, A week will be spent on the below items

-Clean holes for new Rivets for clips
- Prepare the surface for primer
- all the other prep job


23rd Dec, it hits the paint booth and I will be there for the entire process, 3 Layers of Color and 3/4 layers of clear..


PS: This time I did not import these parts, got lazy. Got it done by a supplier. So cost above can be a bit cheaper if your import directly

Also only the door seals are not MB OEM, they cost upwards for 20k; so i weaseled, if it does not fit well I will spend on it when my Salary comes

Last edited by DeepakMenon : 16th December 2013 at 15:36.
DeepakMenon is offline   (2) Thanks
Old 17th December 2013, 11:38   #22
BHPian
 
Join Date: Mar 2009
Location: Bangalore
Posts: 277
Thanked: 222 Times
Re: Let the Restoration Begin - Mercedes W124

Quote:
Originally Posted by DeepakMenon View Post
Body Work Over.. Time for the Positive SideNow the first lot of parts have arrived, In all there are more than 30 parts in various quantify ordered, the First few are here and as promised parts details below...

Fender Partition in front, I have never seen a W124 with this part [Every one has this missing]; makes the wheelhouse in front look complete
Thanks for sharing. It will be very good reference guide for me.
One question - Does the rear also has similar Fender partition ?
I am also interested to get one for Front as well. Is it possible for you to share the supplier details - can he ship to Bangalore ?

Last edited by Ravindra M : 17th December 2013 at 11:42. Reason: Mistake
Ravindra M is offline  
Old 17th December 2013, 14:39   #23
Newbie
 
Join Date: Jun 2013
Location: Bengaluru
Posts: 17
Thanked: 2 Times
Re: Let the Restoration Begin - Mercedes W124

Quote:
Originally Posted by Ravindra M View Post
I am also interested to get one for Front as well. Is it possible for you to share the supplier details - can he ship to Bangalore ?
I am also closely following this thread. Please also let us know how you are getting the parts in and more importantly, getting all the part numbers correct. Looks like it will be the Indian W124 Bible! It is like Depeche Mode singing: "Let me see you stripped"
blackcloud is offline  
Old 17th December 2013, 16:21   #24
BHPian
 
wartikars's Avatar
 
Join Date: Nov 2009
Location: Pune
Posts: 168
Thanked: 12 Times
Re: Let the Restoration Begin - Mercedes W124

Quote:
Originally Posted by DeepakMenon View Post
Second Installment..


Well one thing that is good and scary with the W124 is that it does not show any rust in any obvious places, it is a well built car and has its more than fare share of cavity wax in all applicable areas which protects it from all elements ...
Great work Deepak. I also have a 1993 300D W124. I also wish to restore it. How much did your restoration project cost? And where was it done?
wartikars is offline  
Old 17th December 2013, 20:59   #25
BHPian
 
bIte tHe bulLet's Avatar
 
Join Date: Oct 2007
Location: Bombay
Posts: 441
Thanked: 279 Times
Re: Let the Restoration Begin - Mercedes W124

Oh man...

*WHAT A THREAD!!!*

My fella's in pretty decent nick for a 17 year old, but there are a couple of paint bubbles and rust spots on the A & C pillars that are going to bug the life out of me till I can get them fixed and done. (I'm hoping it is only in the pillars, because the bud I bought it off from has already had the car painted and done a couple of years back...)

I'll be following this restore very closely - and I love the ATD.. Great going and all the best Deepak
bIte tHe bulLet is offline  
Old 17th December 2013, 21:10   #26
BHPian
 
jatinpatel's Avatar
 
Join Date: Jun 2010
Location: Mumbai
Posts: 610
Thanked: 196 Times
Re: Let the Restoration Begin - Mercedes W124

Quote:
Originally Posted by bIte tHe bulLet View Post
Oh man...

*WHAT A THREAD!!!*

My fella's in pretty decent nick for a 17 year old, but there are a couple of paint bubbles and rust spots on the A & C pillars that are going to bug the life out of me till I can get them fixed and done. (I'm hoping it is only in the pillars, because the bud I bought it off from has already had the car painted and done a couple of years back...)

I'll be following this restore very closely - and I love the ATD.. Great going and all the best Deepak

Hey,

Paint Bubbling generally means there is tiny or major rust underneath the paint which is cropping its head or it can be a Very very heavy body filler job which is coming out.
In either cases if its more than 4-5panels it better to go get a complete overcoat to get an even finish everywhere and make the car look fresh,
hope this helps.


Thanks
Best regards
Jatin.Patel
jatinpatel is offline  
Old 17th December 2013, 21:35   #27
BHPian
 
DeepakMenon's Avatar
 
Join Date: Nov 2008
Location: Mumbai
Posts: 278
Thanked: 180 Times
Re: Let the Restoration Begin - Mercedes W124

Quote:
Originally Posted by jatinpatel View Post
Hey,

Paint Bubbling generally means there is tiny or major rust underneath the paint which is cropping its head or it can be a Very very heavy body filler job which is coming out.
In either cases if its more than 4-5panels it better to go get a complete overcoat to get an even finish everywhere and make the car look fresh,
hope this helps.


Thanks
Best regards
Jatin.Patel

+1 on the above


The easiest way to check it burst that bubble and see what you find inside, but honestly at-least inches around that bubble has to be sanded down for a touch up

If it is A-Pillar on a W124, you can easily assume that the panel under the windscreen is in a worse state and will require the windscreen to be removed and checked for a 100% peace of mind


On C Pillar of a W124 is generally near the rear windscreen, again needs a check under the windscreen


The parts are supplied by a dealer in Mumbai, and Guys I am not at home partying out so will post the details by Thursday.

The reason I get the part numbers is because I have the entire EPC for MB especially W124


Lastly the restoration is done by the Man I quoted above [WagenWorkz]
DeepakMenon is offline  
Old 18th December 2013, 15:15   #28
BHPian
 
DeepakMenon's Avatar
 
Join Date: Nov 2008
Location: Mumbai
Posts: 278
Thanked: 180 Times
Re: Let the Restoration Begin - Mercedes W124

Carpet Dilemma

For some reasons unknown my DPO [Dreaded Previous Owner] has installed shabby office wall to wall carpet on top of the OEM carpet. I have spent quite a while in the past few weeks to find a replacement worth the OE but in vain


Below is one of the Center Console carpet panel, and you can see the glue stains, though the carpet fibers are in good nick.


Any idea how I can remove these glue stains. Getting a carpet or carpet material from outside india is more than 500 USD. Unless someone is travelling in the next few days


Any help guys, I am lost here
Let the Restoration Begin - Mercedes W124-img20131218wa0002.jpg
DeepakMenon is offline  
Old 18th December 2013, 16:29   #29
BHPian
 
Join Date: Nov 2007
Location: Mumbai
Posts: 748
Thanked: 49 Times
Re: Let the Restoration Begin - Mercedes W124

Hi Deepak,

This thread is exactly what I need. I will be watching this place very carefully.
In the initial images, one would imagine why do you need a restoration. As the images progress, we know why.

I think I know where this work is being done. There was a TN something W140 being restored at the same place some time back, and rare W123 limo being restored in the vicinity. Let me know when are you or Jatin at the spot. Will drop in if I have the time.

Why is this thread of my interest ? Its because I was offered a W124 220 at a mouthwatering price. Problem is with a crank sensor and the bodywork. The car is parked at a place for more than a year. It is exposed to Mumbai sea wind at full blast. The corrosion is evident in the C pillar and the A pillar, same as your car. Im sure if the grey cladding is removed more would be revealed. So these need to be corrected along with a full paint job inside out, as its cracked in small pieces on the top.

Wish you all the luck and let me know if you are looking for parts, as I stay at Opera house itself.

Regards,
Kavesh
kavesh55 is offline  
Old 18th December 2013, 16:45   #30
Senior - BHPian
 
SunnyBoi's Avatar
 
Join Date: Dec 2006
Location: Mysore / B'lore
Posts: 1,666
Thanked: 4,110 Times
Re: Let the Restoration Begin - Mercedes W124

Quote:
Originally Posted by DeepakMenon View Post
Any idea how I can remove these glue stains. Getting a carpet or carpet material from outside india is more than 500 USD. Unless someone is travelling in the next few days
Contact detailers/interior guys with access to steam cleaning machines. Steam when used properly will help remove glue All the best!
SunnyBoi is offline  
Reply

Most Viewed


Copyright ©2000 - 2024, Team-BHP.com
Proudly powered by E2E Networks