| |||||||

| Search Forums |
| Advanced Search |
| Go to Page... |
 |
| Search this Thread |  356,980 views |
 27th September 2014, 12:12
| #1 |
| Senior - BHPian Join Date: Aug 2005 Location: New Delhi
Posts: 1,421
Thanked: 2,281 Times
| All about car dent repair & painting - Processes, methods & tools Introduction: You are driving around town in your pristine car, when suddenly, in a fleeting moment your pride & joy is struck! You get out, and staring you in the face is the heart wrenching sight of a beauty in motion - interrupted! Image courtesy: Google  If you are like most other TBHPians, the sight likely preys on your sensibilities, and correspondingly results in an urge to get it fixed ASAP! And thus begins a trip to the FNG denter/painter or the main dealer. In doing so, you happily give in to the monetary demands that they make , trusting in them when they say the magic words: "whole panel has to be painted", "at least 3 days of labour", "Don't worry you won't have to pay anything - we will work it out with the insurance company" etc. But has it ever occurred to you , that knowing about common dents and their fix, can help you save $$$? Has it further occurred to you, that the slightest demonstration of knowledge and 'shopping around' can save you even more $$$? So here's the first tip, which can be easily employed by someone who knows next to nothing about dent/paint shops. Rule 1: "Shop Around". If you can Shop Around, when buying a fridge or a TV set or a camera , why not Shop Around when there's a denting/painting job to be done? This tip alone can save you at least 10% from the most expensive quotation ! Last edited by joybhowmik : 27th October 2014 at 15:47. |

|  (33)
Thanks (33)
Thanks
 |
| The following 33 BHPians Thank joybhowmik for this useful post: | anilntny, anra, arunphilip, ashpalio, Captain Slow, dhanushmenon, dr. sen, espraveen, GTO, gurudutt, Guru_Shikhar, HappyWheels, hemant.kamat, InControl, IndigoXLGrandDi, itwasntme, Joe M, khoj, MaheshY1, manij, mrbaddy, parsh, PGNarain, Praveen92, Rehaan, shetty_rohan, shibujp, shipnil, theexperthand, TheLizardKing, The_Outsider!, V.Narayan, vincyf1 |
| |
|
27th September 2014, 12:41
| #2 |
| Senior - BHPian Join Date: Aug 2005 Location: New Delhi
Posts: 1,421
Thanked: 2,281 Times
| How was the car painted in the factory? The REAL factory finish paint process Before we begin our journey to understand what is employed by a body shop, it may be helpful to understand what are the processes used to paint a car in the factory. It's not really  . And you will understand why, as we go along. . And you will understand why, as we go along.Here's a 2 minute video of a Toyota getting painted. Whilst the detailed paint process differs for different manufacturers, at a high level, the process looks something like this. Source: Automotive Paints and Coatings, Edited by Hans-Joachim Streitberger & Karl-Friedrich Dössel 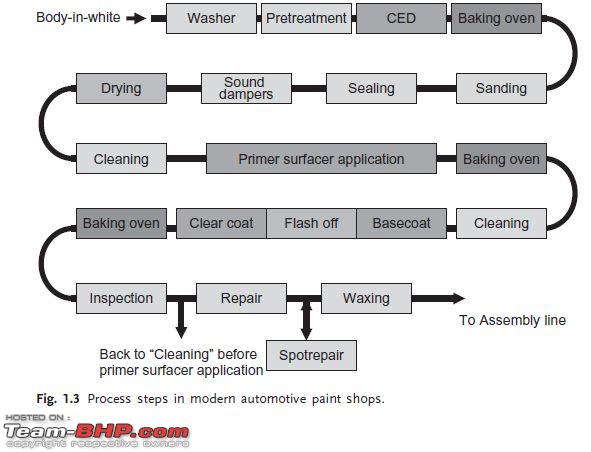 The car body (from the weld shop) is washed, degreased, electrodipped in zinc phosphate, oven baked, sanded, sealed, dried, cleaned (with chemicals), primered, baked, painted, baked, clear coated, baked and then inspected for faults (which are repaired). All high volume manufacturers have fully automated lines that take between 14-18 hours to finish a single body. The result is layers of carefully laid out coats, all of which put together is only slightly thicker than the average human hair. Courtesy: BASF-Coatings 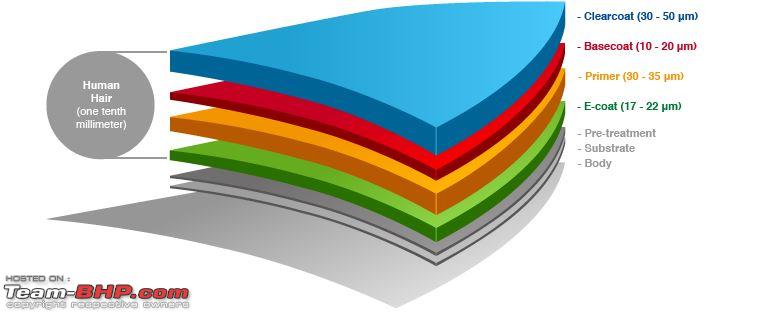 Cathodic e-coating gives the car body a primer coat. It protects the car from corrosion , especially the cavities of the body that cannot be reached easily by spray application. It is an excellent base for applying subsequent paint layers. Primer: evens out any irregularities of the underlying layer. It can be sanded easily and provides a smooth surface. The primer also protects against stone chipping and it protects the e-coat from UV radiation. Basecoat: gives the body its color. The paint is made up of different pigments and special-effect substances (such as metallic and pearl effect particles). The basecoat therefore plays a significant role in establishing the visual impression of the car. Clearcoat: seals everything else and is applied last. It protects the car from damage caused by hail, snow, UV radiation and scratches. The clearcoat is exposed to all environmental impacts during a car's life (e.g. bird droppings). Why is developing an understanding of what happens at the factory important? It's because you will then begin to appreciate what is missing from the 'factory finish' when you get the car painted at the workshop. Last edited by joybhowmik : 28th September 2014 at 10:16. |
|
| (36)
Thanks
|
| The following 36 BHPians Thank joybhowmik for this useful post: | Akib Khan, anra, arunphilip, ashpalio, BoeingDriver, Car-go-man, dhanushmenon, dr. sen, gearedup, GTO, Guru_Shikhar, HappyWheels, hemant.kamat, Hulk, InControl, IndigoXLGrandDi, khoj, kutlee, Leoshashi, MaheshY1, mrbaddy, NomadicLife, parsh, Pferdestarke, PGNarain, Rehaan, rxpaul, Sridhar K, theexperthand, The_Outsider!, Utham123, V.Narayan, VeluM, vincyf1, watchoutankit, Wildy |
|
28th September 2014, 10:33
| #3 |
| Senior - BHPian Join Date: Aug 2005 Location: New Delhi
Posts: 1,421
Thanked: 2,281 Times
| Paint process outside the factory. Paint process outside the factory. If you have been following the thread this far, you would already have understood what happens in the factory. The more valiant would already have downloaded the voluminous "Automotive Paints and Coatings" and devoured every page. It's therefore appropriate to turn our attention to the paint process at most main dealers, or reputed body shops, as well as examine the paint process at the FNG. By the way the biggest difference between the FNG and the main-dealer is that one is a have-not and the other is a have. What we're talking about is a paint-booth. Image courtesy: Google 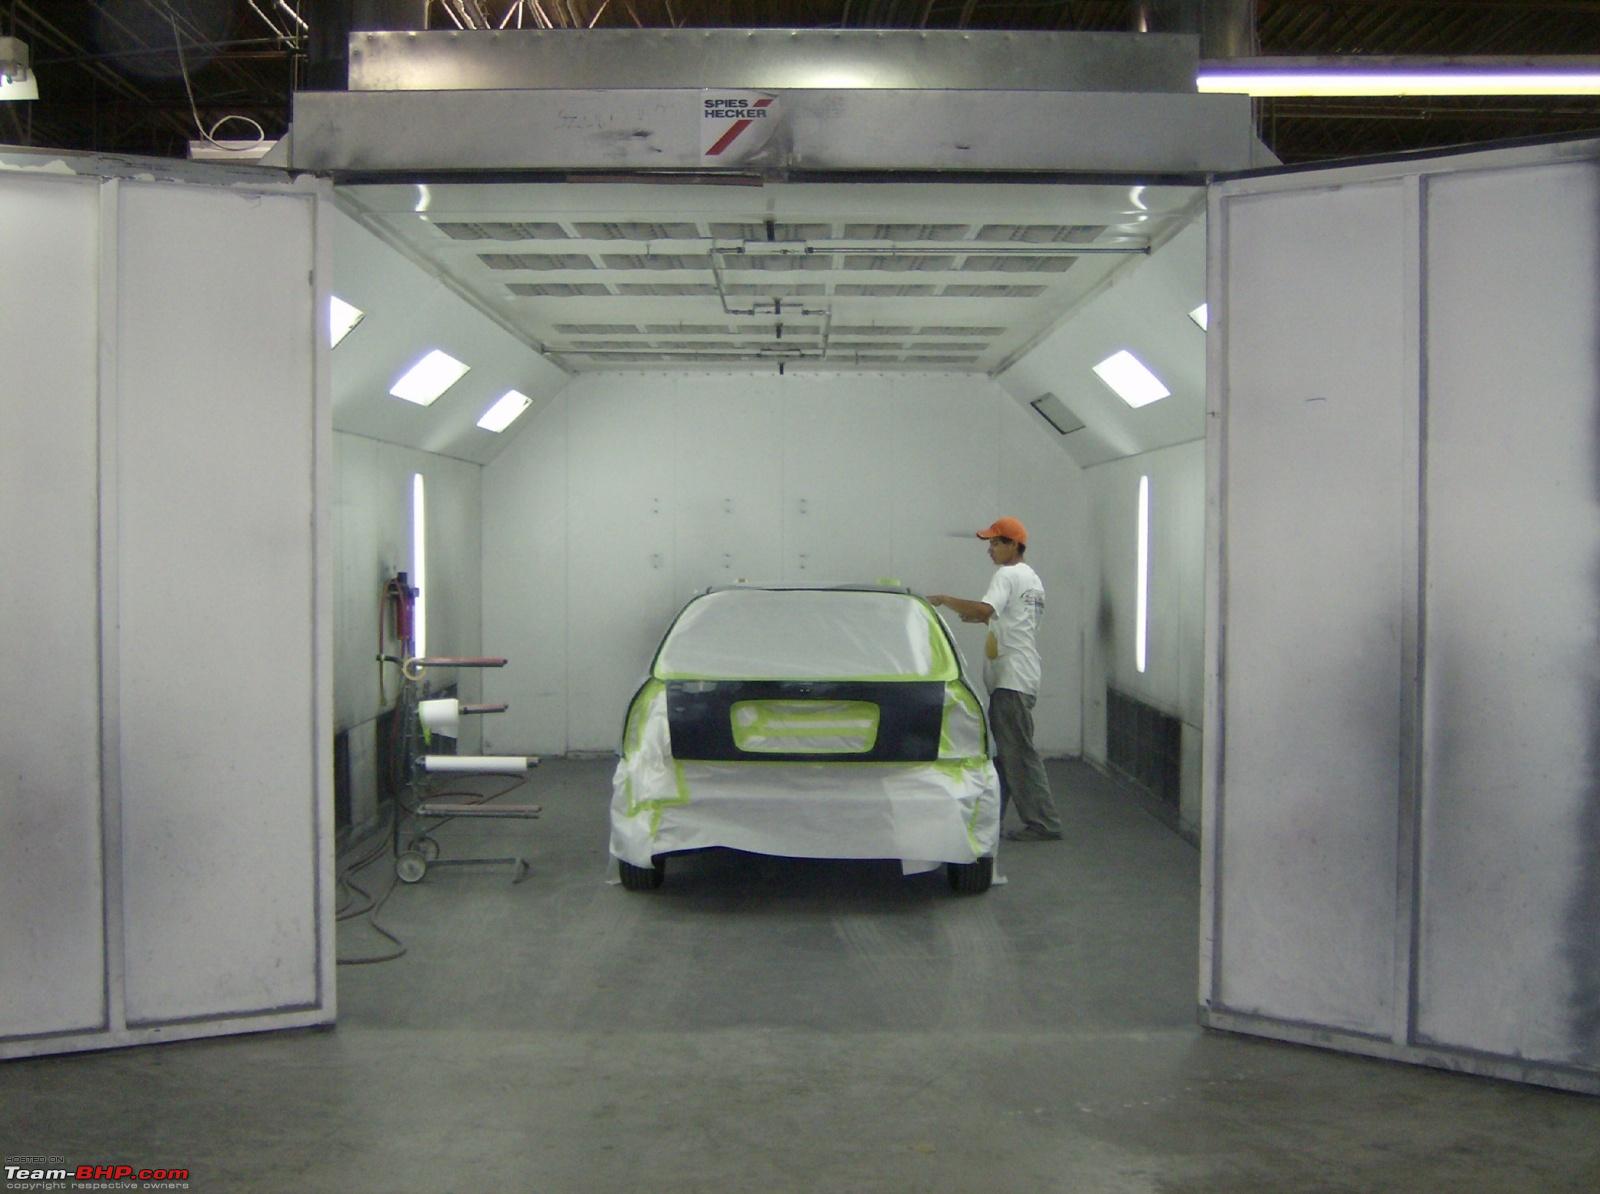 Note: I have not talked about the denting work yet. That's a different topic which will follow, once we have understood what happens in the paint process. So here's the list of steps and where possible I have listed the appropriate tool for the job. There are five major steps. A) Preparation B) Primer C) Base Coat D)Clear Coat E) Polish Preparation: 1) Wash the whole exterior with plain water and soap and scrub off any deposits with a microfibre cloth. Image Courtesy: Amazon.in  2)Remove badges, trims, door handles, side-indicator lamps, headlights, even the windscreen if it's going to be in the way of the paint job. For this you need to ensure the right tools are used for the job. This will ensure, the process of removal does not leave unsightly scratches on the car - or what's worse - injure you. Image courtesy: www.autoevolution.com Nylon Pry tools to be used where you may damage plastic trim if you used steel tools.  Variety of large to small steel panel pry tools where you need to pry loose a steel panel using its edge  Clip removal pliers to remove clips  3) Finish doing the dent work for the area to be painted. If the area had any rust, grind that out. If new metal had to be welded in, do so, and ensure the weld seam is ground out. Additionally (optional) treat rusted areas with corrosion protection spray. An angle grinder can make light work of large areas.  For small areas, wrap coarse emery paper (50 No.) around a small wooden block and sand the area using a smooth reciprocating strokes. Fill in small imperfections with body filler , and sand back the surface with increasing grades of emery paper (e.g. start with 200 and go up to 500), until the surface is smoothed out. Note the number of the emery paper signifies the number of grains per sq. cm. As you go higher in grade, with increasing number of grains, the paper gets progressively smoother. Here's a nice video about preparation 4) Mask the surrounding area with Brown paper ( the kind that comes off a roll) - NOT Newsprint and stick this with the right Masking tape. Image courtesy : Google 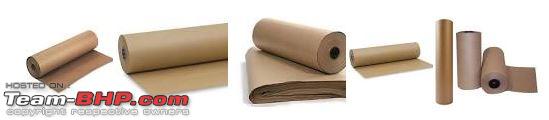 While using Newsprint is convenient, it's also risky. The solvents and chemicals in the spray, can make the ink run on the newsprint. I am sure the last thing you want on your pristine red Swift, is ugly splotches of black ink from the TOI or HT An example of the kind of masking tape that should be used. Image courtesy: 3MCollission.com  Any old masking tape will not do. The tape should have enough adhesive strength to ensure it sticks to any vehicle surface, and importantly does not slip due to the weight of the paper it's holding up. 5) If the surface contains painted areas already on which the base coat will be applied again - then use a fine grade emery paper (e.g. 500 or 600) to create slight roughness on the surface so that the new paint or primer will stick to it. 6) Degrease the surface to be painted using a degreaser such as this ; Image courtesy: StardustColors  and wipe the surface free of dust using lint free paper wipes. Image courtesy: autorefinishdevilbiss.com  Last edited by joybhowmik : 27th October 2014 at 16:11. |
|
| (19)
Thanks
|
| The following 19 BHPians Thank joybhowmik for this useful post: | anra, Captain Slow, deep_bang, dhanushmenon, dr. sen, GTO, Guru_Shikhar, HappyWheels, hemant.kamat, IndigoXLGrandDi, khoj, MaheshY1, mrbaddy, parsh, Rehaan, theexperthand, V.Narayan, vincyf1, Wildy |
|
6th October 2014, 17:28
| #4 |
| Senior - BHPian Join Date: Aug 2005 Location: New Delhi
Posts: 1,421
Thanked: 2,281 Times
| Paint process outside the factory (continued) Paint process outside the factory (continued) If you are in a paint booth, nothing could be better. A paint booth helps because it has facilities to abstract the harmful fumes out of the way, ensure that no contaminants enter the area, and provide an even temperature environment to help cure the surface. If you are on the roadside, be prepared to use hardeners to quickly cure the surface, and pray that contaminants do not get onto the surface between cleans. Another point. Stick to one paint system. If it's Standox, then stick with Standox from body filler, reducers, thinners, base coat to clear coat. If it's BASF, then stick to BASF. If it's Nippon - then stick to Nippon. If it's some other system, then stick to that. Don't mix and match products from different brands. You will probably go wrong. And what's worse it will show itself through ugly adhesion failures months after the job is over. B) Primer This is where we first meet the spray gun, which runs on compressed air. Remember the robotic nozzles spraying primer? Well this is the manual equivalent. These come in various shapes and sizes. Images courtesy: Google The commonly available gravity feed spray gun... the fluid is in the inverted bottle  A spray gun to use with two fluids -e.g. base coat and clear coat.  All spray guns use a powerful jet of air to atomize the fluid so that it gets applied more evenly. How do they work? Same principle as this household atomizer - but don't use this to spray your car  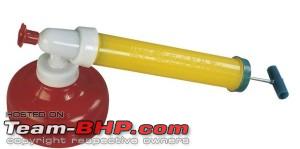 On the better quality spray guns, Atomiser heads are changeable. For base coats - a nozzle size of 1.3 to 1.4 mm for primer a nozzle size of 1.6mm to 1.8 mm is good. Primer is mixed with a Reducer . Simply put a reducer is used to thin a primer or paint so that it sprays on more evenly. Mixing has to be with the primer manufacturer's specificied ratio. The first coat is then applied wih gentle side to side movements. Then wait 5 to 10 minutes allowing the coat to dry before spraying the next coat. When applying primer on a panel that has some area covered by the base coat , it's advisable to cover the entire area with the first coat, while spraying the subsequent coats only on those areas which had no base coat to start with, and feathering the edges. Depending on whether you are spraying a full panel of bare metal (more primer coats meeded) or fixing up just a small area that needs primer, the number of coats will vary. Usually though one would need 2 to 4 coats. Make sure to key the surface (500 or 600 paper) between coats, and wipe the dust off with pre-clean and lint free paper. Sometimes, primer manufacturers recommend mixing undercoat hardeners to be mixed as well. This hastens the drying time between coats. Attached a spec sheet from just one such manufacturer JP202.pdf Here's Applying Primer 101, or what to avoid when applying primer. As an optional step, some body shops like to give the surface a primer sealer. A sealer is designed to hide the primer that might otherwise show through the base coat (when applied). Why? It's cheaper than having to apply an additional coat of paint. Once the primer coats have gone on and fully dry, it's time to apply the base coat. C) Base Coat Before applying the base coat, it's important to give the surface to be painted a key with 800 or 1000 paper and a thorough cleaning with degreaser to get rid of surface contaminants. Then prepare the correct base color. Doing so is easier said than done. Here's how it should be done: 1) Find the right color and produce it. a) The factory color code is usually identified by a sticker in a corner of the engine bay. Paint Manufacturers oufit their retailers with color mix system - a computer controlled paint mixer, which has color formulas for the thousands of factory paints out there on our cars. b) Usually, with age, color fades. And that's when the body color does not match the factory spec. What do you do? Well there's a cheap way: Use color cards, (something like a deck of cards of different shades), and use that to visually match the color on different parts of the body. The color card which shows the greatest number of matches, is selected as the color to be used. The formula on it is fed into the computer, and the new color is produced in the required quantity. http://www.axaltacs.com/us/en_US/pro...tramaster.html And a more expensive way (and way more accurate way): Use a color spectrophotometer to take color readings from around the vehicle, and use that to generate the right mix for the paint job. http://www.axaltacs.com/us/en_US/pro...-efx-plus.html 2. Dilute the paint with the right amount of thinner recommended by manufacturer See an example here: Courtesy Standox SX-TDS-610-Eng.pdf 3. Apply the base coat evenly, with 50% to 75% overlap covering every nook and cranny. It's not important at this step to achieve the right color at this stage. Just to cover the whole area. 4. Once dry, apply the next coat. Usually between 2-3 coats are sufficient to achieve the right color and lustre. Remember that if you are spraying over an already painted area, then you need to taper (i.e. spray less) on such areas, and focus more on areas that do not have paint. D) Clearcoat This step is quite similar to the previous steps. After a pre-clean to rid the surface of contaminants, The clear coat is mixed with hardener in the recommended ratio, and applied in one or two coats and allowed to dry. An example of such a product http://www.axalta.com.au/standox/stx-voc-clear E) Polish This is the final stage. Once the clear coat is dry usually allow between 12-24 hours, polish the painted surface with a good brand rubbing compound such as this Inspect for any blemishes, e.g. clear run or paint run - and gently remove these with rubbing compound and/or thinner. Finally remove all masking from the car. Then wash it thoroughly and wax when dry. The video below shows you how paint is applied. Notice the smooth even strokes. Notice also, how the painter never stops at a certain area. Last edited by joybhowmik : 6th October 2014 at 21:35. |
|
| (31)
Thanks
|
| The following 31 BHPians Thank joybhowmik for this useful post: | Akshay1234, anilntny, anra, ashpalio, Captain Slow, dhanushmenon, dr. sen, DWC, espraveen, GTO, Guru_Shikhar, HappyWheels, hemant.kamat, hemanth.anand, IndigoXLGrandDi, khoj, kutts, MaheshY1, mrbaddy, parsh, Rehaan, shifu, shipnil, Sivasankar, sridhar-v, theexperthand, V.Narayan, vincyf1, watchoutankit, Wildy, zavegur |
|
10th October 2014, 17:28
| #5 |
| Senior - BHPian Join Date: Aug 2005 Location: New Delhi
Posts: 1,421
Thanked: 2,281 Times
| Denting work on the car We can now finally turn our attention to the topic of denting. Or rather fixing dents. There is wide acceptance of two categories: there's the paintless dent fix work (dry denting) as opposed to dent fix work that requires painting. Let's get dry denting out of the way first. "Dry denting" fixes are employed where the dent does not leave a crease on its edge. A variety of techniques oblige, all of which are not 100% successful. Introduction http://www.monkeysee.com/play/11975-dent-repair Dent removal using just a finger and then a hammer http://www.monkeysee.com/play/11975-...Using-a-Finger Dent removal using a Paintless dent removal kit http://www.monkeysee.com/play/11975-...epair-with-Kit Two points a) It's not really very successful b) The guy here uses a really NICE kit. Cheaper versions are available on ebay - those are not as good as the one featured here... but you may be OK with the results. Here's an example of a Home DIY kit "Pops-A-Dent" "As-seen-on-TV". I have personally tried these. Even on dents without creases, if you leave the puller on for a bit longer than advocated, the puller is likely to come off with a bit of paint sticking to it. Thus leaving you with more of an eye-sore than what you had previously. The other kind of dent puller is the air suction type. This again operates best on dents that have no creases. Their success is also measured by how much they flatten the said depression. 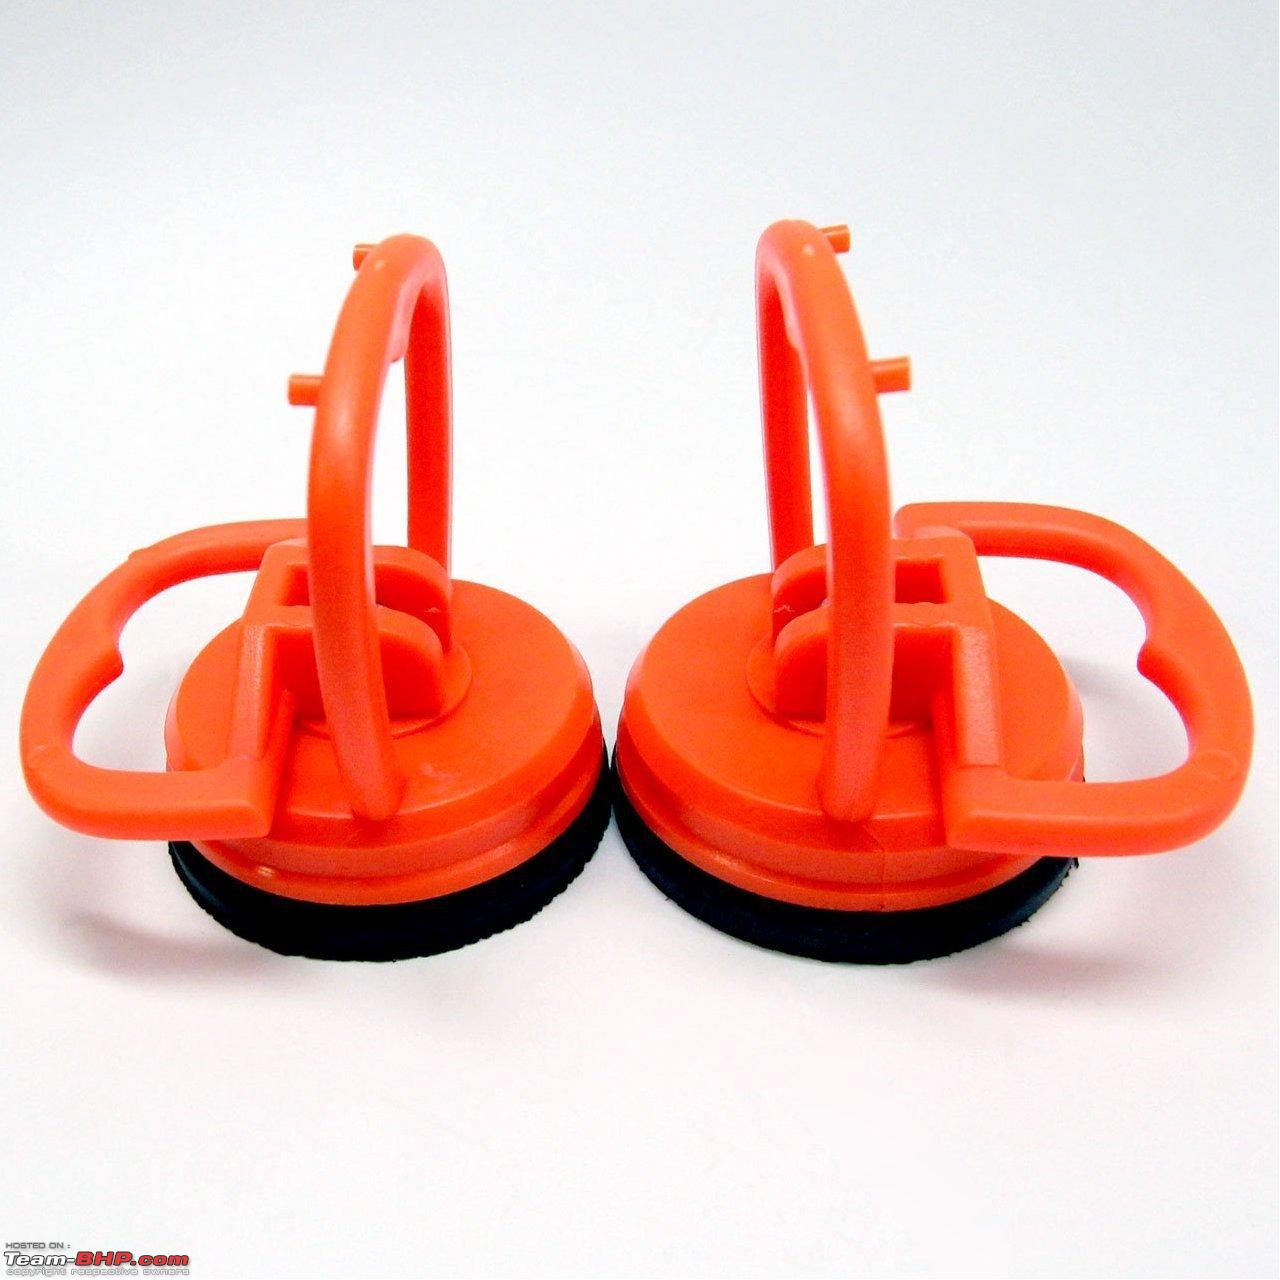 A poor cousin-the toilet suction cup, but just about as effective.  Dent removal using Dry Ice in this video http://www.monkeysee.com/play/11978-...r-with-dry-ice Dent Removal with a hair dryer in this video http://www.monkeysee.com/play/11979-...h-a-hair-dryer Last edited by joybhowmik : 27th October 2014 at 10:43. |
|
| (21)
Thanks
|
| The following 21 BHPians Thank joybhowmik for this useful post: | ajmat, Akshay1234, anra, ashpalio, Captain Slow, dhanushmenon, dr. sen, espraveen, GTO, Guru_Shikhar, HappyWheels, hemant.kamat, hemanth.anand, InControl, khoj, MaheshY1, mrbaddy, parsh, theexperthand, vincyf1, Wildy |
|
14th October 2014, 15:27
| #6 |
| Senior - BHPian Join Date: Aug 2005 Location: New Delhi
Posts: 1,421
Thanked: 2,281 Times
| The 'normal' denting process a.k.a. denting process that requires painting So now that you know that chances of a perfect repair using a dry denting process are slim (though not non-existent), its time to turn our attention to the dent fixing process that ultimately requires paint. And why do we require painting the area after removing dents from it? It's because, when we fix a dent, we essentially beat/pry the metal back to near original shape (I use the word 'near' not the word 'exact'). No amount of beating/prying will get any panel to the exact contours which was forged using a hot panel with the die and press. The tools of the trade. Broadly there are the following types: Hammers, Spoons & Picks, Dollies and the dent-pullers. Source: www.eastwood.com for hammers, picks , spoons and dollies. A ) Hammers 1) General Purpose Pick Hammer : General purpose hammer for body jobs  2) Bumping hammer : Heavier head with round and square faces for thicker metal;  3) Cross-Peen hammer :Form radii, contours, curves  4) Cross-Chisel hammer: Smooth or straighten detail creases and inside corners.  5) Pick Fin Hammer : works on restoring contours of dented fins e.g. 50's cars with nice tail fins!  6) Cross Chisel Shrinking hammer: for shrinking wide areas 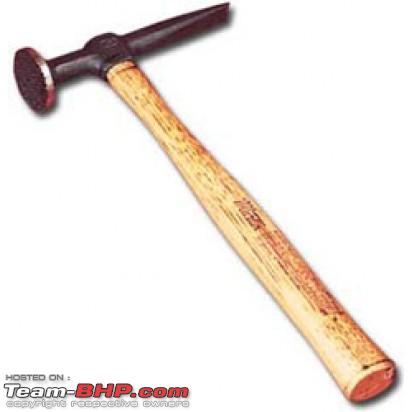 7) Dinging hammer: for removing small dents without removing the panel  8) Doorskin hammer: for use on door-skins  9) Trim Hammer: for use on stainless trim e.g. S.S. bumpers  B) Spoons and Picks Whilst hammers and dollies are great for repairing the large sized dents, spoons are used to distribute the force of a hammer over a wider area than the hammer head; whereas picks are best used to poke and pry out minor dings and dents from hard to reach places, often while preserving the paintwork. 1) Long handle Spoon-Dolly Used as a light hammer for hard to reach places such as inside door pockets, quarter panels, and fenders  2) Caulking Iron Useful for finishing wired fender edges or shaping/straightening metal on inside moldings.  3) Light Dinging Spoon Effectively spreads hammer blows over a wider surface area.  4) Slapping Spoon Works well for smoothing and shaping.  5) Medium Short Curved Pick Access dents inside doors or between inner/outer fenders. Use with twisting or prying action.  6) General Purpose Fender Spoon Used as a dolly behind brackets, inner-panels, etc. Handle offset to give balance when dinging and for long reach.  C) Dollies A dolly is the name given to a category of tools used in shaping sheet metal. In general, a dolly is a solid piece of metal, small enough to hold in one hand, with a curved or shaped face. Generally a dolly will have more than one surface, each with its own radius of curvature (much like a three-dimensional French curve), allowing the craftsman more flexibility in using the tool. A dolly can be used either as a hammer, shaping the metal to match the curve of the dolly, or as small anvil to provide a curved surface over which to dome or dish metal. They are commonly used to shape sheet metal in auto repair, especially in locations where it is difficult to swing a hammer. They can also be used as backers for upsetting metal. 1) General Purpose Dolly  2) Shrinking Dolly. Note the serrations shrink metal when beaten with a hammer.  3) Anvil Dolly  4) Dome Dolly  5) Round forming Dolly  6) Oblong Dolly  7) Heel Shaped Dolly  8) Curved Dolly  9) Toe-Shaped Dolly  10) Shrinking Body dolly  11) Wedge shaped Dolly  12) Egg shaped Dolly 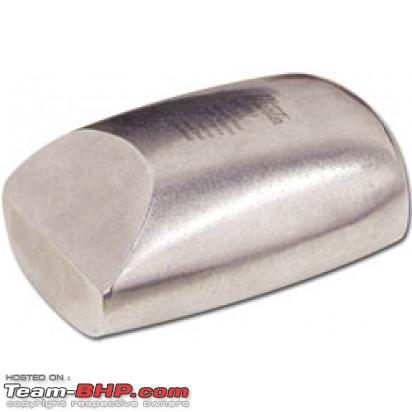 D) Dent-Pullers Dent-pullers vary in shapes and sizes. There are two kinds - the pneumatic type (vaccuum based), and the spot-weld type. The pneumatic type have limited action and efficacy and are best suited for the amateur action scene. These have been covered above. The spot weld type, employ a combination of a spot welded key and a slide hammer assisted puller. Spot weld dent puller system 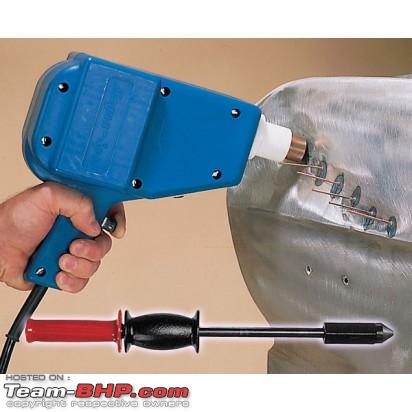 These are especially useful when pulling out dents from double-sheeted sections with no access. Example the running board underneath a door, where the two layers of sheet metal are seam welded, or the hood. If one does not have one of these, a less than perfect way of removing dents is to punch a series of holes through these areas, and later fill them up. As in this picture: Here's an example of just such a system. Finally, panel beating is only part of the job of a major accident repair (aside from replacement of critical mechanical parts). There are chances of damage to the chassis or frame of the car e.g. bent chassis rails. In such cases a more sophisticated and powerful machine - a jig puller is required Last edited by joybhowmik : 27th October 2014 at 17:10. |
|
| (33)
Thanks
|
| The following 33 BHPians Thank joybhowmik for this useful post: | aeroamit, Akshay1234, anra, ashpalio, d3mon, deepfusion, devilwearsprada, dhanushmenon, diliprayar, DWC, espraveen, gearedup, GTO, Guru_Shikhar, HappyWheels, harikrishna.te, hemant.kamat, hemanth.anand, IndigoXLGrandDi, Leoshashi, MaheshY1, mrbaddy, parsh, Rehaan, shipnil, Sivasankar, sridhar-v, Thad E Ginathom, theexperthand, V.Narayan, vhharan1, vincyf1, Wildy |
|
27th October 2014, 15:44
| #7 |
| Senior - BHPian Join Date: Aug 2005 Location: New Delhi
Posts: 1,421
Thanked: 2,281 Times
| Going back to square 1 - Or how to save money. So now that we have taken a glimpse into the tools of the trade, and got all technical with information about tools and processes, we still have not answered the basic question. How do we save money? Well the answer was partially answered in the OP. As remarked earlier the key to saving money is "Shop Around". And to follow up on that here's a few more: Rule 2: Lay emotion aside. Analyze the damage. Most people are tempted due to whatever reason , to rush to the bodyshop to get the slighest or gravest injury attended to. Whoa! Tarry a while!! What's the rush? Poor looks won't kill your car -right?  Rather use the time, and all the day-light in the world, to examine and analyse the damage. Ask yourself the question: if I were to get it repaired at the body-shop with an insurance claim - which specific panels will be paid for by the insurance company - and which won't be? Does it make financial sense to claim insurance, or should I pay out of pocket? 9 times out of 10, it makes financial sense to claim insurance if your car is older than 5 years and you plan to keep it for another 5. Reason? The NCB benefit is paltry compared to the claimed amount. Rule 3: Where do you want to get which part of the job done? Yes you read that right. One provider does not "have to" sort out the full damage on your car. You may even want to break down the work into its constituent parts. Ever considered, getting the dent fixed somewhere, and the painting done somewhere else ? Why not? Ever considered getting one of two damaged panels repaired at one place, and the other repaired elsewhere? Ever considered bargaining for a better deal at the main dealer , when the damage is on more than one panel? Ever considered, getting a replacement panel and avoiding labour charges for getting a mangled panel repaired? The choice is yours. You have the money. Rule 4: Full-tu painting the panel saar. It will be expensive. Bollocks! Now that you realize what painting the panel really entails, do you think the hustler at the main dealership, or even at FNG is saying the truth when he says, your panel needs a full coat of paint? 9 times out of 10 the guaranteed answer is NO! Usually, what they end up doing is a combination of the following a) repairing the dent b) filling and primering the affected area c) painting 2-4 coats on the affected area, and feathering/blending in the paint with the rest of the panel - so it does not look out of place. d) worst comes to worst, they will give a key to the entire surface, and spray paint 1 coat on the non-affected area, while feathering in 2-3 paint coats on the affected area. All while giving the impression that he is painting the entire panel up from bare metal! So the answer is - call out his bluff. Do your research. Talk to an auto-paint provider, and obtain a quotation for a litre of paint. Even the biggest panel does not require more than 1 litre when repainting as described here. Then beat him down on price. Rule 5: Buy your own materials, and ask for labor quotations. 2 out of 3 times, if you are flexible as to when the job can be done, you will get good deals - e.g. Rs 500/- for a day's labour provided you supply the paint materials. I have on occasion used the services of paint shop providers such as these , and ended up saving anywhere between Rs 1500 to Rs 2000/- on single panel jobs. More if the damage was on multiple panels. Rule 6: Avoid putting your car into the tightest of spots just to get an inch ahead of your neighbor and massage your ego. Ever wondered why the drivers of Mercs and BMWs from 5 star hotels, drive such spotless vehicles? Quite simply because they have all the time in the world! Finally in closing the formal disclaimers: 1) Specific products finding mention in this article are to illustrate the correct use of materials , tools and practices. The author has no commercial interest in any such product, and nor does the author express claims of the product's efficacy or function in performing its intended task. 2) Specially in India - whether in FNGs or in main dealerships, the reader may not find the use of all tools and methods as illustrated in this article. That does not mean that the FNG or main dealership is 'in any way deficient' or conversely 'at least proficient' in providing denting/painting services. Very often, non-usage of correct tools in fixing dents , or non-application of the right method in painting, is not detectable except to the trained eye and/or the test of time itself. 3) The availability of tools and materials does not make for a great denting or painting job by itself. Equally, the mechanic in-charge must have a minimum level of relevant and demonstrable competence. In the main-dealership , this is evident through examples of certifications , whilst at FNGs, this is often evidenced through word-of-mouth. 4) No amount of tinkering with the right set of denting tools, and applying the right cleaners,primers and paints can ever replicate the factory finish look exactly. There will always be some differences- however un-discernible to the naked eye - but these will definitely show up under close examination. Hope this article is of some use. Even if it inspires you to save Rs 100/- on your next dent paint job, it just might have been well worth it for me personally, as I am sure it will drive down prices for everyone - including me! Last edited by joybhowmik : 27th October 2014 at 22:16. |
|
| (68)
Thanks
|
| The following 68 BHPians Thank joybhowmik for this useful post: | abhijitvp, abirnale, aeroamit, Akshay1234, amit_purohit20, anra, anshuman_v, anuragn, aps88, arunphilip, ashpalio, avisidhu, balavj27, balenoed_, bhaskaracs, bikertillidie, bj96, comfortablynumb, d3mon, deepfusion, dhanushmenon, diliprayar, dr. sen, Dr.Naren, drhoneycake, driverace, espraveen, fiat_tarun, gauravanekar, gischethans, GTO, Guru_Shikhar, HappyWheels, hemant.kamat, hemanth.anand, Hulk, InControl, IndigoXLGrandDi, Inquisitive, jalsa777, jinojohnt, jnanesh, khoj, mallumowgli, mashmash, mi2n, mrbaddy, nitrous, parsh, PGNarain, psankar, Rehaan, samabhi, shifu, shipnil, skotha, Sridhar K, Thad E Ginathom, theexperthand, TheTeacher, Top-Gear, V.Narayan, varoon9999, VeluM, Viju, vikred, vincyf1, whitewing |
|
29th October 2014, 15:49
| #8 |
| Team-BHP Support  | Re: All about car dent repair & painting - Processes, methods & tools Thread moved from the Assembly Line to Technical Stuff. Thanks for sharing! |
|
| (2)
Thanks
|
| The following 2 BHPians Thank GTO for this useful post: | joybhowmik, MaheshY1 |
|
29th October 2014, 16:13
| #9 |
| Senior - BHPian Join Date: Aug 2009 Location: Trivandrum
Posts: 1,124
Thanked: 794 Times
| Re: All about car dent repair & painting - Processes, methods & tools A very good informative thread. I have a query, though. However hard you try, and regardless of the quality of the paint/labor/paint shop, you will end up with a 'different' color 6 months after the re-paint (you would see a noticeable difference in the color/texture of the panel that you got re-painted, after 6 months of sun and rain). This is based on my experience with Maruti dealer (Popular, Trivandrum), independent garages, and 'freelance' painters who offer home servicing. It would be helpful if someone can explain how to avoid (or minimize) this. Last edited by jinojohnt : 29th October 2014 at 16:17. |
|
| ()
Thanks
|
|
29th October 2014, 16:27
| #10 | ||
| Senior - BHPian Join Date: Aug 2005 Location: New Delhi
Posts: 1,421
Thanked: 2,281 Times
| Re: All about car dent repair & painting - Processes, methods & tools Quote:
First Quote:
Usually in the Indian scenario, paint matching is by sight under bright light (day light). The way this is done is to take the computer mixed color, or the color direct from factory, and then do a walkabout around the car, matching the color to different spots of the car. In the end, what the painter achieves is a blend - which is close to the average hue of all the panels put together, or as close as can be, subject to the limitations of the individual's eye. Having painted this color, one often finds, that after a few months - it begins to look different to the other panels as first it was not an exact match to start with , and secondly the rate of color fade depends on the cumulative time the panel/car is exposed to direct sunlight. The only way to completely avoid this is to key the entire surface and paint it. Unfortunately no other way - given the limitations of present paint technology - but that's too expensive, so we live with the imperfections. Last edited by joybhowmik : 29th October 2014 at 16:36. | ||
|
| (7)
Thanks
|

| The following 7 BHPians Thank joybhowmik for this useful post: | anra, bj96, eastwind, Guru_Shikhar, jinojohnt, MaheshY1, mallumowgli |
|
29th October 2014, 21:57
| #11 |
| BHPian Join Date: Jun 2009 Location: Udumalpet / Che
Posts: 318
Thanked: 237 Times
| Re: All about car dent repair & painting - Processes, methods & tools Thanks for disseminating the knowledge. having worked in an automotive paint shop for 9 years, this whole thread is like re-calibrating myself. Brilliant! |

| (1)
Thanks
|
| The following BHPian Thanks rangarx for this useful post: | arunphilip |
| |
|
30th October 2014, 09:06
| #12 |
| BANNED Join Date: Jun 2014 Location: Tapukara
Posts: 452
Thanked: 1,309 Times
| Re: All about car dent repair & painting - Processes, methods & tools Can't thank you enough. So much information, the problems, and the solutions to all of those problems. A couple weeks back, I got a small dent on my right doors. A thin line that runs on both doors. No metal exposed. And I'm in no hurry to get it repaired. I filed a complain with the insurance company and bought some time with the surveyor so I can shop around and compare. Obviously, the best thing to do is not be in a hurrylike the Merc and BMW driversbut sometimes I give into the honking and flashing done by the guy (or the Miss,) who wants to zip past me. |
|
| ()
Thanks
|
|
30th October 2014, 10:18
| #13 |
| BHPian Join Date: Dec 2012 Location: Kolkata
Posts: 113
Thanked: 75 Times
| Re: All about car dent repair & painting - Processes, methods & tools What an excellent article, Joy, as always!! Rated a very well deserved 5 stars!! Anybody with an absolutely zero level of knowledge about denting and painting would be well advised to go through your post and make informed decisions henceforth.  My Etios Liva had to go through a harrowing experience in September when its hood was severely dented when a public bus moved backwards to create space for the bus to overtake another bus in front and hit her. Even though I eventually fixed it from the dealer alongwith other minor scratches and dents from insurance, I was fortunate to be guided by him to tell them exactly what I wanted and more importantly what I did not want them to do on my car. I think there are two sides of this article. The first one is definitely how you can save money and not allowing yourself to be taken for granted. The second point and which I think is more important is that now we understand the technical part of the job and select the FNG that can handle the job best in terms of availability of necessary tools and of course expertise. Thanks again Joy for this wonderful thread!!  |
|
| (1)
Thanks
|
| The following BHPian Thanks Inquisitive for this useful post: | joybhowmik |
|
30th October 2014, 10:51
| #14 | |
| Senior - BHPian Join Date: Aug 2009 Location: Trivandrum
Posts: 1,124
Thanked: 794 Times
| Re: All about car dent repair & painting - Processes, methods & tools Quote:
2. One of my colleagues mentioned that he got one panel of his car repainted from a 'hot' paint booth (some thing like a covered paint booth with increased ambient temperature). He says that this procedure is useful for minimizing color difference in the long run. Would this really help? 3. How is repainting done in other countries such as the US and UK? Do they also have this 'color difference' problem after a few months? 4. Can somebody list the colors that are less prone to this 'color difference after a few months of repainting one panel'. I know White and Silver are good in this. Last edited by jinojohnt : 30th October 2014 at 10:52. | |
|
| ()
Thanks
|
|
30th October 2014, 11:12
| #15 |
| Distinguished - BHPian  | Re: All about car dent repair & painting - Processes, methods & tools Hi Joy, it would be interesting to compare the ideal processes described by you to what commonly happens with our FNG denters-painters. Could you mention:
Last edited by SS-Traveller : 30th October 2014 at 11:28. Reason: Typo |
|
| (2)
Thanks
|
| The following 2 BHPians Thank SS-Traveller for this useful post: | IndigoXLGrandDi, varoon9999 |
|