| |||||||

 |
| Search this Thread |  118,556 views |
 14th November 2020, 22:51
| #76 |
| BHPian Join Date: Jun 2020 Location: New Delhi
Posts: 129
Thanked: 606 Times
| Re: Hondu: Restoring my 3rd-gen '09 Honda City Update on Friday, the 13th |

|  (10)
Thanks (10)
Thanks
 |


| The following 10 BHPians Thank kunalsingh for this useful post: | dailydriver, GTsunny, InControl, jeygani, Leoshashi, rayjaycleoful, sai_ace, vaasu, WhiteSierra, Yakuza |
| |
|
19th November 2020, 20:23
| #77 |
| BHPian Join Date: Jun 2020 Location: New Delhi
Posts: 129
Thanked: 606 Times
| Re: Hondu: Restoring my 3rd-gen '09 Honda City Update on Thursday, 19th November :Just a quick update on my parts order from Courtesy Honda, Okhla. Dealing with them has been a surprisingly pleasant experience with S.A. Nitish being prompt in arranging the parts for me. I had placed the order on Friday, 13th November and the parts arrived within 4 working days (Wednesday, 17th) inspite of Diwali and Bhai Dooj holidays. I was caught up with some work and could only go to Courtesy Honda today. Nitish had told me beforehand that he service centre was running low on staff (technicians) and it might take some time to install the parts in my car. I however told him that it was not a worry for me as I intended to only take the parts and install them myself later on. I'd asked Nitish for the total price over the phone earlier but he said that he'll only be able to confirm it once he feeds the part numbers into their system. He also said that the invoiced parts will also include labour charged (I was ready to show him the email copies provided to TBhpian techcoze by Senior Honda management acknowledging over-the-counter spare parts sales but I decided to first wait and see how much labour would be charged before I challenge it). I reached Courtesy around 3pm but had to wait as their servers were down and the Parts couldn't be invoiced. Finally after about an hour and a half, the servers started working and S.A. Nitish released the parts from their store for me. I was also pleasantly surprised to know that they were ready to sell me just the spares without any labour charge (basically following an over-the-counter sale). I had to show my RC copy once again (for proof of ownership and noting down VIN/Engine details) and I was good to go! I would like to thank BHPian techcoze for taking up this issue of OEM spare parts sale with Honda and helping so many members by sharing this valuable information. I'd also like to extend my thanks to BHPian Yakuza for bringing this news to my attention or I would have never known that it was actually possible to buy OEM over-the-counter spare parts from Honda. At Courtesy Honda service, Okhla (I always try to find a safe and covered parking for Hondu) :  Parked alongside another 3rd gen iVtec :  Here are the parts :  Final invoice amount came to Rs.1690/-, which was Rs. 223 cheaper than the MRP (Rs.1690/-). I'm a happy guy  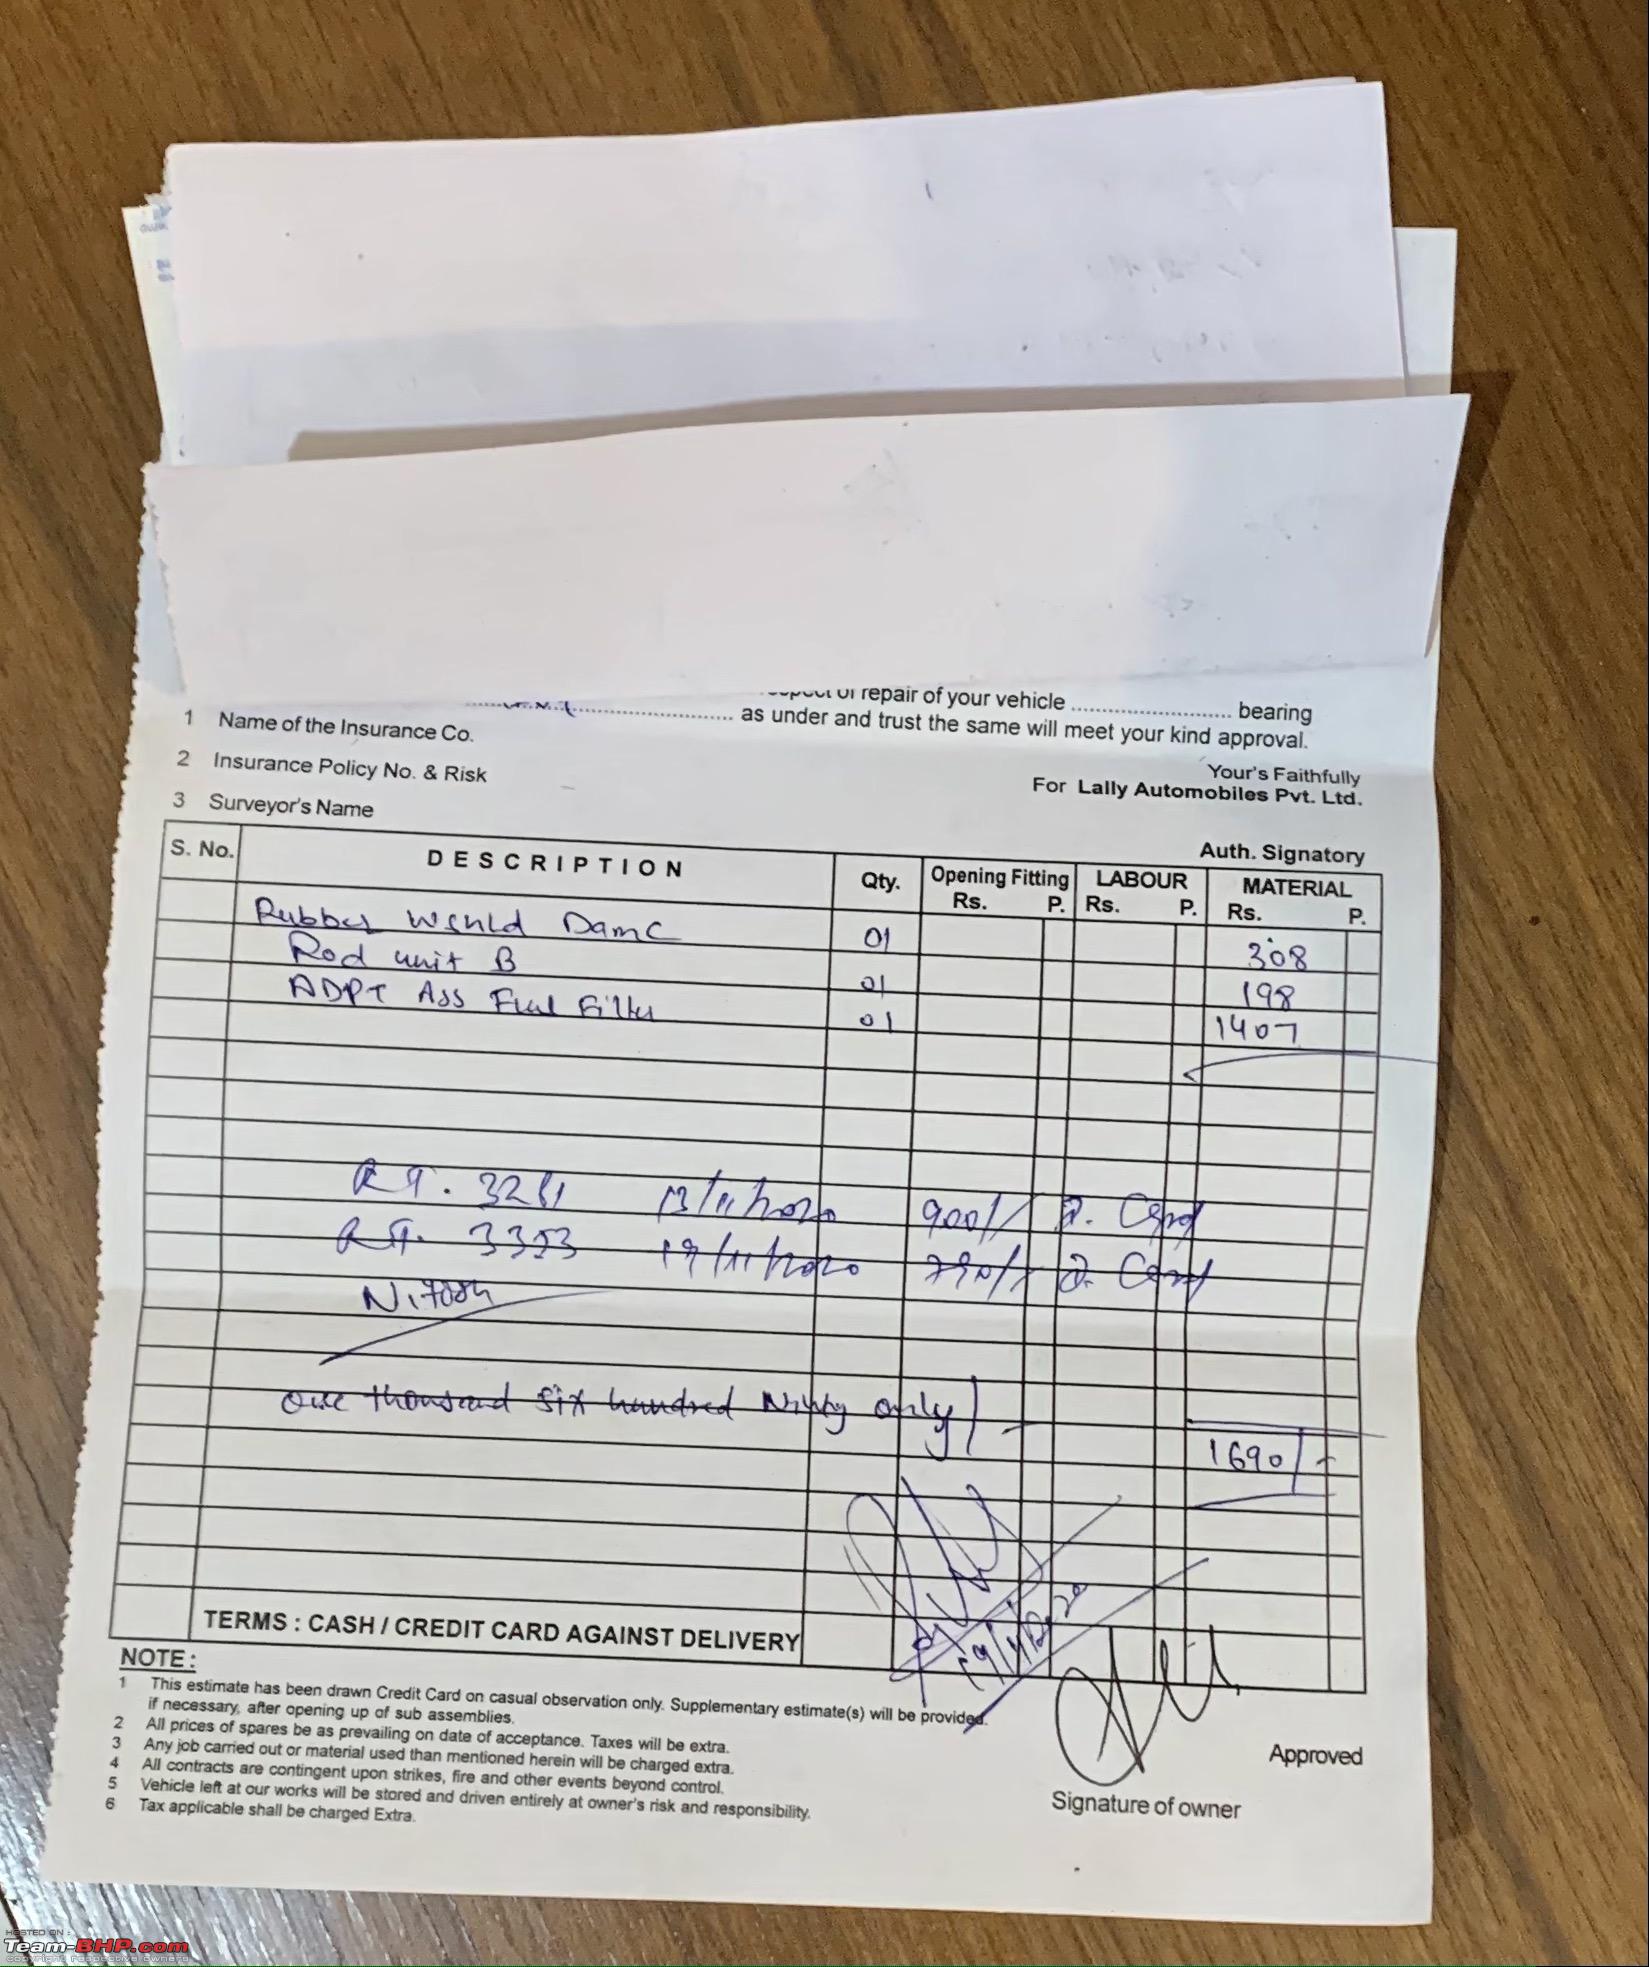 Here are some close up shots of the individual parts (for reference) : 1. Fuel Filler Assembly Housing : 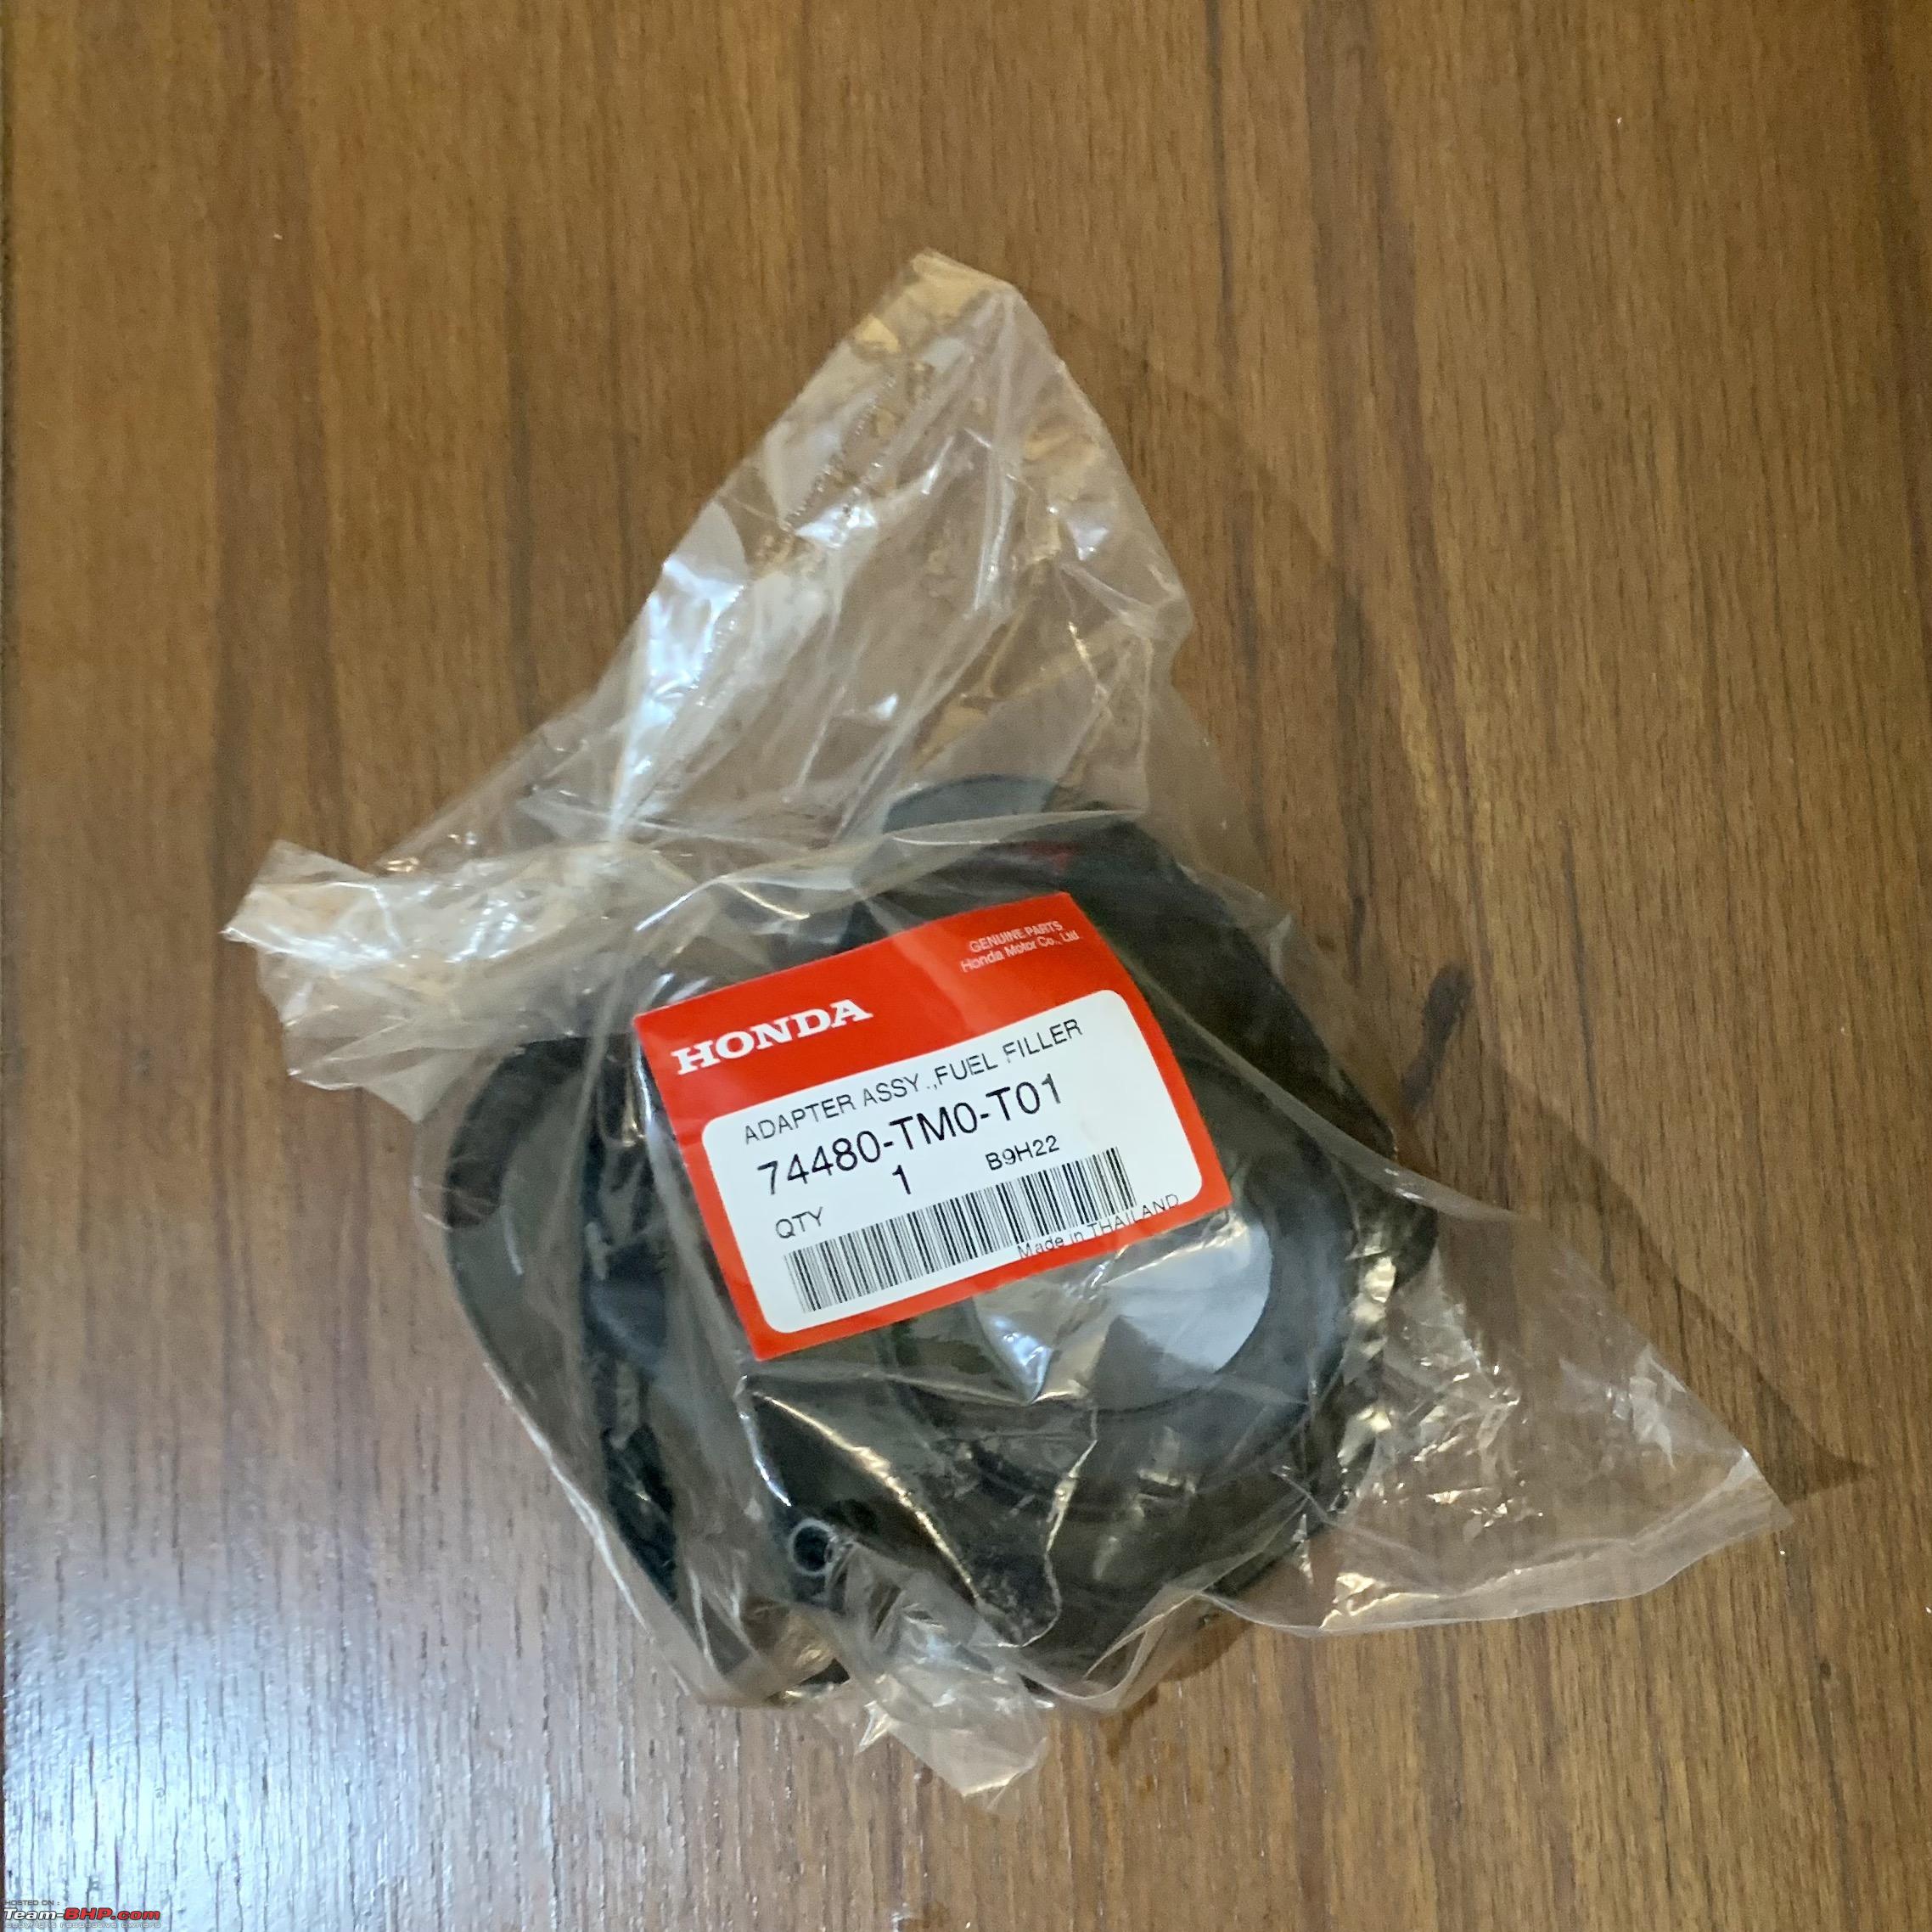  2. Wiper Linkage Assembly, Rod Unit B : 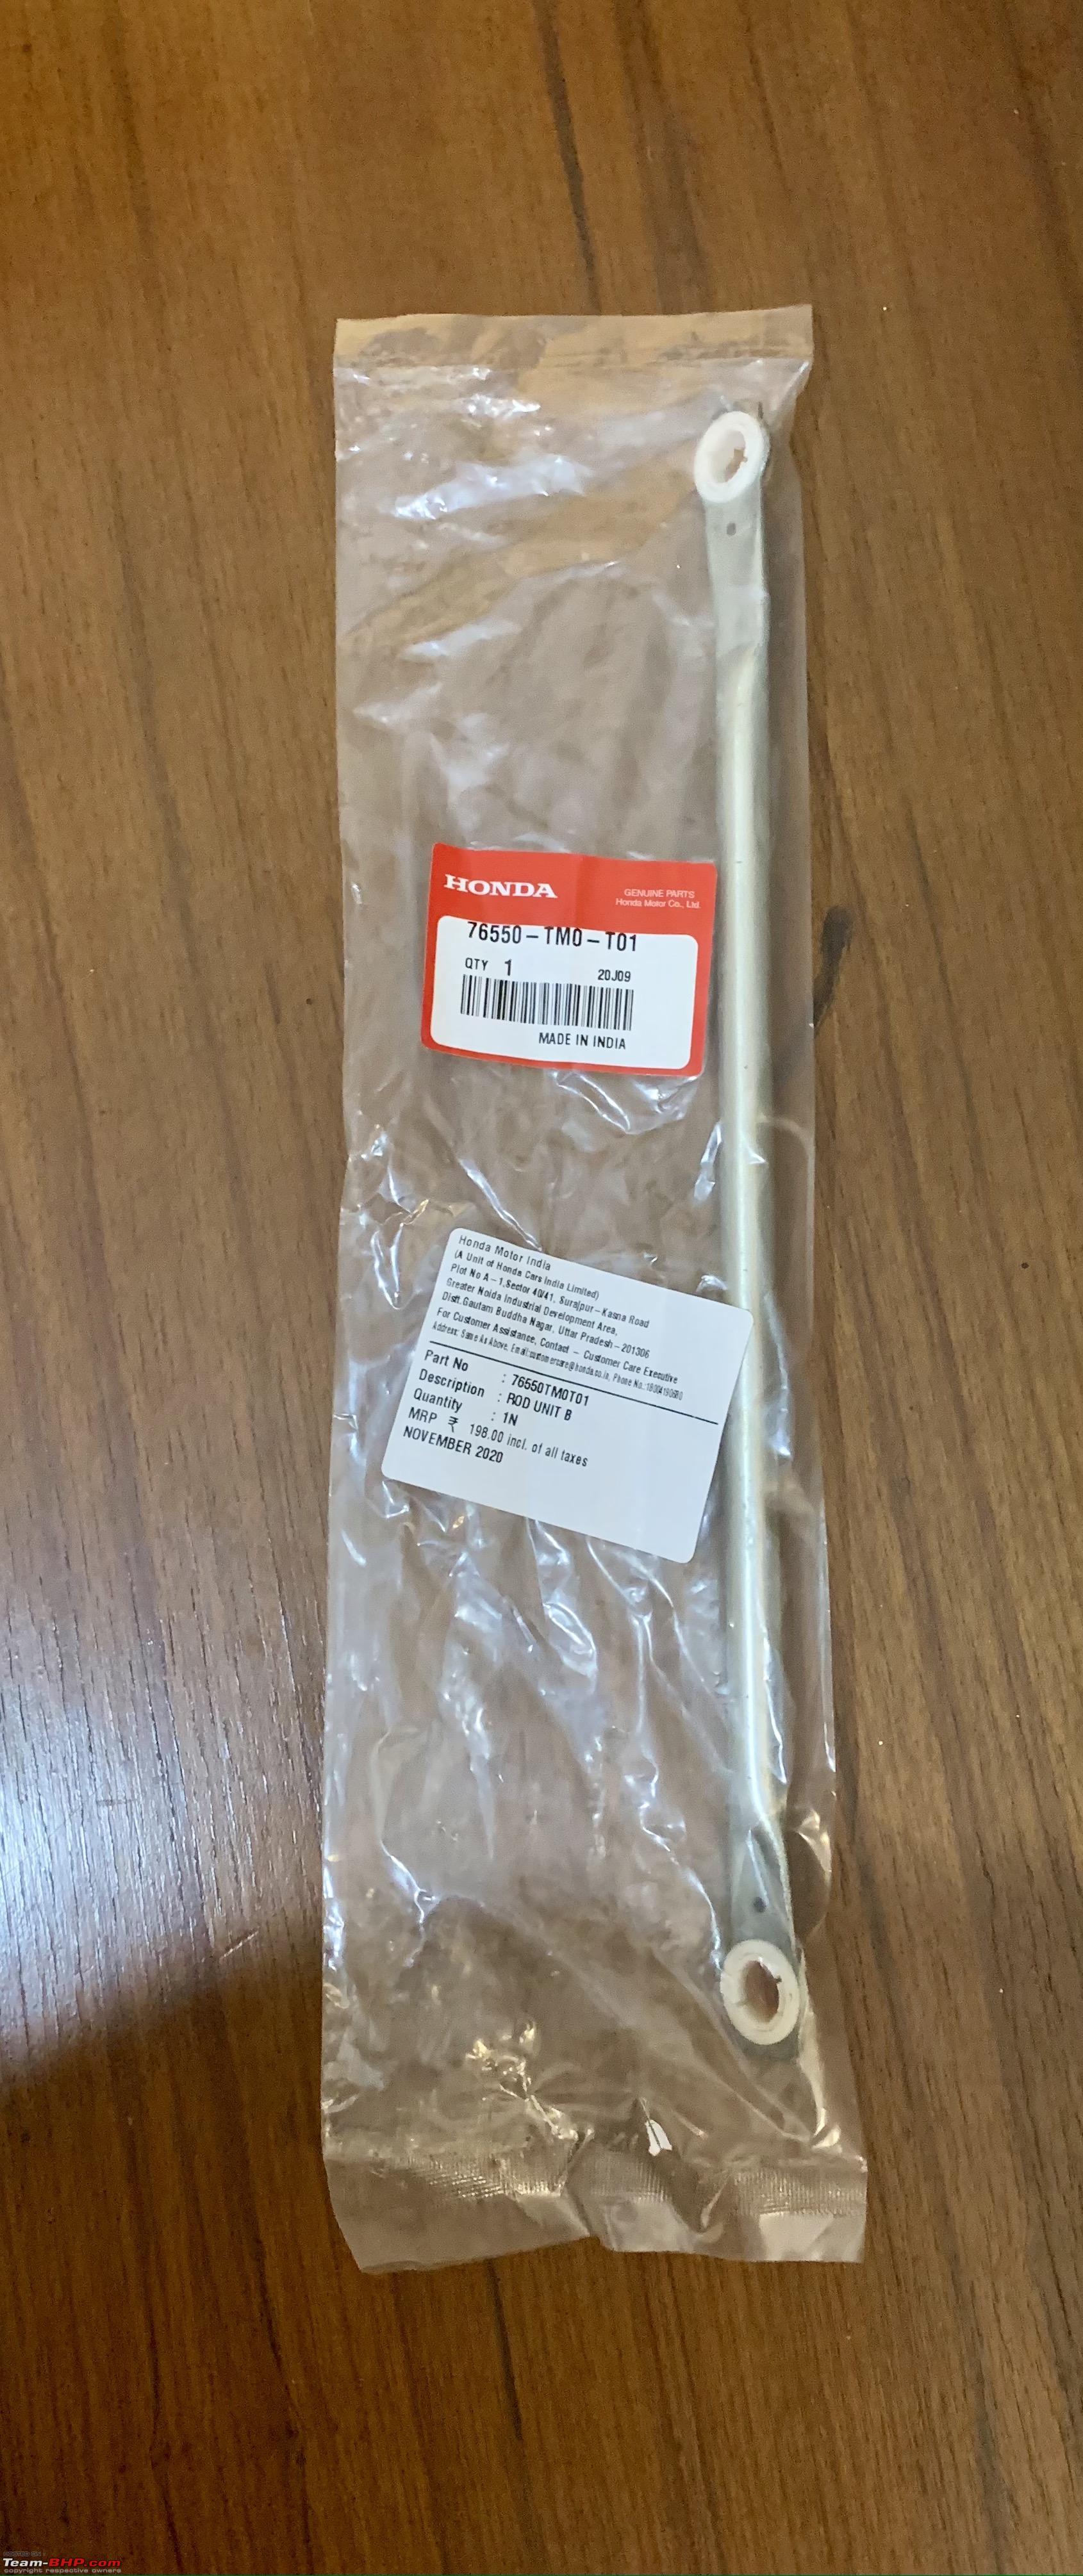 3. Rear Windshield Rubber Beading C :  Also, the fourth and final part of Hondu's restoration is up on Nakul's YouTube channel. Sharing the video link here, please do give it a watch  : : |
|
| (4)
Thanks
|
| The following 4 BHPians Thank kunalsingh for this useful post: | Cessna182, GTsunny, InControl, WhiteSierra |
|
19th November 2020, 22:19
| #78 |
| BHPian Join Date: Jun 2020 Location: BLR/BOM
Posts: 124
Thanked: 186 Times
| Re: Hondu: Restoring my 3rd-gen '09 Honda City Glad it all worked out buddy! End of the day nothing like OE Parts. |
|
| (1)
Thanks
|
| The following BHPian Thanks Yakuza for this useful post: | kunalsingh |
|
3rd December 2020, 12:53
| #79 | |
| BHPian Join Date: Oct 2020 Location: Mumbai
Posts: 52
Thanked: 87 Times
| Re: Restoration of my '09 Honda City "Hondu" Quote:
You have tastefully modified your City and brought it back to as good or better than new, and I could relate to it as I have a City too (the 2012 face lift) and I was in a similar situation where I wanted to upgrade but didnt need to as the car is still in good condition at around 40k kms running, and I was feeling bad about letting the City go and getting a new car, more so for the money involved in a new or used car purchase at this time of financial crunch so instead, to calm me down from that upgrade itch feeling I had the dents fixed and car painted and was excited to try some of the products you had written about so, purchased the car cover and the magnetic shades via Amazon link and Im thankful for both your recommendations, and I wanted to post my reviews on both. The magnetic sun shade was set up in the car in last week of Oct 2020 and is holding up very well, it has brought down the temperature around at least 20% I would say and, earlier the AC blower was always started at position 3 and after a while dropped to position 2 but never lower, and after the shades setup the blower has been on position 1 almost all of the time and hardly needed to go to position 2 and even if switched to 2 then it was only for short duration and back to position 1, and neither while looking at ORVMs nor IRVM is visibility hampered. The cover was put on the car in last week of October 2020 and, it has done a fantastic job of keeping bird poo and dirt and tree leaves and twigs away from the car so, it saves me from going down daily and cleaning the bird poo with water and microfiber cloth, and the dicky channels dont get jammed with twigs and leaves. Today after I removed the car cover, noticed that something like runny bird poo in white colour and textured print was on the car, mainly bonnet and the roof. Im assuming it was bird poo which got through the cover and, the textured white imprint on the car is the inner material of the cover, and my first reaction was to clean the white imprinted bird poo like spots off so, in that hurry I didnt click any pics. I would kindly request for feedback from Kunal and our friends here, on what could possibly be happening, so pl share your knowledge and your experience thanks. | |
|
| (1)
Thanks
|

| The following BHPian Thanks GTsunny for this useful post: | kunalsingh |
|
3rd December 2020, 21:06
| #80 | |||
| BHPian Join Date: Jun 2020 Location: New Delhi
Posts: 129
Thanked: 606 Times
| Re: Restoration of my '09 Honda City "Hondu" Quote:
Quote:
Quote:
This has also happened to many times and there's not much we can do about it. I guess it is still better than having the droppings land directly onto the car  Here is a picture of my cover - after many bird droppings, dry leaves/twigs and a big patch (courtesy of of a neighbourhood stray dog) :  | |||
|
| (1)
Thanks
|
| The following BHPian Thanks kunalsingh for this useful post: | GTsunny |
|
8th December 2020, 23:15
| #81 |
| BHPian Join Date: May 2020 Location: Navsari-AMD
Posts: 94
Thanked: 521 Times
| Re: Hondu: Restoring my 3rd-gen '09 Honda City Hi kunalsingh, What a beautifully restored City and beautifully documented and written thread. Wishing you many more years and kms with it. I own a 2011 Honda Jazz having run 1.10L kms on the odo, but is in an impeccable condition mechanically. Just installed a fresh set of 195/60/15 Yokohama earth 1s. I was toying with the idea of either restoring the car or getting a new one. Your thread has reaffirmed my belief to restore the car. Mechanically the car has always been maintained at Honda ASS, but I am on good terms with a reliable FNG. Let us see how things pan out. |

| (2)
Thanks
|
| The following 2 BHPians Thank hridaygandhi for this useful post: | asbshyam, kunalsingh |
|
9th December 2020, 22:18
| #82 | |
| BHPian Join Date: Jun 2020 Location: New Delhi
Posts: 129
Thanked: 606 Times
| Re: Hondu: Restoring my 3rd-gen '09 Honda City Quote:
Between Honda ASS and FNG, I would say get the minor (5k) services done at Honda. This will serve two purposes - 1. You will maintain a thorough service record on paper and 2. ASS will do a detailed inspection as a part of the service and will bring your attention to any major work which might be required in your car (which you can then get done at your trusted FNG). However, this is if you have a decent Honda dealer near you. My experience with HASS has been horrible from the very beginning and I'm glad to not be at their mercy anymore. I hope the Yokos are performing well. I'm running the same tyres on Hondu and have had no complaints with them. Would you mind sharing the cost as it's been quite a while since I checked, and Nakul (who also runs the same set ) will be needing a new set soon. | |
|
| (2)
Thanks
|
| The following 2 BHPians Thank kunalsingh for this useful post: | hridaygandhi, R2D2 |
|
10th December 2020, 12:03
| #83 | |
| BHPian Join Date: May 2020 Location: Navsari-AMD
Posts: 94
Thanked: 521 Times
| Re: Hondu: Restoring my 3rd-gen '09 Honda City That has precisely been my policy with respect to regular maintenance, to get the car inspected at scheduled intervals at ASS, and to get the parts replaced at FNG; more so in case of my BMW X1, as the labour charges there are exorbitant. The Honda ASS I go to is nothing to write home about, but fortunately not as dreadful as the experience you have encountered with yours. Quote:
I paid Rs.5,100/- per tire x 4 = Rs.20,400/- for a set of four, including alignment, balancing and nitrogen filled air for August 2020 manufactured tires. | |
|
| (1)
Thanks
|
| The following BHPian Thanks hridaygandhi for this useful post: | kunalsingh |
|
10th December 2020, 15:14
| #84 | |
| BHPian Join Date: Oct 2020 Location: Mumbai
Posts: 52
Thanked: 87 Times
| Re: Restoration of my '09 Honda City "Hondu" Quote:
2. Valid point and no debate on something is better than nothing and, I dont know if its a coincidence but, these imprints didnt appear earlier and, this issue seems to have started after I washed the cover for the first time so, did you notice that after first wash too or do you feel its regardless of washing the cover? 3. So, I had removed the car cover yesterday for cleaning the cover and, as soon as I noticed the imprints I started cleaning with microfibre cloth and water spray and, midway I realised that I had forgotten to click pics last time so I clicked pics of the bonnet and the roof and the before cleaning and after cleaning pics which Ive attached here and, the imprints were easy to clean off and, today I cleaned the bird poop and put the cover back and while I had knelt down to put the buckle someone came from behind and licked my ears and I looked back and she licked my cheek and I hugged her because I hadnt met her from so long, and yes so she aint a pet dog and there are couple of them in our society, and almost everyone in our society ( specially me ) loves dogs, so I have a request, these stray dogs have bitten the cover off without knowing theyre causing damage so, pl dont mind them friend because they dont mean no harm  | |
|
| (2)
Thanks
|
| The following 2 BHPians Thank GTsunny for this useful post: | kunalsingh, R2D2 |
|
11th December 2020, 12:42
| #85 | ||||
| BHPian Join Date: Jun 2020 Location: New Delhi
Posts: 129
Thanked: 606 Times
| Re: Restoration of my '09 Honda City "Hondu" Quote:
Quote:
Quote:
Quote:
| ||||
|
| (1)
Thanks
|
| The following BHPian Thanks kunalsingh for this useful post: | GTsunny |
|
11th December 2020, 19:35
| #86 |
| BHPian Join Date: Jun 2020 Location: New Delhi
Posts: 129
Thanked: 606 Times
| Re: Hondu: Restoring my 3rd-gen '09 Honda City Update on Friday, 11th Dec : DIY Parts InstallDearest forum members, it's been quite a while since I've posted an update on Hondu. As a continuation of my last update - I did a DIY install of all the spare parts I'd procured from Honda, and I'm my experience of the same. I started off the DIY on a lazy sunny afternoon. Here is a random assortment of parts and tools that I used for the job : 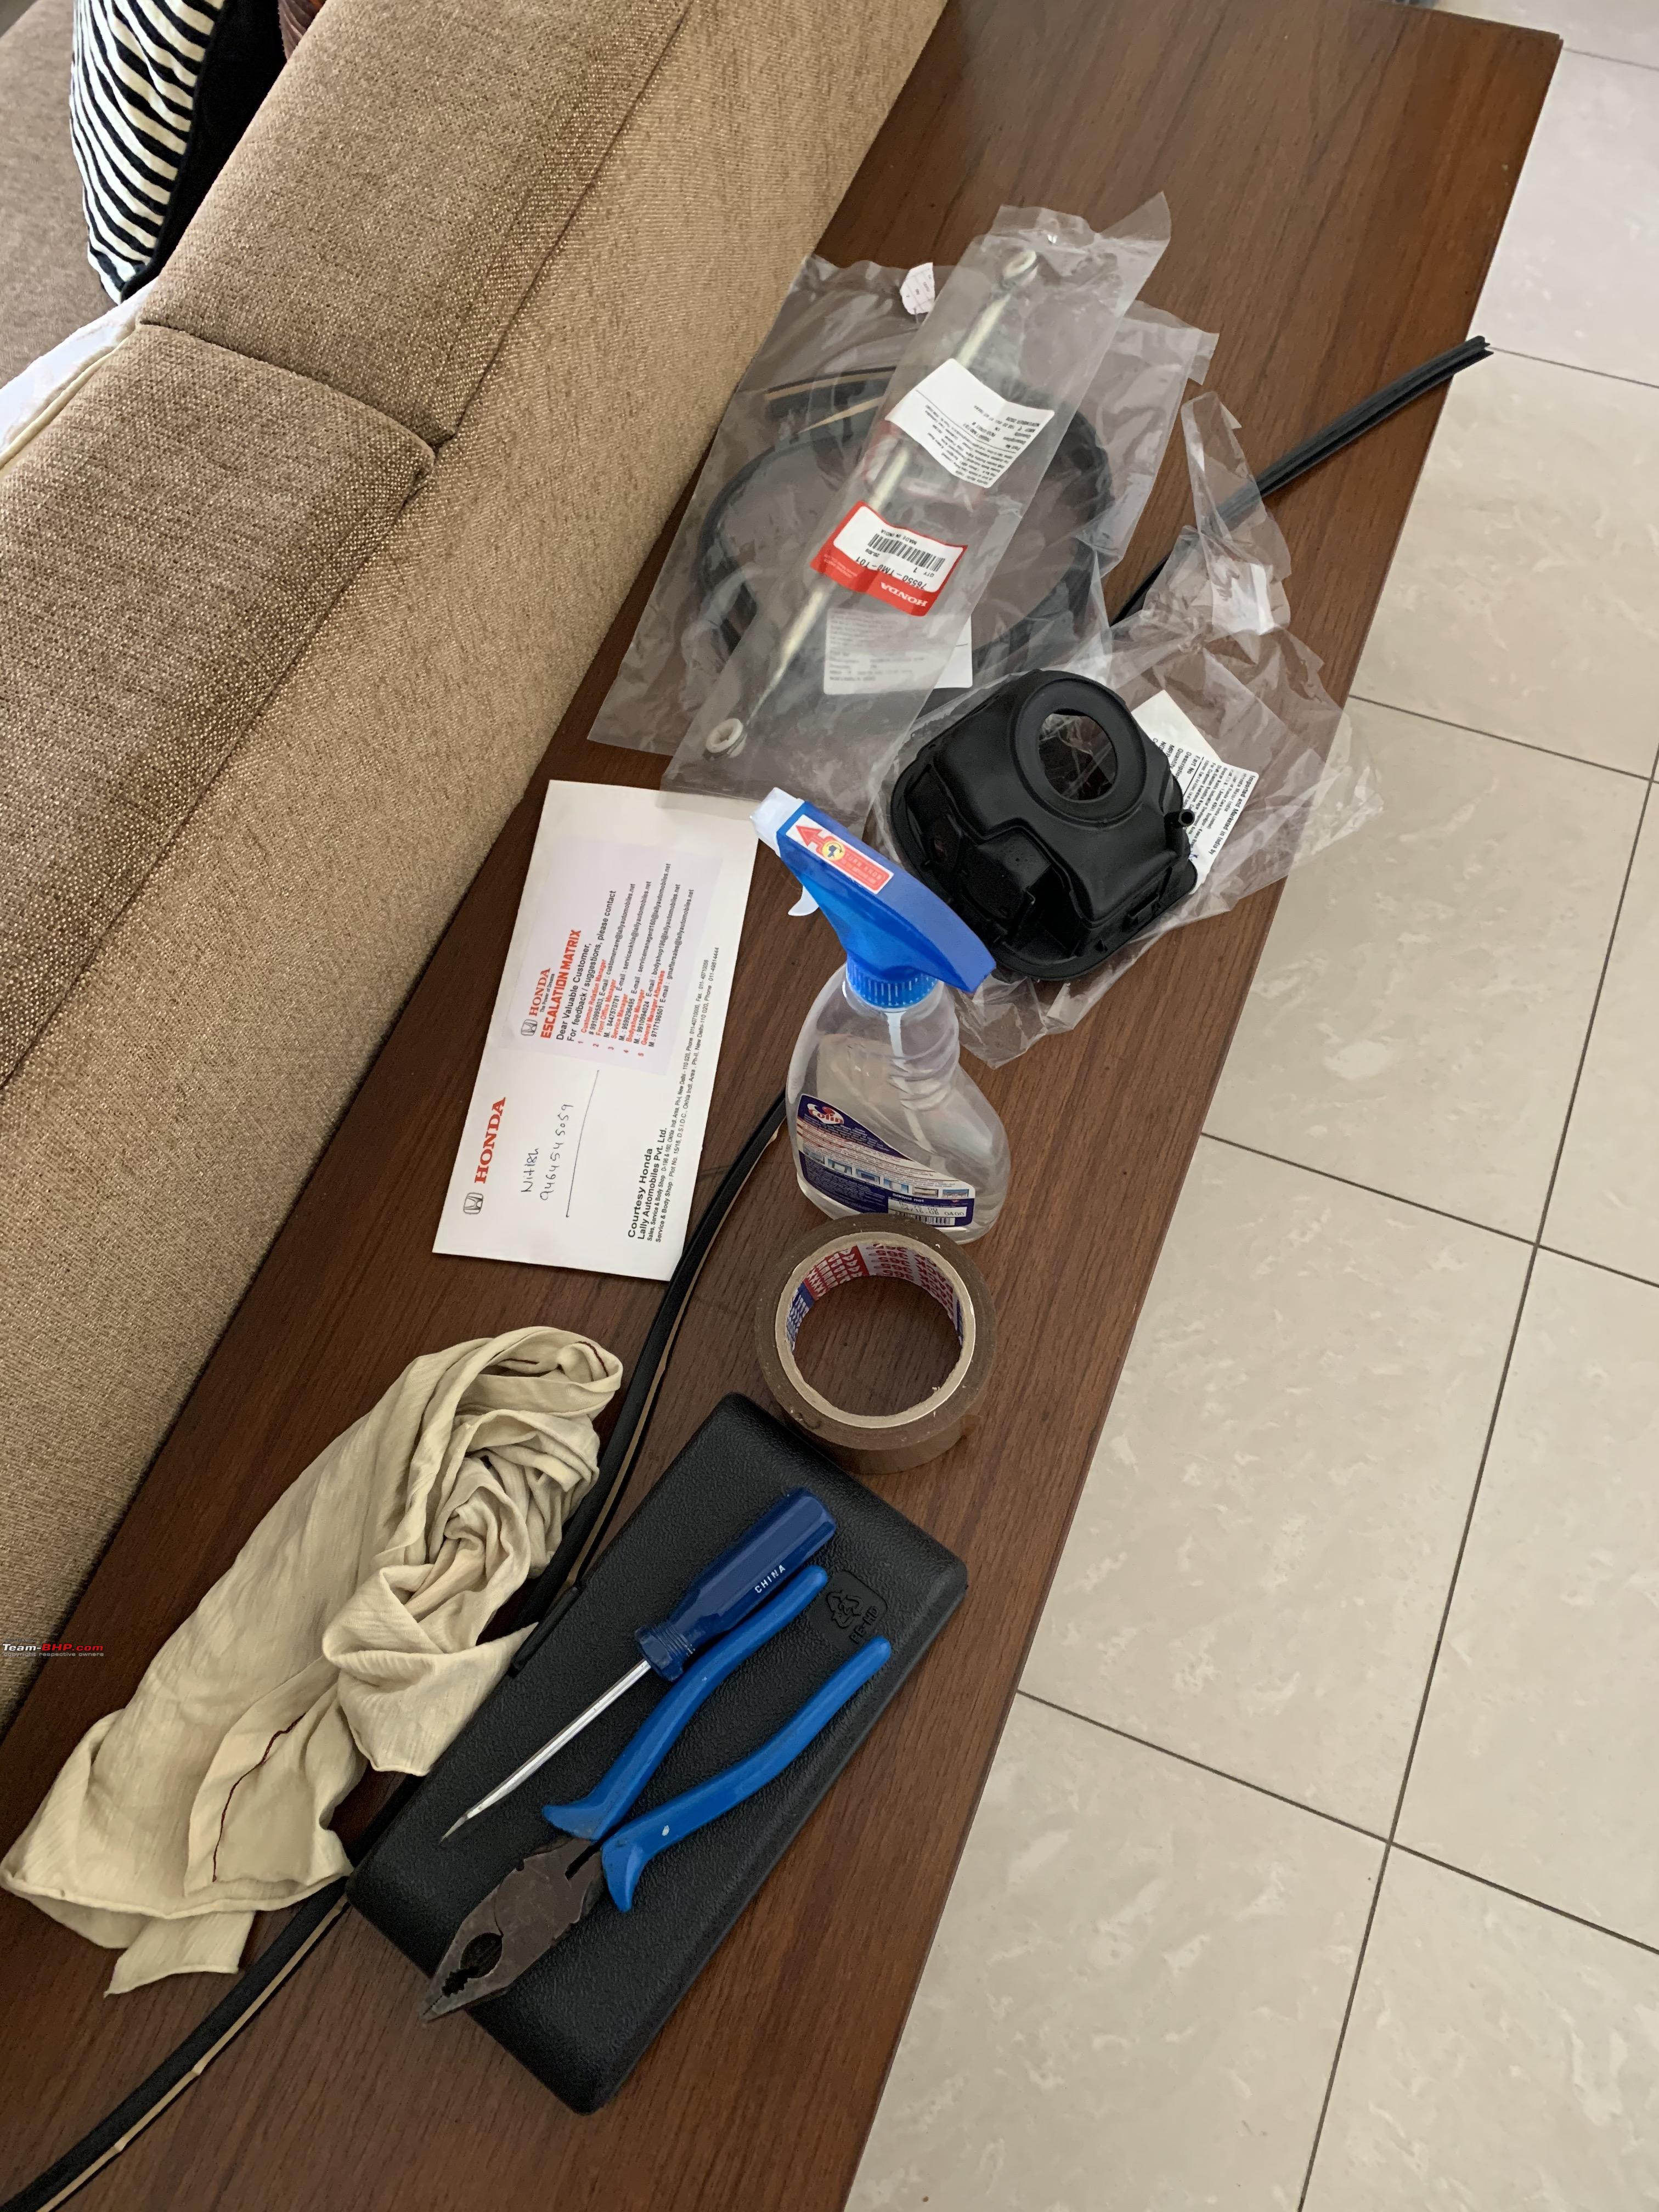 The install was divided into 3 parts : 1. Fuel filler housing replacement 2. Wiper motor assembly replacement 3. Rear windshield beading replacement Part 1 : Fuel filler housing replacement : This was the current state of Hondu's fuel filler assembly - as you can see, the rubber housing had turned brittle and cracked with age. The plan was to replace this with the new housing :  Step 1 was to remove the fuel filler cap (this needs to be done to get the housing off) and tape it off to prevent petrol from evaporating and also from letting any dirt into the fuel tank :  Step 2 was to figure out a way to pull out the current housing assembly. To understand how the housing was stuck on, I observed the new one carefully and noticed that it had tabs in three places (with clips) through which it was attached to the car's body :    I then used a flat-head screw drive with a cloth wrapped around its edge to carefully pry out the housing from its position. Years and years of dirt, grime and muck had made sure that the process was tricky. A problem with this generation of Honda city is that it has no plastic covering for the rear wheel-well. This results in all the grime and muck from the tyres being splashed directly on to the back of the fuel filler assembly and fuel pipe. I had to use a bit of force to pull the assembly off. Here is a look at the compartment minus the rubber housing:  And this is a picture of the housing - you can see years and years of dirt caked on to it :  While comparing the old and new fuel filler housings, I noticed that the old one had a hook-like tab along with a chamber attached to it which was not present in the new housing. I realised that this was a part of the central locking assembly and had to be carried over to the new housing. However, the challenge was to figure out a way to take it off without damaging it. The whole assembly was so dirty that I had to bring it back home and give it a thorough wash just to be able to see how to disassemble the hook :  Finally took part out and gave it a good wash and pat-dried before taking it back to the car :   Now the next step was to put the locking assembly into the new housing and see if it works with the car central locking (notice the little metal pin next to the fuel cap - this is the central locking pin for the fuel filler cover) :   Did a dry fit with just the housing and locking pin and it worked perfectly! Here is a look at Hondu's fresh new fuel filler housing. A job well done and one that I was mighty proud of  Last edited by kunalsingh : 11th December 2020 at 19:38. |
|
| (5)
Thanks
|
| The following 5 BHPians Thank kunalsingh for this useful post: | Cyborg, GTsunny, hridaygandhi, InControl, R2D2 |
| |
|
11th December 2020, 20:39
| #87 |
| BHPian Join Date: Jun 2020 Location: New Delhi
Posts: 129
Thanked: 606 Times
| Re: Hondu: Restoring my 3rd-gen '09 Honda City Part 2 : Wiper motor assembly rod install This was the second part of my DIY parts install series. As some of you might remember from my earlier posts, I had in fact changed out Rod Unit A from the Wiper linkage motor assembly during Hondu's rebuild and repaint process itself. However, I'd not been able to source Rod Unit B and it was very irritating to have one wiper work perfectly with the other having a lot of play in it (which is a common issue with wiper arms on older cars - they start developing play due to the mounts turning hard and getting loose with age). I had recently managed to source the linkage rod after a lot of struggle (as detailed my earlier posts) and wanted to install it in my car immediately - hence started my DIY! Step numero uno was to pop the hood and remove the wipers, followed by removal of the windshield cowl. I have removed the cowl on my car many times before (I open and clean inside the insides regularly to prevent the water drainage lines from getting blocked due to stuck leaves, twigs, dirt etc.) :   I used my trusty ol' Dayton toolbox for this job (and all my other DIYs). Used the socket wrench with the size 14 socket to remove the wipers :  With the windshield cowl removed :  Next step was to remove the wiper motor linkage assembly. I first disconnected the power supply coupler to the linkage before taking off the mounting screws. The motor is secured at four different points (three are flat and one is sideways) and these need to be removed before taking it out :  With the wiper linkage assembly removed. It consists of the wiper motor and the linkage arms :  With the assembly removed, it was time to replace rod unit B. Here is a look at the old rod - you can see the bushing which had turned hard and cracked (while removing) :  Next step was to mount the replacement rod into place. This, however turned out to be quite a struggle as the rod has to be mounted in quite tight. I had to use a lot of strength to get it to fit in correctly :  Now that the rod was installed, it was time for a dry fit and test. Connected the coupler and did a dry run to check if the linkage was functioning, and Voila! It was working perfectly. Installed the motor back and tightened all the nuts with my size 10 socket wrench :  Here is a zoomed-in shot of the new wiper-linkage rods. These retail for under Rs.200/- individually and if you were to go to Honda with this problem, they would ask you to replace the whole motor assembly (which costs around Rs.4000 + labour). I know this because my Honda ASS asked me for it.  And my wipers are now back in top-condition (with no wobble or play in them) for just under Rs. 400/- and after a few hours of DIY'ing. All in all, I'm a happy man I then put everything back into place and cleaned up the whole area with a water solution spray and a microfibre cloth before installing the windshield cowl and wipers back again :   Last edited by kunalsingh : 11th December 2020 at 20:52. |
|
| (7)
Thanks
|
| The following 7 BHPians Thank kunalsingh for this useful post: | Cyborg, GTsunny, InControl, R2D2, rayjaycleoful, vaasu, WhiteSierra |
|
11th December 2020, 23:48
| #88 |
| BHPian Join Date: Jun 2020 Location: New Delhi
Posts: 129
Thanked: 606 Times
| Re: Hondu: Restoring my 3rd-gen '09 Honda City Part 3 : Rear windshield rubber beading install and a big disappointment : Part three of the DIY series was quite a simple and straightforward process. The Honda OEM rear windshield rubber beading has a layer of double-sided tape running throughout it's inner edge that helps it get a gapless fit along the windshield. I only had to trim the edges slightly as the length of the beading was marginally longer than the glass. Here are some pictures of the result :  It's a perfect fit :   With this, I had finally completed all the little jobs that were pending and I decided to do a little aesthetic mod on Hondu - a Shark Fin Antenna install! I had first noticed this on my younger brother's Verna and really liked the way it looked :  And I'd also noticed it on Nakul's car, which convinced me that the antenna does in fact really compliment the look of our cars :   I was on the lookout for a good quality shark-fin antenna and came across this thread by Bhpian Sail where he's given a detailed report about his shark fin antenna order and installation experience : https://www.team-bhp.com/forum/diy-d...ml#post4131481 (DIY: Shark fin antenna install on my Hyundai Grand i10) I placed an order for the exact same brand Auto Pearl (via Amazon) after reading his thread. Here is the link of the product I ordered : https://www.amazon.in/dp/B0126K2JRS/?tag=tbhp0e-21 however my experience was not so great. I was really excited for the new antenna and was eagerly waiting for it to arrive (took 3 days with Prime). However, this is what I saw when I opened the package :  The seller had sent me a silver coloured antenna!! This is inspite of them clearly stating that the colour was "WHITE" and for my particular car model (City iVtec; 2008-2013). Anyhow, I tried to get a replacement but the seller policy didn't allow replacements (only refunds). Had to contact Amazon customer care (they're quite excellent in solving issues) and had them place a request for a replacement antenna in the correct colour. Received the replacement package after 3 more days and I opened in front of the delivery agent to check the colour. Thankfully it was white this time :  However, I couldn't help but notice that this particular antenna looked visibly different from the one showed in the product description by the seller on Amazon. It also didn't look as well made either. However, I still decided to go ahead and do a dry-fit test on my car :   My doubts did come true and the Antenna did not fit my car at all! It had a completely straight bottom edge (as compared to the curved slant of the car roof) and kept lifting off from the edges no matter how I tried to align it. Disappointed with the product as it turned out to be just a generic one and not made for my car, my only option now is to try Karol Bagh (and this is exactly what I was trying to avoid - going to crowded places). I have decided to put the antenna install idea on hold for now and will make a trip to Karol Bagh with Nakul to buy some accessories for Hondu (shark fin antenna, auxiliary lights, more powerful bulbs, etc.) after the Corona surge goes down  Also, esteemed members - kindly help me to choose a good pair of headlight bulbs for Hondu (stronger/brighter than my current OEM bulbs). I'd like to stay with the stock specifications (60/55W, 12V) and am confused between the usual Philips Xtreme Vision/Osram Night Breaker options Vs. full LED Bulbs. I'll also be installing a pair of LED auxiliary lights (fog lights) near the lower air damn (for highway/ night driving in the hills) and would like to know about good bulb options for the same. I would like to go for yellow coloured bulbs and not the typical white LED bulbs, kindly give suggestions about the same. You inputs would be greatly appreciated! Last edited by kunalsingh : 12th December 2020 at 00:03. |
|
| (3)
Thanks
|
| The following 3 BHPians Thank kunalsingh for this useful post: | InControl, R2D2, WhiteSierra |
|
12th December 2020, 19:31
| #89 | |
| BHPian Join Date: Jun 2020 Location: New Delhi
Posts: 129
Thanked: 606 Times
| Re: Restoration of my '09 Honda City "Hondu" Quote:
 : :  Hondu was completely caked by dust and water marks. It might be a well-fitting cover but it offers practically zero water resistance. No wonder the bird dropping marks used to seep through. Just thought I should let you know.   I'm not satisfied with the performance of this cover and will change it out with a CoverWell water resistant cover before the start of monsoon next year. | |
|
| (2)
Thanks
|
| The following 2 BHPians Thank kunalsingh for this useful post: | GTsunny, R2D2 |
|
24th December 2020, 21:48
| #90 | |
| BHPian Join Date: Oct 2020 Location: Mumbai
Posts: 52
Thanked: 87 Times
| Re: Restoration of my '09 Honda City "Hondu" Quote:
2. That is so kind of you and your family, thank you  3. So, I don’t know who up there is reading our conversation’s down here but, the day I last cleaned the car was 9th Dec and last posted on this thread with pics was 10th Dec and, I thought next rainy season would begin around July next year but, the very next day after my last post, it was raining here and the first thought I had was, someone really wants us to test out the effects of our magnetic shades' and our cover's and, after I saw the pics you posted I was filled with despair at the thought of what would become of my City and, I delayed the inevitable as I didn’t want to see her in a sorry state and, finally went down on 16th Dec to check out the car. Fortunately it didn’t look as bad as I thought it would be and, I’ve attached some pics of the car cover after the rains and the leftover imprints and dirt and mud on the car. It did take around 30 – 40 mins and the car was all clean after I was done with it. And no, water doesn’t seem to have seeped through the doors due to the shades so I guess that’s good for now.  4. Had spoken with an auto electronics store owner who I consider honest and, he had stock of the shark fin antennae and, he said this antennae looks good but may spoil the radio reception and, he said our short stubby antennae is at least better off than the earlier longer thinner ones the older cars came with, you know the ones which always touched the ceilings whenever the car passed under any low covered areas so, I left it at that but, I admit the car does look cooler with the shark fin antennae And, what’s the next DIY update planned! Hey, guess who showed up on Nakul’s Youtube channel couple of days ago! Last edited by Akshay1234 : 25th December 2020 at 01:26. Reason: As requested | |
|
| (3)
Thanks
|
| The following 3 BHPians Thank GTsunny for this useful post: | InControl, kunalsingh, R2D2 |
|