Removal
With the working established, its time to remove the delco. First thing to do is to bring the engine to TDC using marks on the crank pulley, note the position of the delco rotor (by popping the cap off) and then move on to actually removing it.
The Delco is clamped onto the engine block with a 10mm nut and bolt combination at the very bottom. You will simply need two 10mm spanners or ratchets to break it loose and take them off
Before actually removing it, unplug all the 4 plug wires and the main wire going into it from the ignition coil. Also unplug the black wire attached to it on the side which goes from the points mechanism to the -ve of the coil. Its held by an 8mm nut
Thats it. Pull the delco out now.
With it on the bench, take the cap off and work on removing the points mechanism. The points mechanism includes a capacitor, a contact breaker and a spring mechanism. The connect points and capacitor are held in place by 2 flathead screws. The spring mechanism pivots on a pin which is attached to the delco top plate.

Once the points and condenser are out, you can actually work on removing the top plate. Again, only two screws hold it but they are flathead screws and very easy to strip. Someone had already had a go at removing them before and stripped them partly.
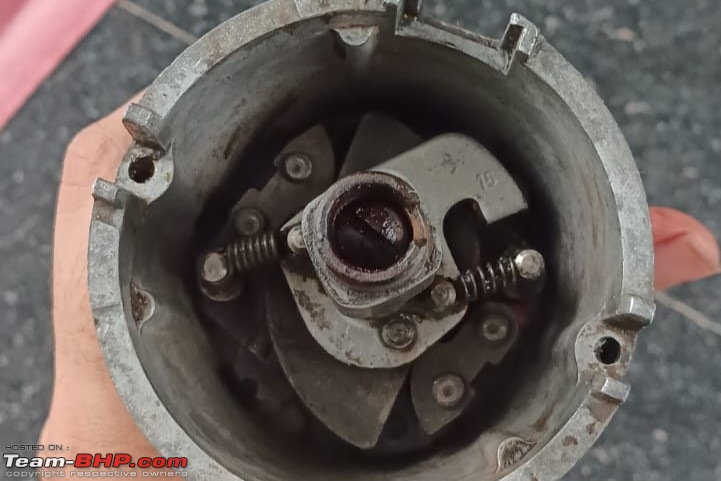
After removing the flathead screws, the top plate comes off, revealing the advance mechanism. There is a set of 2 weights and springs here. If you do want to dismantle the delco further, it is to be kept in mind that each of the weights and springs are different. The 23D4 advances the timing at two distinct points in the revv range, hence the two different spring-weight combinations. It goes without saying that they will need to go back in exactly as they came out else the advancing mechanism wont work as intended.

Also, there is tonnes of grease in here as is visible. This is simply the wrong way of doing things. Apart from gunking up the insides, the grease adds to the effective mass of the centrifugal weights and doesnt allow them to fly apart at higher RPMs and alter timing. The most lubrication this mechanism should see is some sewing machine oil on the delco base and weights or some engine oil.
I simply cleaned all of this without dismantling it using petrol and a rag. It took me about 40-45 minutes and 3-4 rounds of cleaning to get it back to acceptable shape. There isnt really any technique to clean it, just good old elbow grease and ensuring that you dont accidentally pop off the advance springs.
Another very important point to note is that the delco body has two drain holes at the very bottom. Any lubricant poured (sewing machine oil or engine oil) should be able to exit the body via these holes. If not, it might eventually make its way up onto the contact breaker (in the case of a point-condenser system) and cause misfiring.

After unplugging the holes from grease using a thick needle, I proceeded to very lightly lube the weights and base with engine oil. The excess amount simply escaped through the drain holes as intended.

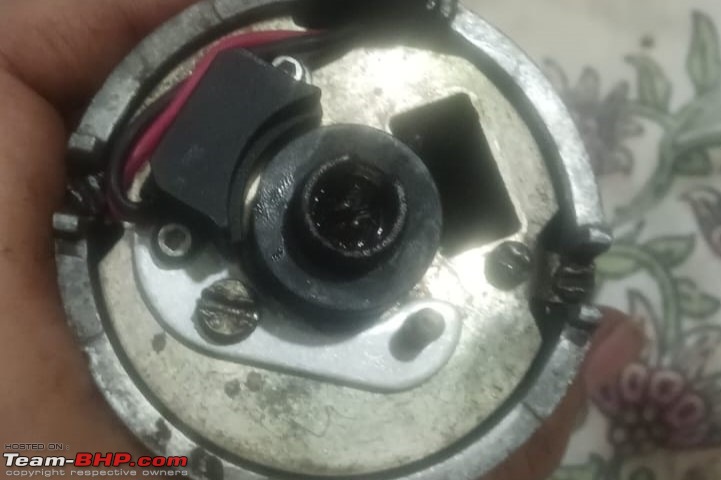
The top plate then went back on. Post this, the electronic ignition module was fixed. The module uses only the pivot pin and one flathead screw as opposed to the point condenser mechanism which needed two screws & the pivot pin.

The sensing ring then pops onto the rotor shaft (its a simple friction fit) and then on top goes the rotor arm. Check and alter the position of the ignition module such that the distance between the sensing ring and module is about 1mm and the gap is equal at all points. A slightly wider gap is not an issue, but the two shouldnt touch


 Wiring
There is a slight change in wiring too. As opposed to the points mechanism which only had one wire going to the coil negative, the electronic ignition has two. There is an additional positive to actually power the module. The most important thing to keep in mind is to ONLY power the module via a ballast resistor and not directly via the coil. Attempting to directly power it from the coil positive will fry it within a few minutes.
Install
Reinstall is easy. Position the rotor arm exactly where it was when you removed the delco, ensure the engine is at TDC and insert the delco. Complete the wiring as indicated above. Dont tighten the delco completely in place. Put the cap back on and plug wires in the correct order (1-3-4-2) clockwise.
Fire the engine up. The car should atleast start. If it doesnt slightly advance and then try. Get a timing gun and time the engine to be around 5-10BTDC. If you dont have one, advance the timing till the engine starts to ping very slightly, then retard it just a bit so that the pinging stops.
Conclusion
This pretty much sums up my shenanigans with the ignition system. The electronic ignition kit should theoretically perform better (stronger spark), be zero maintenance (no need to adjust point gap or replace the points) and have better reliability (points can misbehave in moisture laden conditions). However, I never take things at face value. I plan to keep the stock points and condenser with me in case the worst happens.
A pic of the stamping on the delco for reference. The 23D4 is used on many MGs and Minis from the 70s and 80s. Unfortunately, it doesn't have vaccum advance which offers load based timing advance as opposed to only RPM based advance. I won't be able to install one either since my current carburettor doesn't have a vaccum port needed for the job.


 24th October 2024, 22:14

 (13)
Thanks
(13)
Thanks


