Team-BHP > Technical Stuff
Register New Topics New Posts Top Thanked Team-BHP FAQ


Reply
  Search this Thread
126,031 views
Old 23rd August 2008, 23:24   #16
Team-BHP Support
 
Jaggu's Avatar
 
Join Date: May 2004
Location: Bangalore
Posts: 20,215
Thanked: 15,906 Times

Ill give it a try, please correct if am wrong.

Quote:
Originally Posted by BaCkSeAtDrIVeR View Post
So, the questions right now are:-

1. How do I open the fuse box?

There will be two clips on either side, carefully release them (maybe you require a screw driver for this) and then the cover will come out

2. What is that thing marked as 2 on the fuse box?

Should be a relay or Bigger wattage fuse, open the cap and inspect. mostly for the AC (my guess)

Attachment 40499

3. I got an extra horn fitted from the dealer. Think the 2nd image is showing the relay for that horn. Anything wrong with those wires marked as 3 and 4? Look like bare copper covered in insulation tape. The job is done by the dealer.

They have taped it, no big deal.

Attachment 40507

4. Image 3 shows the RHS head lamp assembly from inside. Leads 5, 6 and 7 are for ..... ? And How do I remove the head lamp bulb?
4a. Where do I look for the headlight focussing screw / nut?

Those are headlight, park light and turn indicator bulb connectors.

Remove the buld connector, then the rubber covers and there will be clip which needs to be released to remove the bulbs/holder. Refer manual, since it will differ from model to model


Attachment 40508


5. What is marked as 8 and 9 in the next picture? 9 is actually longer that it seems in the image. 10 is air filter, right?

8 isAutocop siren. 9 is AC diffuser and 10 is air filer box

Attachment 40511

6. Where is the ECU?

Should be under the dash, differ from model to model

7. I have Autocop (model 2k / 2000) installed. Where is it in the pictures?

Again will be inside the cabin

8. I have read of a slot where you hook up the laptop / USB cable for engine diagnostics. Where is it? (Not that I will do it, but just want to know).

Again it will be inside, under or by the side of the dash

9. I have seen autowallahs cleaning the spark plugs. That is closest I have got to petrol engines. Looks like spark plug handling on cars are not DIY?

You can remove the plug caps, but will require long headed plug spanners to remove the plugs

10. The battery - seems to be a sealed one? How do I pour distilled water into it (if I have to, that is)?

Maintenance free battery! remove the stickering and you will see the filler cap. Or just take it to the battery shop and they will do it for you in 5 mts

11. The relays marked on fuse box - what are they for?

???

12. What this marked as 11?

Its wiper motor

Attachment 40515

13. What do we find here?

Spark plugs

Attachment 40527

12 is alternator, 13 is spark plug (There should 3 of them?) 14 is?

14 is ignition coil, i think the other two plugs are hidden under the coils. Havent observed the Wagon R engine bay in long while. 15 is throttle cable

The 4 separate tubes from brake fluid reservoir - independent brake fluid circuit?

Yes, refer manual should have the brake system split, FT to Back, Cris cross

What is 15 (the tube)?

15 is throttle cable
I think you need to go through the owners manual in detail, will clear lot of your doubts.
Jaggu is offline  
Old 5th November 2008, 12:40   #17
BHPian
 
valhallen.282's Avatar
 
Join Date: Aug 2008
Location: Bangalore
Posts: 331
Thanked: 196 Times

new questions for the gurus here. my wagonr's headlight lens' have cracked. is it possible to replace them or do i need an entire new assembly. P.S. my dad royally bumped the car so one side fender is kinda jammed. haven't found time to fix it. :-( IF i indeed CAN change the lens where can i buy in bangy?
valhallen.282 is offline  
Old 7th November 2008, 08:10   #18
BHPian
 
Join Date: Nov 2007
Location: trivandrum
Posts: 478
Thanked: 290 Times

OE headlamps are available as an assembly. So you would have to replace the whole thing.
Even if you would find the lens from the local spare walla/scrap walla ( Highly unlikely) you would need to break open the sealed head lamp asssembly and then try to seal the new one in, which is close to immpossible.

Last edited by sureshkishore : 7th November 2008 at 08:11.
sureshkishore is offline  
Old 8th November 2008, 11:06   #19
BHPian
 
Swifty2008's Avatar
 
Join Date: Oct 2008
Location: Pune
Posts: 236
Thanked: Once

If a thread like this can be started for Swift Petrol and Diesel, it would be helpful for all those who are new including me. A thread of this sort, needs a lot of effort. No gurantee, but I will try for Swift Petrol version very soon.

Last edited by Swifty2008 : 8th November 2008 at 11:07. Reason: Add detail
Swifty2008 is offline  
Old 19th February 2009, 15:51   #20
BHPian
 
Shakensoul's Avatar
 
Join Date: Apr 2007
Location: AS01
Posts: 498
Thanked: 241 Times

From this picture, the part circled is the ignition coil. If I need to connect a tachometer, which one will be the negative terminal ?

Know your car: Under the Hood of a WagonR-coil.jpg
Shakensoul is offline  
Old 19th February 2009, 16:49   #21
Team-BHP Support
 
Jaggu's Avatar
 
Join Date: May 2004
Location: Bangalore
Posts: 20,215
Thanked: 15,906 Times

14 (grey coupler) is the connector and it has 3 wires, use a multi meter to find which one is negative. Anybody else with wiring diagram please help.

Careful when you take connection and avoid shorting or breaking off the wire from the coupler. Ideally tap at a place slightly distant from the connector.

ps: if its just negative feed, grounding will do the trick.

Last edited by Jaggu : 19th February 2009 at 16:51.
Jaggu is offline  
Old 19th February 2009, 17:18   #22
BHPian
 
im_srini's Avatar
 
Join Date: Sep 2006
Location: Portland
Posts: 1,010
Thanked: 490 Times
I'm not sure this is right !

Quote:
Originally Posted by Shakensoul View Post
From this picture, the part circled is the ignition coil. If I need to connect a tachometer, which one will be the negative terminal ?
Hi ShakenSoul, the M800 & the Alto with the F8D engine have a single large ignition coil for all 4 cylinders & what you are trying will work. But in the case of the WagonR, I'm not sure its right to splice into the DDLI coil as it controls only 2 cylinders. You will, in all probability, see only half the engine RPM. A better bet is to tap into the tach signal to the ECU.

Last edited by im_srini : 19th February 2009 at 17:20.
im_srini is offline  
Old 19th February 2009, 18:02   #23
BHPian
 
Shakensoul's Avatar
 
Join Date: Apr 2007
Location: AS01
Posts: 498
Thanked: 241 Times

Thanks Jaggu and im_srini.

I'm planning to get a Auto Meter 233904 tachometer. This is the installation instructions, please advise the best possible way to wire it as I will try a DIY.

Know your car: Under the Hood of a WagonR-tacho-wiring.jpg
Shakensoul is offline  
Old 20th February 2009, 11:17   #24
BHPian
 
im_srini's Avatar
 
Join Date: Sep 2006
Location: Portland
Posts: 1,010
Thanked: 490 Times

Quote:
Originally Posted by Shakensoul View Post
I'm planning to get a Auto Meter 233904 tachometer. This is the installation instructions, please advise the best possible way to wire it as I will try a DIY.
Hi ShakenSoul, if the Wagon-R uses the same ECM as the Altos with the F10D engine, the following pic should help.

Know your car: Under the Hood of a WagonR-ecm_coupler_0.jpg

This is the pin-out diagram for the C03 connector, I think what you need to tap into is C03-6.

Know your car: Under the Hood of a WagonR-ecm_coupler_1.jpg

I suggest you confirm it with somebody who's done this before if you're going to DIY.
im_srini is offline  
Old 20th February 2009, 13:06   #25
BHPian
 
Shakensoul's Avatar
 
Join Date: Apr 2007
Location: AS01
Posts: 498
Thanked: 241 Times

After going through the various threads and consulting members, it seems that the WagonR/Santro has a DIS system and to get the correct RPM reading I'll have to connect to the ECU which might be a tedious process with the risk of frying the ECU. So I have decided to get the Sunpro CP7905 5" Super Tach III which can be set to 2 cylinder mode to get the full reading from 2 cylinders without the hassle of connecting to the ECU.

Quote:
Originally Posted by Jaggu View Post
14 (grey coupler) is the connector and it has 3 wires, use a multi meter to find which one is negative.
A noob question, I do have a multimeter but how do I check for the negative wire 
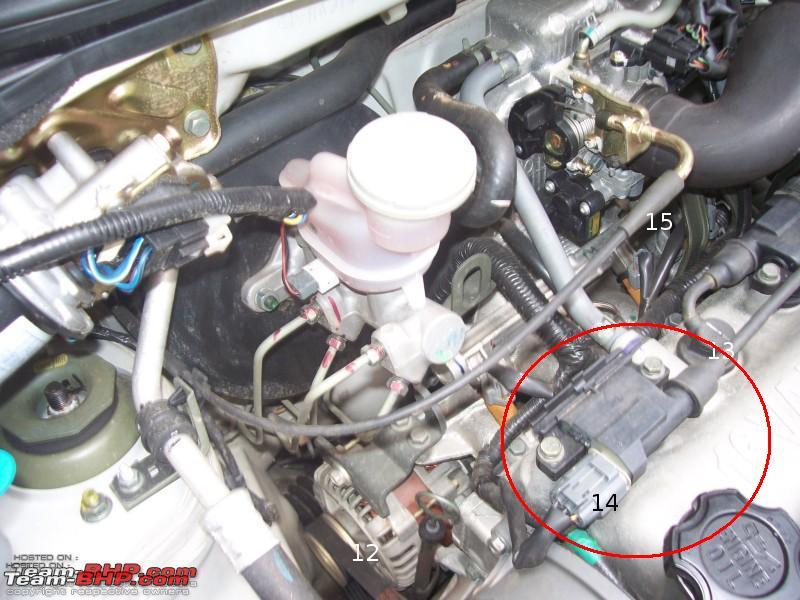
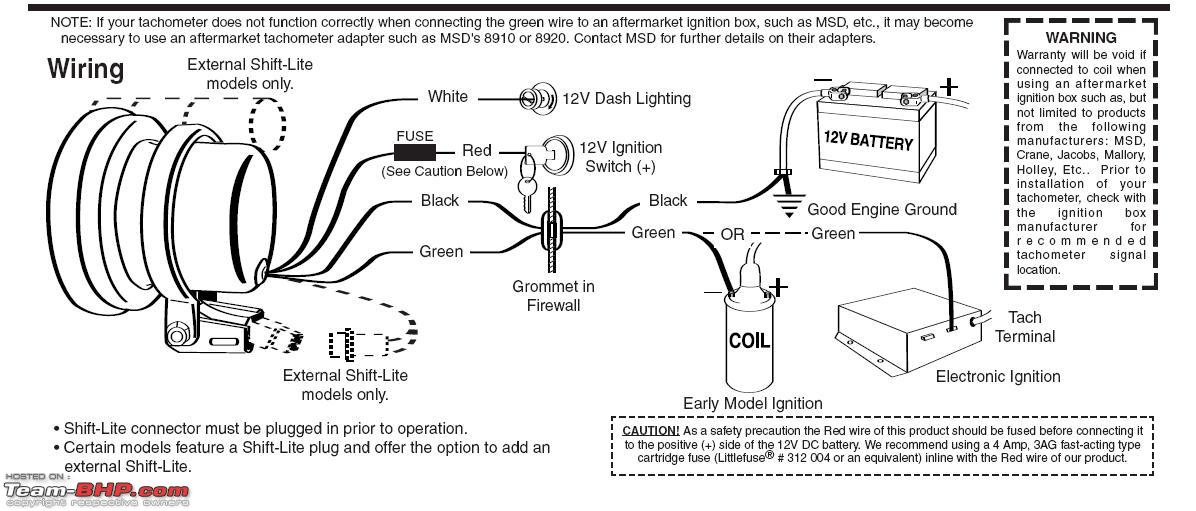
? Do I look voltage on the wires and the wire which shows no reading is the negative ?

Quote:
Originally Posted by im_srini View Post
Hi ShakenSoul, if the Wagon-R uses the same ECM as the Altos with the F10D engine, the following pic should help.

This is the pin-out diagram for the C03 connector, I think what you need to tap into is C03-6.

I suggest you confirm it with somebody who's done this before if you're going to DIY.
Thanks srini, these pictures are of immense help, but I have decided to get the Sunpro 2 cylinder tacho to avoid connecting to the ECU. So connecting the sunpro should be comparatively easier.

This is the wiring instruction for the Sunpro tacho

Quote:
DISTRIBUTORLESS IGNITION SYSTEM EQUIPPED ENGINES

If your vehicle’s DIS ignition system has a tachometer output lead set the switch to the 4 Cylinder position for the 4 cylinder engines and to the 6 Cylinder position for the 6 cylinder engines. Connect the tachometer GREEN wire to the vehicle’s tachometer output lead.
If your vehicle’s DIS ignition system does not have a tachometer output lead but allows access to the driver wires from the vehicle computer to the ignition module, set the switch to the 2 Cylinder position regardless of the number of cylinders in the engine. Connect the tachometer GREEN wire to either of the driver wires.

Last edited by Shakensoul : 20th February 2009 at 13:08.
Shakensoul is offline  
Old 30th August 2013, 10:27   #26
BHPian
 
reddy6980's Avatar
 
Join Date: Sep 2005
Location: bangalore
Posts: 151
Thanked: 44 Times
Part name and its function

Hi,

I have attached the image of the part which name i wanted to know and also the function of it.

This is on a diesel vehicle, once i know the part name and function i have lot of questions.

Thank you.
Attached Thumbnails
Know your car: Under the Hood of a WagonR-wp_000157.jpg  

reddy6980 is offline  
Old 21st May 2020, 21:15   #27
BHPian
 
Manoj2268's Avatar
 
Join Date: Jul 2008
Location: Delhi
Posts: 302
Thanked: 436 Times
Re: Know your car: Under the Hood of a WagonR

Asking for a friend here.

How to disable a fuel pump or the injectors of the F10D wagon R?

His car was not started for 9 months and is afraid of dry starting the engine.
Manoj2268 is offline  
Old 21st May 2020, 22:15   #28
BANNED
 
Join Date: Oct 2011
Location: Hyderabad
Posts: 12,350
Thanked: 21,411 Times
Re: Know your car: Under the Hood of a WagonR

Quote:
Originally Posted by Manoj2268 View Post
Asking for a friend here.

How to disable a fuel pump or the injectors of the F10D wagon R?

His car was not started for 9 months and is afraid of dry starting the engine.
Pulling the fuse out is the easiest way.
a4anurag is offline   (1) Thanks
Old 22nd May 2020, 00:15   #29
BHPian
 
Manoj2268's Avatar
 
Join Date: Jul 2008
Location: Delhi
Posts: 302
Thanked: 436 Times
Re: Know your car: Under the Hood of a WagonR

Where is the fuse located? Can anyone point me the location?
Manoj2268 is offline  
Old 22nd May 2020, 00:23   #30
BANNED
 
Join Date: Oct 2011
Location: Hyderabad
Posts: 12,350
Thanked: 21,411 Times
Re: Know your car: Under the Hood of a WagonR

Quote:
Originally Posted by Manoj2268 View Post
Where is the fuse located? Can anyone point me the location?
Fuse box is located in the engine bay. Attaching screenshots from the owner's manual:

Know your car: Under the Hood of a WagonR-screenshot_20200522002048.jpg

Know your car: Under the Hood of a WagonR-screenshot_20200522002132.jpg
a4anurag is offline   (1) Thanks
Reply

Most Viewed


Copyright ©2000 - 2024, Team-BHP.com
Proudly powered by E2E Networks