| |||||||

| Search Forums |
| Advanced Search |
| Go to Page... |
 |
| Search this Thread |  57,552 views |
 20th July 2018, 01:01
| #16 |
| BHPian Join Date: Jun 2018 Location: Mumbai
Posts: 182
Thanked: 491 Times
| Re: Our Gentle Giant - Maruti Ertiga ZDi+ SHVS DIY #1: Upgrading headlights: PS: All the DIY/Modifications done to the car are for my own convenience. None of the parts used are sponsored by any brand whatsoever, neither am I related to the seller or the company in any manner. The whole purpose of this DIY's is to help other Bhpians/guests find solutions to common problems they may face. I will not be held responsible for any warranty issues you may face after following my DIY's. I'll try my best to help and provide all the support I can. Tools required:
Since our first car was also an Ertiga, we knew that the new car would also need a upgrade over the standard headlamps. Since we had tried and tested a lot of brands and different color temperature (halogens only), we exactly knew what was required. Before selling our old car I took out the headlamps from the car, but left the relay and the electrical part. Before the new car was home, I had already purchased a new relay kit from my local accessory dealer for Rs.900. The kit is now plug and play type as opposed to the one in the previous car. The kit comes with a relay unit, two fuses (25A each, one for low and other for high beam), two ceramic holders as compared to the original plastic ones. Since the kit is already installed in the car I could only take pictures of it while it was inside the engine bay. The original bulb: (Philips 60/55W bulb, H4 adapter type)  Bulb used for upgrade: (Plasma Xenon 120/90W, H4) We had used HELLA bulbs on the previous car, the light was bright and the throw was sufficient, but within a period of 8-9 months one of the bulb stopped working. We brought a new pair, and it worked fine for another year and a half, after that one light became a little dim and stopped working eventually. After talking to my accessory dealer, he gave me these bulbs for ~1000 bucks. The brand was Chinese, and I thought they won't last more than 6 months. But they are doing good for the past three years. (2 years on the old car one year on the new) Install Procedure: Since the entire wiring and connection is made on the passenger side of the engine bay, I'll be showing the install procedure of that side only. Step 1: Open the hood: Step 2: Disconnect -ve terminal of battery using the spanner. Step 3: Using the long bolt, fix the relay to the engine bay as shown below. Make sure the wires are facing down as shown in the image, this is to prevent water from entering the relay. Also notice the fuse holders besides the relay.    Step 6: To take out the original headlamps, pull out the plastic holder gently. Once it is out, pull the rubber dust cover with one or both of it's rubber tabs.   Step 7: The bulb goes inside the holder in the upright position only, like I have posted the picture in the beginning. The top tab of the bulb is thicker than the other two bottom ones. Place the new bulb gently in the holder, and lock the bulb in place using the locking mechanism.  None of the parts need huge amount of force to open or close/ lock unlock, if you need to apply force, you are doing it wrong. Check and then proceed. The pin that can be seen from the outer side. (Marked with a red arrow).     Step 8: Connect the male pin of the relay to the female pin of the headlamp. (Original plastic holder) The one on the left is the relay pin and on the right is the original plastic holder. This connection is important as it will control the high and low beam operations.  Step 9: After checking firmly all the connections, fittings etc. connect the main power supply (red cable) to the positive of the battery.  Step 10: Reconnect the -ve of the battery, and ensure all the connections are proper. Shut the hood. Turn on the headlamps and you should be good to go. Check for the high and low beam operations. Output Comparison: The light output has been tested in the car shed , as that was the only white surface available. The car was at a distance of about ~12 feet from the wall. There may not seem much difference in the confined space, but the extra wattage do add some lumens to the overall output, which can be noted during highway and city runs. Philips bulbs on the top and Plasma Xenon to the bottom: High beam:   Low beam:   Some important points to remember:
|

|  (7)
Thanks (7)
Thanks
 |
| The following 7 BHPians Thank francis_vaz for this useful post: | a4anurag, chiranjitp, digitalnirvana, JoseVijay, PraNeel, sukiwa, Varun_HexaGuy |
| |
|
24th July 2018, 20:39
| #17 |
| BHPian Join Date: Jun 2018 Location: Mumbai
Posts: 182
Thanked: 491 Times
| Re: Our Gentle Giant - Maruti Ertiga ZDi+ SHVS DIY #2: Changing rear bumper reflectors to LED. Note: All the DIY/Modifications done to the car are for my own convenience. None of the parts used are sponsored by any brand whatsoever, neither am I related to the seller or the company in any manner. The whole purpose of this DIY's is to help other Bhpians/guests find solutions to common problems they may face. I will not be held responsible for any warranty issues you may face after following my DIY's. I'll try my best to help and provide all the support I can. Tools required:
Link to the item: https://carhatke.com/maruti-suzuki-a...iga?filter=305 The original reflectors:  Original and LED reflectors:   Install Procedure: Step 1: Disconnect -ve terminal of battery. Step 2: Open the boot, using the spanner loose the two screws that hold the tail light in place. To remove the light, you need to hold the light from the bottom by lifting it and moving it a little to the left hand side (away from the body). Then standing behind the light pull the light towards your body, while keeping the light lifted from the bottom. There are two locks that hold the light in place. Do not pull the light with a lot of force, else you may end up breaking the wires, as the wires are short in length. For ease of working remove the bulbs from the tail light unit. They can removed by rotating them either to the clockwise or anti-clockwise direction.  The locks that hold the light in place: 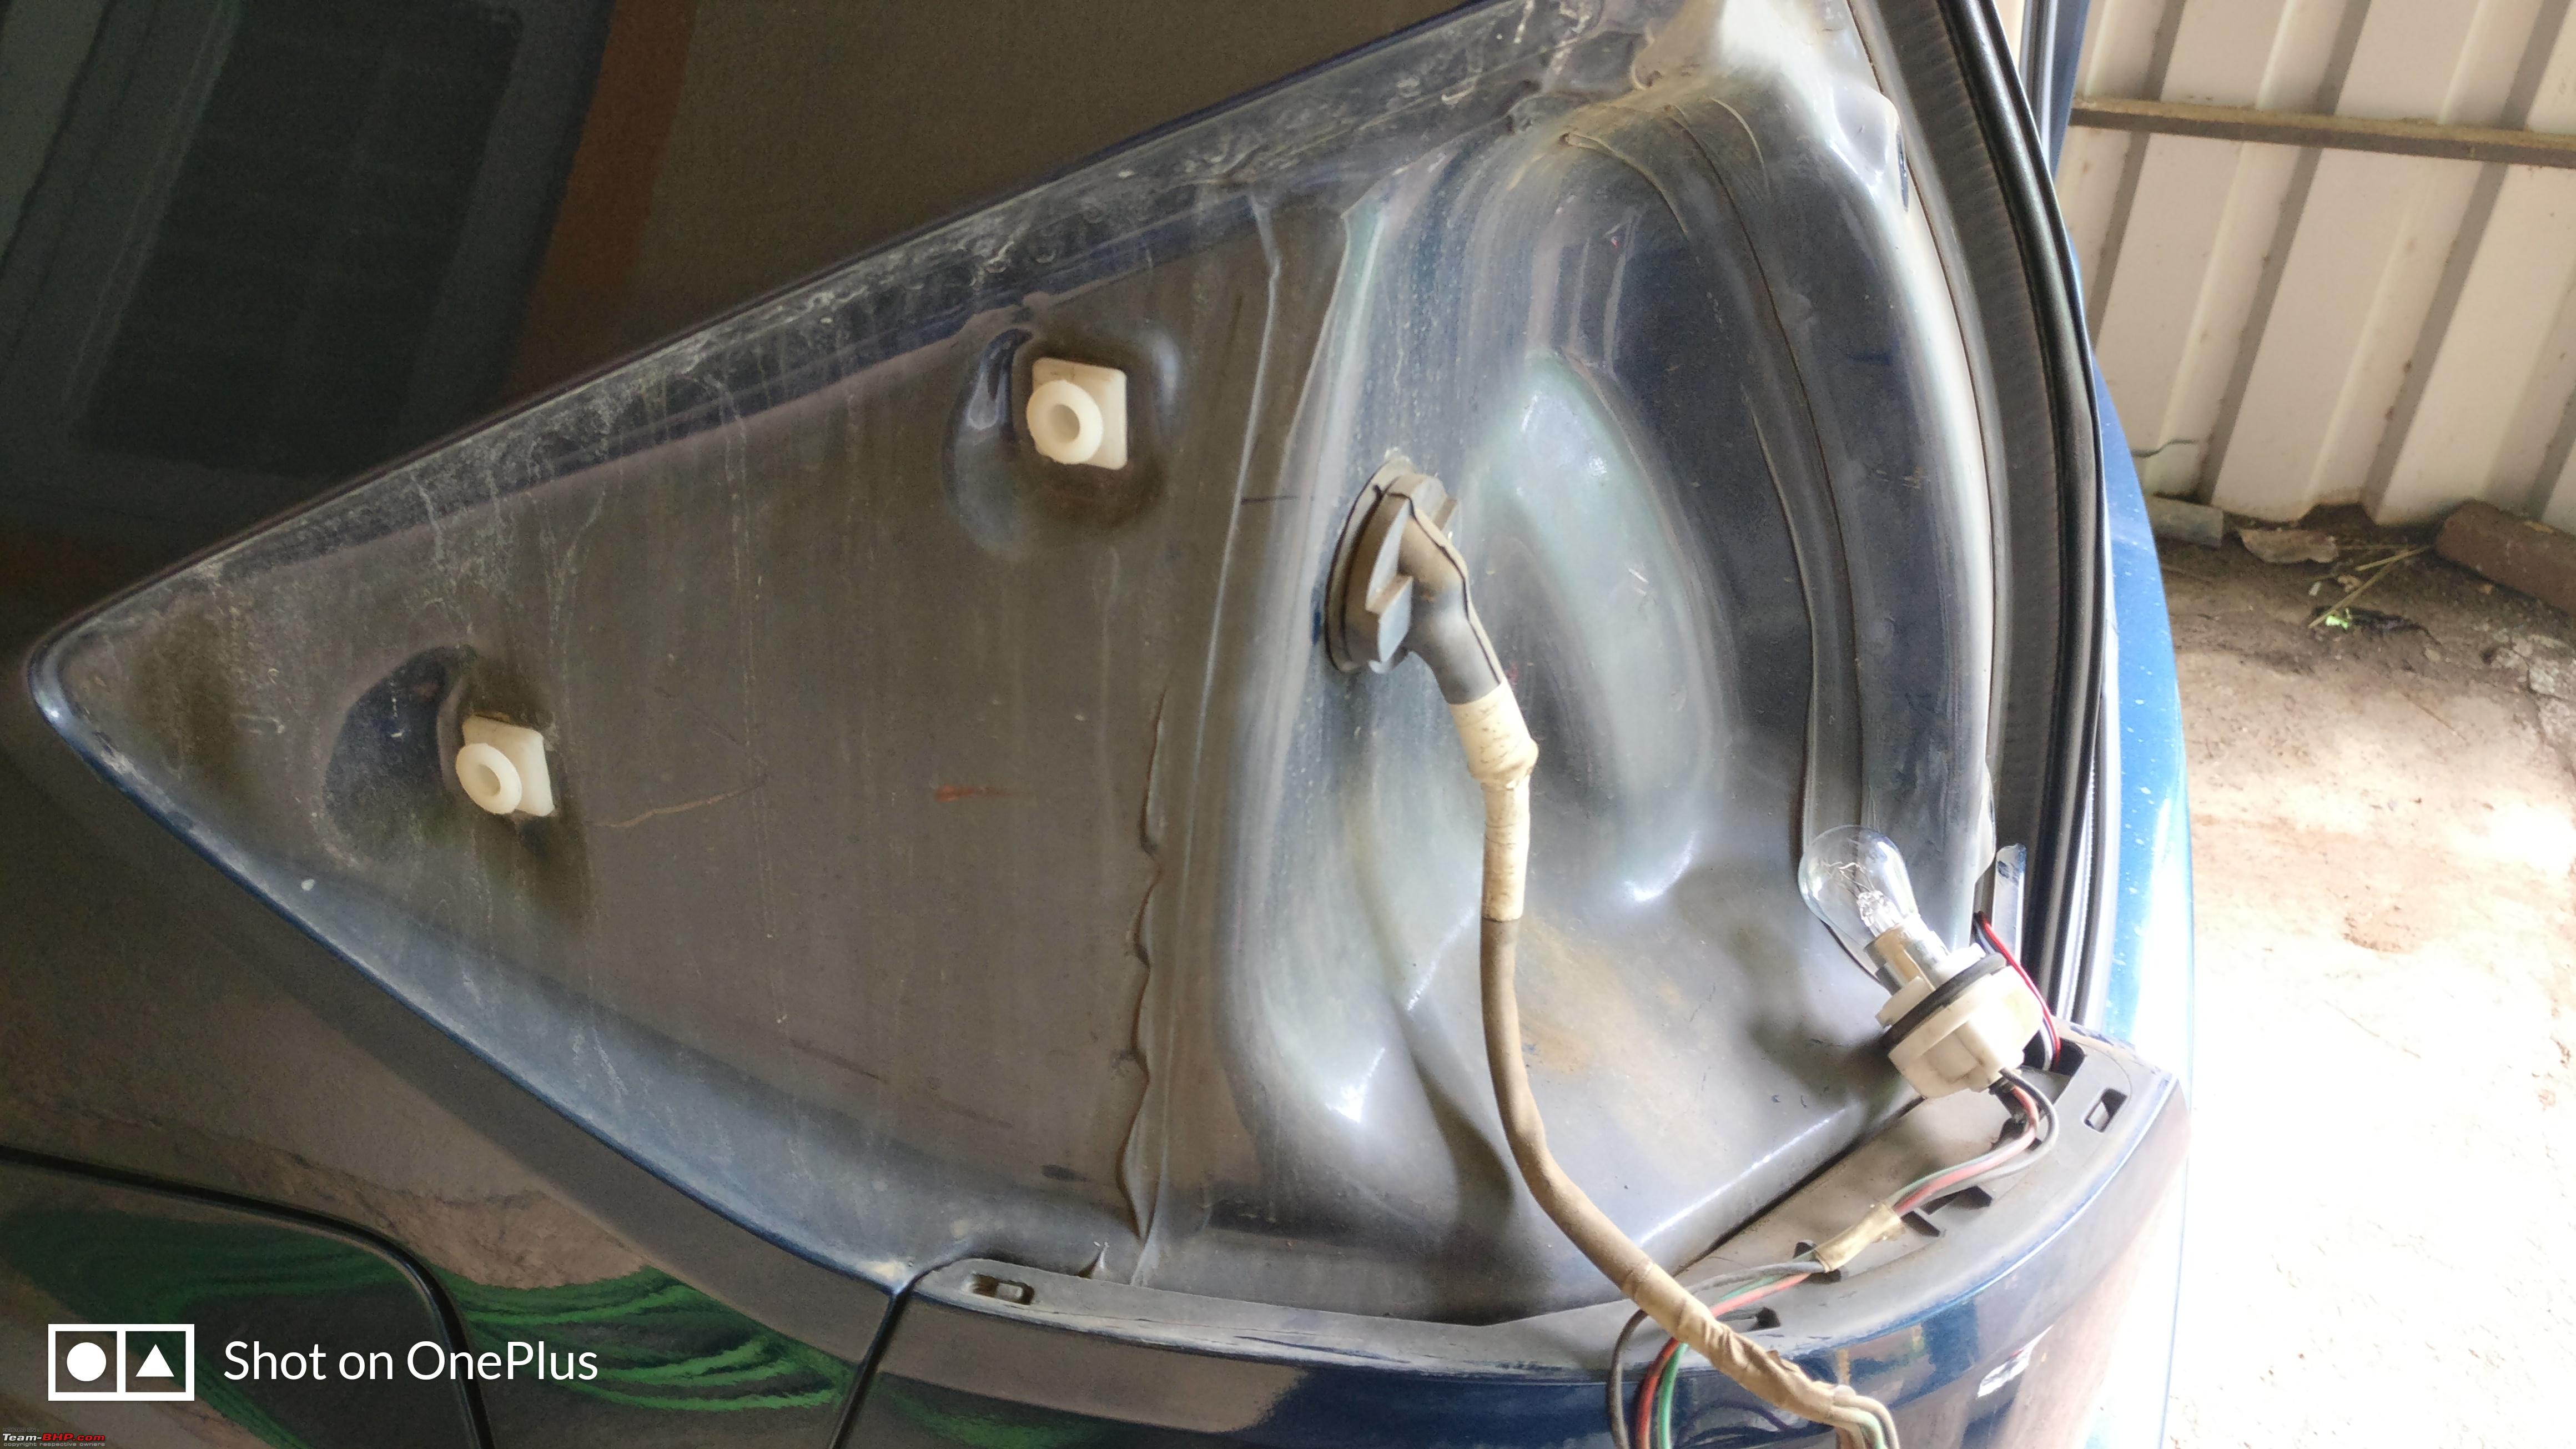   Step 3: Removing the original reflectors. The reflectors have a a single screw at the back and a lock on one side that holds it in place. The screw is a Philips head type. Make sure to use a sharp head screw driver. Than sit perpendicular to the light (next to the wheel) and using the screw driver loosen the screw. The screw may be difficult to remove due to the dirt and mud. In case you are unable to remove the reflector, you can check Parag Sir's post here, http://www.team-bhp.com/forum/diy-do...ml#post3694345, he has given a detailed pictorial guide on the bumper removal process. Since the screws on my car came out with a little bit of effort, I did not feel the need to remove the bumper. After you manage to take out the screw, there is a plastic tab on the reflector that holds it firmly in place, these are on the right side of the left reflector and vice-versa. The locking tab:  Step 4: Since the reflectors have an extra wire that needs to pass, we need to make an extra small hole besides the screw hole. The screw fits perfectly on the original reflector, but is around 3mm taller when it fits the LED reflector. This is because the original reflector has threads for the screw to move ahead and the LED one does not. This is where we need to add metal washers. Metal Washers:  Hole made besides the screw hole:  Step 5: After fixing the reflectors using the washers and the screws, check if the reflectors are still loose and add more washers. I had to add three washers to make them fit very firmly. Wire and the screw:  Step 6: Use a dummy rope/ wire and pass it through the passage that can be seen from the picture below. This will help you to pull the LED wires up to the tail light wires, from where you can proceed with the connection. Tie the dummy to the tail lamp wires so that it doesn't fall down.   Step 7: The connections for the LED are as follows: The LED has two stages of operation, one when the pilot lamps are on and when the brakes are pressed. The LED has three wires; white, red and black. The tail light has three wires; black, red with blue line and green with white line. Connect the wires accordingly: (LED - Tail lamp) Black to Black. White to Red-Blue. Red to Green-White. Since scotch lock connectors tend to become loose over time, and may cause loose connections, so I went with the conventional tap method and secured the joints with electrical tape. Since I did not cut the wire, but make a small incision on the insulation I could not use heat shrink sleeves. The connections:  Step 8: Connect the -ve of the battery for a trial run. After doing a trial run and checking all the connections. Put the lamps in the tail light assembly and fix the tail light assembly back in place. Make sure you hear two clicks of the locks locking in place when you fix the tail light assembly. Tighten the screws and you should be good to go. Work done time for some pictures:  Pilot lamps ON:  Brakes ON:  Both the LED's in action:   The light looks spread out because of the glare on the camera lens:   |
|
| (6)
Thanks
|
| The following 6 BHPians Thank francis_vaz for this useful post: | a4anurag, chiranjitp, digitalnirvana, Lalvaz, PraNeel, Varun_HexaGuy |
|
25th July 2018, 01:18
| #18 |
| Senior - BHPian Join Date: Jul 2006 Location: Bombay
Posts: 1,414
Thanked: 2,183 Times
| Re: Our Gentle Giant - Maruti Ertiga ZDi+ SHVS Excellent review Francis. You've really maintained your ride beautifully and the upgrades are both practical as well as very thoroughly done. Congratulations and wish you and your family many miles of safe motoring in your gentle giant. God bless. |
|
| (1)
Thanks
|
| The following BHPian Thanks Lalvaz for this useful post: | francis_vaz |
|
29th July 2018, 22:41
| #19 |
| BHPian Join Date: Jun 2018 Location: Mumbai
Posts: 182
Thanked: 491 Times
| Re: Our Gentle Giant - Maruti Ertiga ZDi+ SHVS Went for a short drive yesterday took some pictures of the output of the upgraded headlights. Will be doing the fog lamp upgrade soon, report will be up in a few days. This area is just behind my house, it was dark so thought of taking pictures in a more bigger area. This output is of headlights ONLY. Low beam at "0" postion:  Low beam at "1" position:  High beam at "0" position:  Thank You!! |
|
| (3)
Thanks
|
| The following 3 BHPians Thank francis_vaz for this useful post: | a4anurag, Leoshashi, Varun_HexaGuy |
|
30th July 2018, 17:29
| #20 |
| BHPian Join Date: Jun 2018 Location: Mumbai
Posts: 182
Thanked: 491 Times
| Re: Our Gentle Giant - Maruti Ertiga ZDi+ SHVS DIY #3: Upgrading fog lamps. Note: All the DIY/Modifications done to the car are for my own convenience. None of the parts used are sponsored by any brand whatsoever, neither am I related to the seller or the company in any manner. The whole purpose of this DIY's is to help other Bhpians/guests find solutions to common problems they may face. I will not be held responsible for any warranty issues you may face after following my DIY's. I'll try my best to help and provide all the support I can. Tools required:
Since the headlights were upgraded to Plasma Xenons 5000K, the yellow halogen fog lamps looked odd on the car. Also the stock fog lamps were not very powerful or least to say they were just given for the sake of it. The bulbs I used for upgrade are HELLA H8 12V 80W 4400K. I brought them from my local dealer for Rs.1200. The stock lamps were of Phoenix H8 12V 35W. Yes you read it right 35W and 80W quite an increase in wattage. But it seems MS was very generous in providing a higher capacity (20A) fuse only for the fog lamps. This meant that the actual maximum capacity of the bulbs that the electrical system could handle was 240W. I'll explain how: 12V is the supplied voltage for the lights to run. The fuse provided for both the fog lamps is rated 20A. To find wattage we multiply voltage and current i.e 12V*20A= 240Watts. Since the bulbs I am using are rated at 80W each, the maximum total output will be 160W, with another 80W to spare. If you divide the wattage of the bulbs with the voltage, it'll give you the current. i.e 80W/12V=6.666A ~7A for each bulb and 14A for two. Hence, I went ahead with the purchase as I knew the electrical system would be able to handle the extra wattage of the new bulbs. The HELLA and original bulb:  The washer that helps keep the moisture out:  Install procedure: The fog lamp upgrade is very simple as compared to the headlight upgrade. All you need to do is remove one philips/star screw inside the wheel well that hold the bumper in place on both the driver and passenger side, and pull the bumper a little bit outside like shown in the image below. I had already removed the screw so you can only see the hole where it goes.   Pull the bumper a little bit apart outside, making sure the bumper is not stuck in any of the locks that hold it in place. The bumper will only open up to the logo grill bottom start point, it won't go ahead of that. Do not try to pull it further else the bumper will start to tear from there. After you have pulled the bumper aside you can see the fog lamp connector and the light in the housing.  The connector is a different one as the bulb adapter type is different, the fog lamps are H8 type. The holder has a lock at the back that needs to be pressed in order to remove the lamp. The lock and the holder:   To remove the light from the assembly you will need to press it inside and then turn counter-clockwise, this is same for both the sides. The bulb has three tabs that hold it in place. The rubber ring should be there on the light to prevent water from getting in. Since I had installed these lights a year back, the rubber ring had become hard and was not providing a water tight seal, so I swapped it with the original fog lamp ring. Since there was moisture collected in my fog lamp assembly, I cleaned it while I was taking pics for this DIY. I'll post the report on the cleaning in the DIY thread soon. Once the original lamp is out, swap in the new one carefully and make sure you install it in the reverse way of how you took it out. Be extra careful to make sure the bulb is in place and it is locked properly. On my previous car I had to change both the fog lamp housing because the MS technician didn't install them properly. The bulb came out from the assembly and due to the heat it burned the plastic casing rendering it useless. Yes you need to buy them in a pair because of different reflector designs. Since I had taken the entire assembly out I'll post pictures of how the locks and the tabs on the bulbs look for a clearer idea. The front and back side of the assembly:   After checking everything turn the lights ON and you should be good to go. Took this pictures in the car shed itself after the cleaning today. Will post more pictures soon after I get the car out at night this week. The output is of fog lamps only. Since one of the stock fog lamp was not working I couldn't take a comparison shot, sorry about that.    |
|
| (2)
Thanks
|
| The following 2 BHPians Thank francis_vaz for this useful post: | PraNeel, sukiwa |
|
31st July 2018, 16:57
| #21 |
| BHPian Join Date: Jun 2018 Location: Mumbai
Posts: 182
Thanked: 491 Times
| Re: Our Gentle Giant - Maruti Ertiga ZDi+ SHVS Got the puddle lamp DIY done. Adding the link below: http://www.team-bhp.com/forum/diy-do...ki-ertiga.html |
|
| ()
Thanks
|
|
5th August 2018, 23:04
| #22 |
| BHPian Join Date: Jun 2018 Location: Mumbai
Posts: 182
Thanked: 491 Times
| Re: Our Gentle Giant - Maruti Ertiga ZDi+ SHVS DIY #4: Upgrading pilot and number plate lights to LED. Note:All the DIY/Modifications done to the car are for my own convenience. None of the parts used are sponsored by any brand whatsoever, neither am I related to the seller or the company in any manner. The whole purpose of this DIY's is to help other Bhpians/guests find solutions to common problems they may face. I will not be held responsible for any warranty issues you may face after following my DIY's. I'll try my best to help and provide all the support I can. Time taken: ~15 min. The pilot lamps and the number plate lights are T10 type halogen bulbs. LED and the original bulb:  Link to the item: https://www.aliexpress.com/item/Auto...73ec4c4dRCZN1z I) Pilot lamps: Open the hood and near the headlamp assembly you will see this holder, twist and remove it out.  The original light.  Swapped with LED.  Halogen vs LED.   The light is actually white but has that blue tinge due to the halogen bulb's color. II) Number plate lights: The number plate lights can be easily changed without the need to remove the boot panel. The lights are similar type and are very easy to remove and install. There is a plastic cover that prevents water from entering, to remove that twist the cover in anti-clockwise direction and it'll come off. Carefully take it out and pull the light out. Since the LED need proper polarity to work,you may need to remove and turn the lights by 180 degrees and install again. To make things easy you can open the boot and hold the boot at an angle as per your working position and do your work as that will help you in proper aligning the light in the socket. The socket is similar to the pilot lamps. The cover.  Lamp in. Put the cover back in place carefully. Make sure it's locked well in place.    Last edited by francis_vaz : 18th October 2018 at 20:59. |
|
| ()
Thanks
|
|
6th August 2018, 21:52
| #23 |
| BHPian Join Date: Jun 2018 Location: Mumbai
Posts: 182
Thanked: 491 Times
| Re: Our Gentle Giant - Maruti Ertiga ZDi+ SHVS Went for a short trip to Usgaon on Sunday, took some pictures while over there. Drove through some remote places and broken roads with 7 adults and AC on full time. Fuel efficiency was hovering around 15km/l. Even though the roads were bad, the GIANT handled it well.  ODO meter: (The GIANT turns 1 year and 3 months old today)  Some pictures.     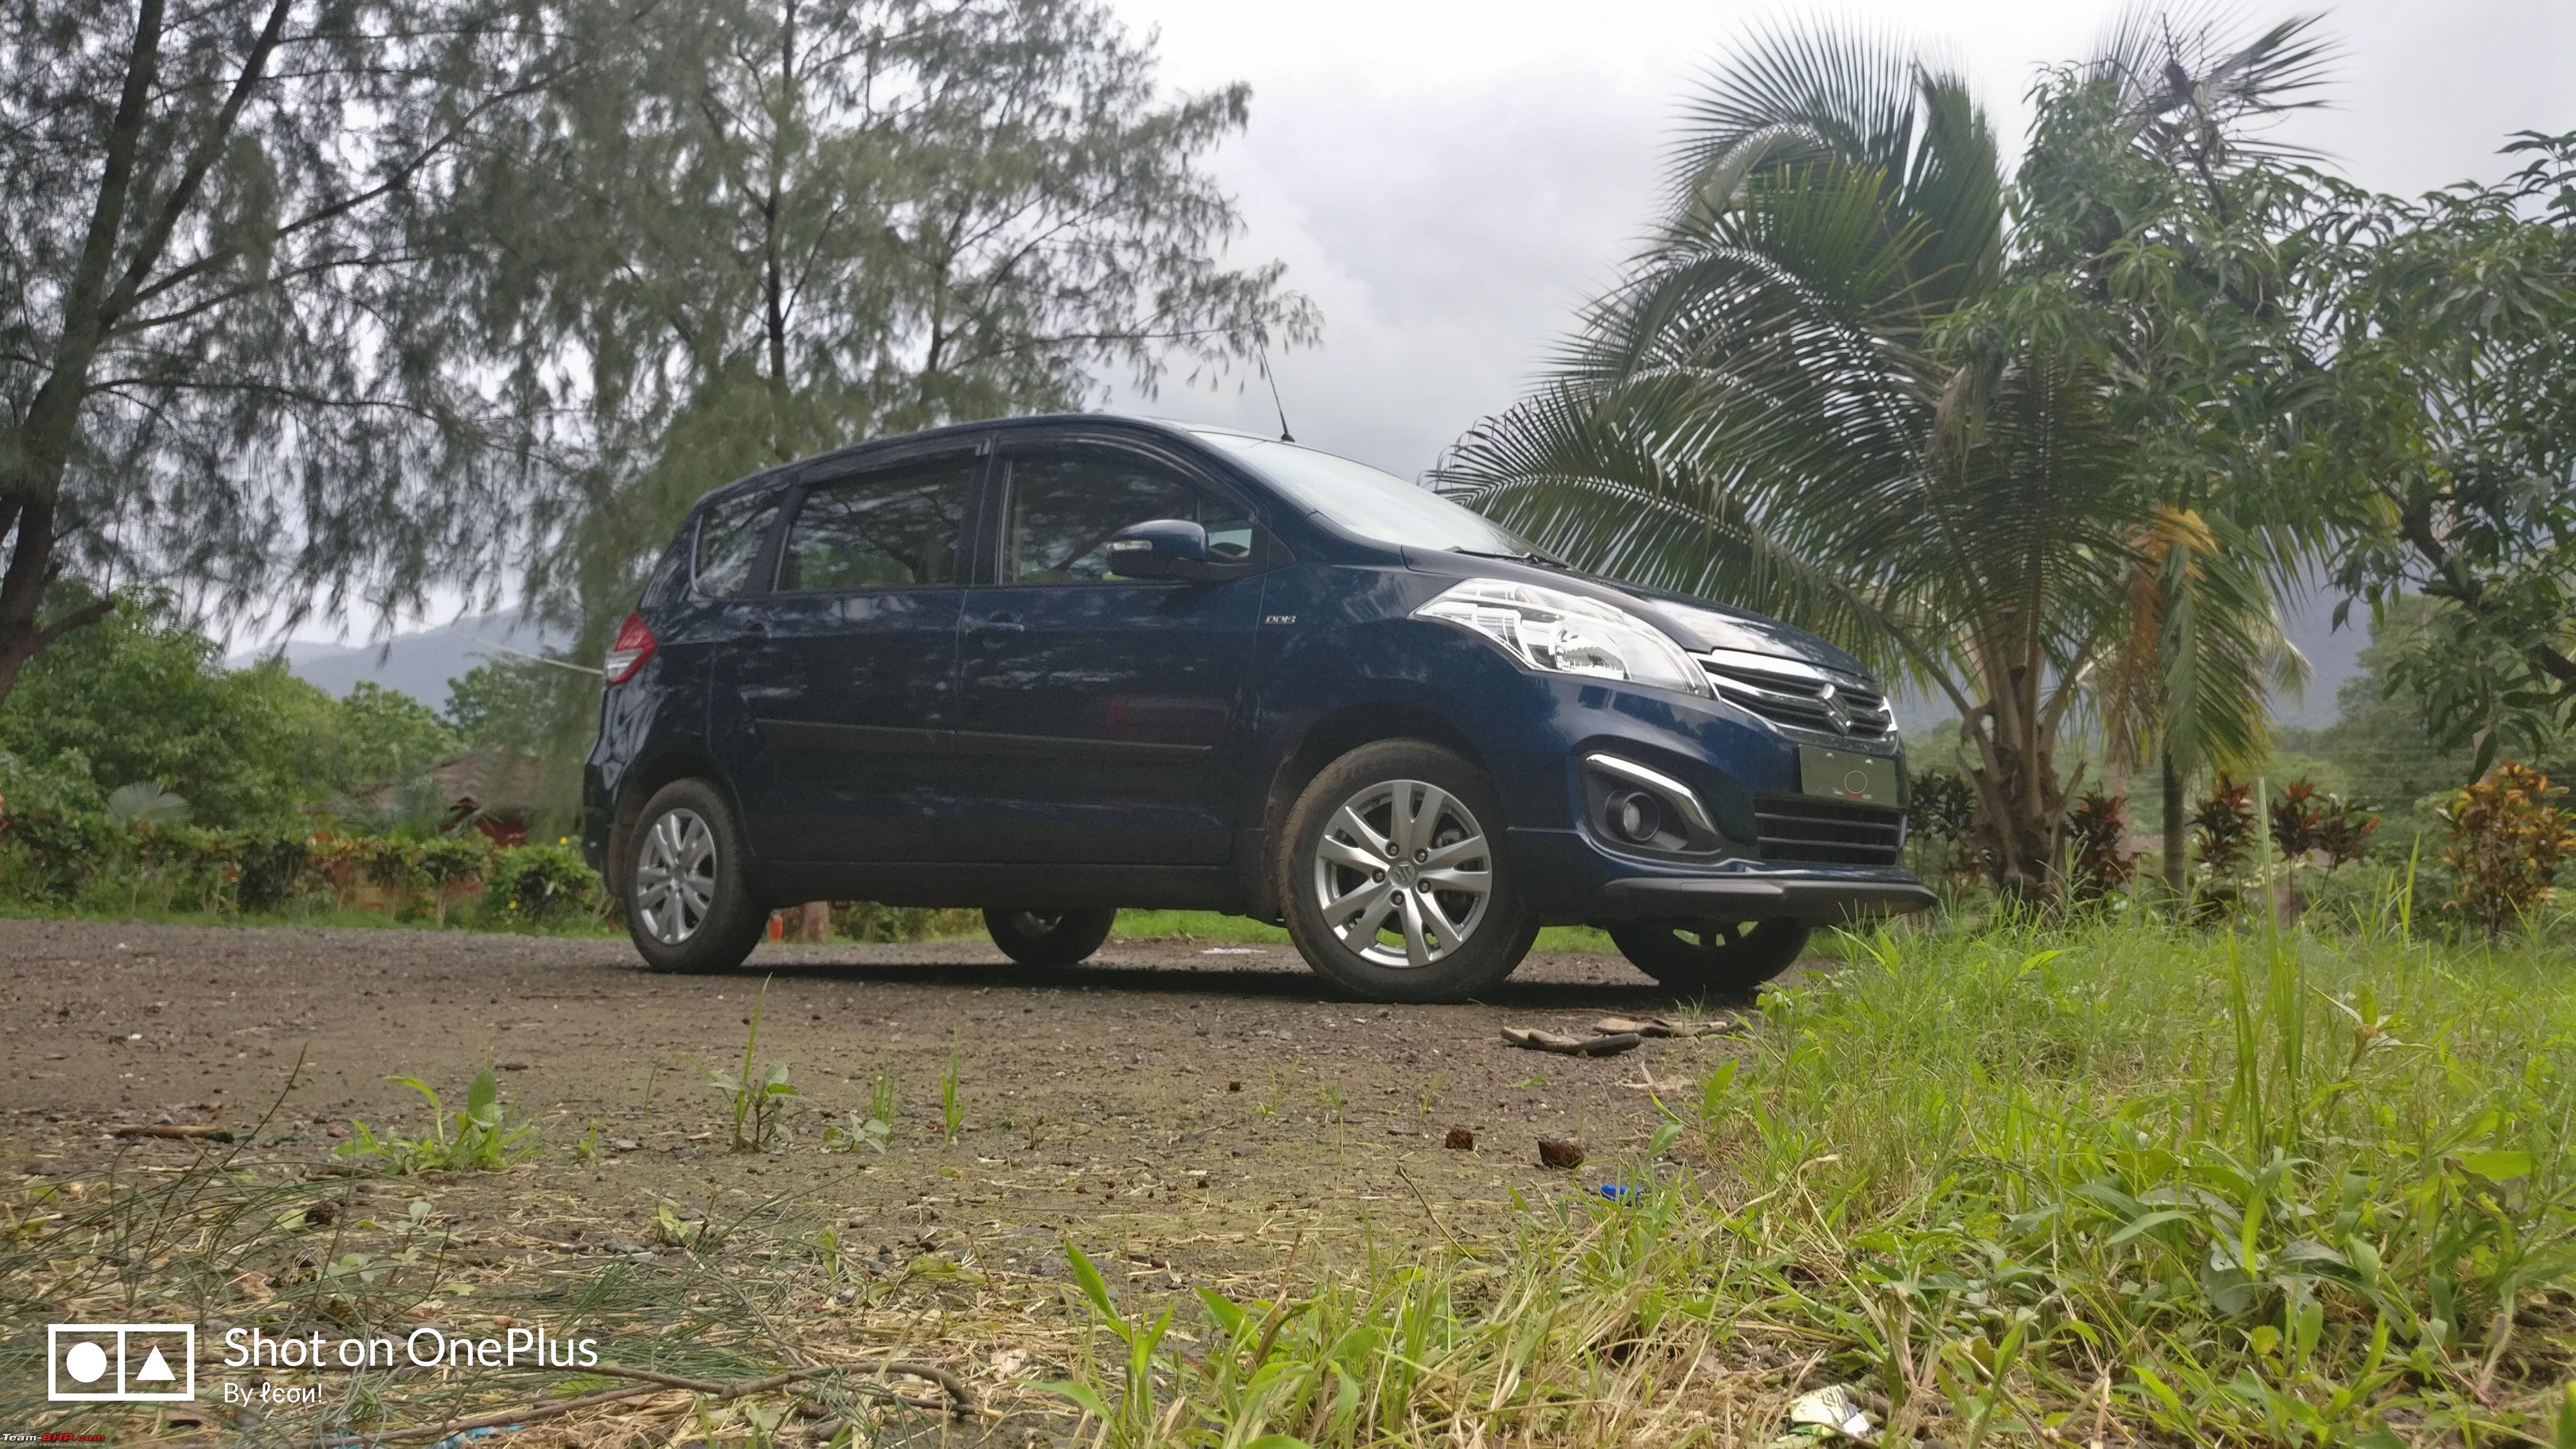 Special thanks to my brother for helping with the pictures. Last edited by francis_vaz : 18th October 2018 at 20:55. |
|
| ()
Thanks
|
|
10th August 2018, 00:08
| #24 |
| BHPian Join Date: Jun 2018 Location: Mumbai
Posts: 182
Thanked: 491 Times
| Re: Our Gentle Giant - Maruti Ertiga ZDi+ SHVS Got the offline maps updated. You can check it here. http://www.team-bhp.com/forum/car-en...nt-system.html Thank you!! |
|
| ()
Thanks
|
|
10th August 2018, 15:29
| #25 |
| BHPian Join Date: Jun 2018 Location: Mumbai
Posts: 182
Thanked: 491 Times
| Re: Our Gentle Giant - Maruti Ertiga ZDi+ SHVS DIY #5: Upgrading interior dome lights to LED. Note: All the DIY/Modifications done to the car are for my own convenience. None of the parts used are sponsored by any brand whatsoever, neither am I related to the seller or the company in any manner. The whole purpose of this DIY's is to help other Bhpians/guests find solutions to common problems they may face. I will not be held responsible for any warranty issues you may face after following my DIY's. I'll try my best to help and provide all the support I can. Tools required:
The interior dome lights are Festoon type halogen bulbs. The front one is a 31mm and the rear one is 36mm. Link to the item: https://www.aliexpress.com/item/1pcs...4d084c4dzsSQMl Original and LED lights: Put the cover back in place once checking by switching it ON. Removing the cover for the rear light: Insert the flat head screw driver at the arrows and pry it open, both sides.  The original light:  LED in place:  Removing cover for the front side: Put the cover back in place after checking.Insert the flat head screw driver at the arrows and pry it open, both sides.  Original light:  LED in place:  Output: (Looks like a stadium  ) )   Last edited by francis_vaz : 10th August 2018 at 15:49. |
|
| (1)
Thanks
|
| The following BHPian Thanks francis_vaz for this useful post: | a4anurag |
|
18th September 2018, 22:25
| #26 |
| BHPian Join Date: Jun 2018 Location: Mumbai
Posts: 182
Thanked: 491 Times
| Re: Our Gentle Giant - Maruti Ertiga ZDi+ SHVS Quick update on the car. The mileage now stands at 23945 kms. The car is running well, except for some small squeaks in the dash board, planning to get this checked during the 30K service. One more issue is with the rear AC blower, it sounds like it looses power randomly and you can hear the motor inside slow down and pick up speed again, it happens randomly so unable to replicate the situation to my SA. Ordered a tyre repair kit from AliExpress: https://www.aliexpress.com/item/11Pc...d5ea4c4dkELcWF Some pictures of the kit: The quality is superb, the handles are heavy and the box is also very well packed.  One of the fog lamp gave up two weeks back, so planned to upgrade to LED. Ordered the following item from AliExpress: https://www.aliexpress.com/item/S-D-...3da24c4dHZL8vl Pictures of the new bulbs:    Fogs only: 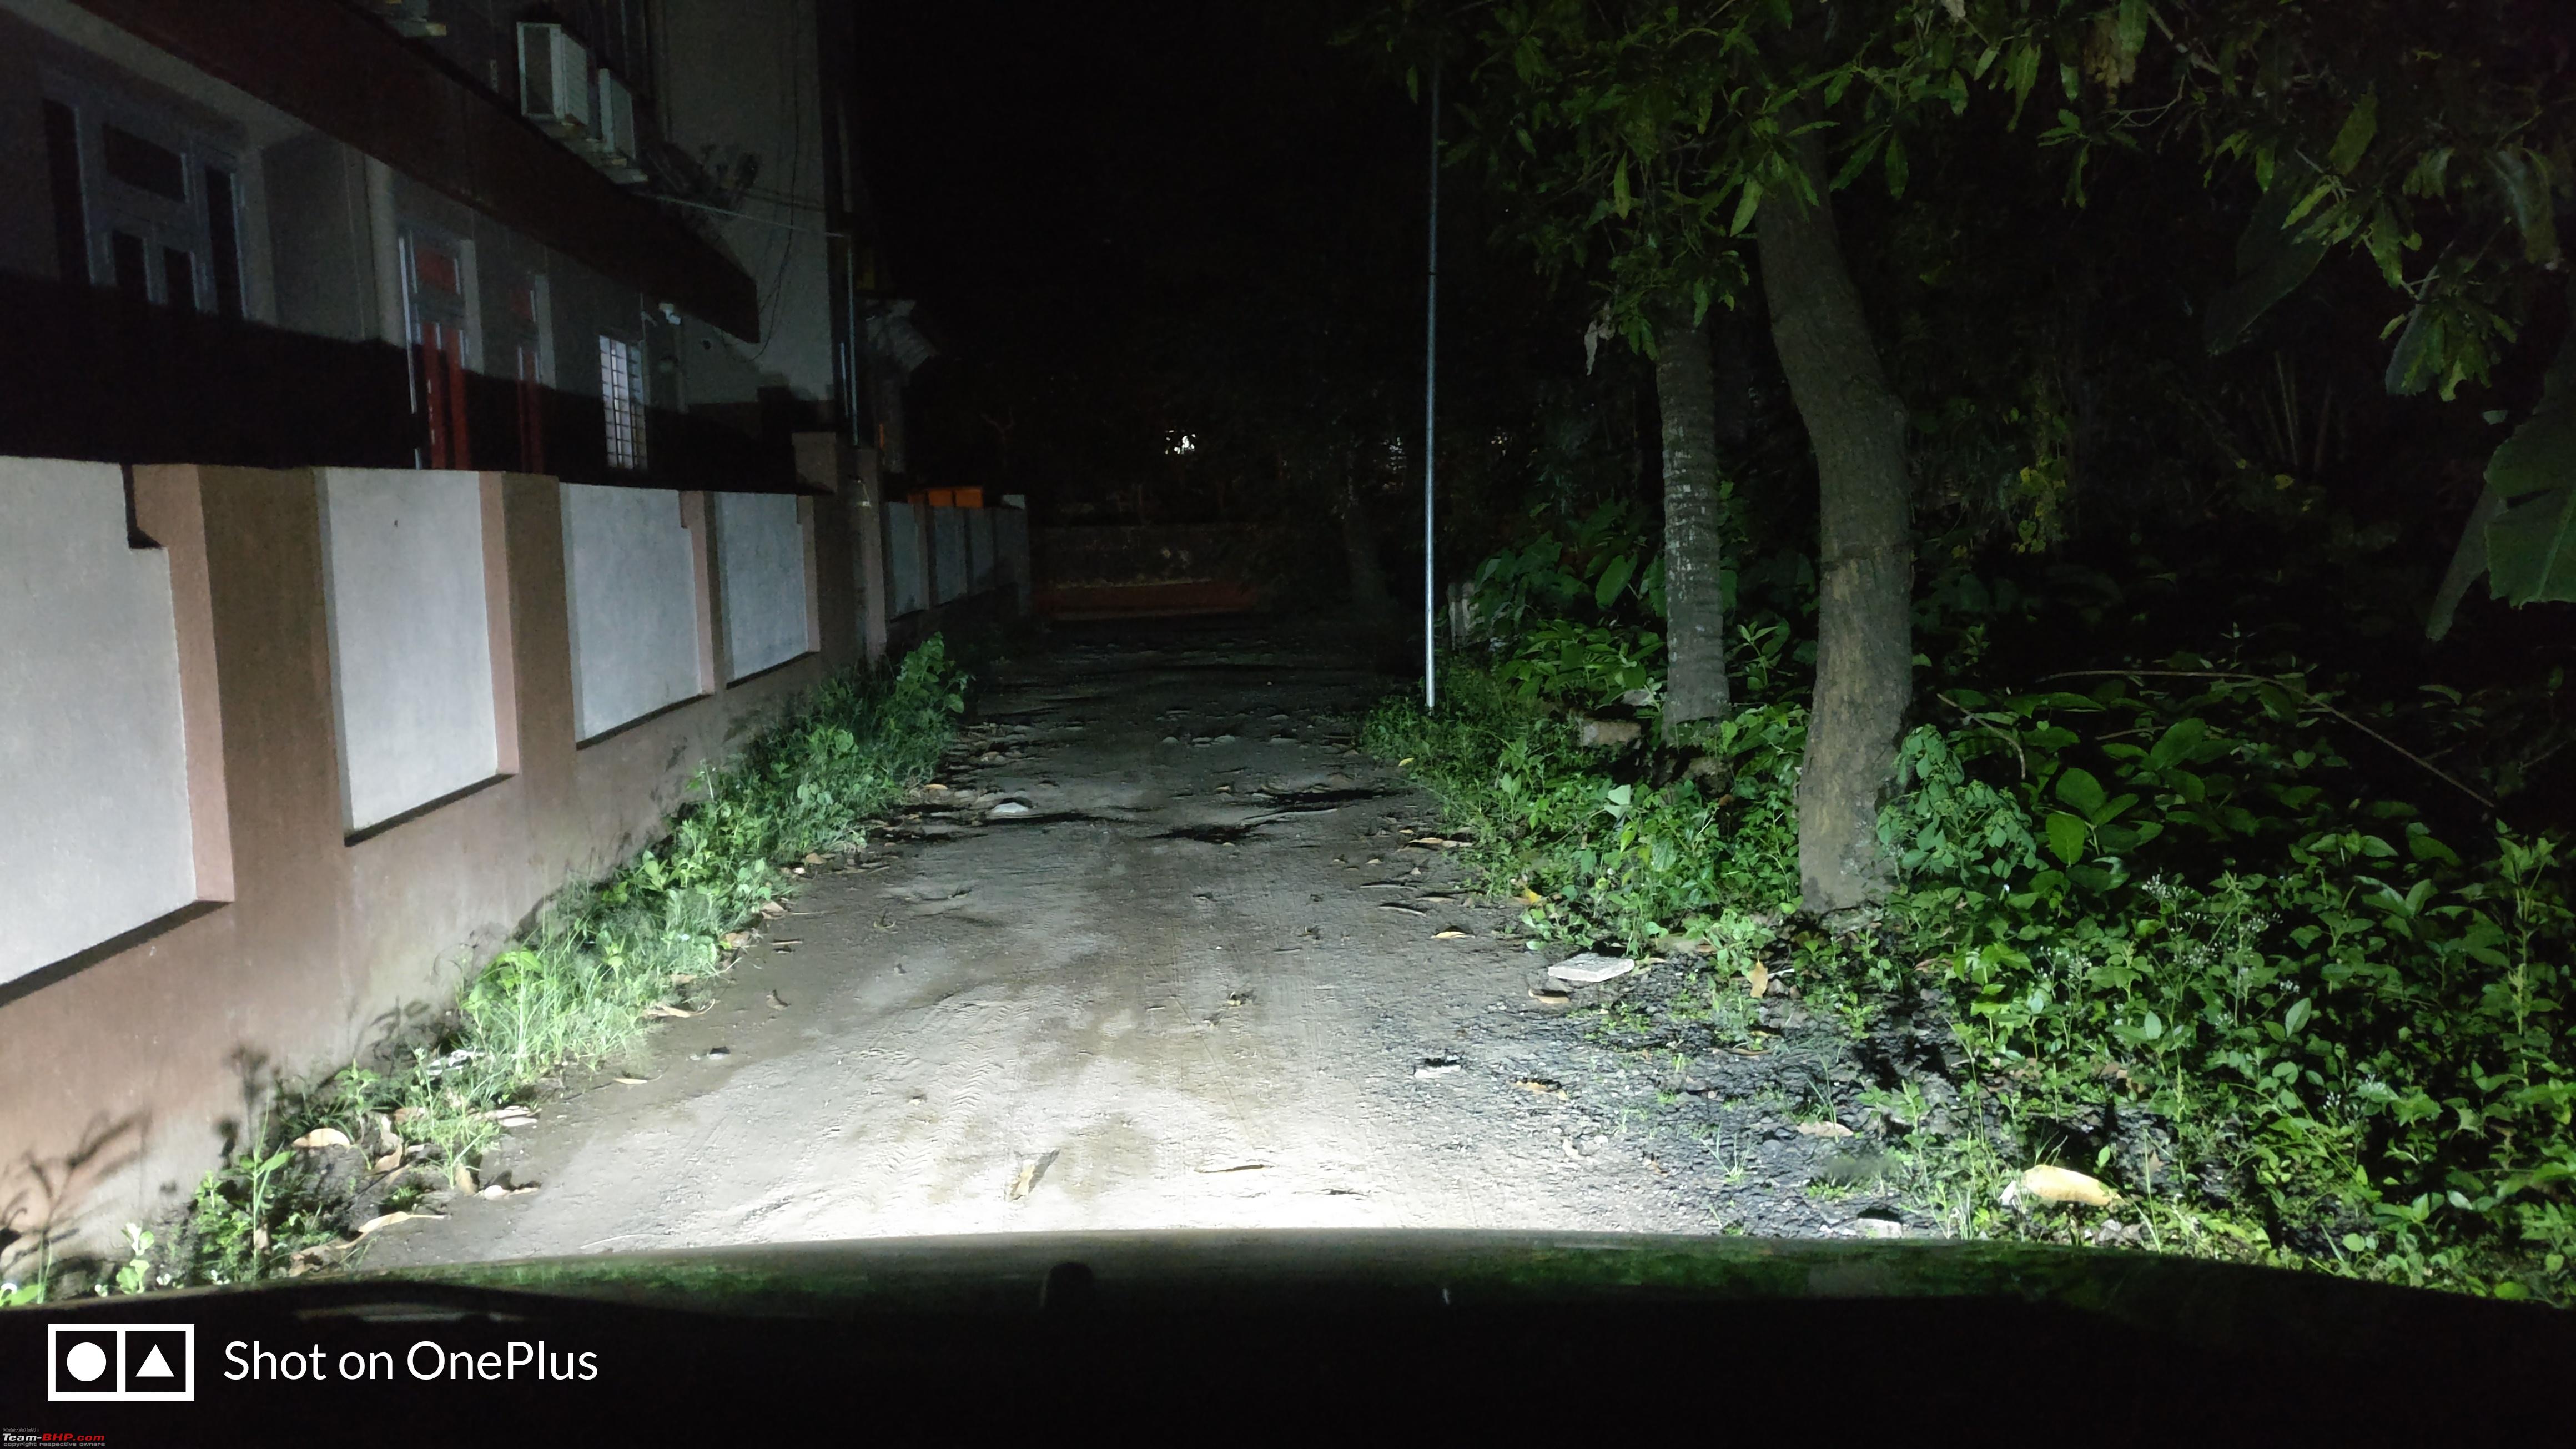 Fogs with low beam:  Fogs with high beam:  Overall very happy with the product, the output is more than what I had expected. Now the itch to upgrade the headlights to LED has started. PS:None of the products mentioned above are sponsored, nor am I related to the seller or to the company in any manner. Last edited by francis_vaz : 18th September 2018 at 22:27. |
|
| (4)
Thanks
|
| The following 4 BHPians Thank francis_vaz for this useful post: | a4anurag, atulsian, supertinu, Varun_HexaGuy |
| |
|
23rd September 2018, 20:39
| #27 |
| BHPian Join Date: Jun 2018 Location: Mumbai
Posts: 182
Thanked: 491 Times
| Re: Our Gentle Giant - Maruti Ertiga ZDi+ SHVS Odometer update: 24000kms.  Mood lighting DIY in the works, will update soon. Last edited by francis_vaz : 23rd September 2018 at 20:43. |
|
| (2)
Thanks
|
| The following 2 BHPians Thank francis_vaz for this useful post: | a4anurag, Varun_HexaGuy |
|
1st October 2018, 13:32
| #28 | |
| BHPian Join Date: Apr 2007 Location: JH/BHARAT
Posts: 382
Thanked: 451 Times
| Re: Our Gentle Giant - Maruti Ertiga ZDi+ SHVS Quote:
other issue that is surfacing is rattling from rear AC segment as if something is getting loose. I have also changed all my lights to LED except interior ones. Mine is mostly used by my wife, I am happy driving my S-Cross What is the average you getting? My gives 18+ on highway and 13-14 kmpl in city. Last edited by drsnt : 1st October 2018 at 13:34. Reason: Addition to old post | |
|
| (1)
Thanks
|
| The following BHPian Thanks drsnt for this useful post: | francis_vaz |
|
1st October 2018, 18:58
| #29 | |||
| BHPian Join Date: Jun 2018 Location: Mumbai
Posts: 182
Thanked: 491 Times
| Re: Our Gentle Giant - Maruti Ertiga ZDi+ SHVS Quote:
The car will be going for a minor repair work this week. I'll ask the SA to check what the problem is and keep you posted. I am not facing the rattling issue yet, hope it stays that way. Quote:
Can you please share the details for the same, and some pictures of the output against the wall. Quote:
Last edited by francis_vaz : 1st October 2018 at 19:00. | |||
|
| ()
Thanks
|

|
2nd October 2018, 13:20
| #30 | |
| BHPian Join Date: Apr 2007 Location: JH/BHARAT
Posts: 382
Thanked: 451 Times
| Quote:
https://www.aliexpress.com/item/Part...27424c4daVxnPo For my S -cross I have been using this one https://www.aliexpress.com/item/Car-...27424c4daVxnPo Better than above. Using for 1 yr now. More powerful. Excellent low beam with good cutoff, Very powerful high beam (strictly for highway and no upcoming traffic). After using this one my earlier LED in Ertiga feels lees powered so have ordered one for Ertiga also. For fogs I have https://www.aliexpress.com/item/MAXG...27424c4daVxnPo No complaints, good spread works wonderfully in complimenting main beam. For number plate and parking I have recently installed https://www.aliexpress.com/item/Osla...27424c4dRhLiIE For interiors My last order went missing so will be buying again. I have also Installed rear window curtains. I am happy with them, can be opened and closed easily, maintains privacy and also protects from sun. https://www.aliexpress.com/item/2pcs...27424c4d7KIFBE I got full floor carpet from local market for 2300. it was prefabricated as per car floor. Using these ones for floor through lighter socket https://www.aliexpress.com/item/4x-9...27424c4dt9LDGq waiting for your mood lightning DIY, also planning puddle lamps. Already ordered one waiting to receive. Last edited by SDP : 2nd October 2018 at 14:51. Reason: Merging back to back posts. Please edit or multi-quote instead of back to back posts | |
|
| (1)
Thanks
|
| The following BHPian Thanks drsnt for this useful post: | francis_vaz |
|