Team-BHP > Team-BHP Reviews > Test-Drives & Initial Ownership Reports
Register New Topics New Posts Top Thanked Team-BHP FAQ


Reply
  Search this Thread
89,291 views
Old 29th March 2019, 10:12   #16
BHPian
 
TheLizardKing's Avatar
 
Join Date: Jul 2013
Location: Mumbai
Posts: 428
Thanked: 1,321 Times
Re: Mini-Mod: Reservoir Cap

Quote:
Originally Posted by Thilak29 View Post
Very interesting read and wish you happy and safe miles.
Thank you so much!

Quote:
Originally Posted by Thilak29 View Post
I had to replace the same cap in my 7-year-old Brio (thanks to ageing) and the cost was just Rs 47!
Wow! I will have to enquire with my SA about the price of the OEM VW part, just for my reference. My mod was possible thanks to the large number of parts shared between the different brands under the VW umbrella. I even found a Porsche part once (I forget which one now) that was compatible with my GT TSI.

Combined with the bonnet strut DIY, the new cap makes reservoir-filling a completely hassle-free process, which is something I don't mind paying Rs 800 for.
TheLizardKing is offline   (2) Thanks
Old 29th March 2019, 10:36   #17
BHPian
 
TheLizardKing's Avatar
 
Join Date: Jul 2013
Location: Mumbai
Posts: 428
Thanked: 1,321 Times
Mini-Mod: Leather Handbrake Grip

As already mentioned in the 'Particular Dislikes' section of my review, I was really irritated to find out that VW replaced the leather handbrake grip with a plastic one. My 2013 MPI Highline has a leather grip, and I wanted the same on my GT TSI. So I went ahead and got this:

My pre-worshipped Volkswagen Polo GT TSI with lots of DIYs-mvimg_20190328_100822.jpg

Source: AliExpress
Price: $25.80

Feedback: The leather quality is not as good as that on my Polo MPI grip, and has a dull finish. But it IS genuine leather, and I hope that it will get better with age. The white stitching is the cherry on top.

Also starring in the above picture are genuine carbon fibre stickers for the DSG knob.

Source: AliExpress
Price: $13.46

Feedback: I was afraid they would look tacky, but they actually look and feel really nice. They are supplied with good quality 3M double-sided tape. As instructed by the seller, I warmed the tape slightly with my heat gun before sticking them. However, the lower edge of one of the stickers started coming away after a couple of days. I fixed it with some FeviKwik gel. All good now.
TheLizardKing is offline   (5) Thanks
Old 29th March 2019, 11:25   #18
BHPian
 
TheLizardKing's Avatar
 
Join Date: Jul 2013
Location: Mumbai
Posts: 428
Thanked: 1,321 Times
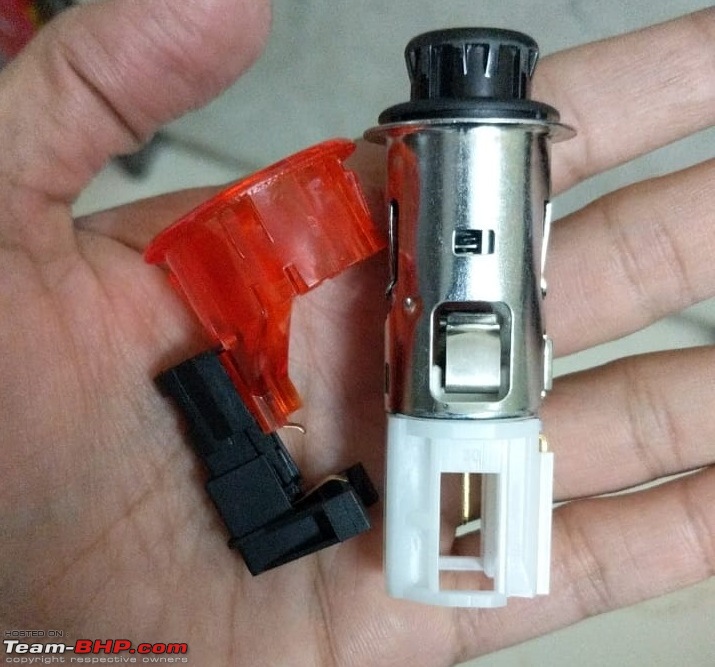
Mini-Mod: Illuminated Cigarette Lighter

The way I see it, every cost-cutting attempt by VW is just another opportunity for enthusiasts. Such was the case with this one: the illuminated cigarette lighter was dropped by VW in the 2015 facelift. I did my research on this one, and realized that the non-illuminated unit fitted in my GT TSI is hard to remove, with the possibility of damage to the console. I decided to play safe, and got it installed at the VW workshop. The technician uninstalled and removed the entire central console, and I ended up with a Rs 1200 bill for labor.

My pre-worshipped Volkswagen Polo GT TSI with lots of DIYs-img20190213wa0012.jpg

My pre-worshipped Volkswagen Polo GT TSI with lots of DIYs-img20190308wa0041.jpg

Part Number: 1J0 919 309
Source: AliExpress
Price: $7.13

Feedback: The unit is of very good quality, indistinguishable from the OEM unit. The red plastic ring is also available separately, and some forum members have installed just that. Given that I don't smoke, I really had no use for the lighter, but I bought it just because my MPI has it too.
TheLizardKing is offline   (4) Thanks
Old 29th March 2019, 14:09   #19
BHPian
 
TheLizardKing's Avatar
 
Join Date: Jul 2013
Location: Mumbai
Posts: 428
Thanked: 1,321 Times
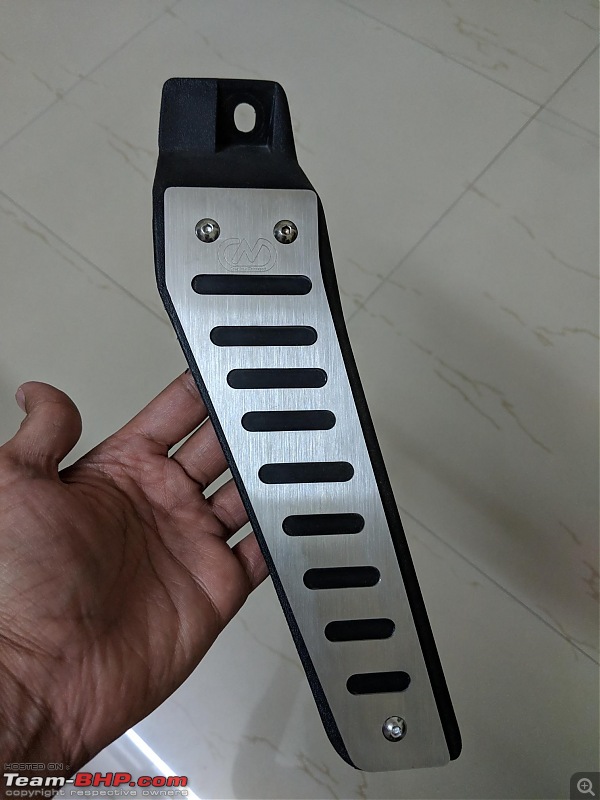
Mini-Mod: Dead Pedal Cover

The naked 'dead' pedal of my GT TSI has always felt inferior to its stainless steel clad 'live' cousins, who always look down their nose at it. I felt bad for the poor guy, who does so much to make my ride a comfortable one by supporting my left foot, and bought some clothes for it:

My pre-worshipped Volkswagen Polo GT TSI with lots of DIYs-footrest-cover.jpg

Source: eBay UK
Price: £19.99 + £9.99 Shipping

My pre-worshipped Volkswagen Polo GT TSI with lots of DIYs-footrest-cover_installed.jpg

Feedback: The cover is made of stainless steel with a full rubber backing, and oozes quality. Installation is straightforward, and only requires three holes to be drilled in the dead pedal. The seller provides all the hardware needed for installation.
TheLizardKing is offline   (6) Thanks
Old 29th March 2019, 14:15   #20
Senior - BHPian
 
JoshMachine's Avatar
 
Join Date: Jan 2013
Location: Pune
Posts: 1,248
Thanked: 6,072 Times
Re: Mini-Mod: Dead Pedal Cover

Quote:
Originally Posted by TheLizardKing View Post
The cover is made of stainless steel with a full rubber backing, and oozes quality. Installation is straightforward, and only requires three holes to be drilled in the dead pedal. The seller provides all the hardware needed for installation.
Thanks, the dead pedal looks fab.
How long you have been using it? Does dirt/mud accumulate on the dead pedal inside edges?
JoshMachine is offline  
Old 29th March 2019, 15:17   #21
BHPian
 
TheLizardKing's Avatar
 
Join Date: Jul 2013
Location: Mumbai
Posts: 428
Thanked: 1,321 Times
DIY #3: Glove Box Lamp

My pre-worshipped Volkswagen Polo GT TSI with lots of DIYs-installation-result.jpg

Part Number: 1J0 947 301
Source: AliExpress
Price: $10.60

This is another mod inspired by Gannu, and I followed the steps described in his thread (VW Polo DIY: Adding a lamp to the glovebox). I have only noted the changes below:

1. VW has changed the shape of the glovebox in the post-2015 facelift Polo. As a result, the lamp now needs to installed on the right hand side (driver side) wall of the glovebox.

2. The overlap between the spring-loaded rocking arm on the lamp and the 'tongue' on the glovebox door is minimal in the new position.

My pre-worshipped Volkswagen Polo GT TSI with lots of DIYs-overlap.jpg

I realized to my horror a few days after installion that the lamp would remain on even after I closed the glovebox because the tongue would slip off the rocking arm. I was lucky that my car is a daily driver, else the battery would have drained completely.

My pre-worshipped Volkswagen Polo GT TSI with lots of DIYs-overlap-fix.jpg

Thanks to a tip from my DIY partner Viraat13, I stuck a zip tie head to the rocking arm with a little FeviKwik to increase the overlap, which fixed the problem. Jugaad zindabad!

Note: The trickiest part of the DIY is getting the slot in the glovebox at the proper location and of the proper size. While I managed the former bit perfectly, I made a mess of the latter and ended up with a larger slot. Swallowing my ego, I had to reach out for the tube of FeviKwik grinning evilly at me from my workbench. I will now have to remove the entire glovebox when I need to change the bulb, which hopefully should not be too often.

Last edited by TheLizardKing : 29th March 2019 at 15:25.
TheLizardKing is offline   (5) Thanks
Old 29th March 2019, 16:48   #22
BHPian
 
TheLizardKing's Avatar
 
Join Date: Jul 2013
Location: Mumbai
Posts: 428
Thanked: 1,321 Times
Mini-Mod: Anti-theft Wheel Bolts

Tips his hat once again to Gannu.

Inspired by his post, I managed to locate and buy the same set.

Part Number: ZGB 5J0 071 591
Source: All Car Parts Fast, UK
Price: £16.32 + £16.99 Shipping

Buying Experience: I found the same item on eBay at a slightly higher cost.

My pre-worshipped Volkswagen Polo GT TSI with lots of DIYs-ebay.jpg
(Image Source: eBay)

The pictures in the eBay posting showed the following items in the kit:
  1. Bolt with Cap (4 nos.)
  2. Socket (1 no.)
  3. Cap Extractor (1 no.)
The sales rep at All Car Parts assured me that all these items would be included in their shipment as well.

My pre-worshipped Volkswagen Polo GT TSI with lots of DIYs-bolt-set.jpg

My pre-worshipped Volkswagen Polo GT TSI with lots of DIYs-bolt_and_socket.jpg

However on receiving my order, I realized that the cap extractor was missing. I ended up buying it from my usual source.

My pre-worshipped Volkswagen Polo GT TSI with lots of DIYs-cap-extractor.jpg

Source: AliExpress
Price: $0.82

Notes:
  1. If you plan to install these bolts in your car, please read the accompanying instruction sheet very carefully.

    My pre-worshipped Volkswagen Polo GT TSI with lots of DIYs-instruction-sheet.jpg

    If the bolts are tightened using a pneumatic wrench as is the standard practice with wheel bolts, the anti-theft pattern may get worn out. The only option in that case, and a really painful one at that, would be to drill the hardened bolt out, which may not be possible if you are stranded at a remote location with a flat tire. Please read Gannu's own experience below:
    Quote:
    Originally Posted by Gannu_1 View Post
    I had some work in the car during the weekend and wanted to remove the driver-side wheel but guess what! The bolt refused to come off despite me trying my best using a longer rebar inserted into the wrench for leverage. Tried the bolts on the other wheels but they won’t budge. The key kept slipping over the bolt head. I recalled that they were tightened using the pneumatic wrench at the service center whereas they are usually tightened using the hand or a torque wrench. The service center guys used the key on the pneumatic wrench to get the bolts off and got 3 out of 4. The one on the driver side wheel refused to come off that easily. Finally, with a lot of effort, it did. So just a heads-up in case you are using these anti-theft bolts - have them tightened using the torque wrench or by hand. Don't use the pneumatic wrench.
  2. Also, keep the socket in a safe place in your car, and don't lose it. The OEM manufacturer of these bolts does not ship to India, and I do not know if Indian dealerships will be able to procure a replacement key. So you'll be in big trouble if you misplace the key.

Last edited by TheLizardKing : 29th March 2019 at 16:51.
TheLizardKing is offline   (4) Thanks
Old 29th March 2019, 17:29   #23
BHPian
 
TheLizardKing's Avatar
 
Join Date: Jul 2013
Location: Mumbai
Posts: 428
Thanked: 1,321 Times
DIY #4: International Spec Tail-lights

My pre-worshipped Volkswagen Polo GT TSI with lots of DIYs-mvimg_20190226_235321.jpg

This should have been a 'Mini-Mod' from the execution point of view, but it turned into a mini DIY thanks to a last minute surprise. I have created a separate thread with all the details here (VW Polo GT TSI DIY: International Polo 6C Tail-Lights).
TheLizardKing is offline   (4) Thanks
Old 29th March 2019, 21:10   #24
BHPian
 
Viraat13's Avatar
 
Join Date: Mar 2010
Location: New Delhi
Posts: 787
Thanked: 3,364 Times
Re: My pre-worshipped Volkswagen Polo GT TSI with lots of DIYs

Love the thread! Wish you many happy miles in the GT.

I see that a lot of our discussions have made their way to the thread too.

You call me your DIY partner, but I haven't even done half the things you have. Got a lot of catching up to do.
Viraat13 is offline   (2) Thanks
Old 29th March 2019, 23:55   #25
BHPian
 
antardaksh's Avatar
 
Join Date: Jan 2006
Location: delhi
Posts: 380
Thanked: 295 Times
Re: Mini-Mod: Anti-theft Wheel Bolts

Quote:
Originally Posted by TheLizardKing View Post
Buying Experience: I found the same item on eBay at a slightly higher cost.
Hi,
Did you check with service center, I got the same installed from service center for INR 2900(approx).
Regards.
antardaksh is offline  
Old 1st April 2019, 11:45   #26
BHPian
 
TheLizardKing's Avatar
 
Join Date: Jul 2013
Location: Mumbai
Posts: 428
Thanked: 1,321 Times
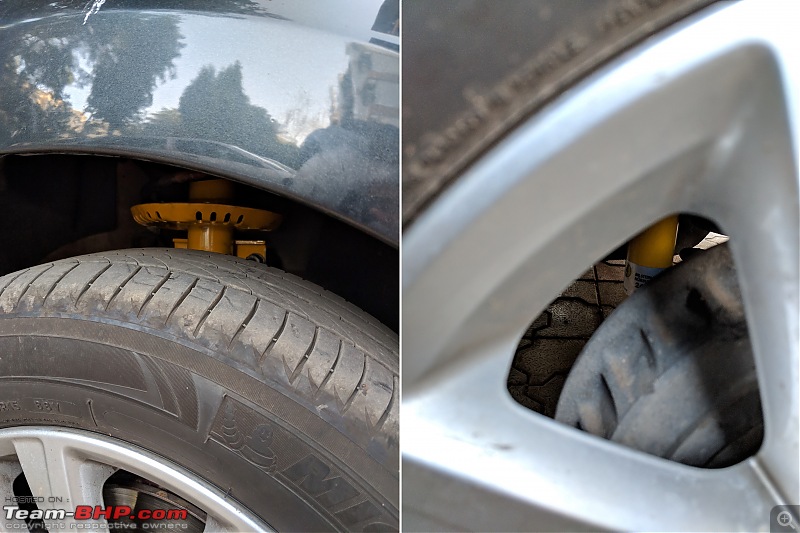
Mega-Mod: B6ed!

My pre-worshipped Volkswagen Polo GT TSI with lots of DIYs-collage.jpg

So after a lot of dilly-dallying, and even installing new stock VW struts 3 months ago, I finally took the plunge and got the Bilstein B6 kit. Here are the details:

Part Numbers: 35-168560 x2 (Front), 24-067898 x2 (Back)
Source: TDC Automotive
Price: £375 + £80 (Shipping) + Rs 10,596 (Customs)

Buying Experience: Like most other Team BHP members, I bought the kit from TDC Automotive, UK. Pete's is the authorized reseller in India, but their quote was not very competitive. Ross Anderton (ross@tdcautomotive.com) is very helpful and prompt with his replies, and he answered all my queries patiently. I decided to buy the kit in the last week of January, but was told that the front struts were on back order until late February. With no other option, I asked Ross to add me to the waiting list. After a long wait made longer by delays at the Bilstein factory in Germany, they were finally dispatched via FedEx on March 15, and reached me on March 22. A positive buying experience overall.

Initial Impression: I installed them yesterday, and have driven about 45 kms on them so far. Here is my preliminary feedback:
  1. The car feels more 'connected' to the road, almost as if an invisible giant hand is pressing down on the roof.
  2. There is absolutely no dipping while braking. It makes a load of difference while darting through vehicles in city traffic.
  3. The steering feels more alive and responsive.
  4. The struts really mask speed. I touched 110 k.m.p.h. on an open road during the post-install trial, and it felt like I was doing 80-90.
  5. They are much less noisy than the stock struts. All the thud thud and pish pish sounds are history.
  6. The car now dismisses anything the roads throws at it with disdain - unevenness, joints, potholes, even speed-breakers! I took the car out for a late night run around the Mumbai International Airport, and missed a set of three mini-bumpers. I didn't feel a thing inside the cabin.
My biggest worry was how the B6 kit would tackle the bad Mumbai roads, and I am happy to report that they are great as a daily driver. I put them through two acid tests (service road along the Andheri flyover on the WEH (towards Borivali) and descent at SEEPZ on JVLR (towards Powai)), and they passed both with flying colors. It is a bit counter-intuitive, but it is more comfortable going faster on bad roads.

The struts will settle down after about 800-1000 kms, and I will post an update then.
TheLizardKing is offline   (8) Thanks
Old 1st April 2019, 12:57   #27
BHPian
 
TheLizardKing's Avatar
 
Join Date: Jul 2013
Location: Mumbai
Posts: 428
Thanked: 1,321 Times
DIY #5: Rear Footwell Lights

My pre-worshipped Volkswagen Polo GT TSI with lots of DIYs-07-installed.jpg

It was a busy weekend for me. After getting the B6 kit installed on Saturday, I decided to finish the long-delayed installation of the rear footwell lights on Sunday. This is a really useful mod, and also adds a premium feel to the car. Here are the details:

Parts Required
  1. Lights - 2 nos.
    Name:  01 Lights.png
Views: 6469
Size:  191.6 KB
    (Image credit: AliExpress)

    Part Number: 5ND 947 415
    Source: AliExpress
    Price: $11.39
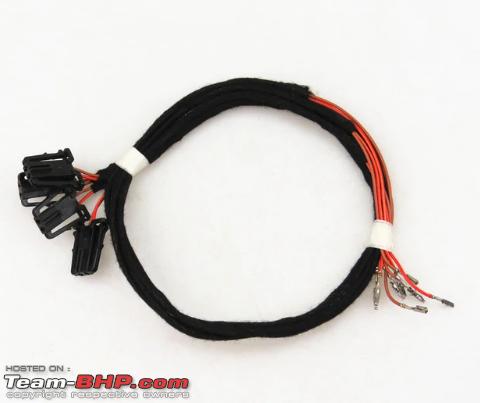
  2. Harness - 2 nos.
    Name:  02 Harnesses  1.png
Views: 6613
Size:  169.8 KB
    (Image credit: AliExpress)

    Part Number: 3AD 947 411
    Source: AliExpress
    Price: $5.05
    Note: This harness is originally for the door warning lights of the VW Passat, but the connectors (for which I primarily bought the harness) are compatible with the lights.
Additional Materials
  1. Wire - 6.2 metres
  2. Luster Terminals - 2 nos.
  3. Heat-shrink sleeves
  4. Zip ties
Tools
  1. Wire cutting and crimping tool
  2. Soldering iron, with solder wire and flux
  3. Heat gun
  4. Utility Knife
Installation:

The inspiration for this mod is, as usual, Gannu's thread here (VW Polo DIY: Upgrading cabin light, headlight switch & installing footwell lights). However, Gannu's 2013 GT TDI did not come with any footwell lights, and he tapped the front dome light to power all four. My 2015 GT TSI comes with front footwell lights, and they switch on/off independent of the front dome light. If I used the front dome light to power the rear footwell lights, they would not operate in sync with the front ones. Like my DIY partner Viraat13, I am a fan of symmetry, and decided that I need another approach. The only other available option however - tapping the inputs of the existing front footwell lights - was not one I was terribly keen on, since I do not like cutting/splicing/tapping OEM cables. However, after a lot of hand wringing, I decided to break my 'Thou shalt not touch OEM cables' rule. The rest of the installation is as described in Gannu's thread.
  1. Disconnect the battery.
  2. Unplug the cables from the front footwell lights. Cut both the cables at about 20-30 mm from the connector end.
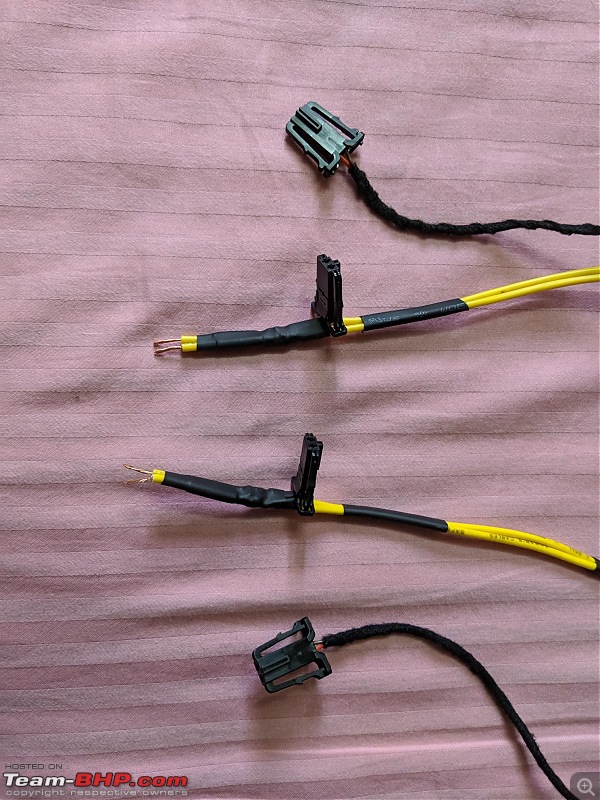
  3. Cut the wire into four pieces ('P1') of length 1.5 metres each. Cut the balance 0.2 metres into four pieces ('P2') of 5 cms each.

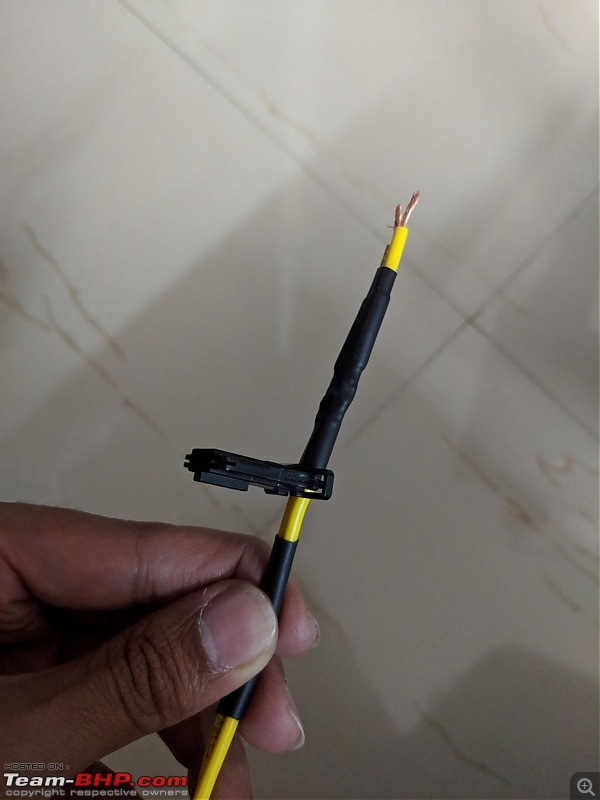
    My pre-worshipped Volkswagen Polo GT TSI with lots of DIYs-03-joint.jpg
  4. As shown above, solder one P1 and one P2 to each of the two wires in the OEM connector cable. Do this for both cables.

    My pre-worshipped Volkswagen Polo GT TSI with lots of DIYs-04-joint-protected.jpg
  5. Use heat-shrink sleeves to protect the soldered joints, and also along the length of the harness at an appropriate pitch.

    My pre-worshipped Volkswagen Polo GT TSI with lots of DIYs-05a-harnesses-2.jpg

    My pre-worshipped Volkswagen Polo GT TSI with lots of DIYs-05b-connectors.jpg
  6. The harnesses are now ready for installation. As seen above, there are four connectors, two for the front and two for the rear. Go out to the car with all the required items.

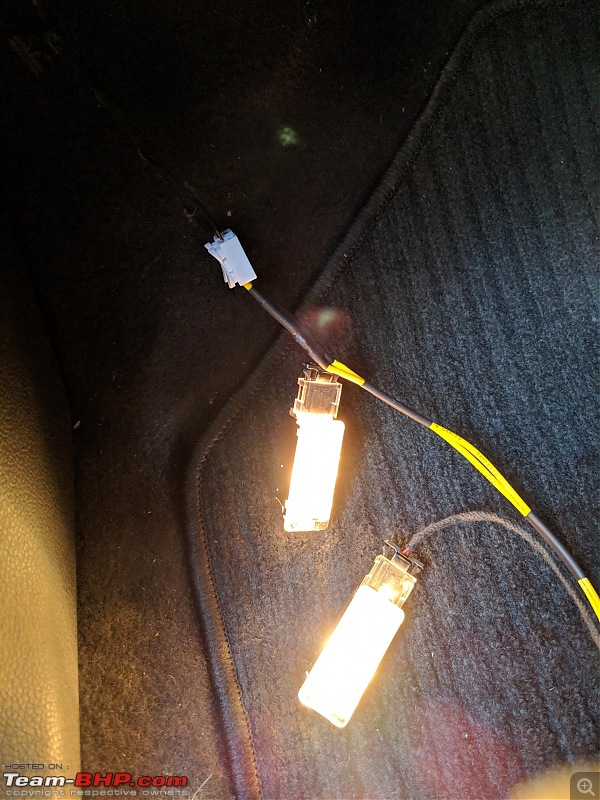
    My pre-worshipped Volkswagen Polo GT TSI with lots of DIYs-06-testing.jpg
  7. Connect the harnesses to the stock cables (that we had cut in step 2) using luster terminals, and test the lights. I used spring-loaded connectors (available on Amazon), which are very easy to use. You may alternatively use butt crimps, which will provide a stronger and more reliable connection.
  8. Install the footwell lights under the front seats using zip ties. Route the harnesses to the back by tucking them under the transmission tunnel flap. Refer Gannu's thread for pictures.
  9. Plug the connectors in, and let there be light!
TheLizardKing is offline   (5) Thanks
Old 1st April 2019, 14:08   #28
BHPian
 
TheLizardKing's Avatar
 
Join Date: Jul 2013
Location: Mumbai
Posts: 428
Thanked: 1,321 Times
DIY #6: Grab Handle Dampers

Gannu, yet again. Here is his thread (VW Polo DIY: Adding dampers to grab handles) for reference.

I followed the steps exactly as described in Gannu's thread, and will not repeat them. I will only note down my learnings, so that they are useful to other members:
  1. This DIY, more than any other one, taught me the importance of using the right tool for the right job. The easiest, and most effective, way to create the cavity for the damper is to use a chisel to cut the ribs and a rotary tool with the appropriate grinding bit to clean the cavity up and create the notch on the side face. Taking shortcuts here will either damage the handle, or give you sub-optimal results.

    Name:  Incomplete Retraction.gif
Views: 6274
Size:  1.89 MB
  2. There is a high probability that the handle will not retract completely at the first attempt. This can however only be checked after the handle has been reinstalled. I faced this problem with all three handles, and realized to my horror that there was no way to disassemble the handle because there is a blind hole on the inside end of the pin!

    My pre-worshipped Volkswagen Polo GT TSI with lots of DIYs-drilling.jpg

    I ended up opening up the blind hole with a drill bit, with the handle in the fully assembled state. Thankfully none of the pins got damaged. If you plan to attempt this DIY, carry out this step at the same time as creating the cavity i.e before installation.

    My pre-worshipped Volkswagen Polo GT TSI with lots of DIYs-damper-quality.jpg
  3. All dampers are not created equally, especially on AliExpress. I believe that part of the reason the handles would not retract completely was the dampers (left one above) themselves. So I bought another set from a different seller, and the new ones are of much better quality. So please check the number of orders and customer feedback before ordering.
TheLizardKing is offline   (2) Thanks
Old 1st April 2019, 14:47   #29
BHPian
 
TheLizardKing's Avatar
 
Join Date: Jul 2013
Location: Mumbai
Posts: 428
Thanked: 1,321 Times
Mini-Mod: LED Side Blinkers

Name:  1.gif
Views: 6308
Size:  2.06 MB

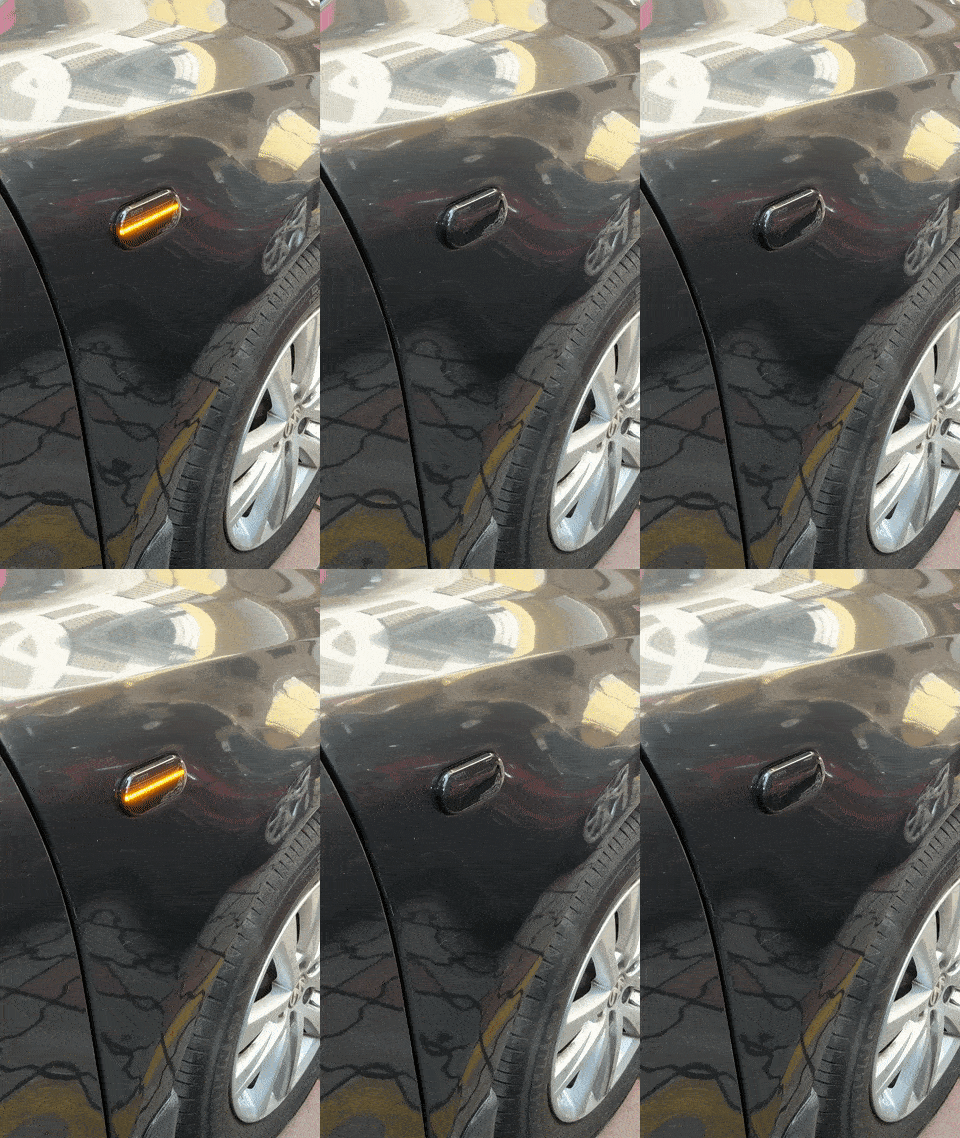
When you browse aimlessly on AliExpress, you often end up buying items you don't really need. This mod was the result of one such impulse purchase. I bought these blinkers for two reasons: 1. the smoked effect which complements the color of my car; and 2. the progressive action of the LED.

Source: AliExpress
Price: $18.89

Feedback: The blinkers are of good quality, and the seller claims that they are waterproof. I guess I will find out in the monsoon.

Name:  2.gif
Views: 6427
Size:  2.99 MB

The progressive action is in perfect sync with the blinking of the OEM turn signal indicators.

My pre-worshipped Volkswagen Polo GT TSI with lots of DIYs-3.jpg

The blinker body is thicker, and it sticks out a bit more from the surface of the car than the OEM unit.
TheLizardKing is offline   (1) Thanks
Old 1st April 2019, 16:05   #30
BHPian
 
TheLizardKing's Avatar
 
Join Date: Jul 2013
Location: Mumbai
Posts: 428
Thanked: 1,321 Times
Some updates

DIY #1: Armrest Installation (Original Post (My pre-worshipped Volkswagen Polo GT TSI with lots of DIYs))

My pre-worshipped Volkswagen Polo GT TSI with lots of DIYs-armrest.jpg

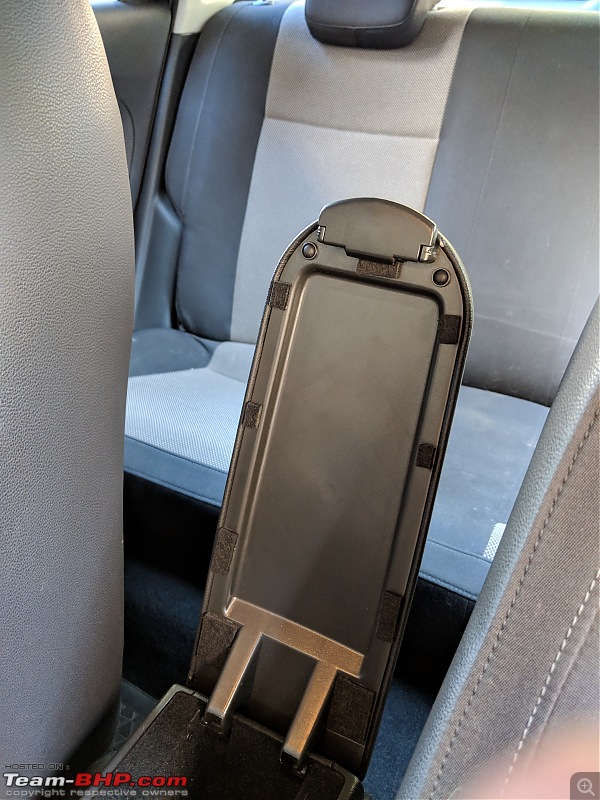
Update: The armrest would emit a horrible creaking sound whenever I placed or removed my elbow, and it was driving me nuts. The problem was correctly diagnosed by Viraat13 as rubbing between the armrest lid and base. He also provided the solution: self-sticking felt pads (purchased on Amazon). I bought a 29 x 21 cm sheet, and cut appropriate sized pieces out of it. I stuck these pieces on the lid all around the contact periphery.

Result: The noise has reduced by almost 80-90%!

DIY #2: Gas Strut for Bonnet (Original Post (My pre-worshipped Volkswagen Polo GT TSI with lots of DIYs))

My pre-worshipped Volkswagen Polo GT TSI with lots of DIYs-bonnet-strut-1.jpg

Update: The hinge at which I had bolted the top end of the strut started making creaking sounds whenever I would open/close the bonnet. In addition, the bonnet would flex when I was closing it, because one end was under load and the other wasn't. When I showed it to the VW workshop technicians, they advised me to install a strut on the driver side as well, since installation of a single strut was disturbing the load distribution. On further inspection, I also noticed that the passenger-side edge of the bonnet was slightly raised as compared to the driver-side edge, confirming my suspicion that the strut had disturbed the bonnet alignment. So after some thought, I went ahead and put in a strut on the driver side as well.

My pre-worshipped Volkswagen Polo GT TSI with lots of DIYs-bonnet-strut-2.jpg

I used zip ties to secure the windshield washer fluid tube (not visible in the picture) to the clamp.

Result: With 700N (350N x 2) of force, the struts easily raise the bonnet. It has become a bit harder to close the bonnet, and I can barely manage to do so with one hand now. The bonnet alignment has corrected itself, but the creaking sound remains. I will get it checked during my next workshop visit. The bonnet no longer flexes when I close it, and also opens more smoothly than earlier.

Conclusion: If any reader is planning to execute this mod, I would advise him/her to use 2 struts of 250N each.

Last edited by TheLizardKing : 1st April 2019 at 16:07.
TheLizardKing is offline   (5) Thanks
Reply

Most Viewed

Copyright ©2000 - 2024, Team-BHP.com
Proudly powered by E2E Networks