| |||||||

| Search Forums |
| Advanced Search |
| Go to Page... |
 |
| Search this Thread |  263,592 views |
 3rd December 2020, 11:51
| #46 | ||
| BHPian Join Date: Aug 2015 Location: Kolkata
Posts: 61
Thanked: 355 Times
| Re: Update : Swaagat Service Kit and Polo 1.0 TSI Petrol Engine Stone Guard Fitment Quote:
Quote:
Unforseen and recurring repairs aside, one would need to undo and refit the guard only during the scheduled services. Considering the peace of mind it provides, the extra time is absolutely worth it. Also, plastic is not inferior to metal in every case. A well designed and good quality plastic protector might absorb a heavy shock and break, instead of transmitting the shock to other places. Closely following your updates on the coolant bubbling. Do keep us posted.  Regards | ||

|  (2)
Thanks (2)
Thanks
 |

| The following 2 BHPians Thank shankha007 for this useful post: | fluidicjoy, Sen |
| |
|
11th December 2020, 15:49
| #47 |
| BHPian Join Date: Oct 2020 Location: Pune, San Diego
Posts: 247
Thanked: 2,446 Times
| Polo Door Scuff Plates and Aluminium Pedal Caps So the dealership had given me a set of Polo Scuff Plates and they were just sitting idle in the boot. To be honest, I'm not even sure if I like these scuff plates anymore, but I thought I'd try it out. This is what the car looked like before the scuff plate install. 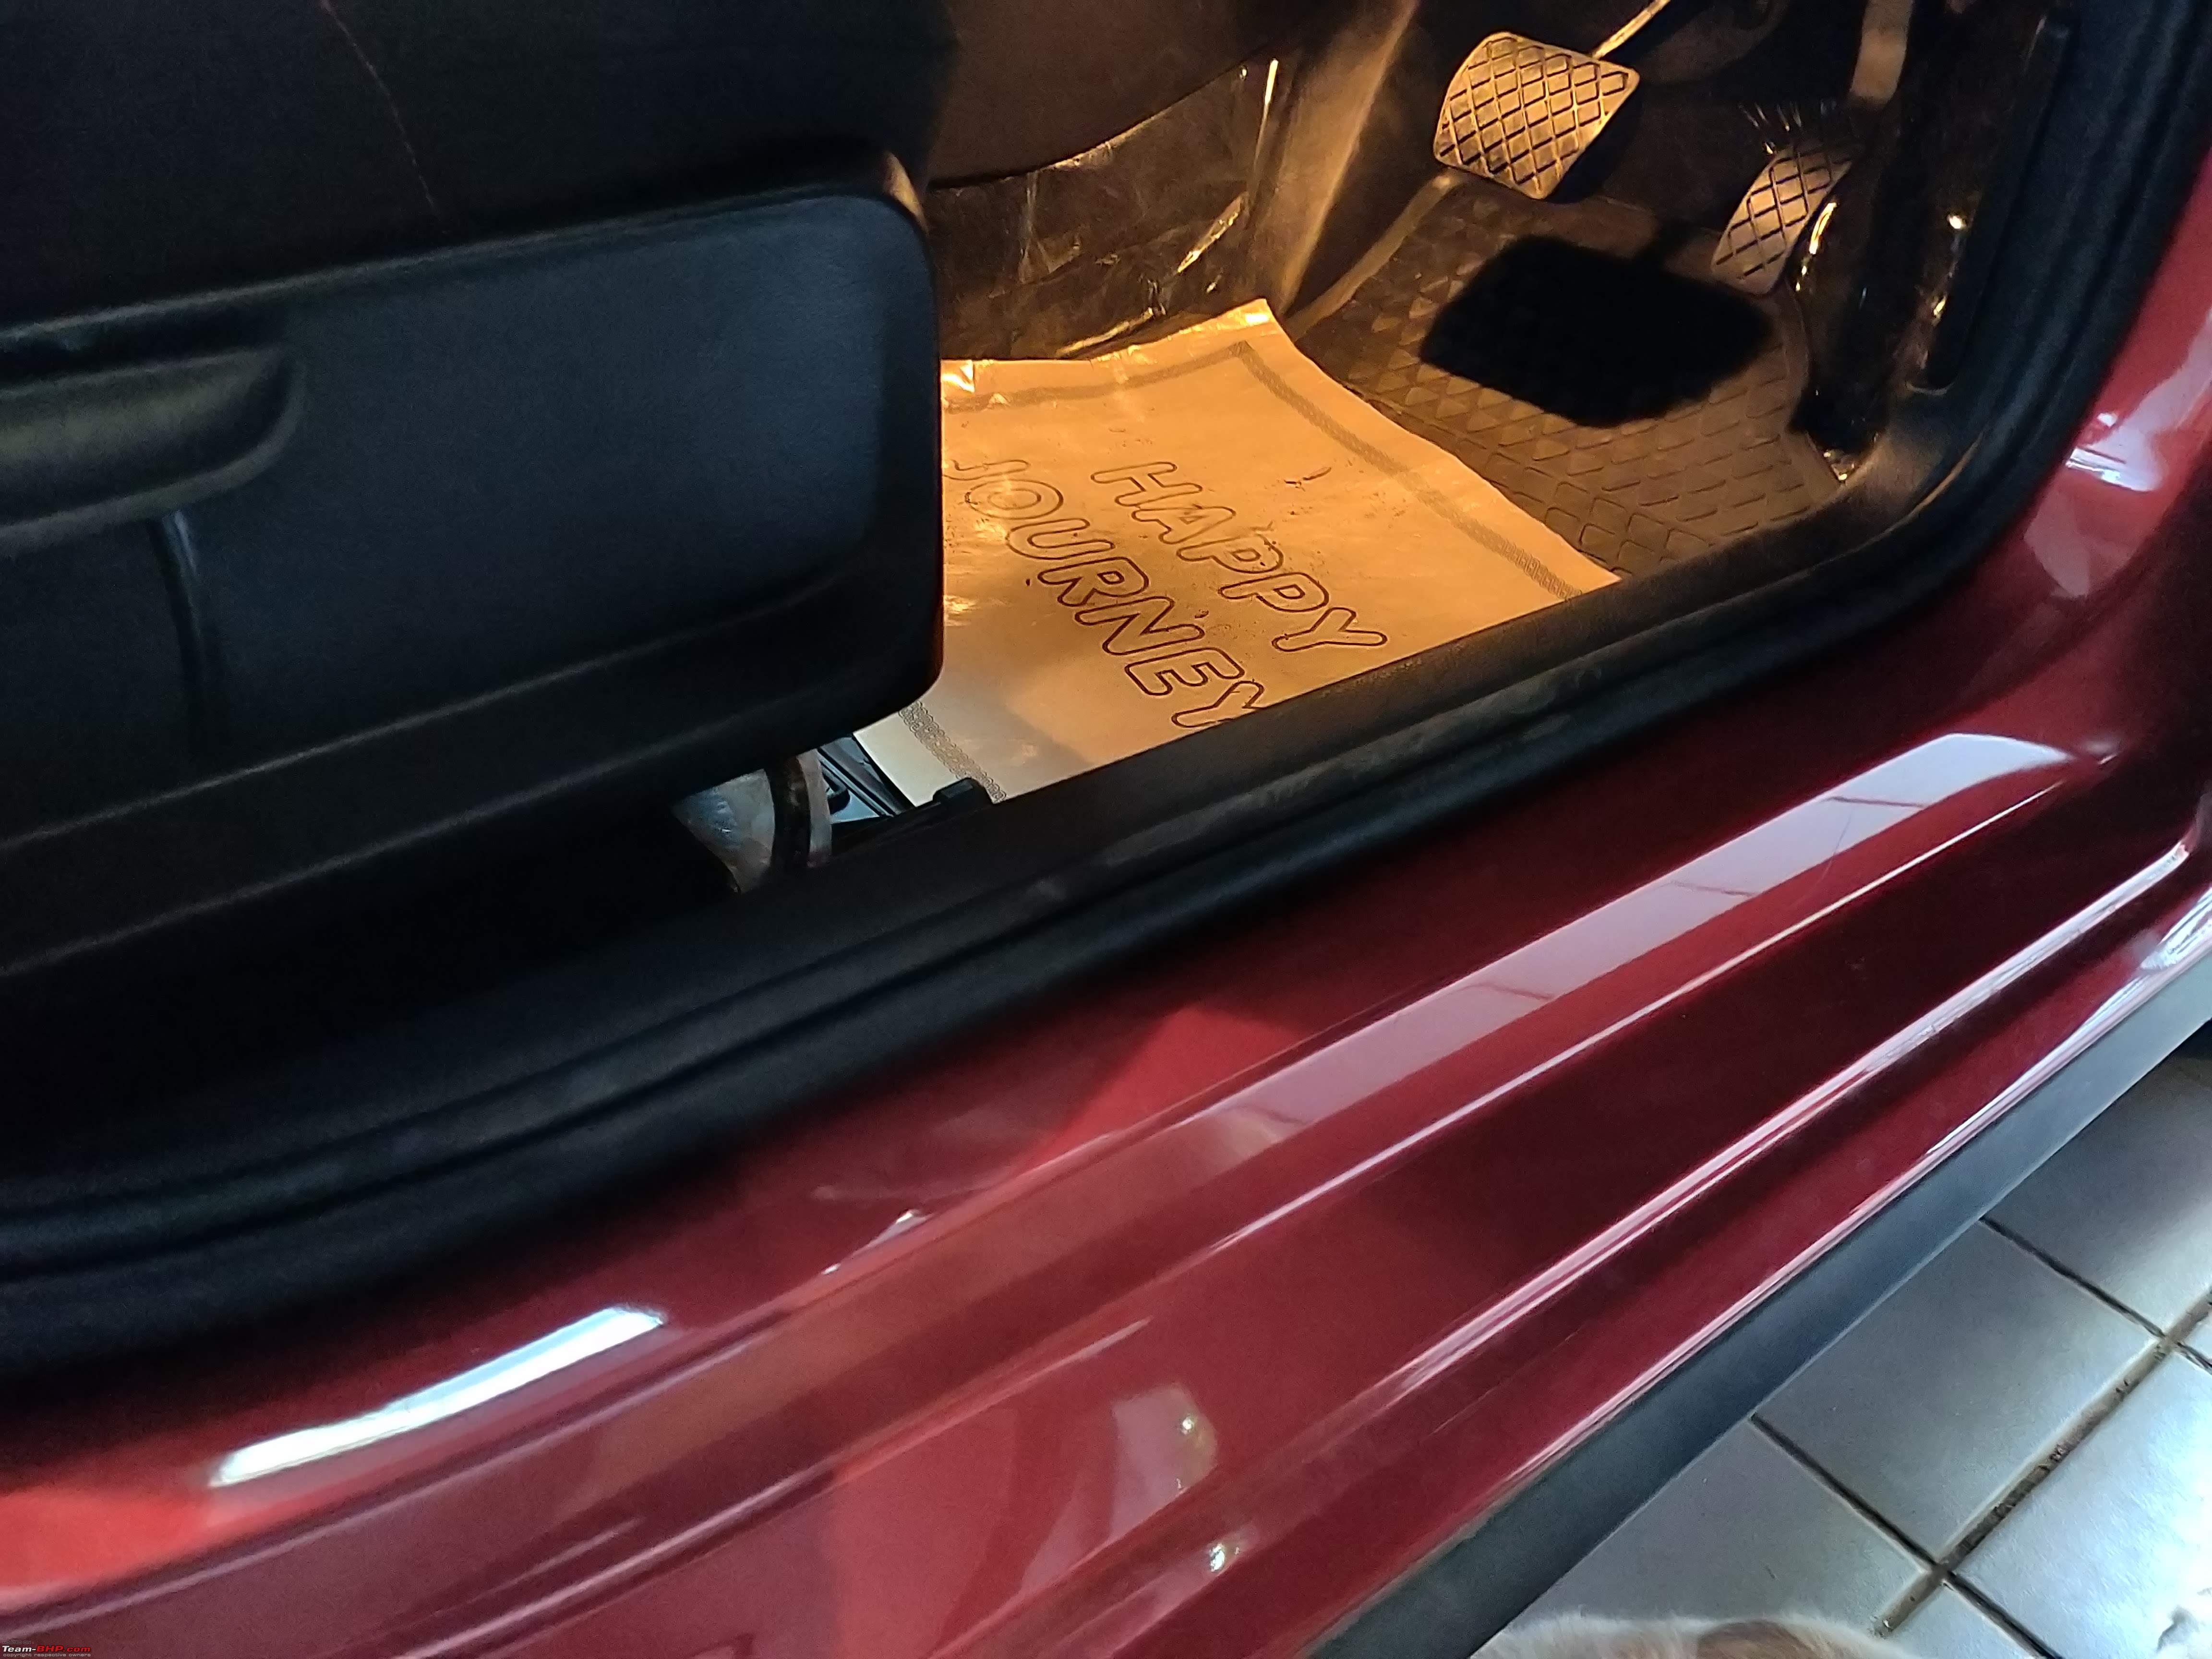 The scuff plates come with a heavy adhesive strip and so I used some rubbing alcohol and cleaned the mounting sill before attempting to install the scuff plate to ensure a smooth surface for the adhesive.  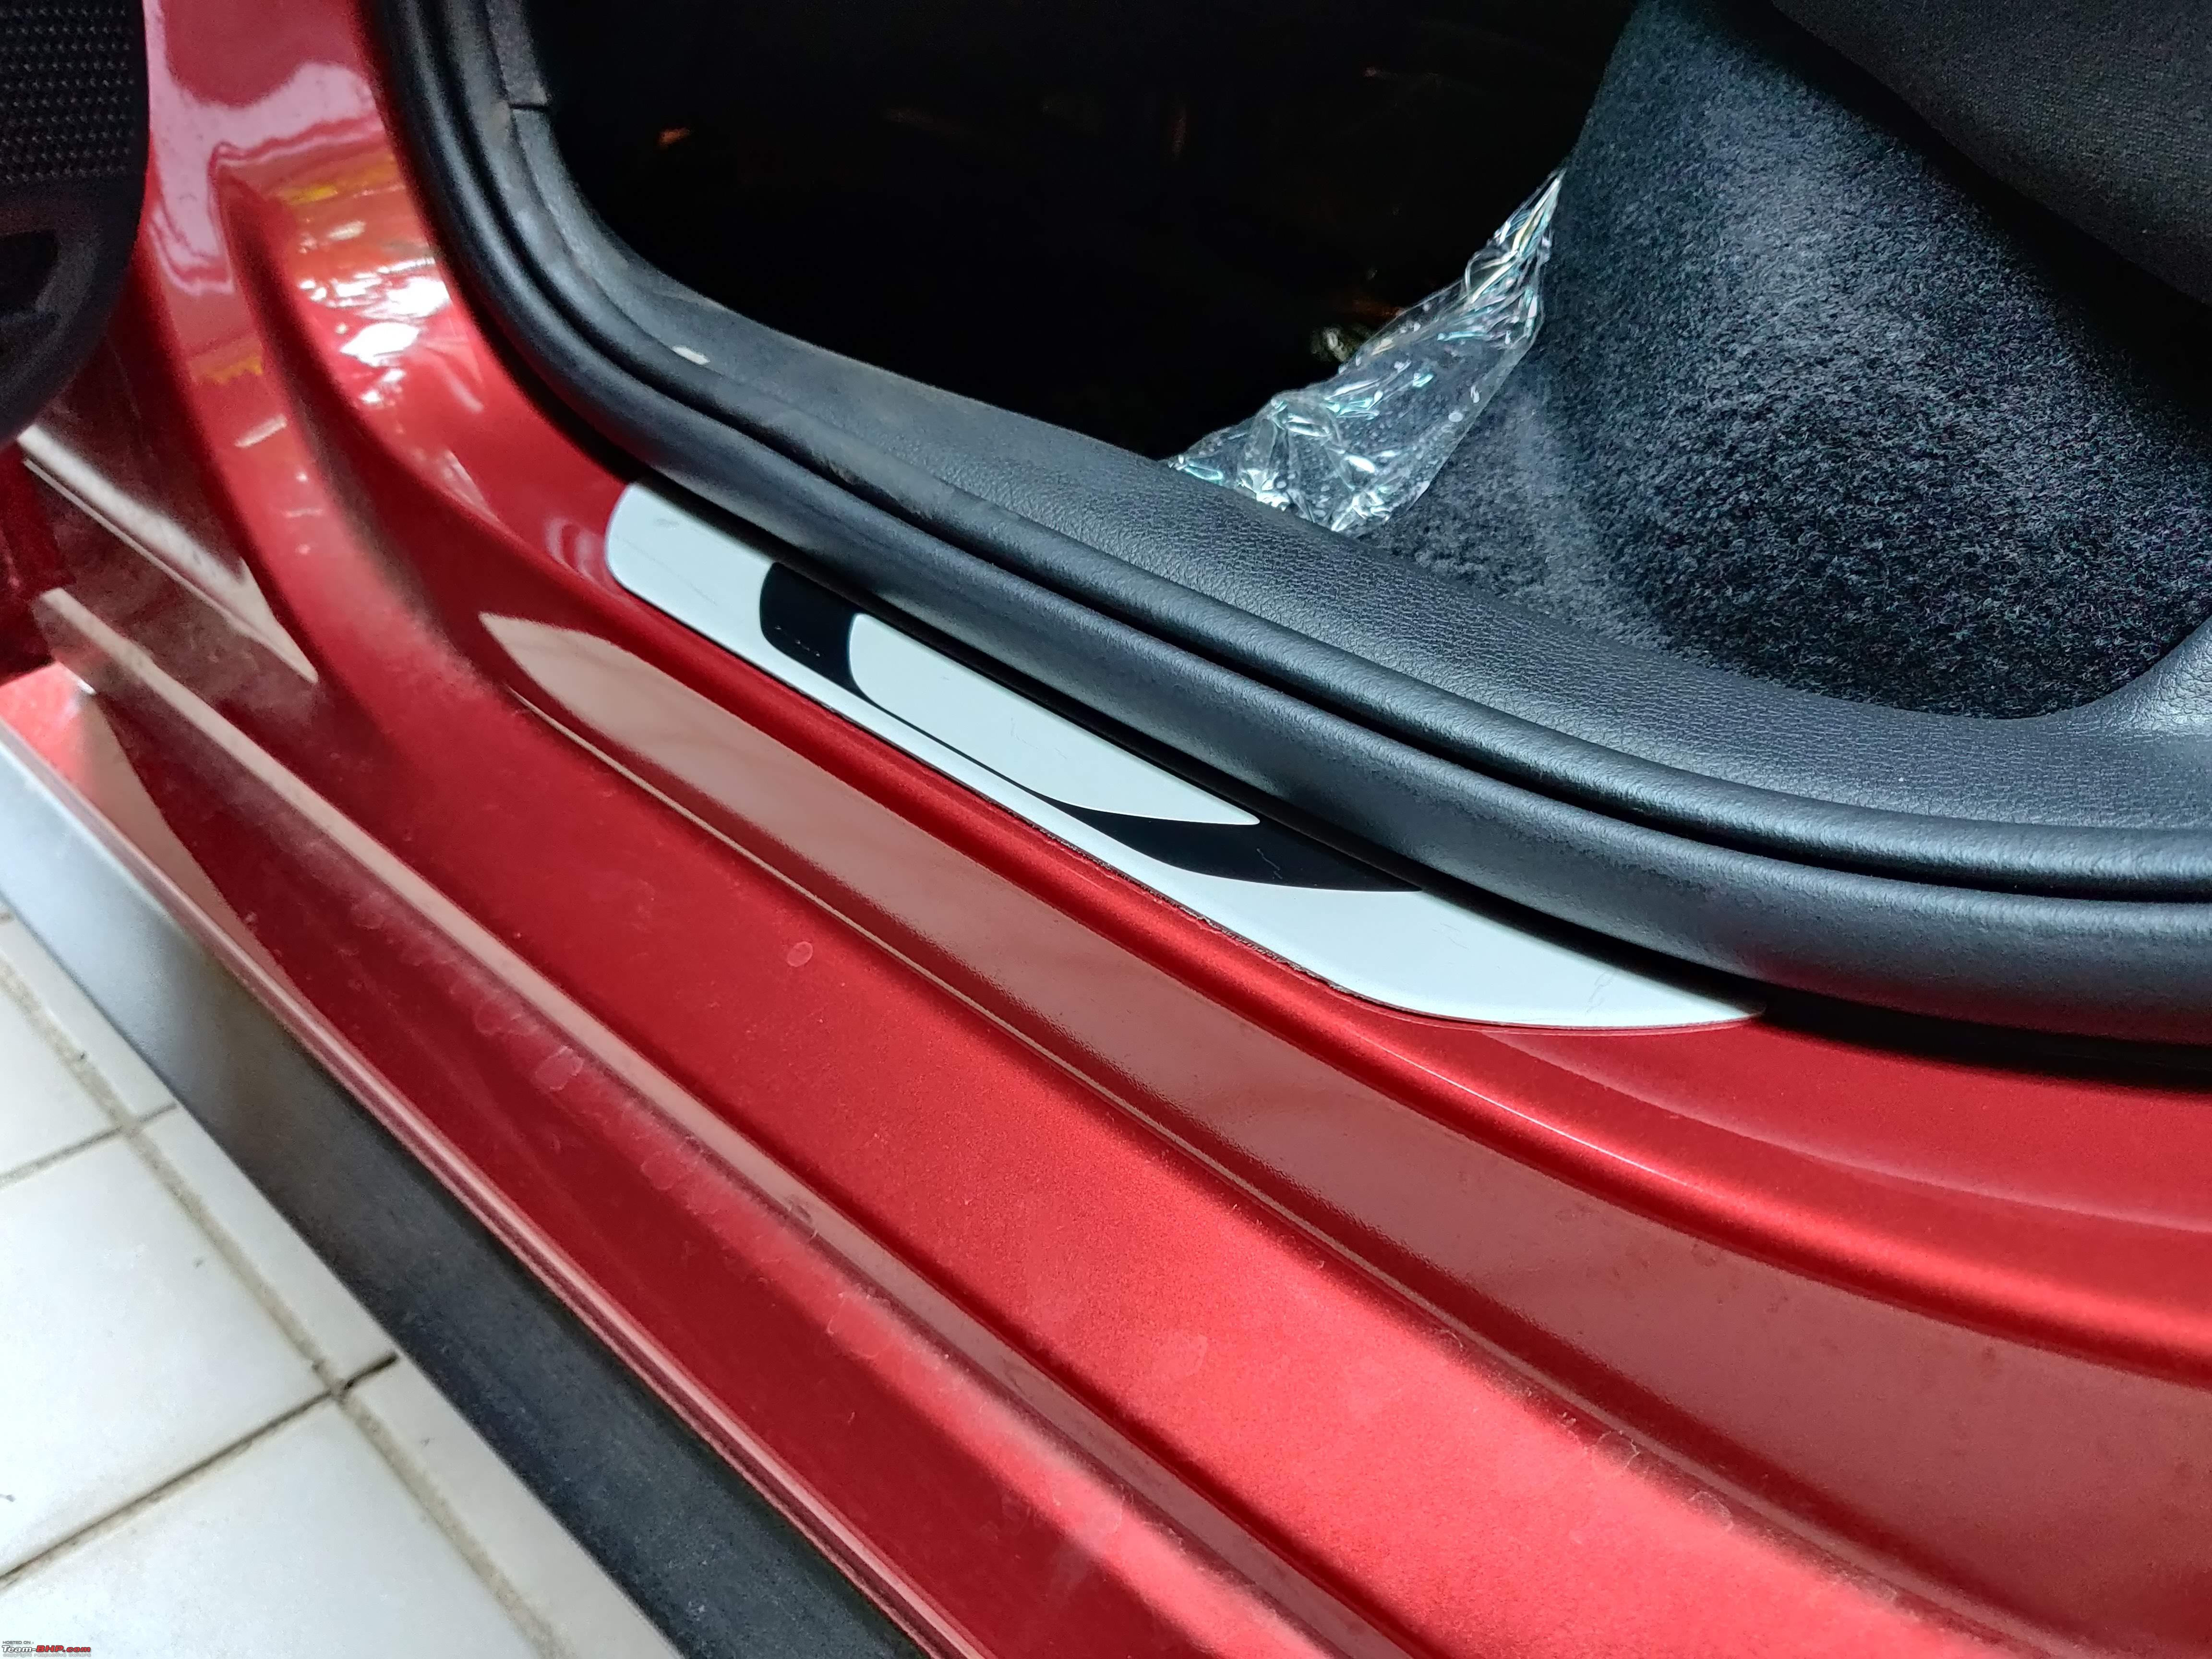 The front scuff plate has POLO printed on it, while the rear scuff plates are relatively plain Jane. Aluminium Pedal Caps The Polo GT TSI came with Sporty Aluminium Pedals with rubber inserts, but this was axed on the 2020 GT TSI with the new 1.0 TSI engine. Since the GT did not get it, there was no chance the Highline+ would get it. Aesthetically, I found these a hot addition and so I ordered a set of pedals from Aliexpress when it was working. Here is a photo of the Pedals from the TeamBHP 1.2 GT TSI official review. Notice how the Accelerator Pedal has a tiny corner cut on the Pedal Cap as well.  So the Pedals I found on Aliexpress seemed to be resembling the Brake Pedal cap just fine, but the Accelerator Pedal was not cut as per the default Accelerator Pedal. The overall Metal finishing was fine, but the Rubber was a little rough in quite a few places. Even the rubber lips which clasp onto the stock pedals were a little irregular at a few places. Considering these cost a fraction of the Volkswagen Branded Pedals, I think this is a fair trade off.  The installation process is fairly simple. Remove the old Brake Pedal cap. It is a fairly tight fit since the Rubber Quality is excellent. Slowly wiggle it out of the Brake Pedal. The Accelerator Pedal Cap is NOT to be removed. This is what the bare pedals look like. 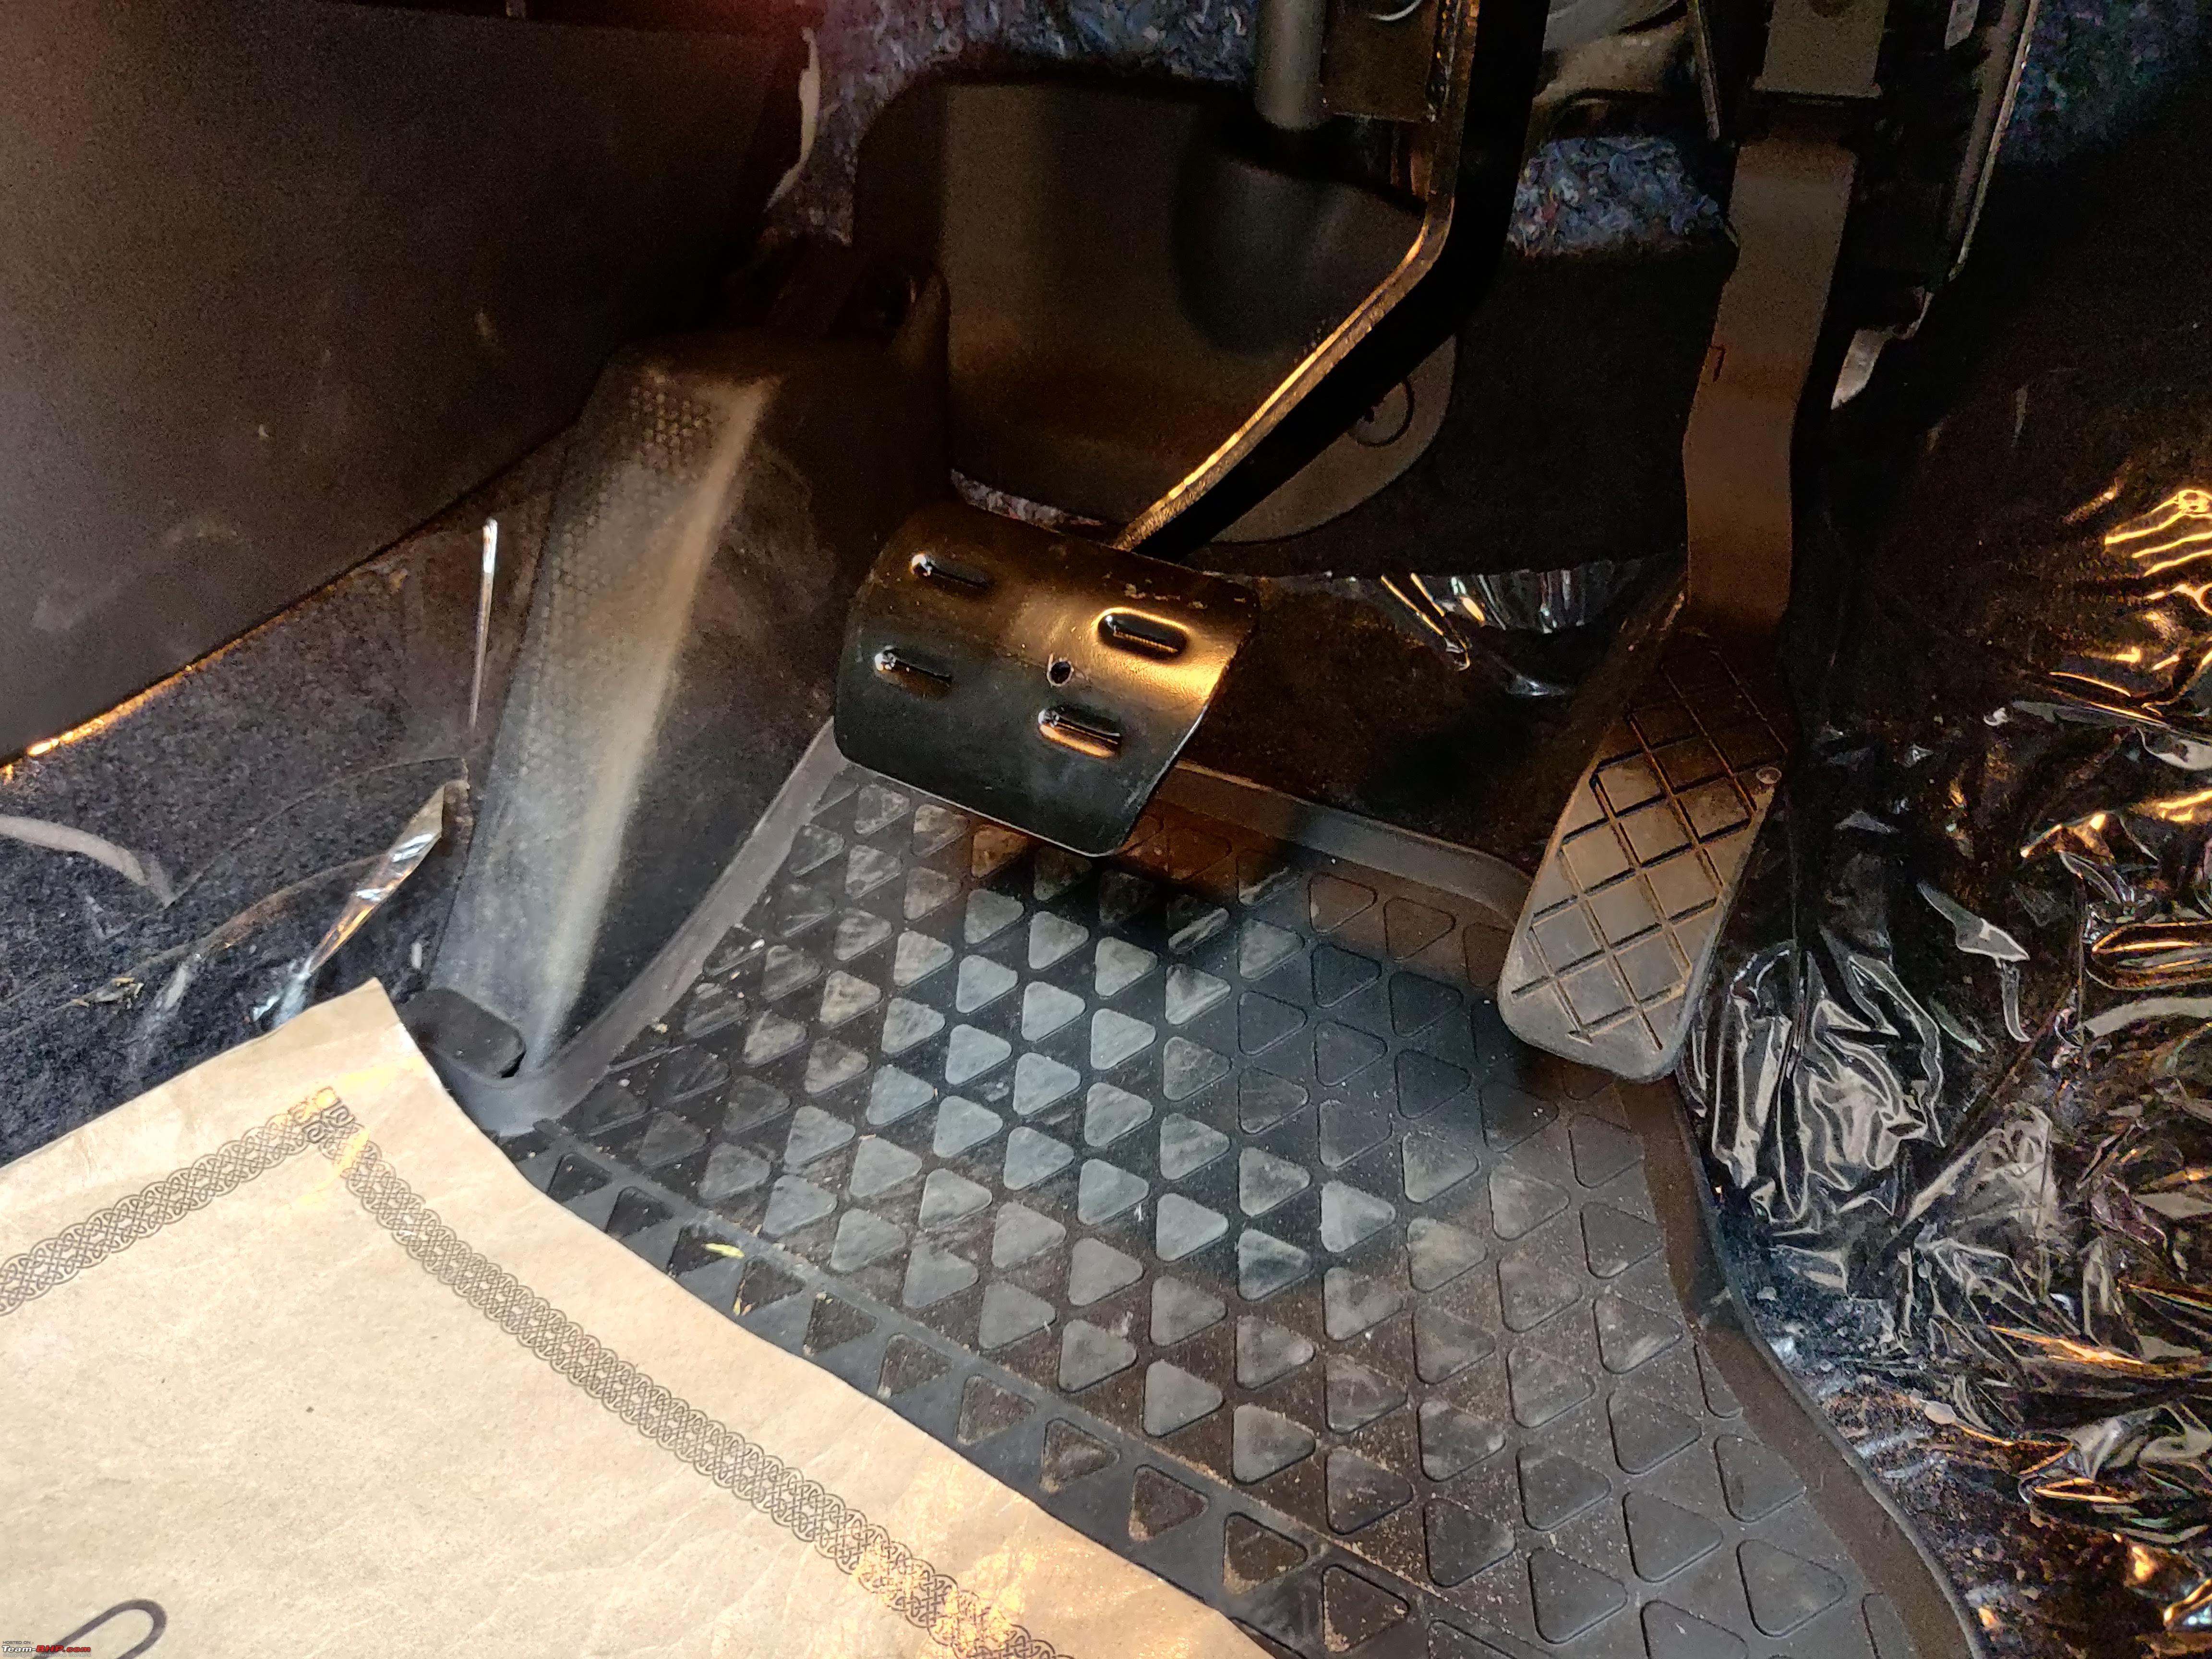 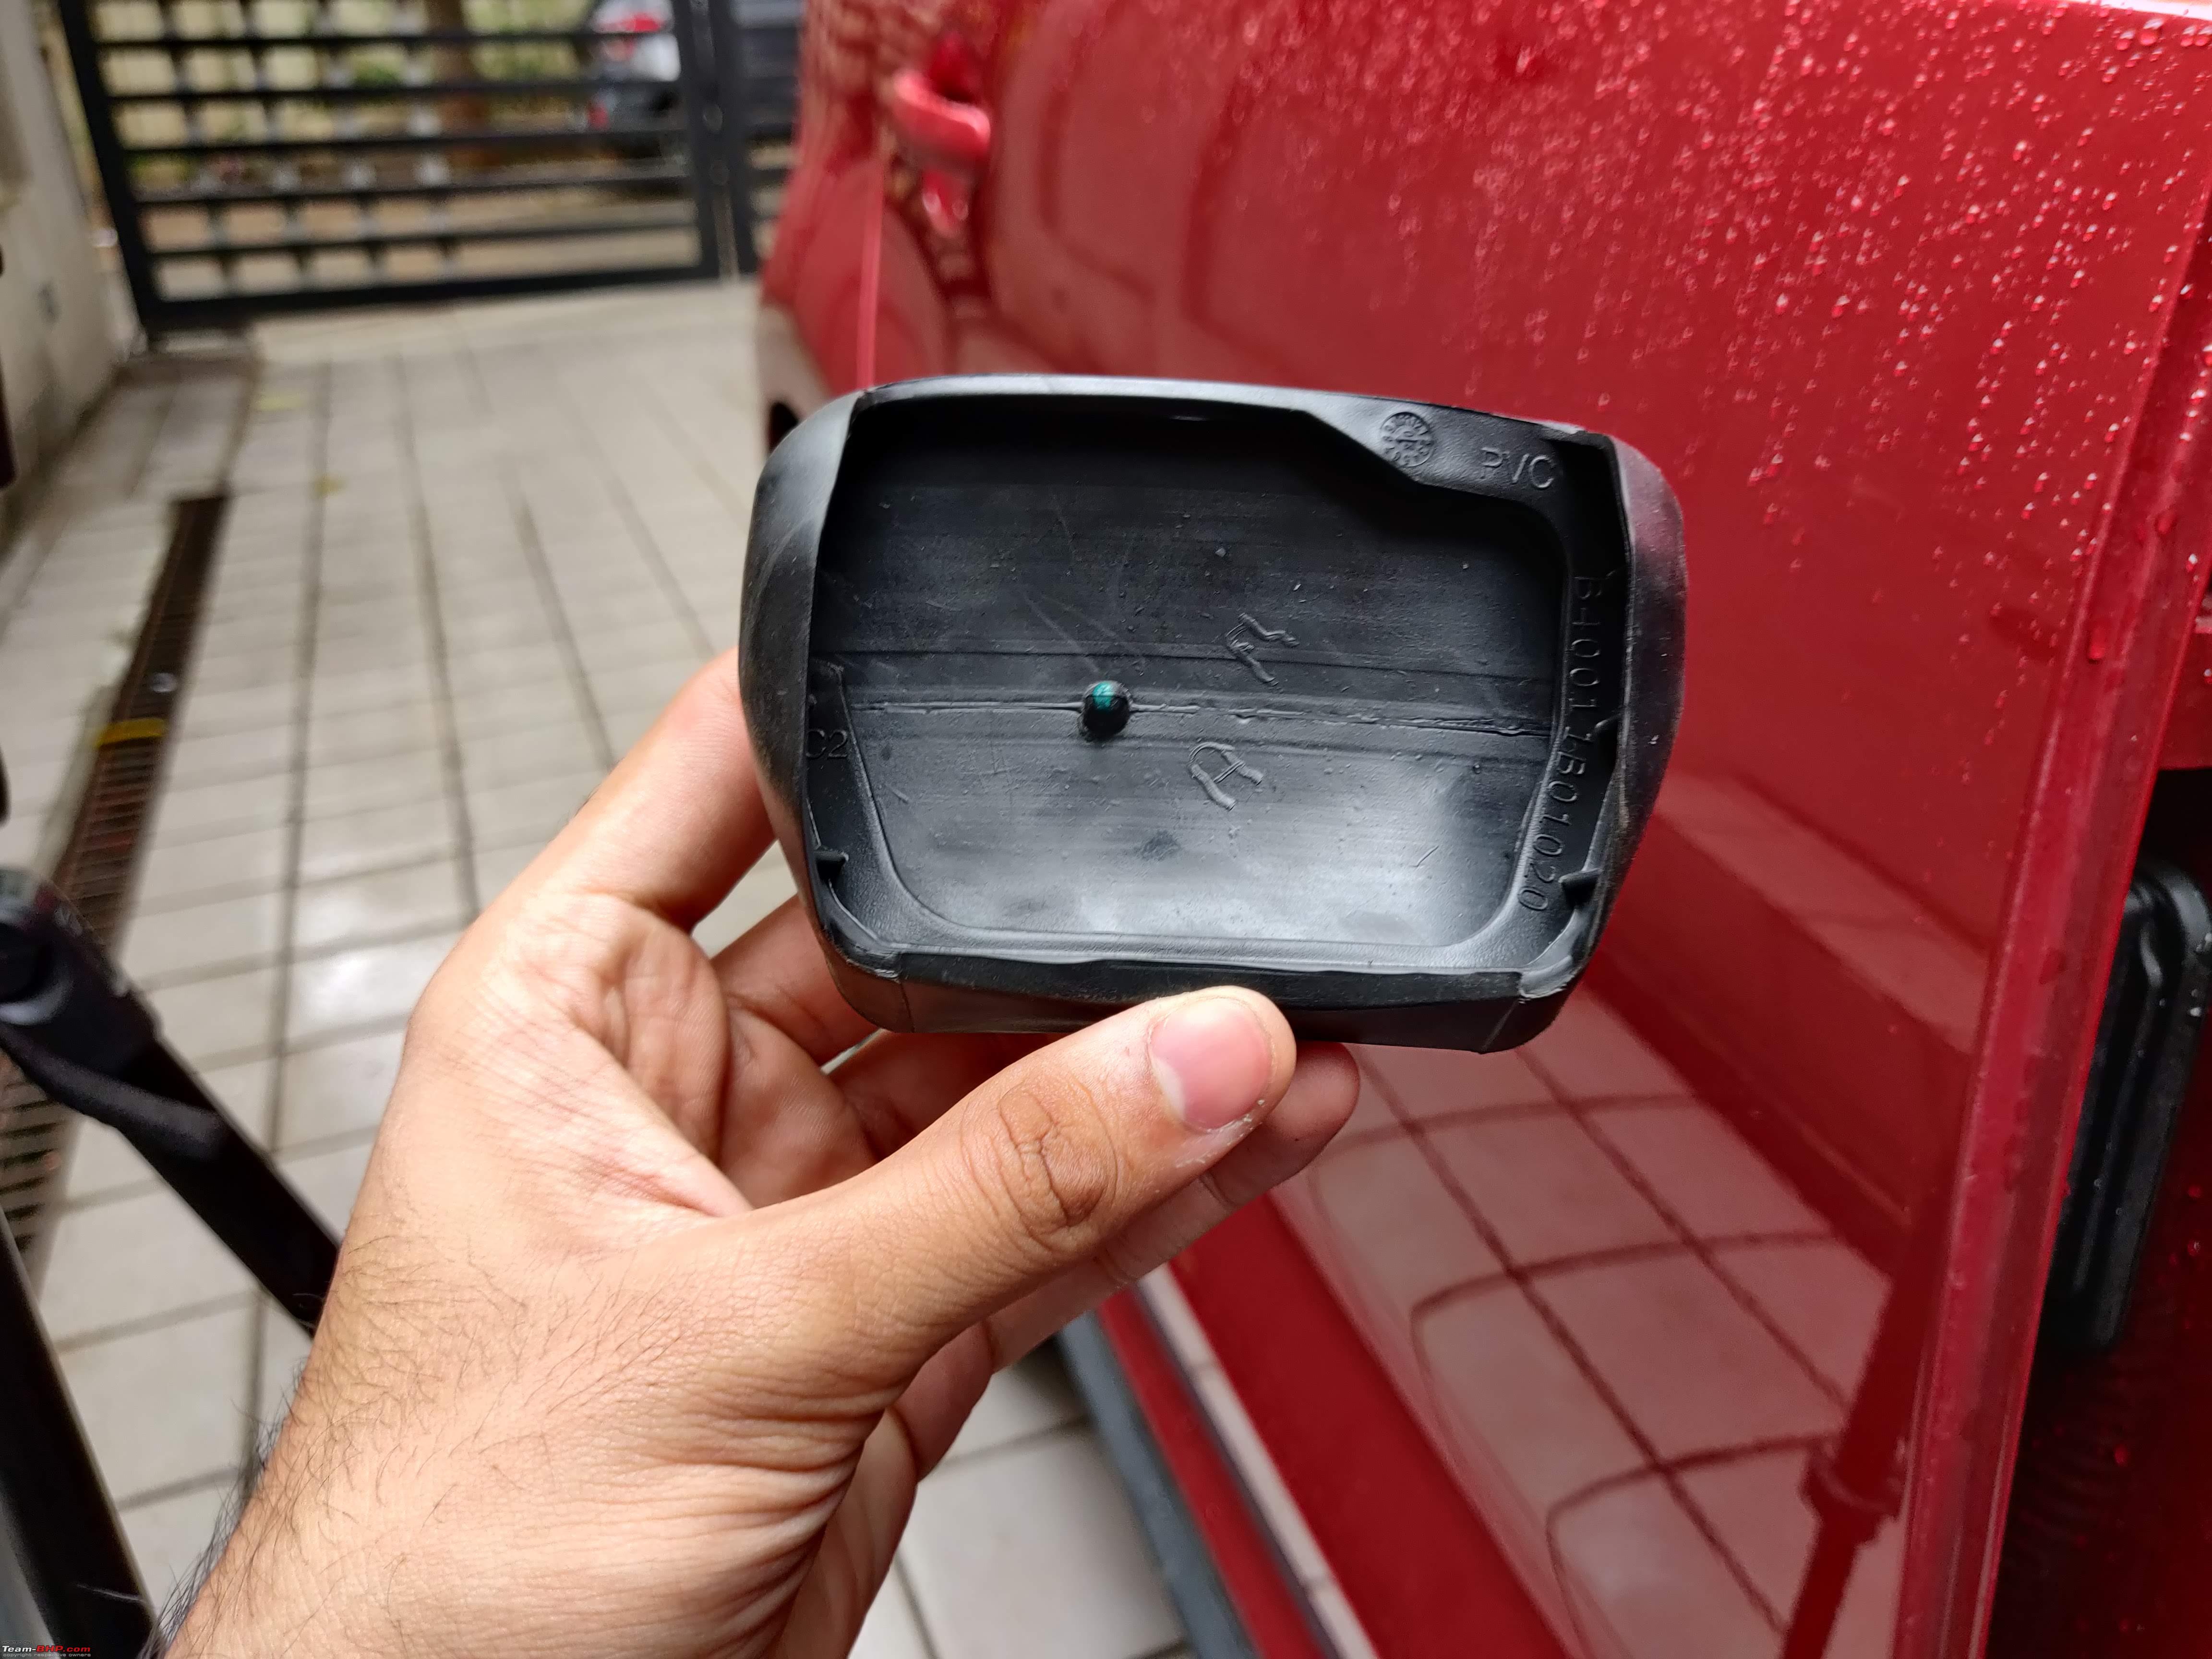 Notice the small hole on the OE Brake Pedal. A small groove on the OE Brake Pedal Cap goes here for added support. This groove is absent on the Aliexpress Brake Pedal Aluminium Cap. 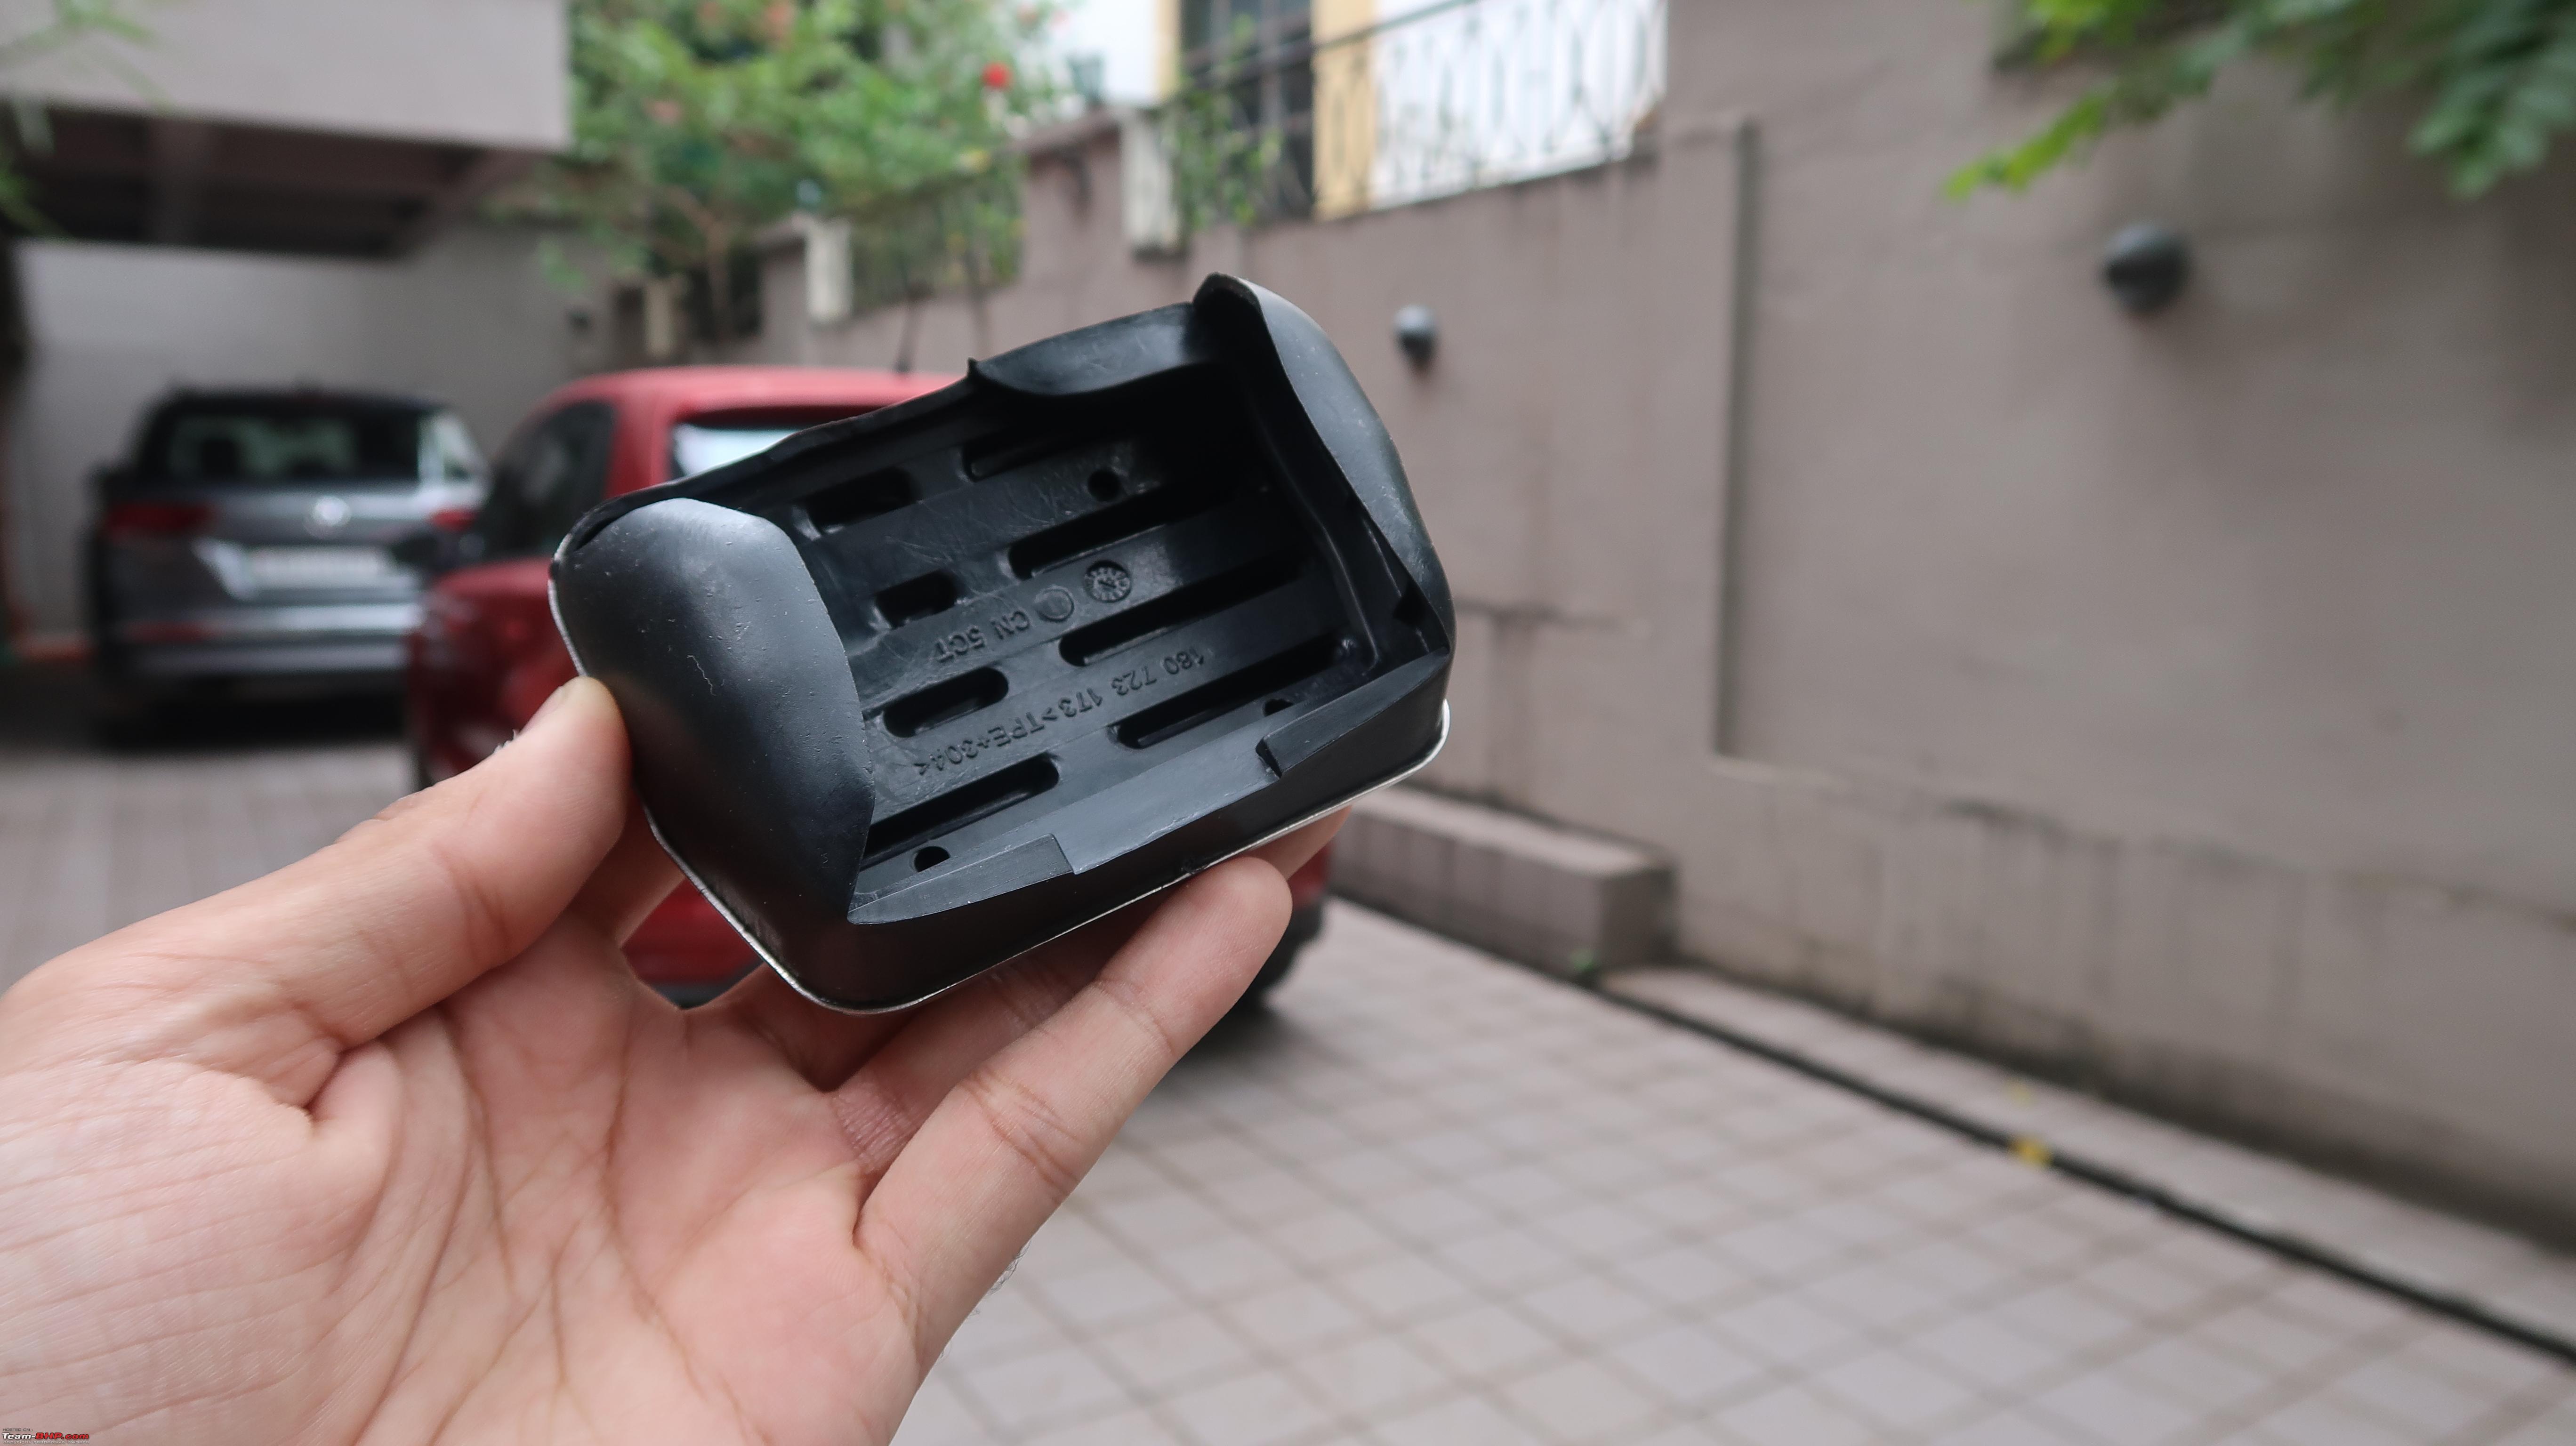 It might take some force to ensure the Rubber Lip seats the OE Pedals securely and does not slip out. I found the Brake Pedal cap fitment to be quite the effort, but wedging it from one side and then stretching it to the other should help you install it.  The Accelerator Pedal is curved and rectangular without the cut-out and I'm presently finding the fit a tiny bit loose. However, in about 60-70kms of driving, the pedal caps have been perfectly tight. 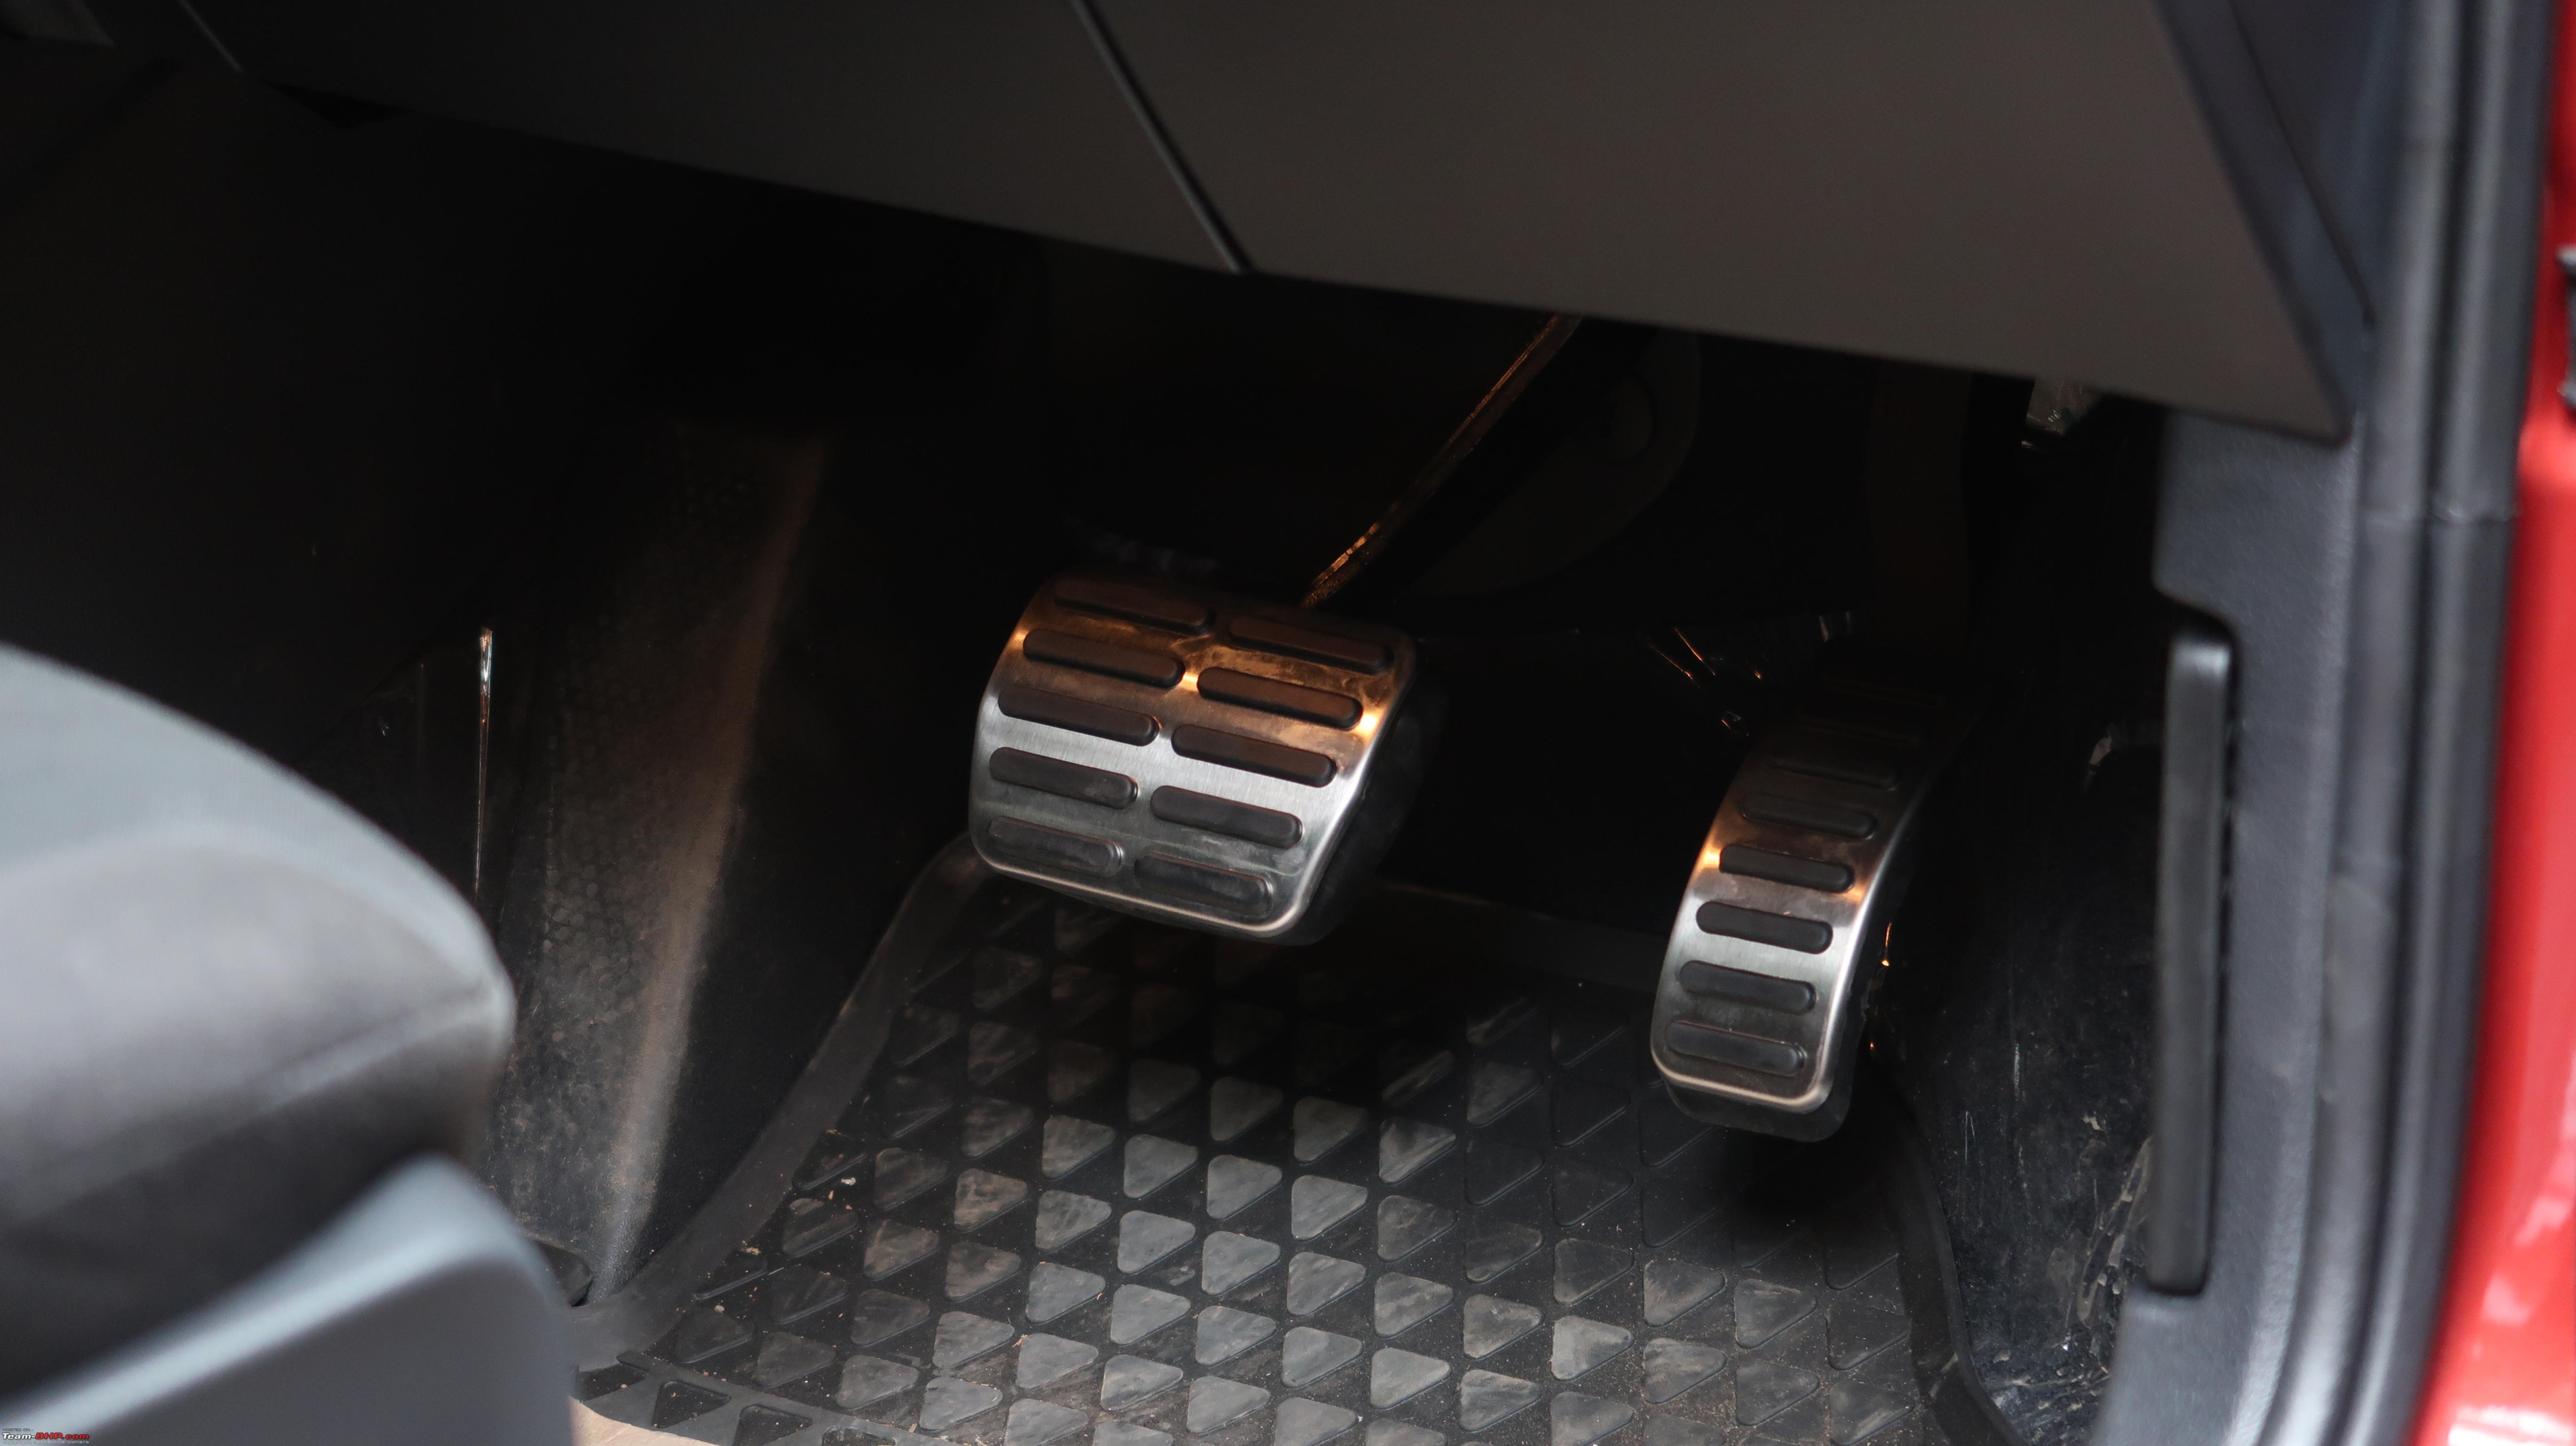 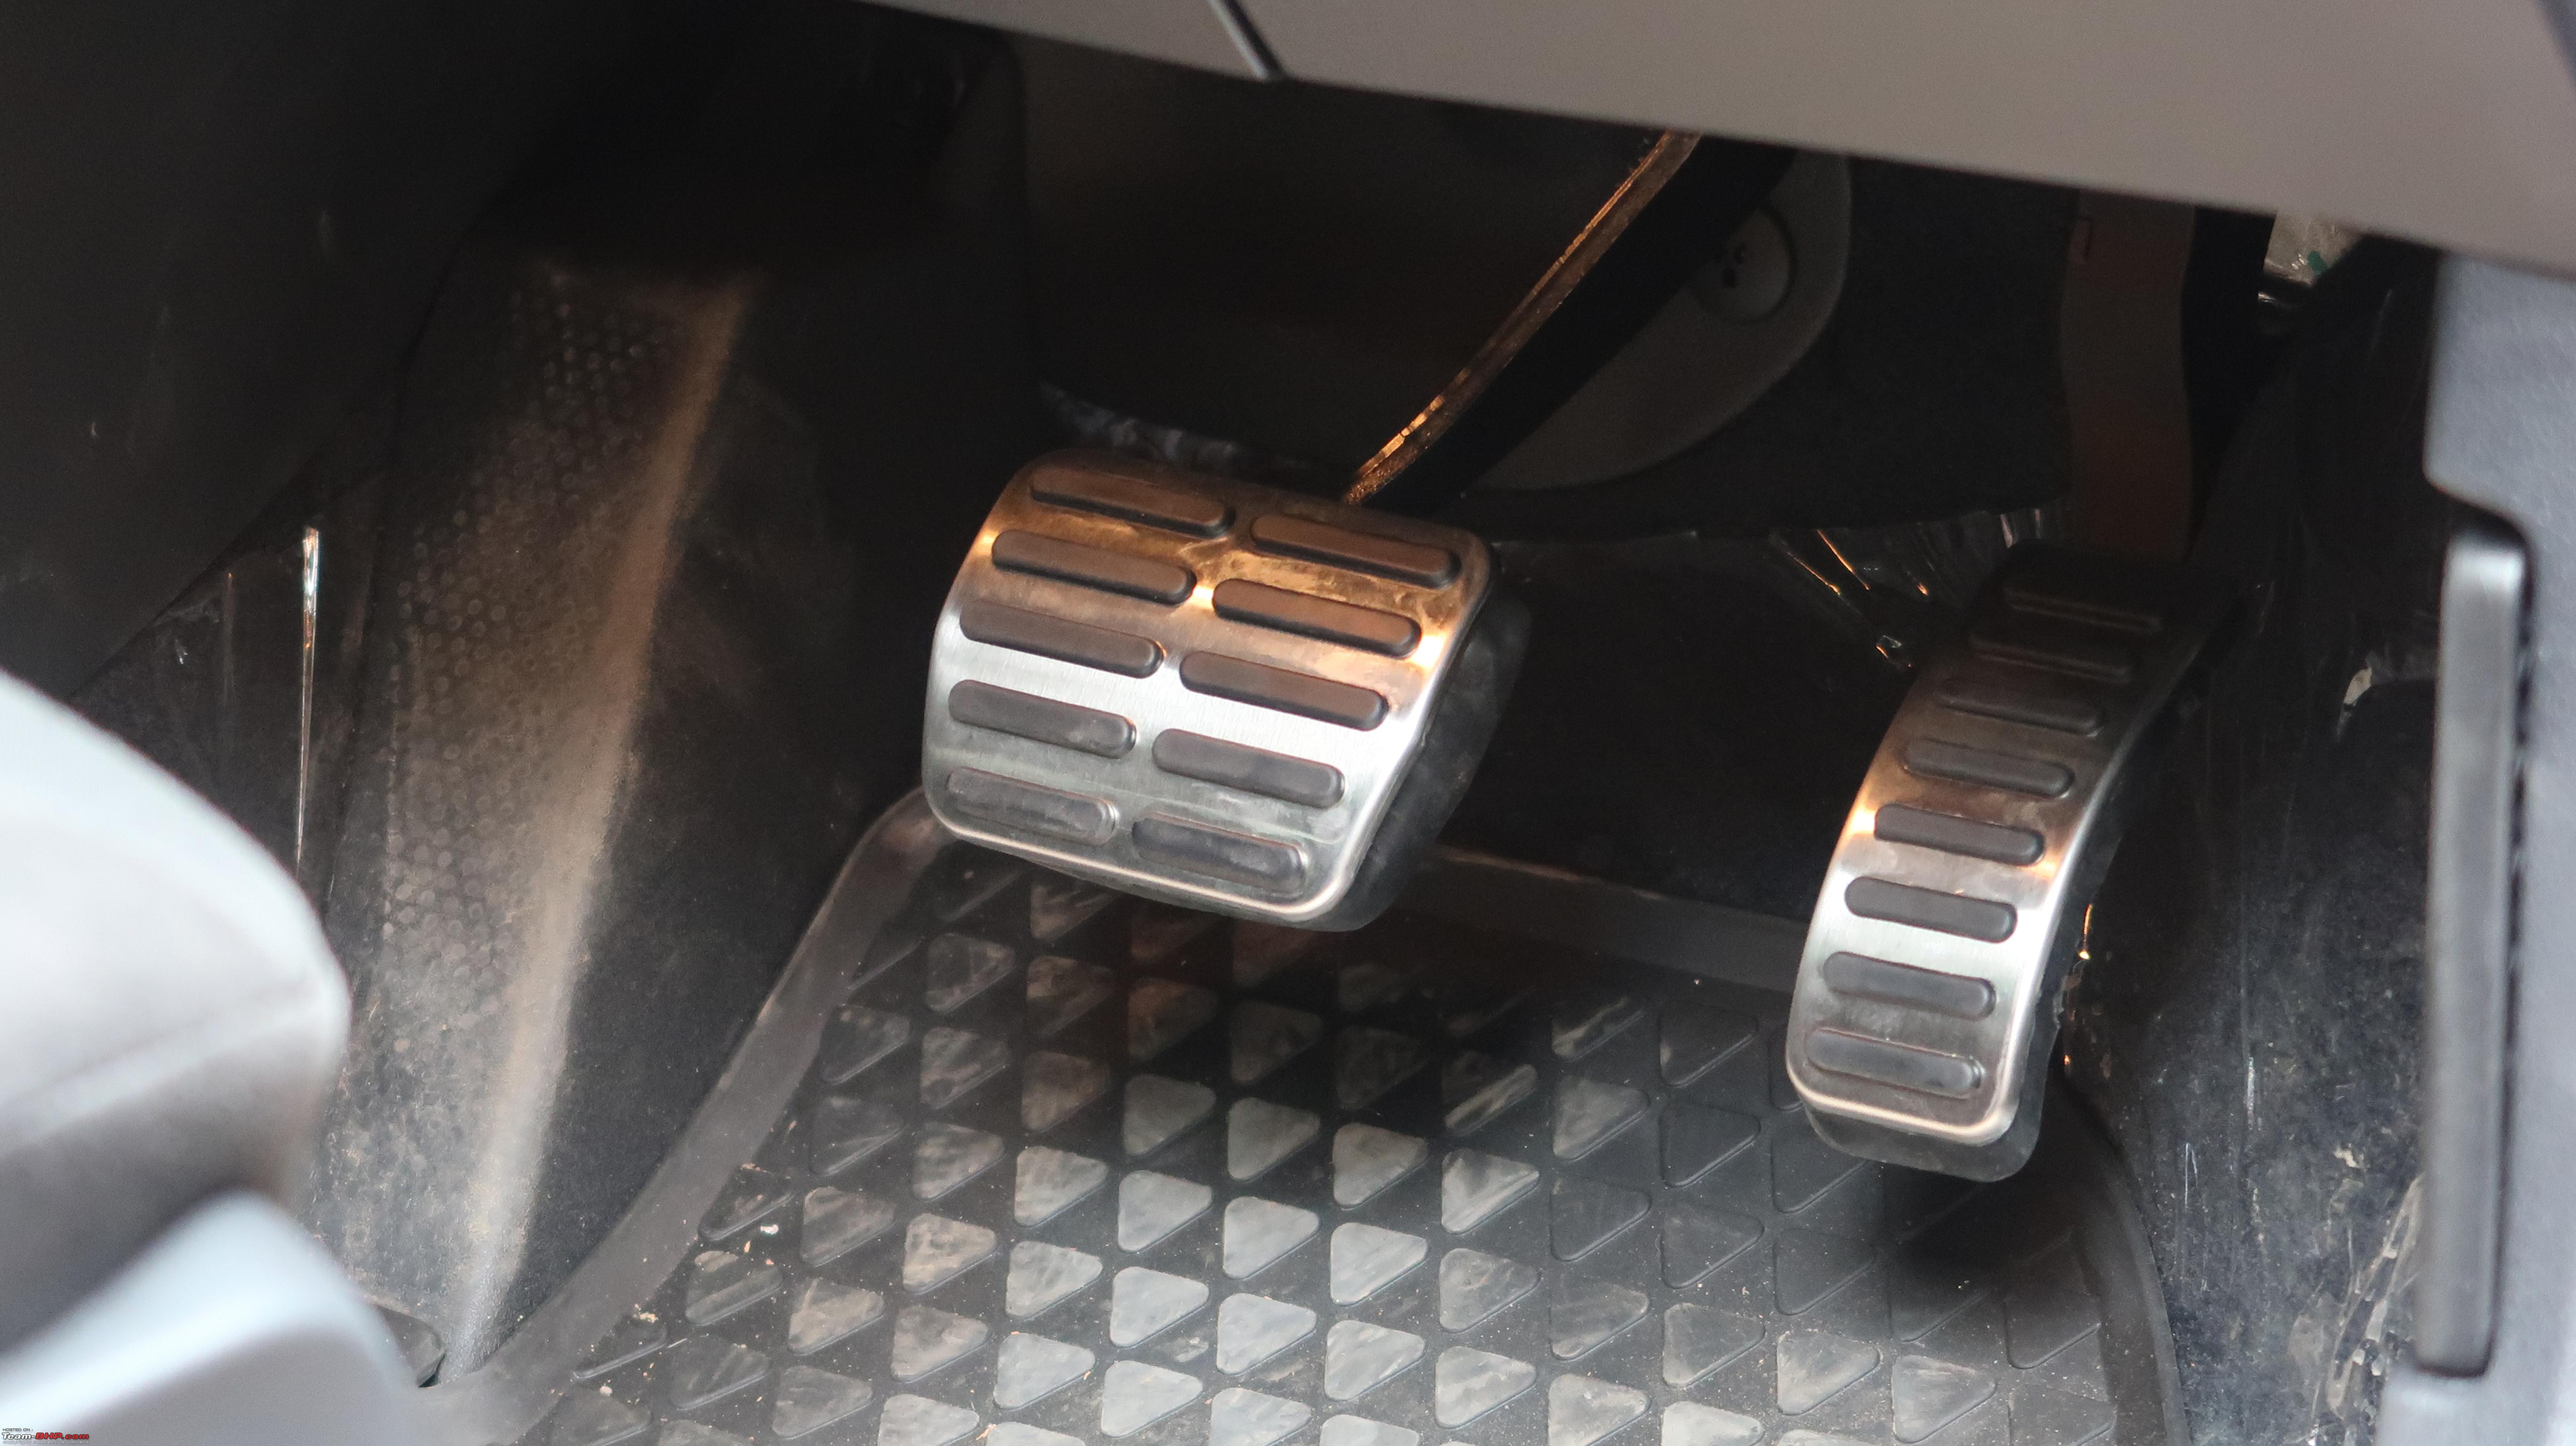 Just for reference, this is what we had before! This shot also lets us have a look at the bottom side of the steering column. Fairly neatly packaged I'd say. Driver Footwell light and the well housed Pink OBD-2 port also visible. That is where we connect the VCDS 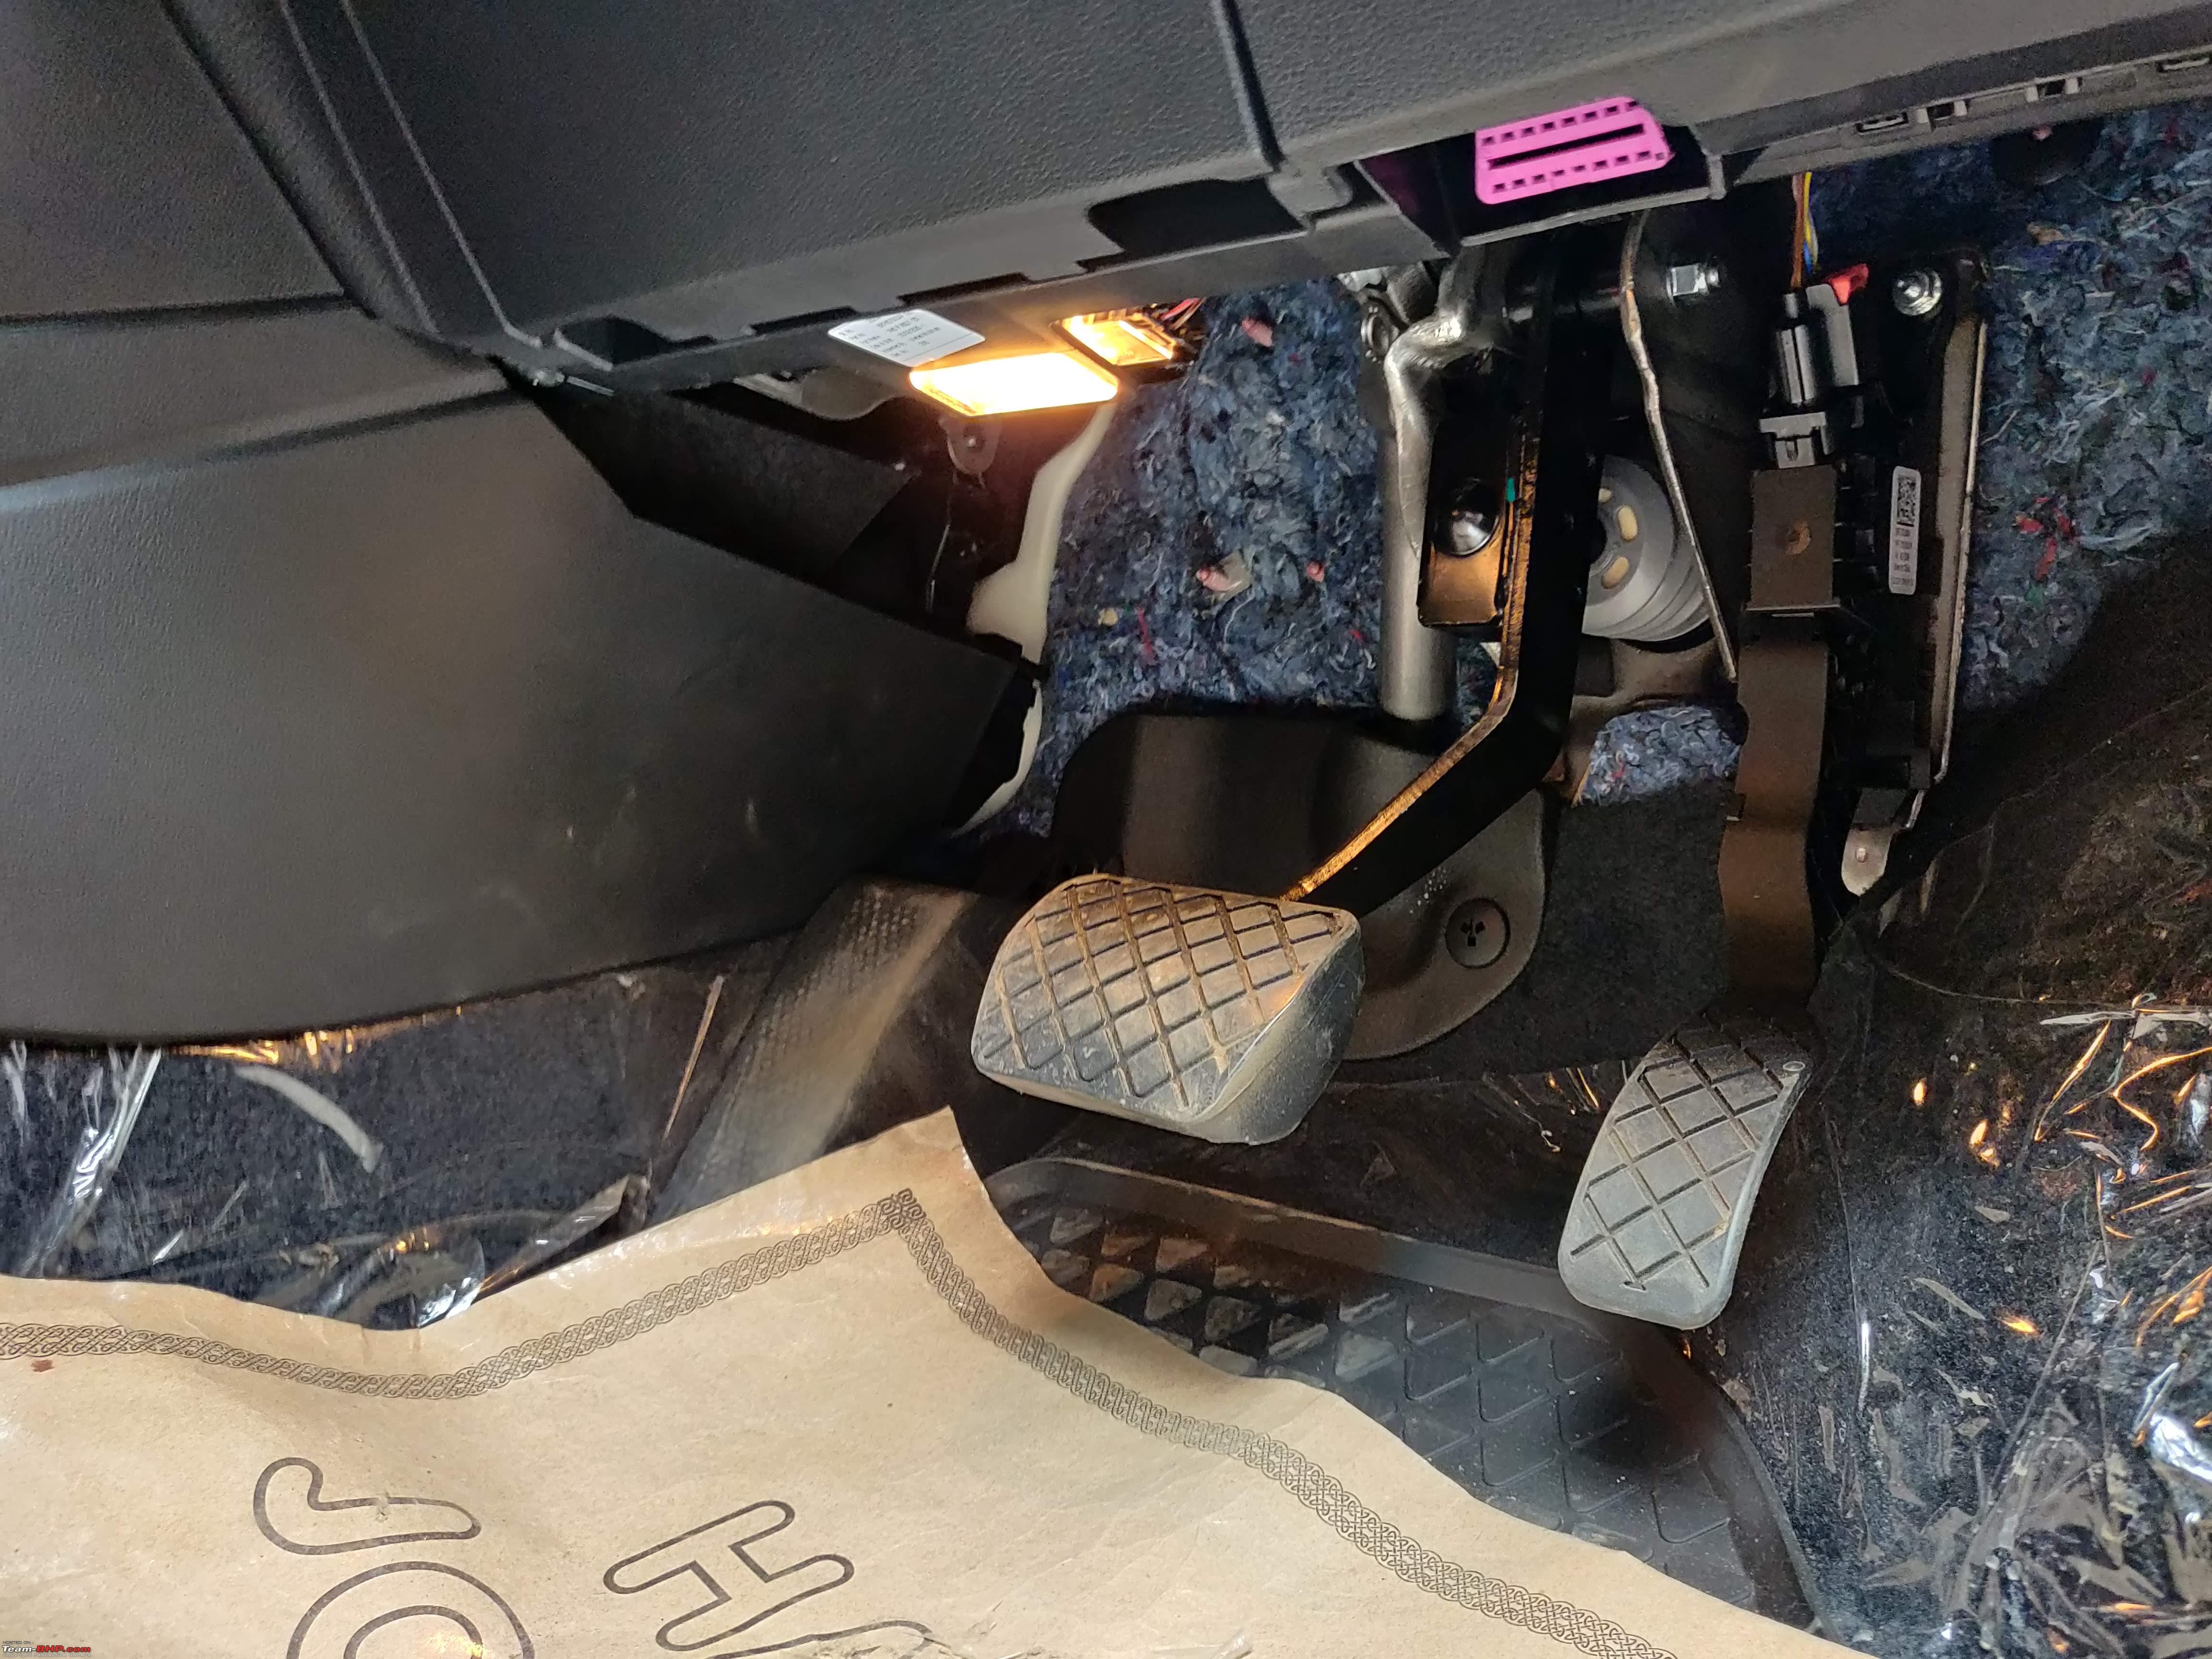 The old Brake Pedal cap can now be safely rested for future use if the need arises. I also happened to fill our Polo for the second time yesterday and the Odometer has crossed 600kms! The next tankful will be an experiment on a higher octane fuel. I have also installed OE LED License Plate lights, but I thought a small video would be better, so I'll post that shortly! 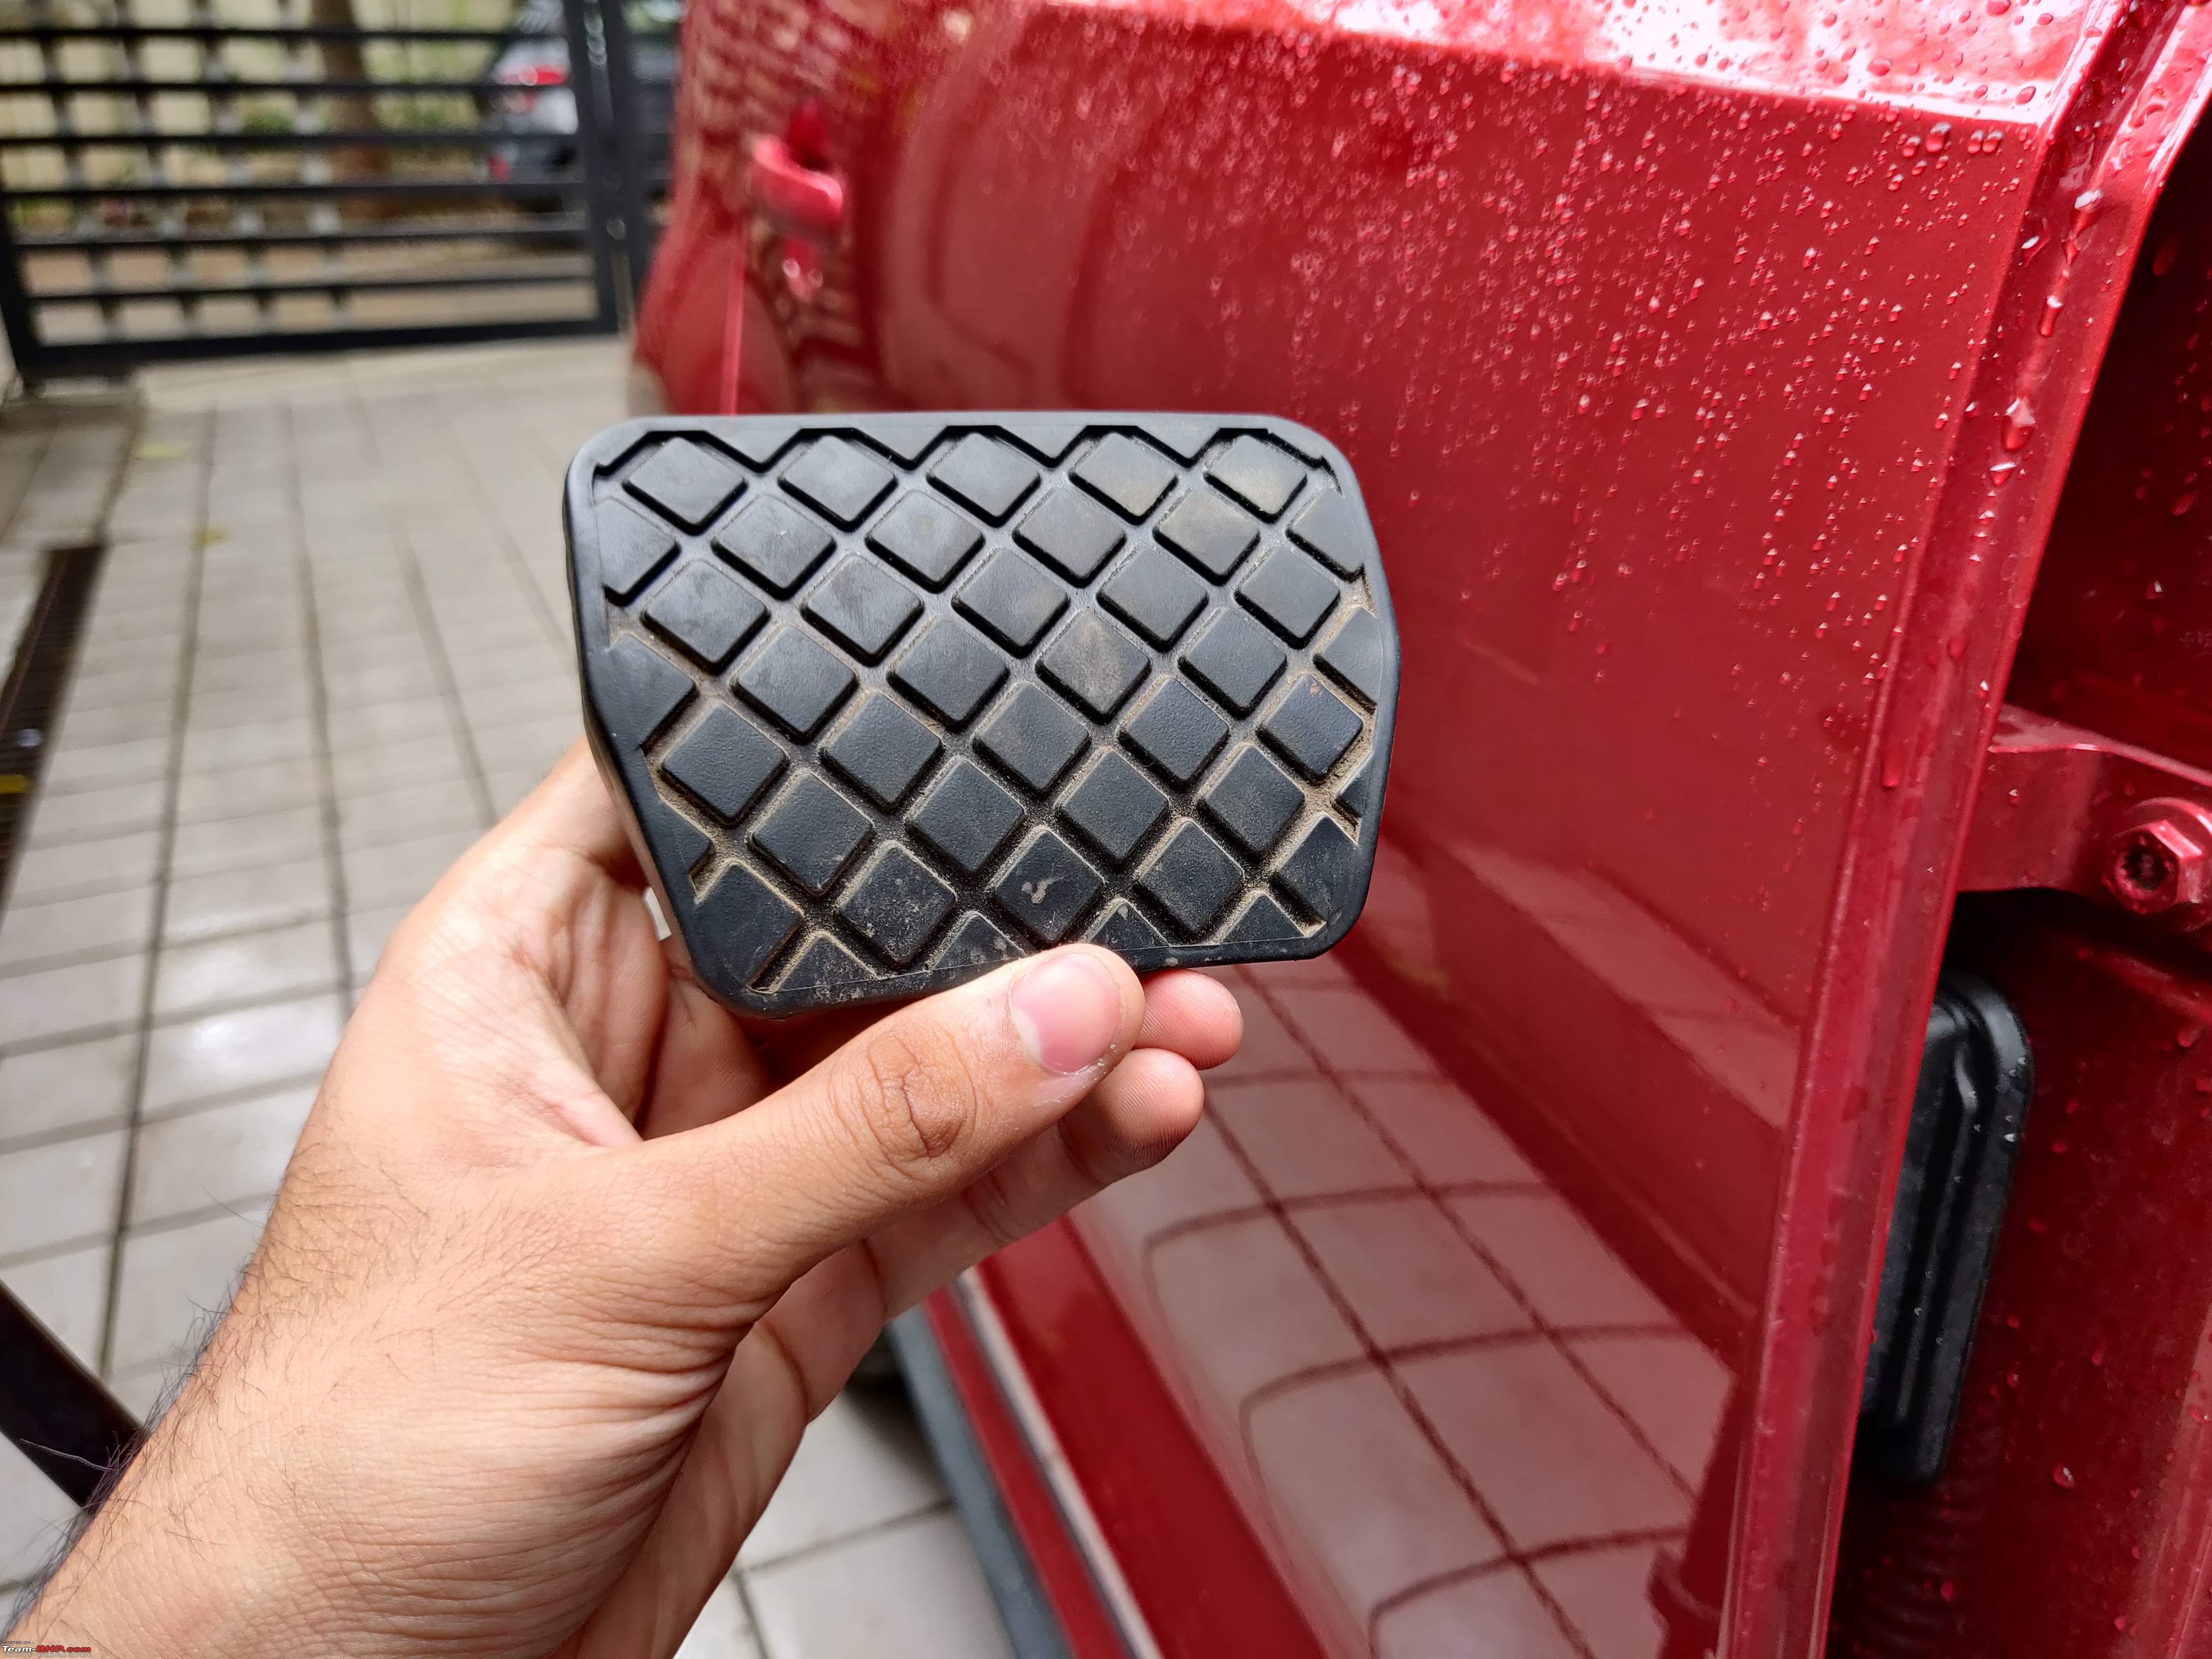 Links to the pedal are here! Last edited by fluidicjoy : 11th December 2020 at 15:52. Reason: Caption. |
|
| (14)
Thanks
|
| The following 14 BHPians Thank fluidicjoy for this useful post: | 7000plusrpm, CarBot, CEF_Beasts, Gaboonviper04, Leoshashi, pritanshchandra, Researcher, sagwal, Sen, The_Outsider!, Varun_HexaGuy, Vik0728, WhiteSierra, yogiii |
|
17th December 2020, 09:47
| #48 |
| BHPian Join Date: Oct 2020 Location: Pune, San Diego
Posts: 247
Thanked: 2,446 Times
| Polo 6R Inspecting and Resetting Steering Angle Sensor I took delivery of our Polo when the car had done about 30kms (including registration and stockyard to and fro) and I noticed that the steering centre position was correct, i.e the centre of the wheel was actually when the wheels were perfectly straight, but the wheel as a whole was tending to stay at about 5-10 degrees to the left, with a noticeable pull. The experience was so painful, that my right hand started to hurt. I started off with the following checks :-
None of the above seemed to be fixing the issue and it was practically frustrating to be driving around like this, since the veering to the left was very evident. The dealership personnel informed me of many such complaints in the past which were fixed over time. They attributed this to tyre tread wear, new steering and suspension components. Then, I read Sen's thread where he was experiencing the same issue, you can read it here (Car veering to the left). A similar issue was occuring on our Tiguan, but it fixed itself after a few thousand kilometres, magically so. Considering this experience, I decided to wait a little before trying anything fancy. It is after all quite gutsy to find faults or diagnose a brand new vehicle for a manufacturing defect, in something so crucial as the steering assembly. Around the 650km ODOMETER mark, the pulling to the left minimized to the extent the problem was practically gone. So, the solution indeed seemed to be giving the car some time to adjust to the road conditions. I do not know what gave me the itch, but I connected my VCDS cable to my car yesterday, and rechecked the Steering Angle Sensor G085 and it was about calibrated to 0 degrees at about 4 degrees to the left. Resetting the Steering Angle Sensor  Opening VCDS, greets us to the Start Screen where all the Installed Modules in the Polo 6R show up. Steering Angle sensor can be read either from ABS-ESP or the Block(44) Steering Angle Sensor, but I could not reset it from Block 44. So I went through ABS-ESP.  The current value can be measured from Measuring Blocks. This is the value at the centre position after the Reset has been performed. Prior to the Reset, this value was off.  I started the car and ensured the wheel was perfectly straight with respect to the driver. If you want you may use a piece of tape and ensure a straight line with the Instrument Cluster. Then, proceed to calibrate the Steering Angle Sensor : Carry Out Zero Calibration. 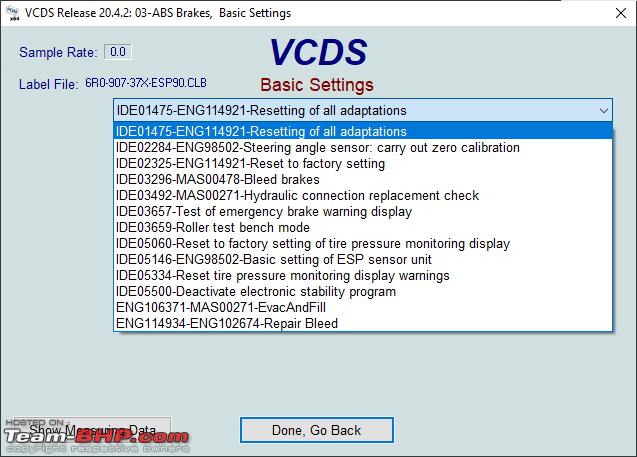 The pulling of the car seems to have reduced a lot post this task, and I'm now confident after driving further, the problem should be completely solved. So, to summarize, the problem was due to the new tread of the tyres and a steering angle sensor calibrated to a slightly offset centre position. It was really stupid of me to merely trust my dealership when they said, "Sir Steering Angle is OK." Last edited by fluidicjoy : 17th December 2020 at 09:52. Reason: Formatting |
|
| (12)
Thanks
|
| The following 12 BHPians Thank fluidicjoy for this useful post: | amarendernag, CEF_Beasts, Crazy_cars_guy, Gaboonviper04, Mu009, neoonwheels, Researcher, sagwal, Sen, The_Outsider!, Varun_HexaGuy, WhiteSierra |
|
20th December 2020, 03:28
| #49 | |
| BHPian Join Date: May 2020 Location: BLR | HYD
Posts: 331
Thanked: 506 Times
| Re: Polo 6R Inspecting and Resetting Steering Angle Sensor Quote:
 Thanks for showing us how to do it, fluidicjoy!  | |
|
| (1)
Thanks
|
| The following BHPian Thanks Sen for this useful post: | fluidicjoy |
|
3rd January 2021, 19:38
| #50 |
| BHPian Join Date: Oct 2020 Location: Bangalore
Posts: 31
Thanked: 31 Times
| Re: Review: Driving home our Sunset Red VW Polo Highline+ TSI Automatic Hi fluidicjoy, Hope you are enjoying your polo. I am about own one. If it is possible, could you let me know how you got hold of the VCDS cable? |
|
| ()
Thanks
|
|
4th January 2021, 10:26
| #51 |
| BHPian Join Date: Oct 2020 Location: Pune, San Diego
Posts: 247
Thanked: 2,446 Times
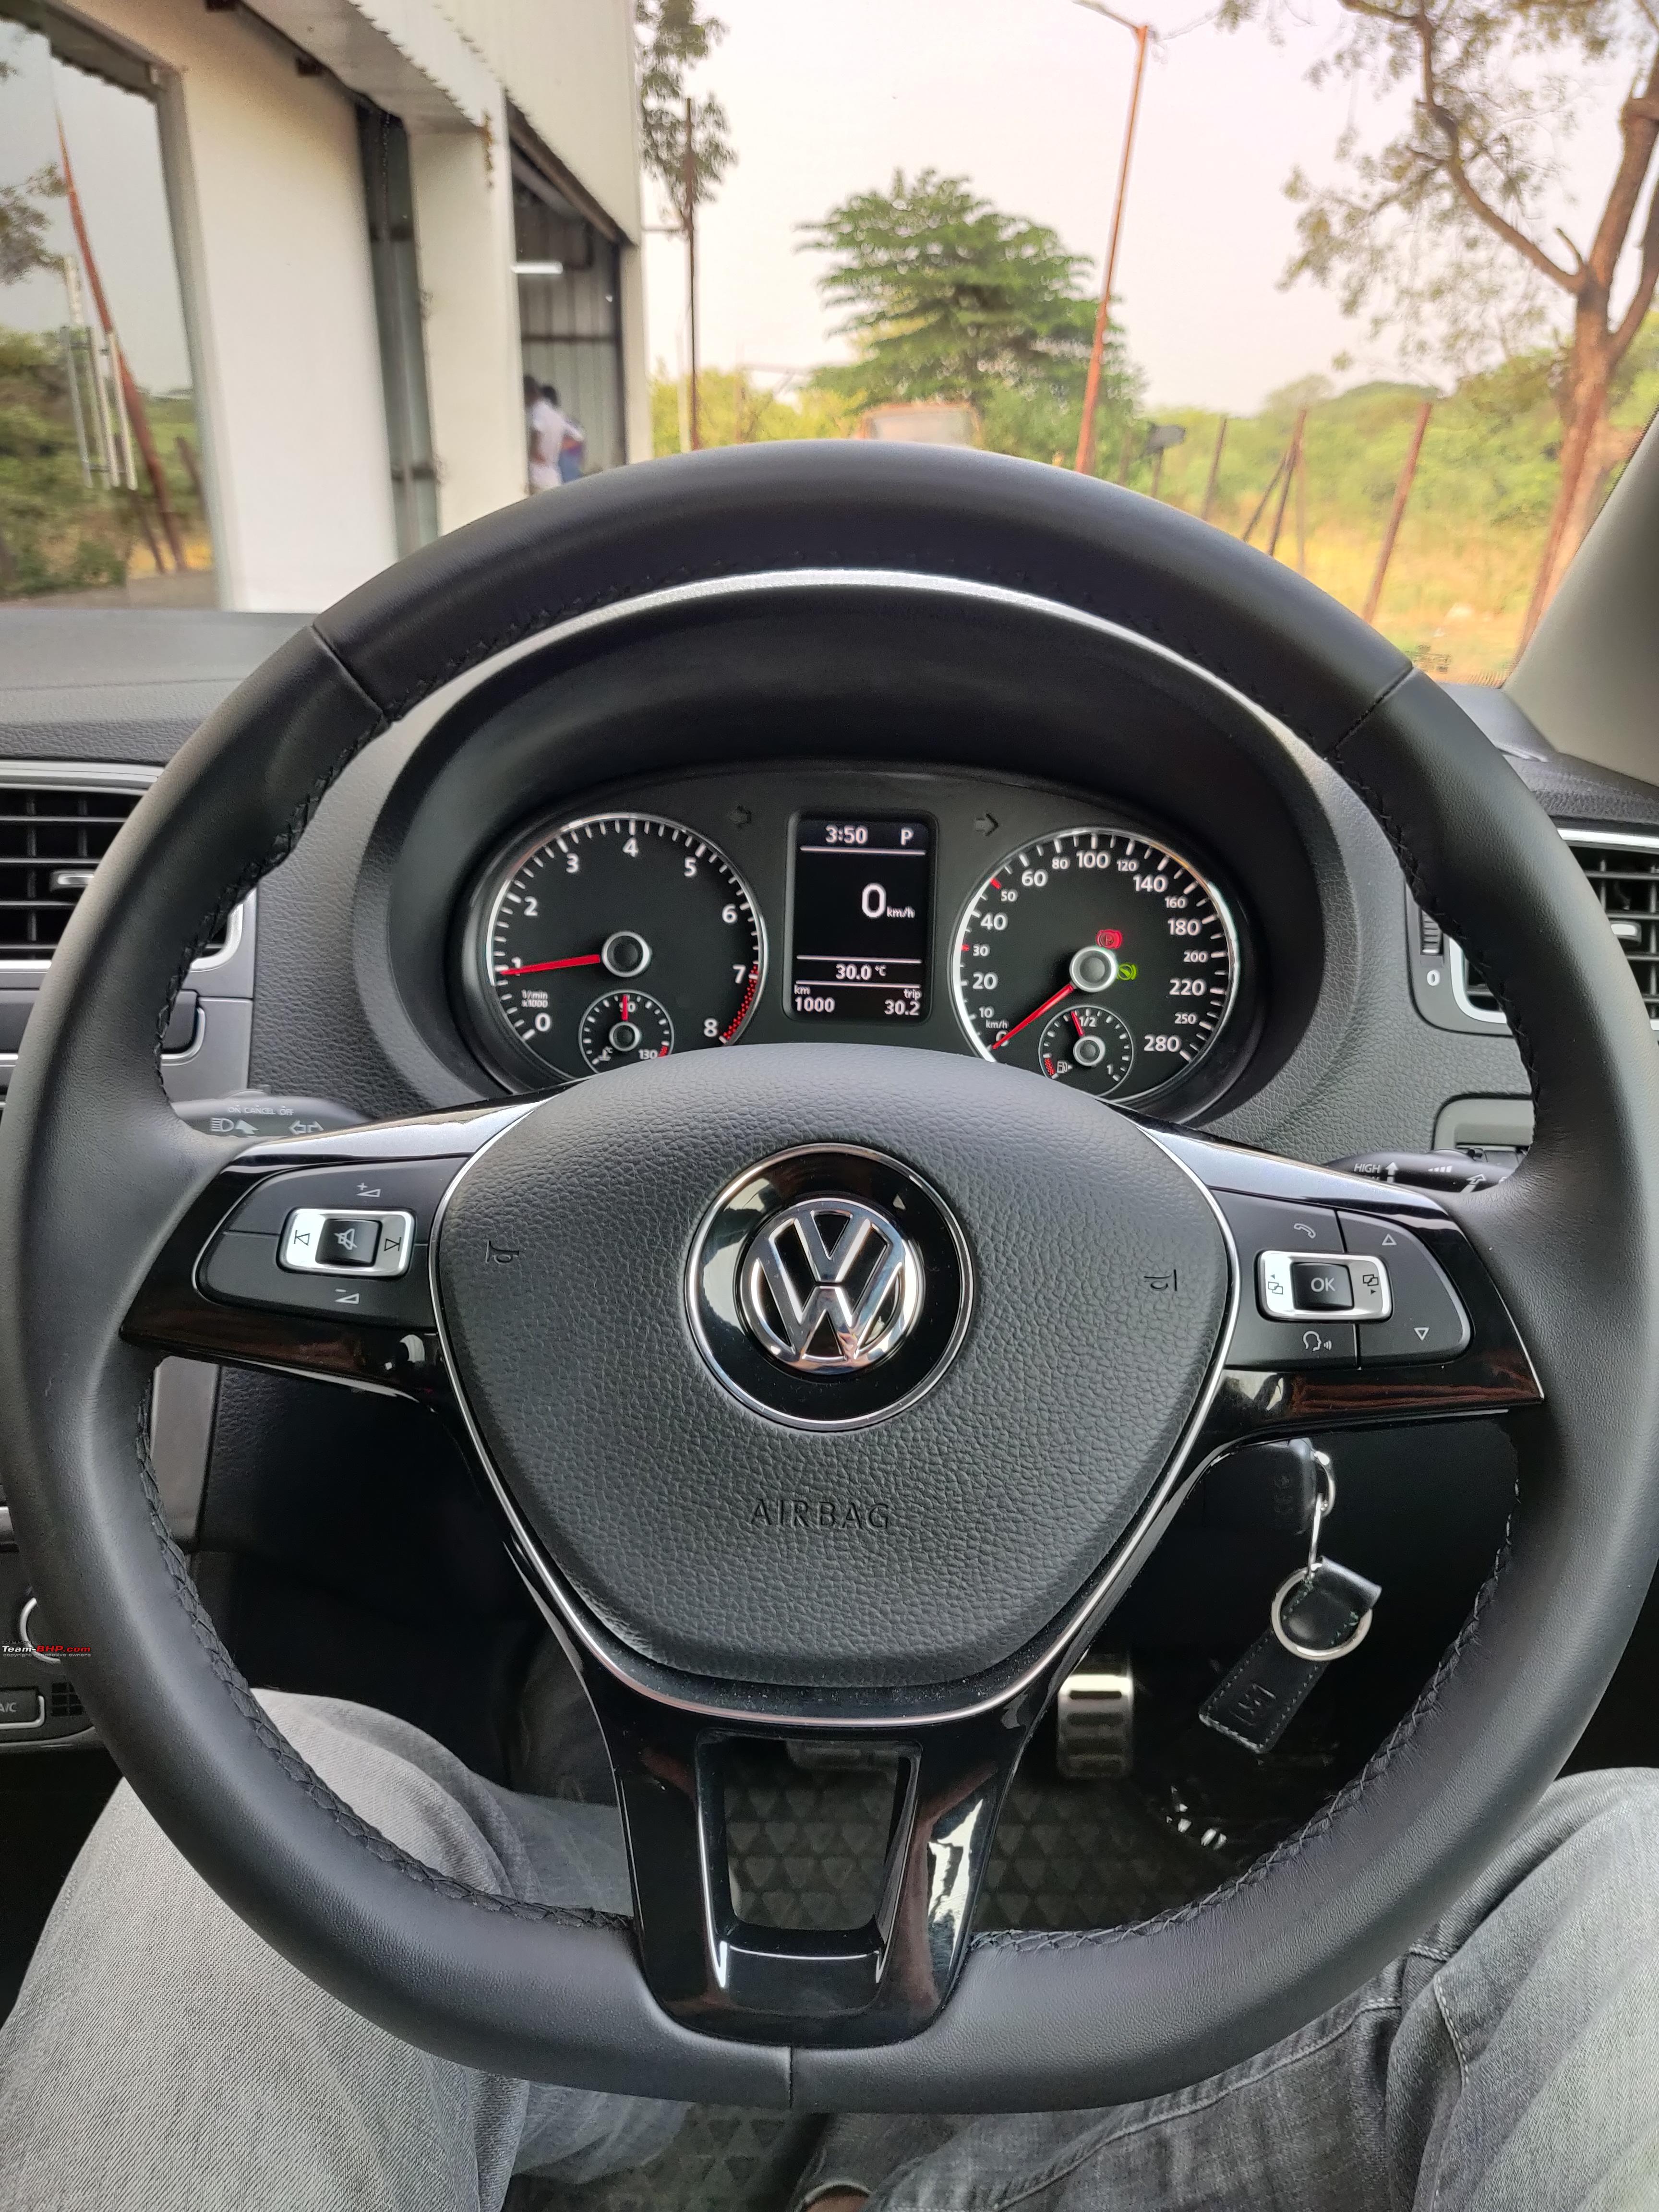
| Polo Highline+ TSI Upgraded with Maxidot Cluster, 8K OPS and More! December 2020 turned out to be surprisingly busy juggling retrofits and the winding up of my even semester activities. I was not even sure how much I'd be able to achieve in the last week of December, but somehow, it all came together and now my Sunset Red beast feels so much better to drive! I will be staggering the upgrade information, but this post is all about the most delightful changes I've made on the Polo - 8K OPS Upgrade and the gorgeous MaxiDot Cluster.  8K OPS Retrofit So the Polos sold in India come with 4 Rear Parking Sensors, which Beep depending on the Proximity. I've frankly never been a huge fan of these, but what has consistently been helpful to me on my Jetta, was the 0K to 8K OPS Kit fitment that I did. It upped the Parallel Parking precision. Now one might argue that a small Polo does not need such an advanced parking system, but hey, we're in 2020, and already being sold a decade old vehicle, and the Kia Sonet has it too, and it's always good to have something than not have it, and so I made the plunge and ordered the parts. The detailed installation guide on TeamBHP was quite helpful for guiding this retrofit, but as per my experience, new challenges await, on every curve. Sensor Painting I was initially considering having the sensors installed at Volkswagen's Dealership, so I could have a responsible entity taking care of removing and refitting my bumper and ensuring a perfect paint match, but I realised it'd have been far too cumbersome doing all the installation work at their premise. As a middle ground, I had only the sensors painted from them at about Rs. 500 + GST, with a perfect paint match, in Sunset Red. 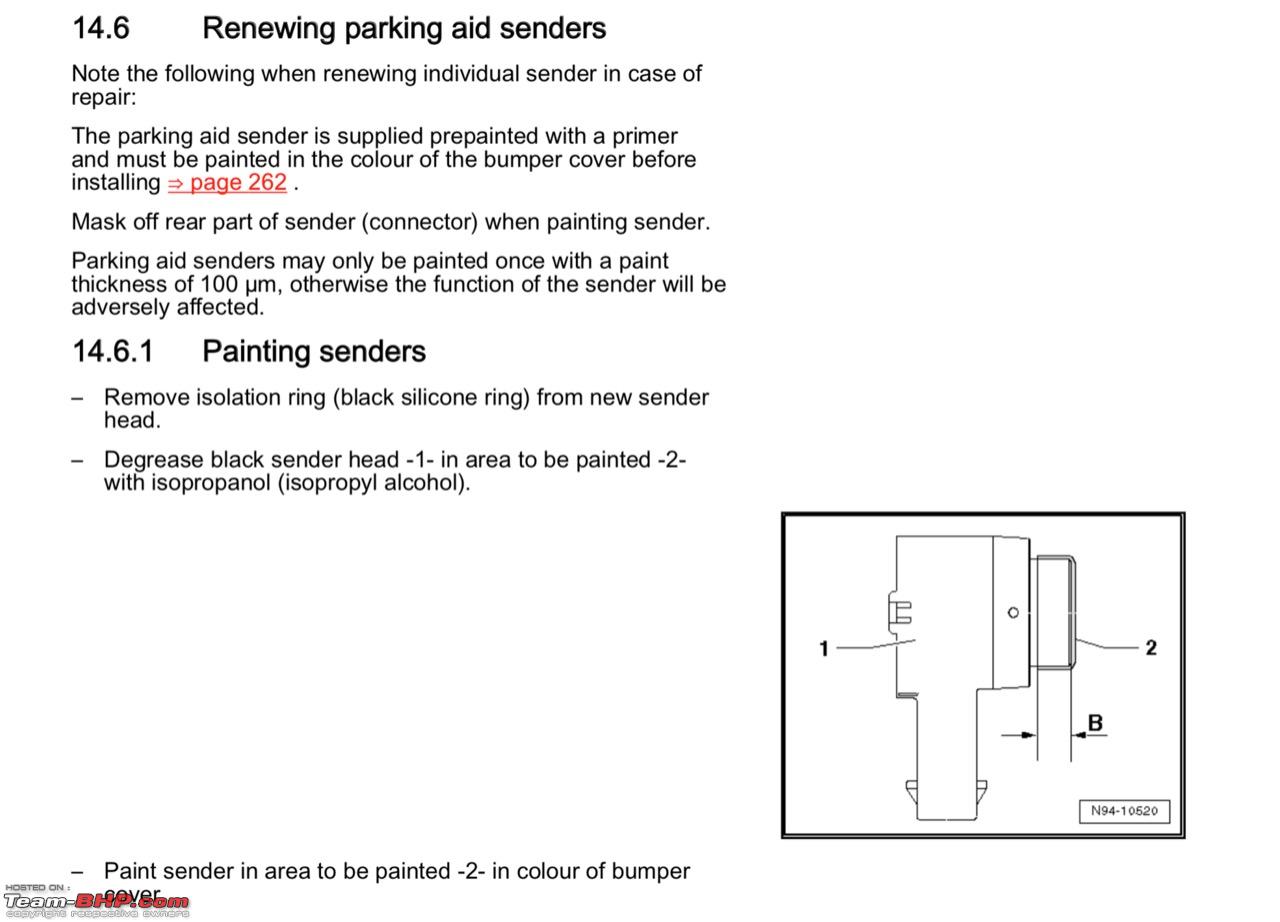 Two years ago, when I installed 8K OPS on my MK5 Jetta, I trusted an outside garage to paint the sensors, and didn't bother to check the technicalities involved, and for the most part, everything has been fine. 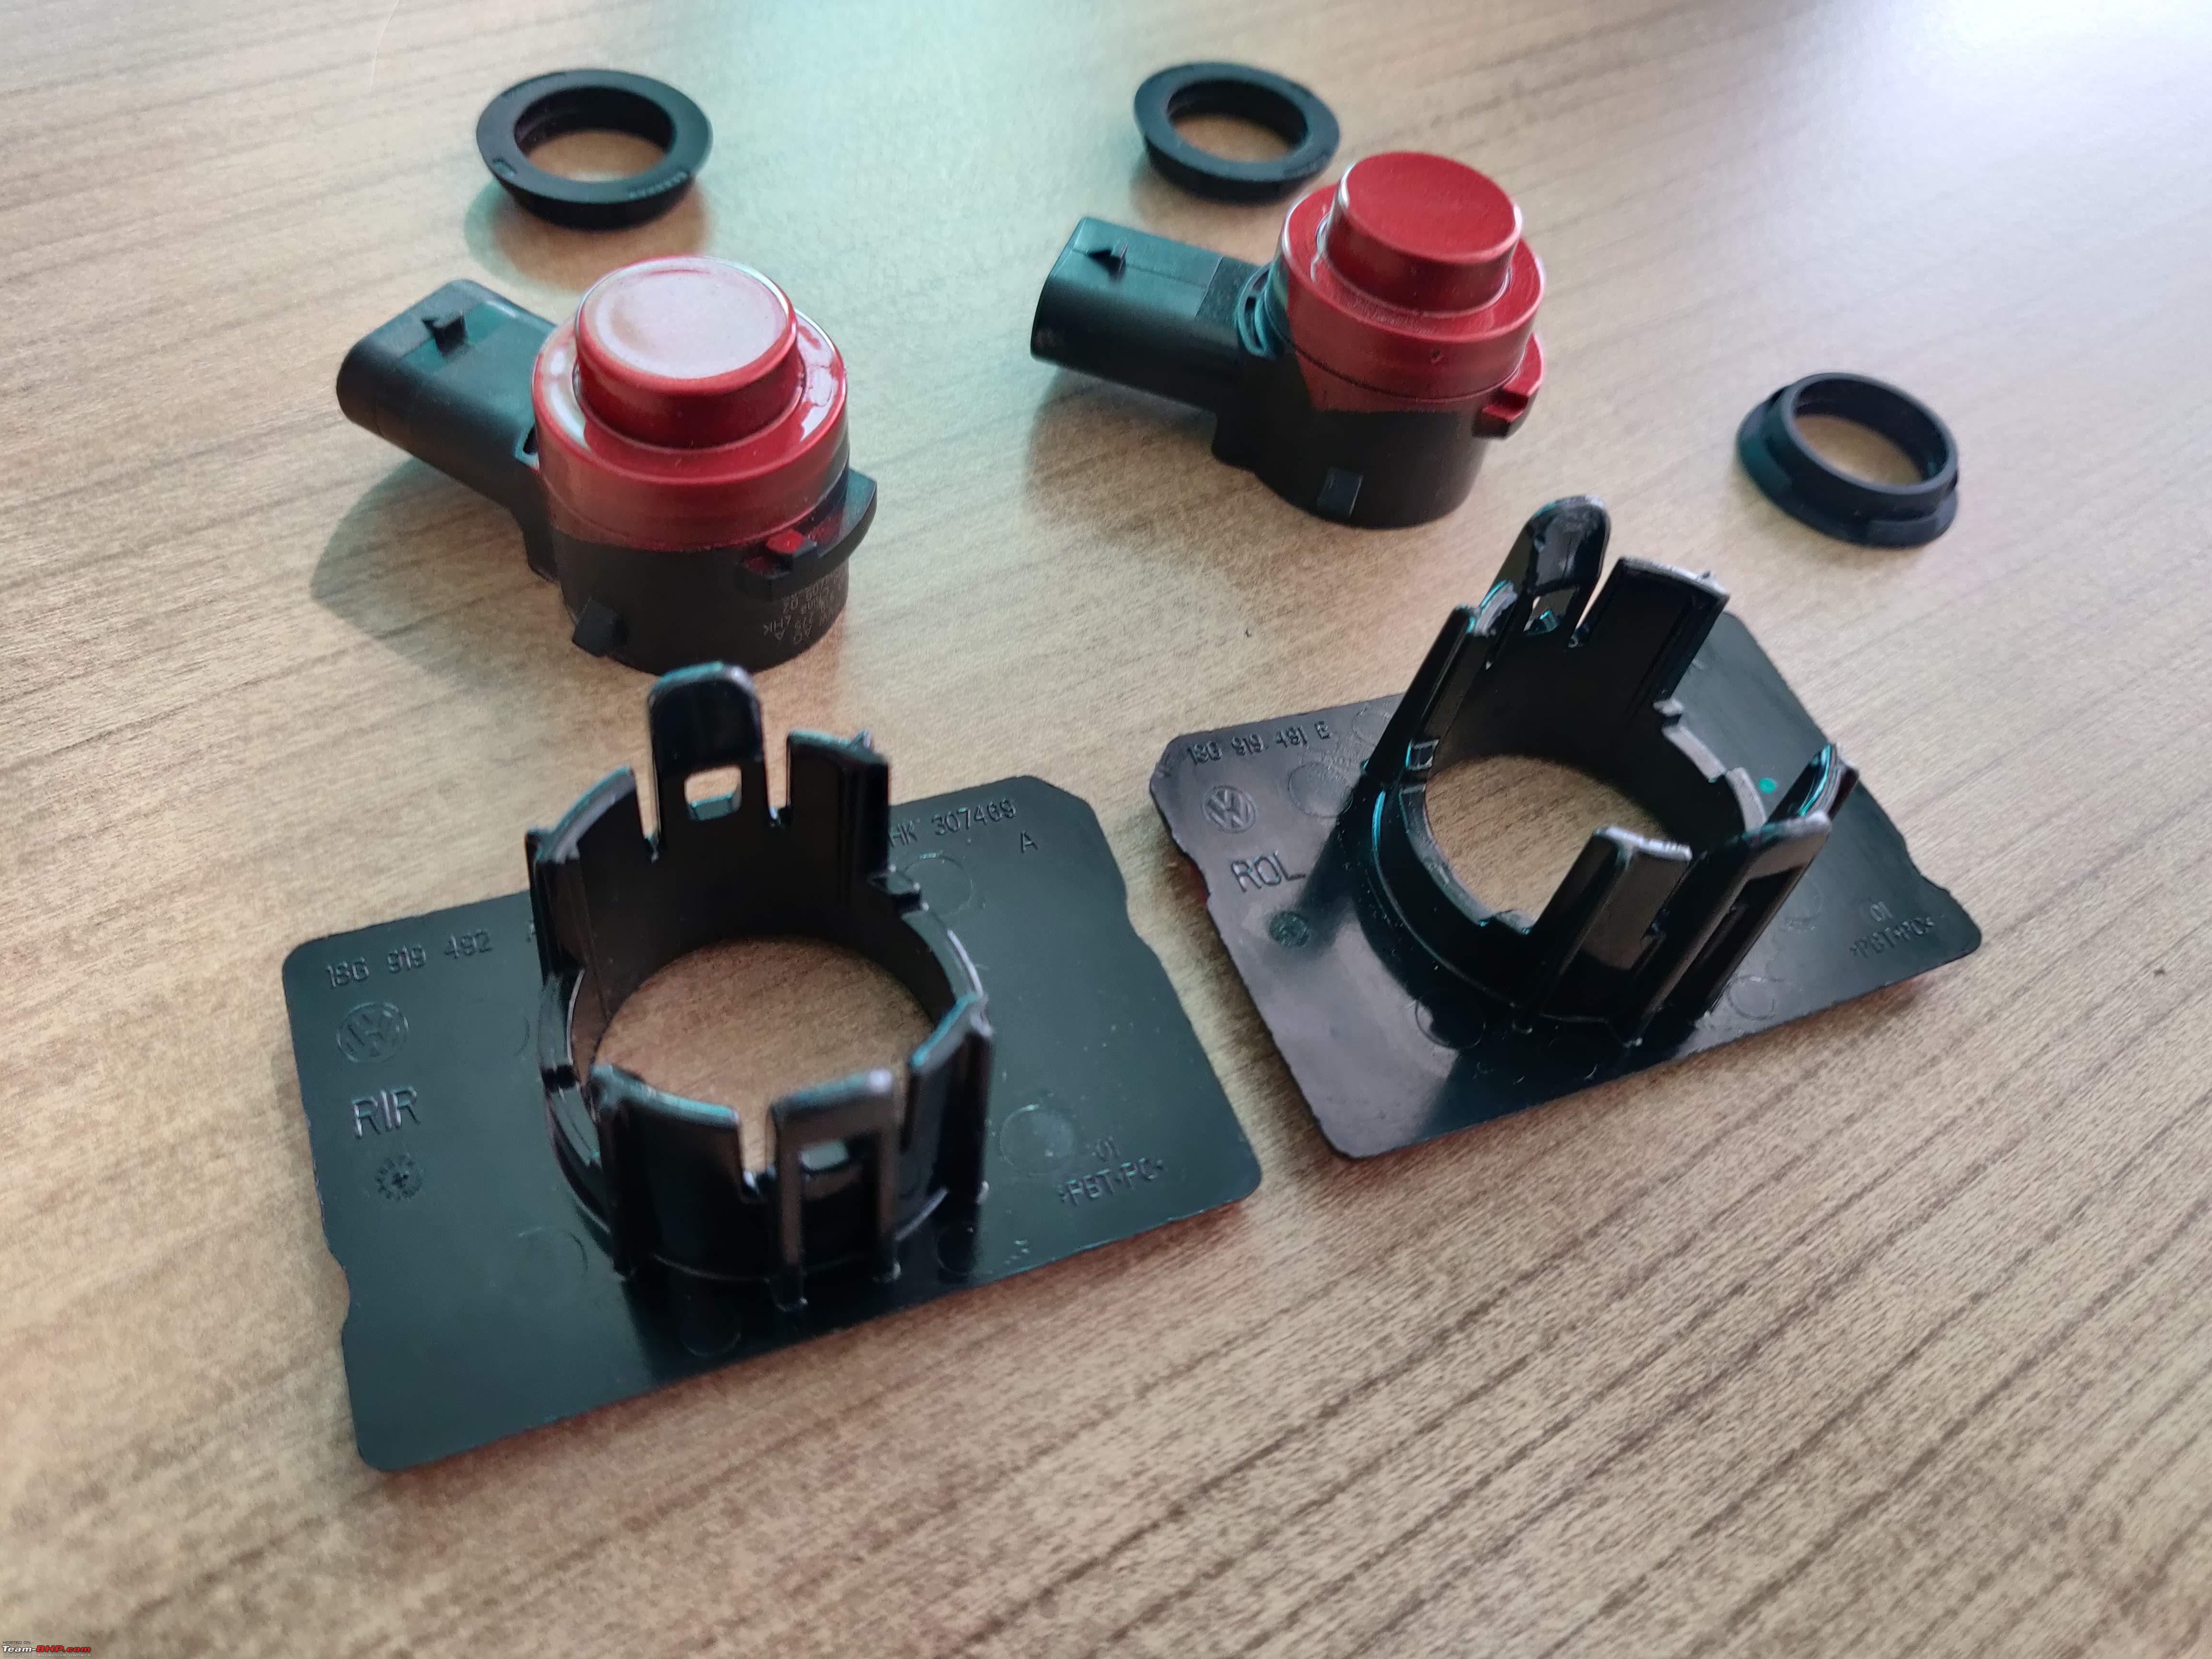 However, there are a few small things to know like removing of the Black Silicone Rings, and ensuring a certain paint thickness, and Volkswagen was prompt at doing these things without even mentioning the same. My OnePlus 6T has a bad habit of playing with the colours, but the paint match is absolutely spot on, just as you'd expect, from a good workshop. Here is a photo of the mounting plate and the painted sensor, after the Silicone ring has been installed. The mounting plates typically have different part numbers depending on the fitment location since some sections on the bumpers are curved while some are flat, but for the most part, the holders I received were pretty much the same. The adhesion was not the strongest, and I did add a few drops of Fast Adhesive to ensure a snug fit. However, there are a few small things to know like removing of the Black Silicone Rings, and ensuring a certain paint thickness, and Volkswagen was prompt at doing these things without even mentioning the same. My OnePlus 6T has a bad habit of playing with the colours, but the paint match is absolutely spot on, just as you'd expect, from a good workshop. Here is a photo of the mounting plate and the painted sensor, after the Silicone ring has been installed. The mounting plates typically have different part numbers depending on the fitment location since some sections on the bumpers are curved while some are flat, but for the most part, the holders I received were pretty much the same. The adhesion was not the strongest, and I did add a few drops of Fast Adhesive to ensure a snug fit.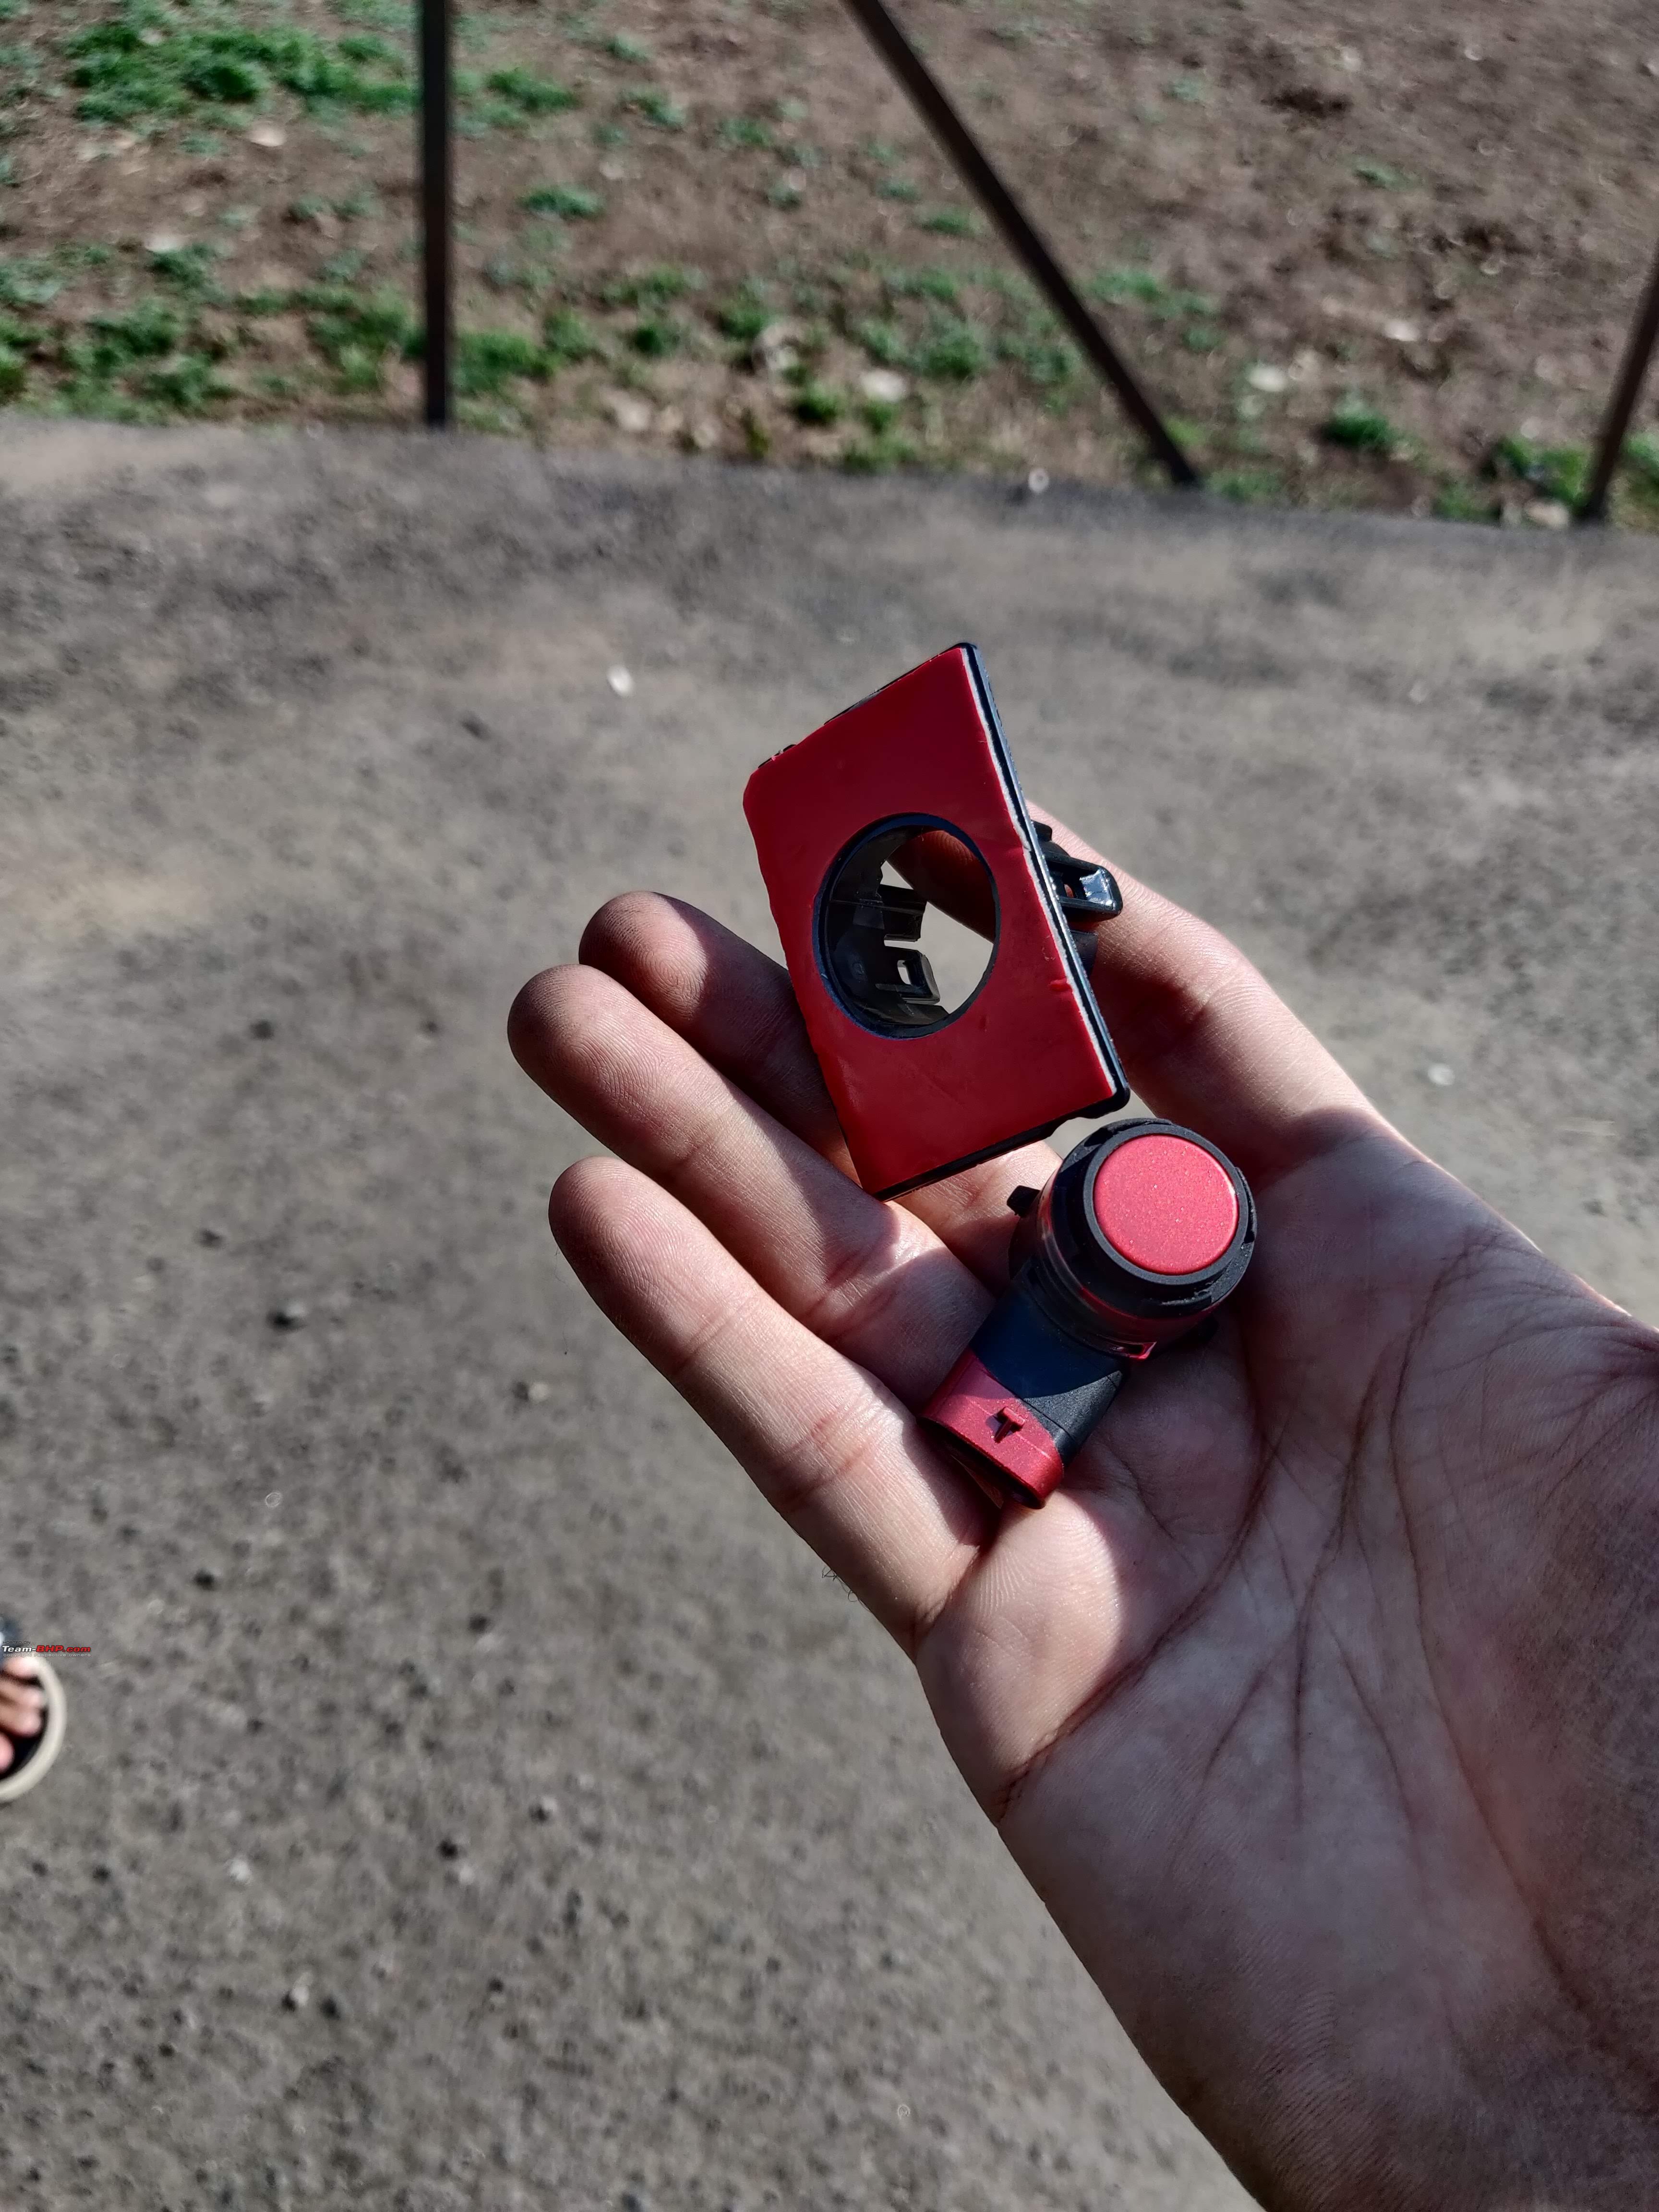 Mounting Locations I was quite skeptical as to whether the bumper would have locations marked for the sensors since most Polos did not come with 8K OPS, even internationally. The 8K OPS was special to the GTI and the Polo Sedan in Russia for instance. I had a picture of a beautiful white GTI downloaded on my phone, but on taking the bumper off, it was quite a pleasant surprise to see 3 out of 4 locations already marked on the bumper.  The hole size you need is an 18mm diameter, but using a normal drill doesn't ensure the perfect surface finish and so we used the Original Volkswagen Skoda Parking Sensor tool for ensuring an immaculate smooth finish on the bumper. 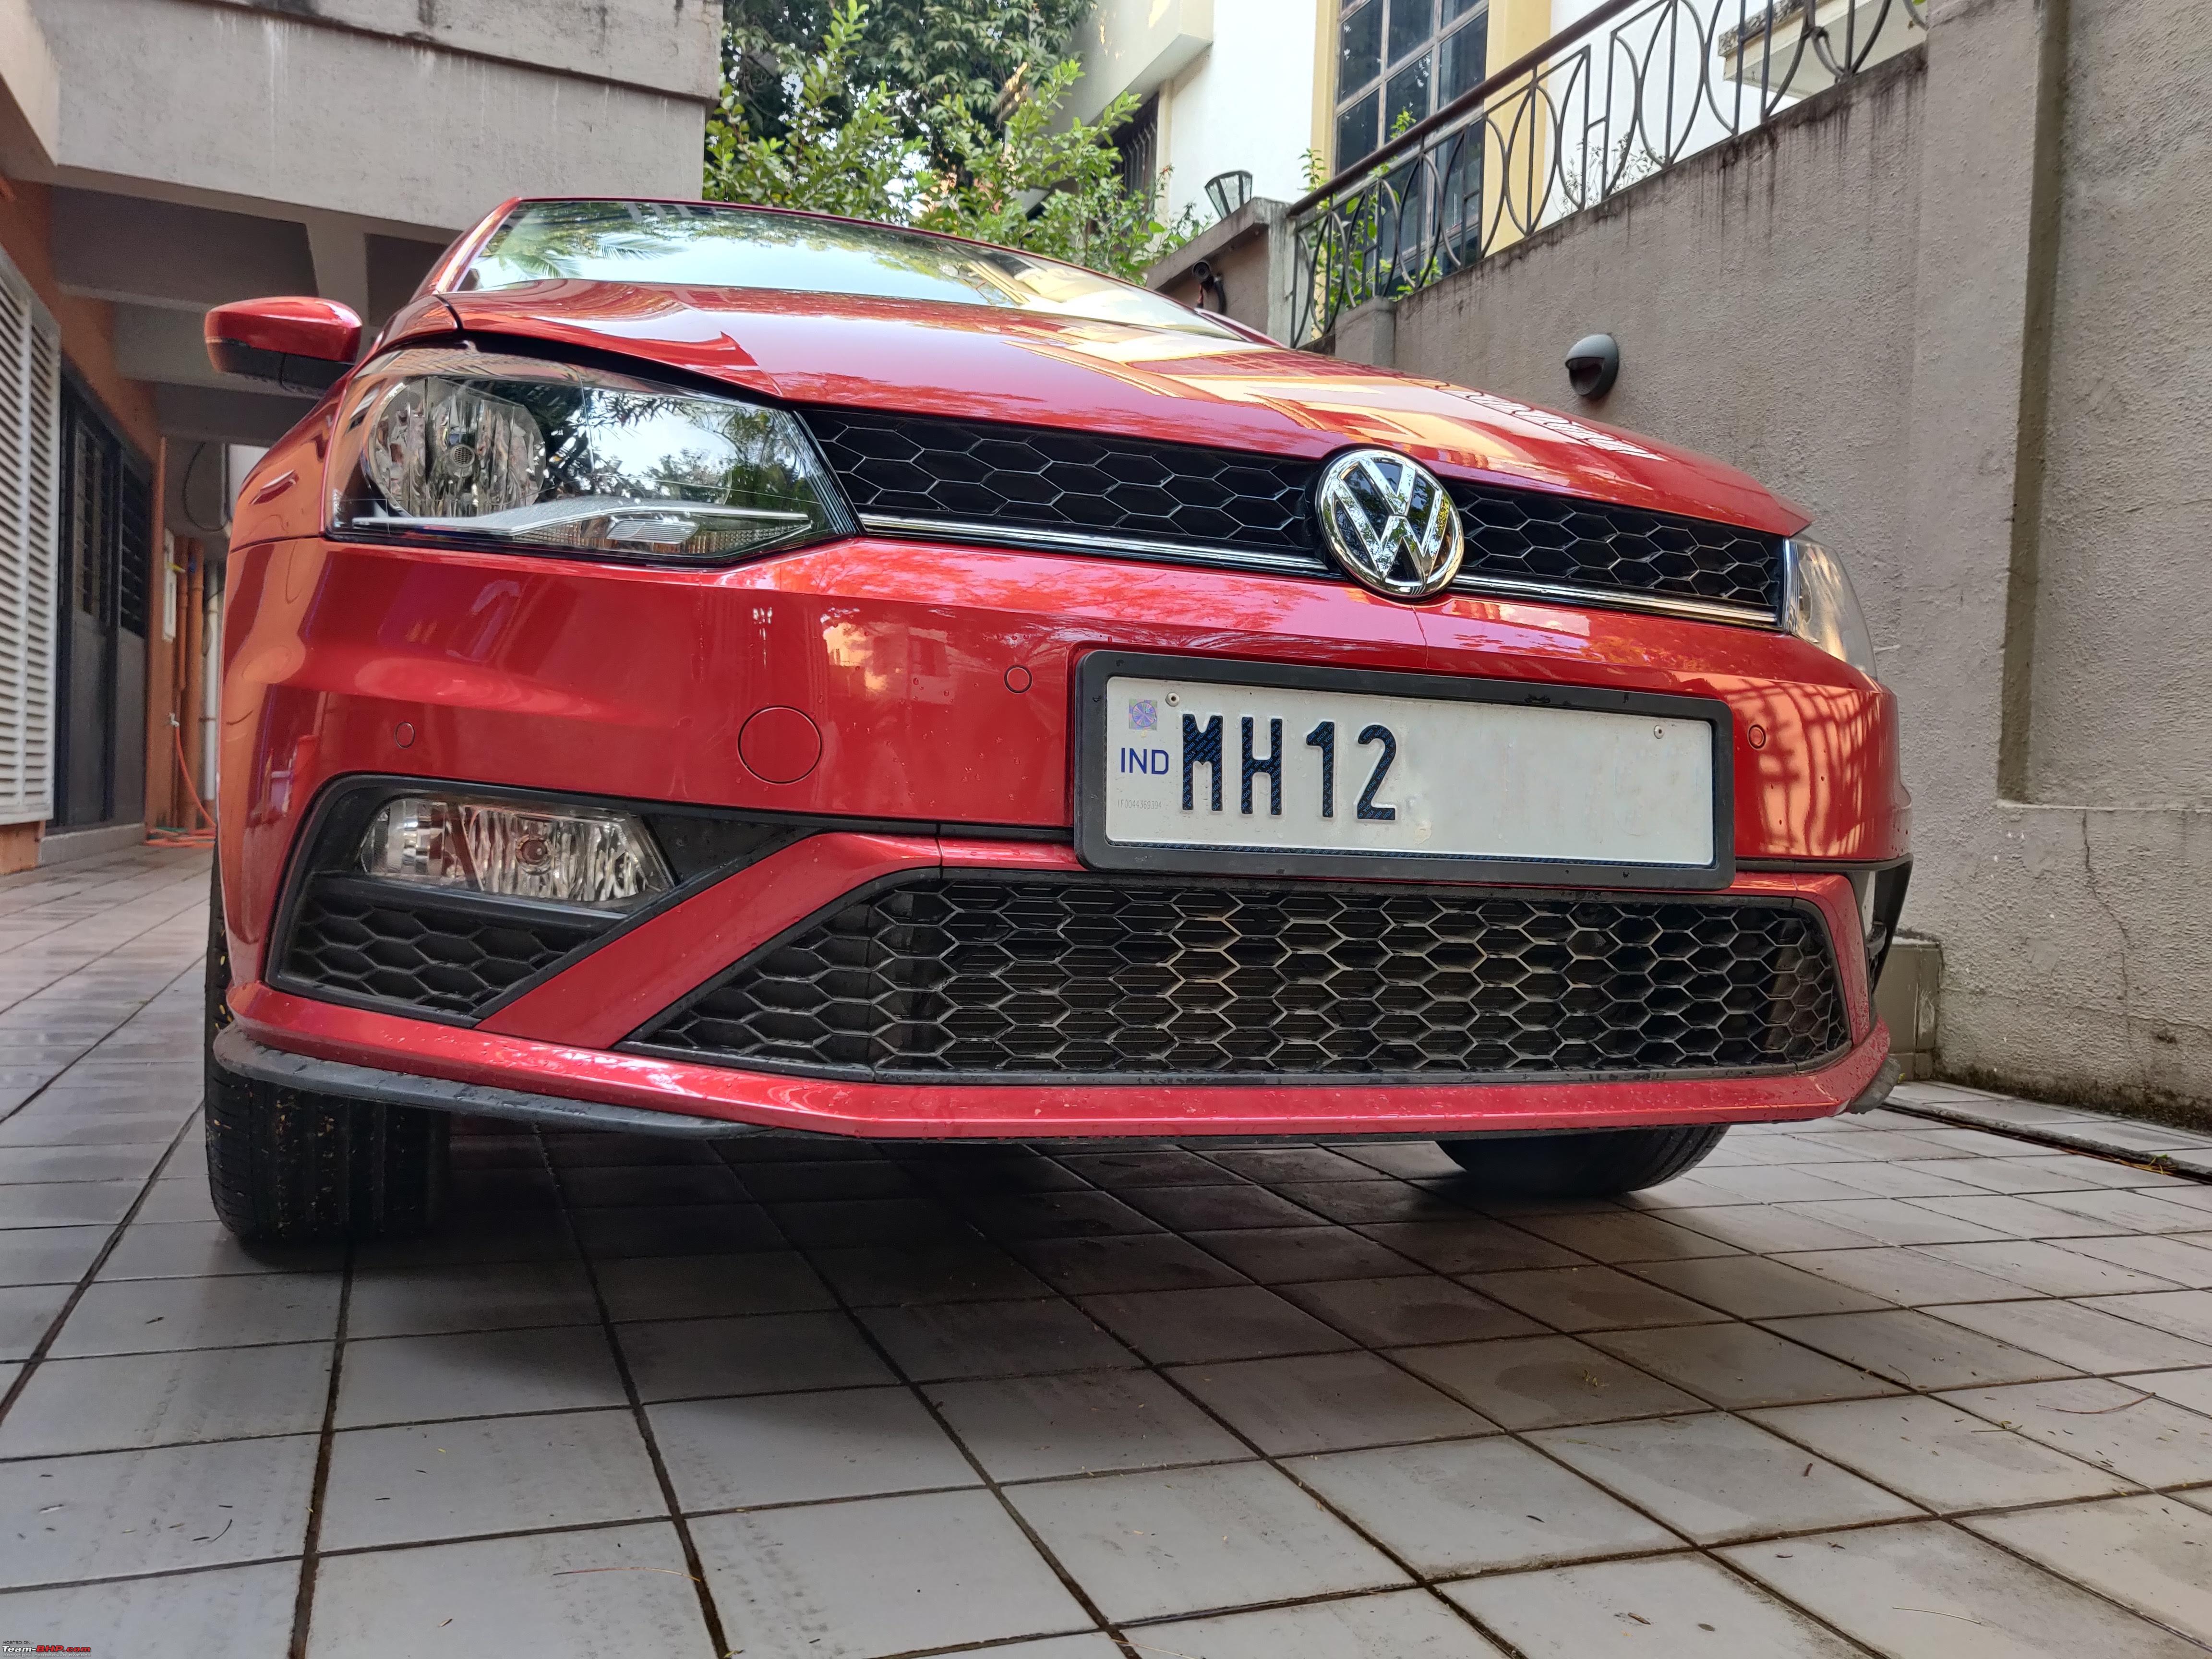   Some Cues and the End Result  Warranty Aspect For the entire retrofit, I have endeavoured to not damage or tap or cut into any stock harness, but the warranty still lies with the mercy of the dealership, who may view this as an "Unnecessary Task" performed by the Customer. Since this is our third Volkswagen, and I have the right resources (VCDS, ODIS and more importantly, a lot of talented friends) to self diagnose, repair my vehicle, I did not care too much about the implication of this retrofit on my warranty. However, a perfectly executed retrofit leaves no ounce for errors and my car has Zero Fault Codes to its credit as we speak. How Much Work? While I initially thought the 8K OPS Upgrade would be a cakewalk, it sure needs it's sweet time to ensure everything is smooth. The work involves Removing the Front bumper, Drilling Holes, Fitting Sensors, Laying the Harness from the Engine Bay to the Rear of The Car which needs removal of all the Floor Panels and taking care of Metal and Plastic Clips which often tend to break, and lastly, making changes to the Stock Connectors to Feed and replace a few wires. 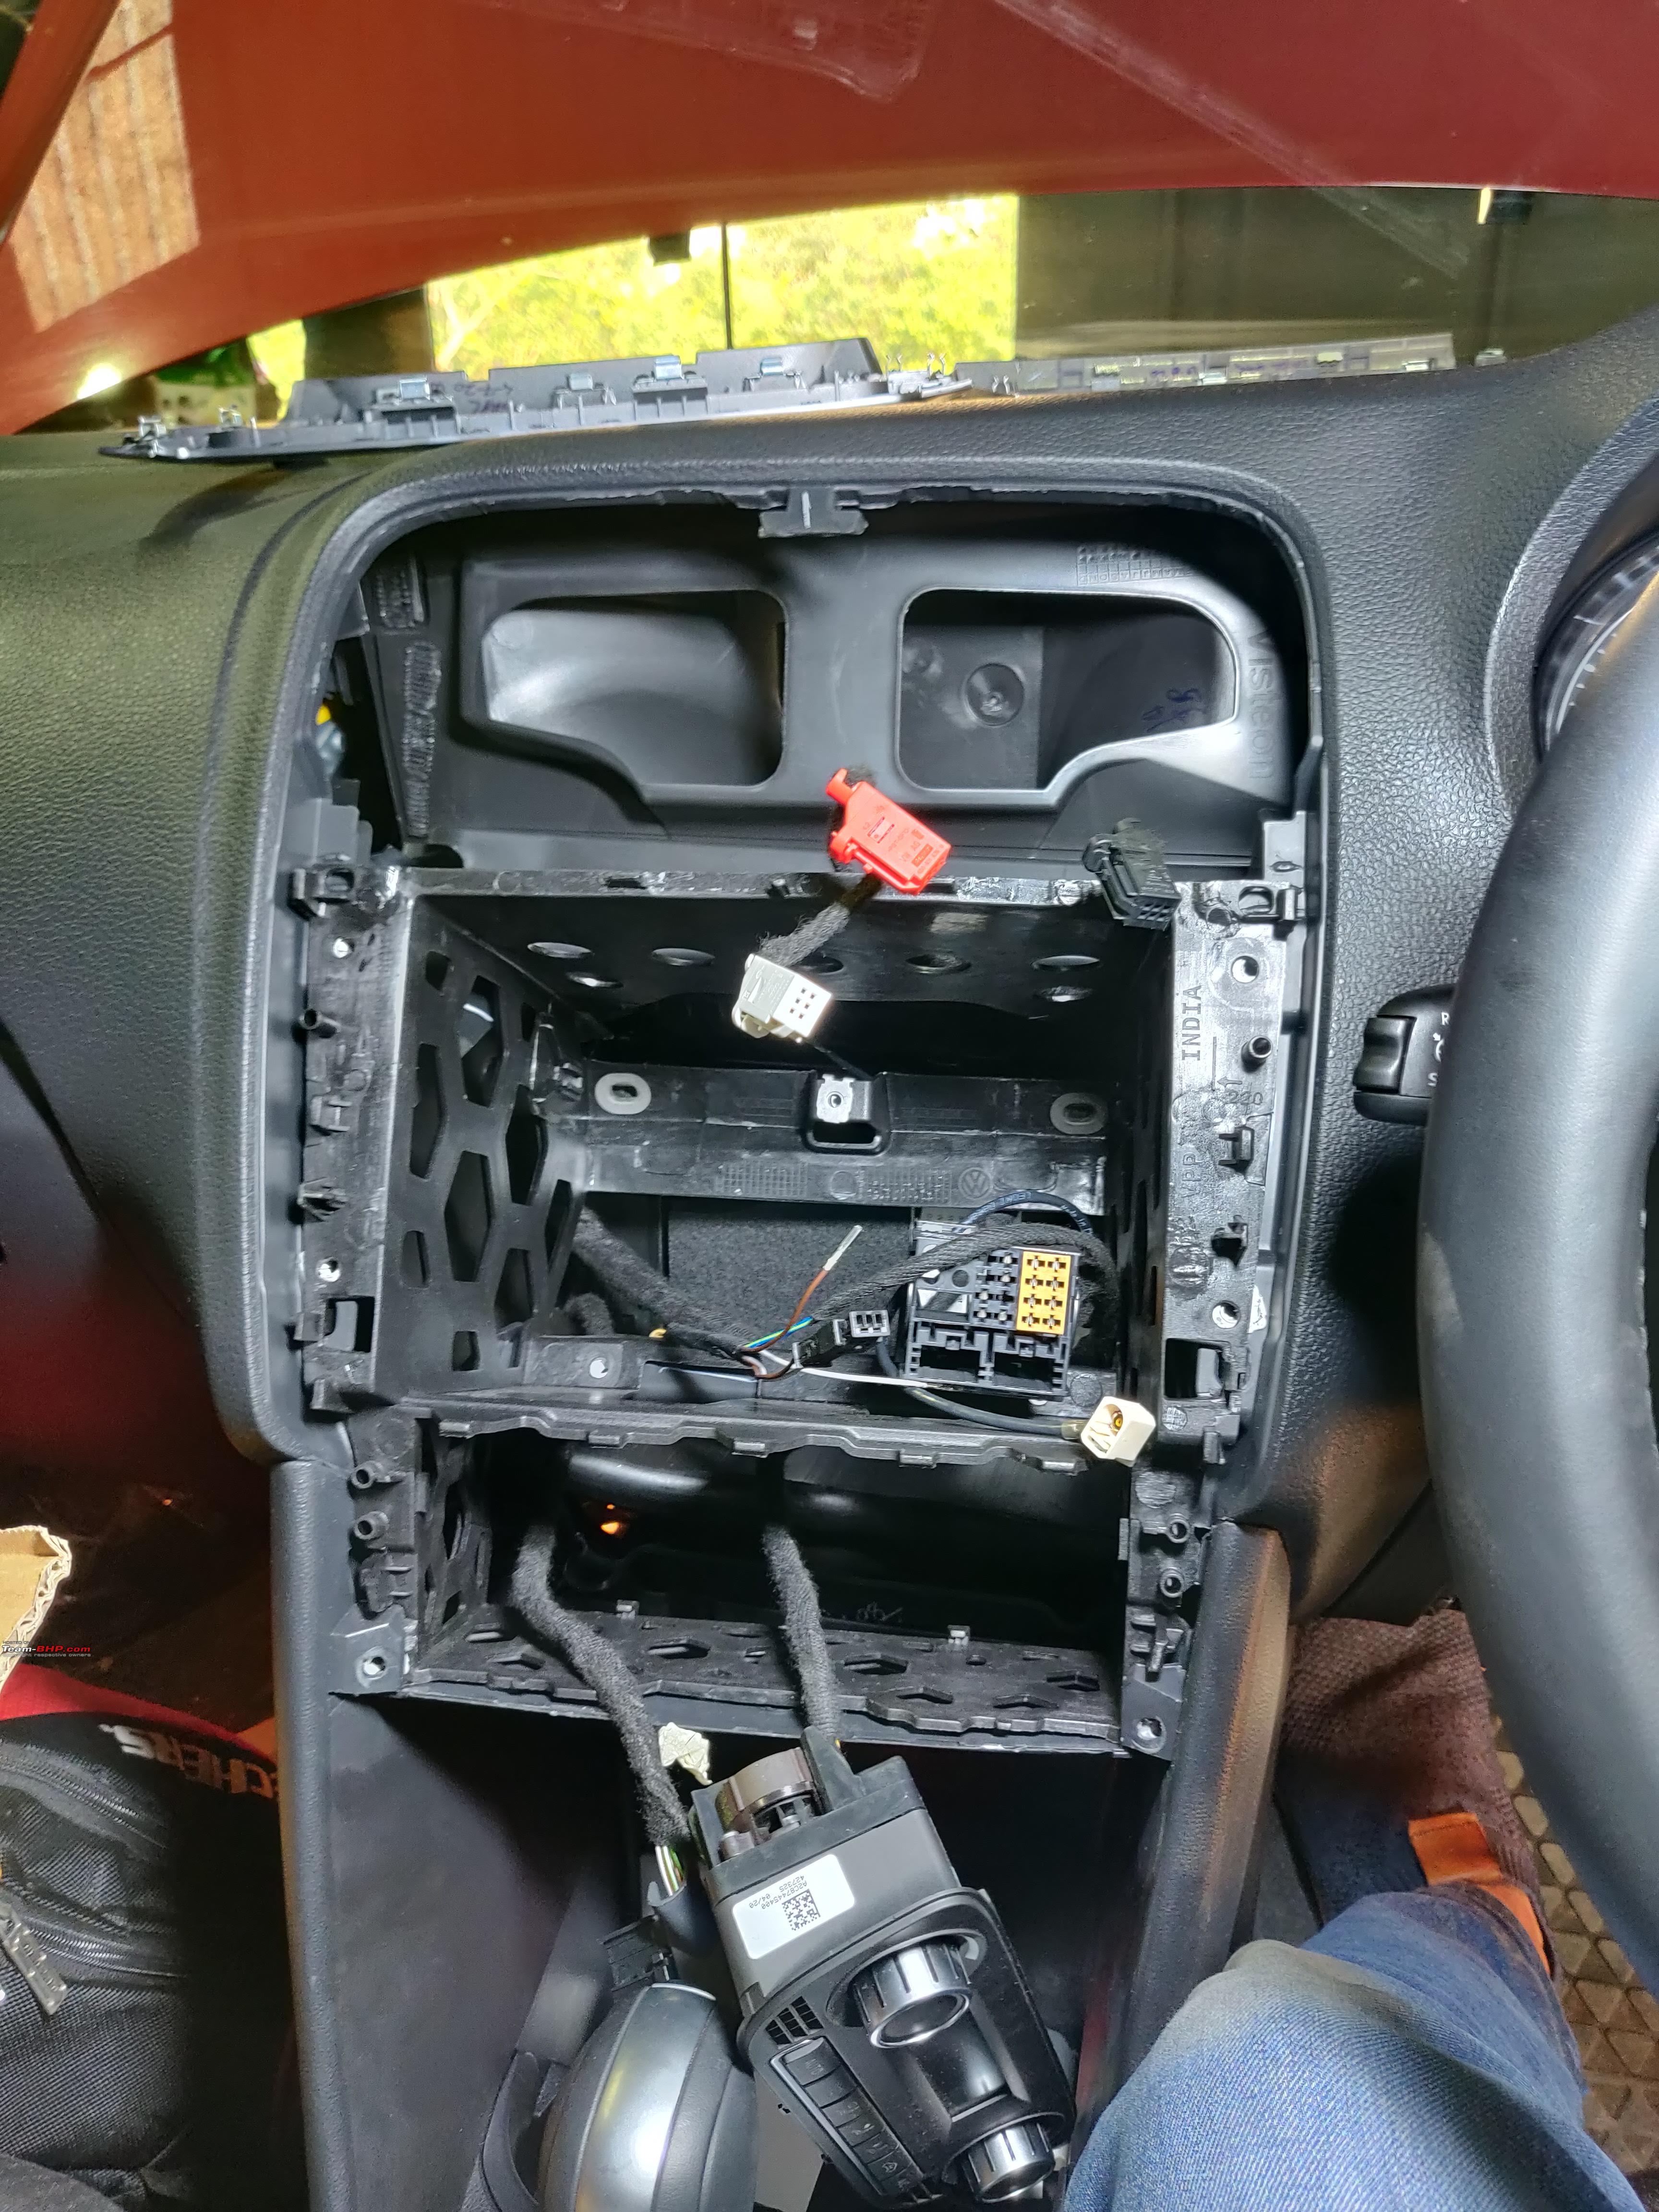 The entire AC Panel, Radio Headunit, instrument cluster, needed to be removed to lay out all the wires correctly and make appropriate connections. There was a point where I felt bad for ripping apart a tight, brand new car, and I almost started to regret it. But with patience, the job was completed, and once everything has been put back together, the convenience and satisfaction is unparalleled. 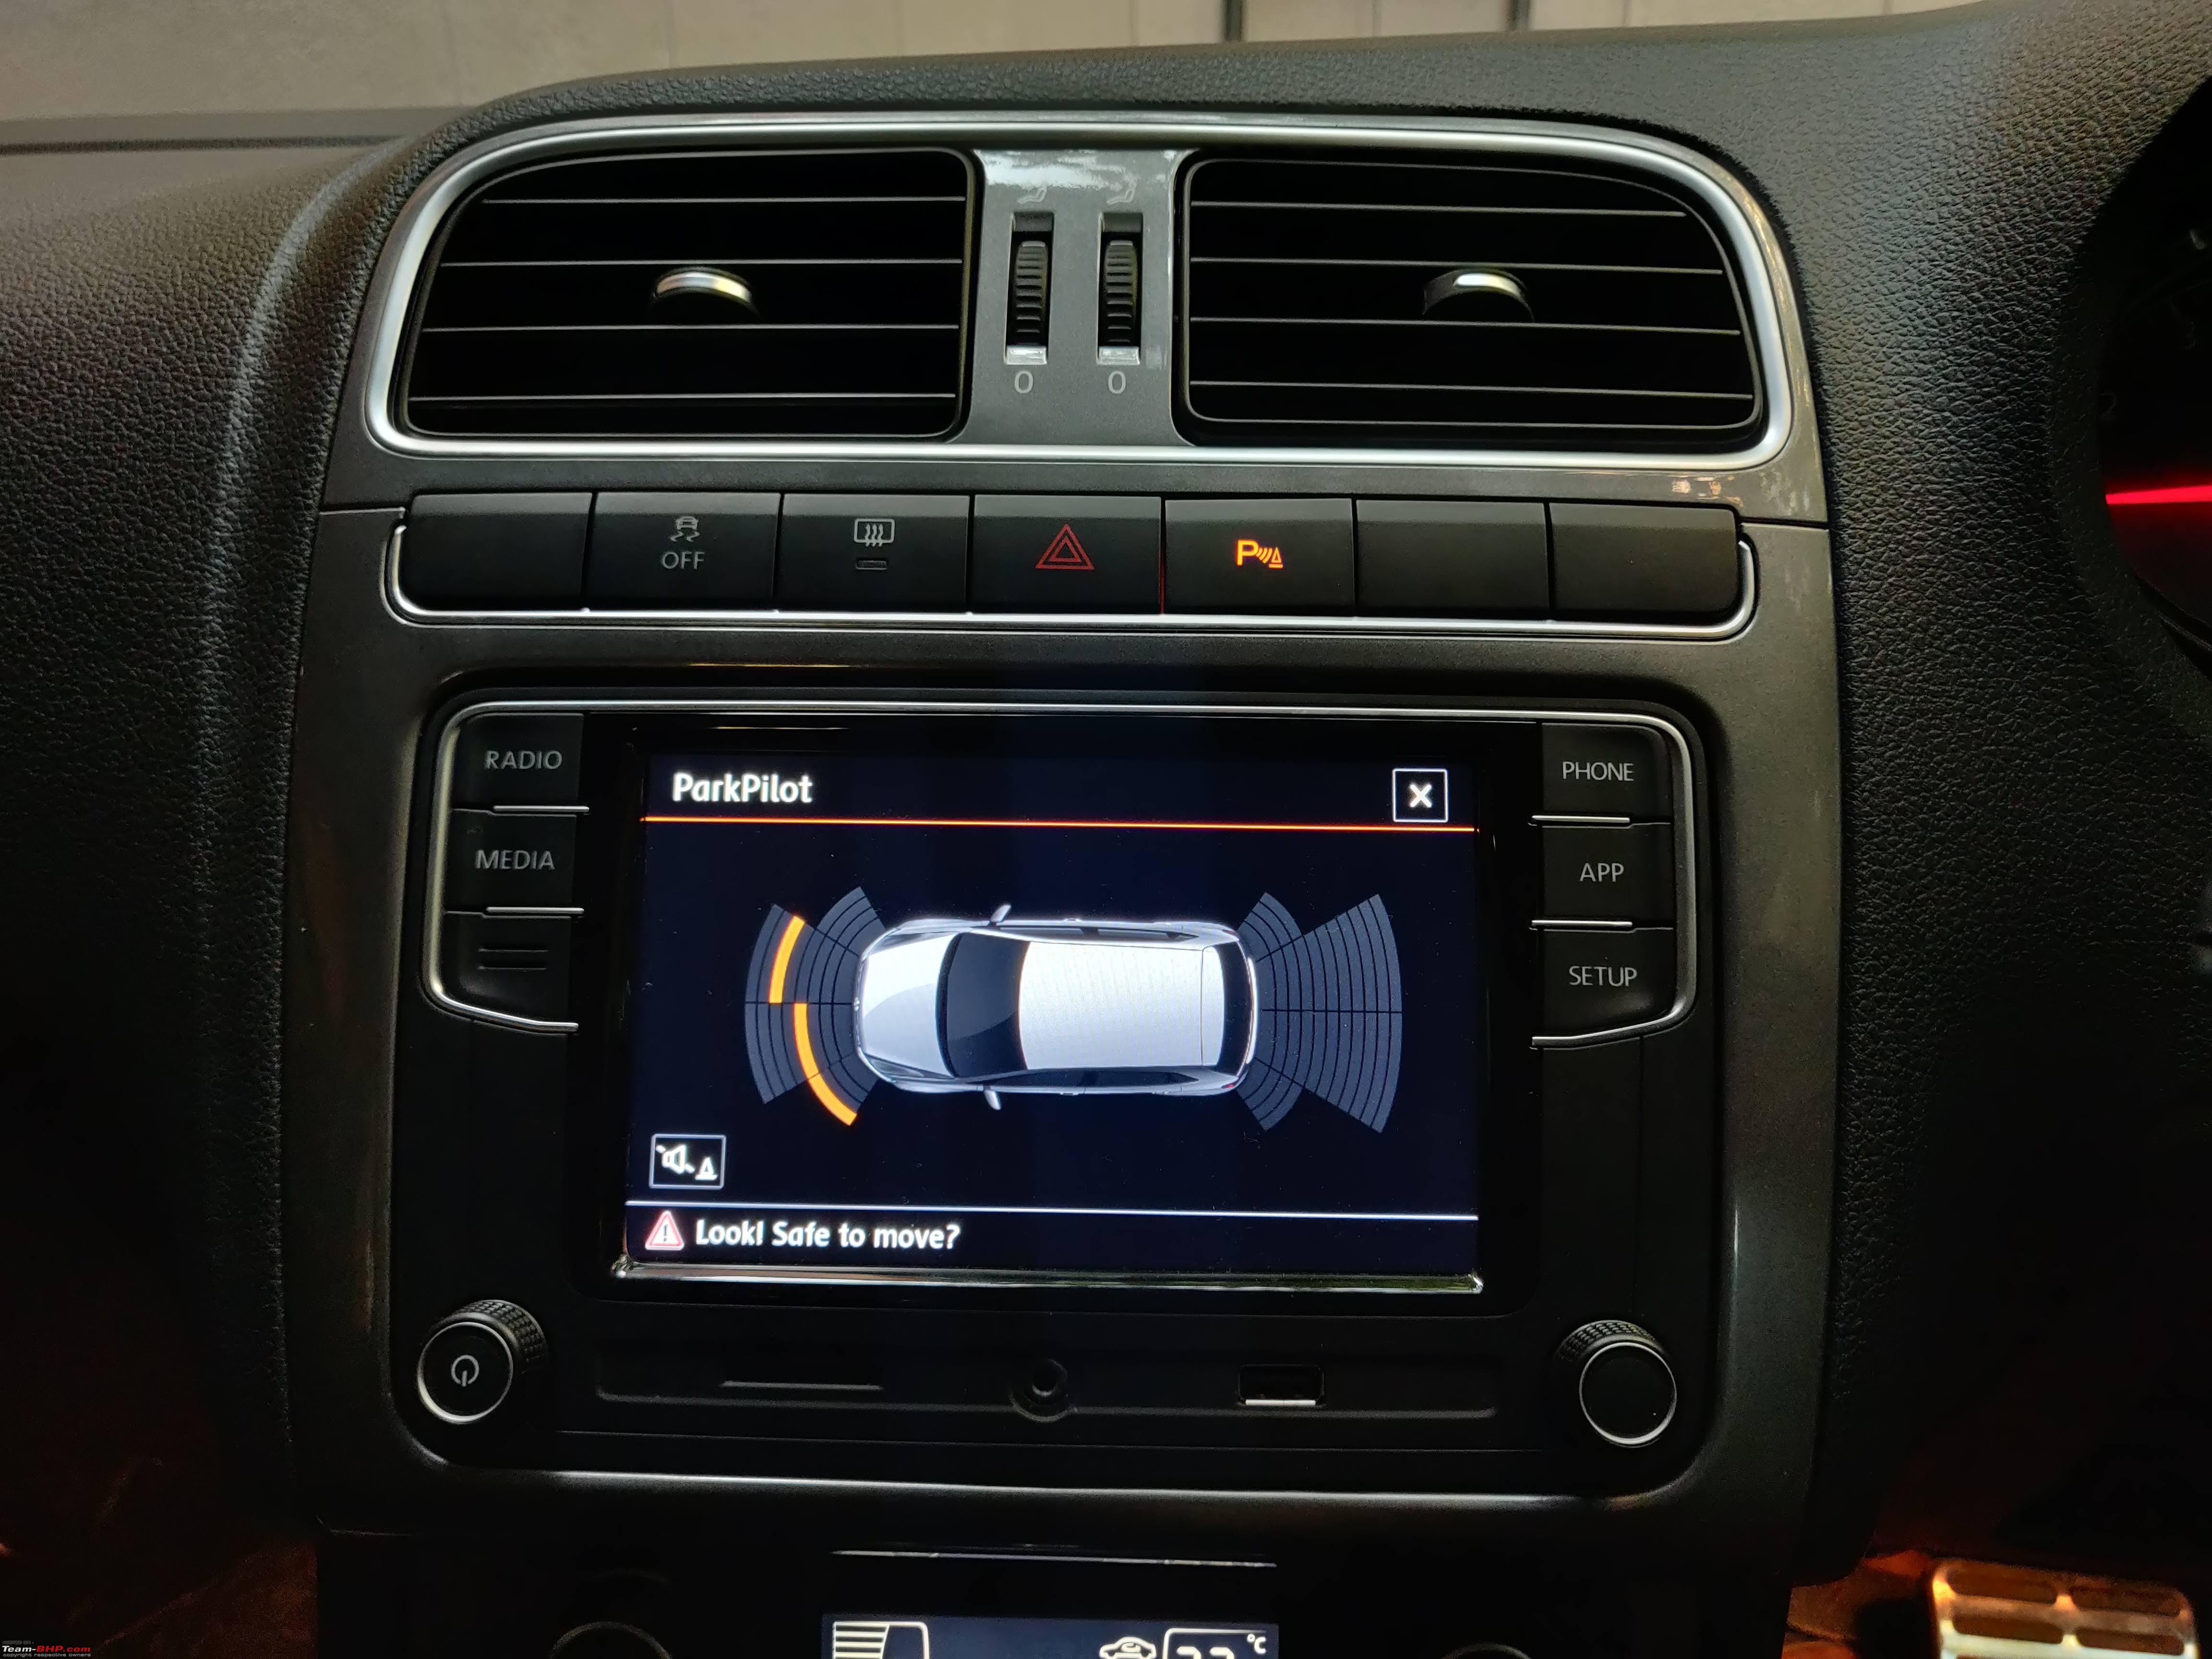 Some Little Things 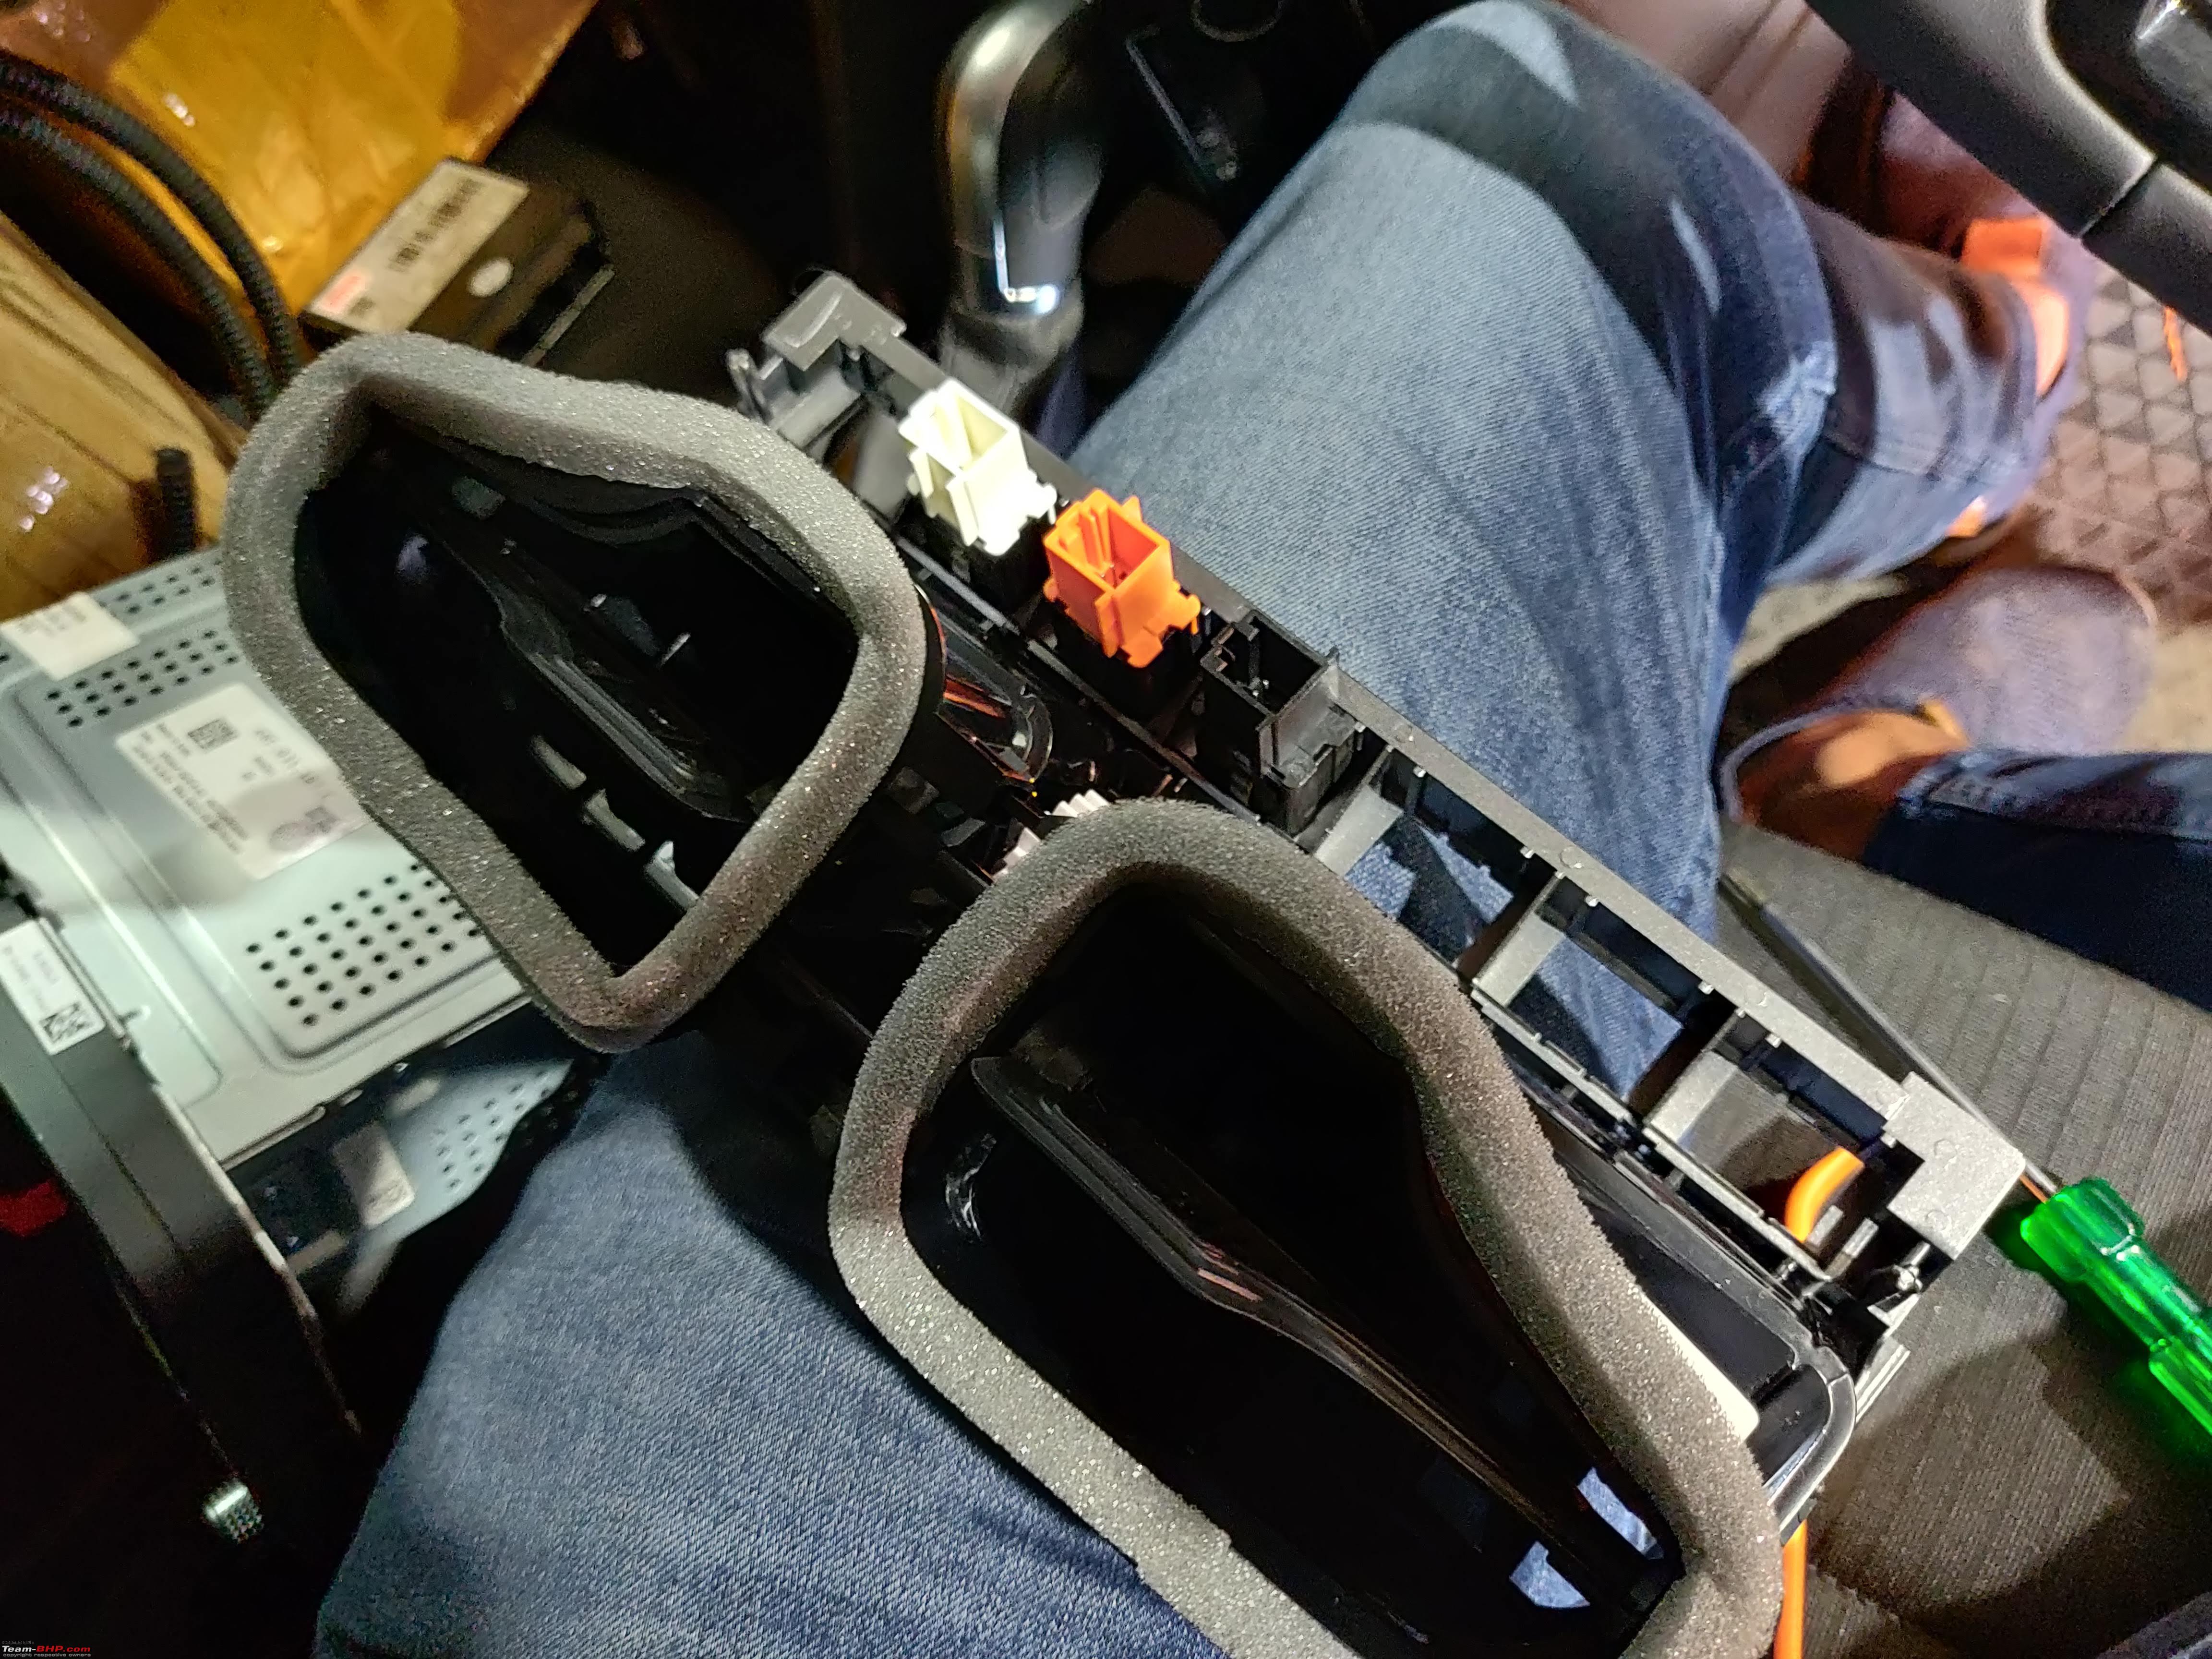 On removing the Air-Condition Panels, I noticed the three 6 Pin Connectors for the ESP, Rear Defogger and the Hazard Switch and it put a smile on my face to see the colour coded connectors and buttons. A small touch, but truly brilliant. 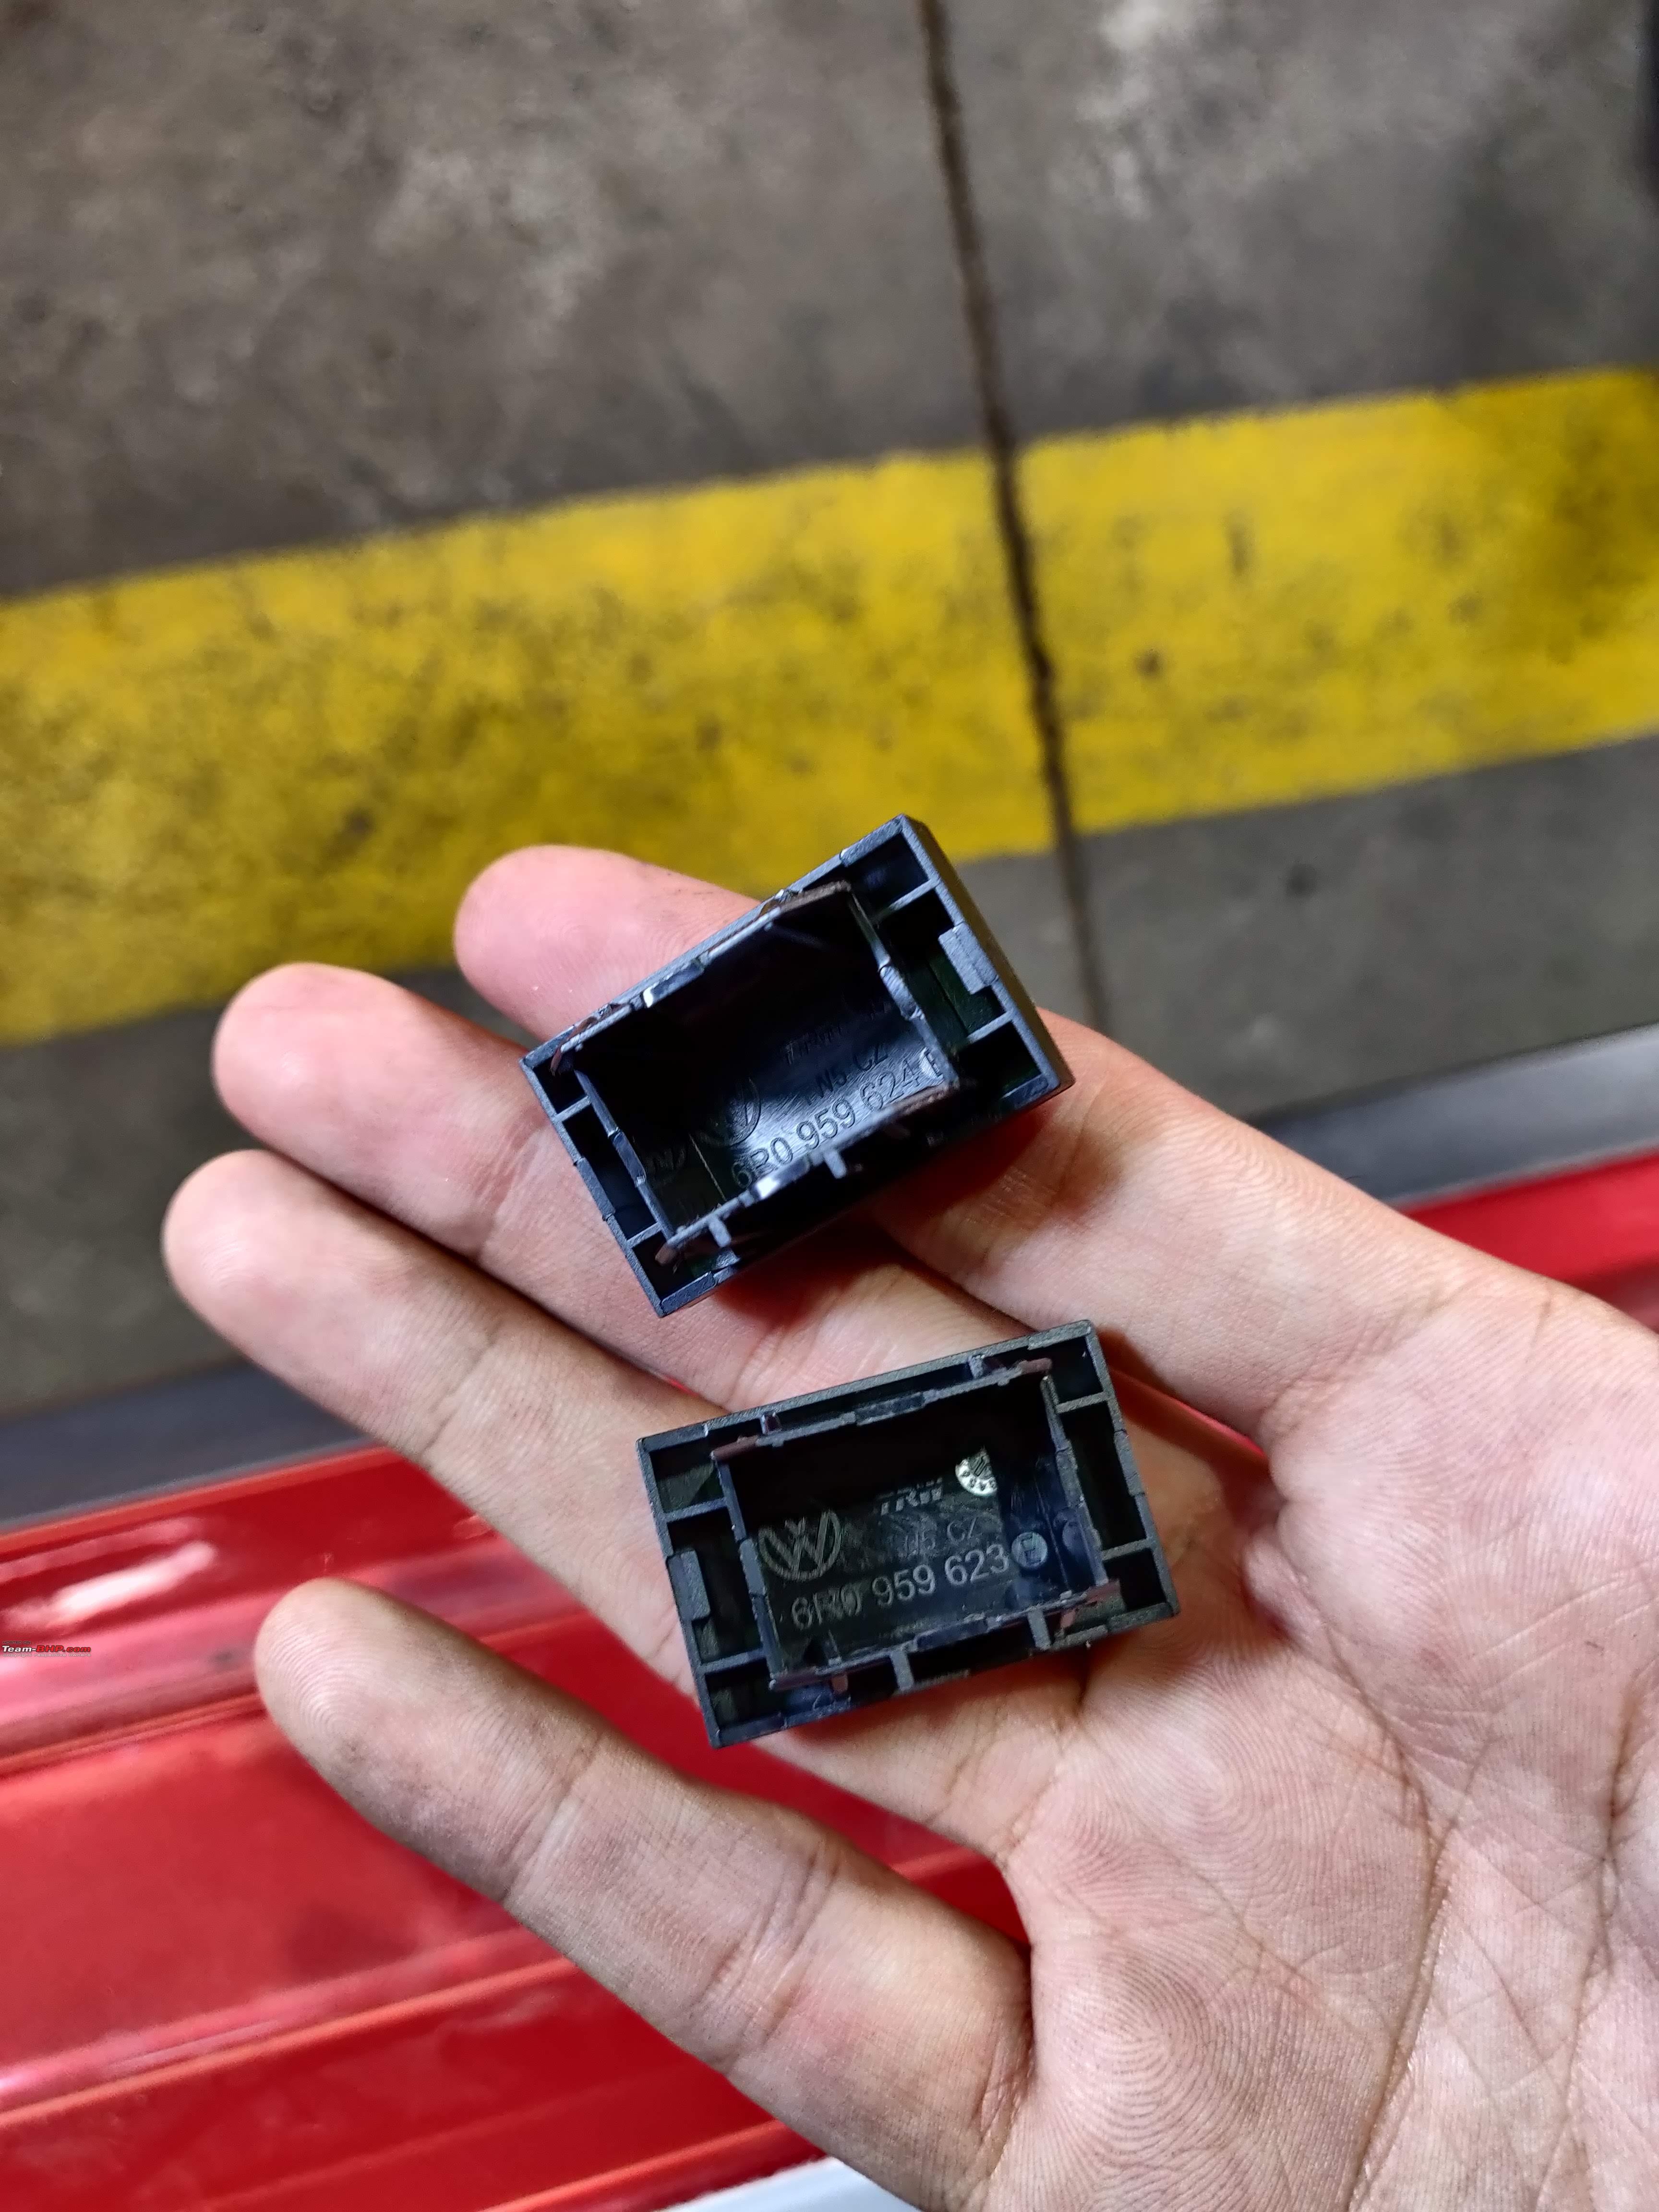 The Blank Switches on the Polo are not alike. Each has a different groove. The OPS Button I received, was not a perfect match to the Shade of the Buttons on the car. It also is a little offset, and looks a tiny bit sore on what is otherwise, a solid looking dash. 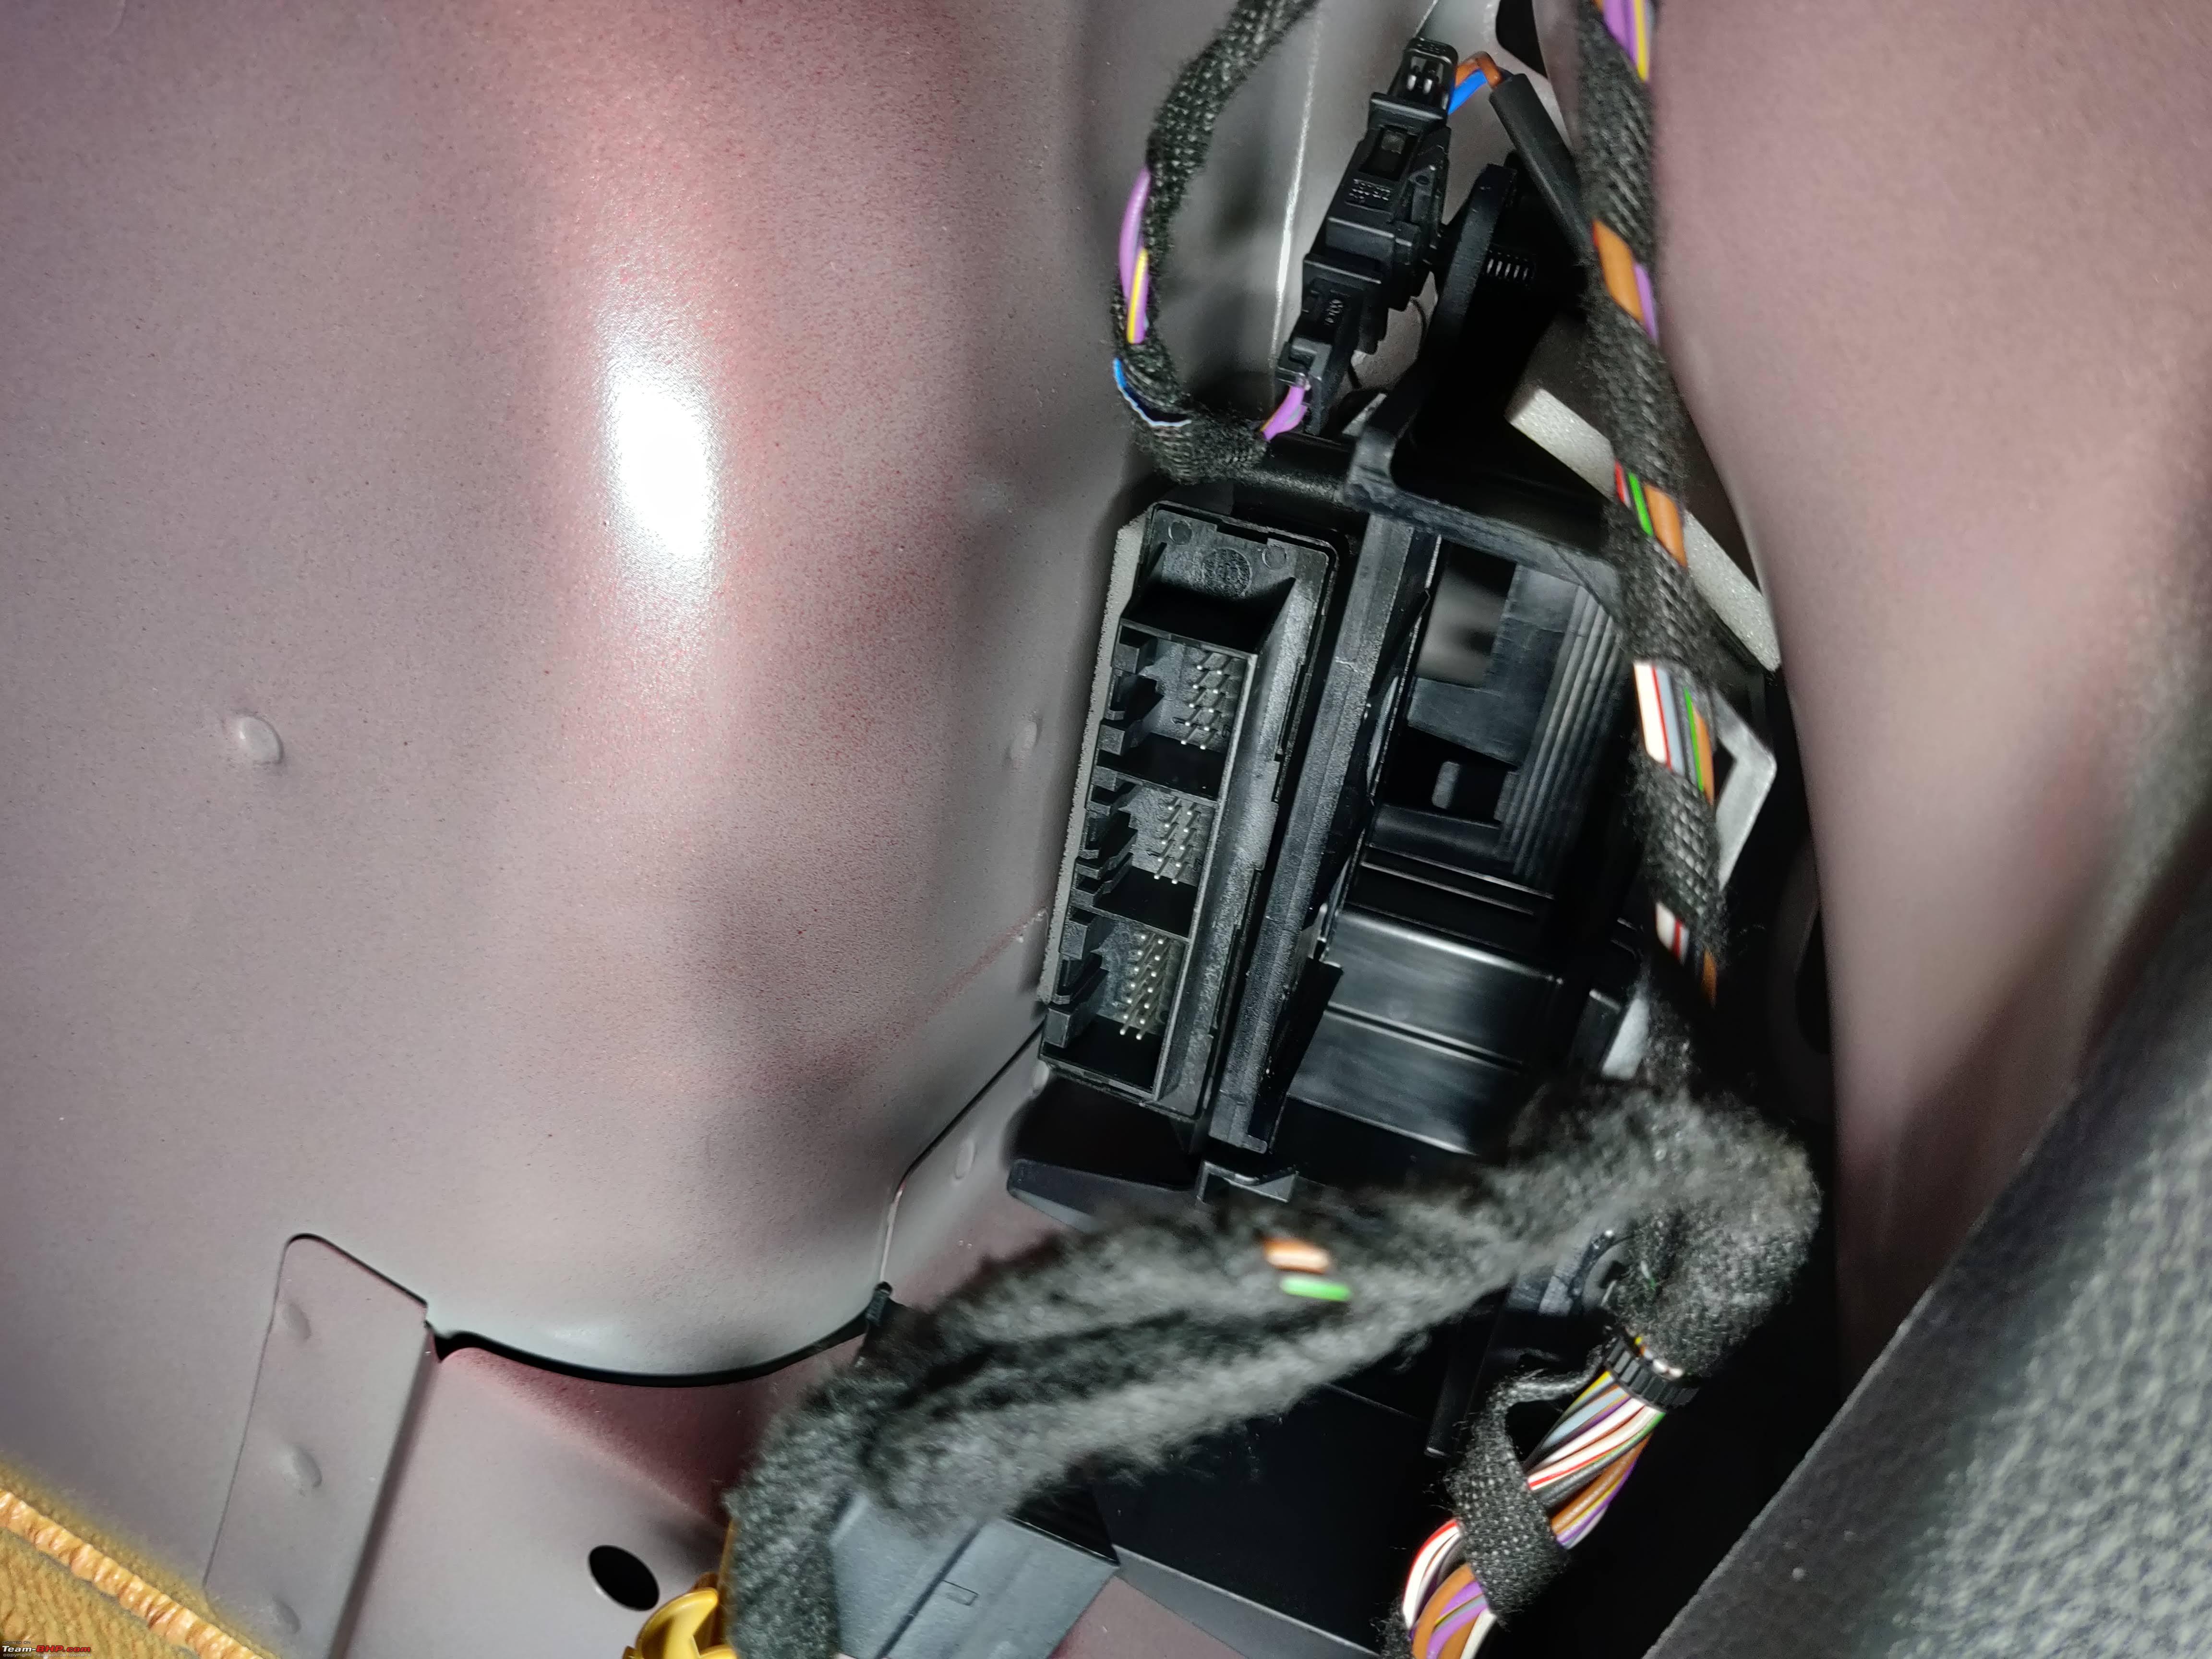 The rear OPS Module on the Polo is located on the Rear Right and it was just plain dumb on Volkswagen's part to omit the CAN enabled wiring Harness. Honestly, how hard is it to simply have left two wires for future users, when they were already offering it in the beginning. MAXIDOT Initially, when I first drove the car during the test drive, it did not strike me how much I'd come to hate the existing cluster on the Polo. Sure, it does display quite a lot of useful information like the :- Consumption, Amount Refilled, Coolant Temperature etc - and to the delight of many, it could even needle sweep. However, I started losing it, when I couldn't realise which door was open, and it started happening quite a number of times.  I also started hating how bad the cluster looked like when it was super sunny outside and it was then that I decided it was time to MAXIDOT my Polo, but even then, I had no idea that this would be the best thing I'd do for upping the premium-ness of what's a decade old car. 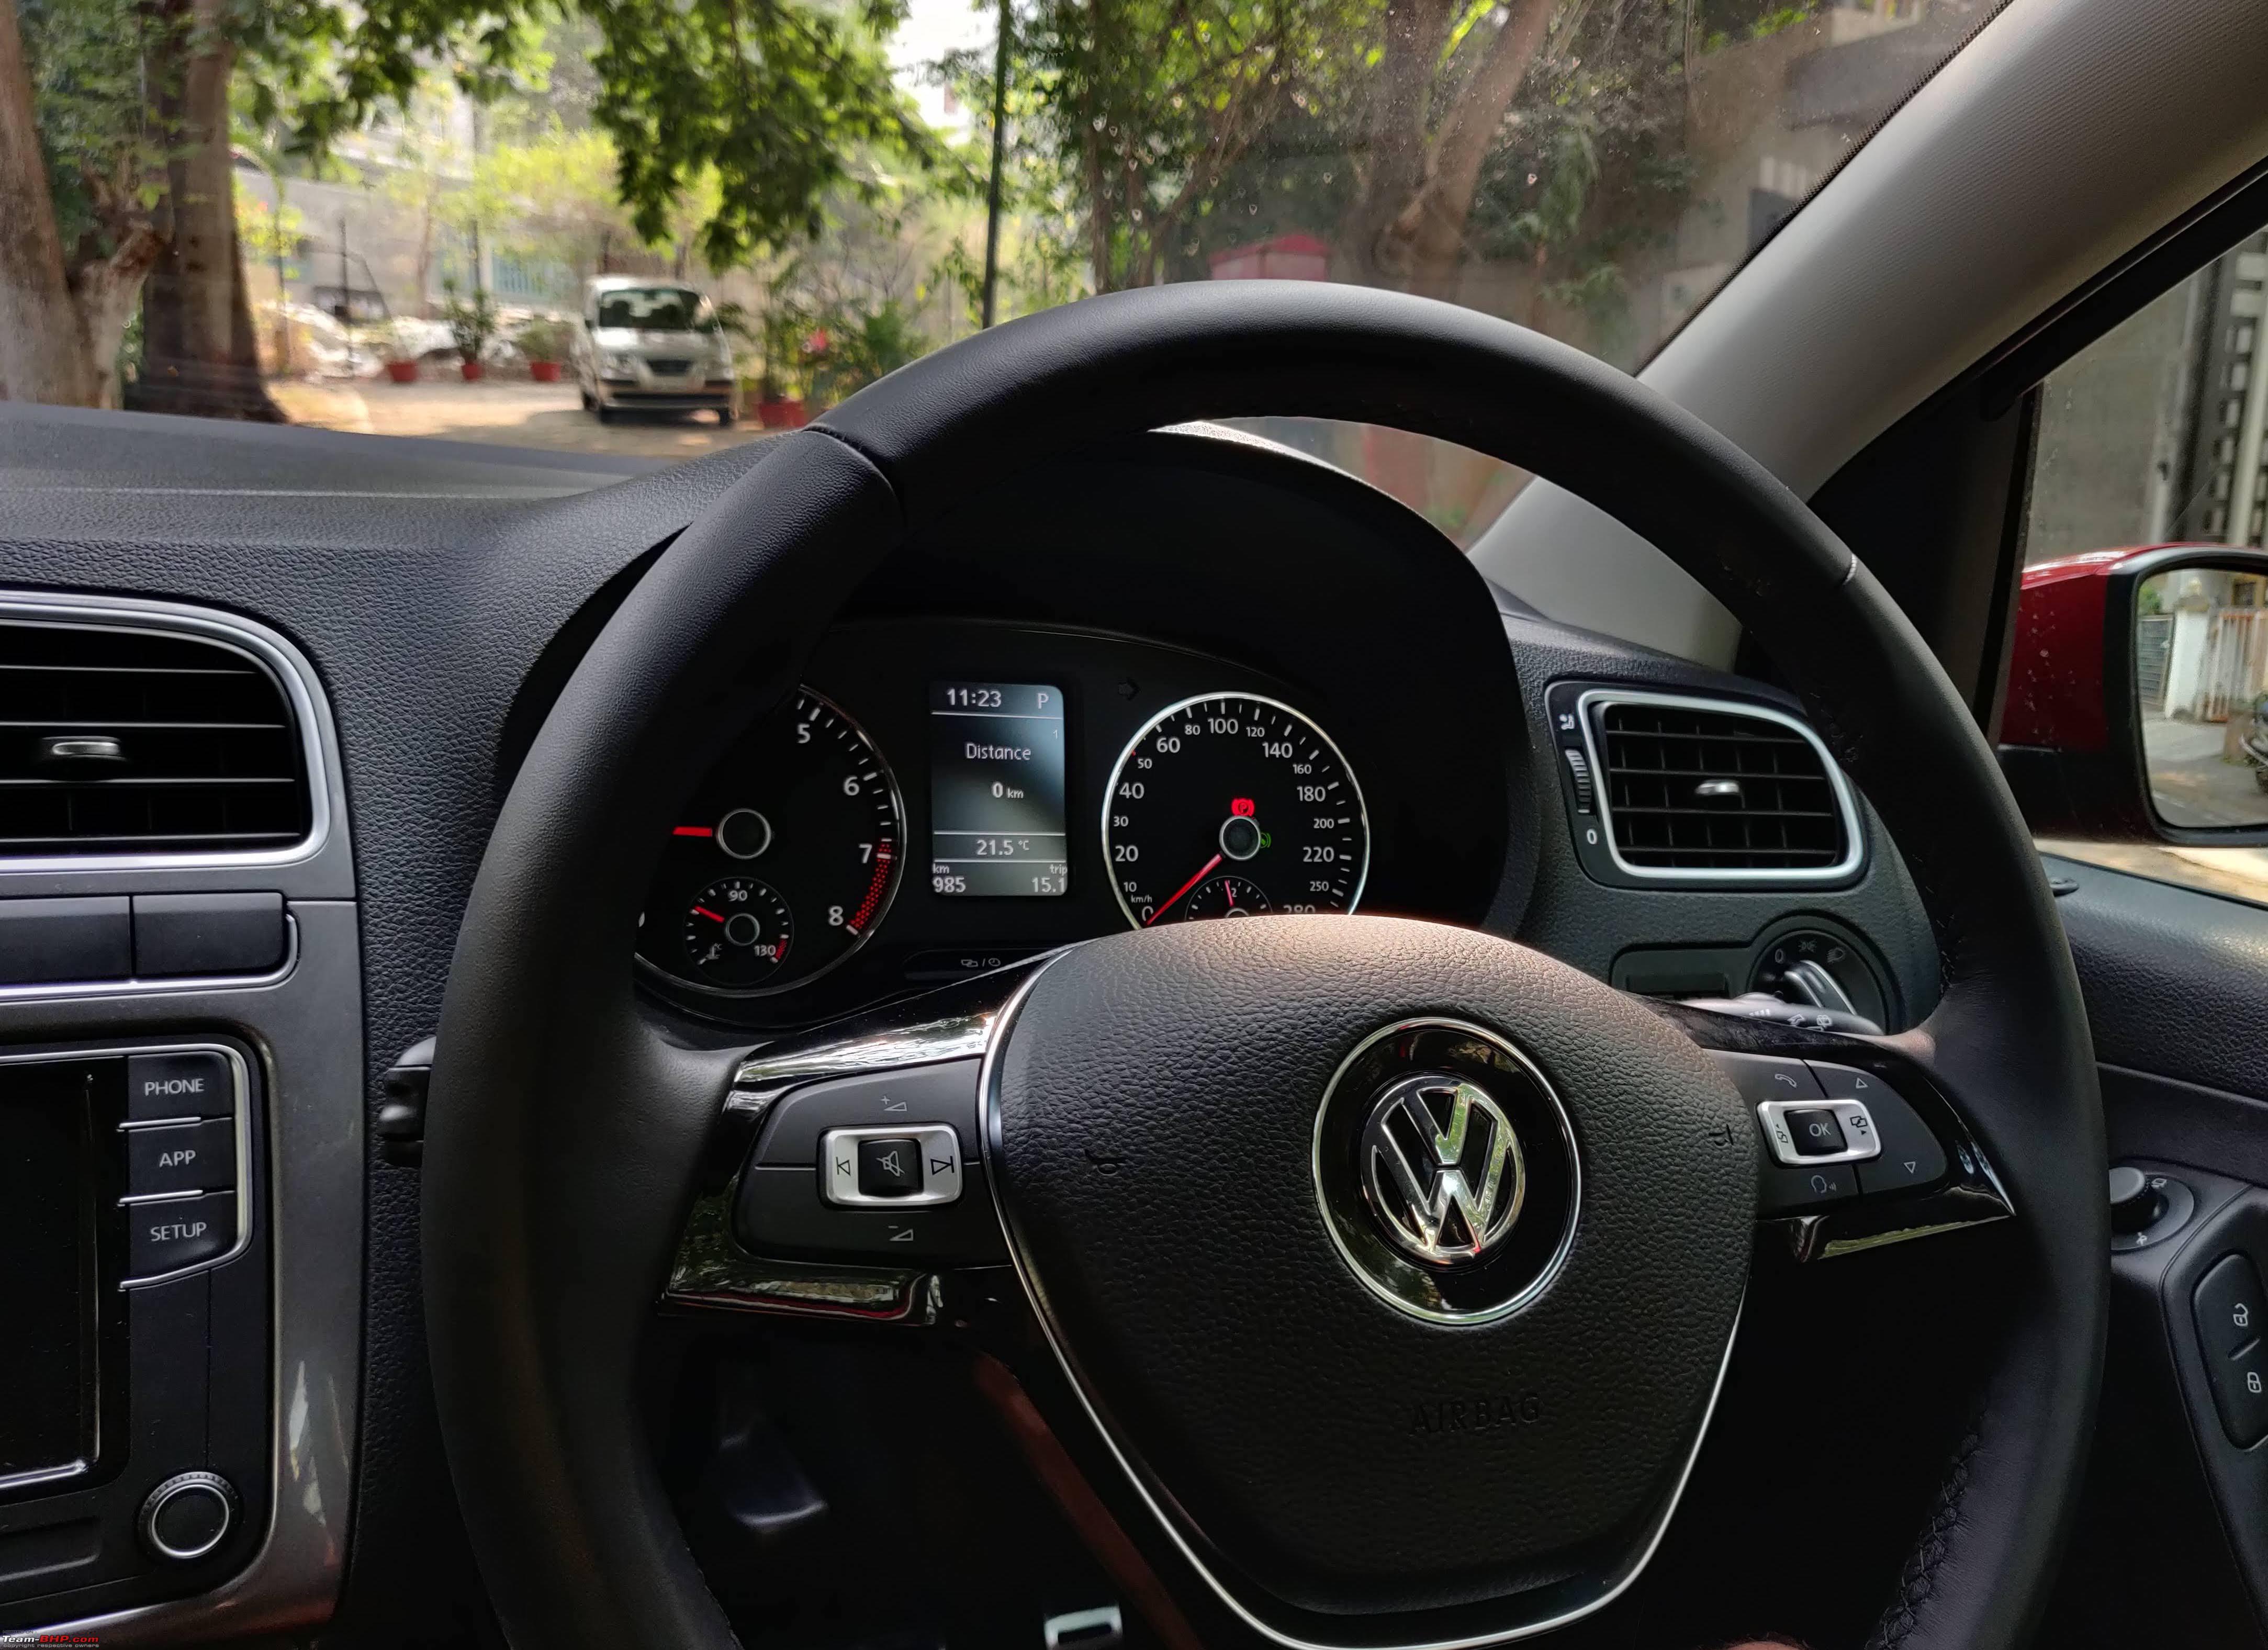 What I Love
 Both of these upgrades were concluded when the car, reached a very special figure, the 1000km mark, in record time, considering our driving pattern. Overall, I truly love the MAXIDOT upgrade and it is worth every penny, if you love driving your car. I feel every Polo TSI deserves it, and its a shame Volkswagen didn't consider it, considering this is the last of the Polos they'll sell here!   On that note, I start 2021, with a mandatory shot at one of my favourite place, The Mechanix Automotive, where the magic happens and there's quite a lot of magic tricks on the way! Wishing everyone a happy new year!  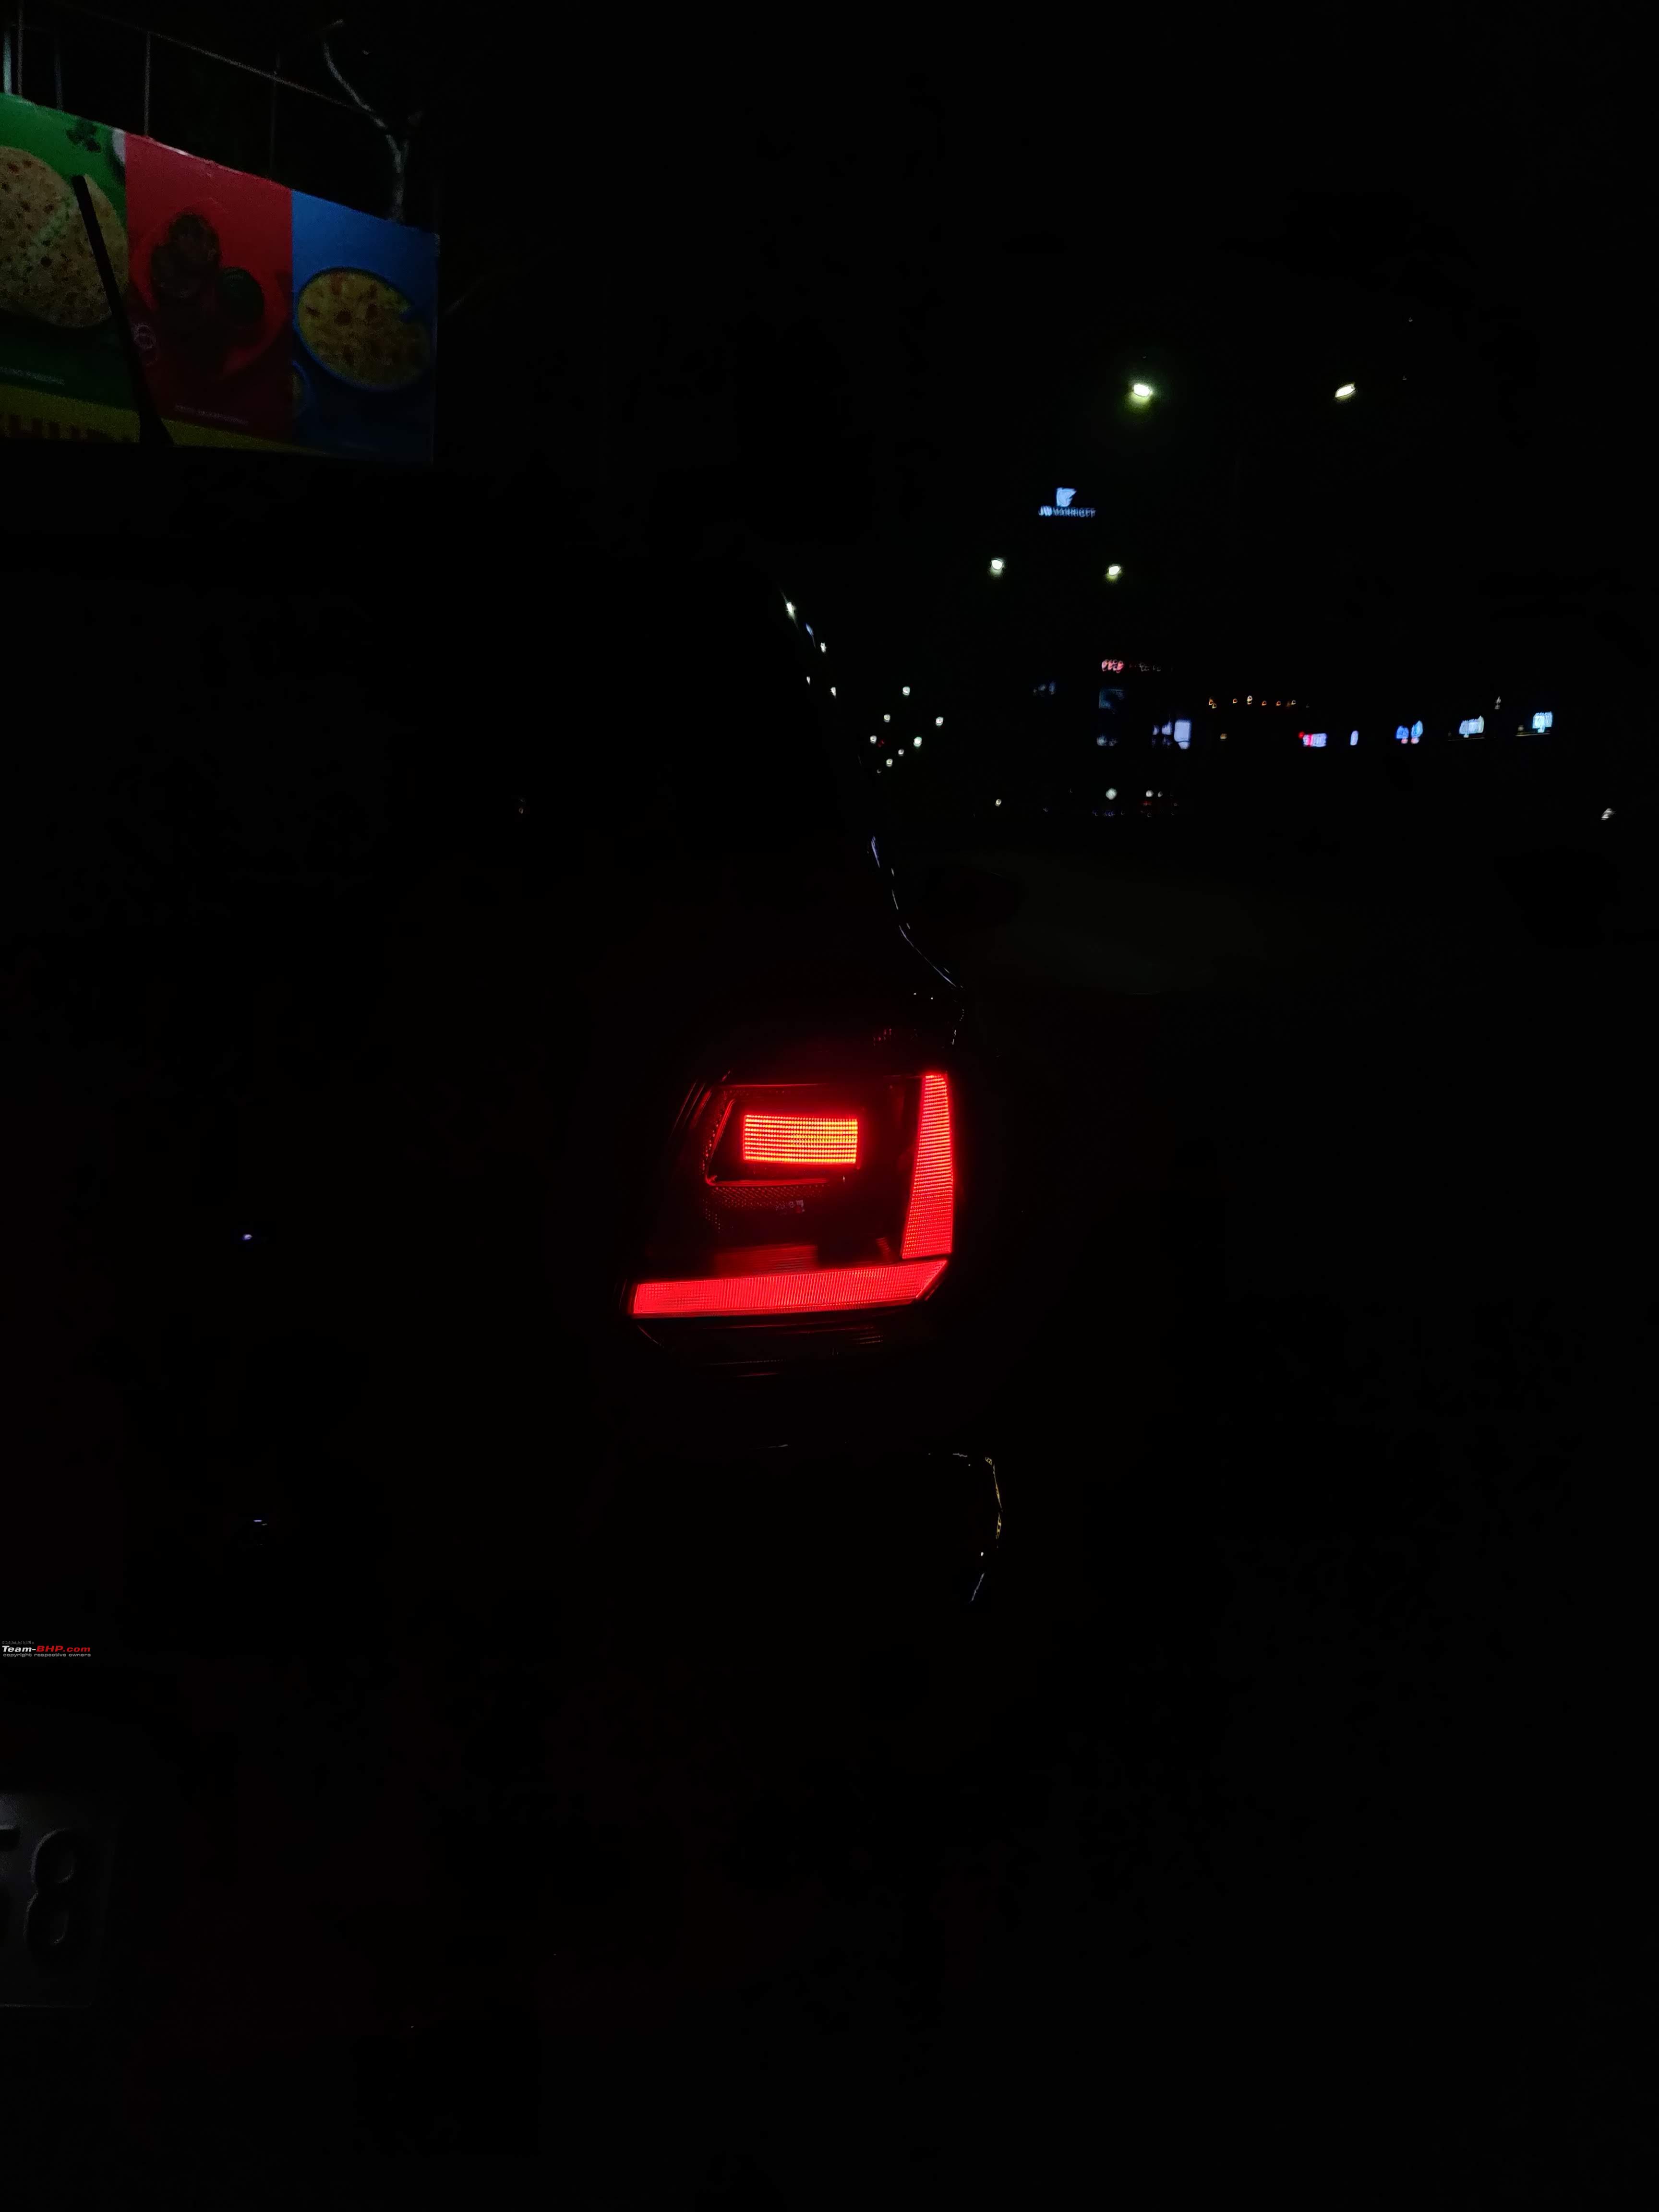 What's Next
Last edited by fluidicjoy : 4th January 2021 at 10:48. Reason: Spello |
|
| (71)
Thanks
|
| The following 71 BHPians Thank fluidicjoy for this useful post: | 2himanshu, Abhinav_2502, adityan27, Akshay2010, amarendernag, arvindmanju, Avikbrio, Big Smoke, car_guy1998, CEF_Beasts, chinmaypillay, Crazy_cars_guy, d3mon, digitalnirvana, Dr.AD, dragntailonfire, DrANTO, DriverNo.420, Endless...., Gaboonviper04, GaryTSI, Gosha, GTO, hdman, Horizon85, iliketurtles, InControl, janakiram_m, Jattitude, jayakumarkp, JithinR, kalyan_hyd, Leoshashi, lionell, manson, McLaren Rulez, neeraj08, neoonwheels, Night_Fury, pmbabu, pvivek2, Rambo-RS, ramnaresh_2000, Researcher, sagwal, saikishor, sainyamk95, sarfraz1997, Sayan, scorpio2107, Sen, somspaple, SS8939, suhaas307, SuhairZain, TheGearBox, TheHelix0202, The_Outsider!, Ultim8, vaish9925, Varun_HexaGuy, Vijay T, VijayAnand1, Vik0728, vishy76, VivekCherian, vredesbyrd, WhiteSierra, Xaos636, yesyeswe, yogiii |
|
4th January 2021, 14:49
| #52 |
| BHPian Join Date: Jun 2020 Location: ???
Posts: 273
Thanked: 576 Times
| Re: Review: Driving home our Sunset Red VW Polo Highline+ TSI Automatic The parking sensors are so flush, they look OEM! And that instrument cluster is a must-have. I believe its the same one that Gannu_1 has installed on his Polo? Looking at the pace of your mods, this thread may well follow in the steps of that one. |
|
| (4)
Thanks
|
| The following 4 BHPians Thank TheGearBox for this useful post: | fluidicjoy, hdman, Rambo-RS, Torque_Curve |
|
6th January 2021, 02:06
| #53 |
| BHPian Join Date: May 2020 Location: BLR | HYD
Posts: 331
Thanked: 506 Times
| Re: Review: Driving home our Sunset Red VW Polo Highline+ TSI Automatic Finally the detailed update i was waiting for! That cluster had me stumped at the start, looks slick. Will consider it as you recommended it, for sure. |
|
| (2)
Thanks
|
| The following 2 BHPians Thank Sen for this useful post: | fluidicjoy, Shreyas |
|
6th January 2021, 09:48
| #54 |
| Senior - BHPian Join Date: Dec 2007 Location: Mysore
Posts: 3,390
Thanked: 5,107 Times
| Re: Review: Driving home our Sunset Red VW Polo Highline+ TSI Automatic I think we've found Gannu's brother from another mother! |
|
| (26)
Thanks
|
| The following 26 BHPians Thank McLaren Rulez for this useful post: | Avikbrio, CEF_Beasts, COMMUTER, Crazy_cars_guy, Crow, digitalnirvana, DrANTO, fluidicjoy, GaryTSI, Govardhansupra, Jattitude, Mahesh Prasad, Researcher, sagwal, saikishor, Sen, Shreyas, suhaas307, TheHelix0202, The_Outsider!, Torque_Curve, Ultim8, VWAllstar, WhiteSierra, yesyeswe, yogiii |
|
6th January 2021, 18:33
| #55 |
| BHPian | Re: Review: Driving home our Sunset Red VW Polo Highline+ TSI Automatic WoW!! Amazingly neat mods. Would be great if you share the breakup of costs involved. Thanks in advance. |

| ()
Thanks
|
|
6th January 2021, 18:55
| #56 | |
| BHPian | Re: Polo Highline+ TSI Upgraded with Maxidot Cluster, 8K OPS and More! Quote:
Also, would you mind sharing from where you sourced the parts, thanks in advance. Last edited by CarBot : 6th January 2021 at 18:59. | |
|
| (3)
Thanks
|
| The following 3 BHPians Thank CarBot for this useful post: | adityan27, Sen, yogiii |
| |
|
6th January 2021, 23:34
| #57 | |
| Senior - BHPian | Re: Polo Highline+ TSI Upgraded with Maxidot Cluster, 8K OPS and More! The maxidot is really nice. I am considering the same for my Rapid as well. What is the cost like ? Quote:
| |
|
| (4)
Thanks
|
| The following 4 BHPians Thank Altocumulus for this useful post: | CarBot, fluidicjoy, InControl, Sen |
|
7th January 2021, 09:42
| #58 | |||||
| BHPian Join Date: Oct 2020 Location: Pune, San Diego
Posts: 247
Thanked: 2,446 Times
| Re: Polo Highline+ TSI Upgraded with Maxidot Cluster, 8K OPS and More! Quote:
Quote:
Quote:
Quote:
Quote:
Last edited by fluidicjoy : 7th January 2021 at 09:44. | |||||
|
| (8)
Thanks
|
| The following 8 BHPians Thank fluidicjoy for this useful post: | adityan27, CarBot, dragntailonfire, Gaboonviper04, gauravanekar, jithin23, sagwal, yogiii |
|
7th January 2021, 10:58
| #59 |
| Newbie Join Date: Dec 2018 Location: Siliguri
Posts: 13
Thanked: 14 Times
| Re: Review: Driving home our Sunset Red VW Polo Highline+ TSI Automatic Nice detailed update. The finishing is really well. Always scared to do any extra modification in my polo (thinking it might break my warranty). I need to plan for my polo too. Happy Motoring ! |
|
| (1)
Thanks
|
| The following BHPian Thanks sanky for this useful post: | fluidicjoy |
|
8th January 2021, 00:21
| #60 |
| BHPian Join Date: Oct 2020 Location: Pune, San Diego
Posts: 247
Thanked: 2,446 Times
| Genuine LED License Plate Lights Upgrade I don't know why, but I've always been fascinated by Cool White Light which has commonly been characteristic of a Premium car. Sadly, the Polo is devoid of Cool Light treatment, both inside and outside, but somehow I don't mind the warm lights on the inside. I had read about Genuine LED Lights from Gannu's iconic thread but I had subconsciously forgotten about it.  I ended up ordering a pair of Genuine LED Lights from Aliexpress and while placing the order, I had no idea that I'd be receiving a Volkswagen branded Genuine Light. Perhaps due to copyright reasons, sellers photoshop or refrain from posting product photos on their listings. These are the Stock Halogen License Plate Bulbs, which do offer a fair amount of brightness.  Advantages
Disadvantages
How To Change The Assembly Just head to your vehicle and observe a small clip on the License Plate Light. The clip has to be gently pushed and the License Plate light swings downwards. Then, the Light connector needs to be disconnected and the new light has to be plugged in. Sounds and truly is super simple! There are quite a lot of videos on YouTube if you struggle with removing of the Volkswagen D-Type connector (hoping that's what its called). But the basic idea that has consistently worked for me, is to push the connector ahead a tiny bit and then pressing the locking tab down and then pulling the connector off. This is what the lights look like now! 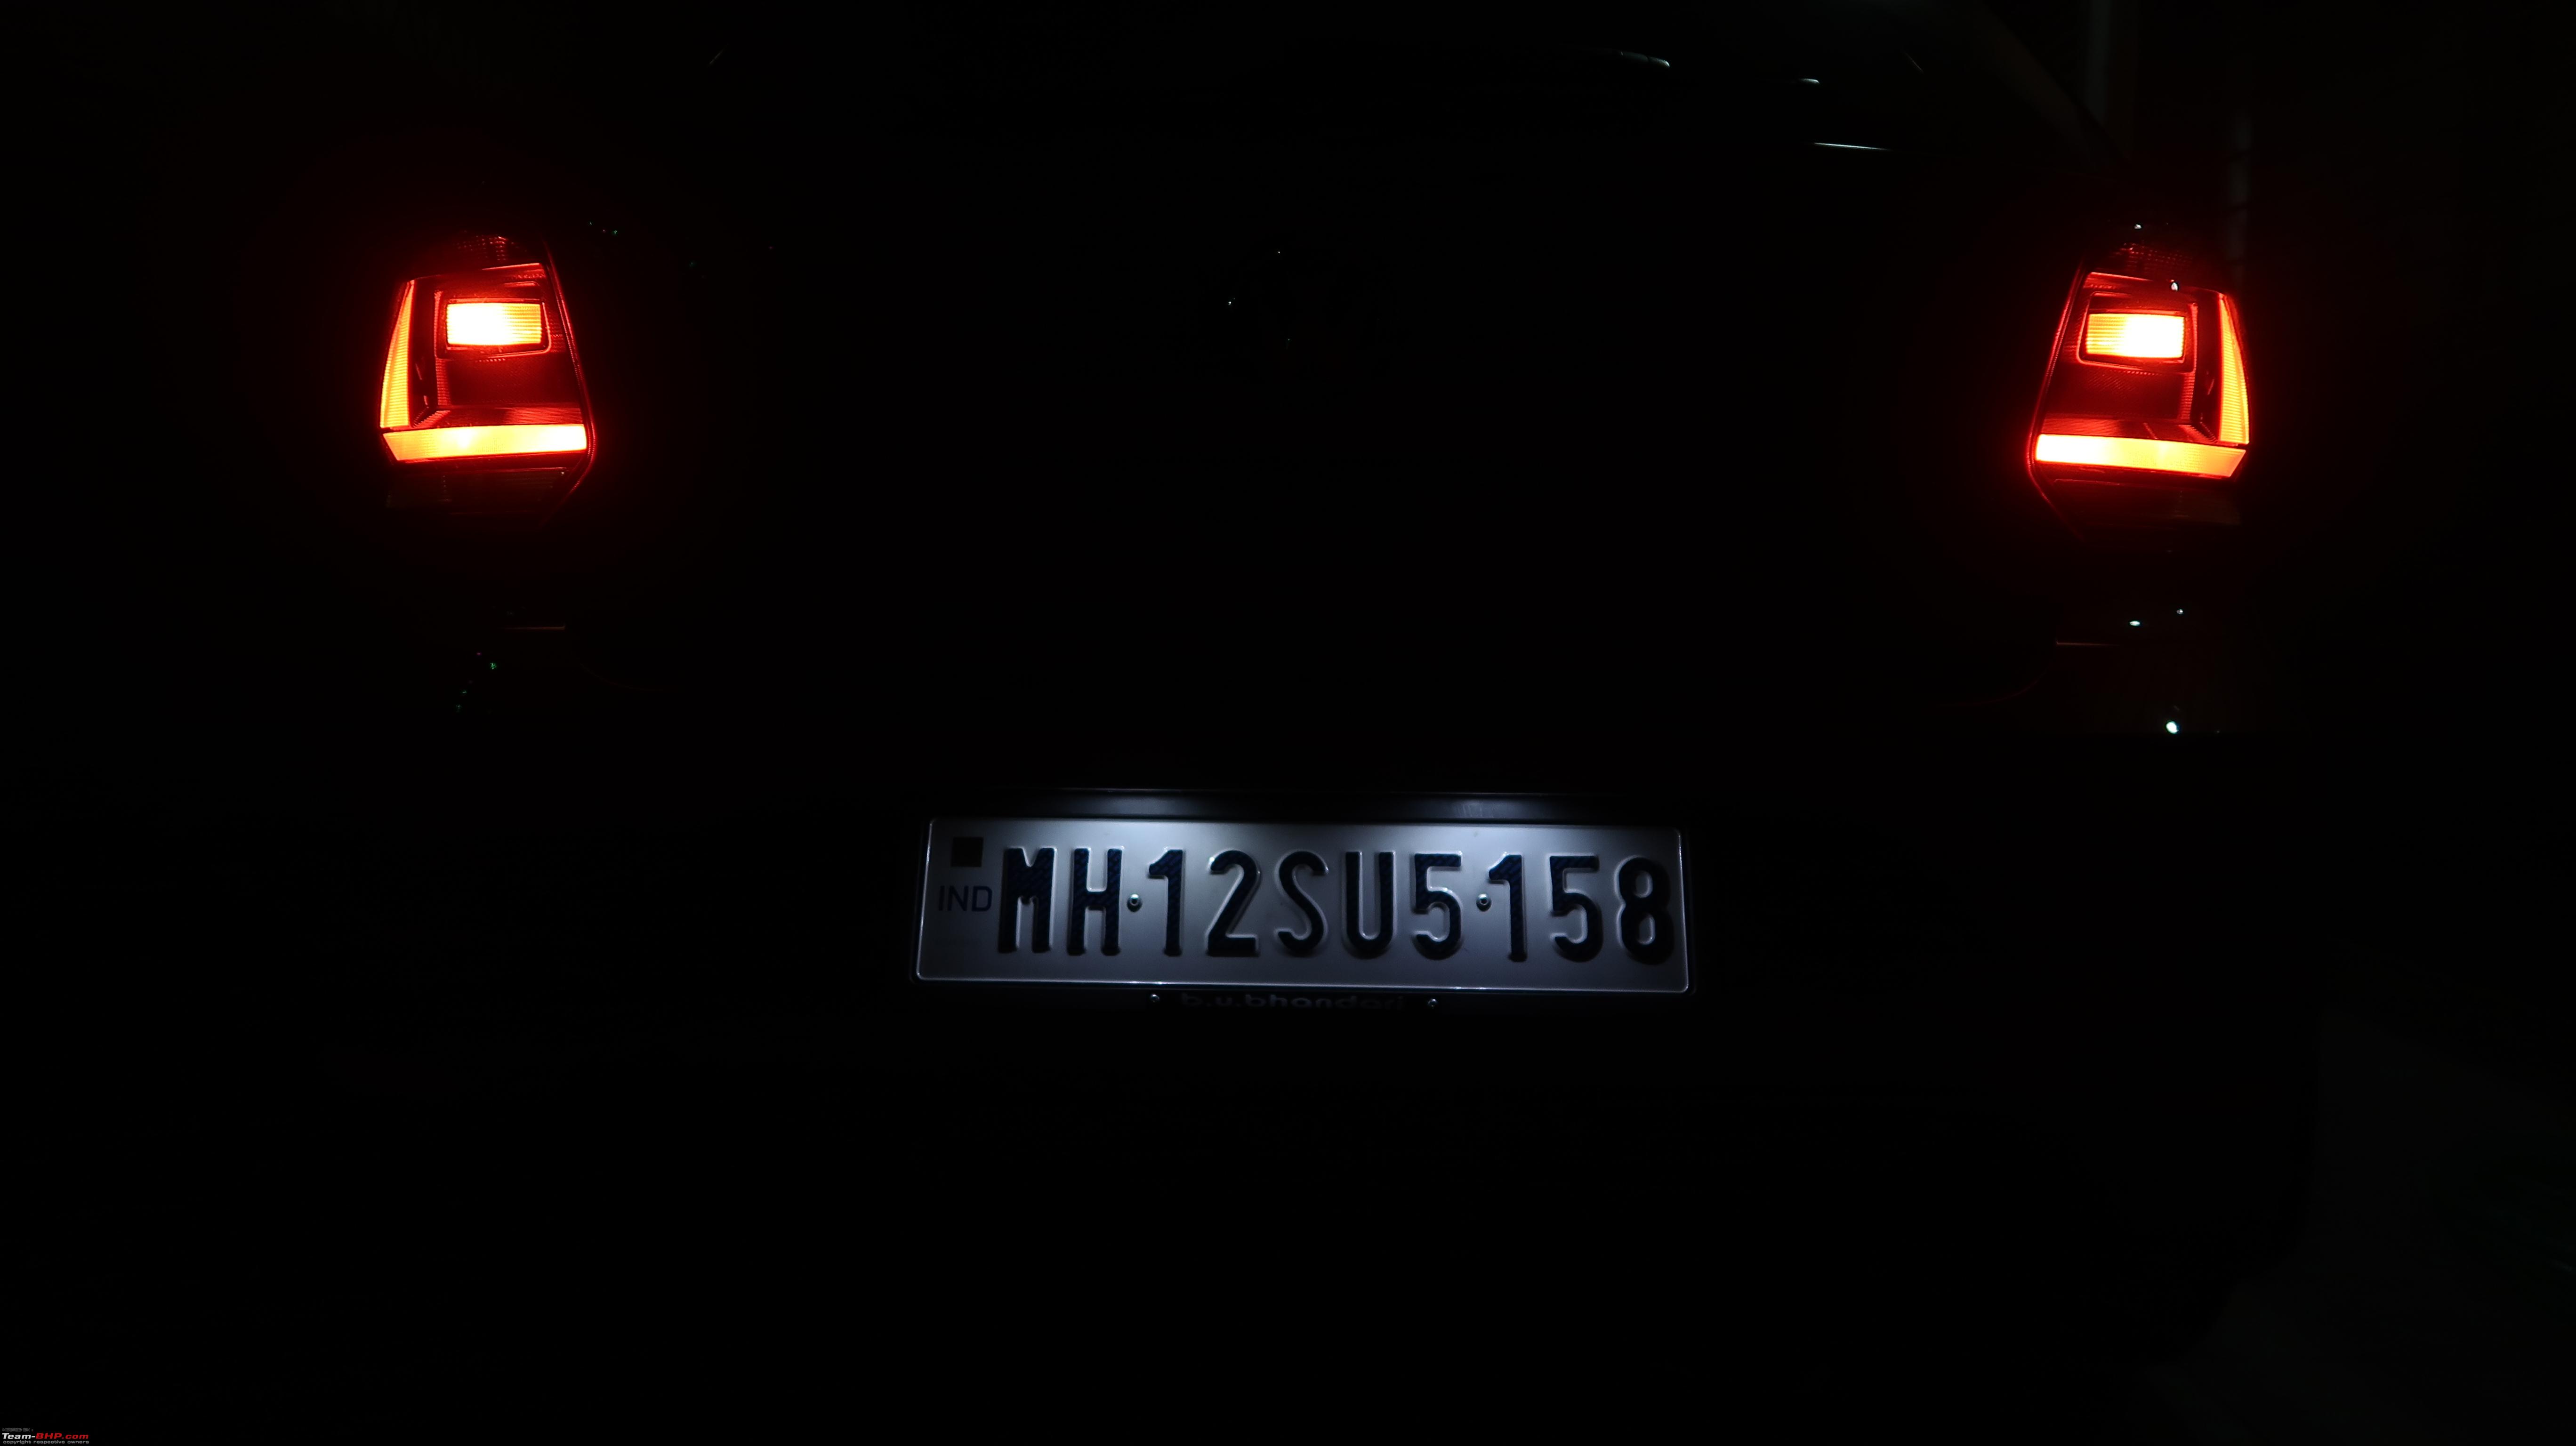 And here is a look at both of the lights simultaneously on the vehicle. I have ensured the same ISO and Optical Settings on the camera to ensure a fair representation.  Another Approach If you do not wish to invest in a Genuine Pair of Lights, you can simply remove the Bulb from the Halogen Holder and replace it with an LED Bulb. The stock bulb is a W5W Bulb. However, replacing the bulb does not change the housing, which was designed with a Halogen Bulb in mind. Considering this is merely a License Plate light, the performance drop should not be too much if you tread this way, but the diffusion pattern of the Genuine Bulb is really pleasing to the eyes. Why No CANBUS Enabled Lights Needed? As per VCDS scans and some playing around in coding, the Lamp Diagnostics for quite a number of lamps was turned OFF on the stock Highline BCM (087S). Typically, when we switch to an LED from a halogen bulb, the power consumption of the circuit reduces because that's how LEDs are, running on lower power and emitting a higher luminance. But since the vehicle is not coded to detect this drop in the circuit, there should be no errors. The fact that these are Genuine LED Lights is another reason to not expect any errors. Quick Cues
I have compiled a small video where I drive the vehicle with both the set of license plate lights and even compare the two light assemblies. Do have a look. Look out for the Maxidot Cluster at the start and the beginning!  Last edited by fluidicjoy : 8th January 2021 at 00:24. |
|
| (7)
Thanks
|
| The following 7 BHPians Thank fluidicjoy for this useful post: | CarBot, CEF_Beasts, Gaboonviper04, manson, McLaren Rulez, Researcher, yogiii |
|