| |||||||

| Search Forums |
| Advanced Search |
| Go to Page... |
 |
| Search this Thread |  263,127 views |
 3rd April 2022, 14:49
| #121 | |
| BANNED Join Date: Jan 2014 Location: New Delhi
Posts: 505
Thanked: 562 Times
| Re: Review: Driving home our Sunset Red VW Polo Highline+ TSI Automatic Quote:
I live in Delhi. Most polluted. Both air and cabin filters dont last 15k. Cleaning degrades performance. Better to not clean and use it for 1 year rather than cleaning it. False sense of security with cleaning | |

|  ()
Thanks ()
Thanks
 |

| |
|
4th April 2022, 02:12
| #122 | |
| BANNED Join Date: Jan 2014 Location: New Delhi
Posts: 505
Thanked: 562 Times
| Re: Review: Driving home our Sunset Red VW Polo Highline+ TSI Automatic Quote:
Cabin filter I do much more often because it is a simple DIY and i buy stock of filters from dealership. The dealership charges so much for labor yet has put in cabin filter in reverse direction twice in both my cars. Now i instruct them specifically to not change or clean cabin filter, and provide new one in box to me. Works for me. Incompetent in many ways, yet I’d say less worse of the lot because they got my gearbox changed for free | |
|
| (1)
Thanks
|
| The following BHPian Thanks H_Dogg72 for this useful post: | sarfraz1997 |
|
15th January 2023, 05:49
| #123 |
| BHPian Join Date: Oct 2020 Location: Pune, San Diego
Posts: 247
Thanked: 2,440 Times
| Polo 6R Improved Hazard Warning Triangle Kit The stock hazard warning kit in the Polo 6R is built well, but slightly on the bulkier side and can take up some space in the boot. Many Polo owners worldwide have upgraded to a slightly more premium hazard warning triangle kit. 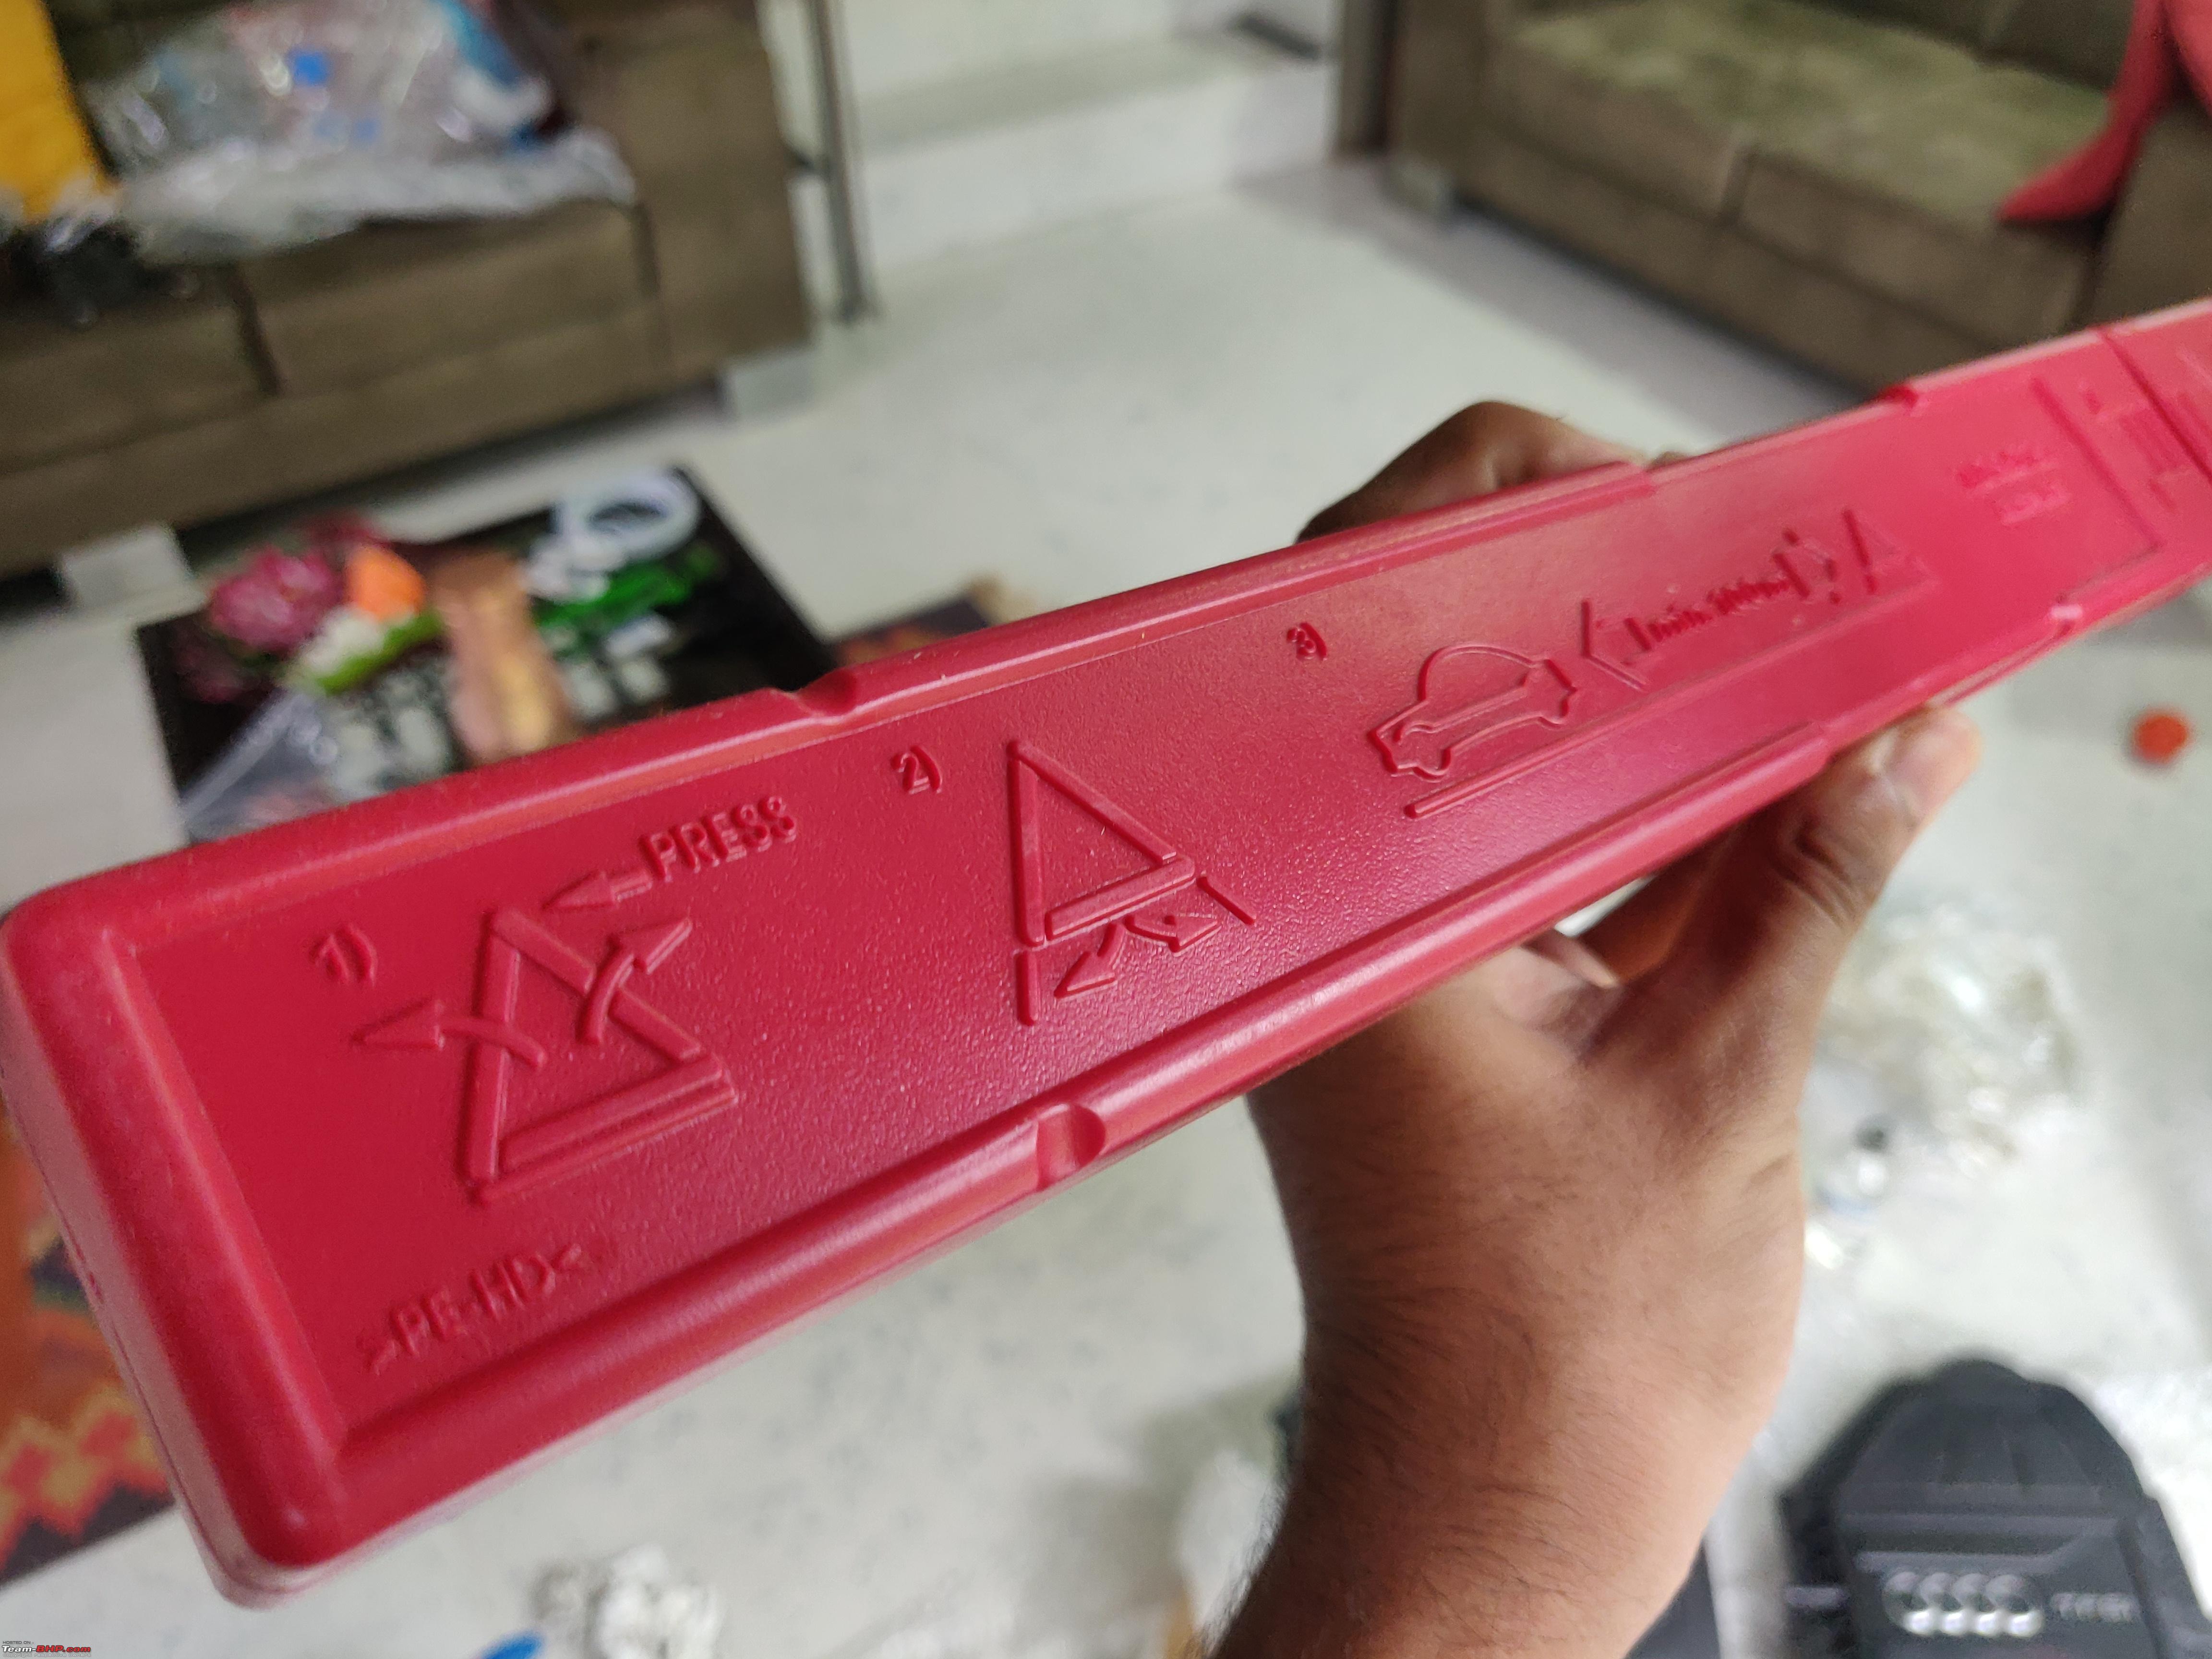 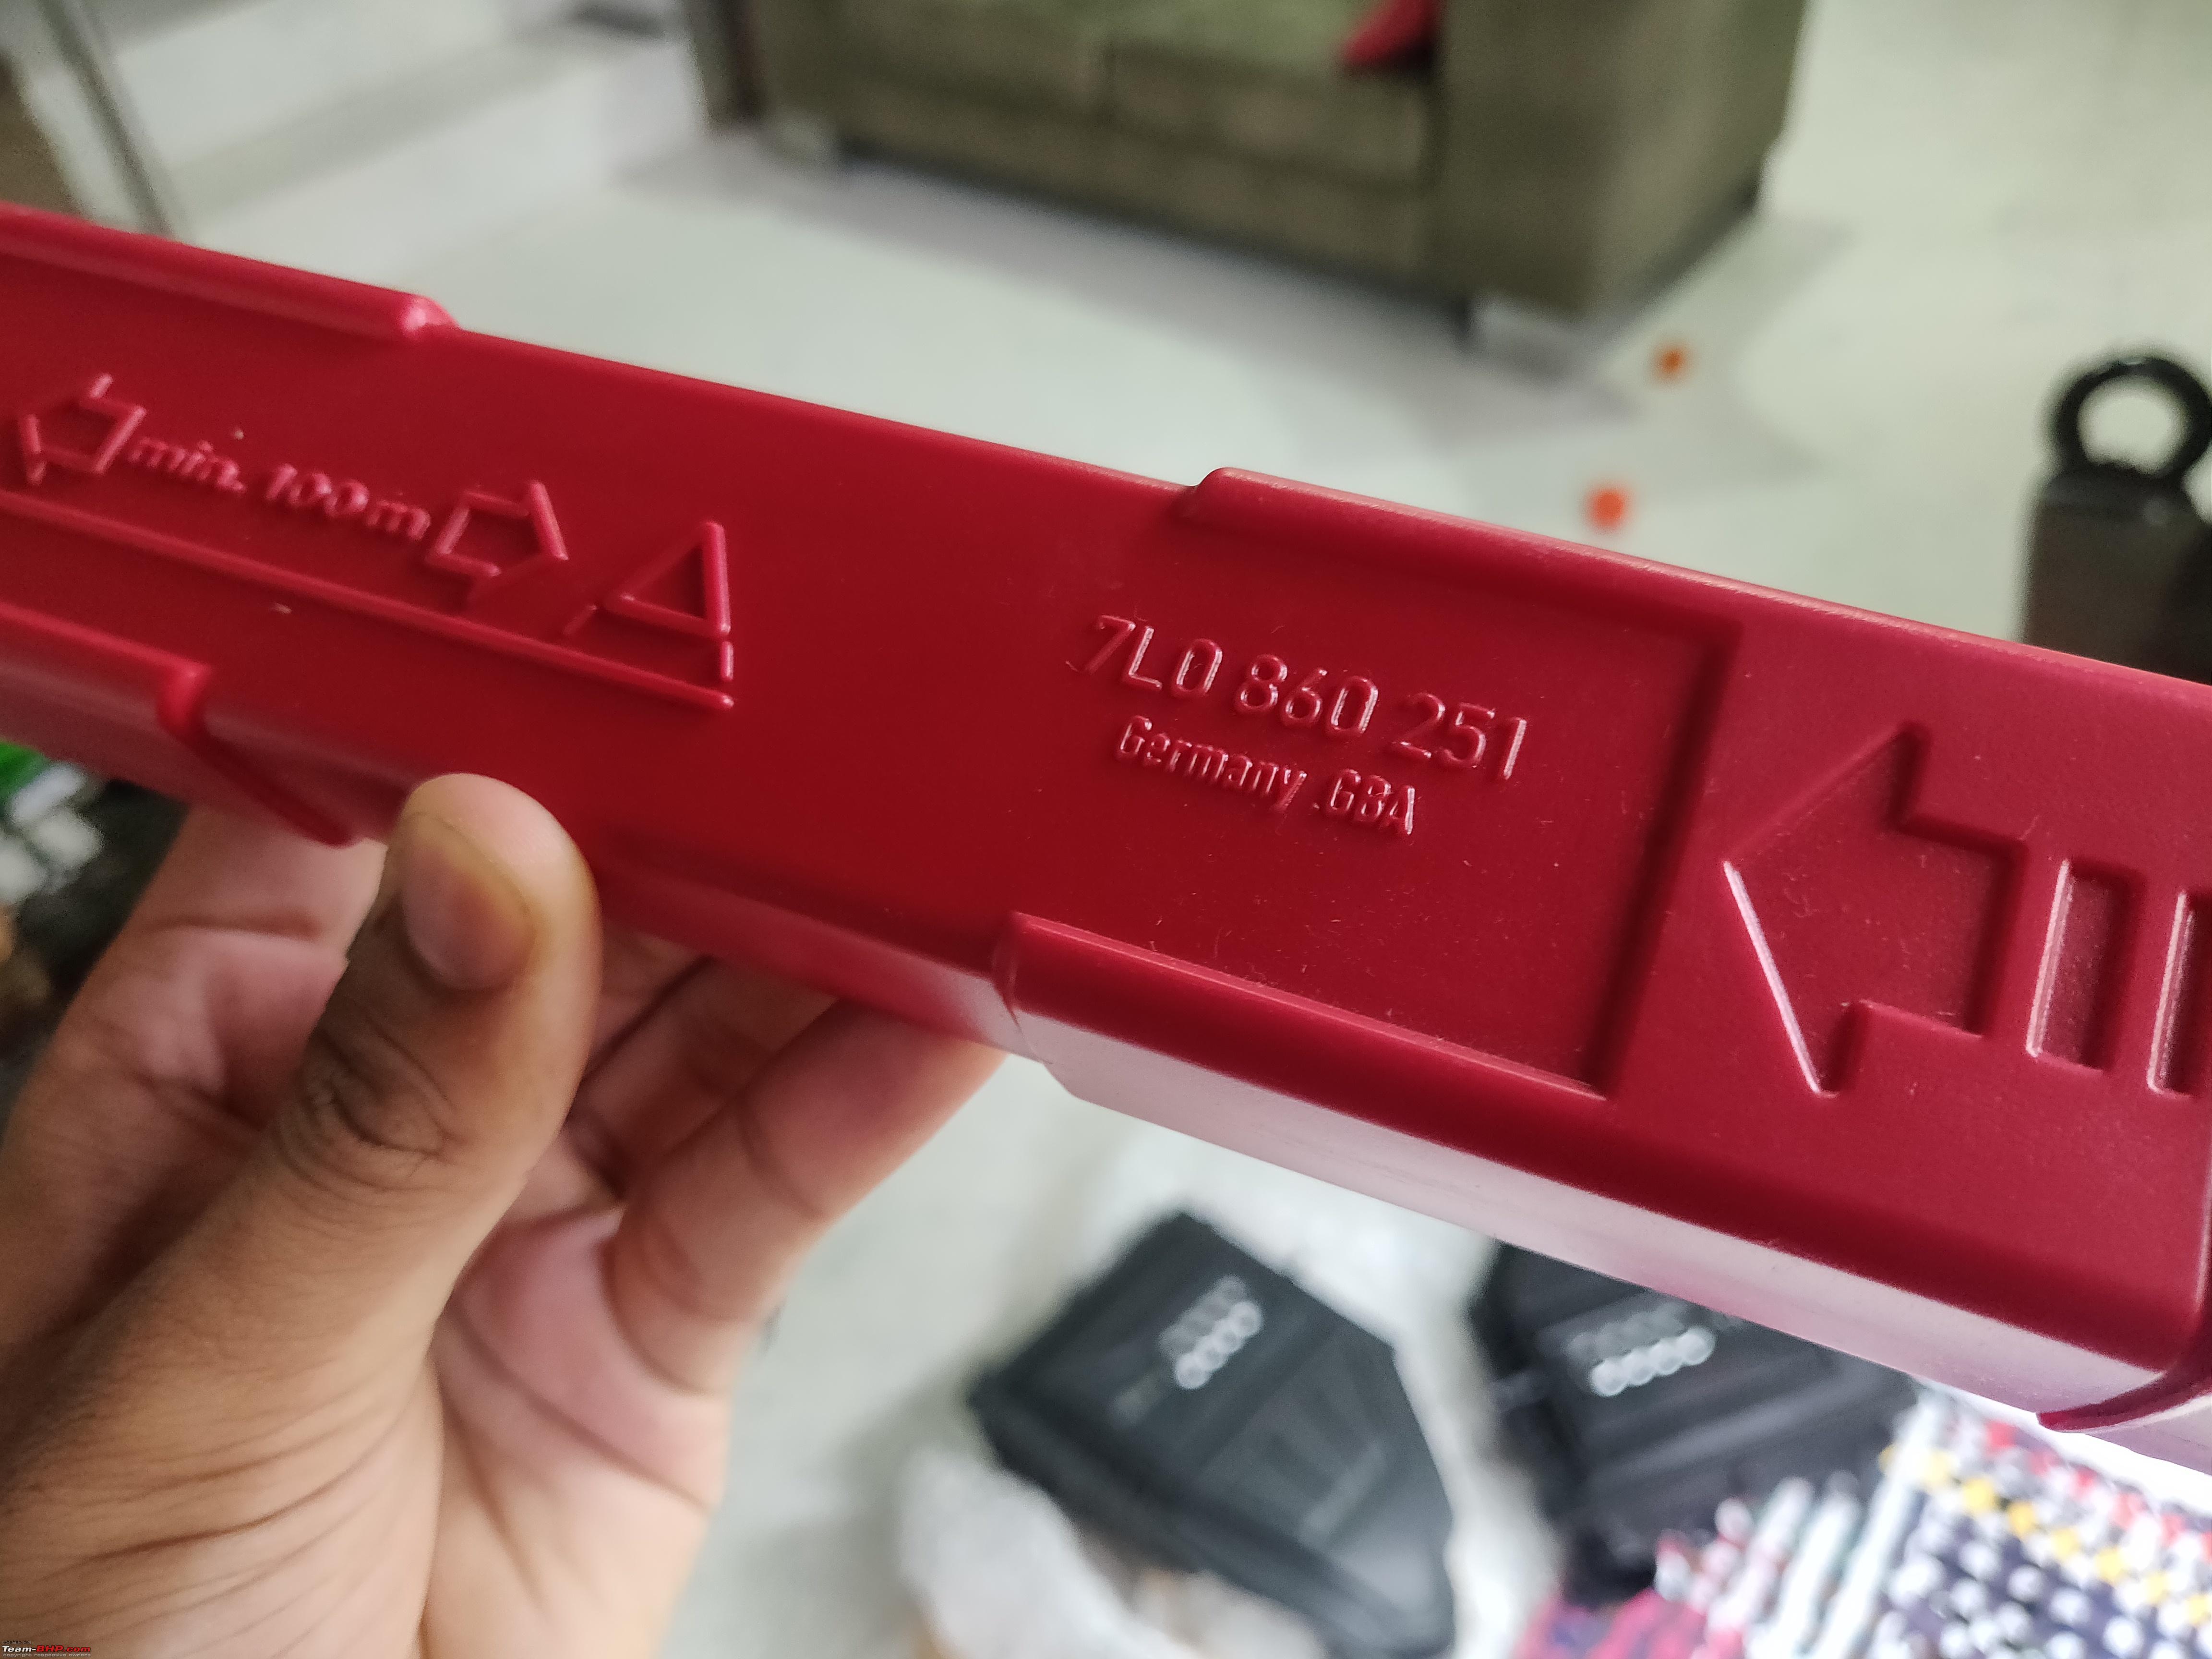 This kit also has inscribed instructions on usage and optimal placement distance on it, which is another neat touch.  The part number is 7L0 860 251 but there might be many more part numbers and kits from the VAG group which may fit equally well on the Polo. I picked this for about $10 and it has been a nice touch, ready for the rare occasion when it would need to be taken out to make other vehicles aware that my car might be stranded on a road.   As per a friend of mine, Volkswagen did offer this kit on earlier Polos sold in India, and later they moved to the Indian spec of the Hazard warning triangle. Here is a very useful video by Gannu which shows both of these hazard warning triangle kits in the flesh. |
|
| (5)
Thanks
|
| The following 5 BHPians Thank fluidicjoy for this useful post: | MayurS, sarfraz1997, Varun_HexaGuy, vedirah, VivekCherian |
|
15th January 2023, 13:42
| #124 |
| BHPian Join Date: Oct 2020 Location: Pune, San Diego
Posts: 247
Thanked: 2,440 Times
| Polo 6R OEM A-Pillar with Tweeters, Updating Station Logos I like the stock speakers on the Polo 6R and they've been quite a good set for the occasional music that we play in our car. The RCD340 is a gem of a radio, and is a good balance of features and sound quality. If you've invested in a better aftermarket head-unit or even an OEM unit like Composition Media or Discover Media, then the sound output and processing can be even better with upgraded internals. I didn't want to spend too much on a dedicated speaker set, but thought it'd be a good idea to improve the Trebles with a Tweeter setup. The Polo GTI comes with A-pillars and tweeters and European cars also came with an option of Tweeters in the A-pillars.  So, it is quite simple to install them, all we need to do is remove the stock A-pillars and replace them with the A-pillars with tweeters. I have some pictures from my A-pillar removal when I removed them to route the microphone and add some foam, and they can be found somewhere on my thread.  Here's a few images of the OEM A-pillars with tweeters. Some of these might be made in Spain, and as always, there will always be some from the Chinese market, but the plastic quality of both of them is neck to neck. You can get these in a couple of different colours like beige, black, but I've found the Grey to be most common on online sites. 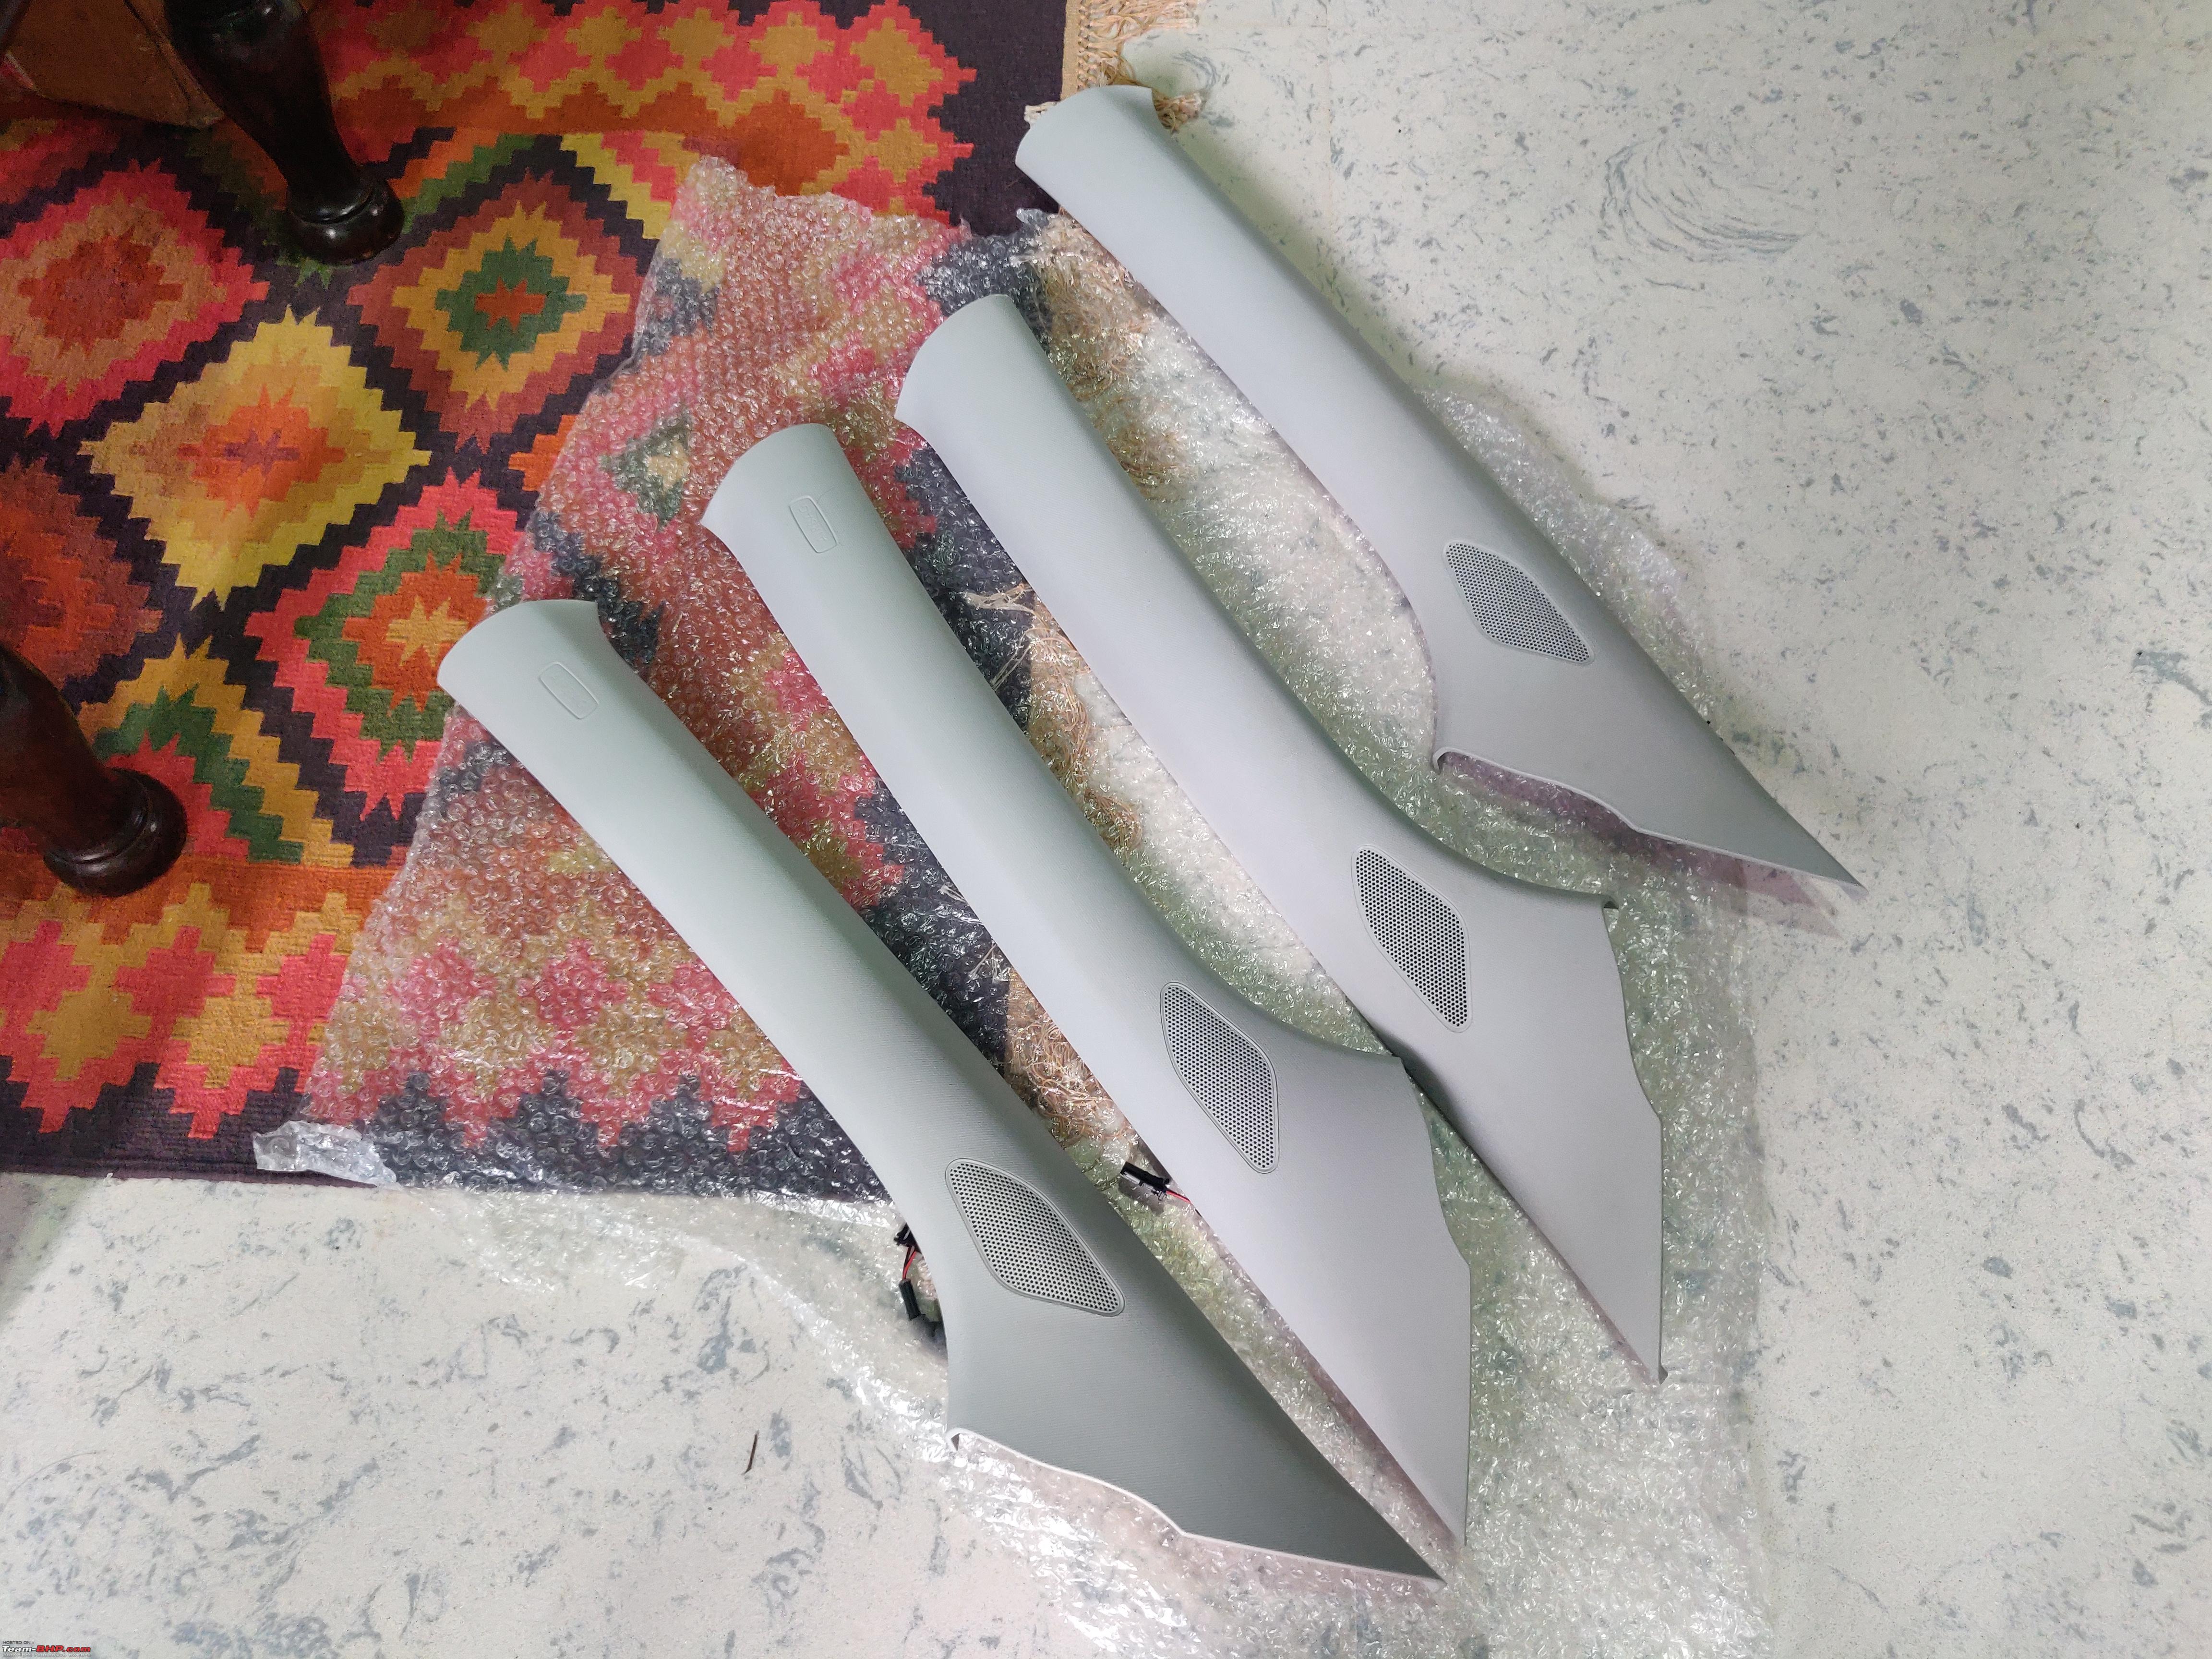 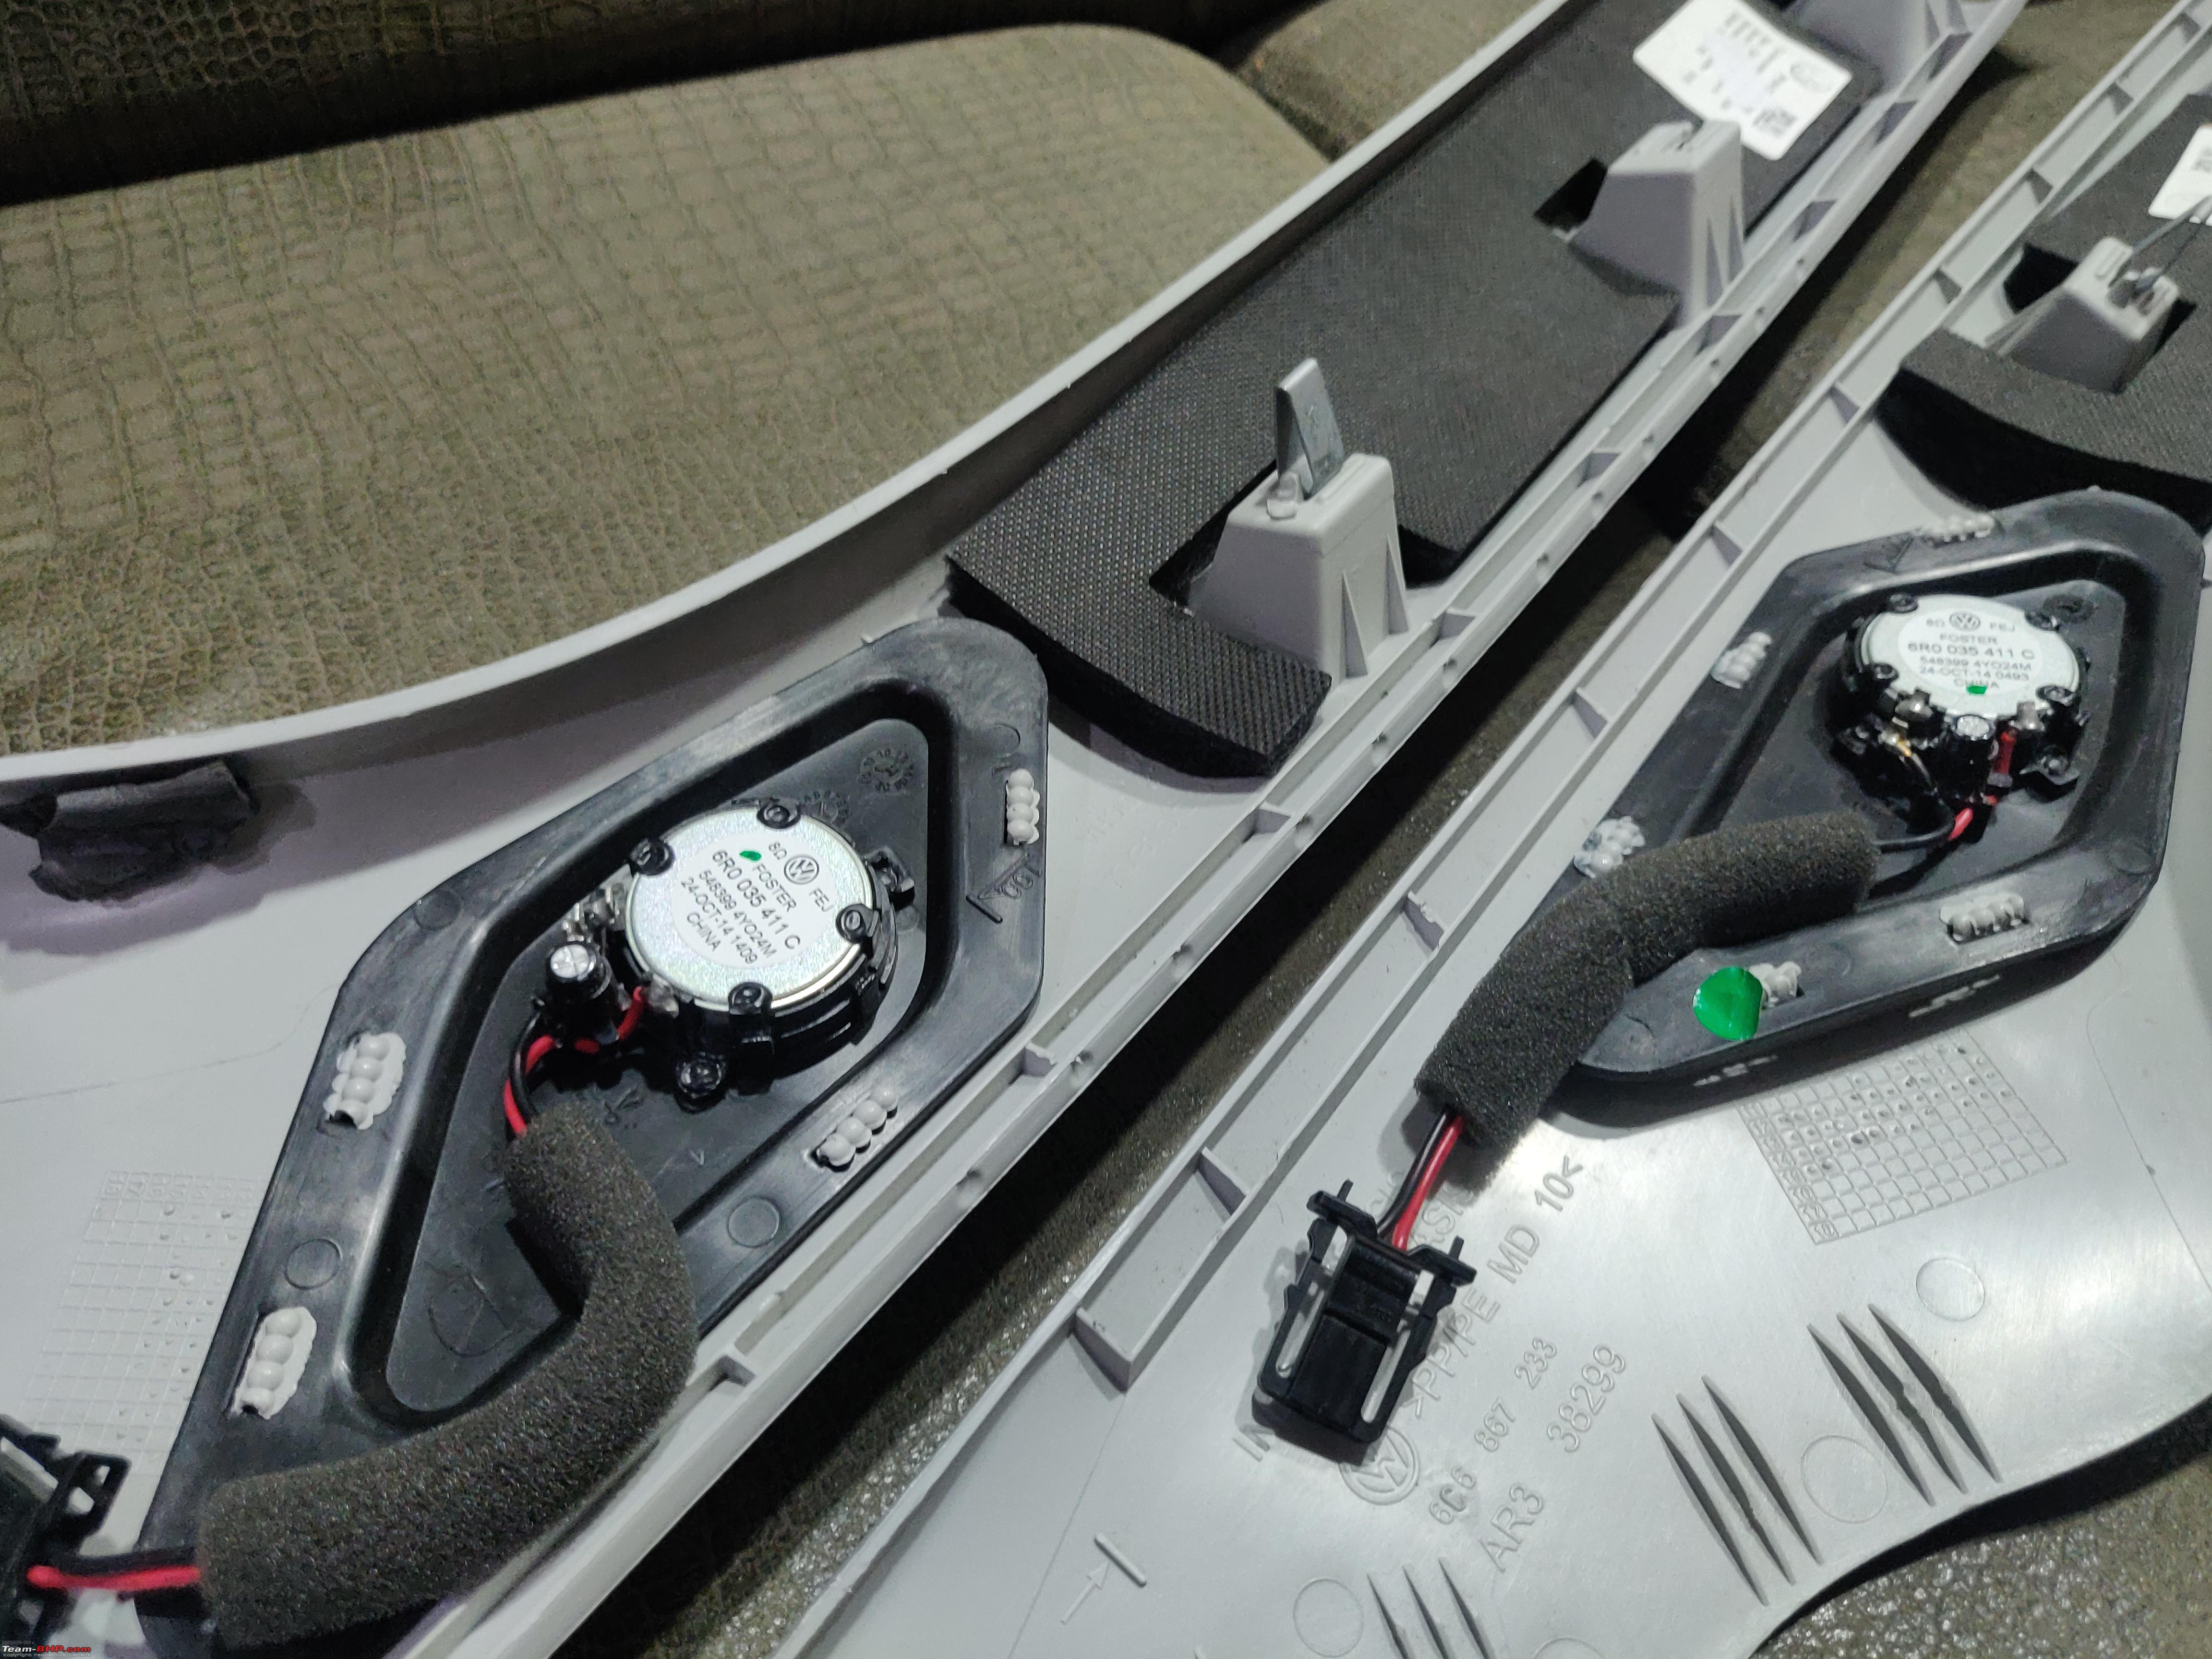 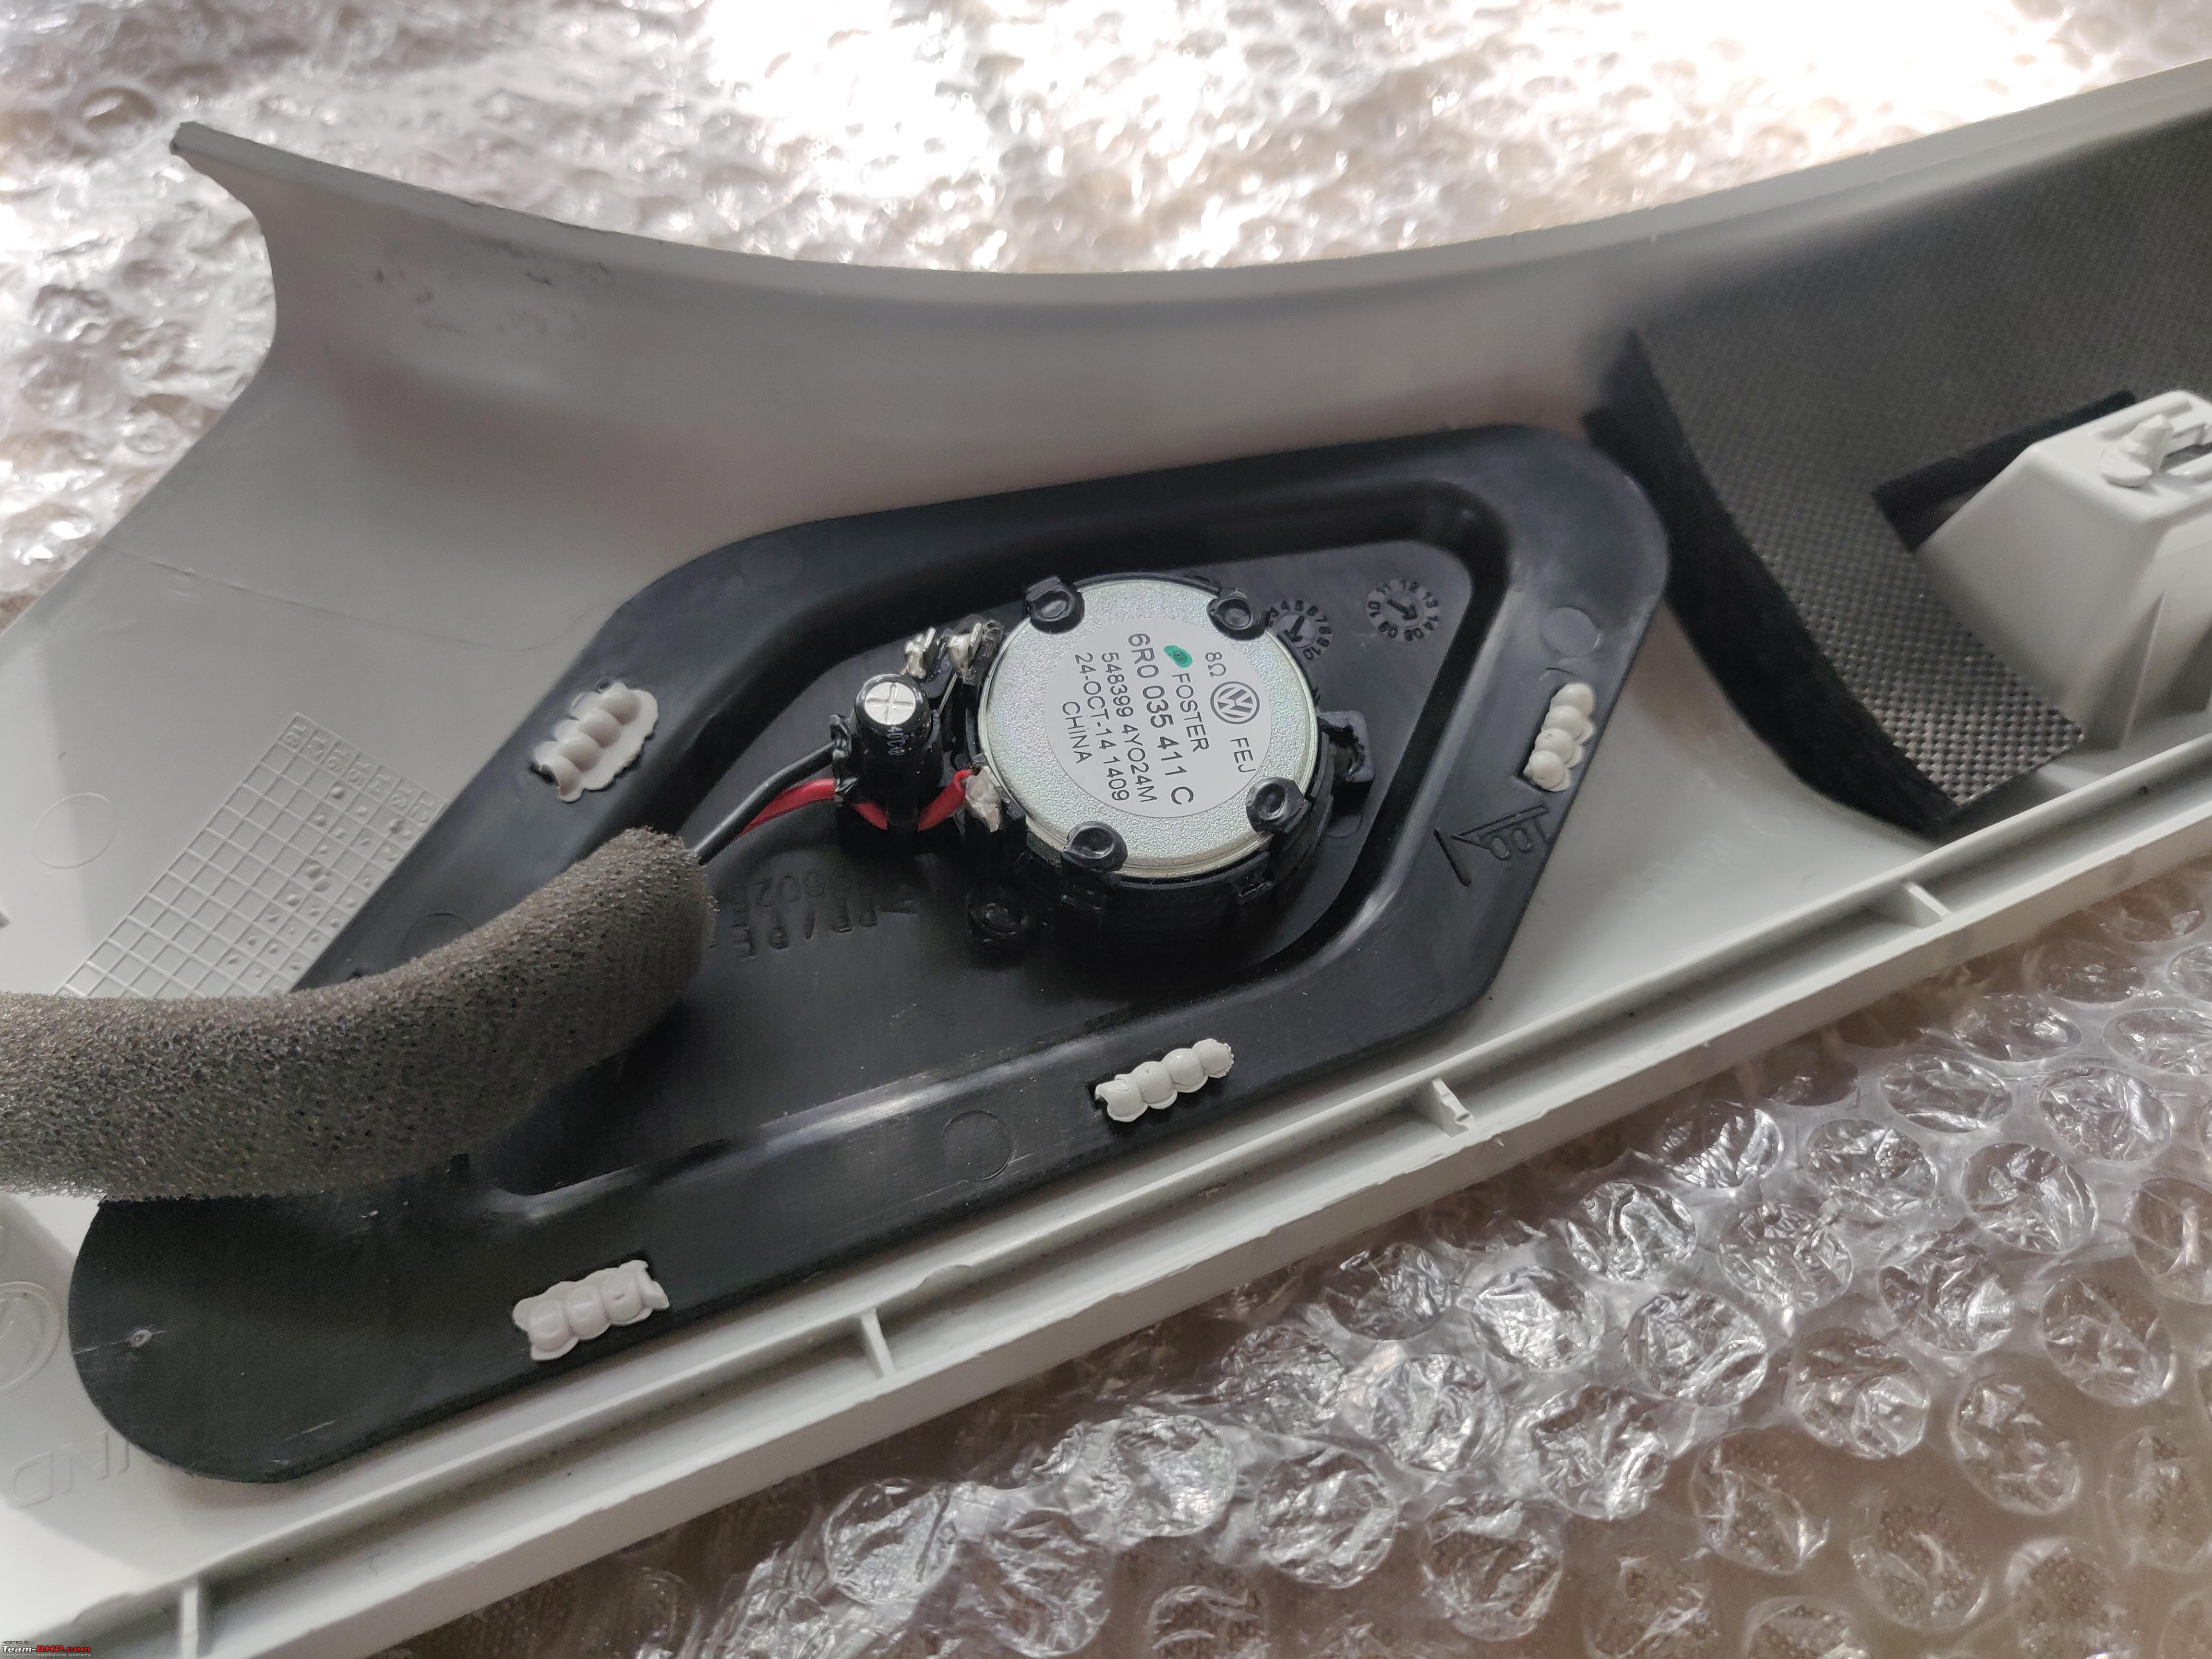 Wiring The new tweeters need to be connected in parallel to the corresponding speaker. Audio-shops will be able to tap very easily to the existing speaker wires in either the door connectors, or even on the quad lock connector behind the radio unit, depending on where they are most comfortable. Within the RCD330/RCD340 quad lock, the light-brown sub-block holds the wires to the speakers. The middle two rows correspond to the Front Speakers (Front Left and Front Right) and naturally has a + and - terminal. The brown speaker block is held in place by small plastic tab. For better access to the wires, this can be slid out from the primary quad lock. 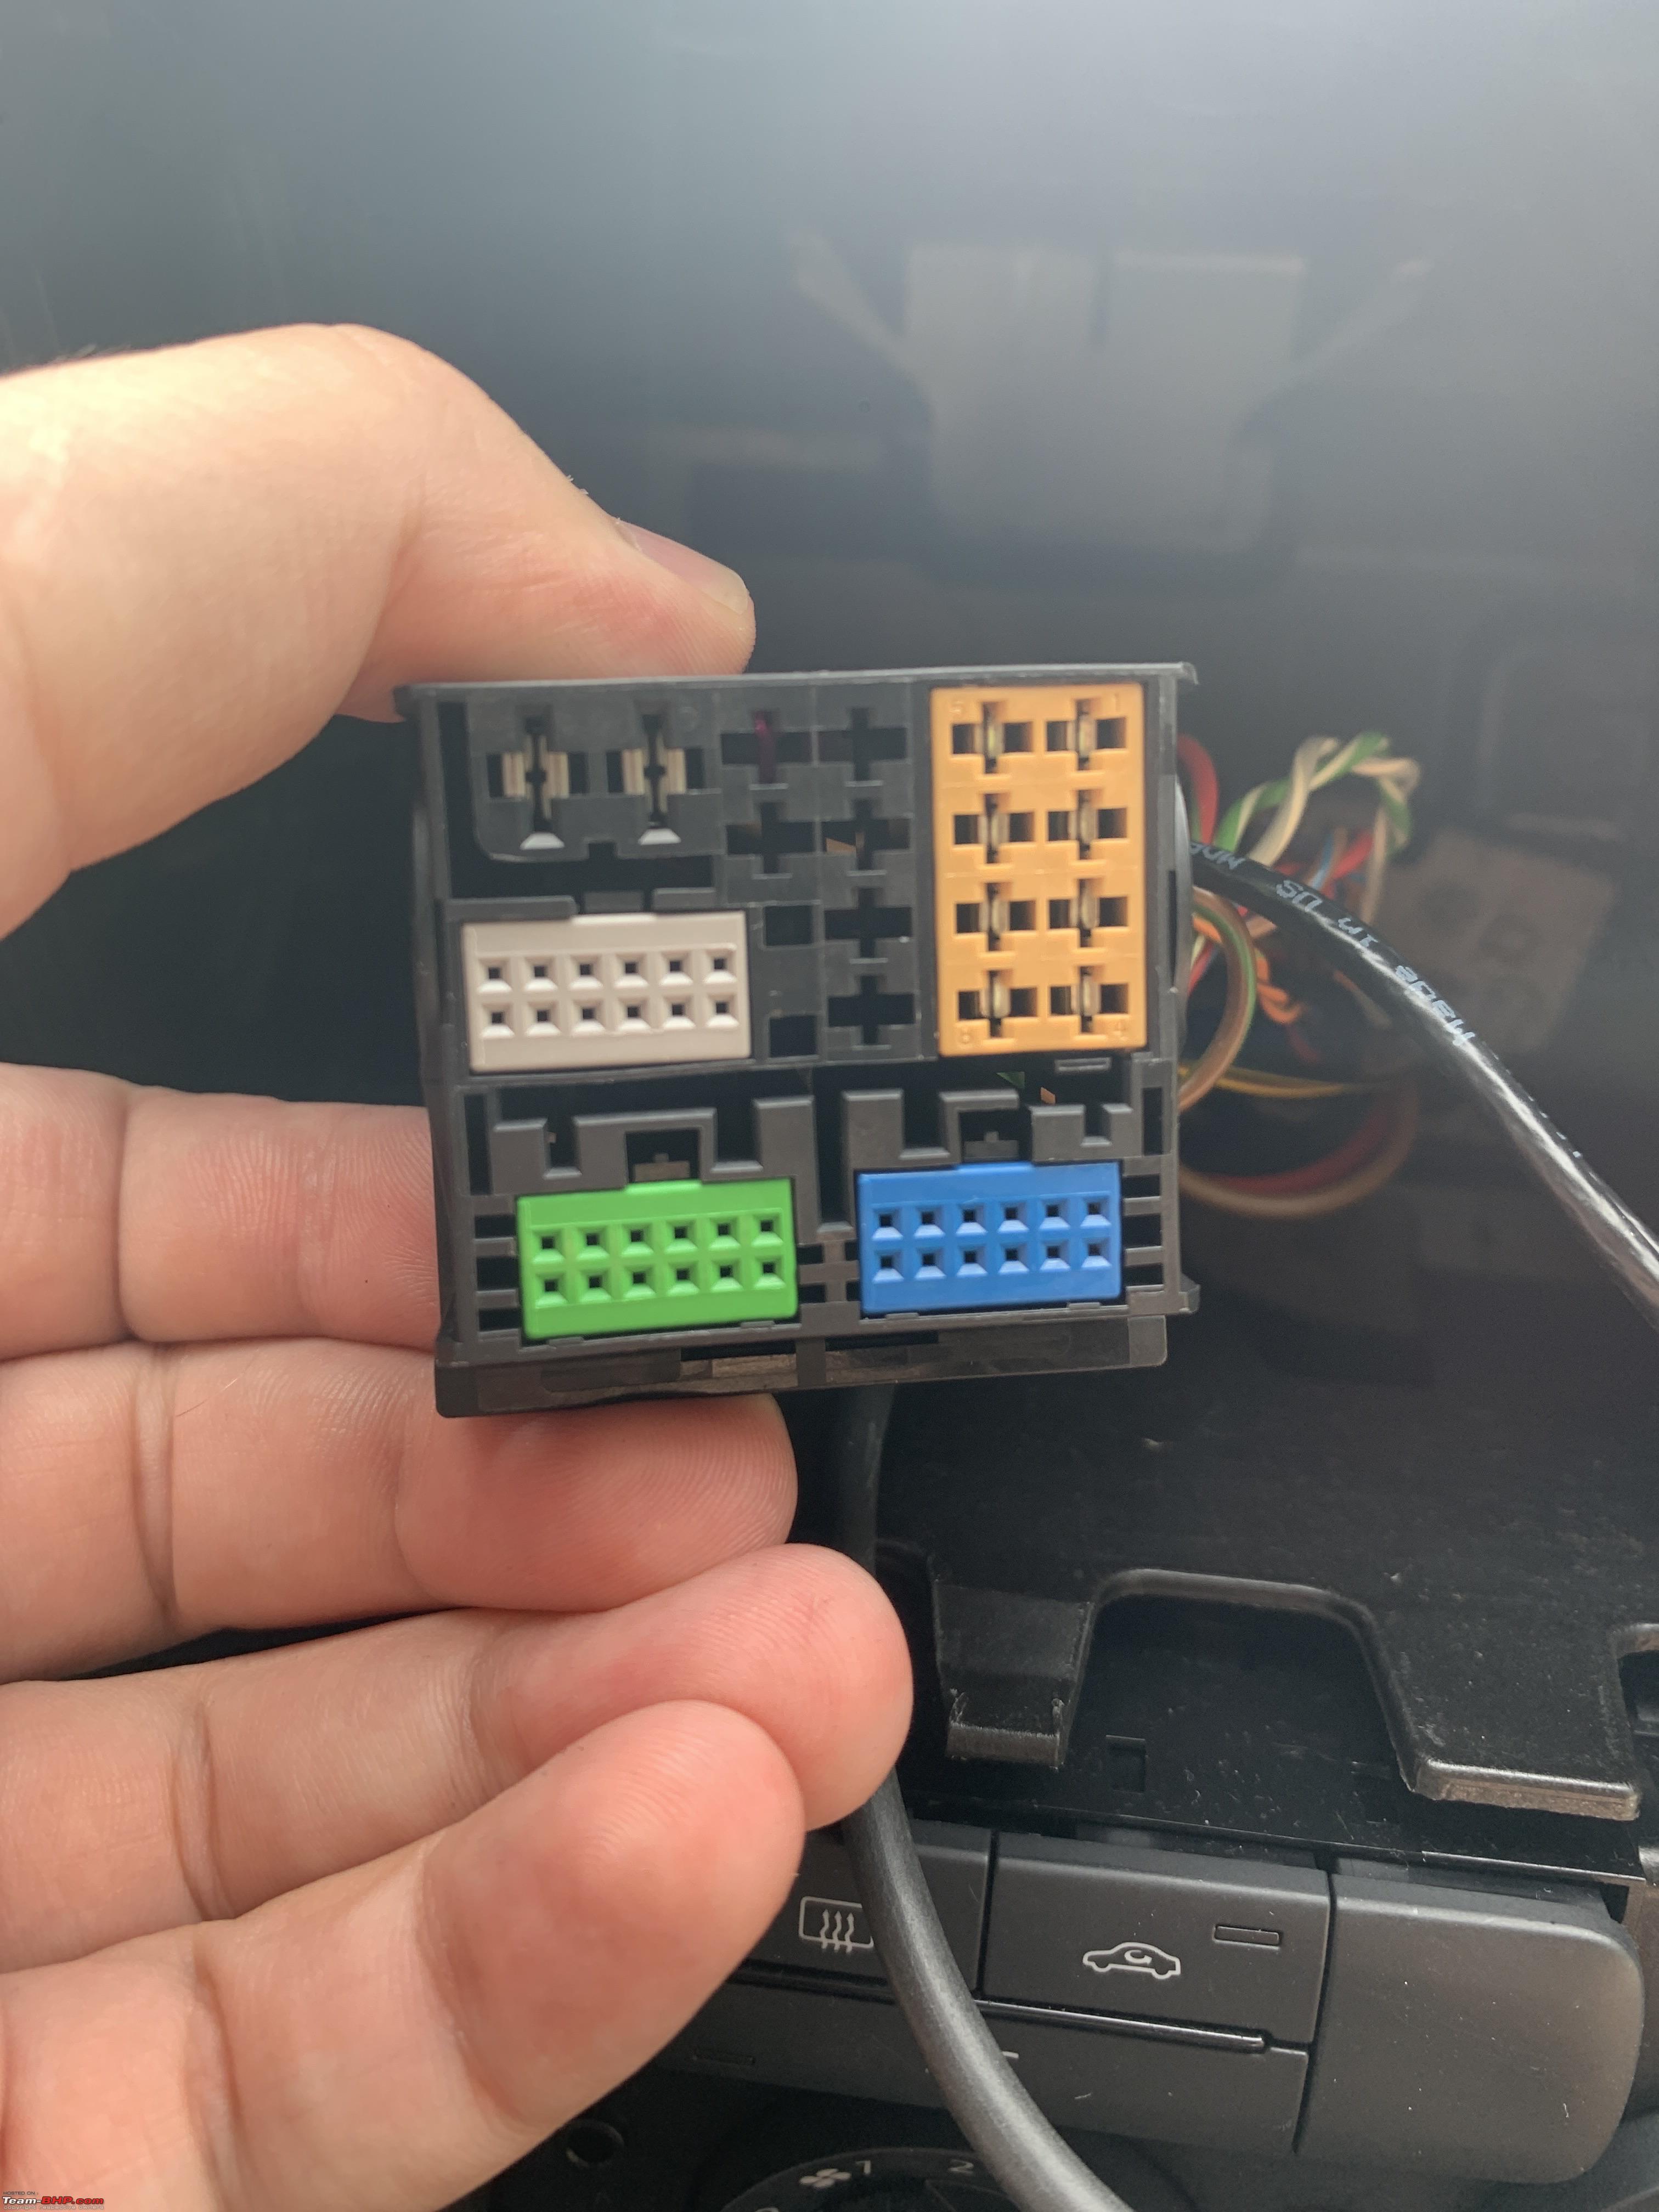 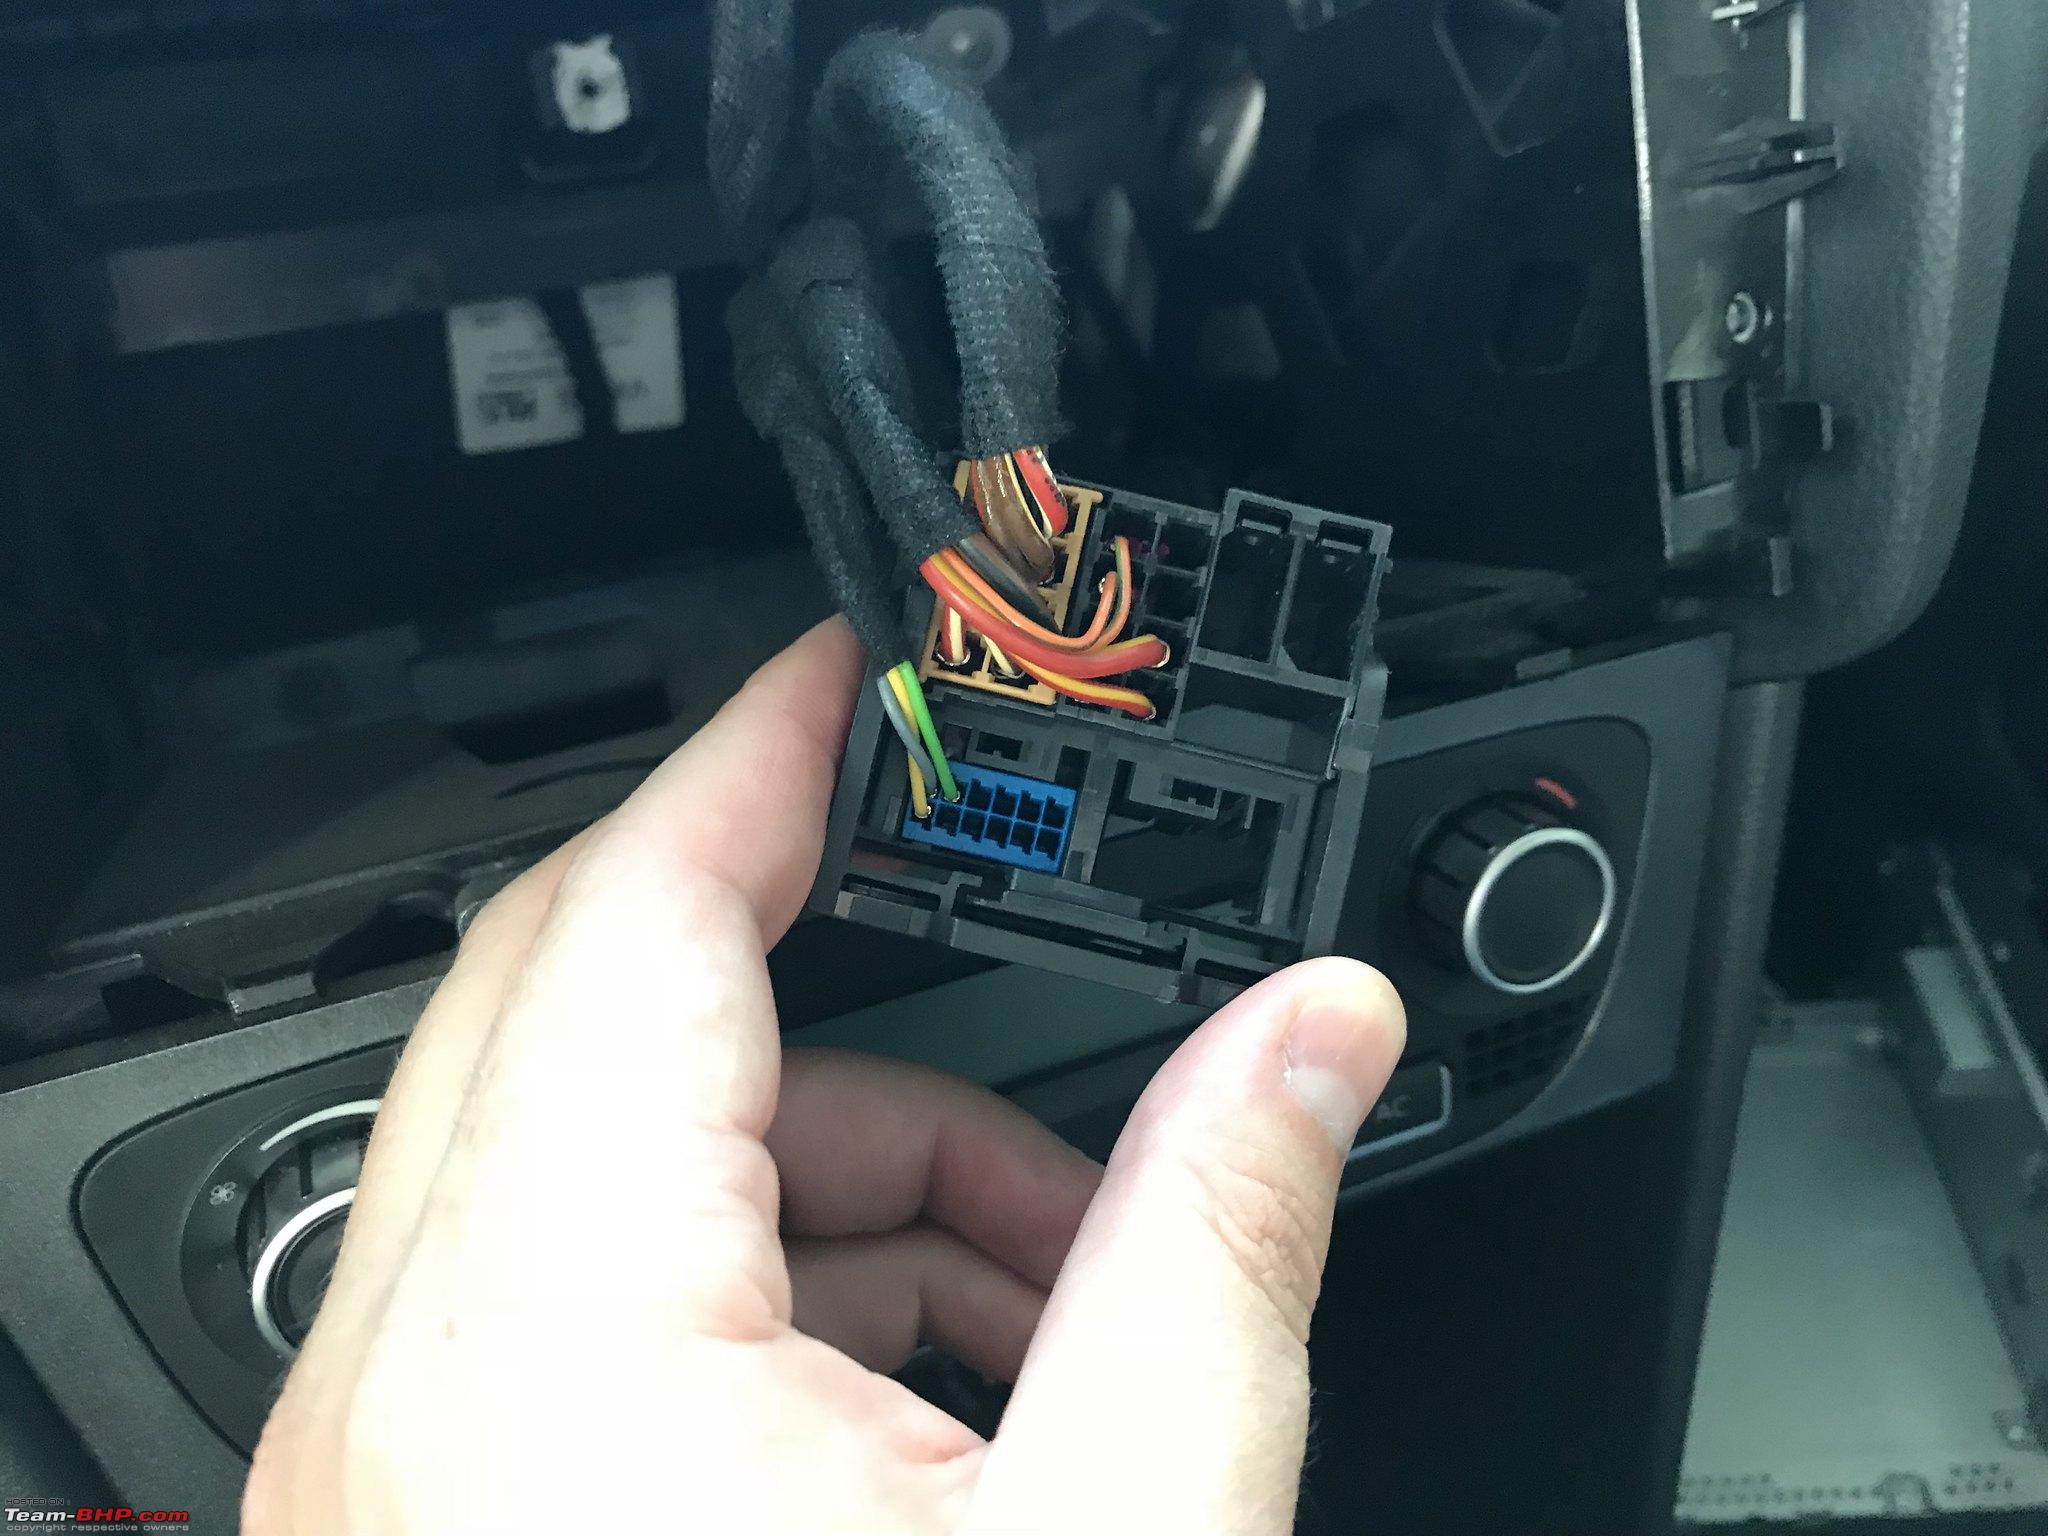 Wire the tweeters in parallel with respect to the pin-out to the front speakers. The tweeter itself has a two pin connector, and you can assemble a plug and play harness and extend it to the point where you'd be tapping the front speaker. 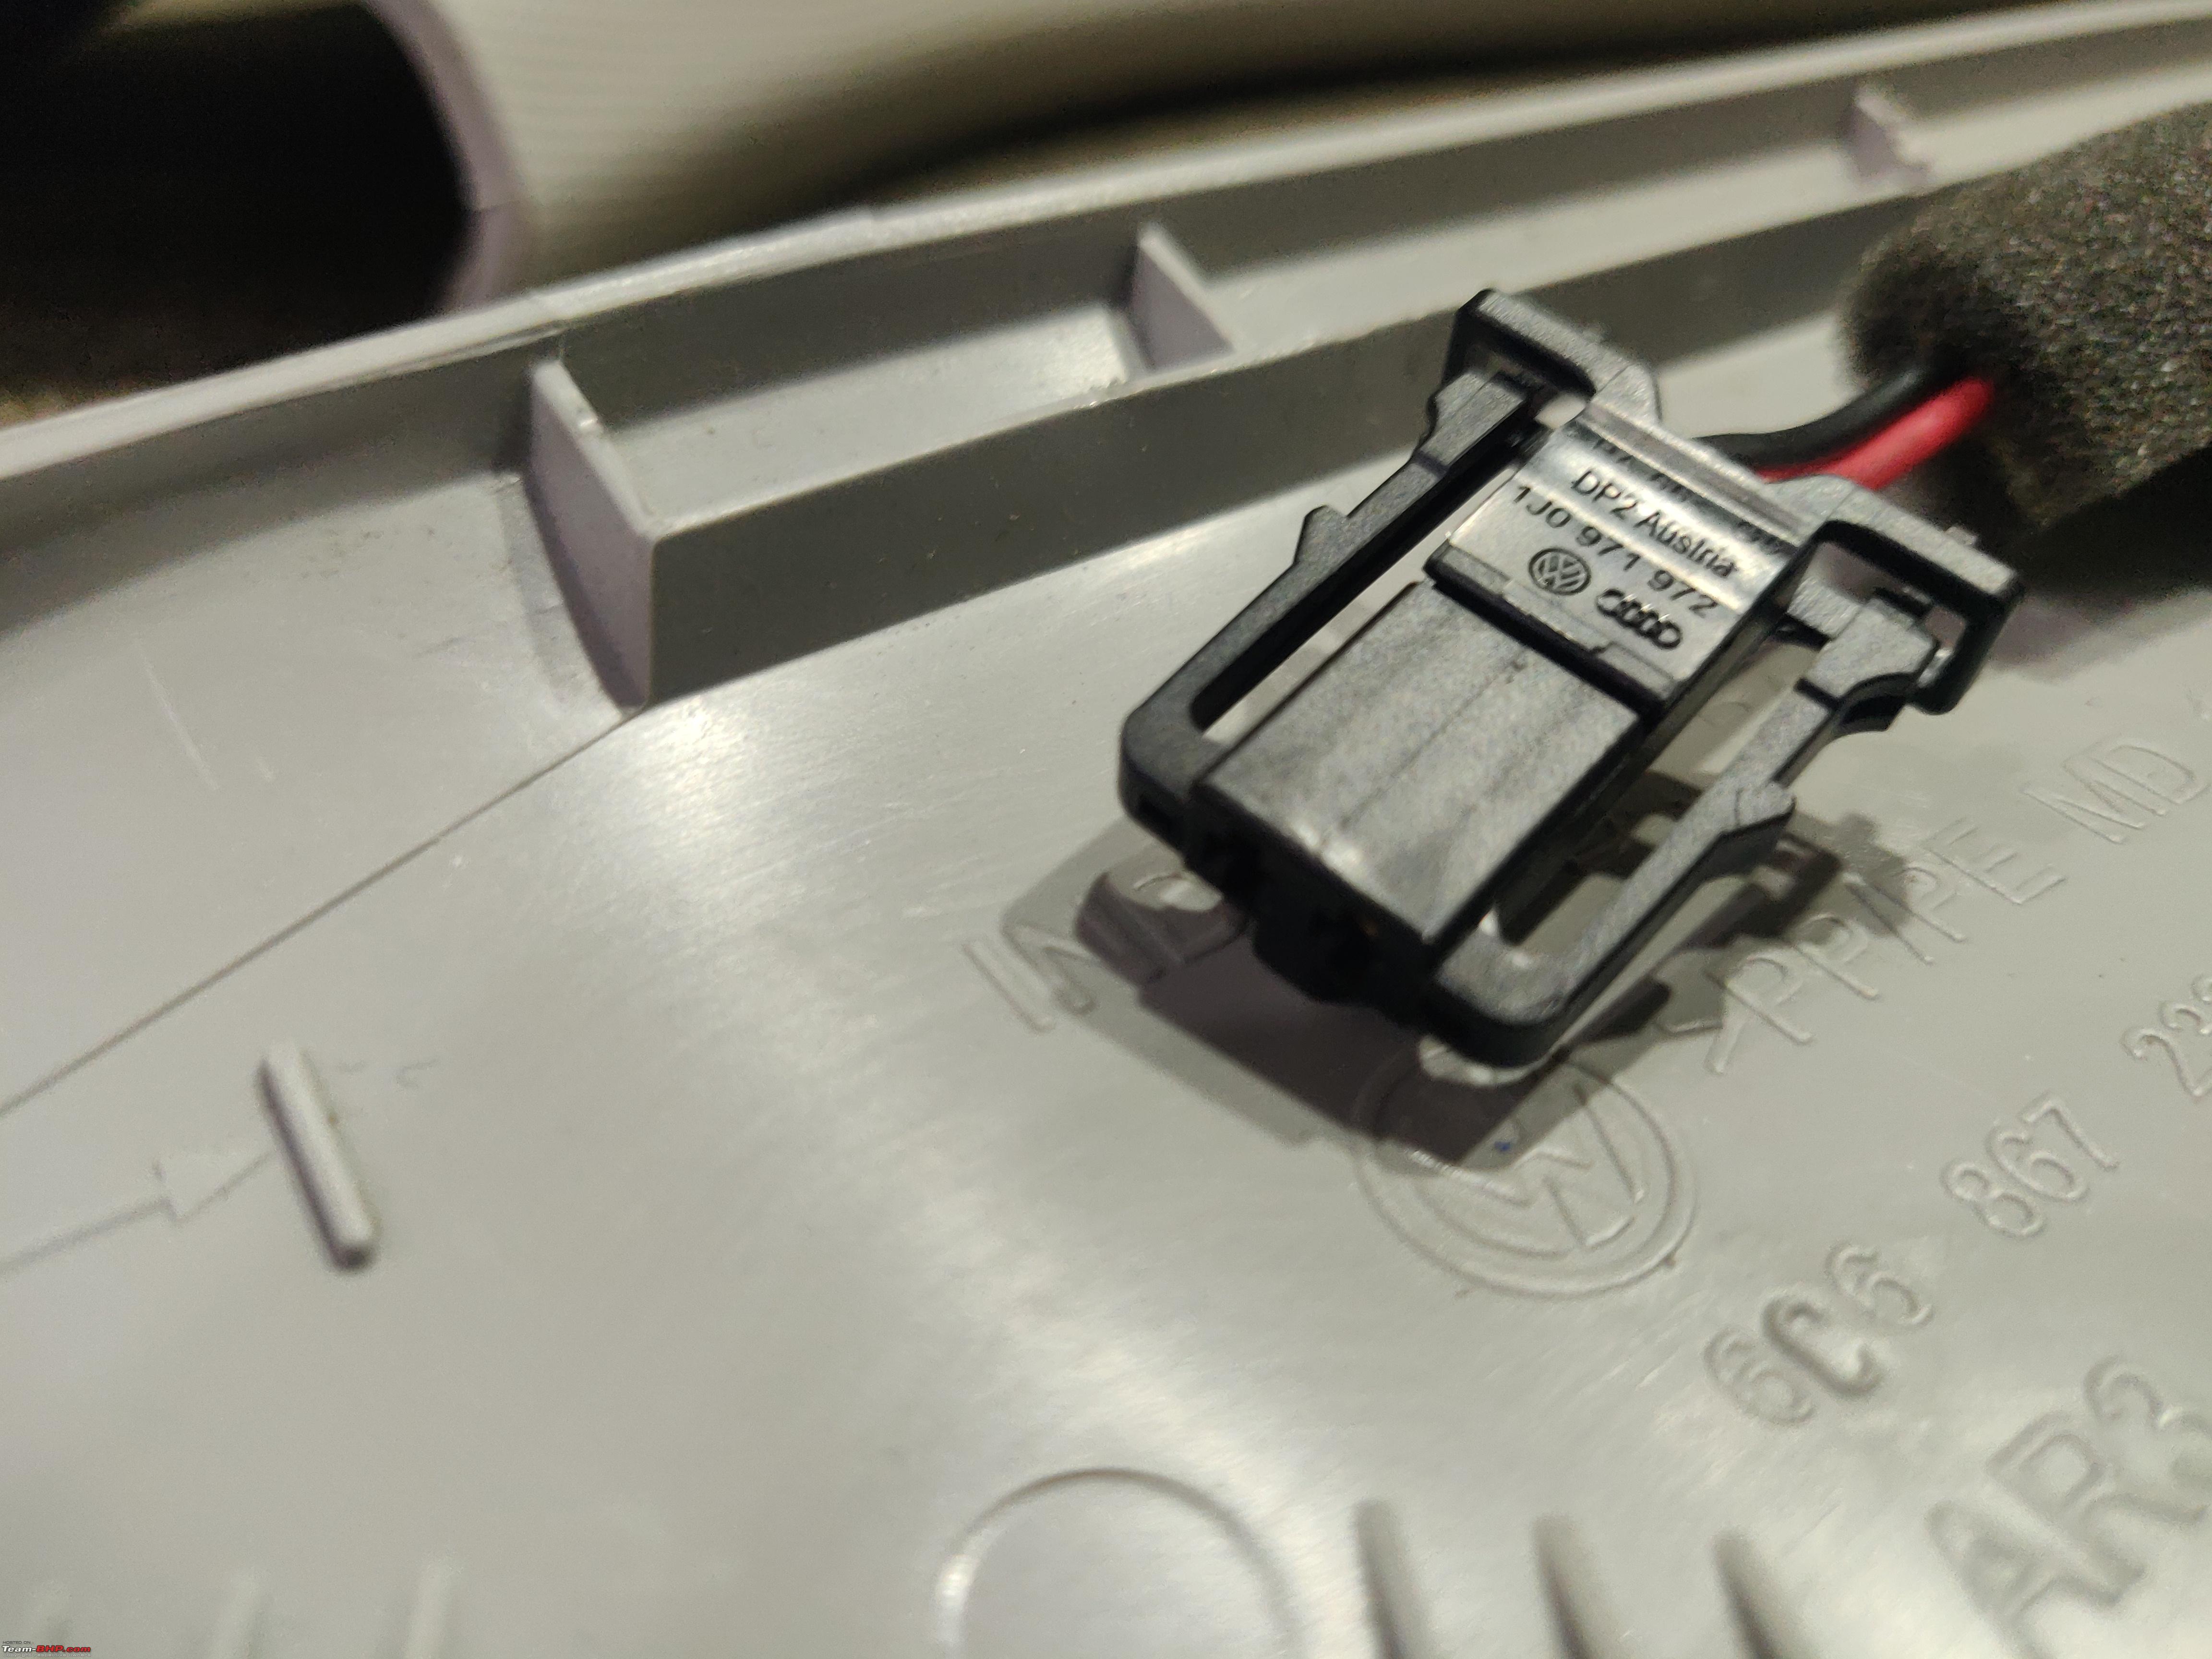 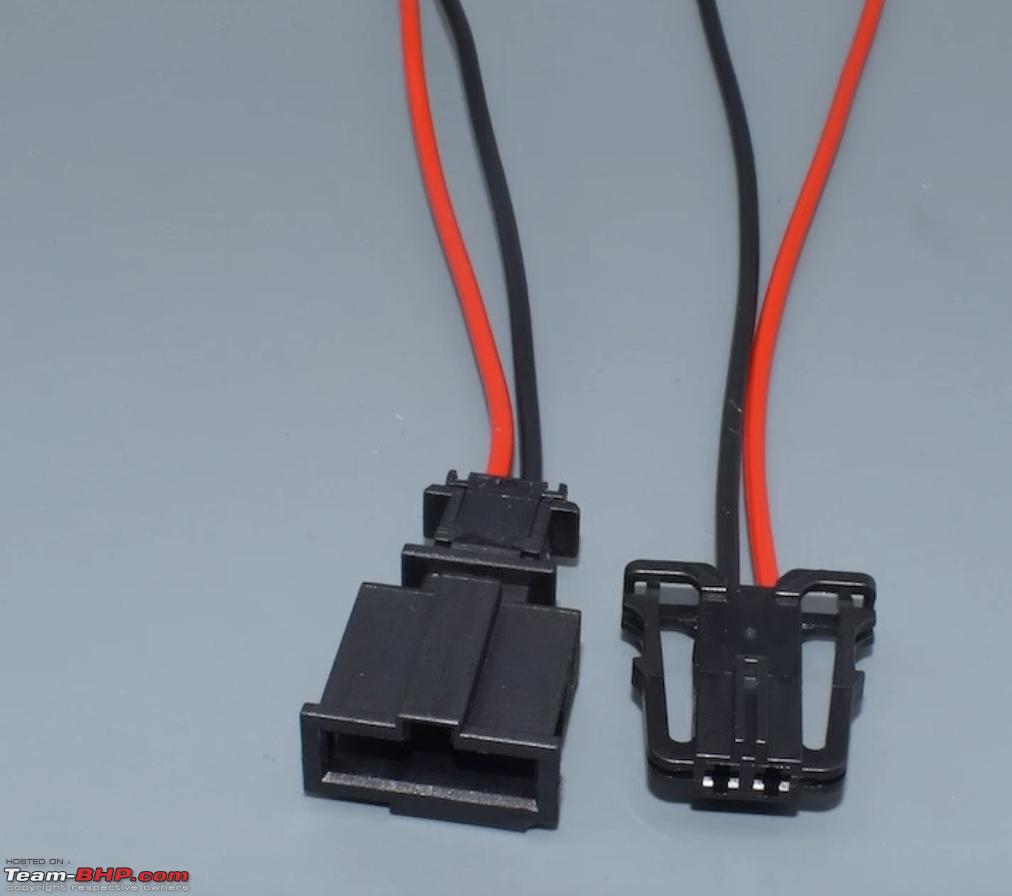  End Result Overall, the treble improvement is definitely felt and it adds a lot of character to the car's audio that is delightful. Since, I didn't get a chance to click pictures like I'd usually do, big thanks to my friend and fellow BHPian Mayur Shinde, for sharing the below two pictures from his Polo for helping me add value to this post.   Availability, Pricing There are quite a few sellers on Instagram who import and stock these tweeter pillars from China. Since they're long items, the shipping costs are on the higher side. In my experience, I've seen these priced between 10k-15k, but I've seen quite a lot of variance in the pricing of this item to comment on what a fair market value of this item could be. Adding Radio Station Logos Might be highly anti-climatic, but after a lot of procrastination, I did manage to update the Radio Station Logos that we have in Pune for the few radios stations I regularly listen to. It is a very easy task, that needs an SD-card or a USB and perhaps 5-10 mins of patience to procure and compile all the logos. P.S excuse the dust  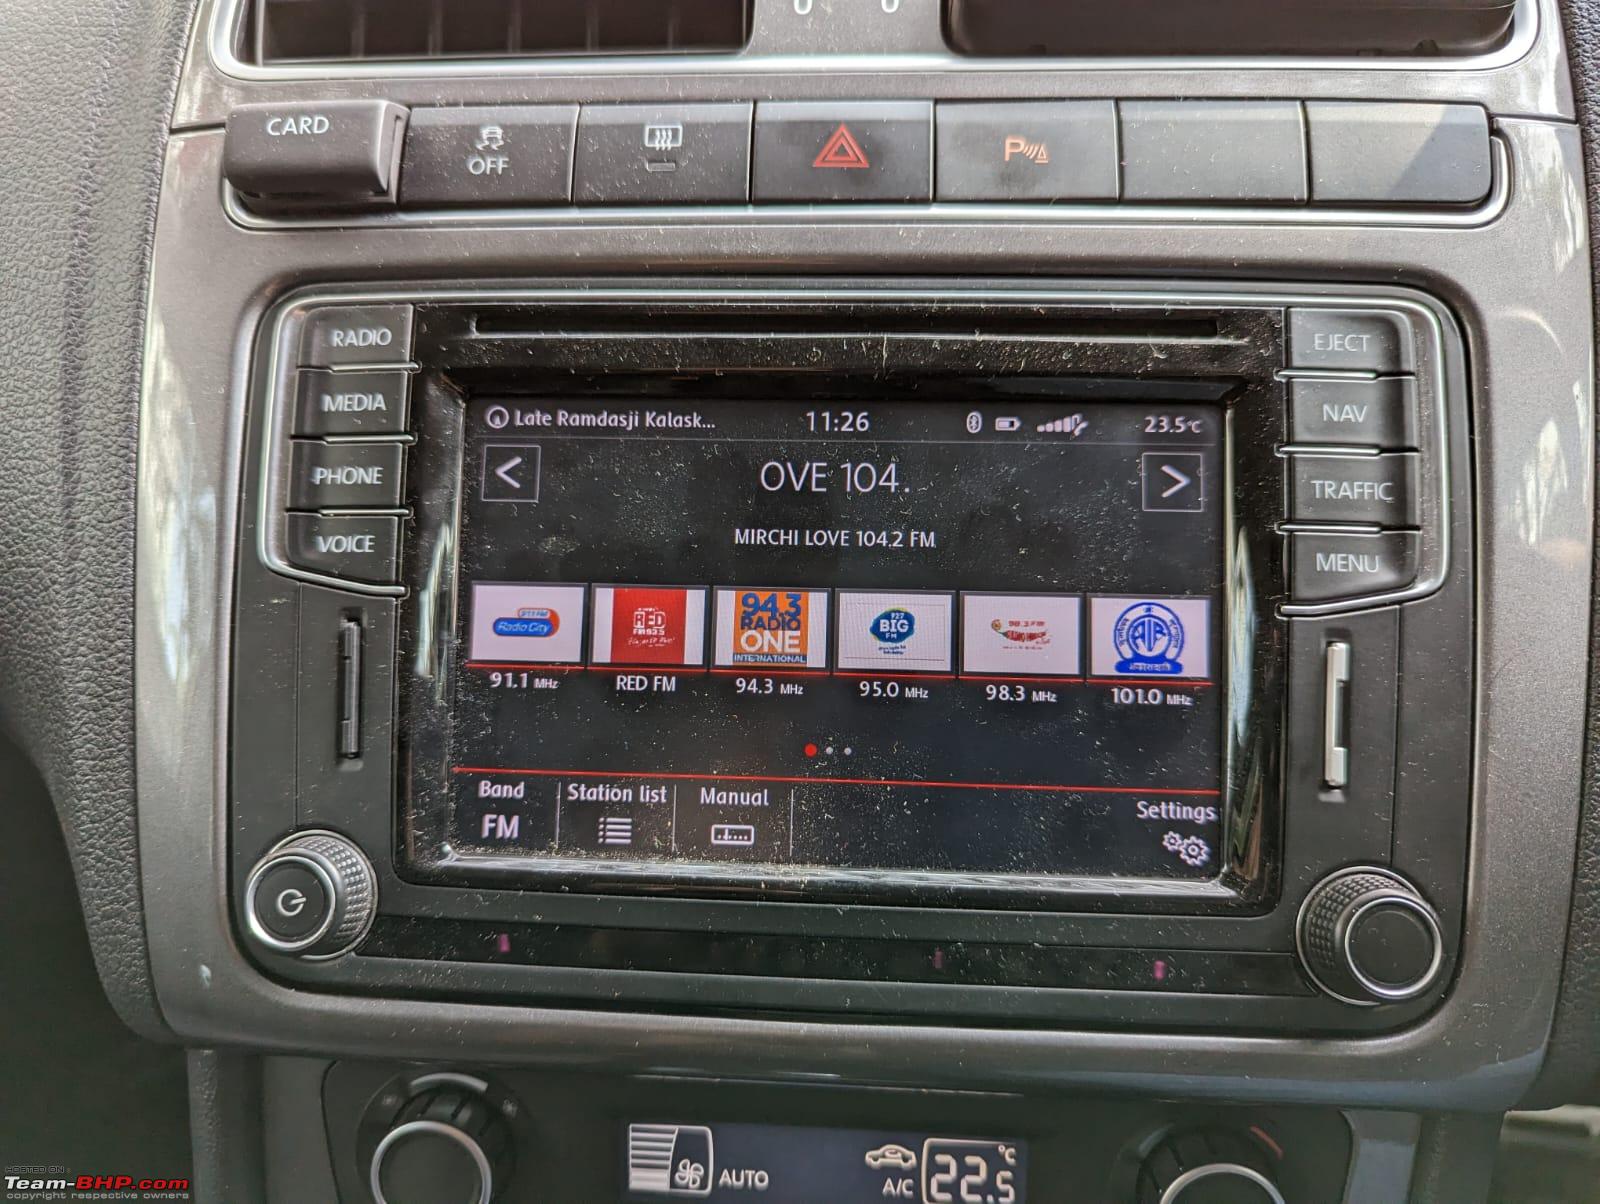 Last edited by fluidicjoy : 15th January 2023 at 13:46. Reason: Added availability comments |
|
| (8)
Thanks
|
| The following 8 BHPians Thank fluidicjoy for this useful post: | adityan27, GaryTSI, MayurS, neoonwheels, sarfraz1997, SolidSnake, vaasu, VivekCherian |
|
16th January 2023, 03:43
| #125 |
| BHPian Join Date: Oct 2020 Location: Pune, San Diego
Posts: 247
Thanked: 2,440 Times
| Polo 6R OEM Spring Loaded Roof Handles with Dampers I am writing about another small mod which was performed quite a while back on this car. It is a very old retrofit and has been thoroughly and comprehensively documented by Gannu in form of photos and videos and I'll leave a link to the thread here (VW Polo DIY: Adding dampers to grab handles). Here are what the grab handles with built-in dampers look like. Notice the white part, which is the damper bead.  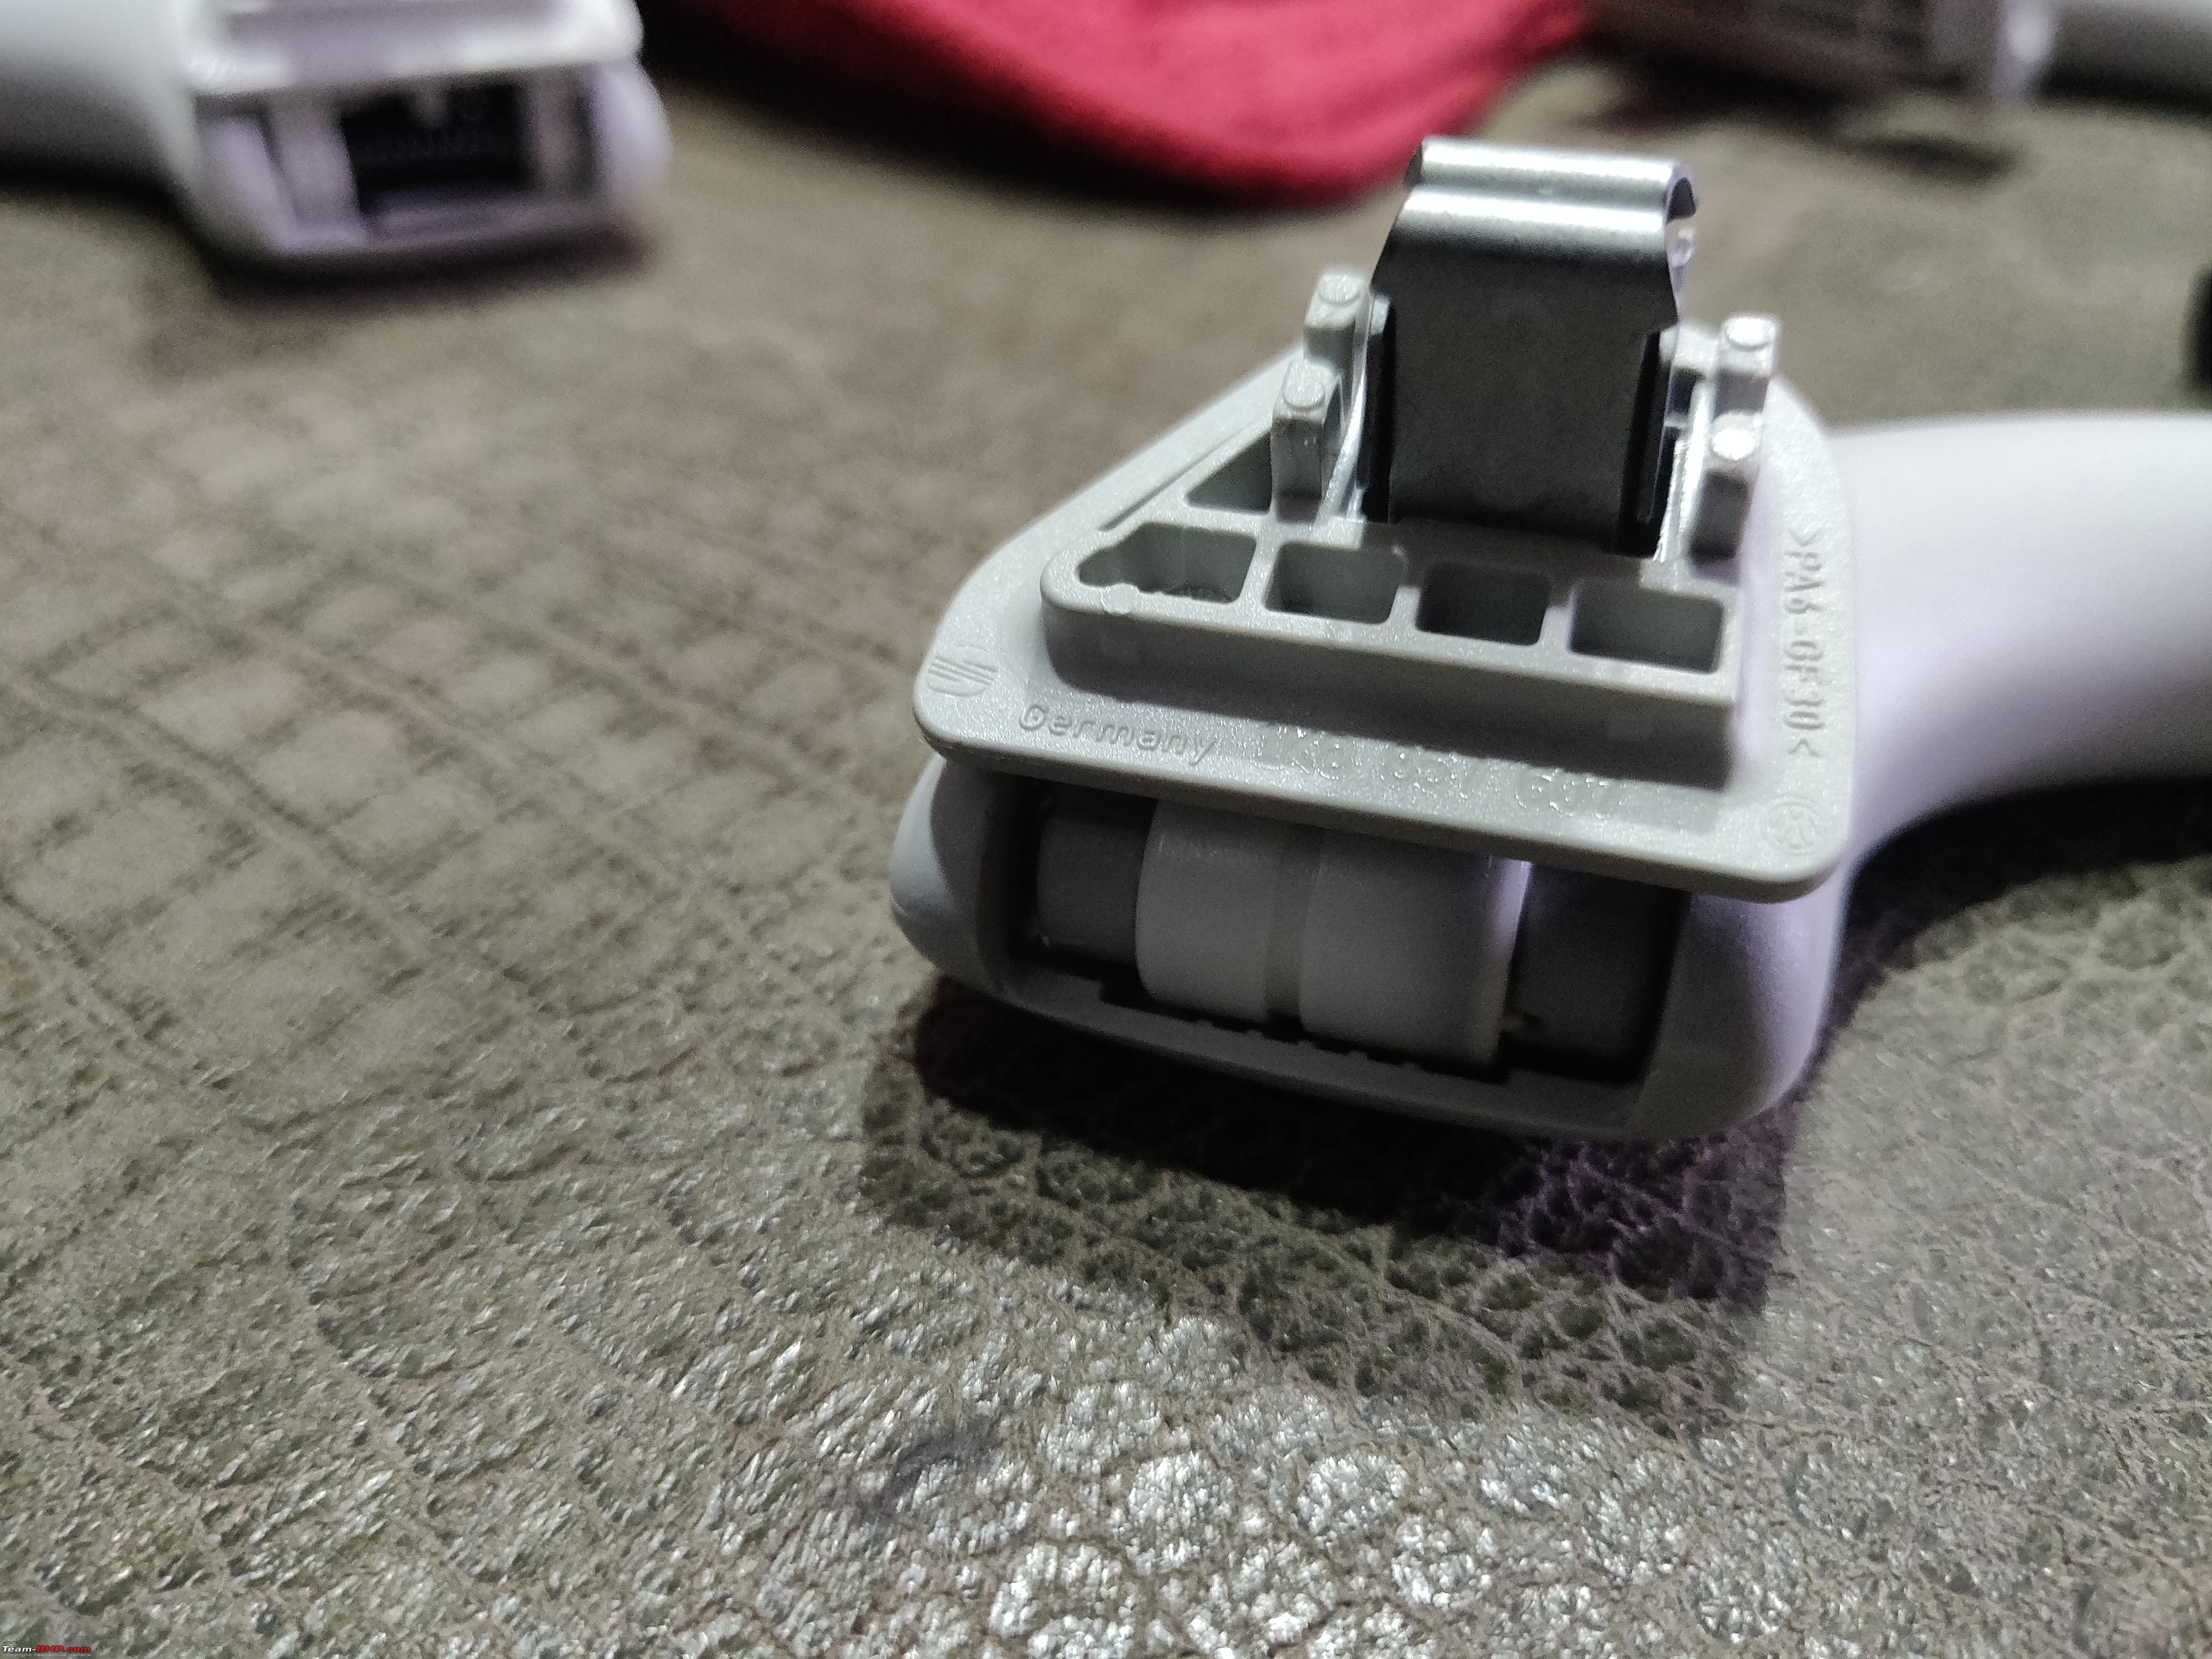 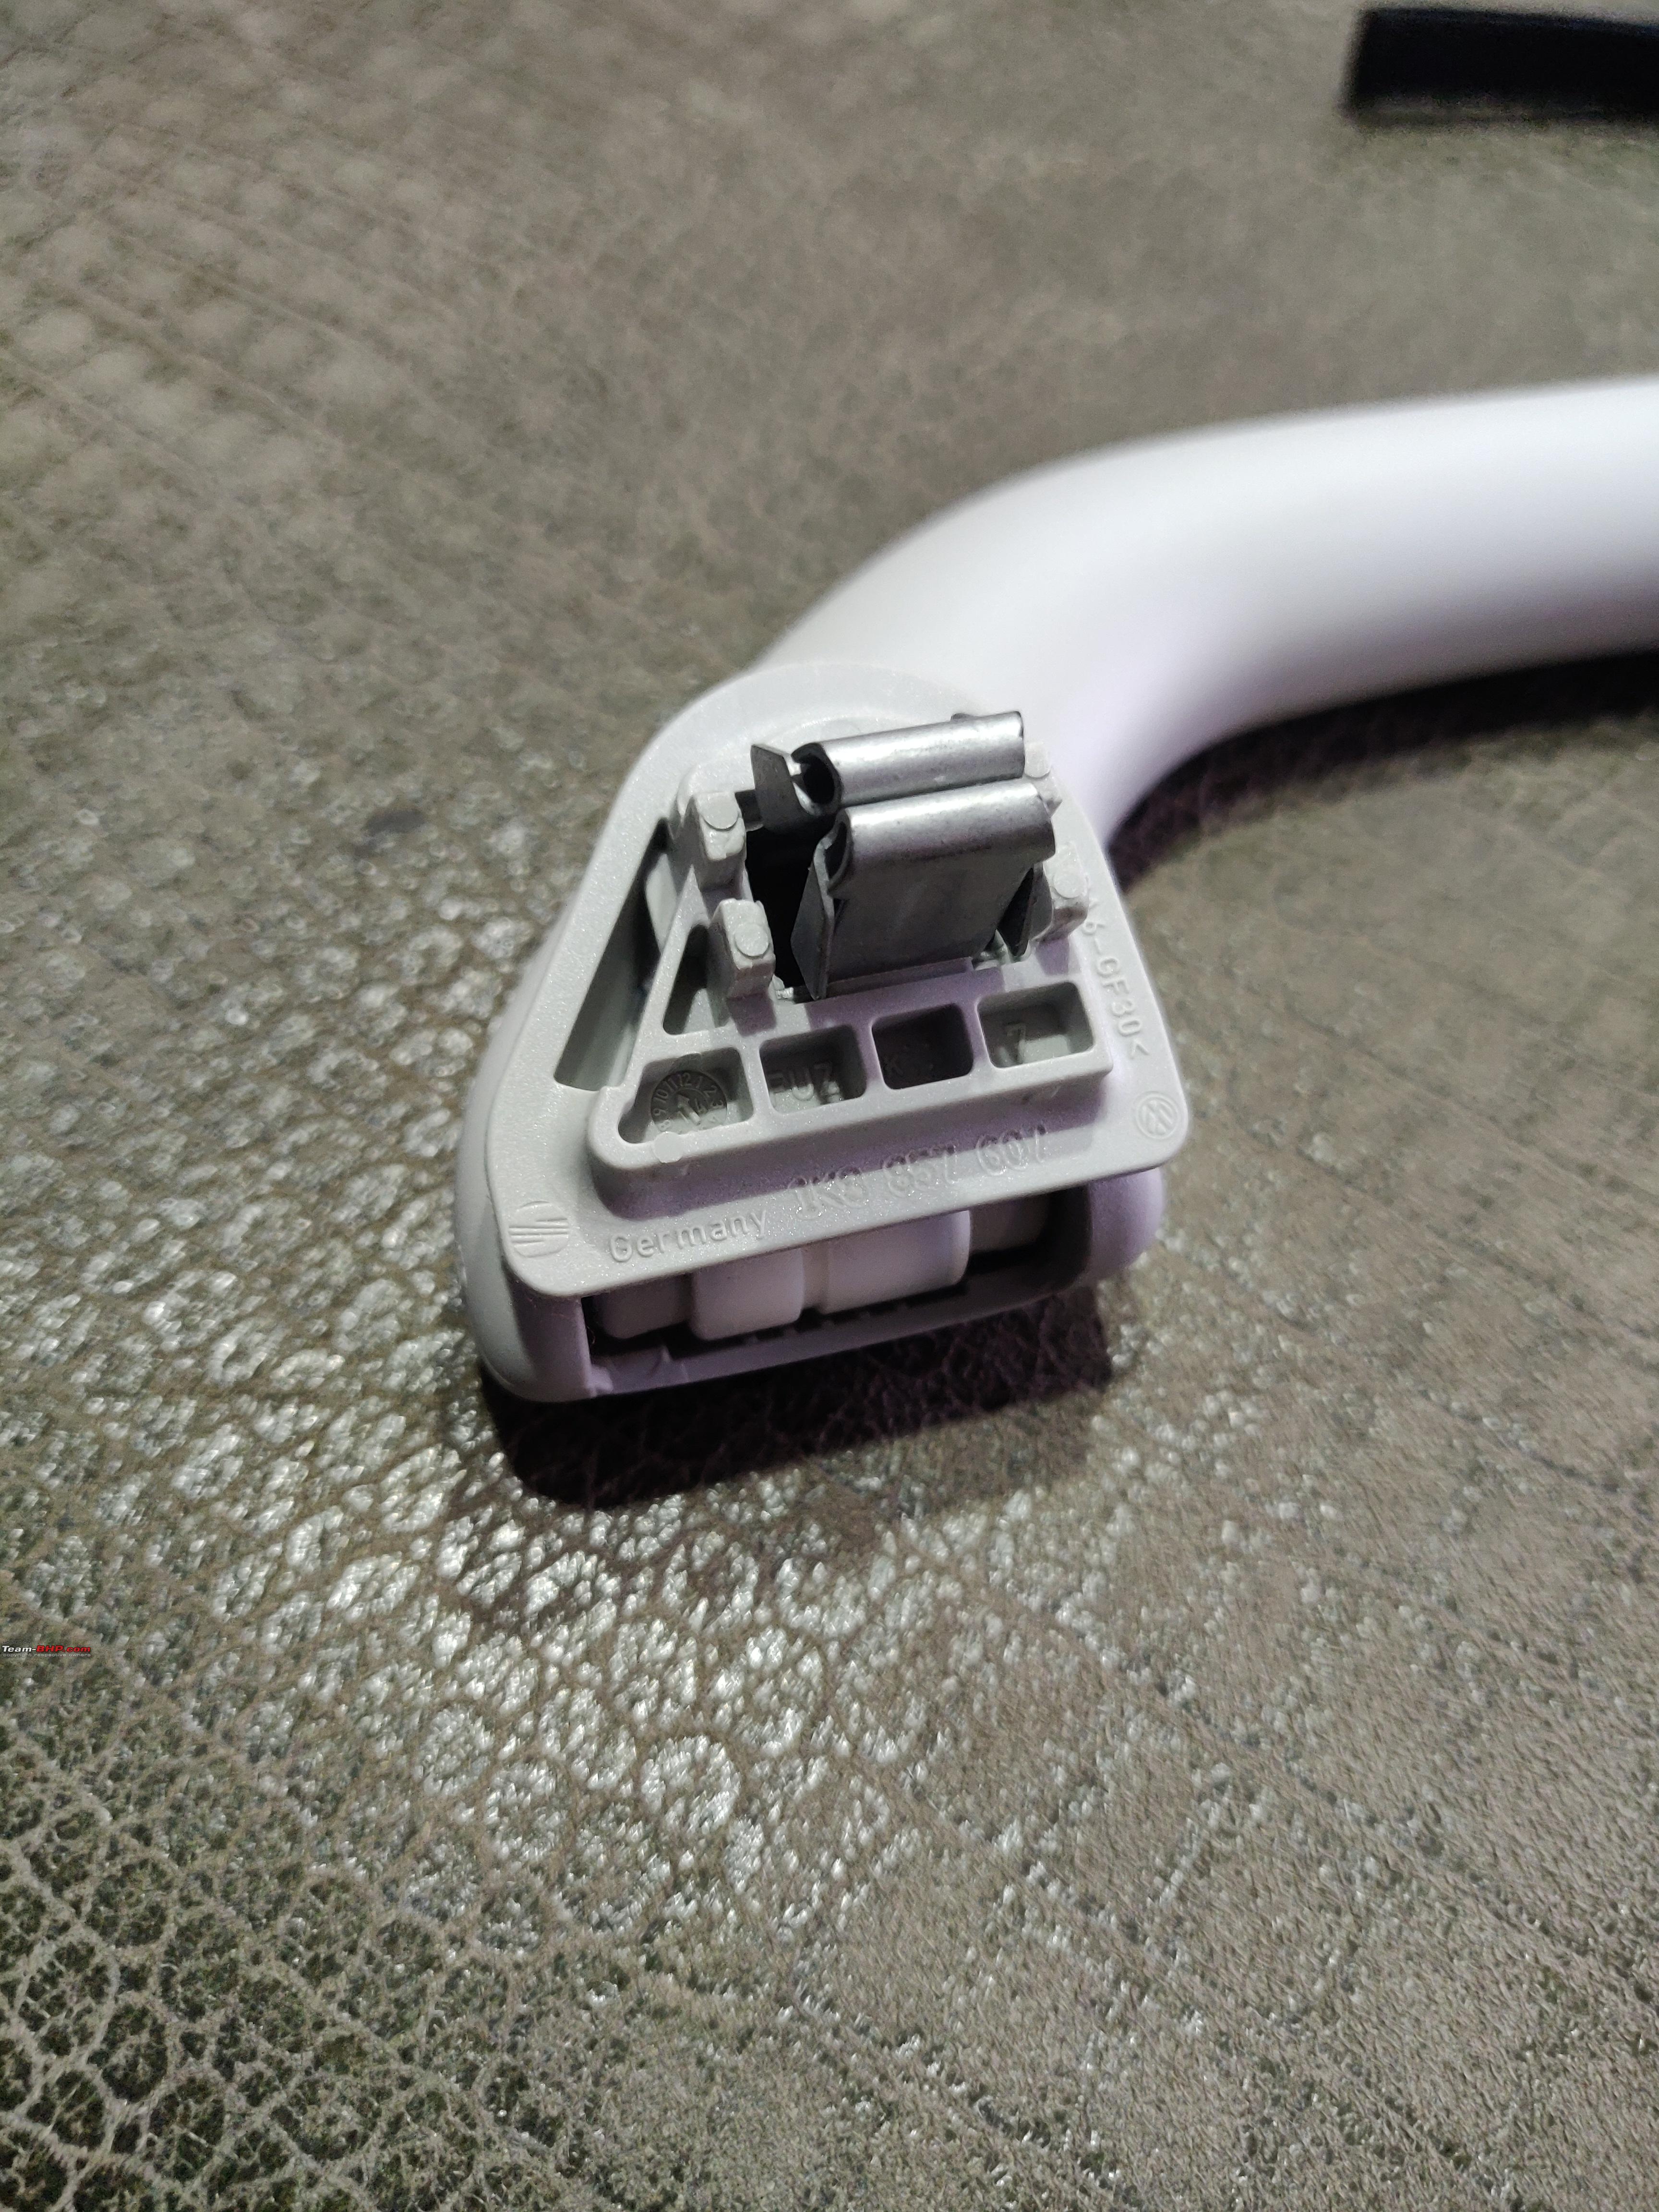 To retrofit them in the existing handle, here is what a damper kit looks like. I had picked a few of these from Aliexpress, a long time back. 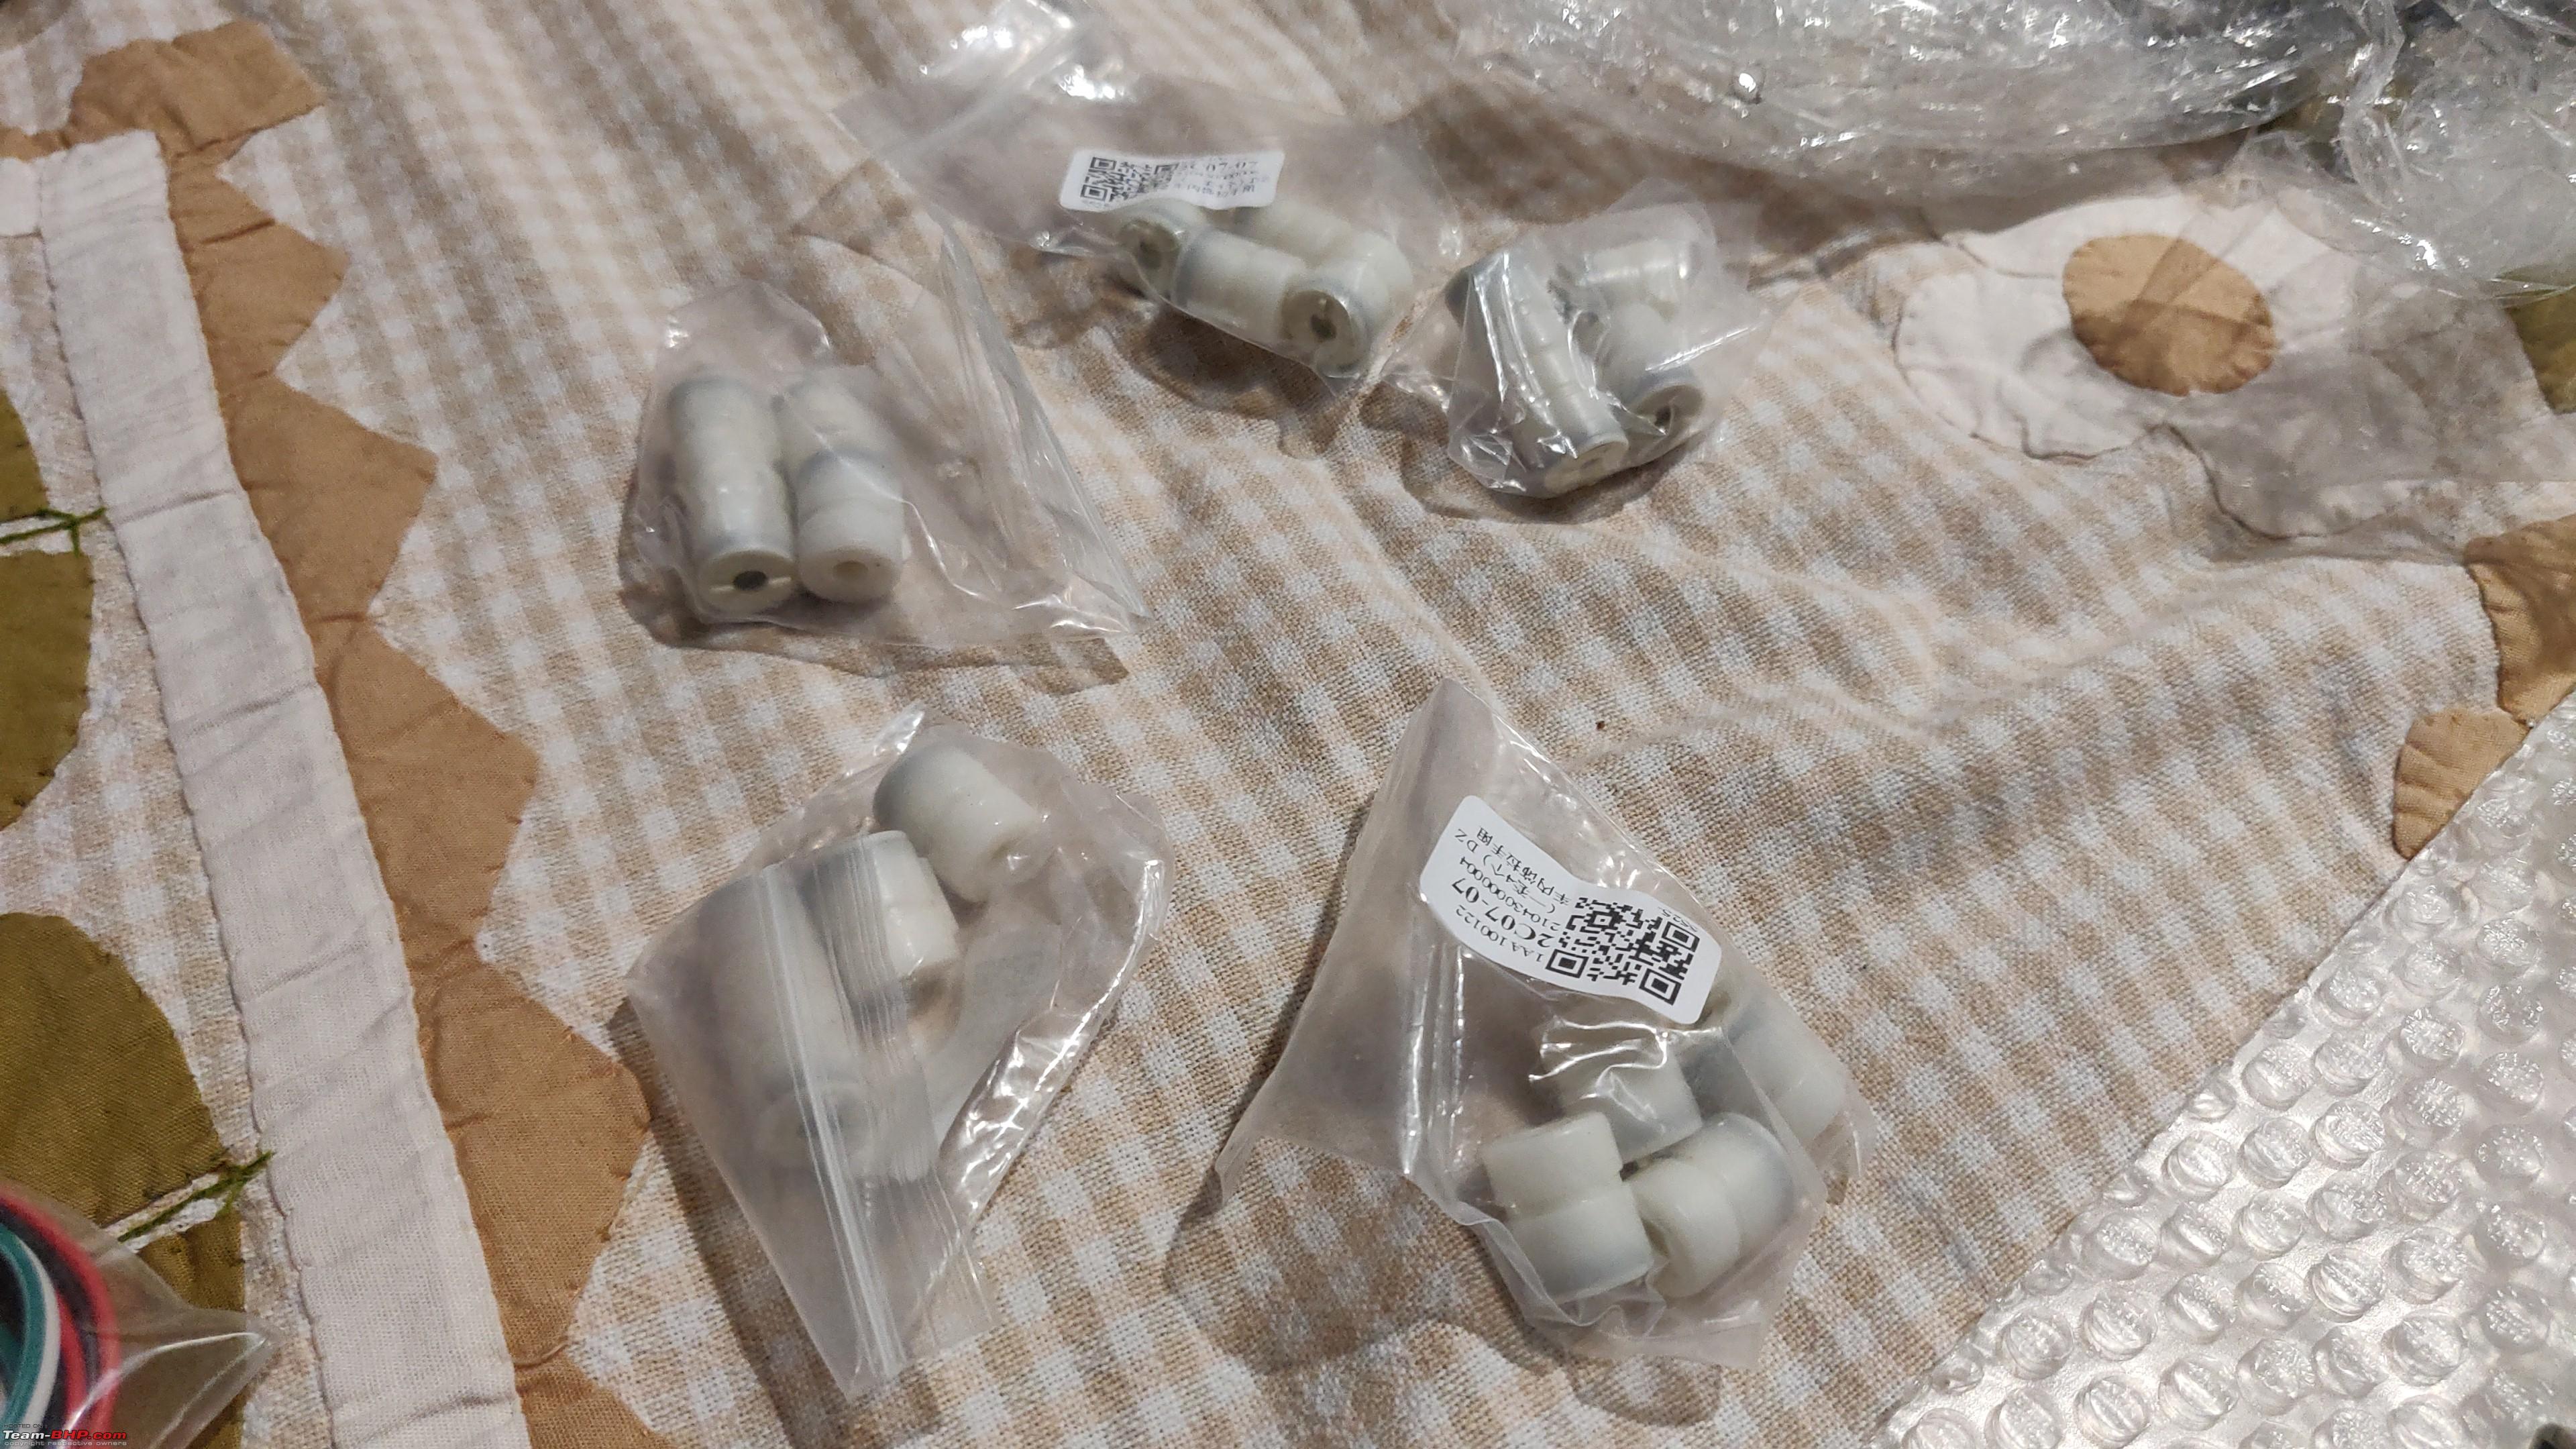 It is my opinion that I don't have the patience and I might lack the finesse required to modify a small object like the grab handles, and so I did myself a favour and bought used handles with dampers built inside. What was intriguing was how good the quality of some plastic parts can be, and these grab handles that I purchased could easily be a decade old, yet they felt just like new, no creaks, no cracks and felt built to last. Even the Indian grab handles display this excellent quality. Nevertheless, to show you the  nuisance associated with the old one, I've compiled a small video where you can hear the slapping sound that the old one made with the roof-liner. nuisance associated with the old one, I've compiled a small video where you can hear the slapping sound that the old one made with the roof-liner. |
|
| (5)
Thanks
|
| The following 5 BHPians Thank fluidicjoy for this useful post: | adityan27, MayurS, TSIboy, Varun_HexaGuy, VivekCherian |
|
19th January 2023, 22:05
| #126 |
| BHPian Join Date: Oct 2020 Location: Pune, San Diego
Posts: 247
Thanked: 2,440 Times
| Polo 6R OEM Maxidot Cluster Upgrade, New Features Since I have already made a post about the Maxidot Cluster, I will link it here (https://www.team-bhp.com/forum/test-...ml#post4969157 (Review: Driving home our Sunset Red VW Polo Highline+ TSI Automatic)) and add more information in this post along with a video that shows some off the functionality along with some new add-ons. I take this chance to update the feature list of the Maxidot Cluster, to the best of my knowledge and will address some common questions about this upgrade. I will make separate posts on the smaller mods related to the cluster.
**Requires the installation of additional hardware, equipment, wiring etc. Installation, Purchase Information The cluster is a plug and play swap and requires no wiring modification. Wiring might have to be added if you plan on adding Brake Pad Wear and Washer Fluid Reservoir Level Sensor warnings. Installing the cluster needs no physical modification, but it requires online coding and adaptation which needs to be done with either OEM or after-market special tools depending on the condition of the cluster, whether it is New or Used. Immobiliser data needs to be transferred to successfully install the cluster. Used clusters cannot be officially adapted, and require special preparation and special tools to make them work, so if you want a very straightforward upgrade, I'd suggest finding a new cluster. This cluster can be installed on most recent Polo and Vento cars, but might require some modification to the EEPROM to change the vehicle depiction to a Sedan from a Polo hatchback. Since IThis cluster seems to be regularly imported and installed by many retrofit shops who have presence on Instagram, so you can reach out to them to discuss pricing and installation queries. Recently, I have heard of prices near the 40-45k mark. Please note that I do not have any affiliation with any of these sellers. |
|
| (8)
Thanks
|
| The following 8 BHPians Thank fluidicjoy for this useful post: | adityan27, Ashtoncastelino, GaryTSI, MayurS, TSIboy, Varun_HexaGuy, VivekCherian, yesyeswe |
|
26th January 2023, 05:33
| #127 |
| BHPian Join Date: Oct 2020 Location: Pune, San Diego
Posts: 247
Thanked: 2,440 Times
| Polo 6R: Ways To Wire Electrical Accessories in The Engine Bay Fusebox When I received my OEM Bixenon Headlights, I still had not completed the BCM Max upgrade and so I needed to use an emulator to enable most of the primary functionality of these headlights. The emulator is wired in to the stock headlight connector, but it also needs an independent line of power, which we take from a small fusebox located next to the battery. 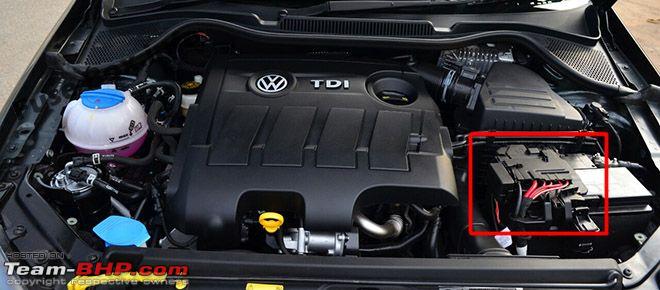 This fusebox is enclosed by a waterproof lid, which can be simply taken off by prying from the sides, as illustrated here.  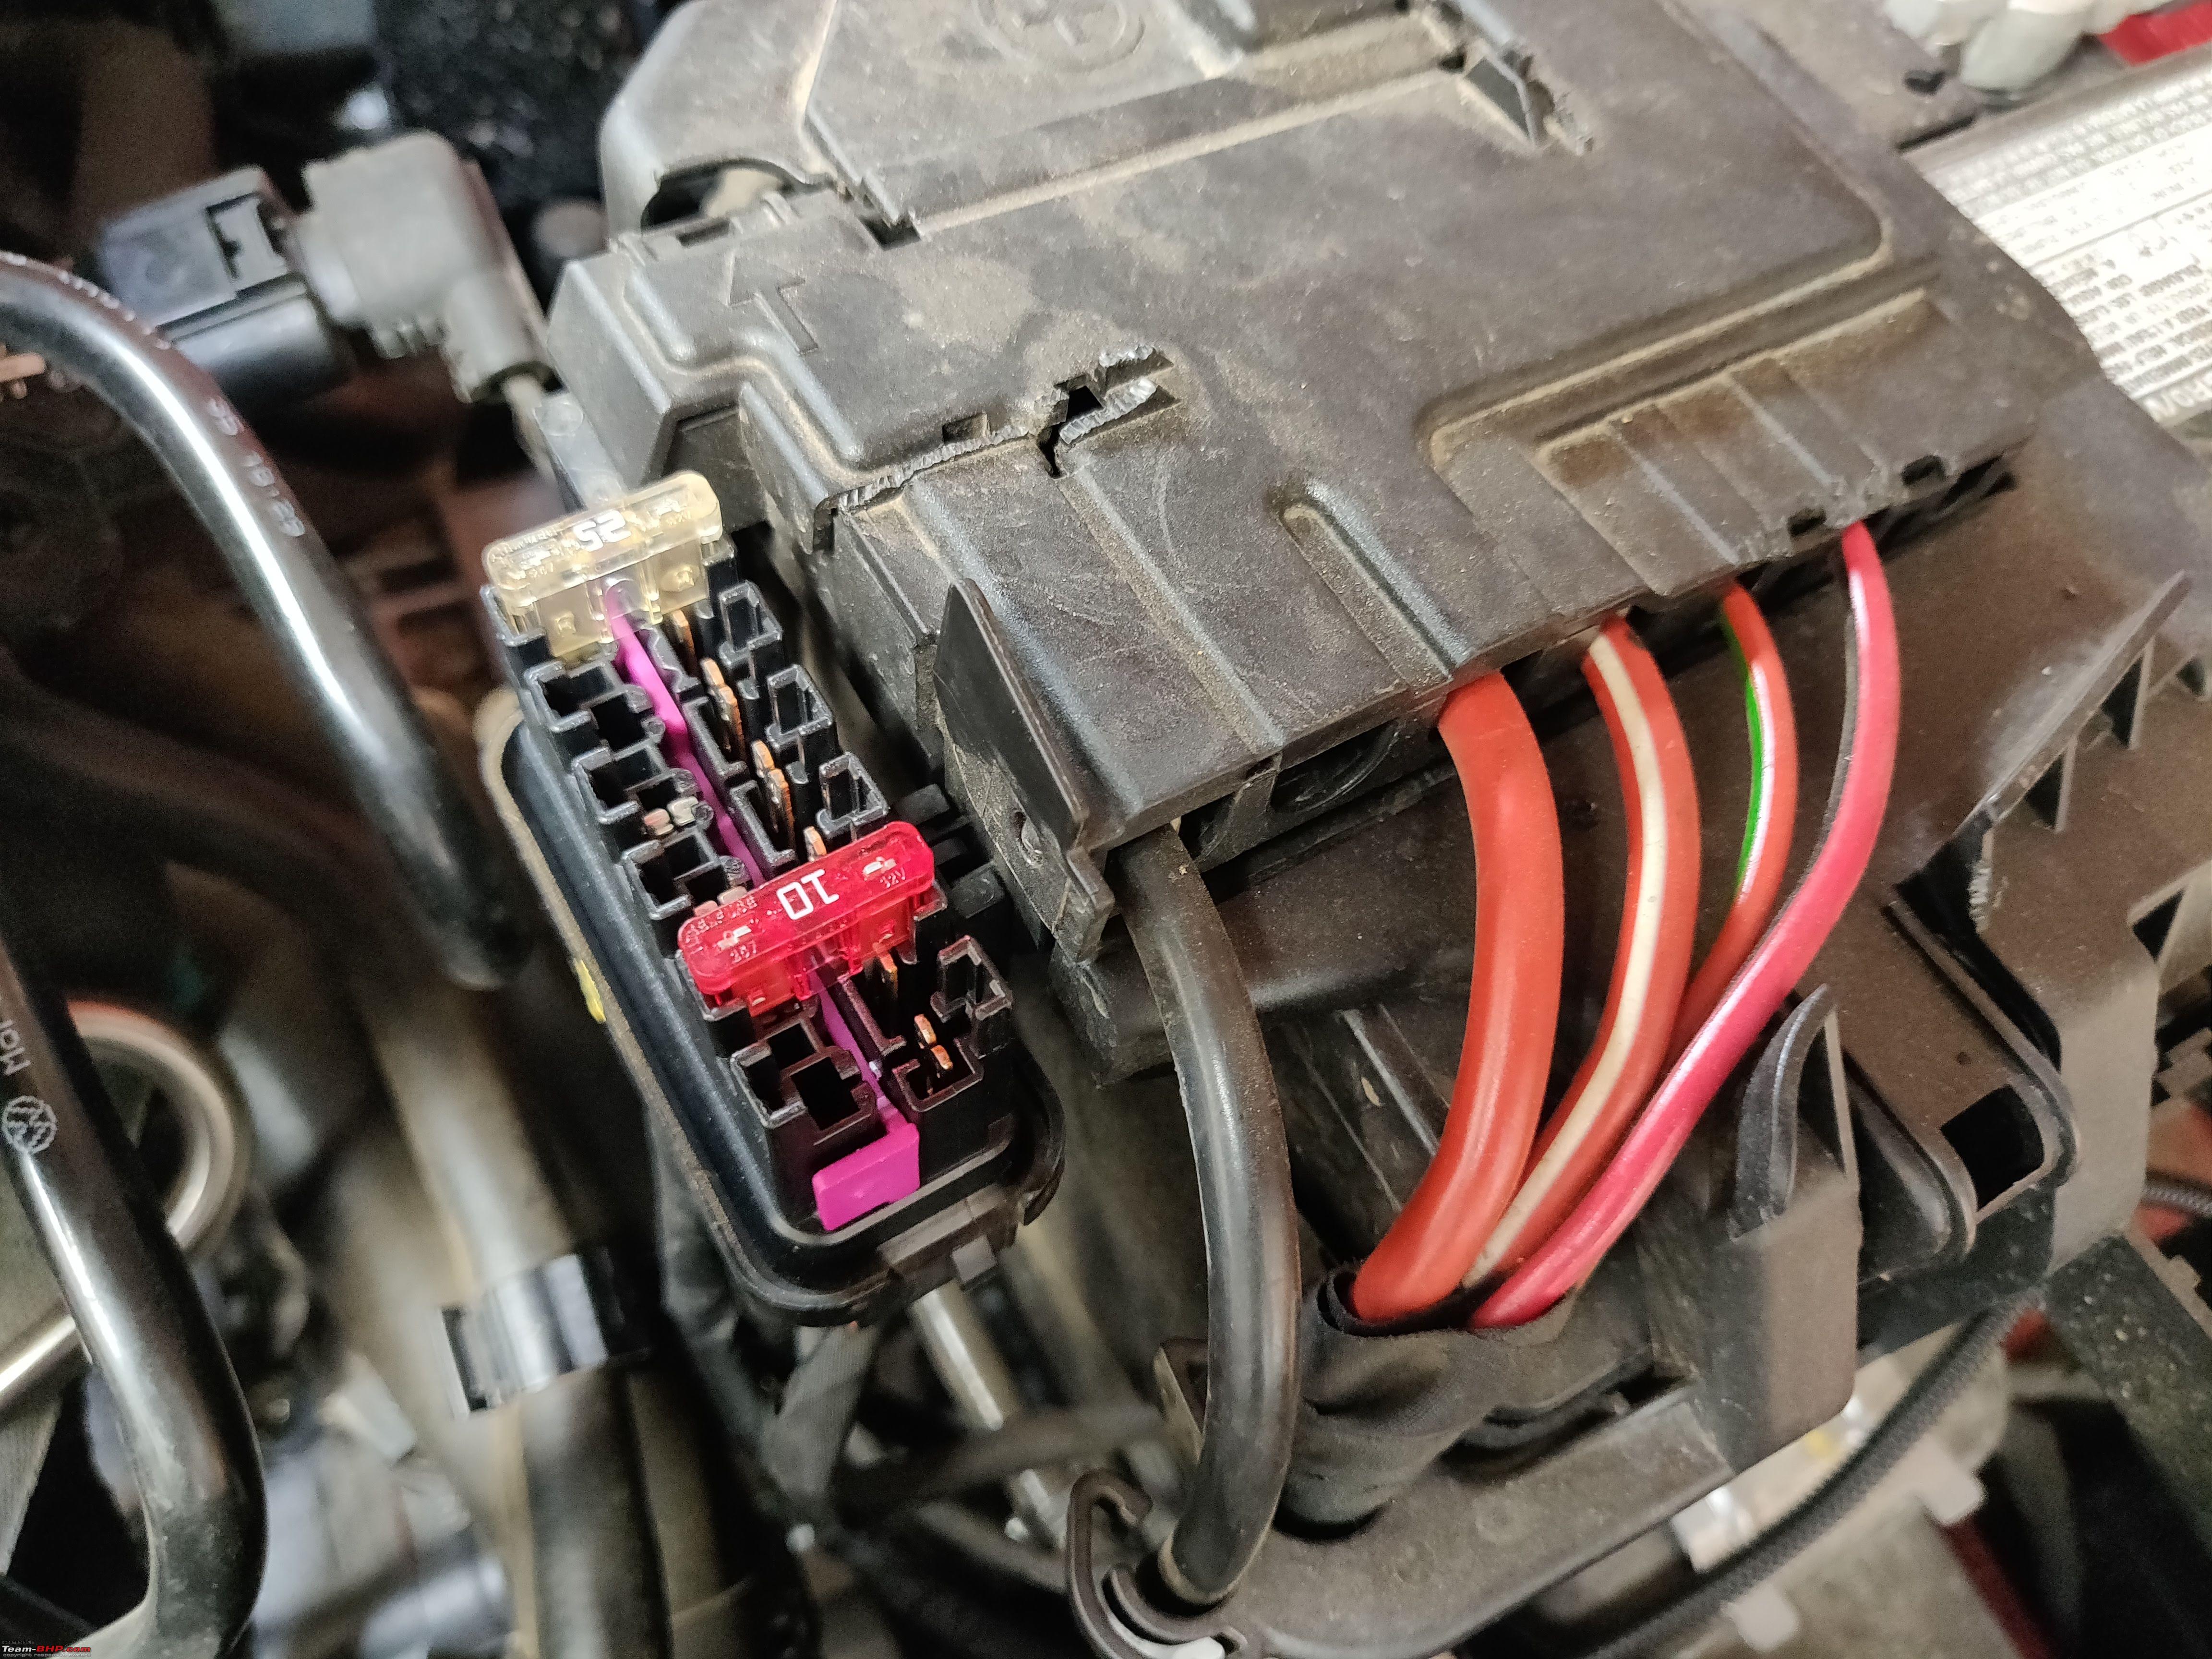 The contacts and wires you will install or the wires already present will be locked by a Pink Locking tab, which needs to be slid out before we can insert a new power line into place.  You don't need to remove the pink locking tab all the way, unless you're using the last socket. The bottom of the fuse-socket will also have a rubber stopper for waterproofing, so make sure you push that down and out of the fusebox, before inserting a new wire into the fuse point. I completed the wiring with a 15A fuse. 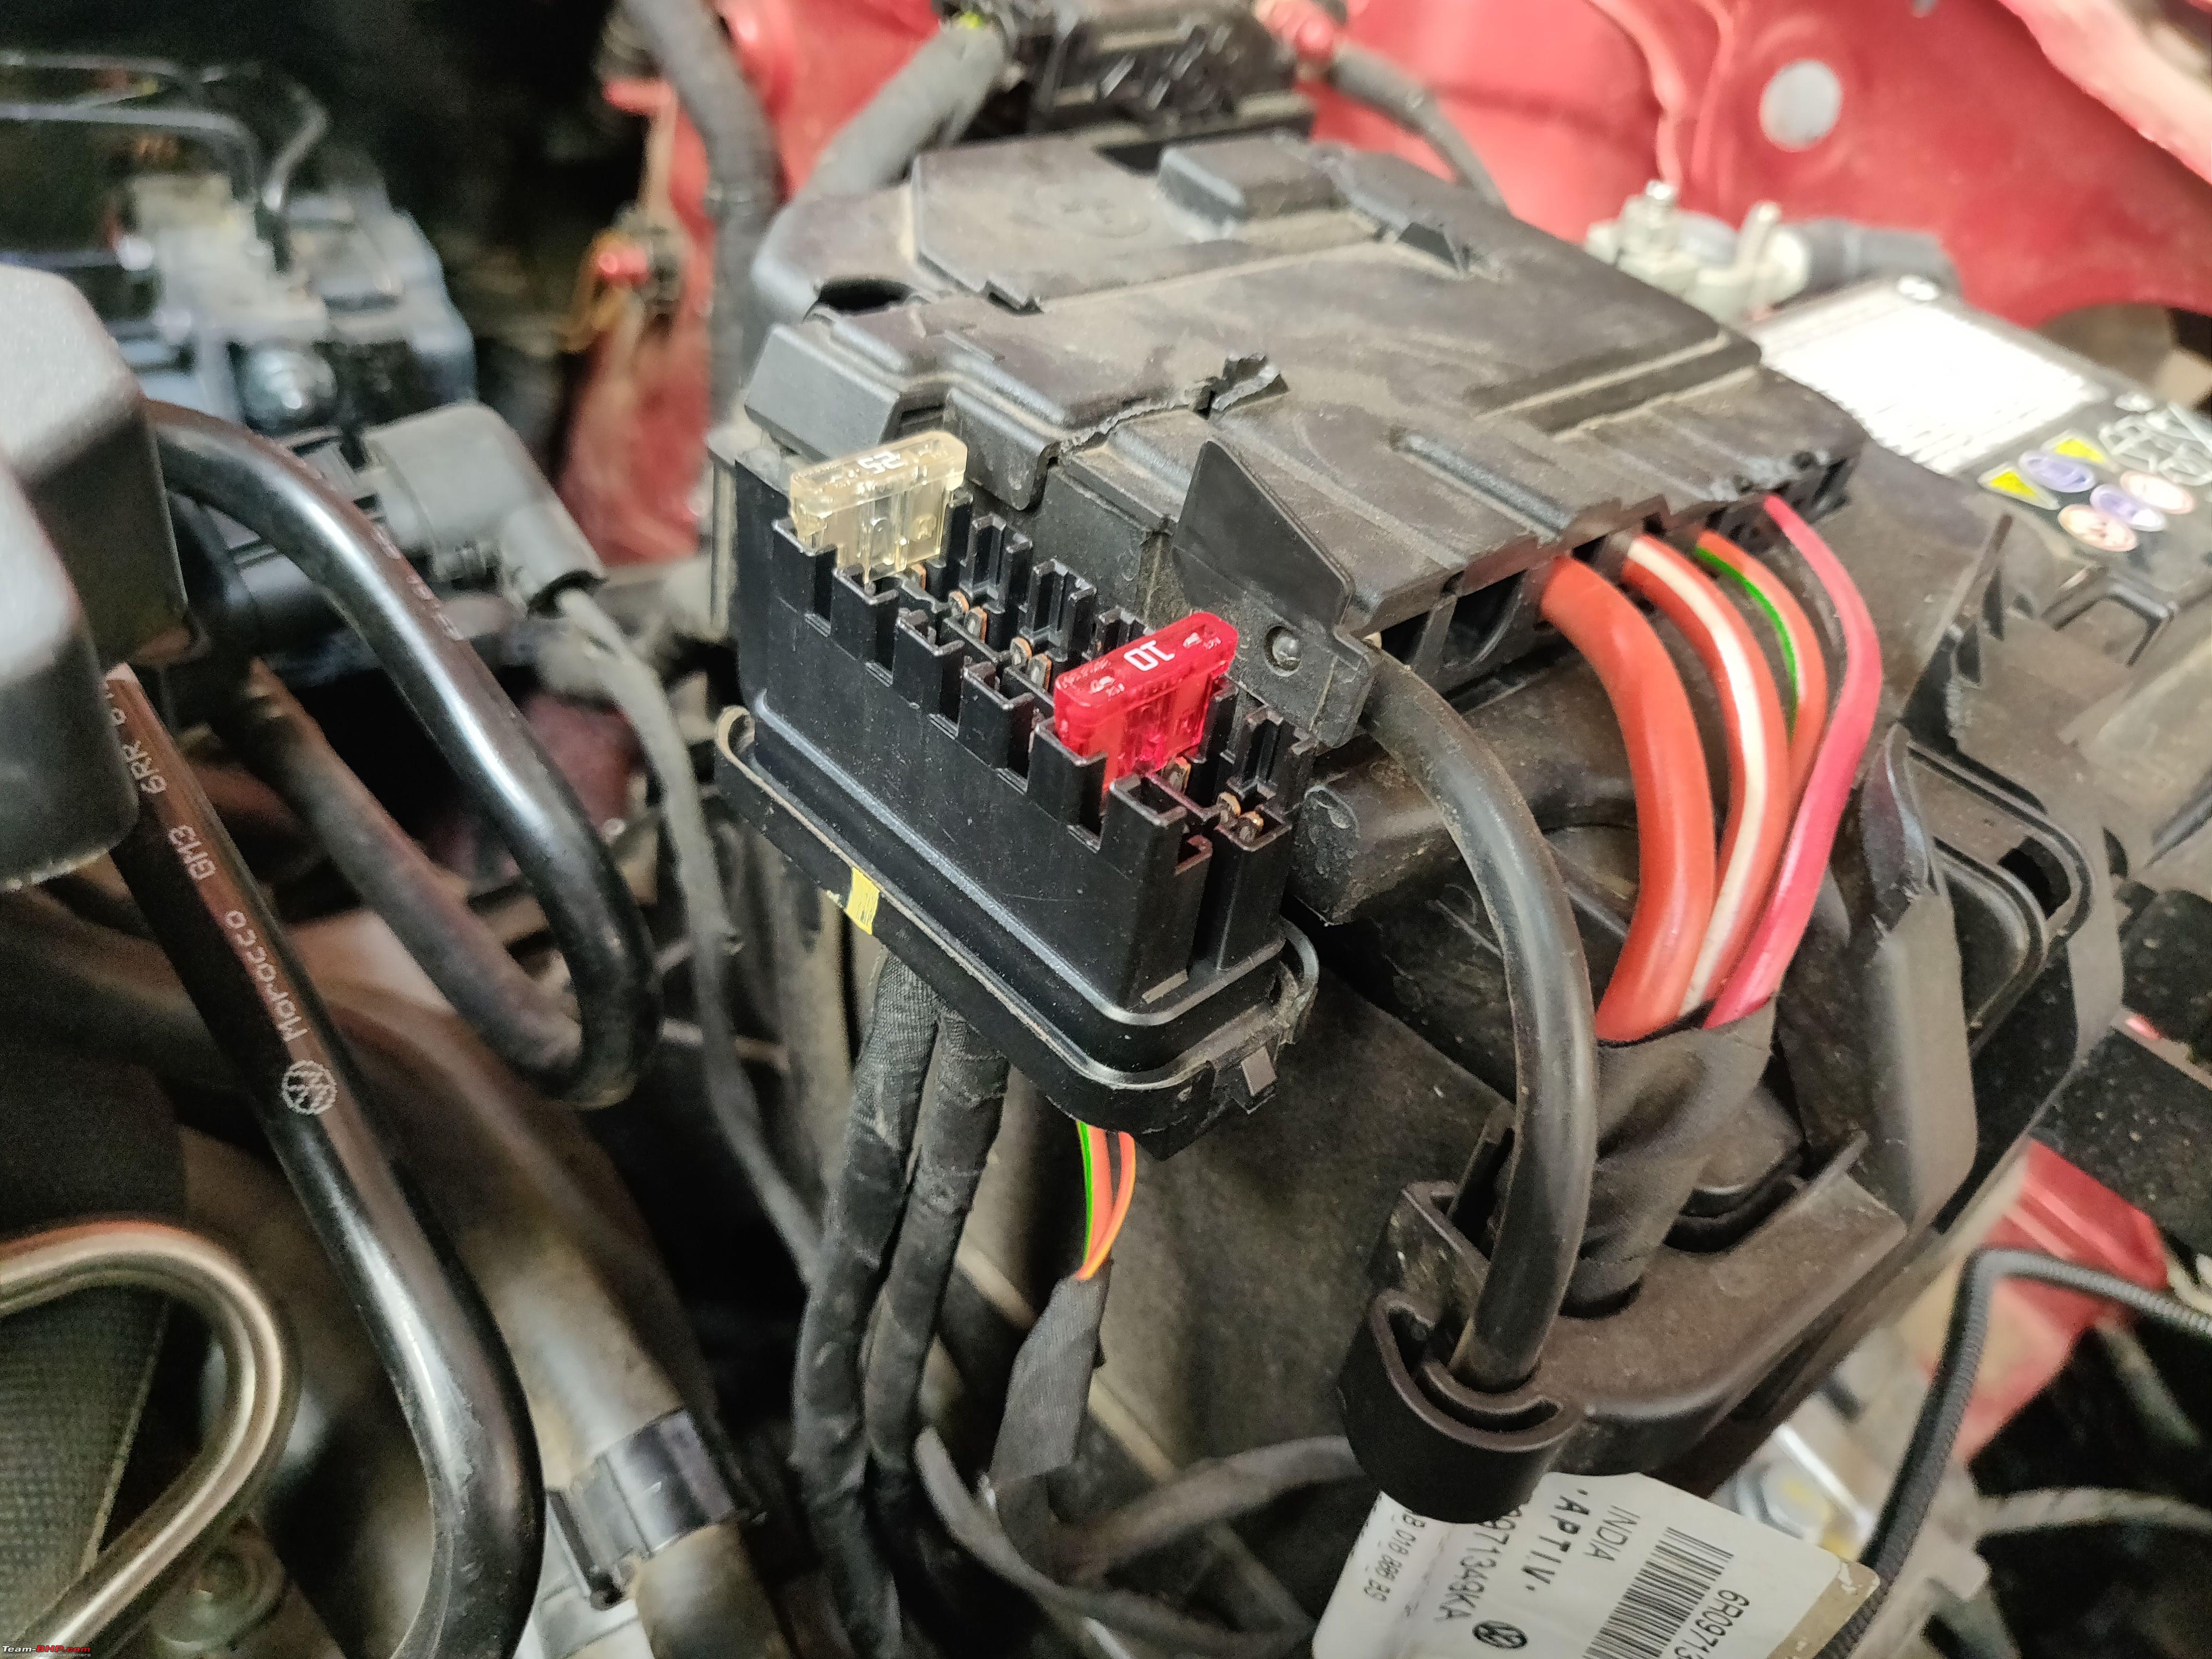  Make sure to slide the locking tab back in place. You can very well use this engine fusebox for other accessories that require power like HIDs etc. This is a much cleaner way compared to directly tapping power across the Battery, which is the common Jugaad many folks might be tempted to resort to. Test the fusebox to check if the electrical fuse-point is active when ignition is ON or if it is always ON as this will determine if this particular fuse point is right for you. For the Bi-Xenon Headlight emulator, I did not have any electrical issues or parasitic drains, but as I write this two years later, I do not remember what kind of fuse-point it was. Here's a look at the stock T10 Headlight connector, in front and rear view, and the here's the plug and play emulator which goes into the stock T10 socket.   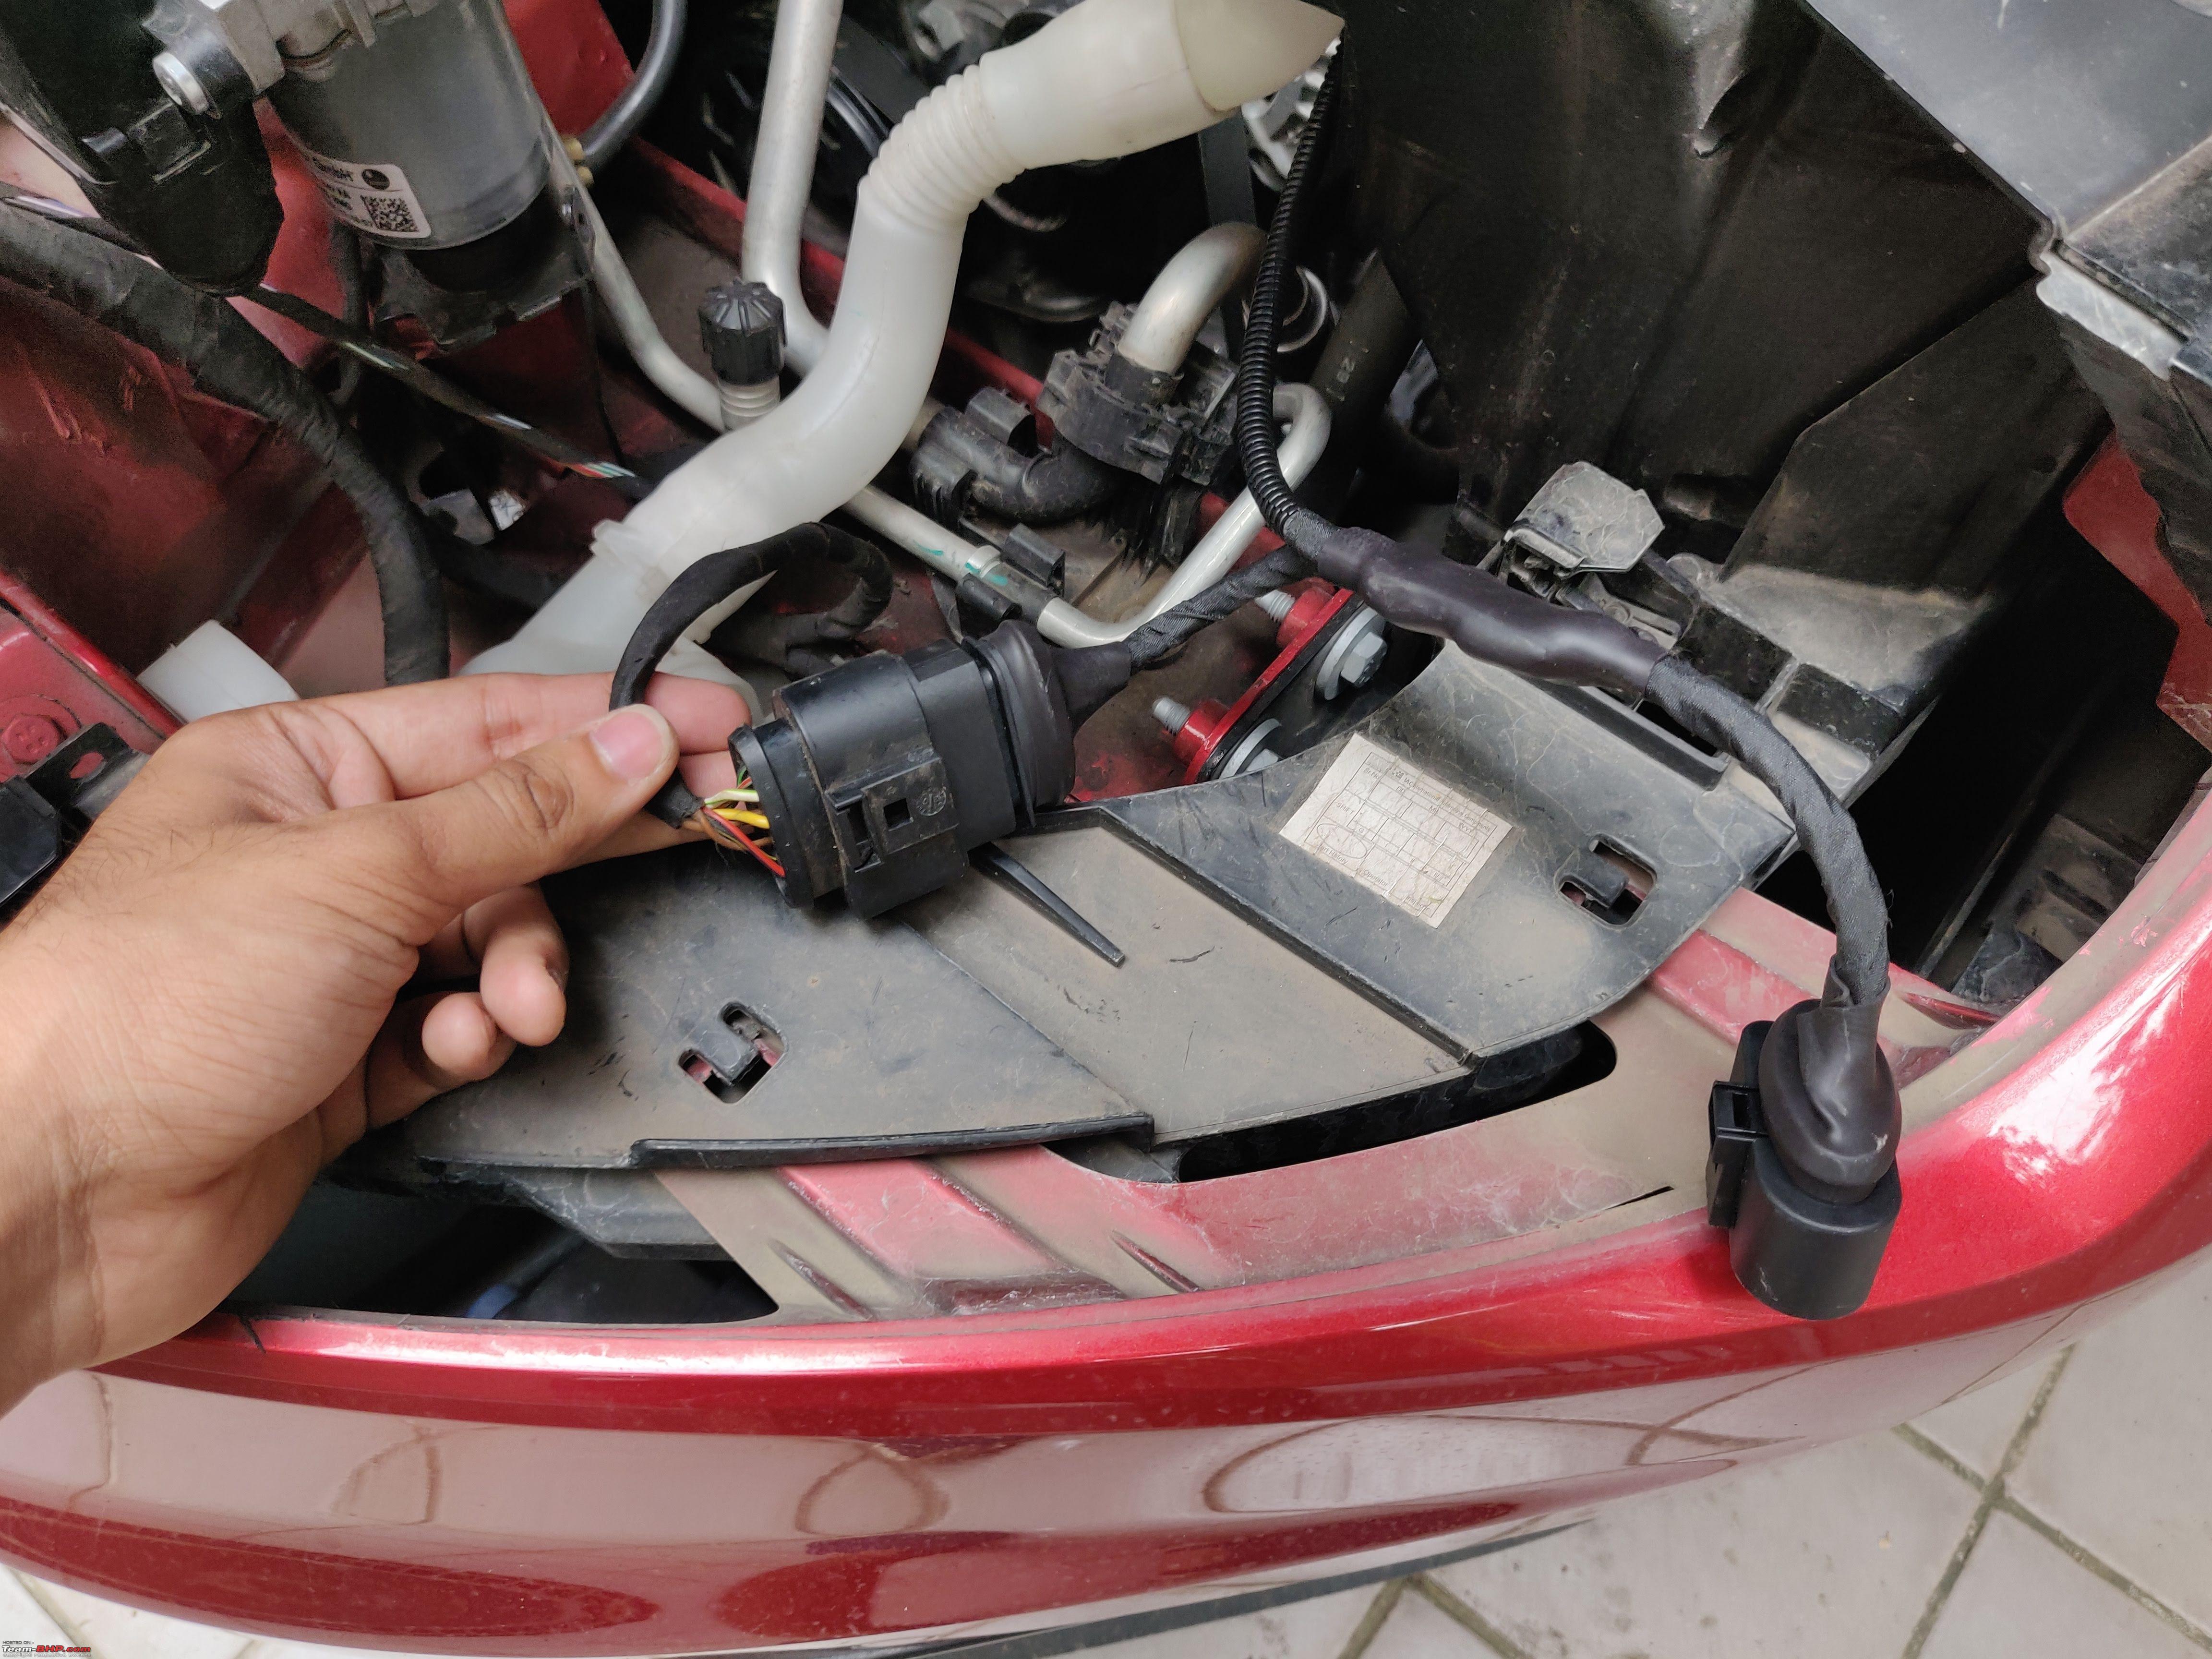 I believe this small post shall help many folks who wanted to add a thing or two in the engine bay. With this writeup out of the way, I can complete my writeup about the Bixenon Headlights themselves.  Last edited by fluidicjoy : 26th January 2023 at 05:34. Reason: Title updated |
|
| (8)
Thanks
|
| The following 8 BHPians Thank fluidicjoy for this useful post: | adityan27, dailydriver, GaryTSI, sauravpat, TSIboy, Varun_HexaGuy, VivekCherian, yesyeswe |
|
26th January 2023, 10:42
| #128 |
| BHPian Join Date: Oct 2020 Location: Pune, San Diego
Posts: 247
Thanked: 2,440 Times
| My Polo Underwent A Heart Transplant The sporty nature of the EA 211 1.0 TSI is the real reason we got the ageing Polo in 2020, and it’s a real beast of an engine. It’s crazy how something so tiny makes so much power and pulls so delightfully. For those who like to appreciate what’s under the hood, the stock 1.0 TSI Engine looks dismal and lacks that aesthetic appeal. 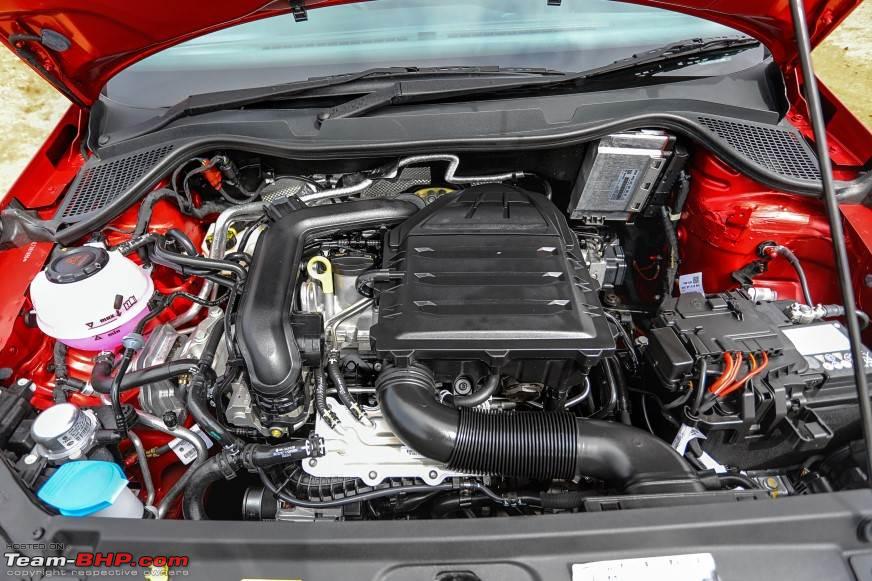 Thanks to how plain and boring the 1.0 TSI engine cover is, nobody can really appreciate it’s a VAG group engine under the hood with just a glance. In typical fashion, the same group of engines abroad got much sportier engine bays.  To make matters worse, it has a terrible design as far as air filter replacements are concerned and I’ve spoken at length’s about the Air Filter replacement in this thread here (DIY : VW Polo Engine Air Filter Service). With all of these thoughts lingering in the back of mind, I started exploring ways to +50 the BHP of this tiny 1.0 TSI Engine  , and I couldn’t think of a better way than performing a heart transplant. I stumbled across this idea shortly after we received the vehicle but it couldn’t materialise since there wasn’t a green corridor for the new hearts to be carried in. However, my friend and BHPian Mayur Shinde beat me to it, but finally our Polo’s hearts resonate, beating 4x faster than before, because of the four shiny legendary rings which are now in place. , and I couldn’t think of a better way than performing a heart transplant. I stumbled across this idea shortly after we received the vehicle but it couldn’t materialise since there wasn’t a green corridor for the new hearts to be carried in. However, my friend and BHPian Mayur Shinde beat me to it, but finally our Polo’s hearts resonate, beating 4x faster than before, because of the four shiny legendary rings which are now in place. The new heart in place, comes from an Audi A1 1.0 TFSI which made a little more power than the engine we get here. This heart should be compatible with all of the new 1.0 TSI cars we get here, right from the Polo, Vento, Rapid to the newest Taigun, Kushaq, Slavia and Virtus. 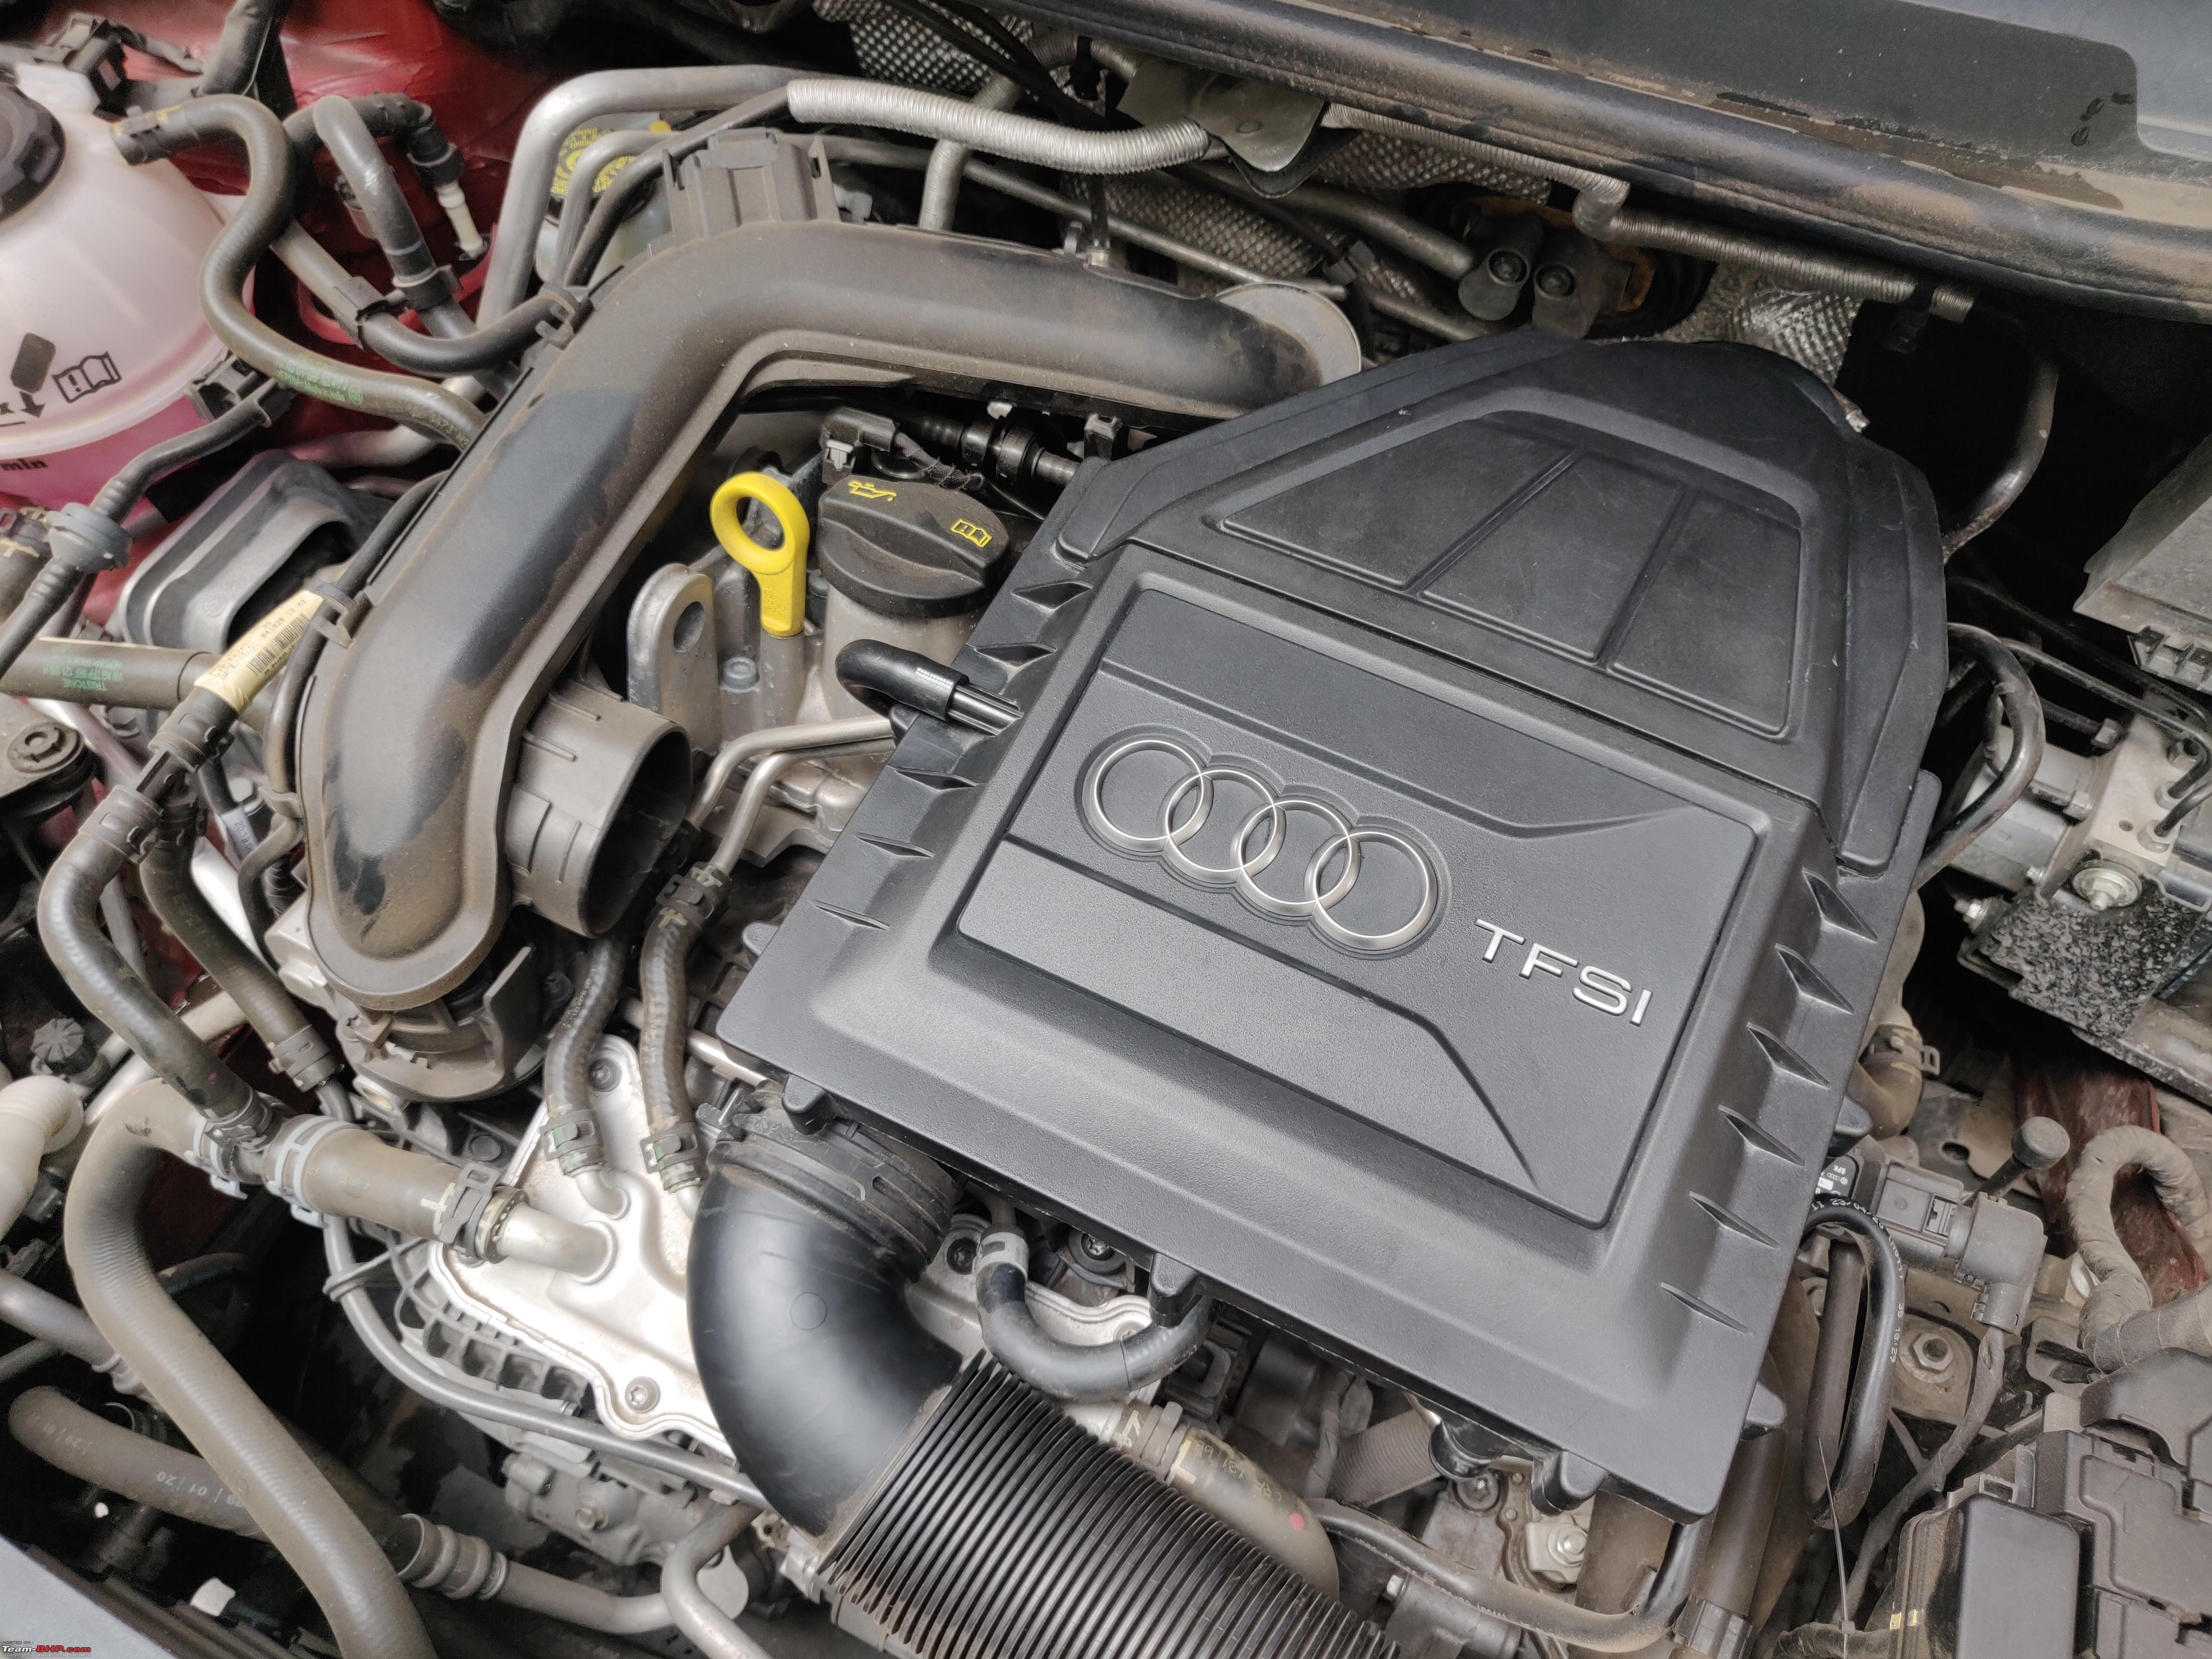 While installing the new air-box was a straightforward task, the old air-box needed quite a bit of love before giving it a new home in the heart of my car. The first step was opening them up and cleaning all of the dust and grime inside. 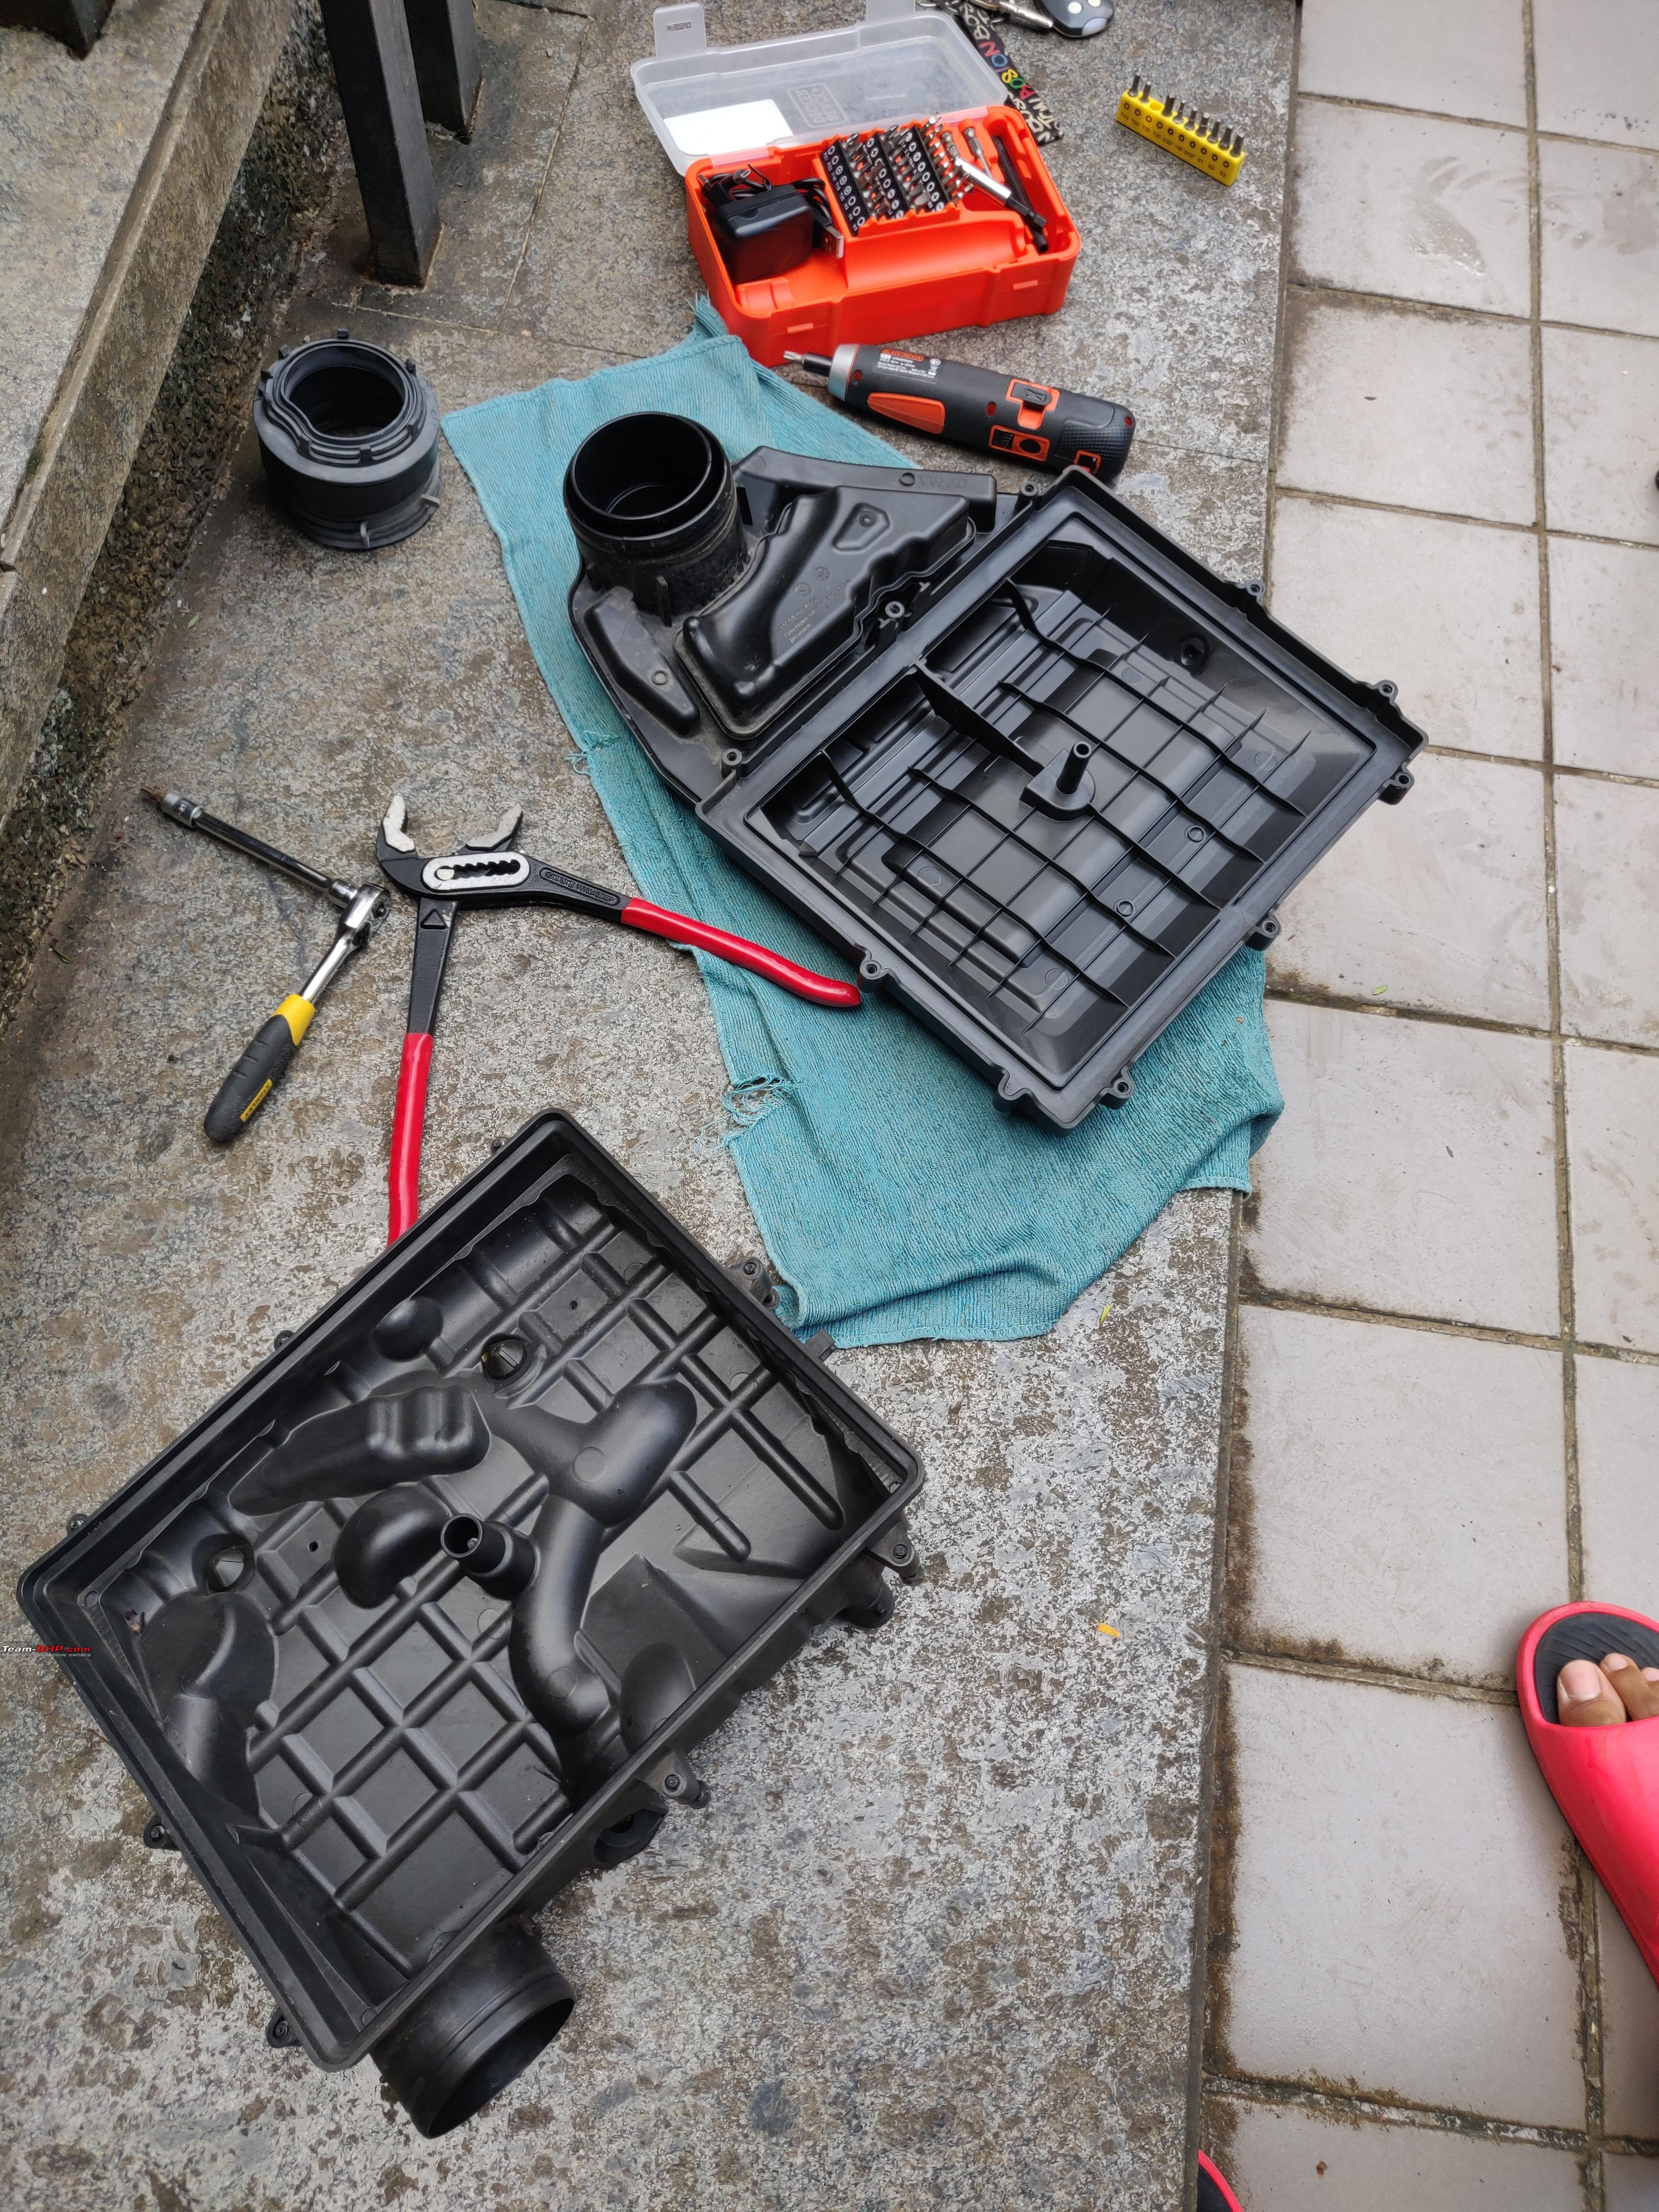 Then it was time for a bubble bath, and I used the good stuff I purchased from the Glosswerkz store. I just gave them a light scrub, but the result was delightful.  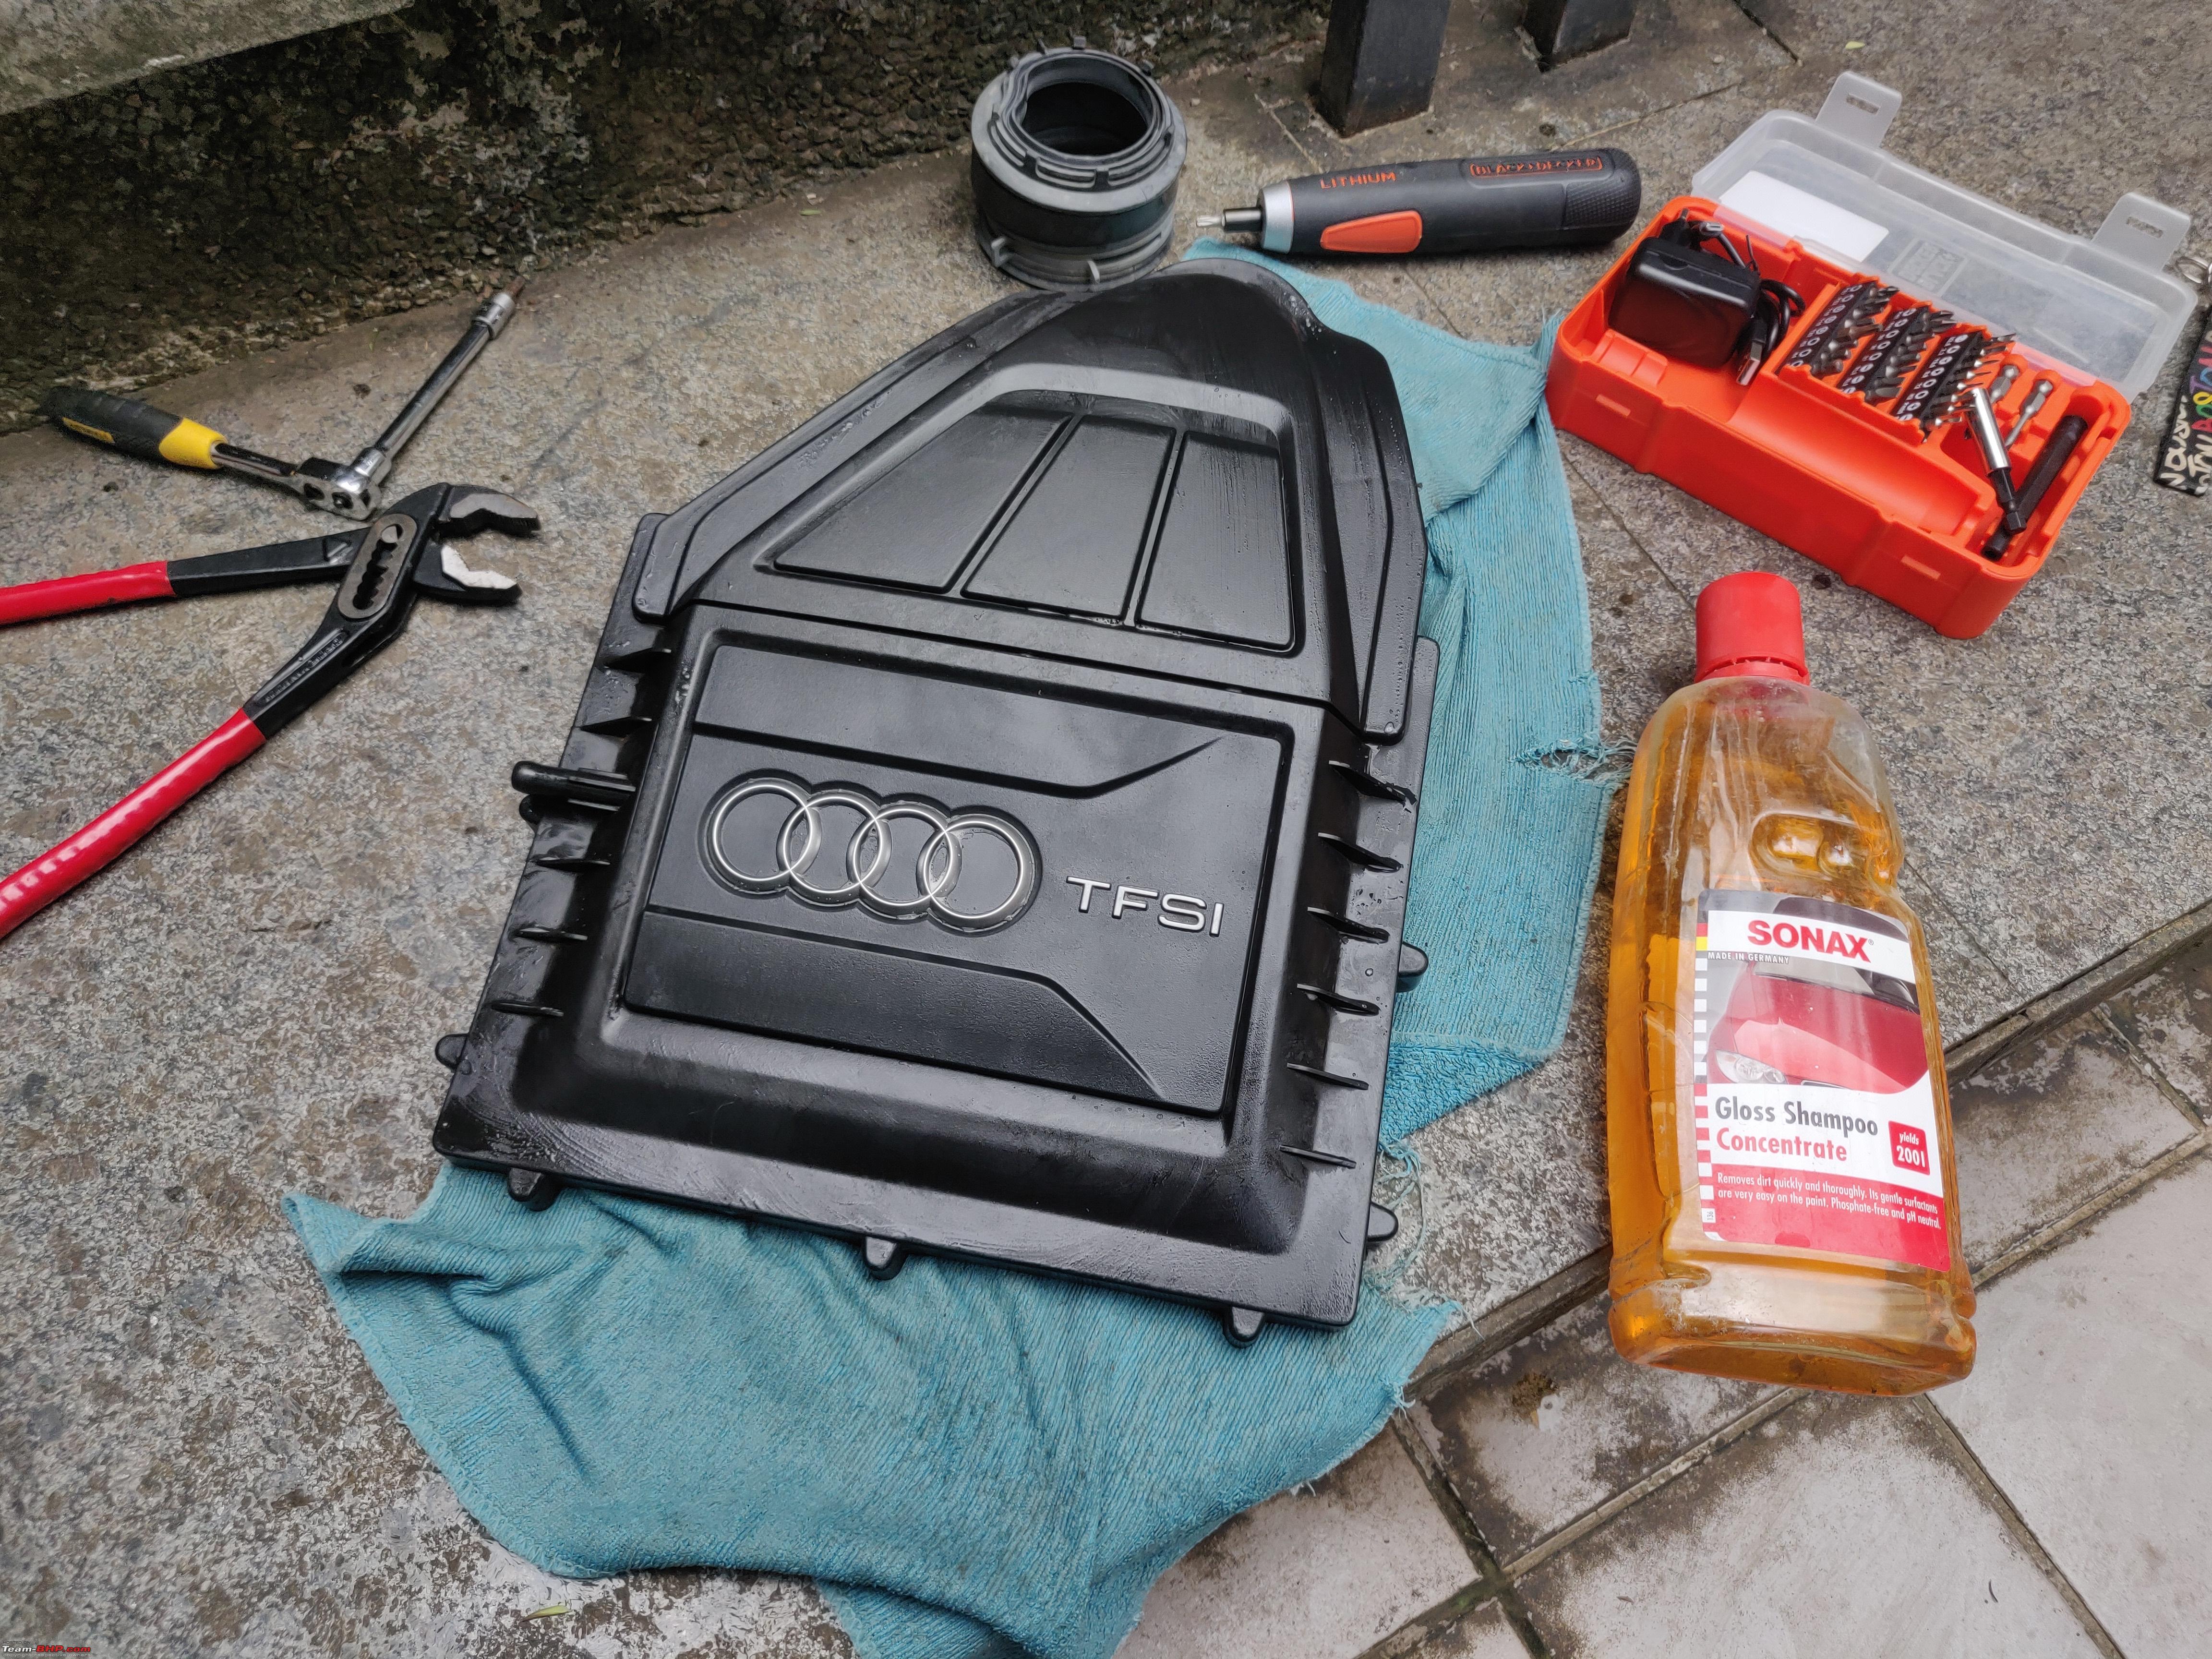 I ended up importing a few of these from Europe, and all of them were subjected to the same cleansing protocol, before placing them in storage, in wait of the next enthusiasts who would want these for their own cars.  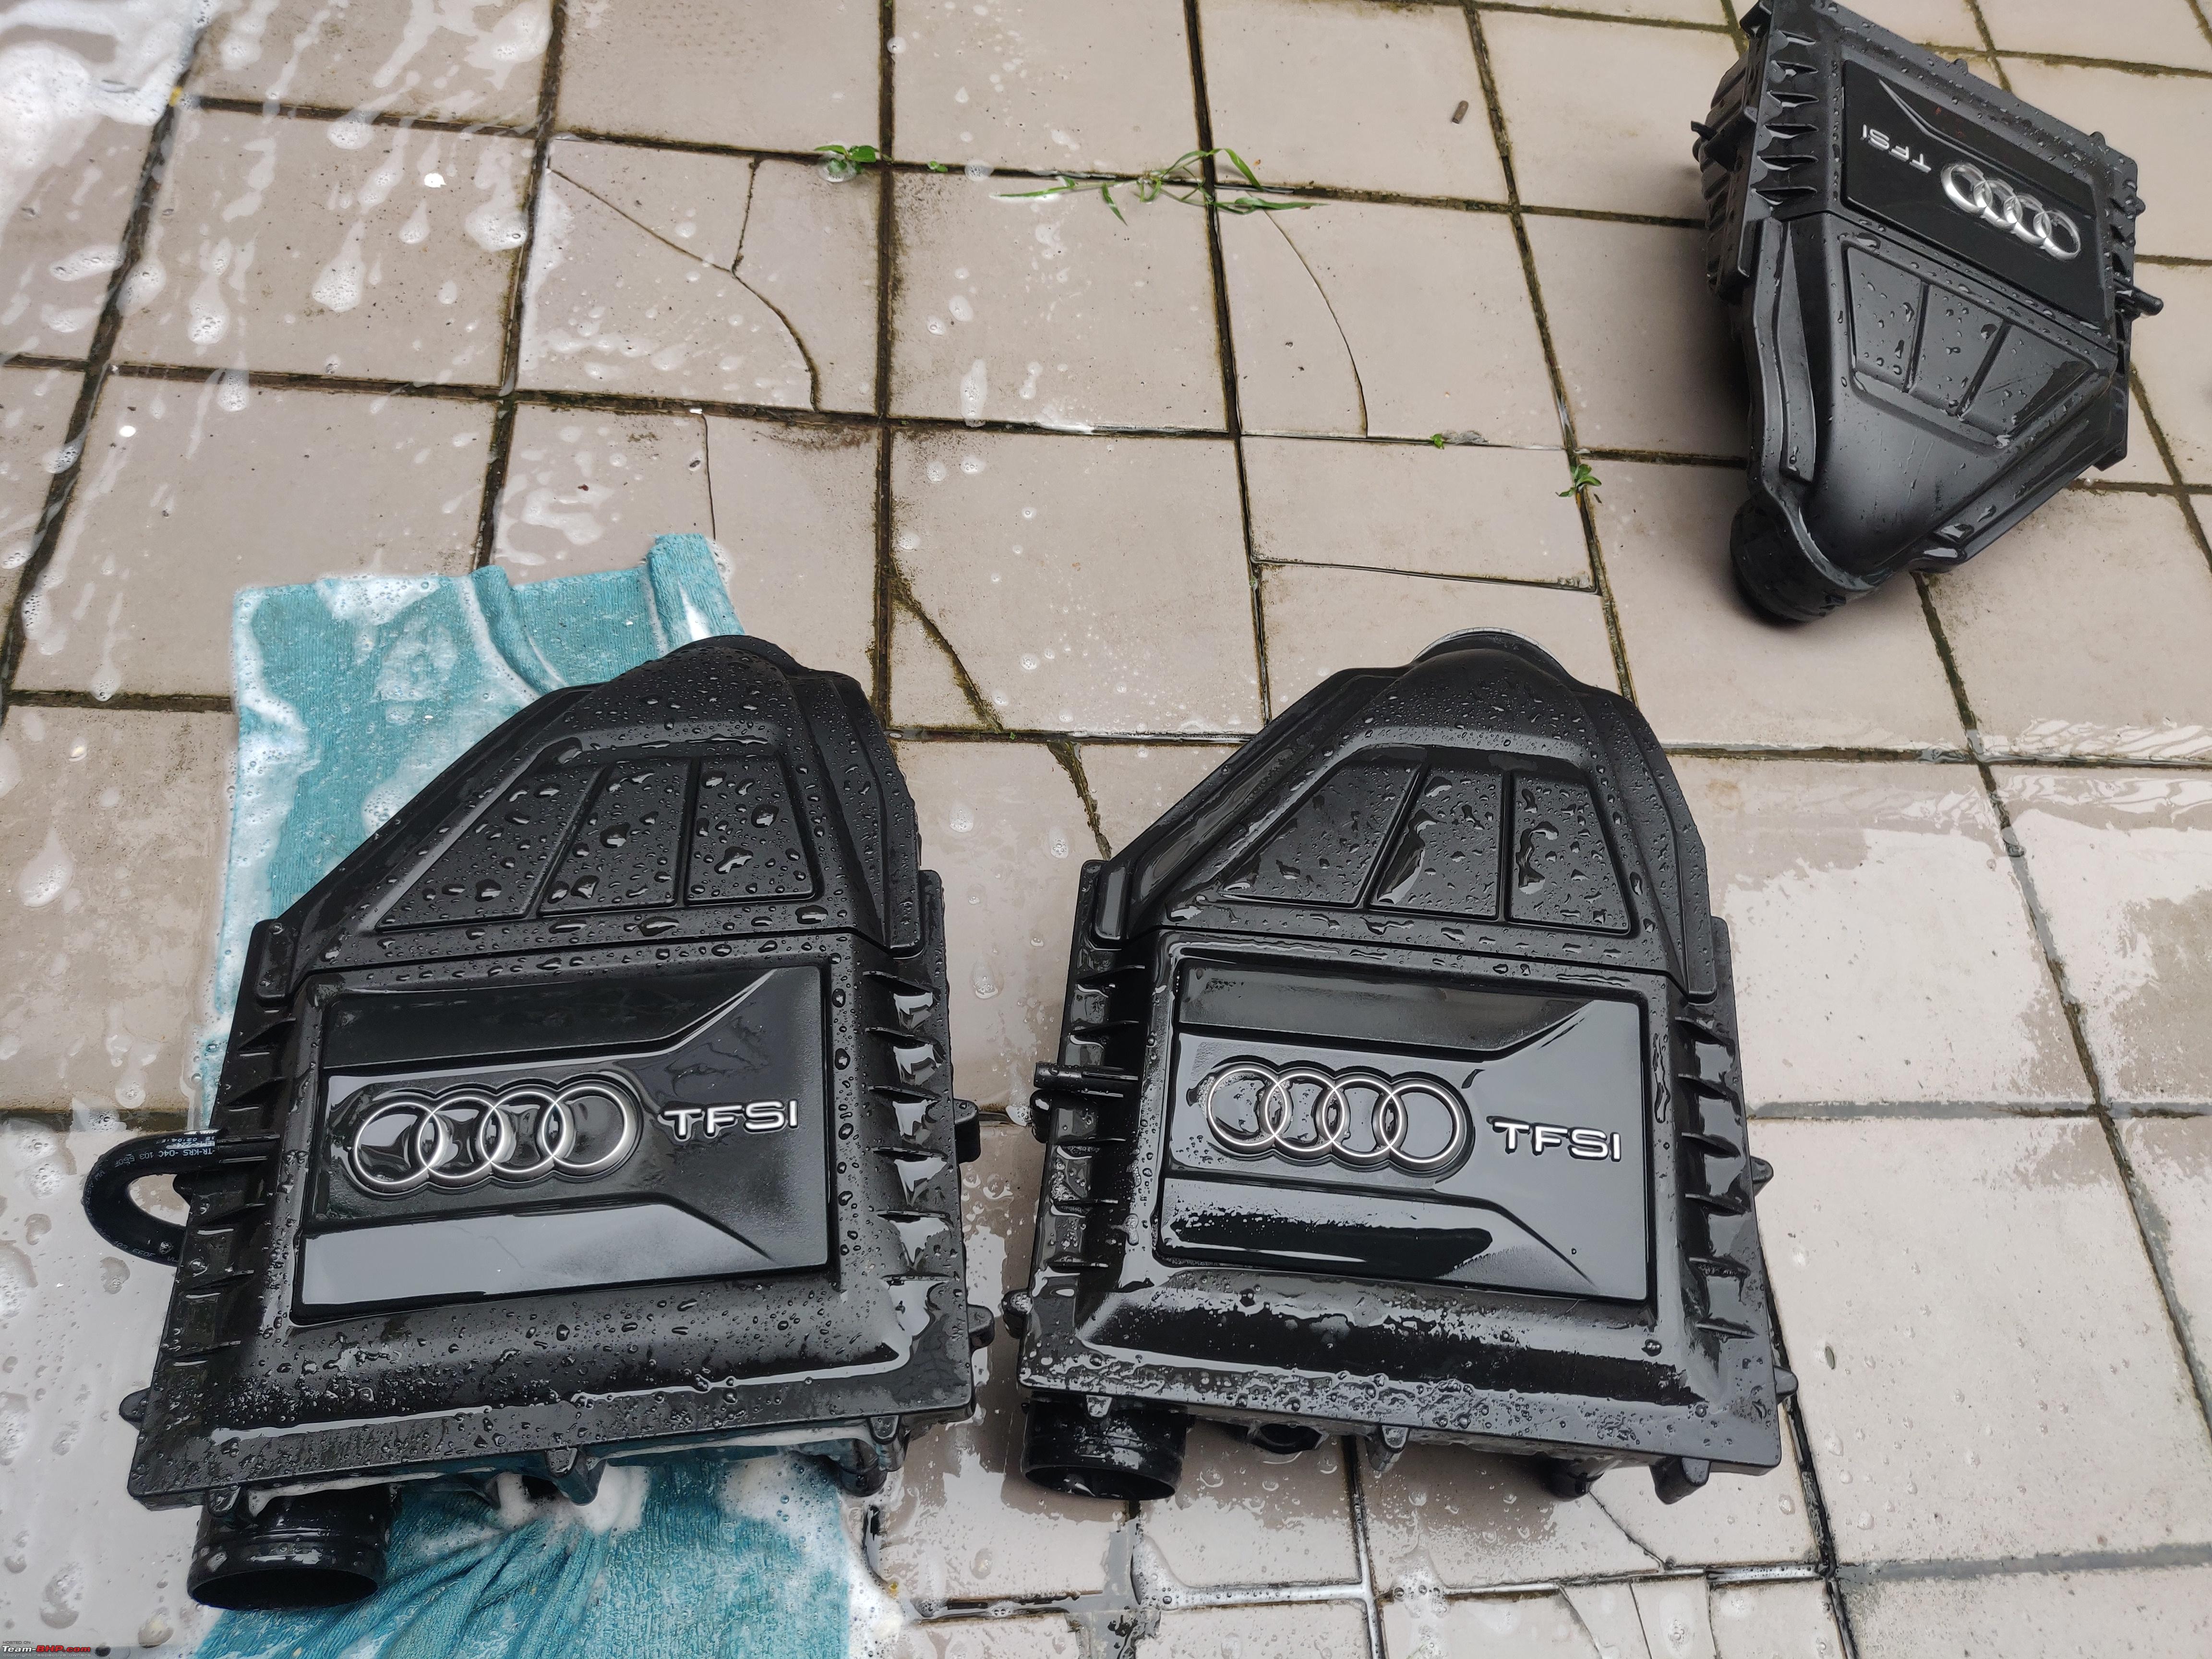 Here's a photo after a few thousand kilometres. Thanks to the open cold-intake Euro-spec Intake mod and the immaculately dusty streets we drive on, the new heart started to feel right at home in this car. 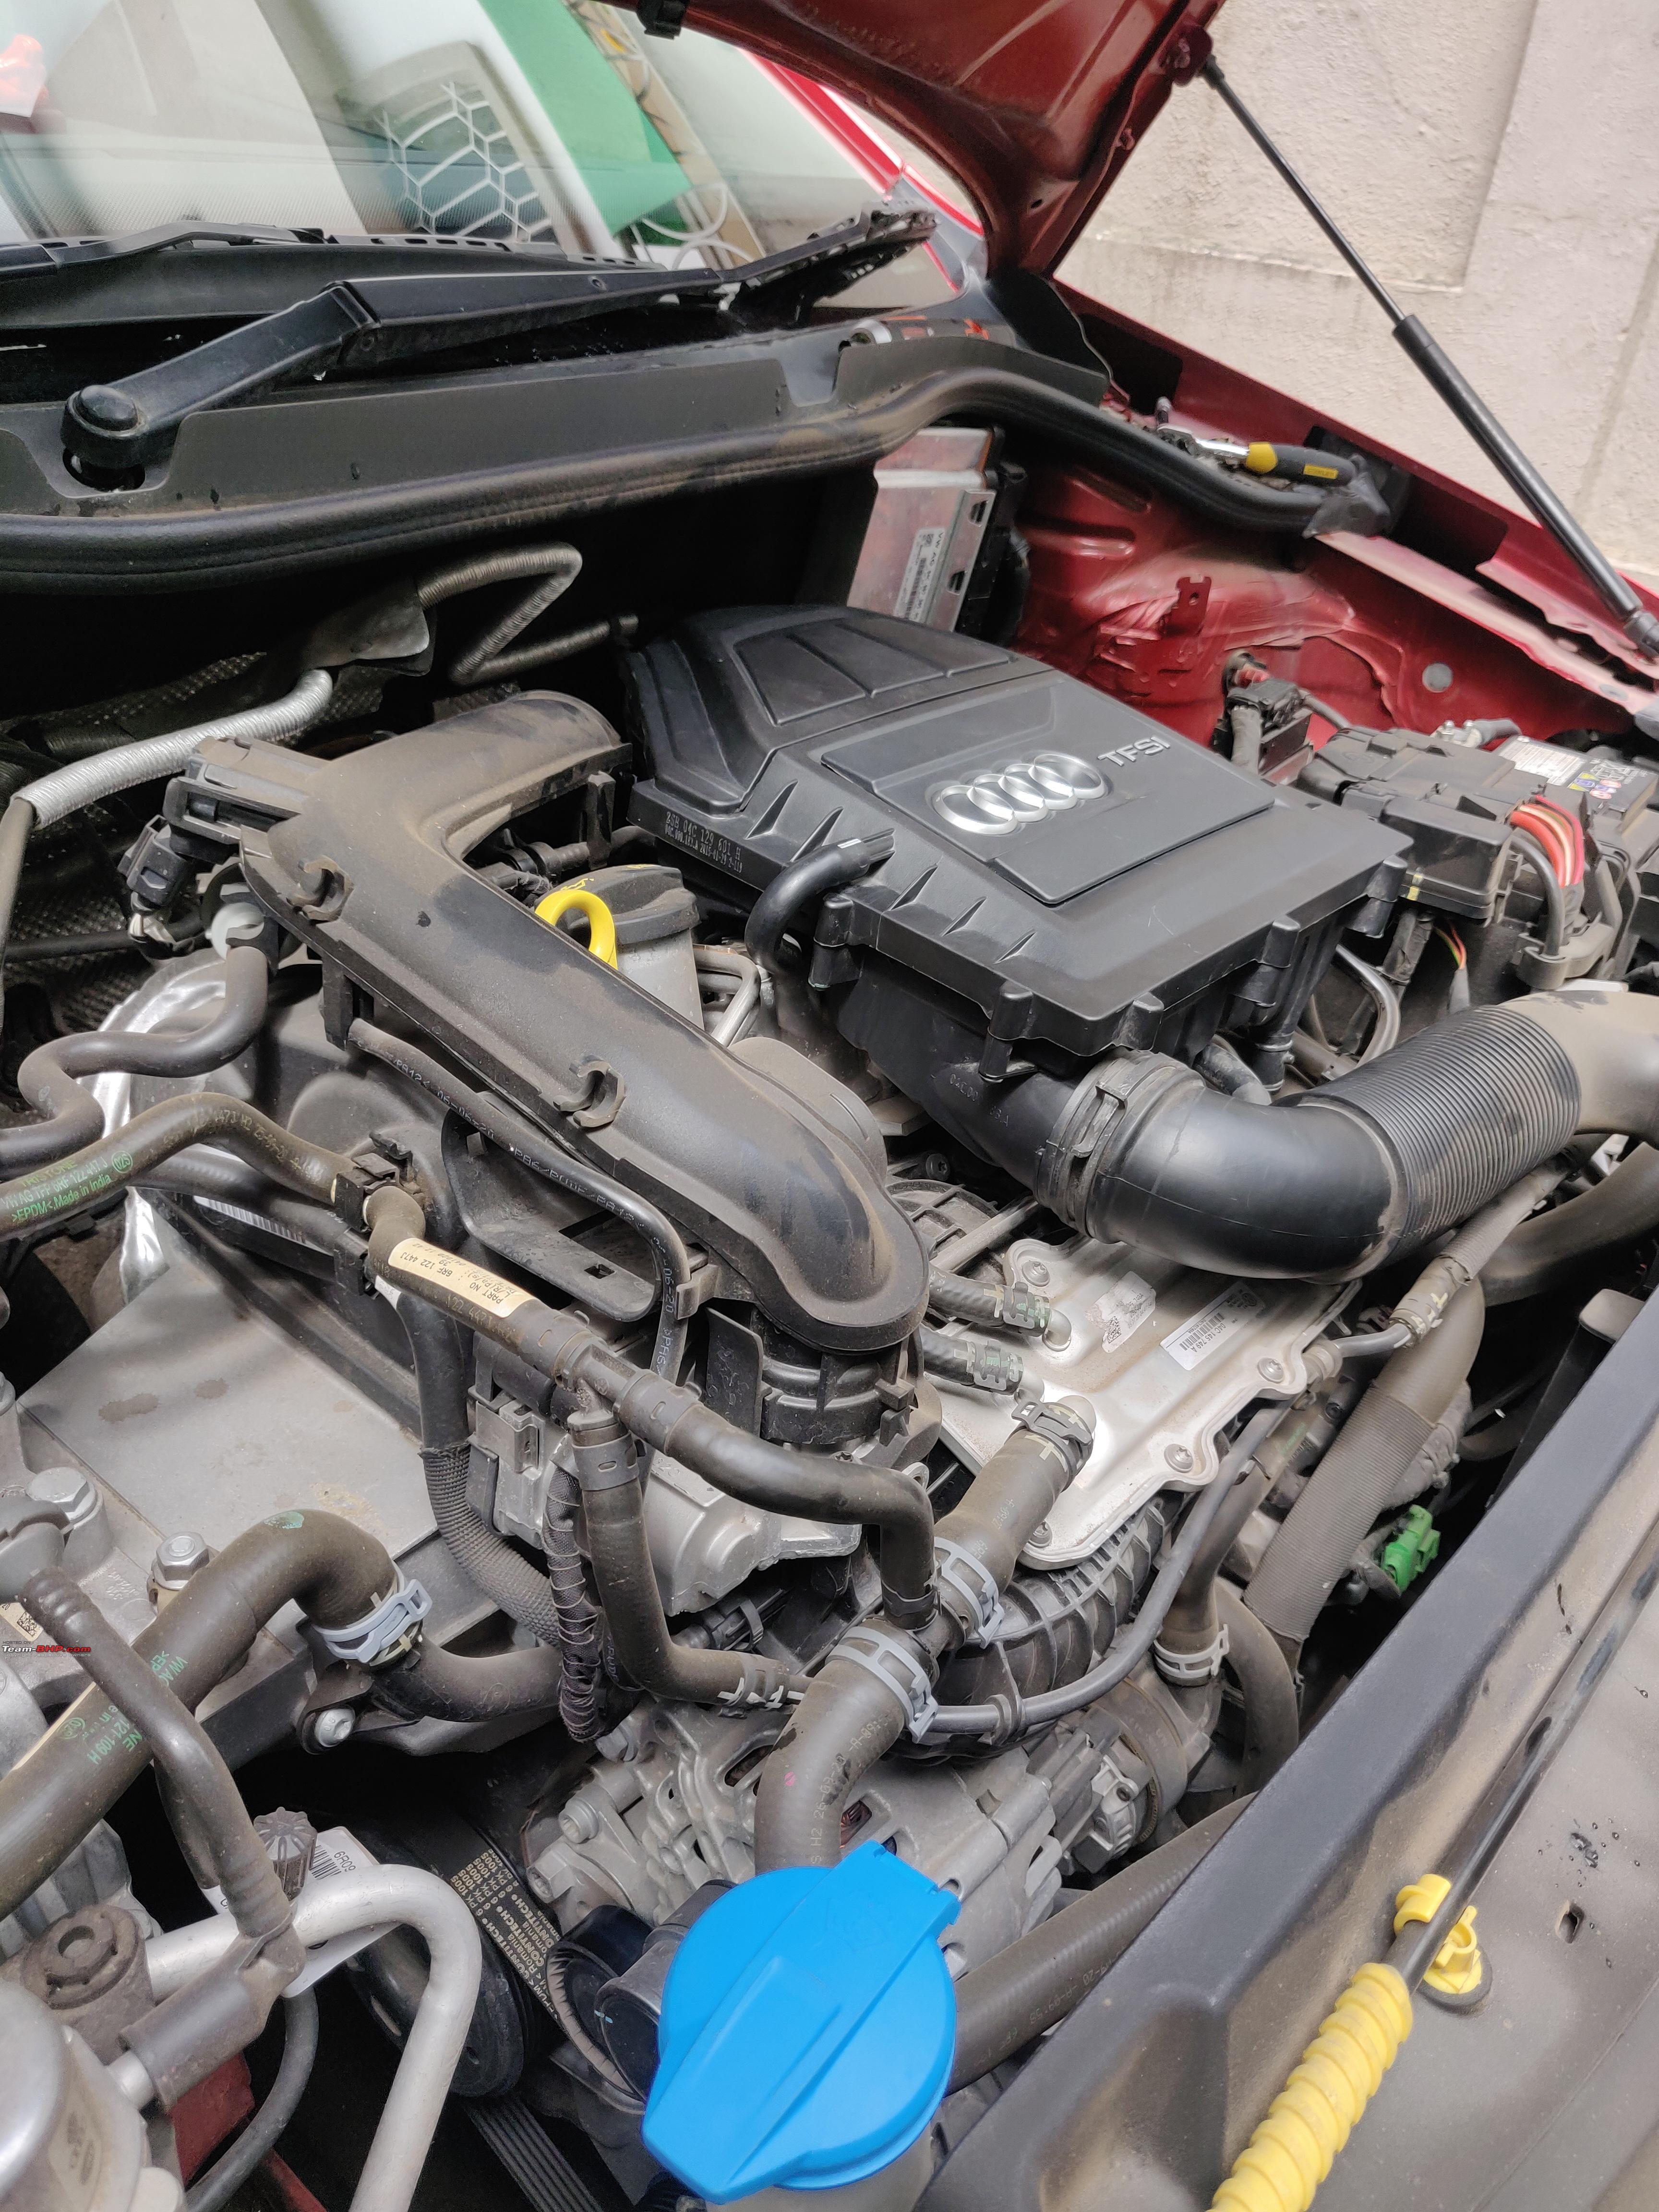  That's it for this short post.  Last edited by fluidicjoy : 26th January 2023 at 10:44. Reason: Moved emoji |
|
| (8)
Thanks
|
| The following 8 BHPians Thank fluidicjoy for this useful post: | adityan27, GaryTSI, keroo1099, MayurS, UtkarshC, vedirah, VivekCherian, yesyeswe |
|
26th January 2023, 11:51
| #129 |
| BHPian Join Date: Oct 2020 Location: Pune, San Diego
Posts: 247
Thanked: 2,440 Times
| Polo 6R : Adding a Boot-Lamp, Better late than never The Polo sold in India came without a boot-light, while internationally this car even got upto two boot-lights on either side. Polo enthusiasts have managed to artistically even install four trunk lights in their car, bright enough to probably read a book or cook dinner in their trunk, but I thought its imperative that I have at least one working light in place. There is a detailed DIY boot-light thread by Gannu (VW Polo DIY: Adding a boot lamp!), but it follows a different strategy than the one I ended up using. We also have a few other nice threads on Boot-Lights which are worth reading. 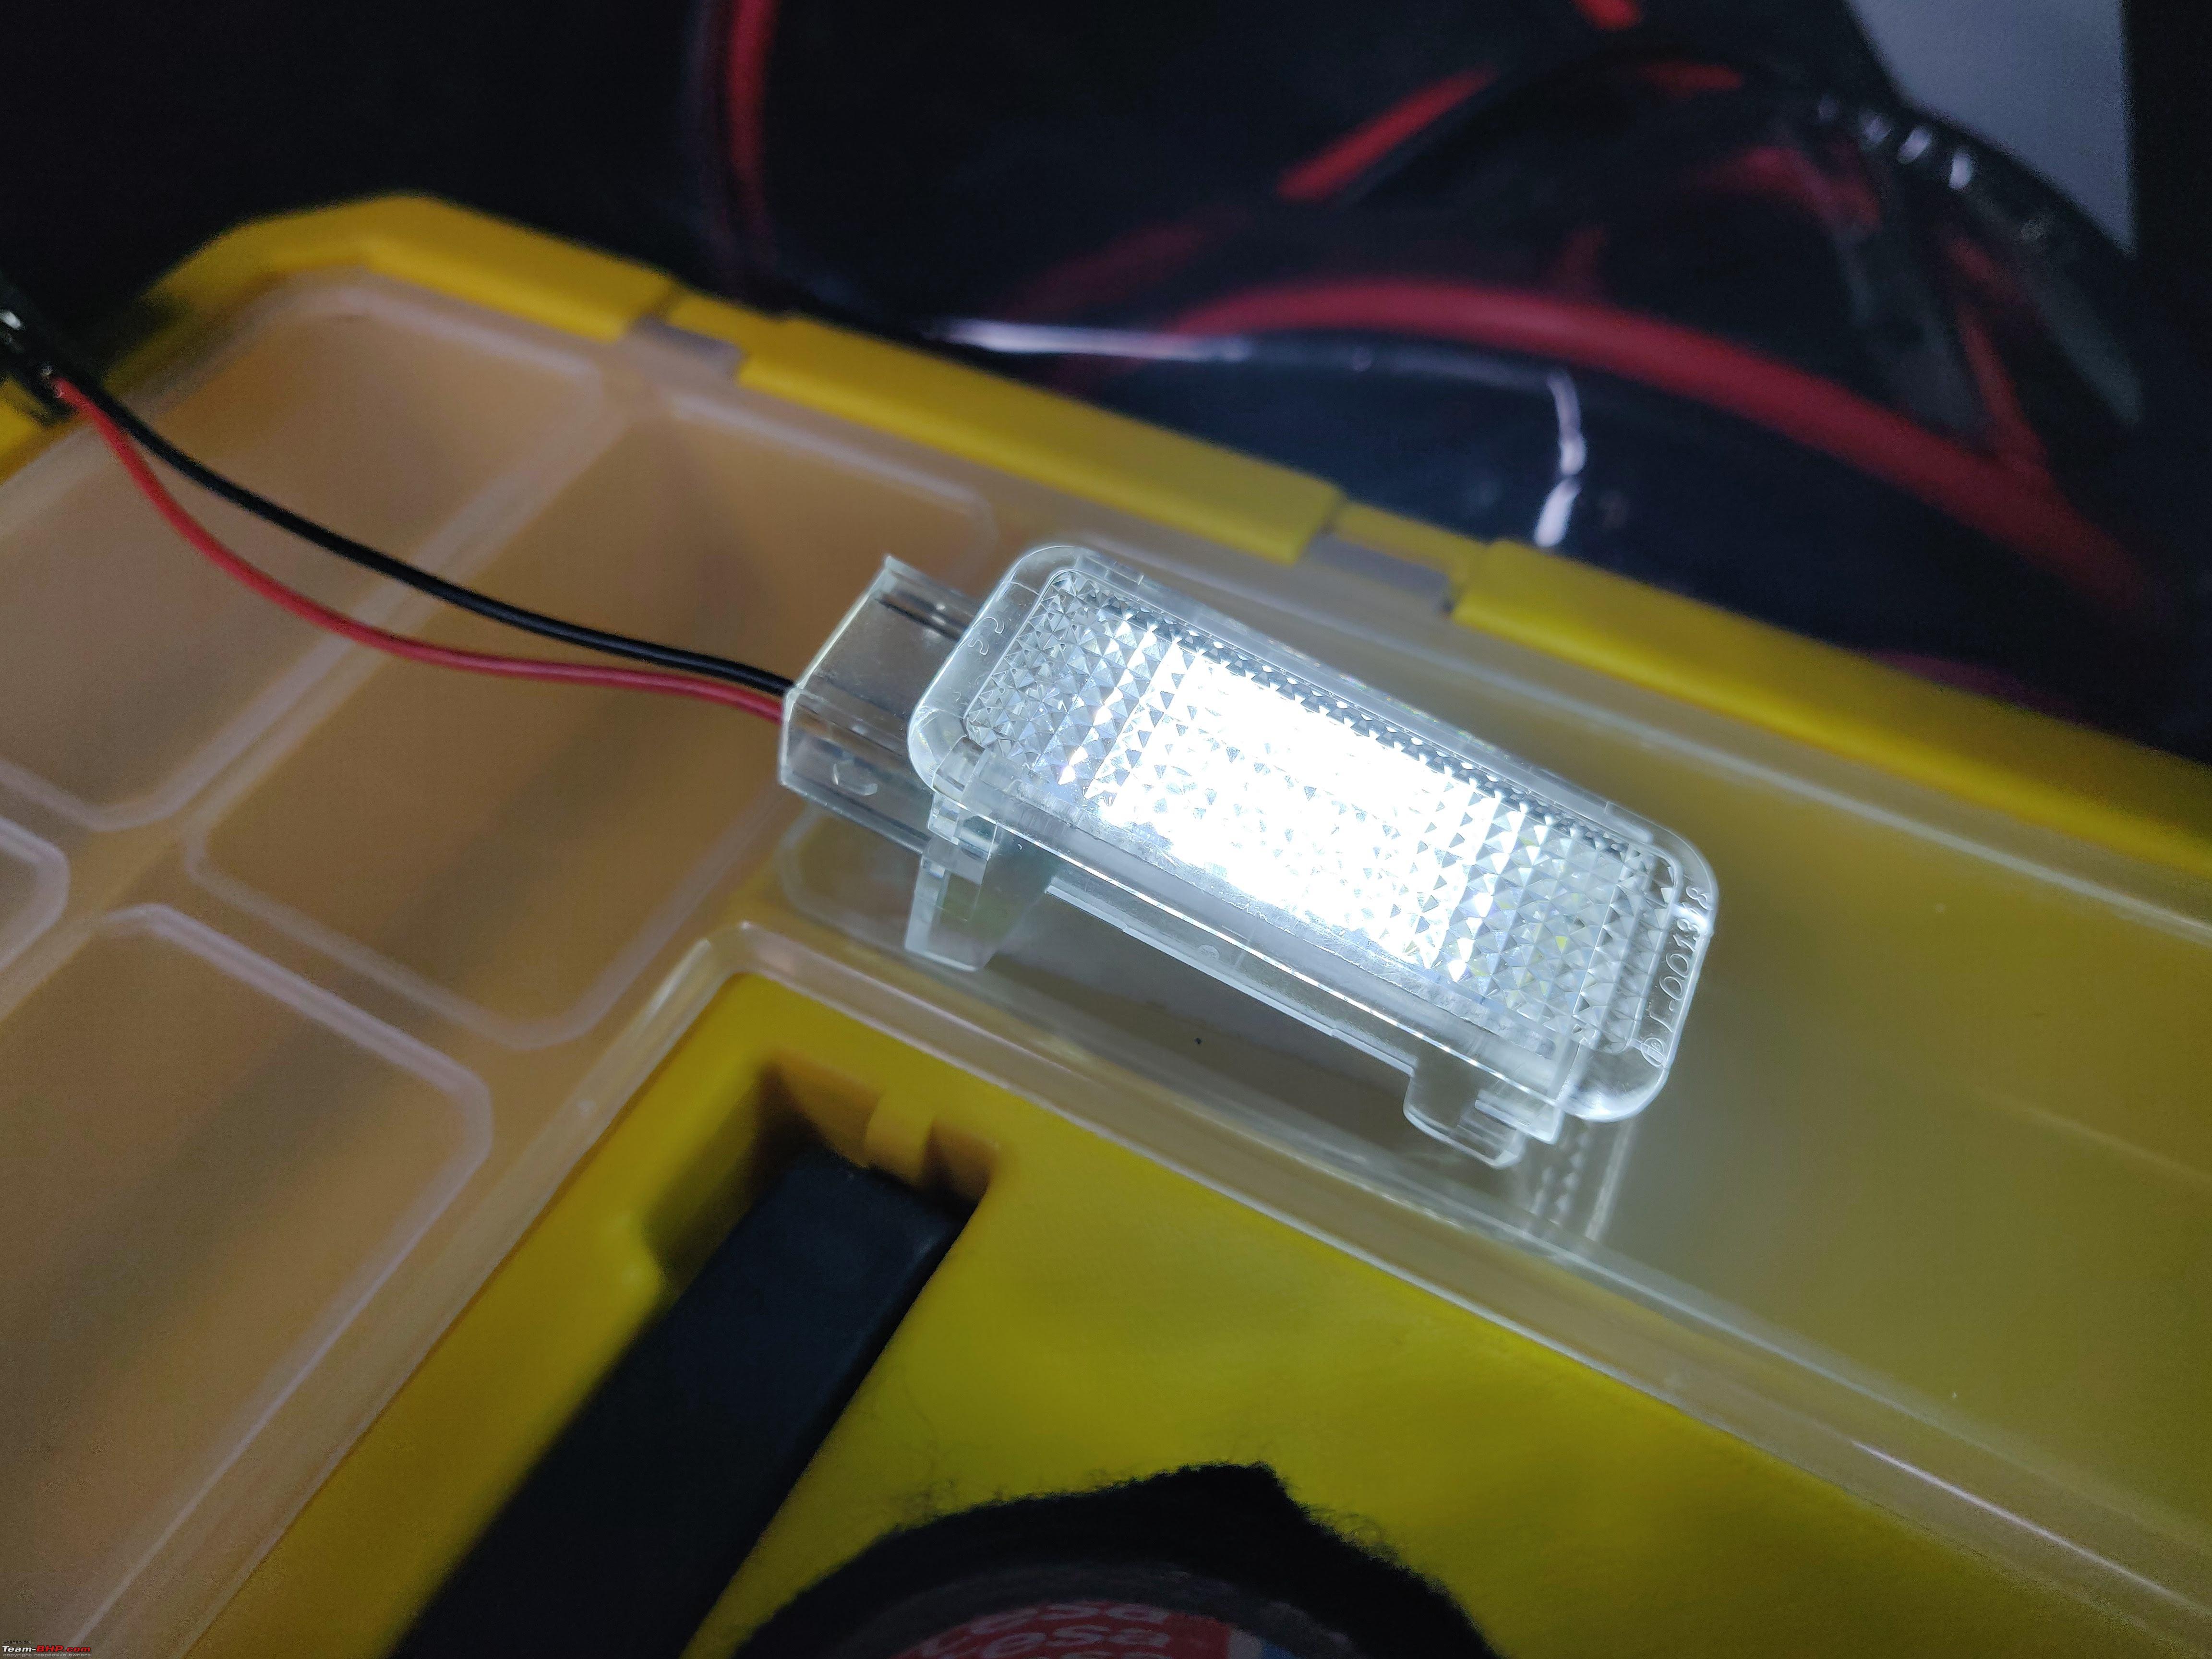 Long ago, I bench tested a bright LED assembly and finalised its wiring. Ignore the messy wires, since they belong to multiple retrofits which were in the testing stage. 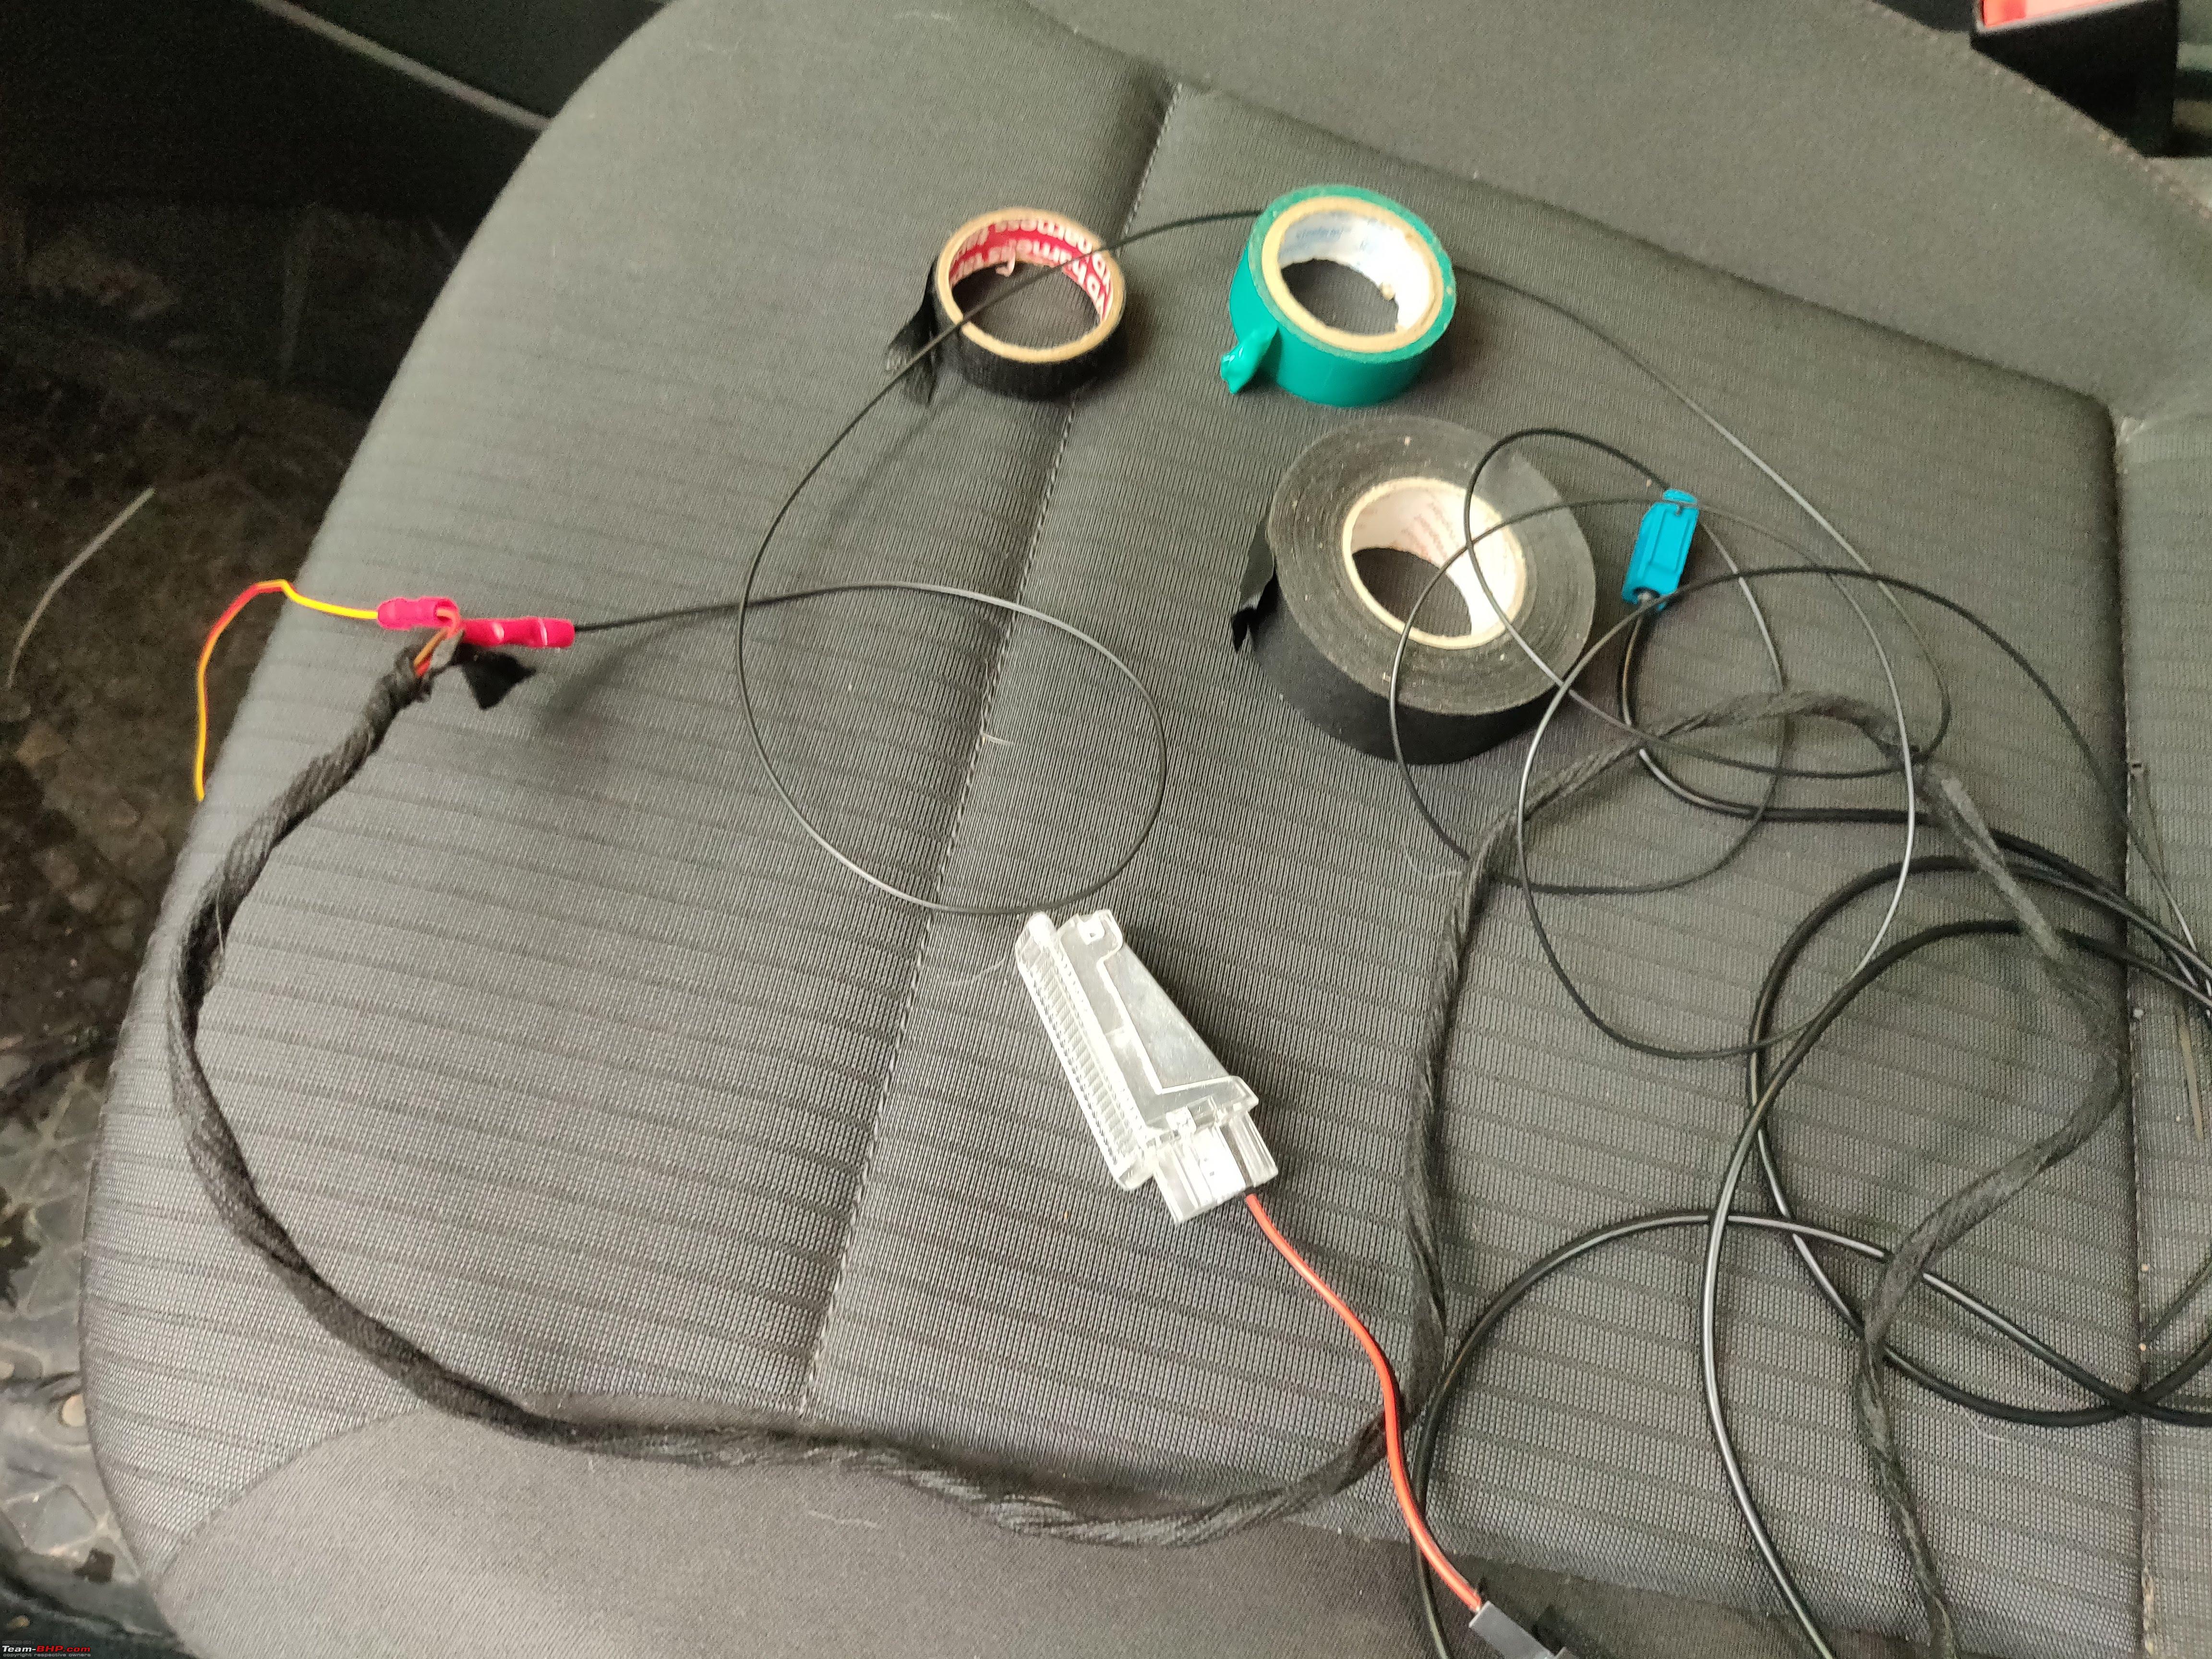 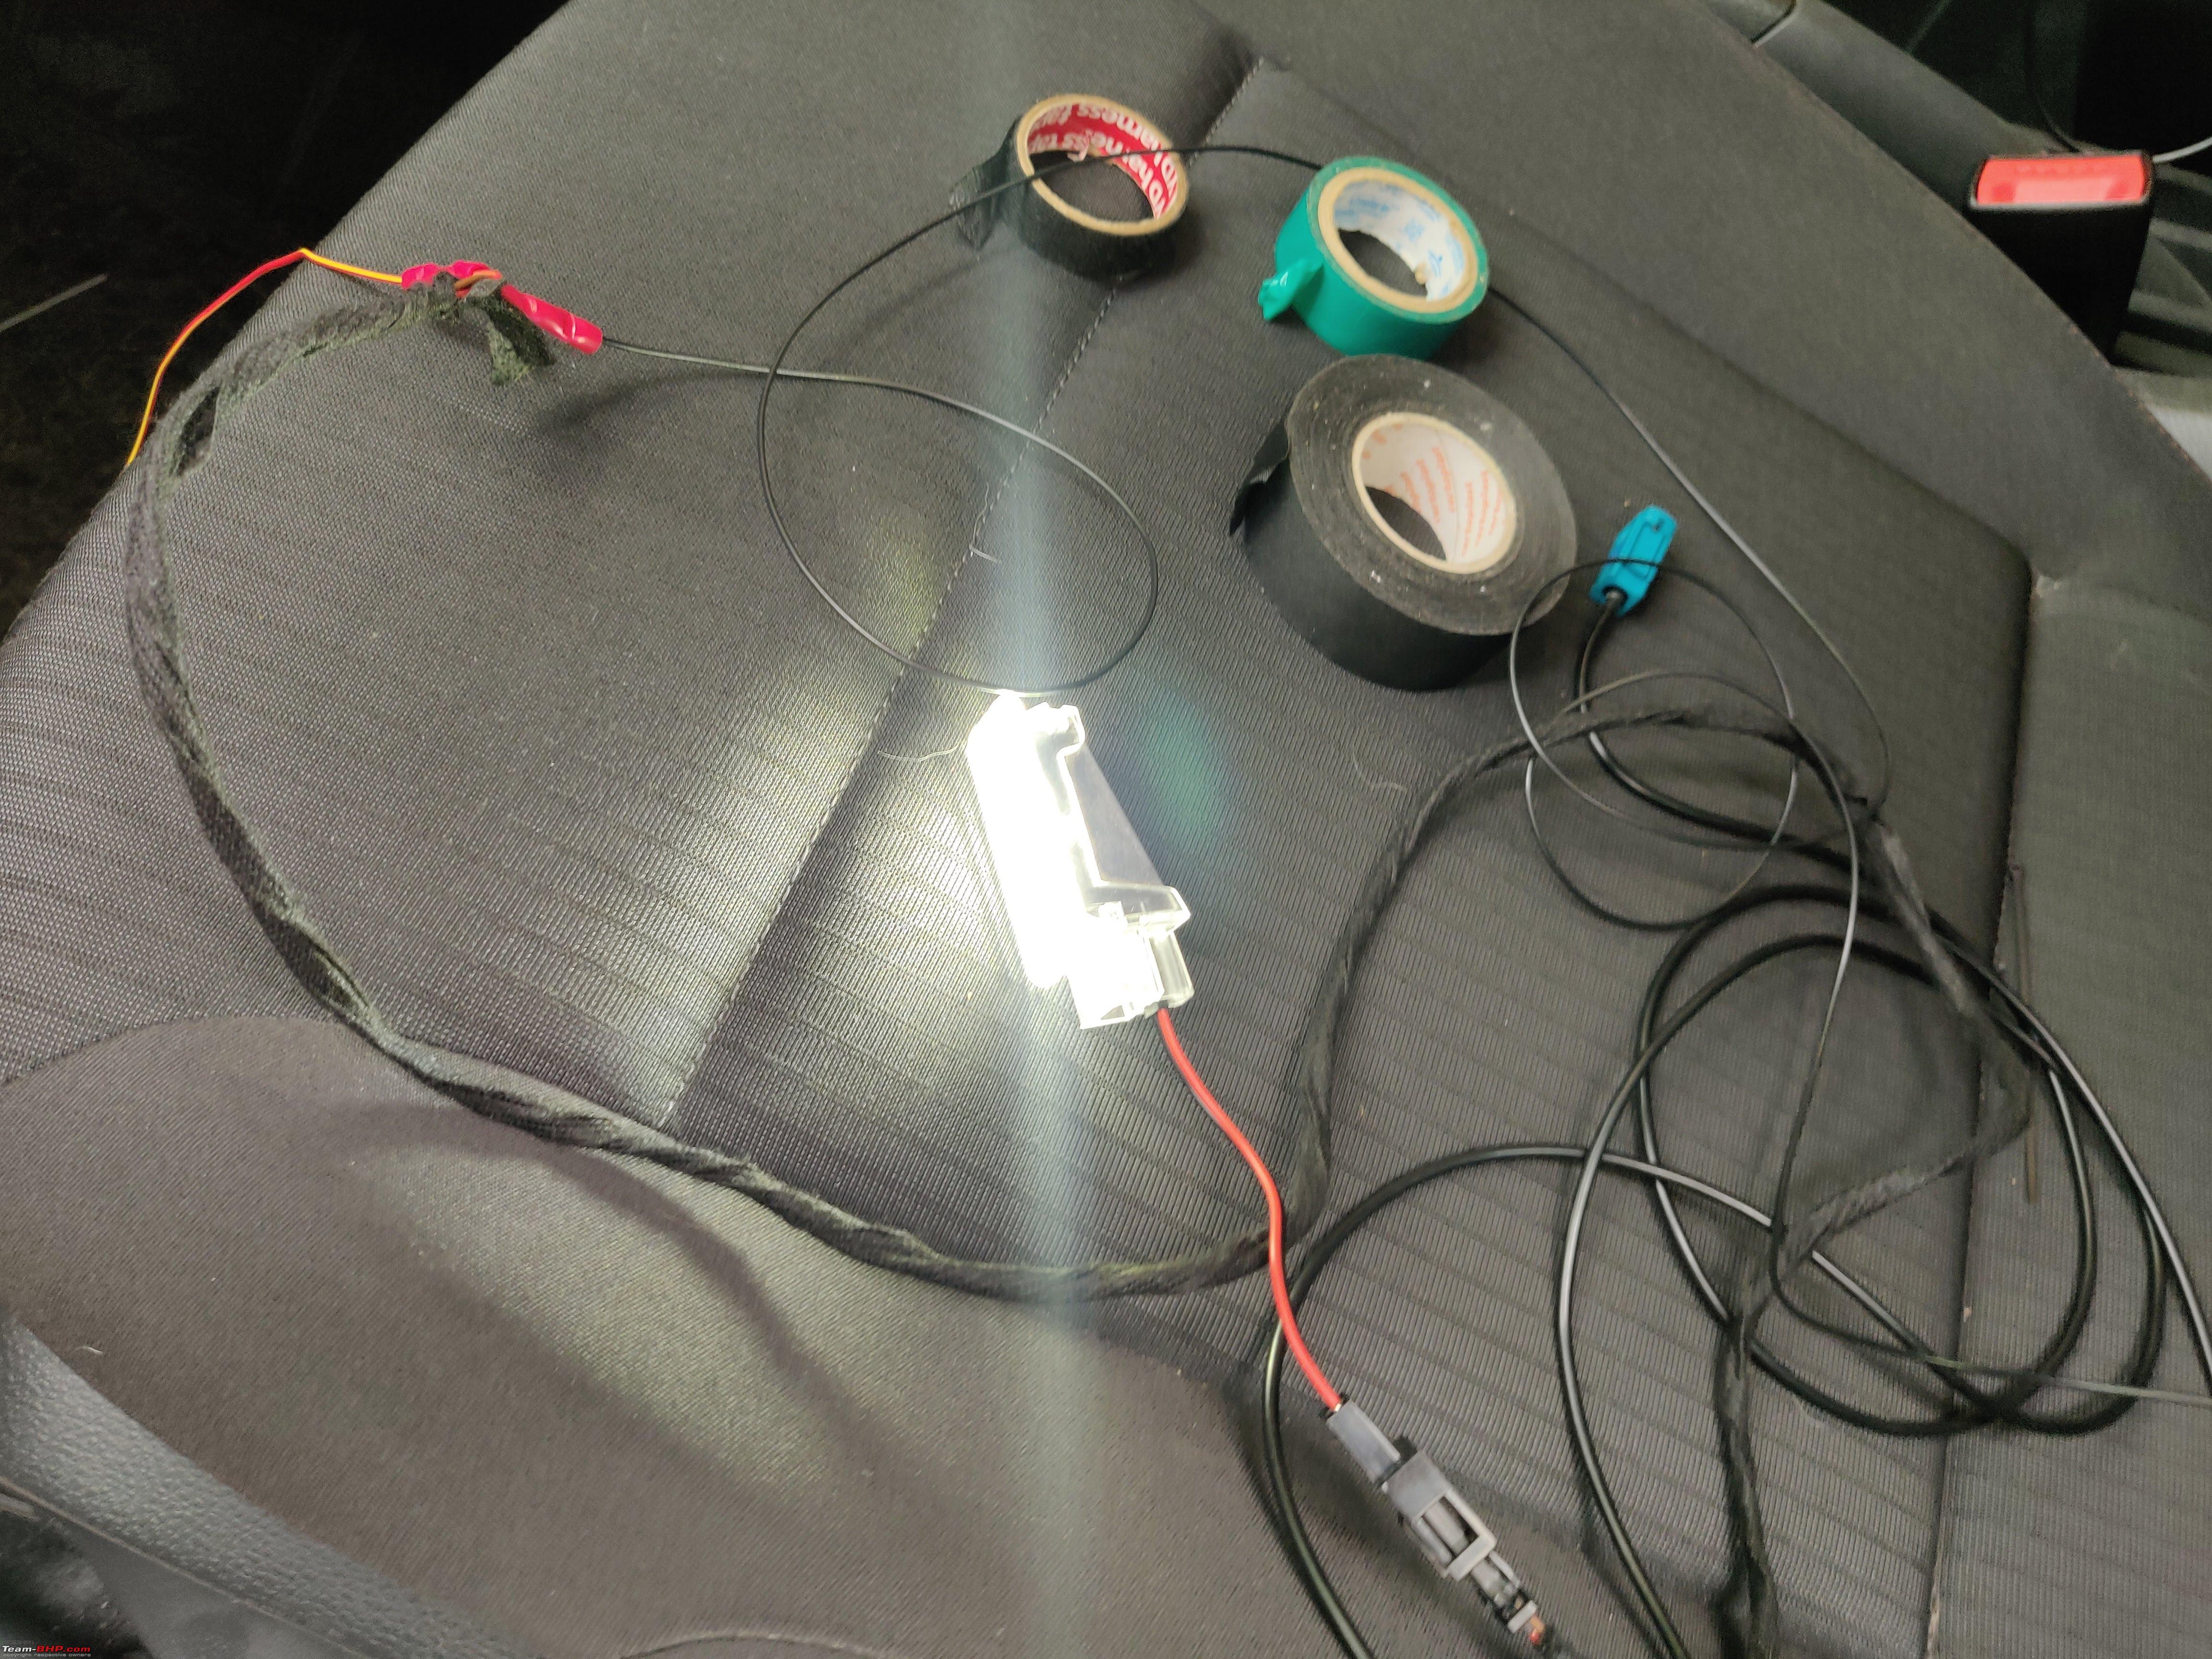 The assembly was ingeniously installed to light up only when the trunk door was open, and was not triggered by the central door open signal.  The key to doing this, is naturally using a special ground or power signal that knows when the boot is open or close.  I took the positive connection from my footwell lights using one of these multiplier harnesses, and swapped the ground to a boot-position biased ground point, which I found on the left side of the car, on the rear left wheel arch.  Using a multimeter, find the ground point which receives continuity, when the boot is open and breaks contact when the boot is open, and you have your wire.  To keep things clean, I wrapped excess of my Ground signal wire to the stock Boot-Ground pin, and taped the two from outside. Perfectly irreversibly, if I ever had to re-wire something or move things around, but I dont see that happening anytime soon. I read about this trick on another Polo forum a long time ago. Last year, I told Prerak about this when he was in the process of wiring his boot lamp and he ended up making a very useful video implementing this trick while wiring and fitting two boot-lights, and I've linked his video at the end of this post. So, with this wiring, I had a perfectly functioning, super bright, bootlight, but I got too busy to take out some time to cut a suitable rectangular slot for mounting this assembly in place. Prior to that, I had hung the boot-light on the luggage hook behind the rear seats and that illuminated more of the seat back than the boot itself.  Finally, this time, I got to it, with the worst set of tools, a kitchen knife and a candle, which I used as a heat source to hot slice through the plastic trim, but perseverance and patience helped get the job done. Heres some pictures of the boot-light during the night. No extra processing has been done other than what smartphones are already doing today. With that, I complete another pending post that I have been wanting to write about.  |
|
| (9)
Thanks
|
| The following 9 BHPians Thank fluidicjoy for this useful post: | adityan27, Blue Vitriol, GaryTSI, GeeTee TSI, InControl, sarfraz1997, Varun_HexaGuy, VivekCherian, yesyeswe |
|
1st February 2023, 12:16
| #130 |
| BHPian Join Date: Oct 2020 Location: Pune, San Diego
Posts: 247
Thanked: 2,440 Times
| Polo 6R: OEM Bi-Xenon Headlight Retrofit: Bits and Bobs The stock halogen headlights on the Polo Vento are nothing to write home about and this is known quite well. Most PQ25 Polo Vento owners I know have at least tried an upgrade, or expressed the desire to improve the headlight performance with either bulb upgrades, or headlight assembly upgrades, be it, OEM or aftermarket. Ive written about my experience with the Philips Ultinon Pro 9000 LED here (Upgrading to the Ultinon Pro 9000 LED Bulbs). Team-BHP is fortunate to have a great thread on the OEM Polo 6R Bi-Xenon Headlights by Graaja (Polo GT TSi Install: OEM Bi-Xenons with BCM Max Upgrade EDIT: 6C RLS + Auto-dimming IRVM installed!). This post should be a go-to for a list of parts youll need, so Ill not make things repetitive and keep my post as short as possible, while sharing a few other details about the hardware and initial installation. I tried upgrading my stock halogen bulbs to Philips LEDs and found them to be quite an improvement, but considering I had other plans for my car, I wanted an even better lighting experience, and hence, I started looking for OEM Bi-Xenon Headlights. Here is a list of parts that I needed to arrange, and these were sourced from eBay etc. and came in from different parts of the world to make this as cost-effective as possible, but even despite my best efforts, this was barely a budget friendly upgrade. Headlight Part List
AFS Parts
Ill make a separate post on the Polo 6R AFS System Retrofit a little later, and transfer a copy of this list to the new post. I feel I have more to share about the AFS retrofit than the actual Headlights themselves. Wiring With The Emulator, Wiring Connector etc. When I received my OEM Bi-Xenon Headlights, I still had not completed the BCM Max upgrade and so I needed to use an emulator to enable most of the primary functionality of these headlights. The Bi-Xenon headlights feature a DRL, a Dynamic Cornering Light in the Headlight, and a Projector for the Low-Beam, High-beam throw, and most of these features including the DRLs dimming cannot work without the emulator. Ive covered the wiring and connections related to the emulator in my previous post (Review: Driving home our Sunset Red VW Polo Highline+ TSI Automatic) where I share some details on working on the engine bay fusebox.  The headlights themselves have a T14 headlight connector, and so a few T14 headlight connectors were purchased along with the crimps to make a T14 to T10 harness. The part number is 1J0 973 737.   With that, let's start having a look at the child parts I needed to use and the climax will be the headlight assemblies. Ballasts and Why They Matter?  Initially 8K0 941 597 C were in use, and the last lot of headlights got updated to 597E. I purchased a pair of 8K0 941 597 E and had a spare 8K0 941 597 C. This was a good chance to compare the two parts side by side, but there was no difference in the performance.  Each ballast is mounted on the underside of this headlight with three screws. 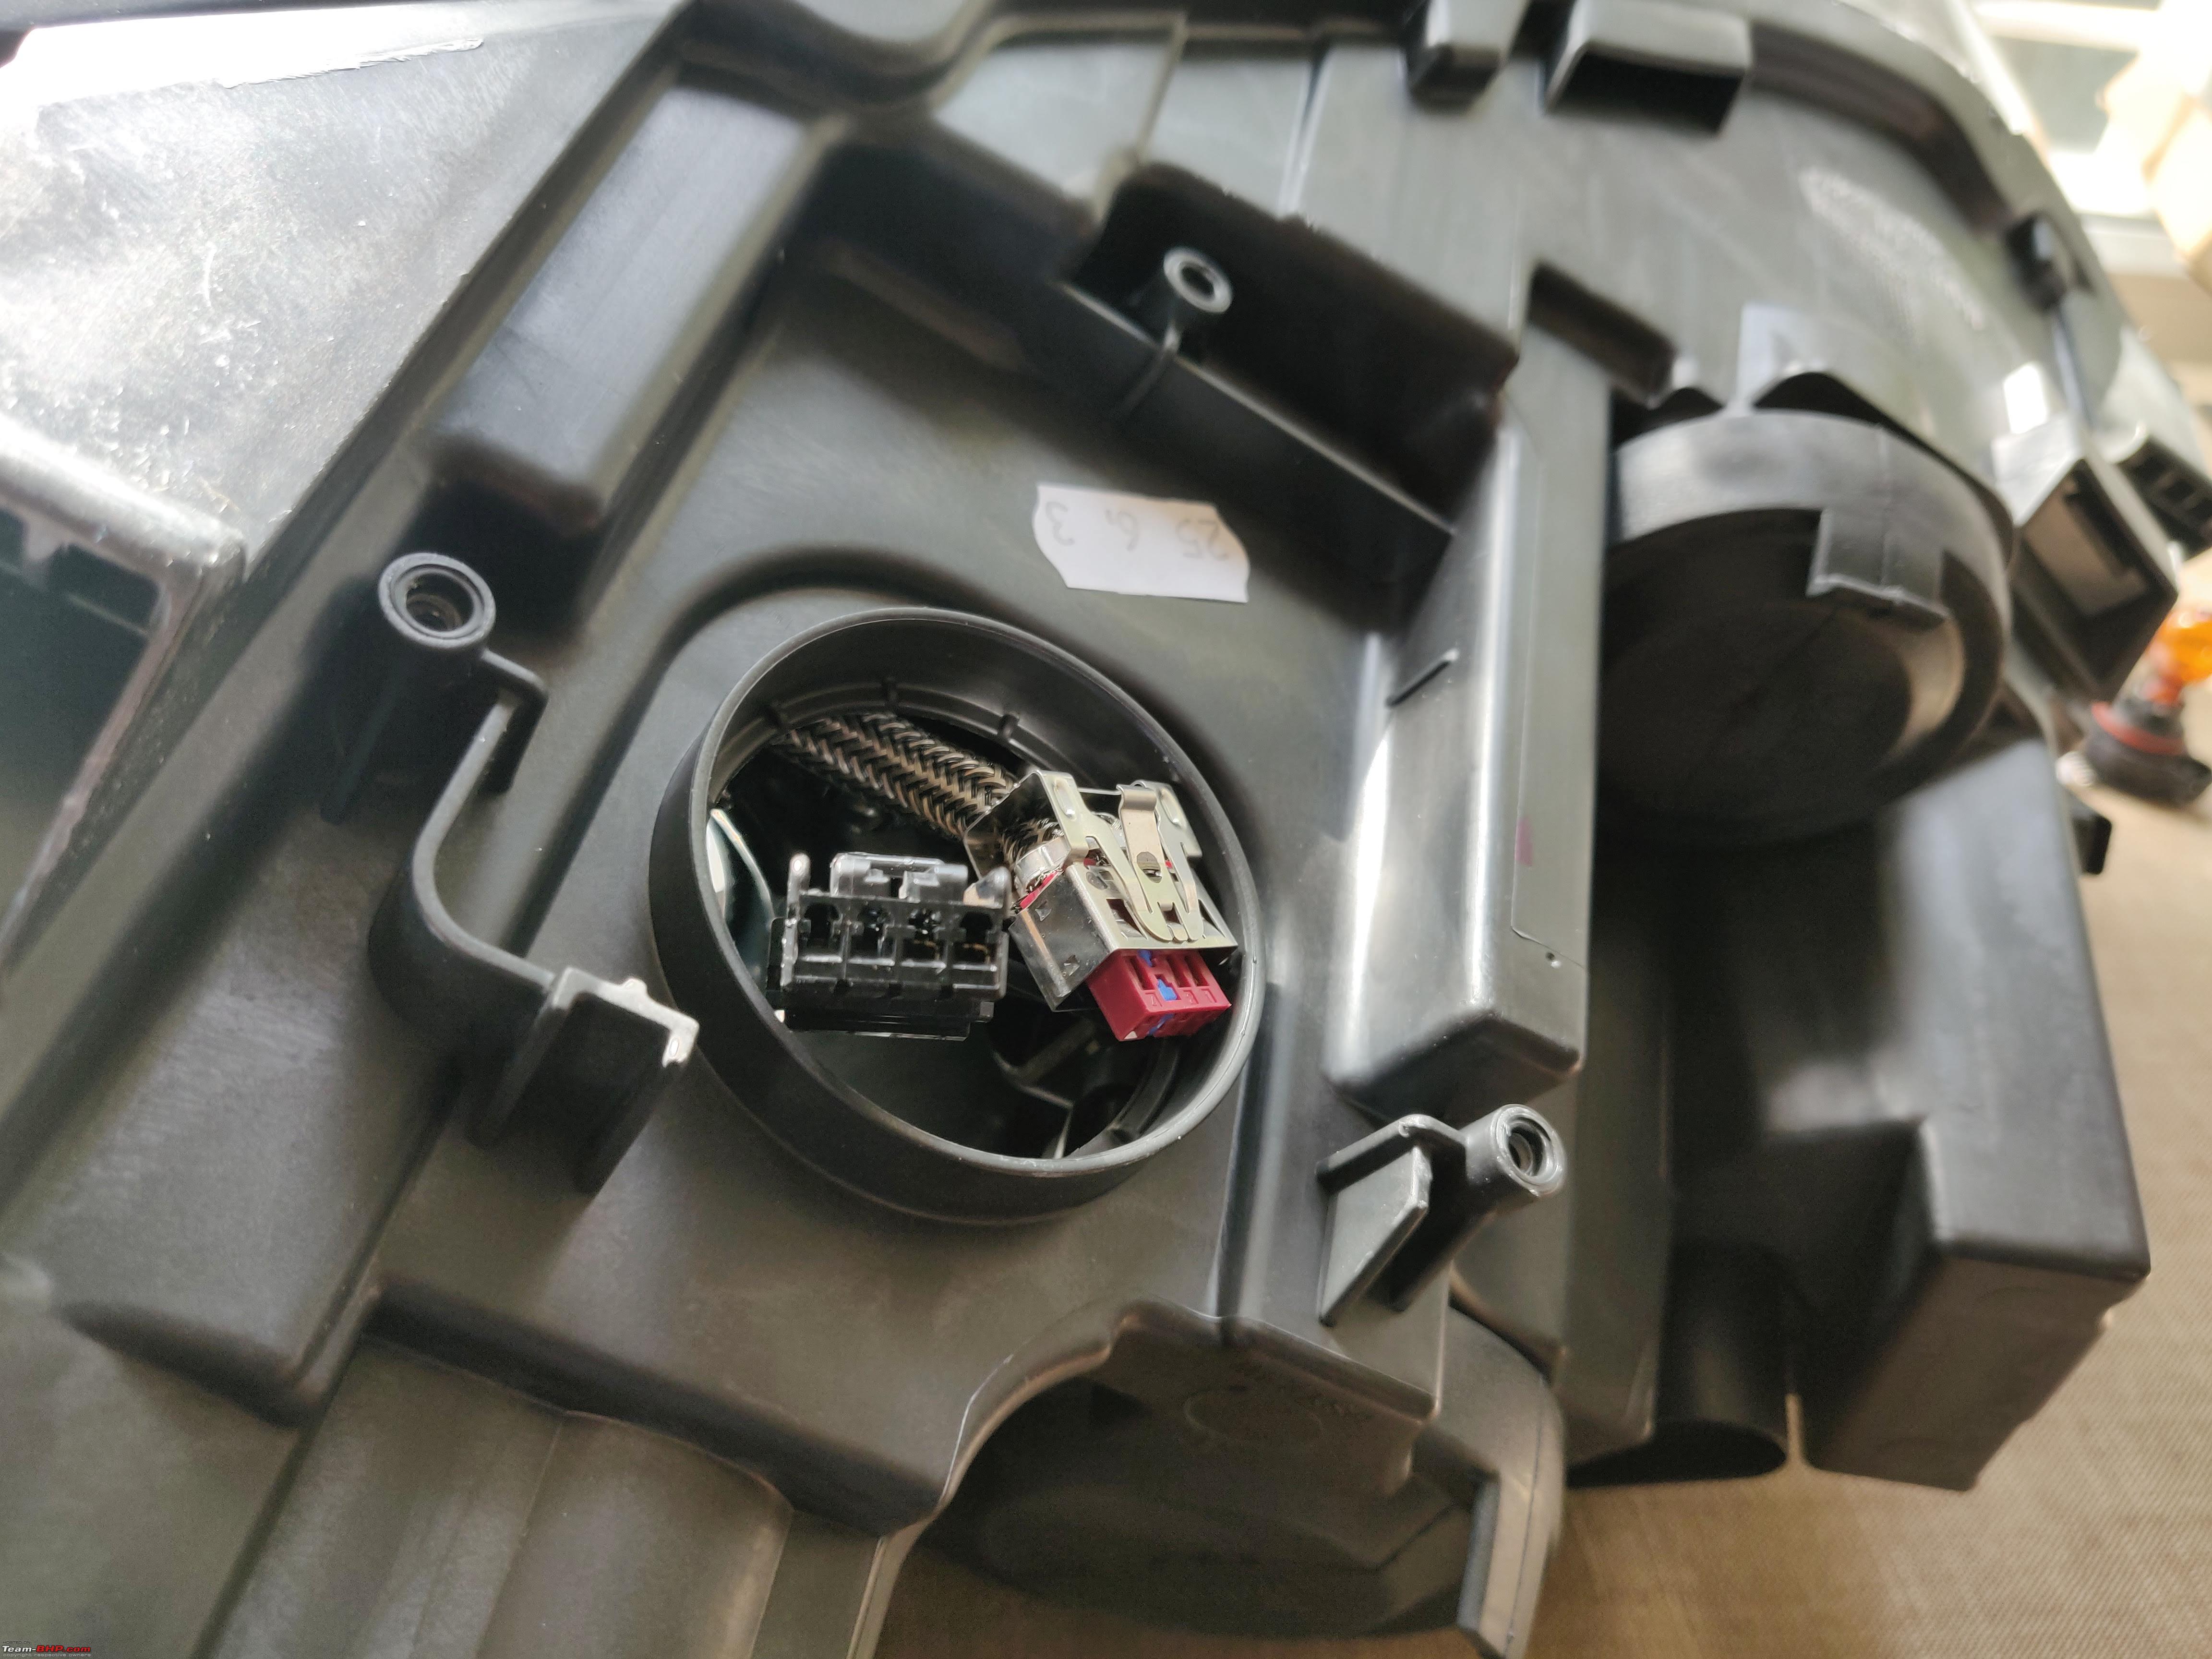 Fortunately for these D3S bulb ballasts, there is no programming involved and you could pickup used modules of the same spec and install them with no issues. Quite a few Audi cars in India like the A4, A6 came with HID bulbs and some of them had this part number. If buying these used, try and check if these seem to be water damaged. The present Adaptive Headlights on most modern cars are not as fortunate as they require lots of programming to make them work as they should. Each module needs to be flashed, coded and initialised as per the headlight assembly. The wattage of the ballast however determines the perceived colour of the HID bulb and you can read more about it here. While there are plenty of new Ballasts floating online when you search for this part number, there's a high chance plenty of these are Chinese replicas. Half of these will not bear the Volkswagen Audi branding. Buying a reliable, genuine ballast is crucial for quite a few reasons. Cheap, knock-off ballasts often cause the D3S bulbs to be under or over-powered since they lack reliable voltage regulation. This translate to bulbs that do not perform as well as they could have. This is also an electrical risk to your car's electronic systems. A few folks I know who had picked up Chinese ballasts observed electrical interference with other sub-systems like the car's radio. Main-Beam Bulbs The headlights use a D3S HID bulb and while the OEM one was rated at 4300K, I thought it might be a little too warm and opted for 4800K. I tried the Philips XtremeVision D3S HIDs, and these came in from Russia since Philips did not retail these here back then.  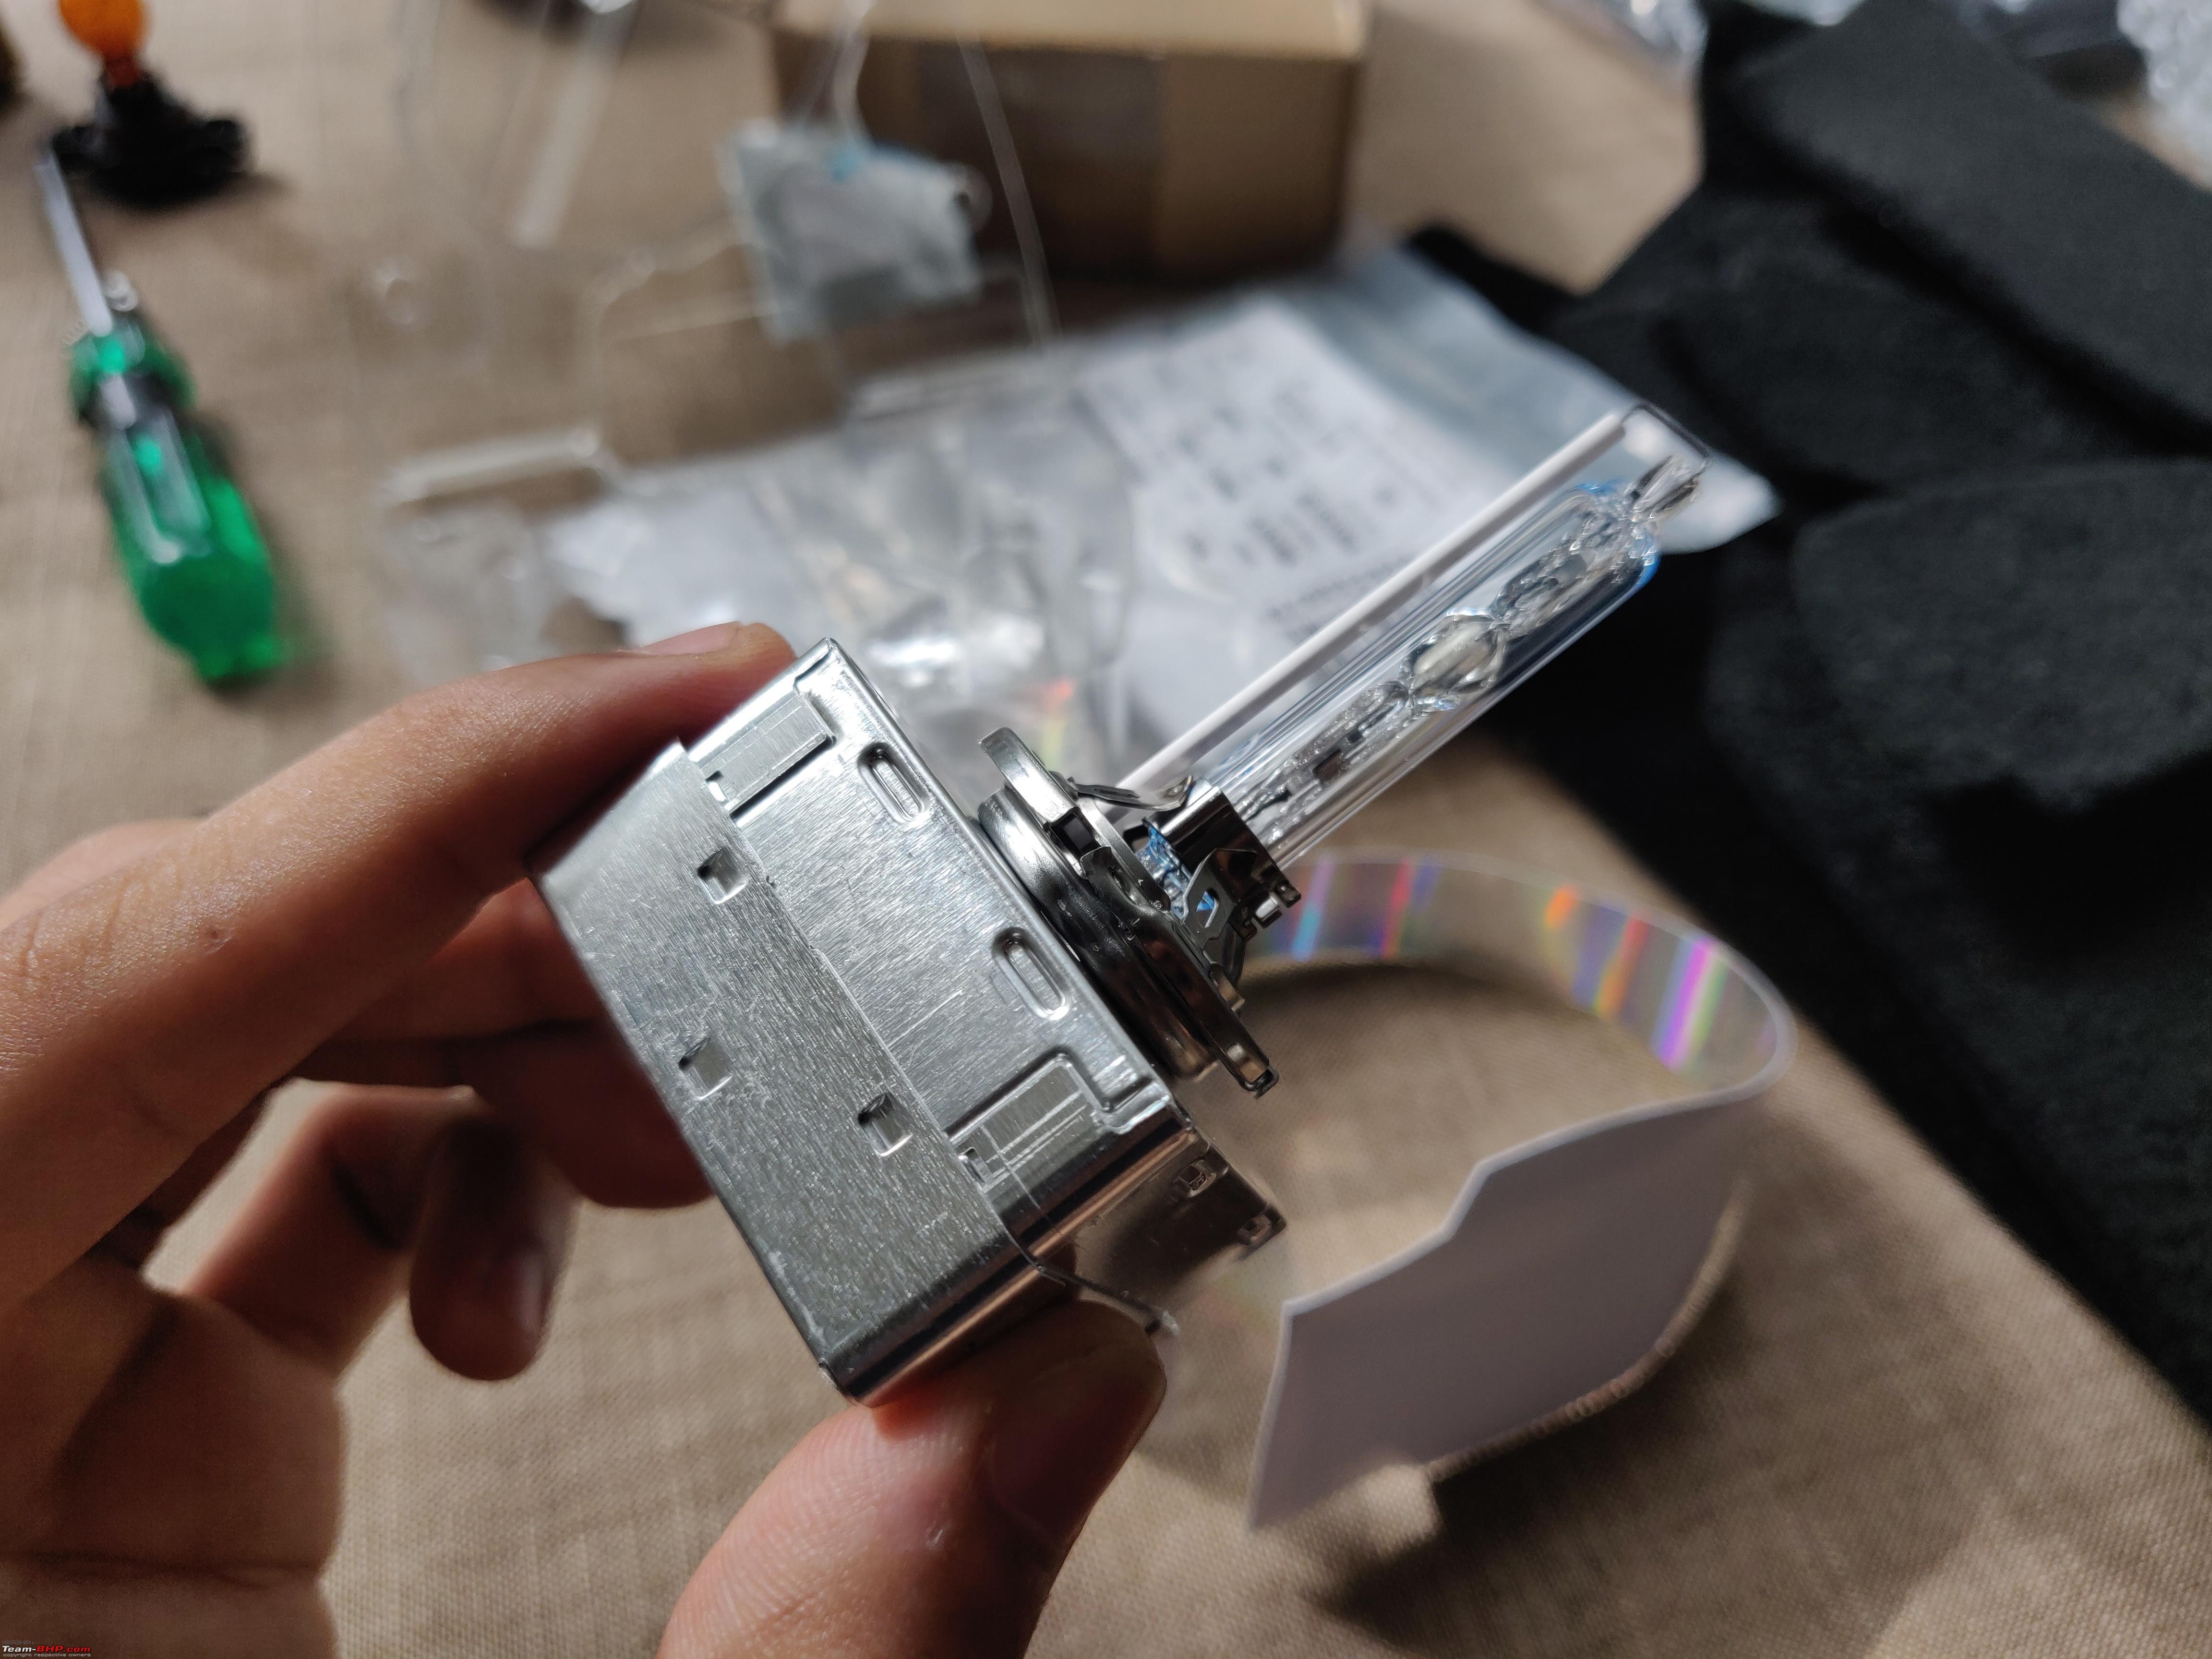  While these are fabulous headlights bulbs, looking back, it would have been better to stick to 4300K for even better all-weather visibility. 4800K is not bad, but 4300K would have been more functional. This is what the D3S bulb looks inside. 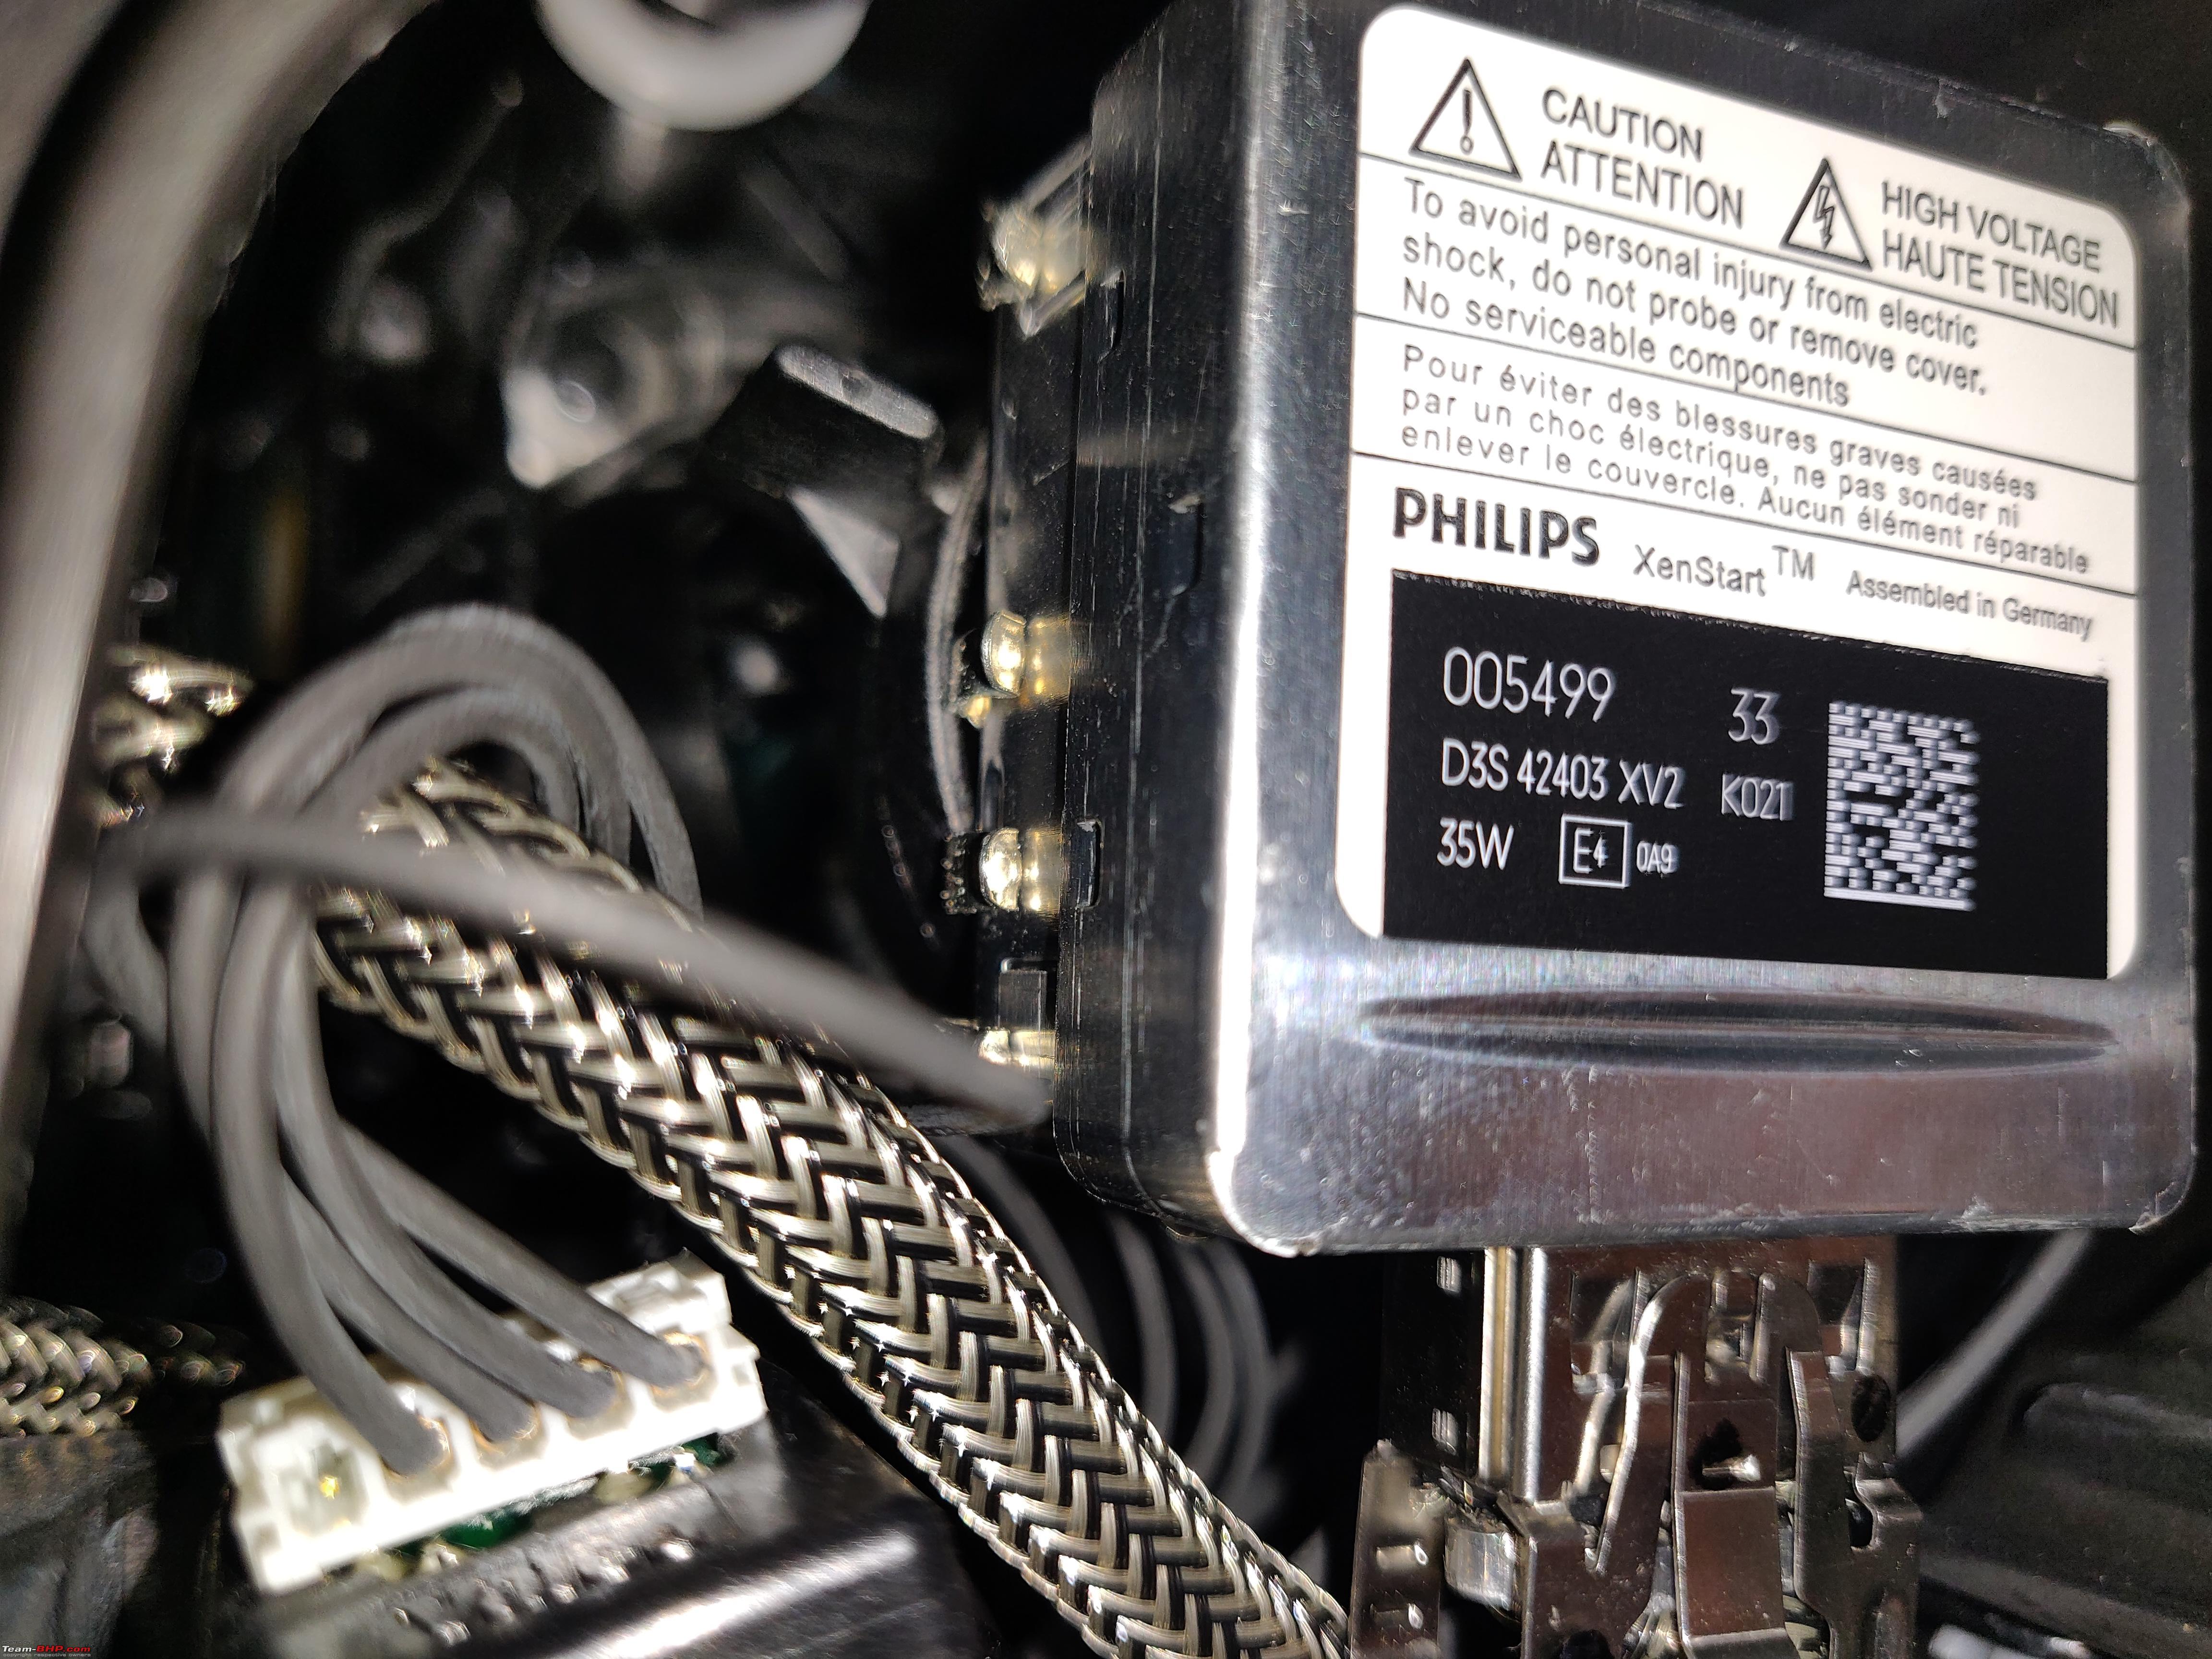 Turn Indicators The headlight assembly does not include integrated turn signal bulbs and hence these need to be bought separately too. 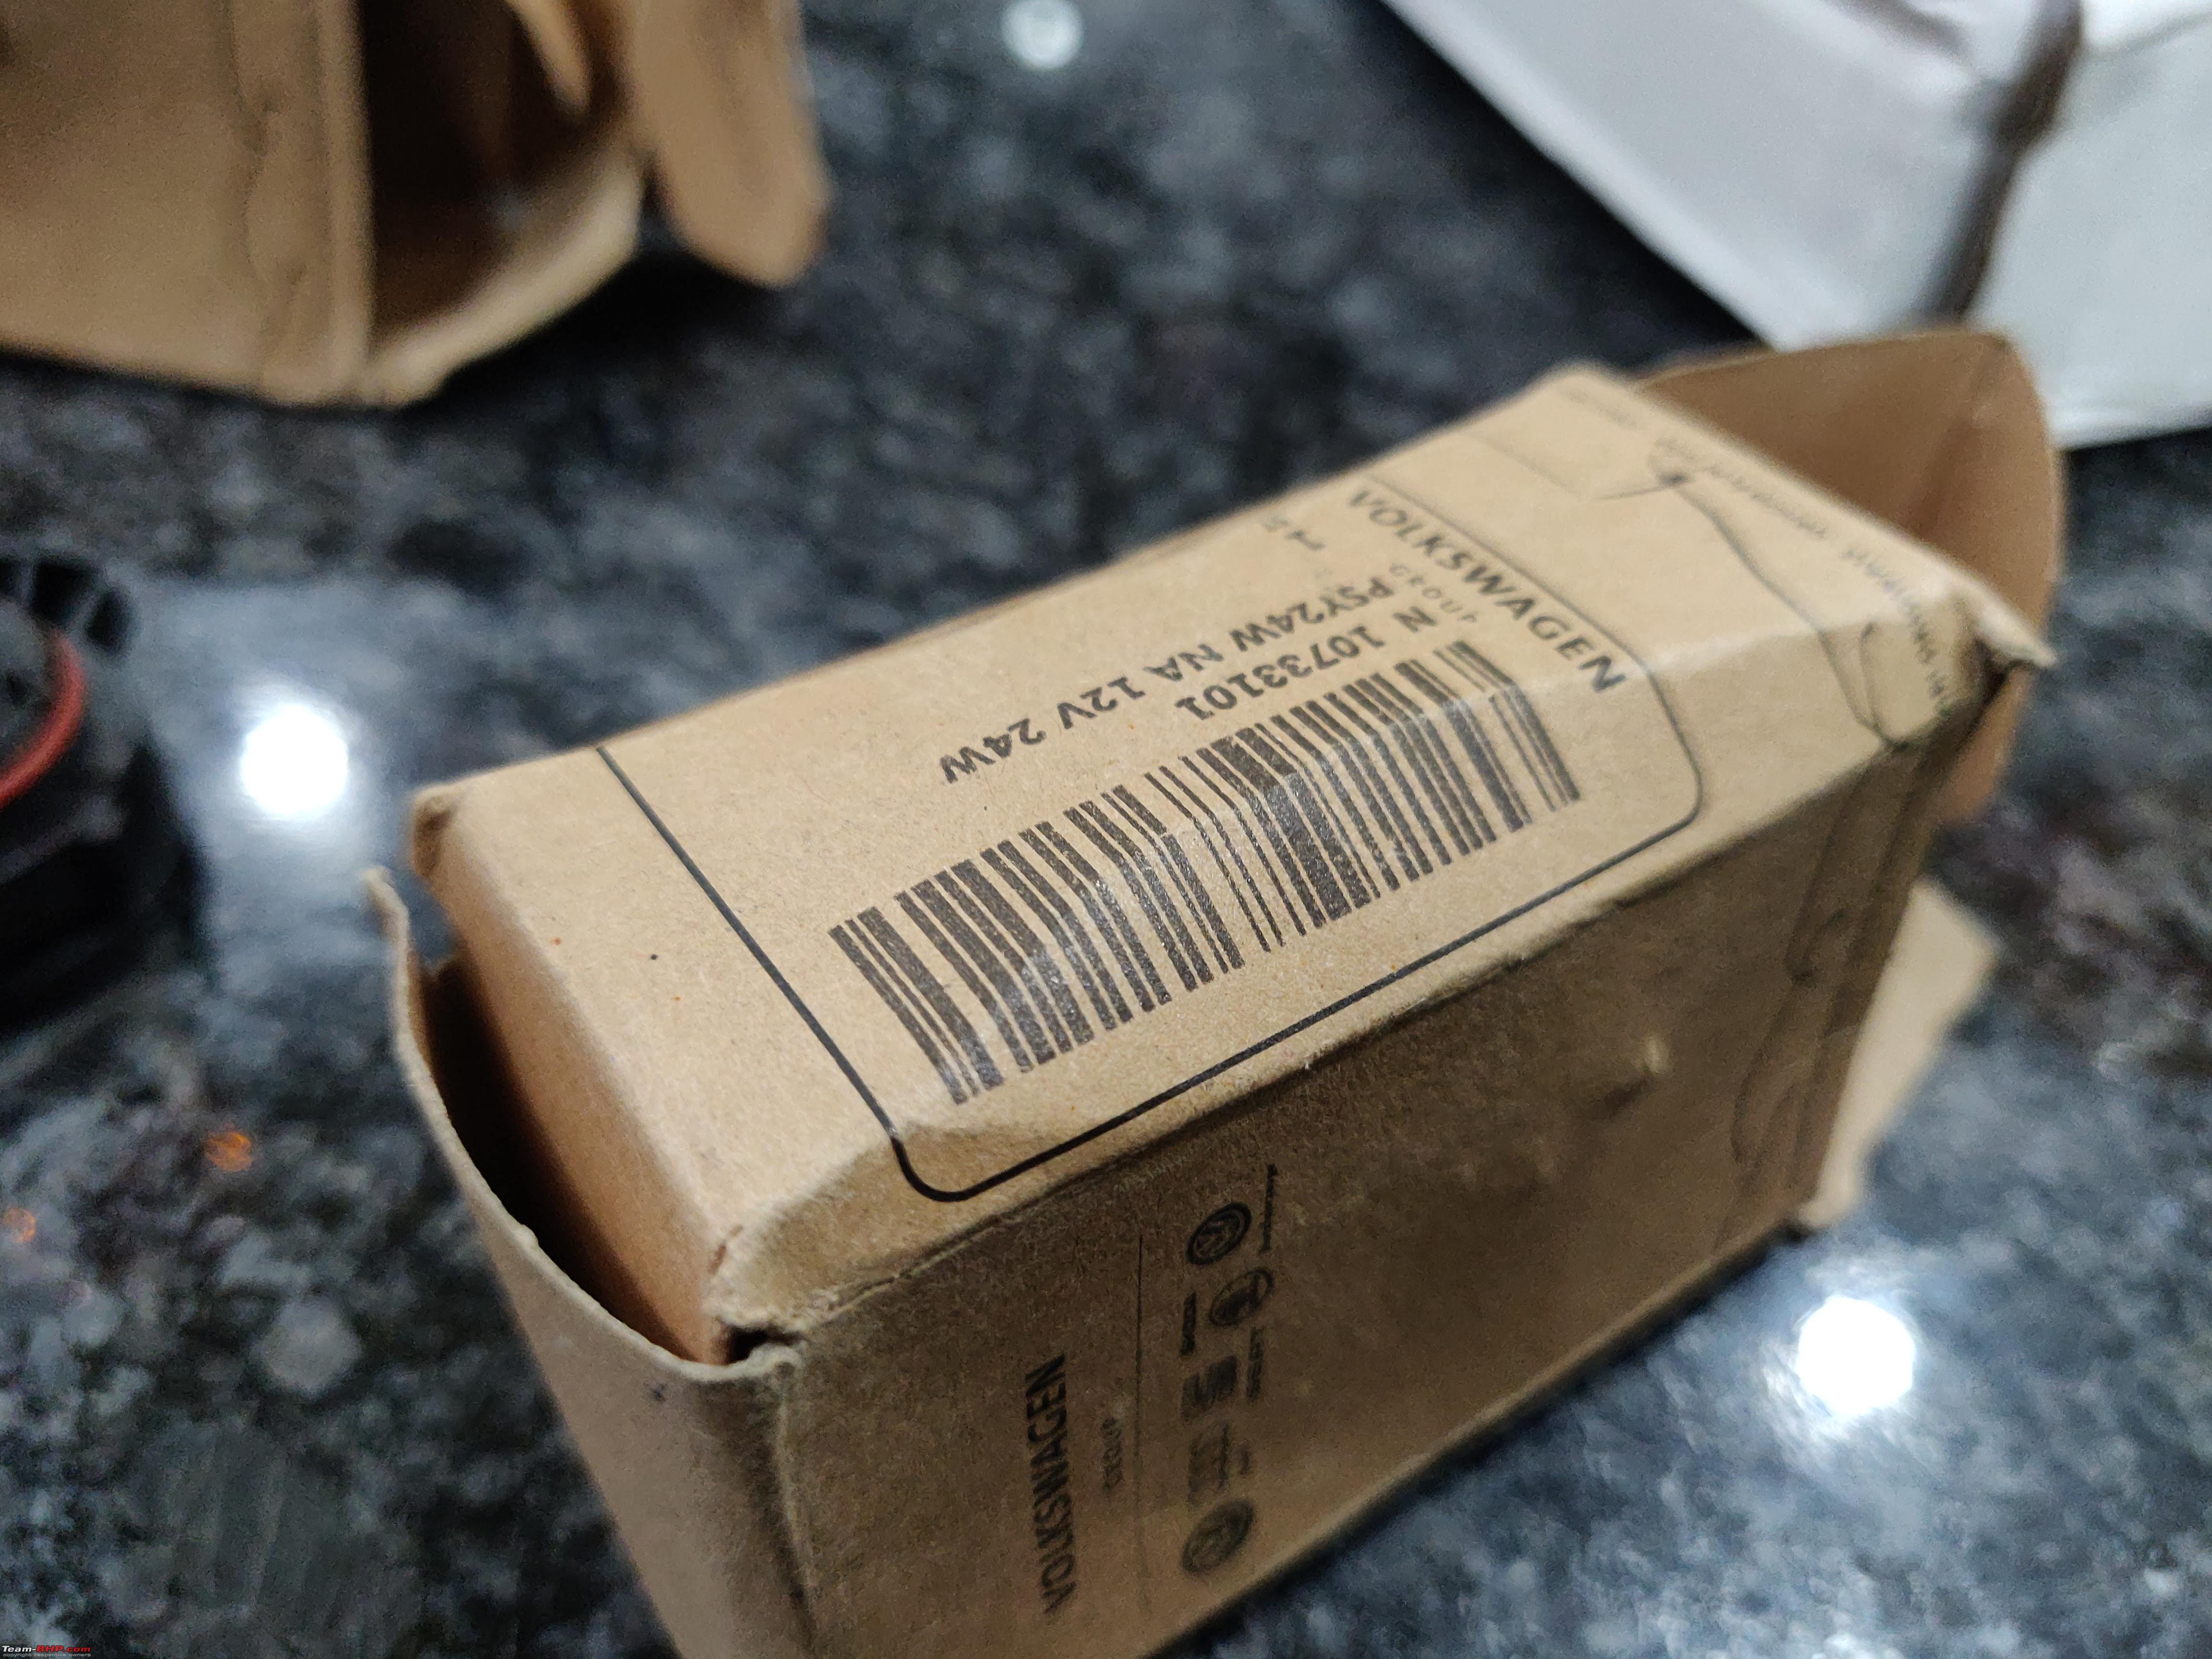  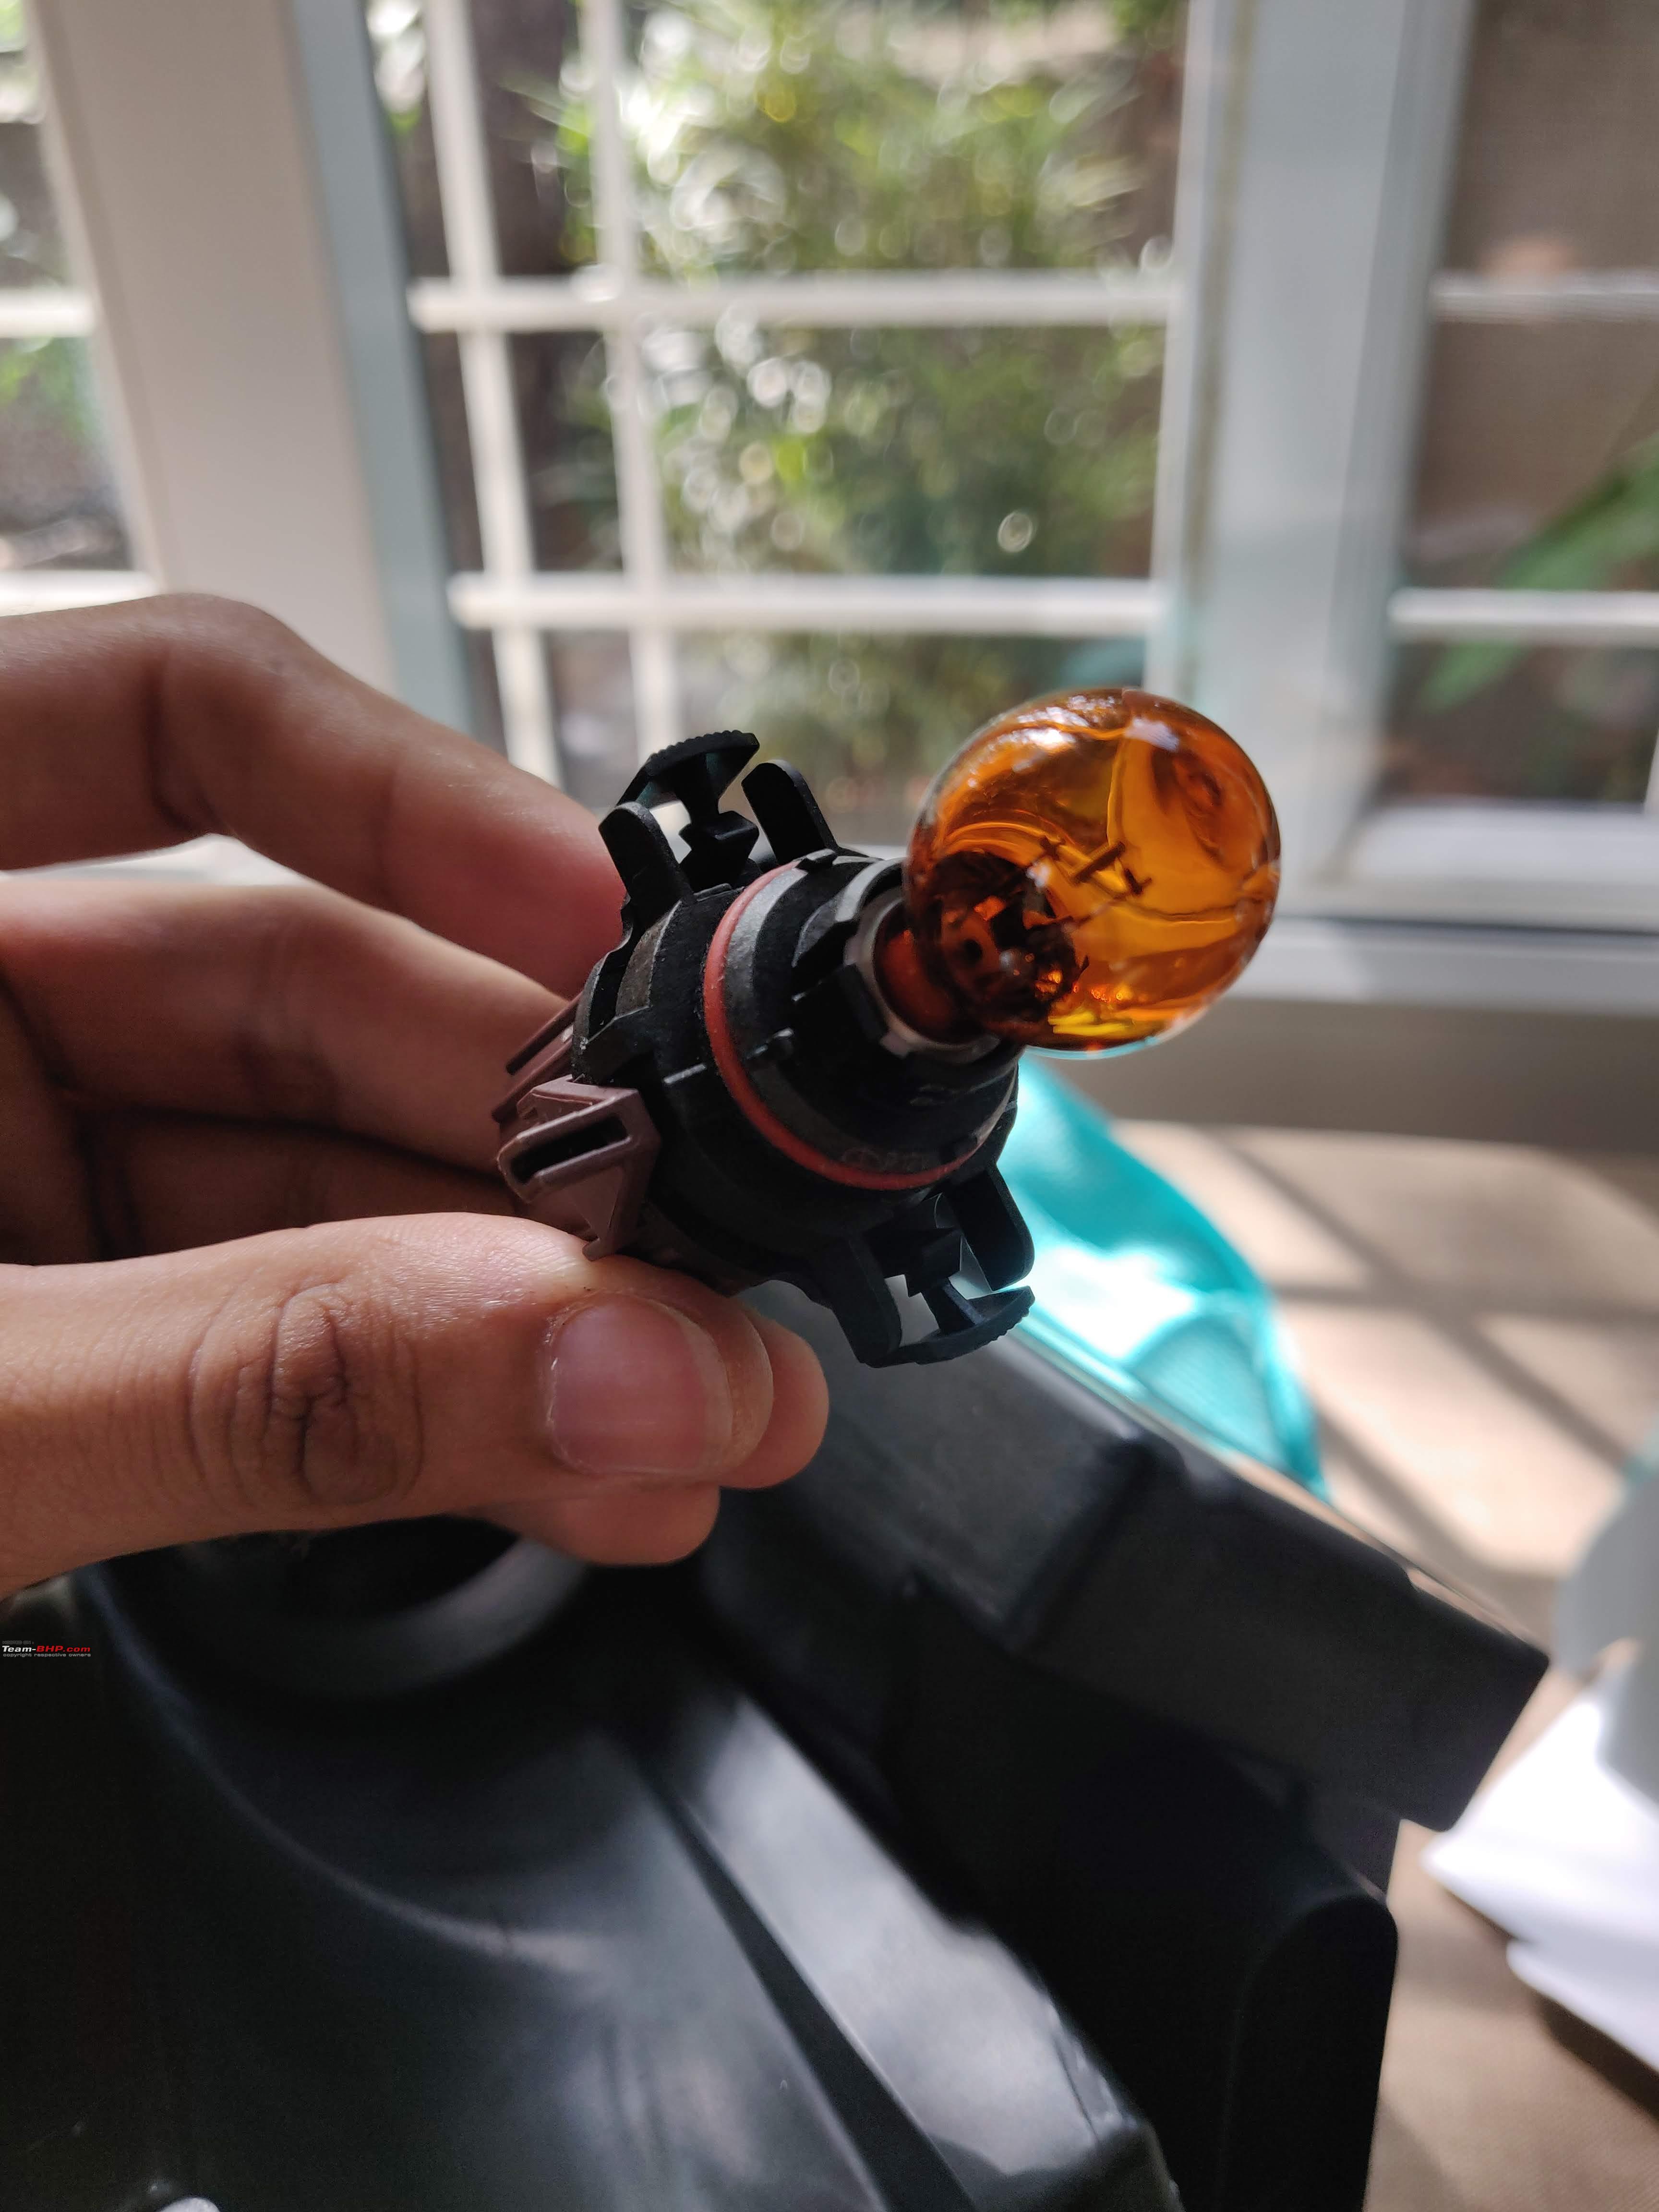  Cornering Lamp The cornering lamp is a full size H7 bulb which can take either LED or a Halogen. The H7 on this imported headlight is not like the ring based, pseudo H7 headlight assembly on the Indian spec Polo 6R. Notice the silver ring which I had to use to retrofit this LED bulb in a reflector Halogen housing. This ring can now safely be stored away to fight another day. 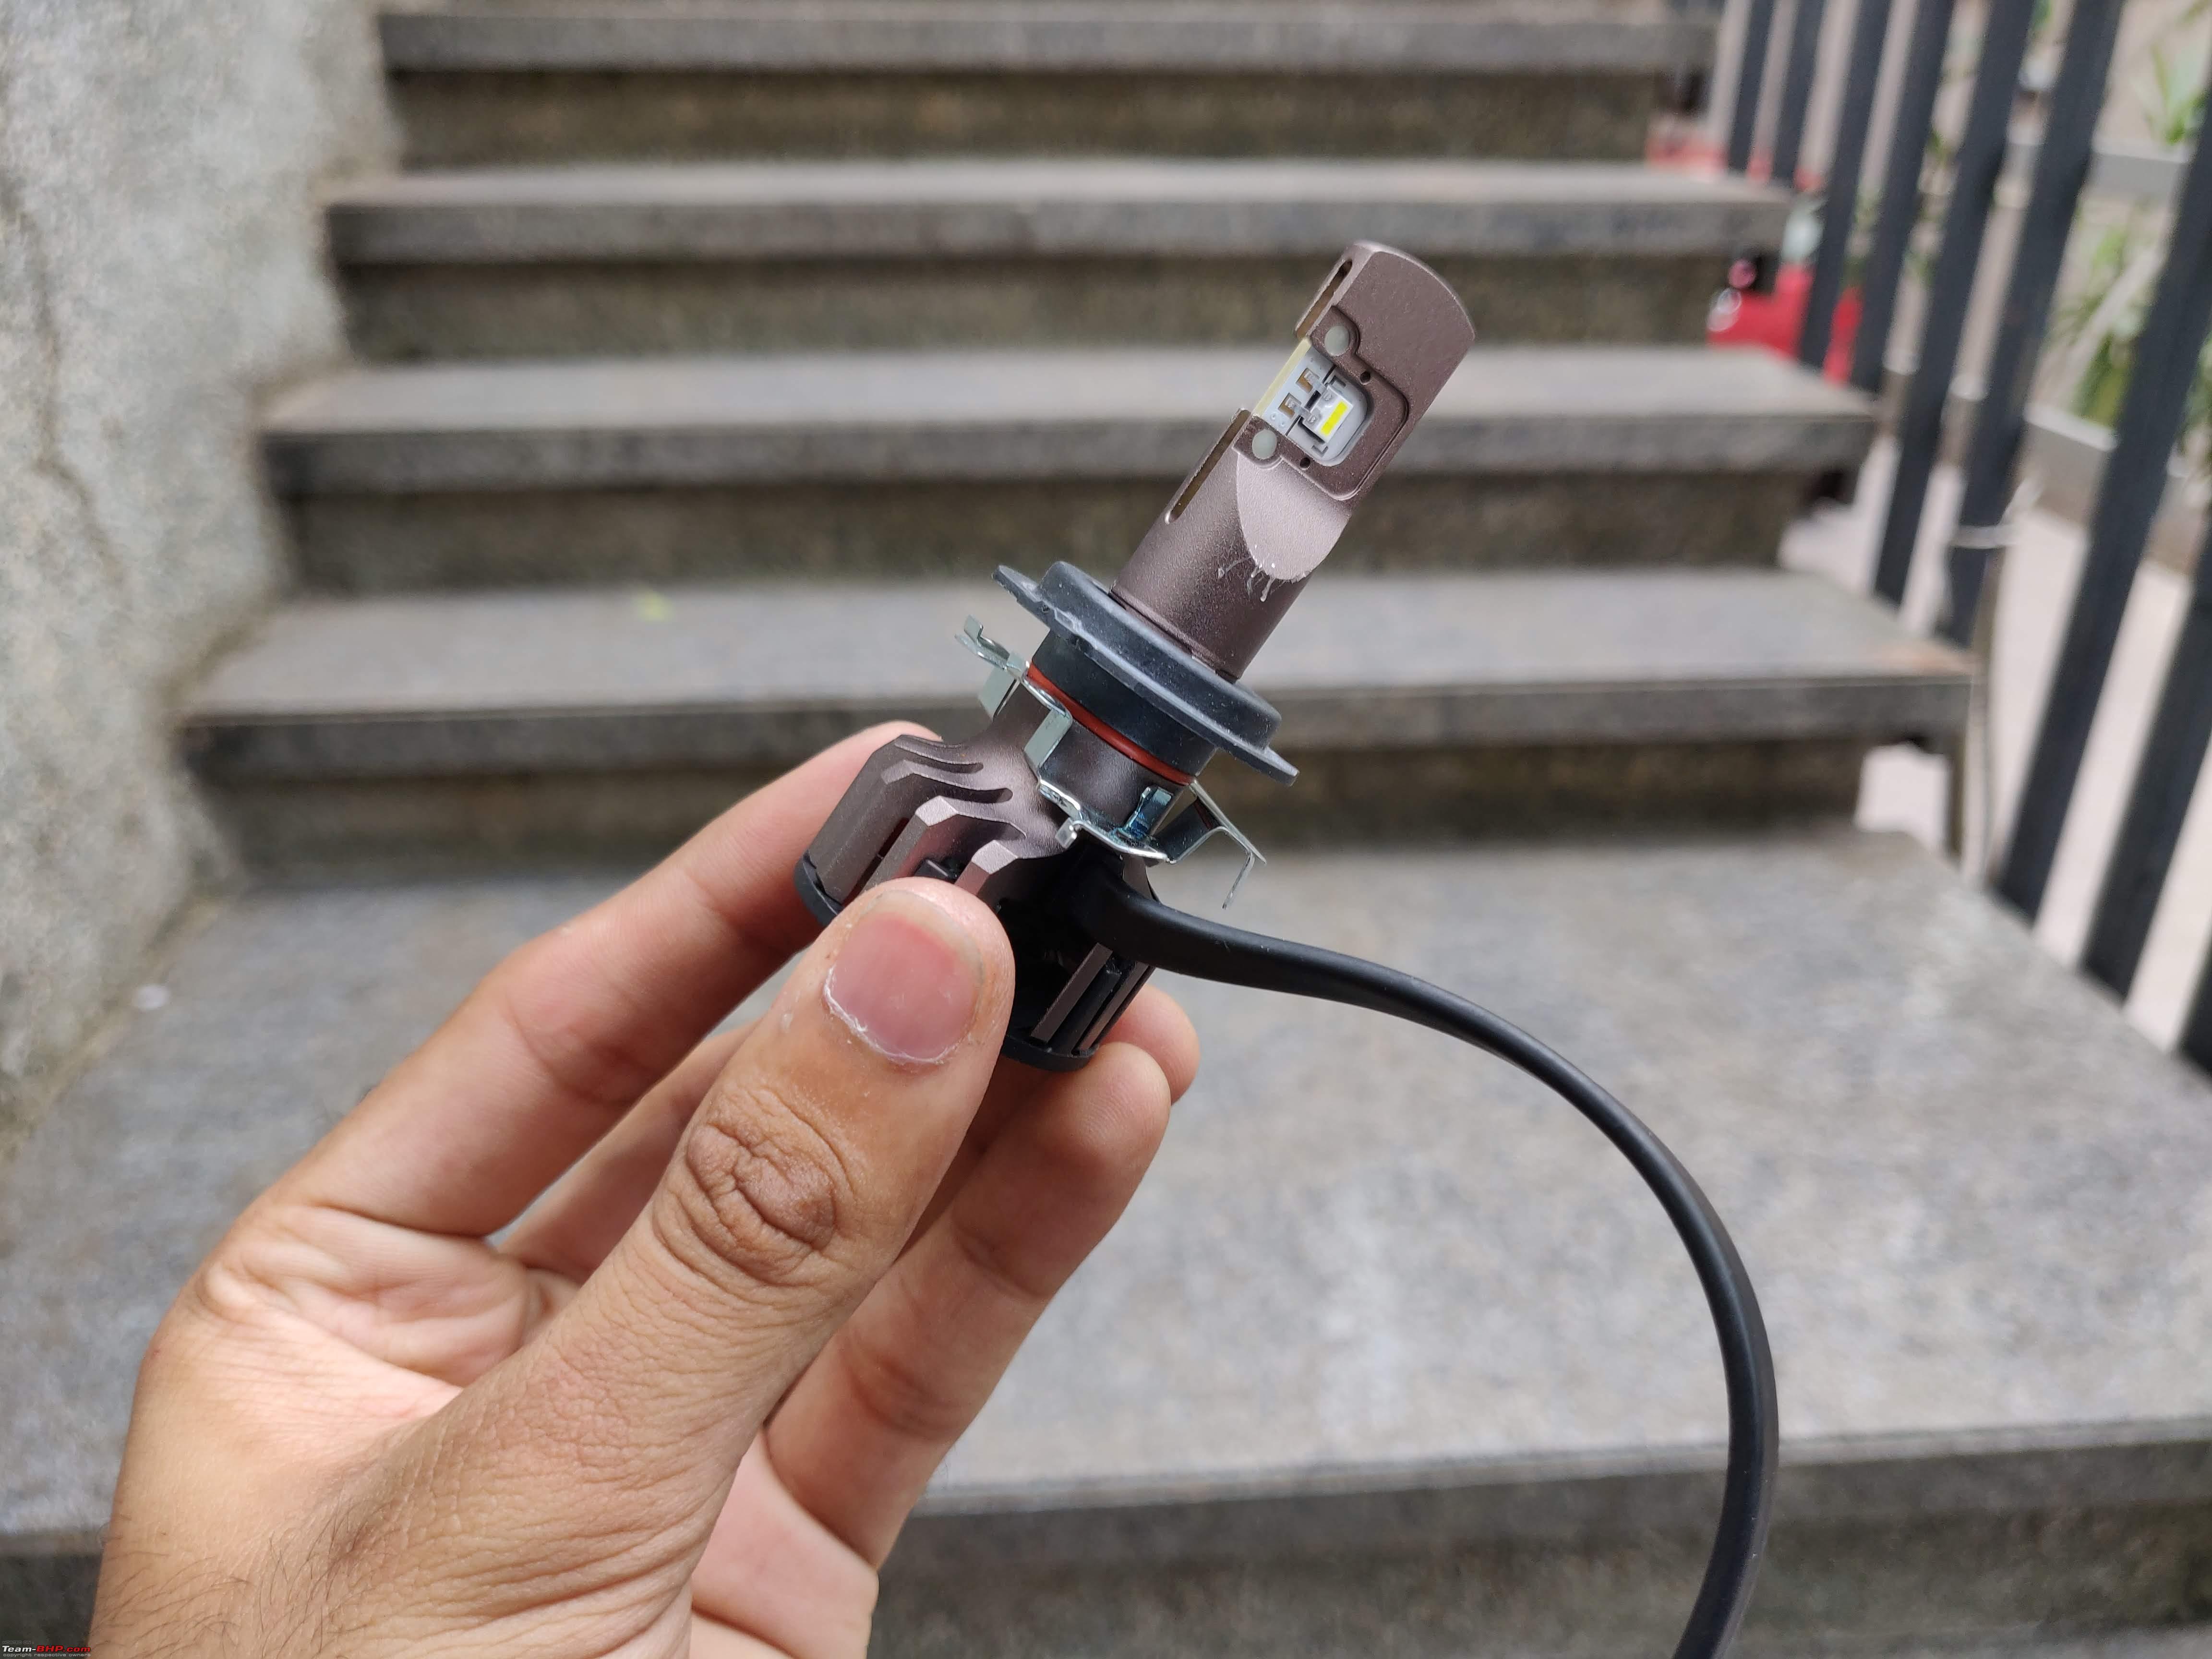 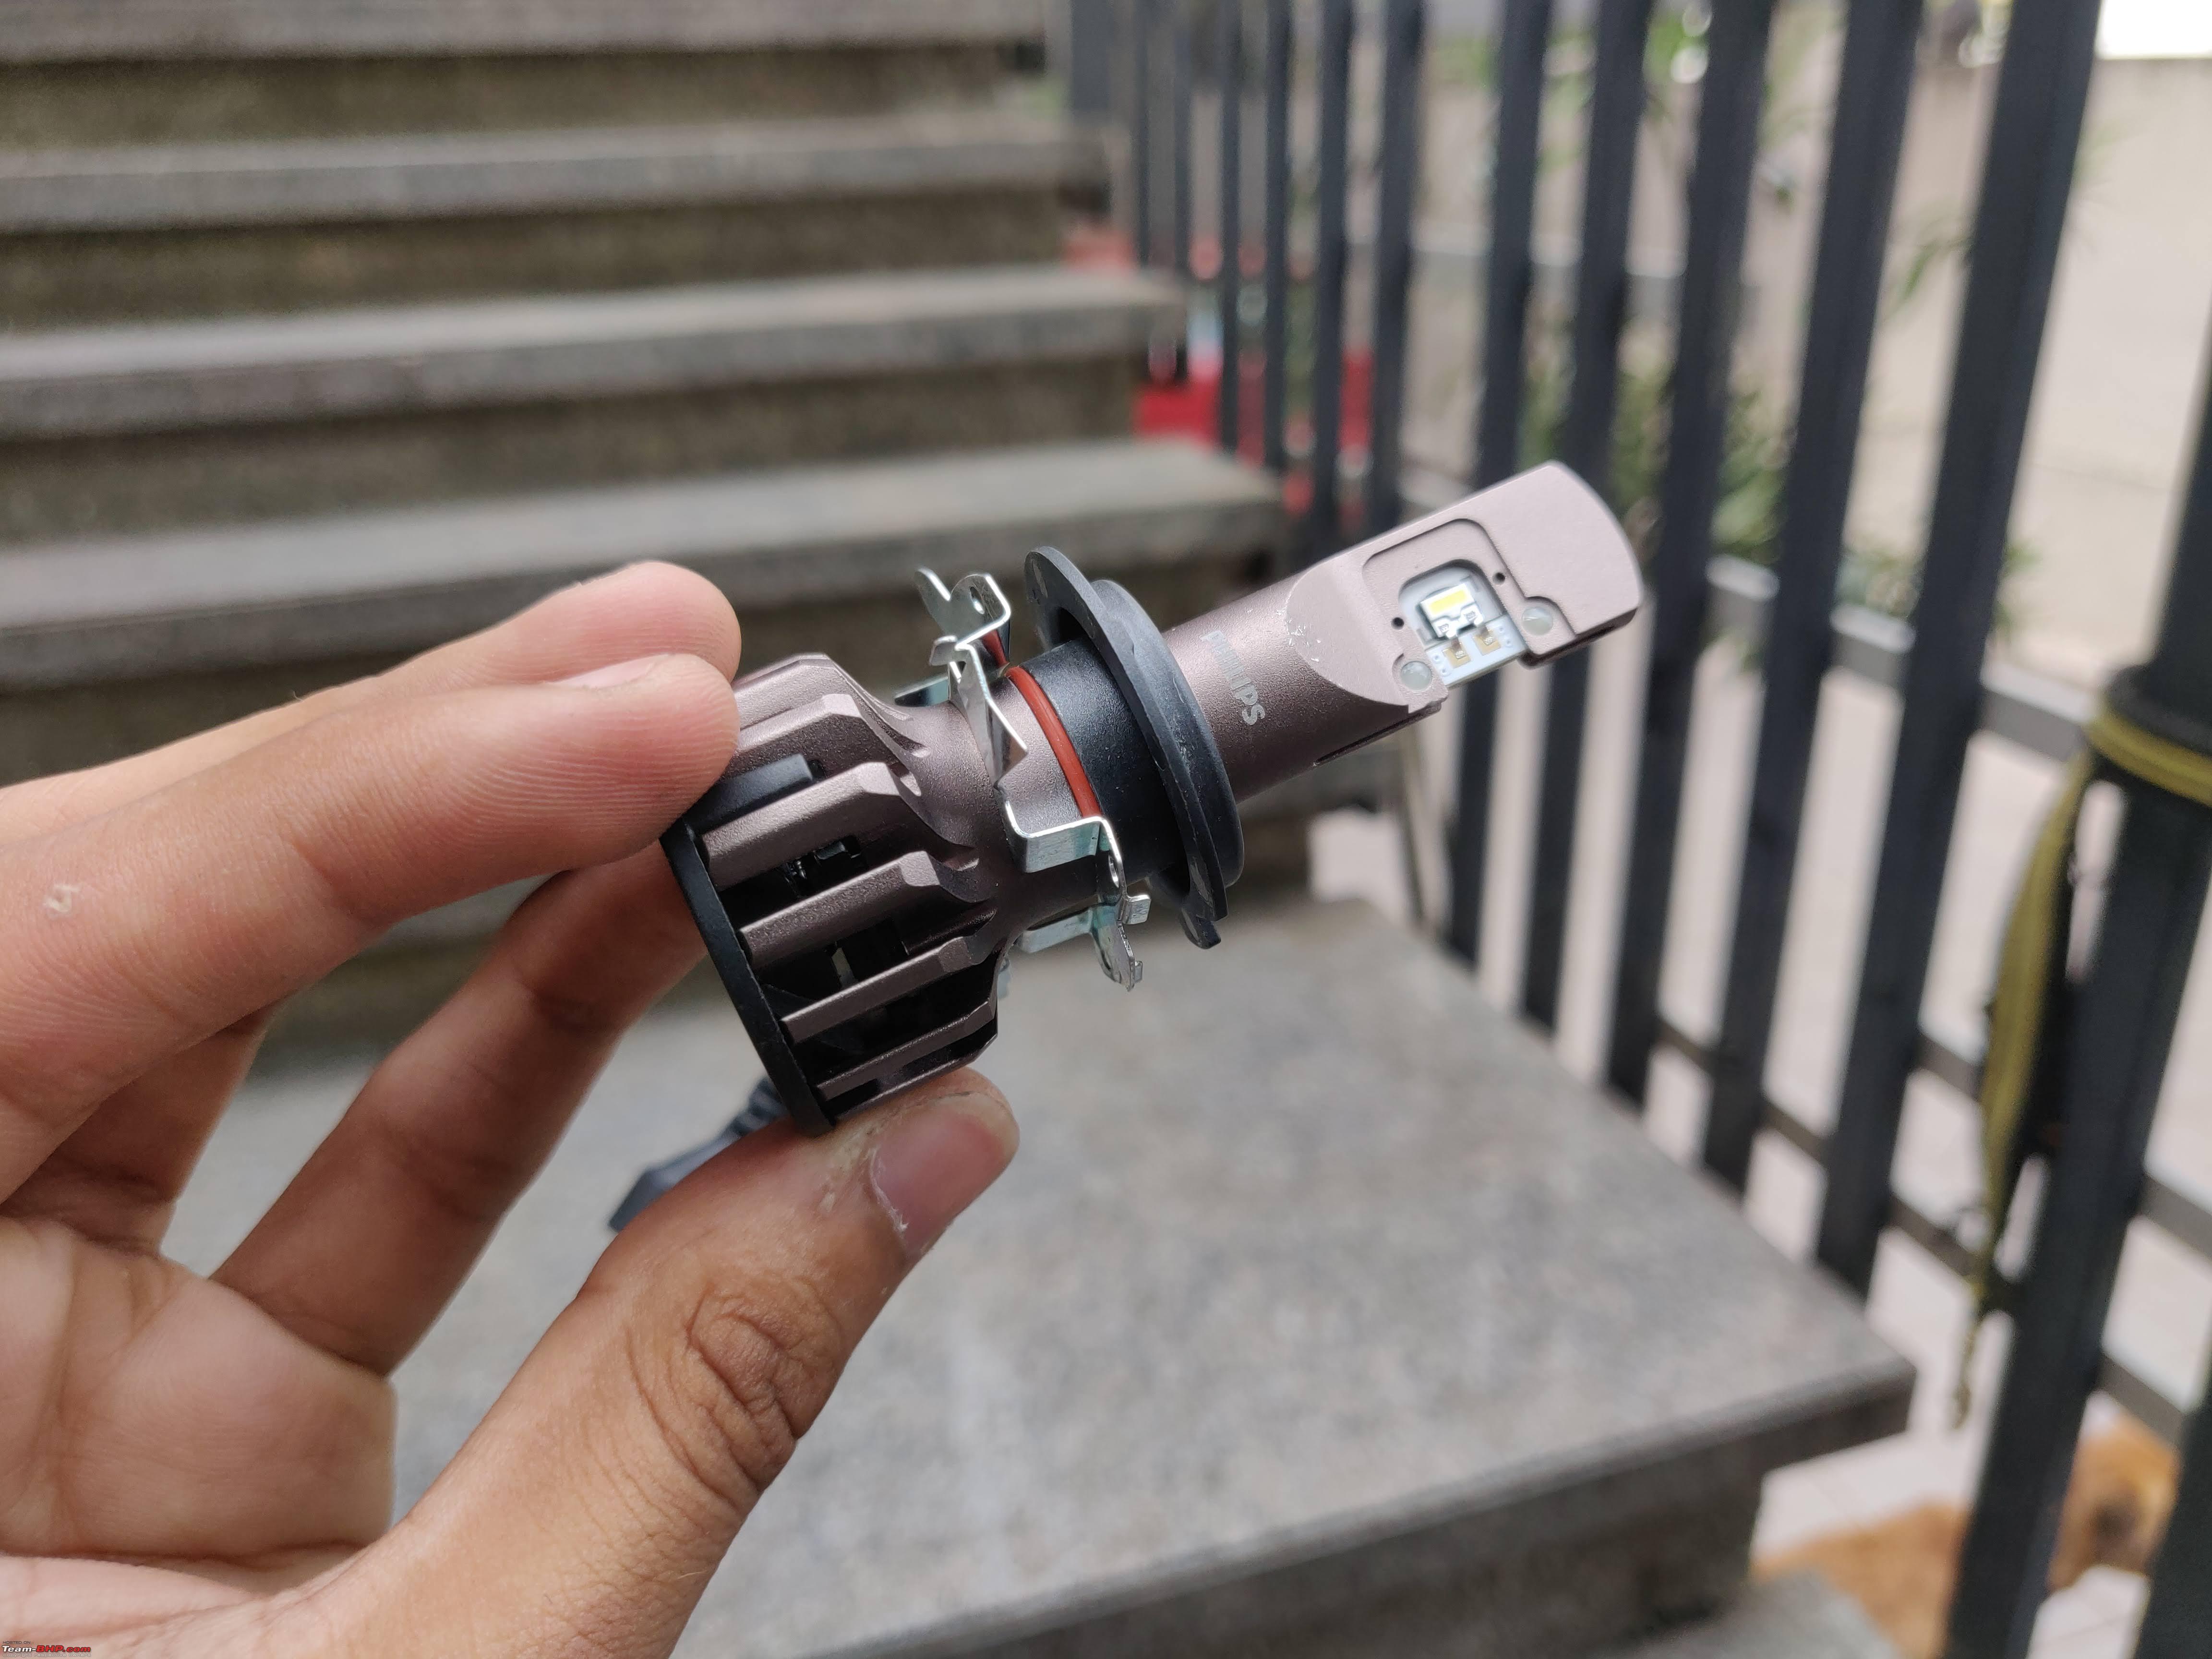  Since I was opting for 4800K in my main beam, I used my Philips Ultinon Pro 9000 lamps as the cornering bulbs, but again, cornering lamp visibility in fog, rains should be better with a good old warm halogen. Almost Onto The Headlights The headlights have a very fancy mounting bracket with a self-locking design and this requires longer screws than the stock screws on the Halogen headlights. 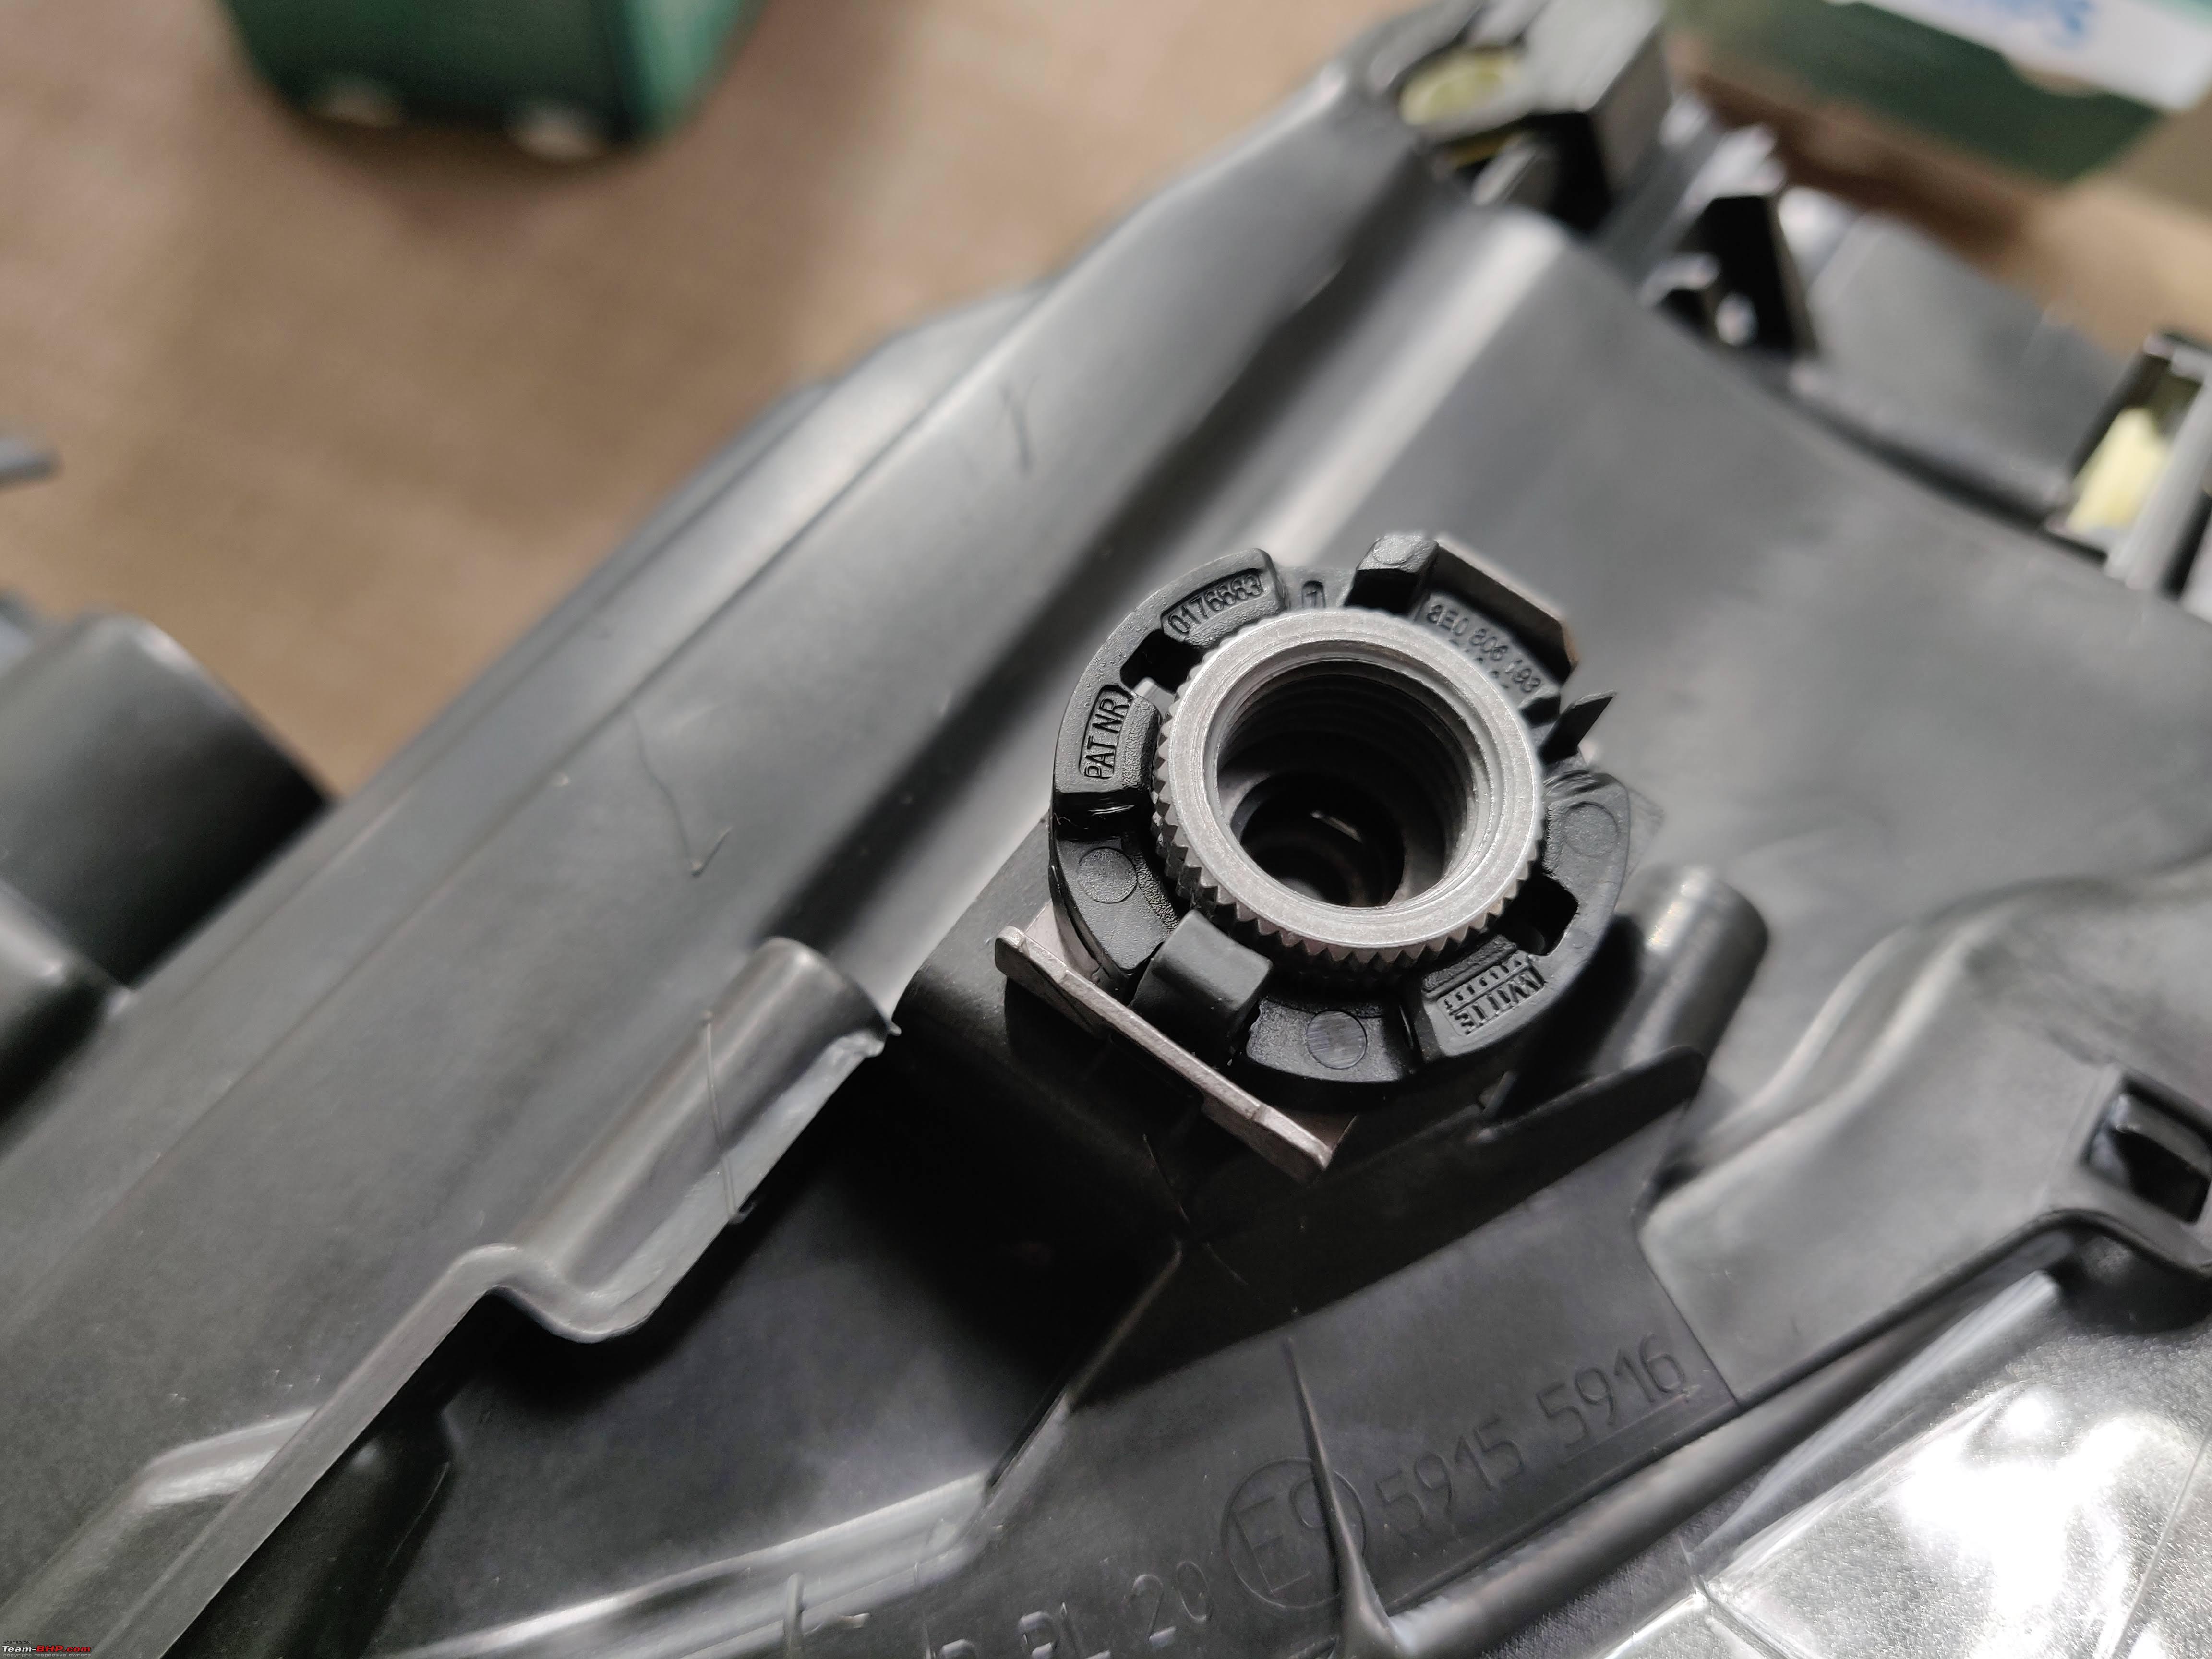 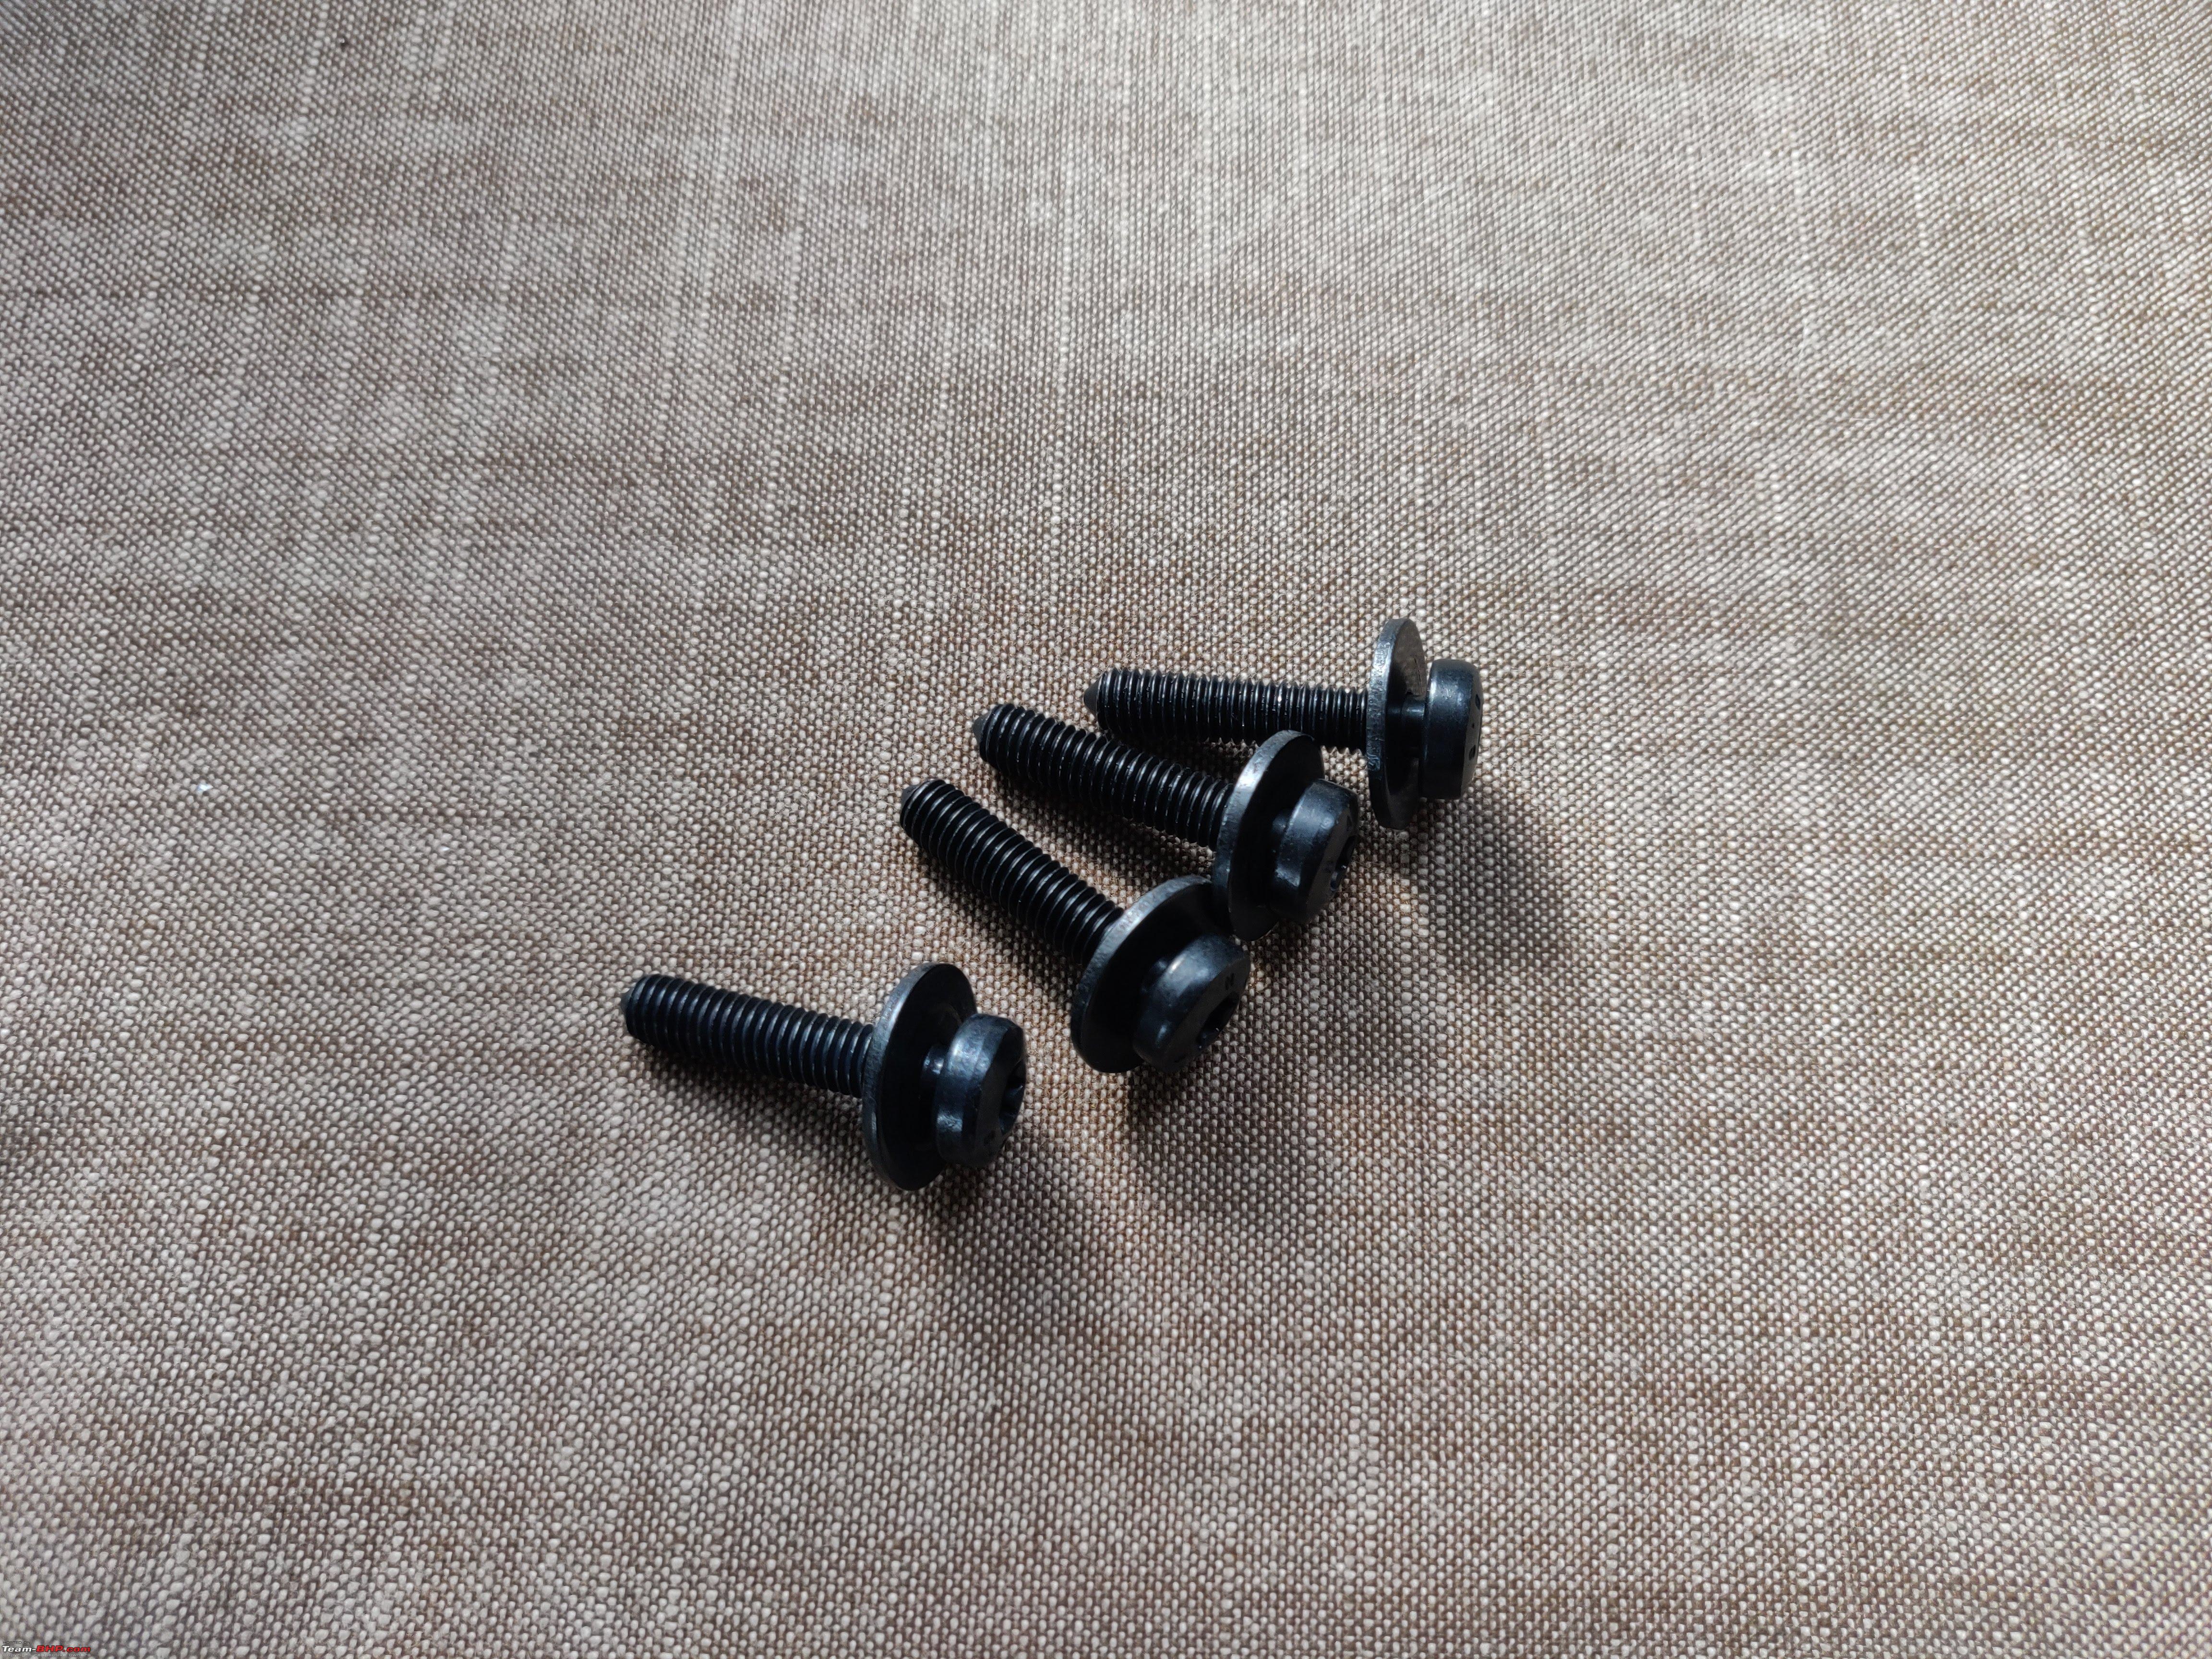 With most of the crucial hardware out of the way, I'll cover the Headlights in the next post. |
|
| (15)
Thanks
|
| The following 15 BHPians Thank fluidicjoy for this useful post: | adityan27, Avikbrio, CEF_Beasts, Dr.AD, Gannu_1, GaryTSI, johannskaria, MayurS, Omkar, Researcher, sarfraz1997, streetfighter, TSIboy, vredesbyrd, yesyeswe |
|
1st February 2023, 12:43
| #131 |
| BHPian Join Date: Oct 2020 Location: Pune, San Diego
Posts: 247
Thanked: 2,440 Times
| Polo 6R: OEM Bi-Xenon Headlight Retrofit In my previous post, I covered the headlight child parts and put them together, and now it is time to put them in the car to "Let there be light."  Installing the Headlights Replacing the headlight assemblies is fairly simple and the basic workflow has been covered by me here when I installed retrofit LED bulbs. (Upgrading to the Ultinon Pro 9000 LED Bulbs)  For a brief moment before its eye transplant, with both of the stock halogen assemblies taken out, the Polo sure looked lost, blind to be brutally honest, but that is a little harsh, even for a car. 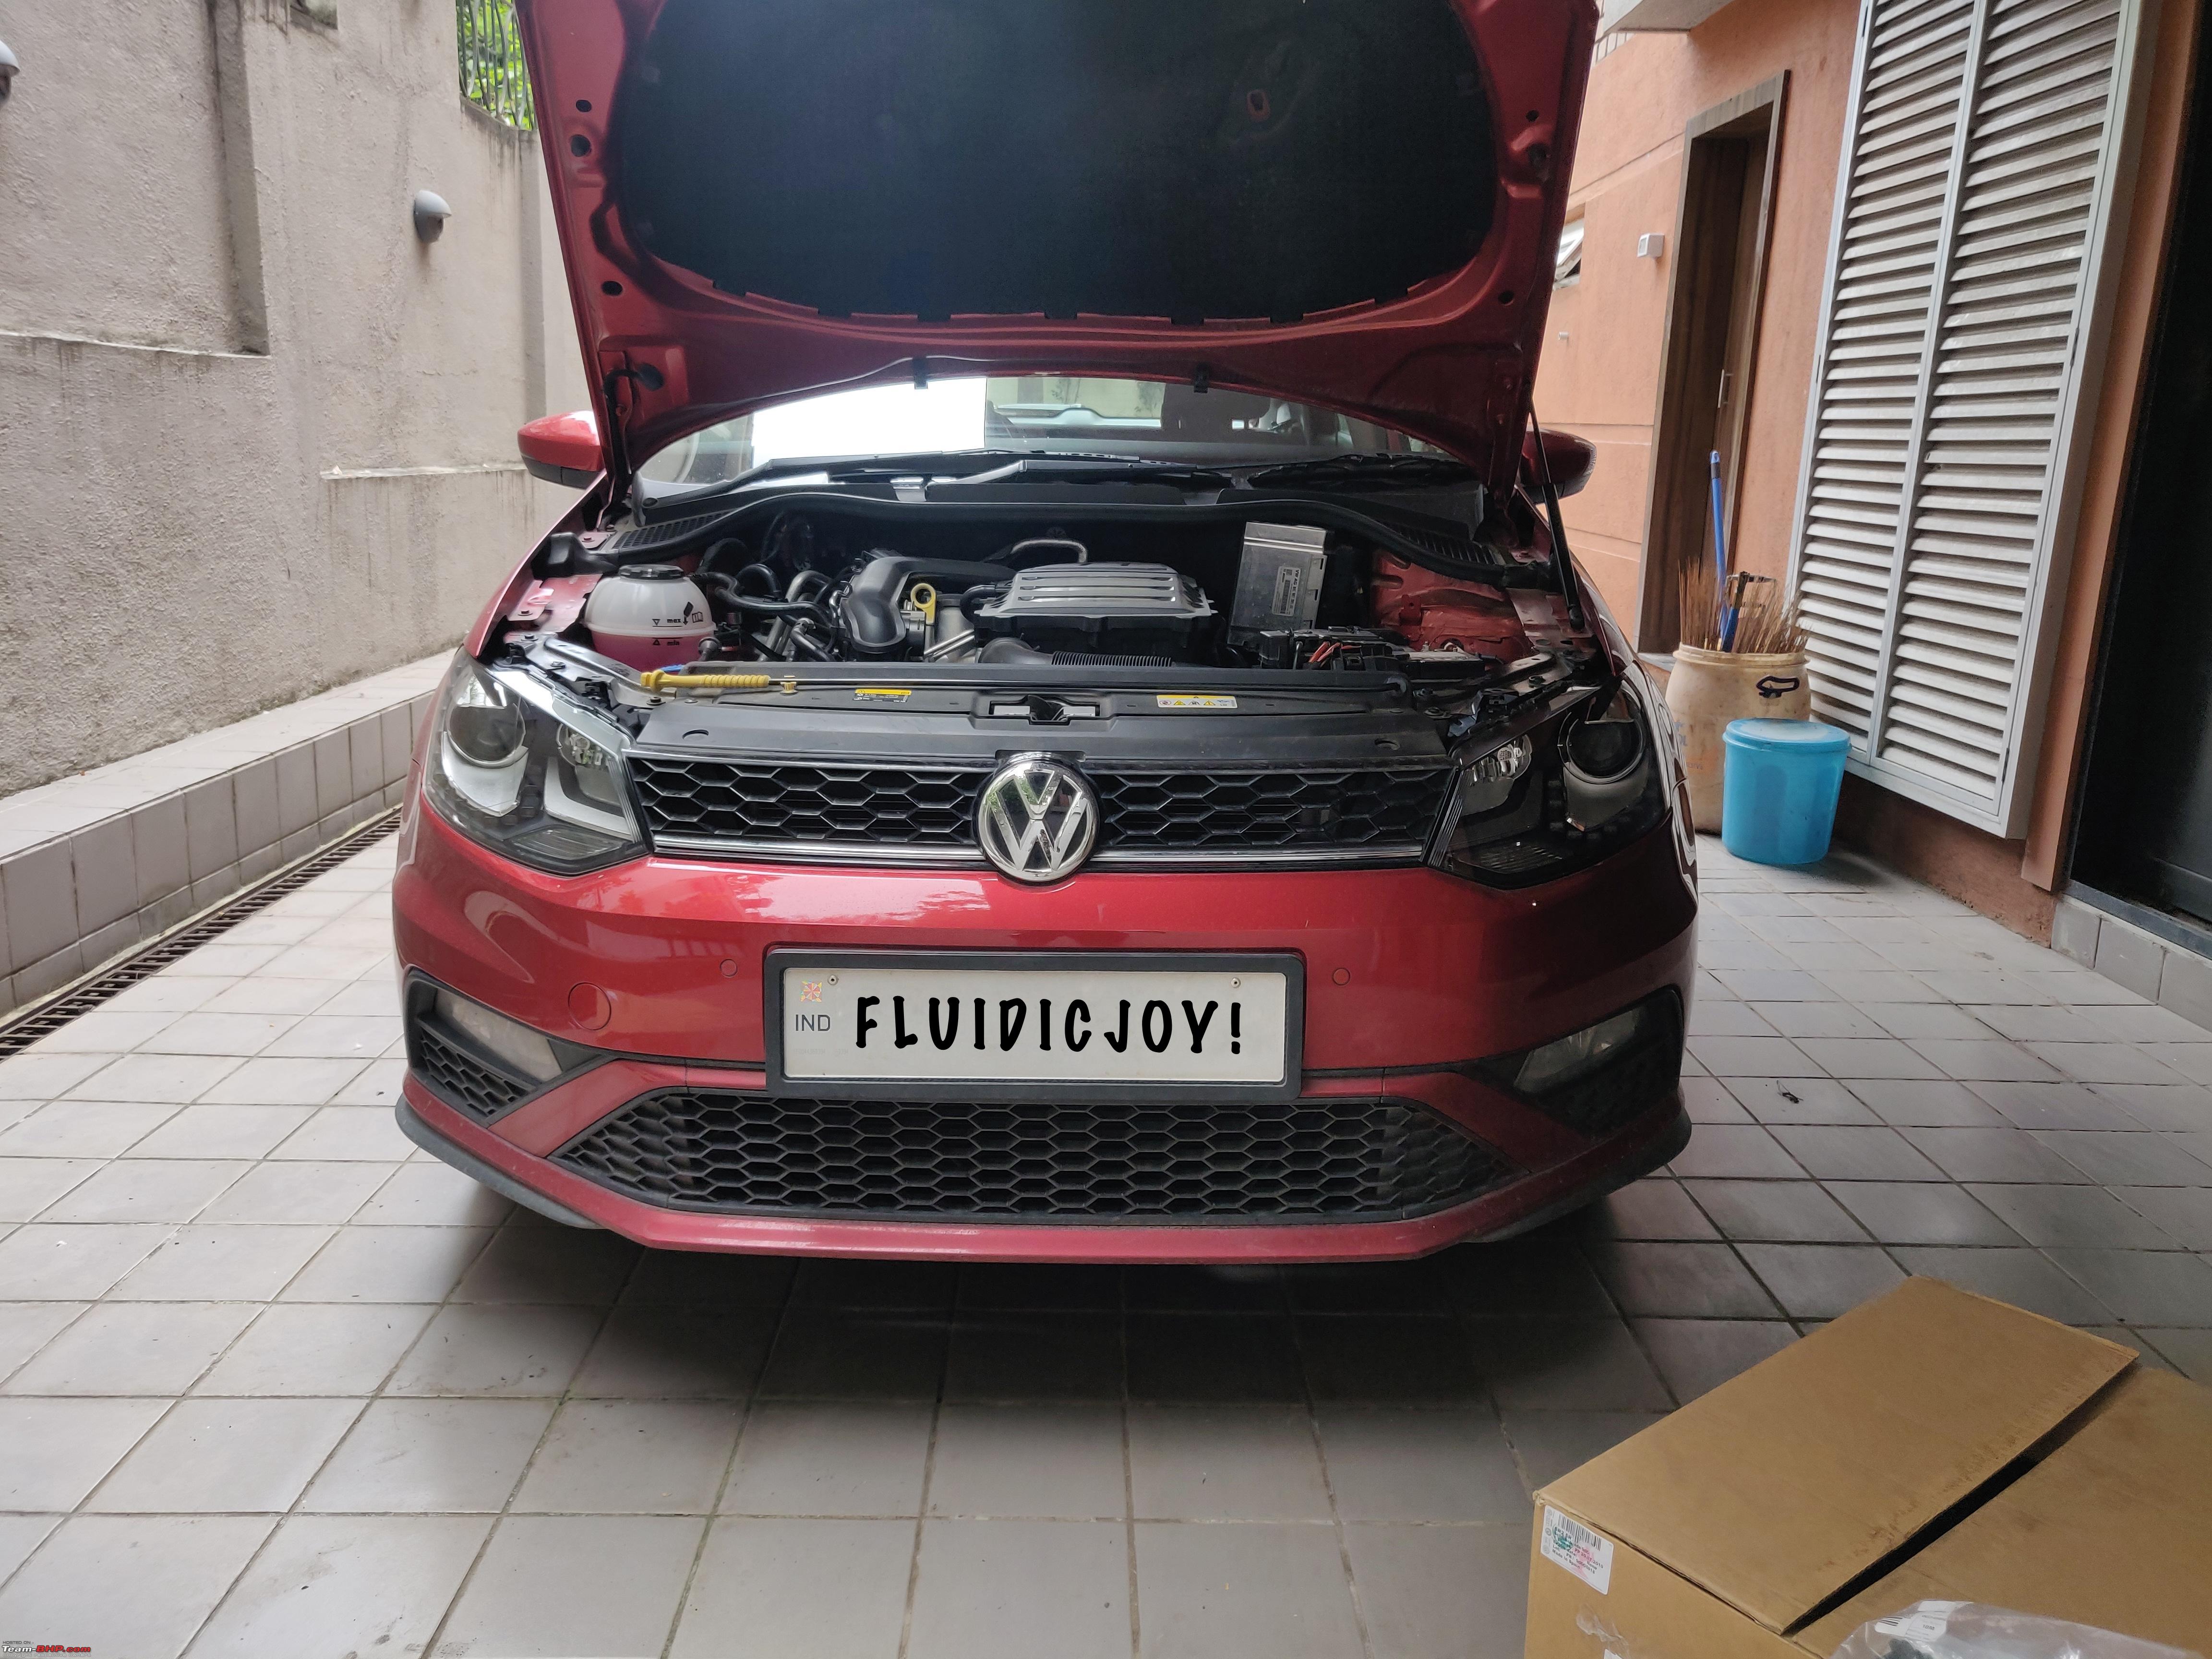 Initial Testing 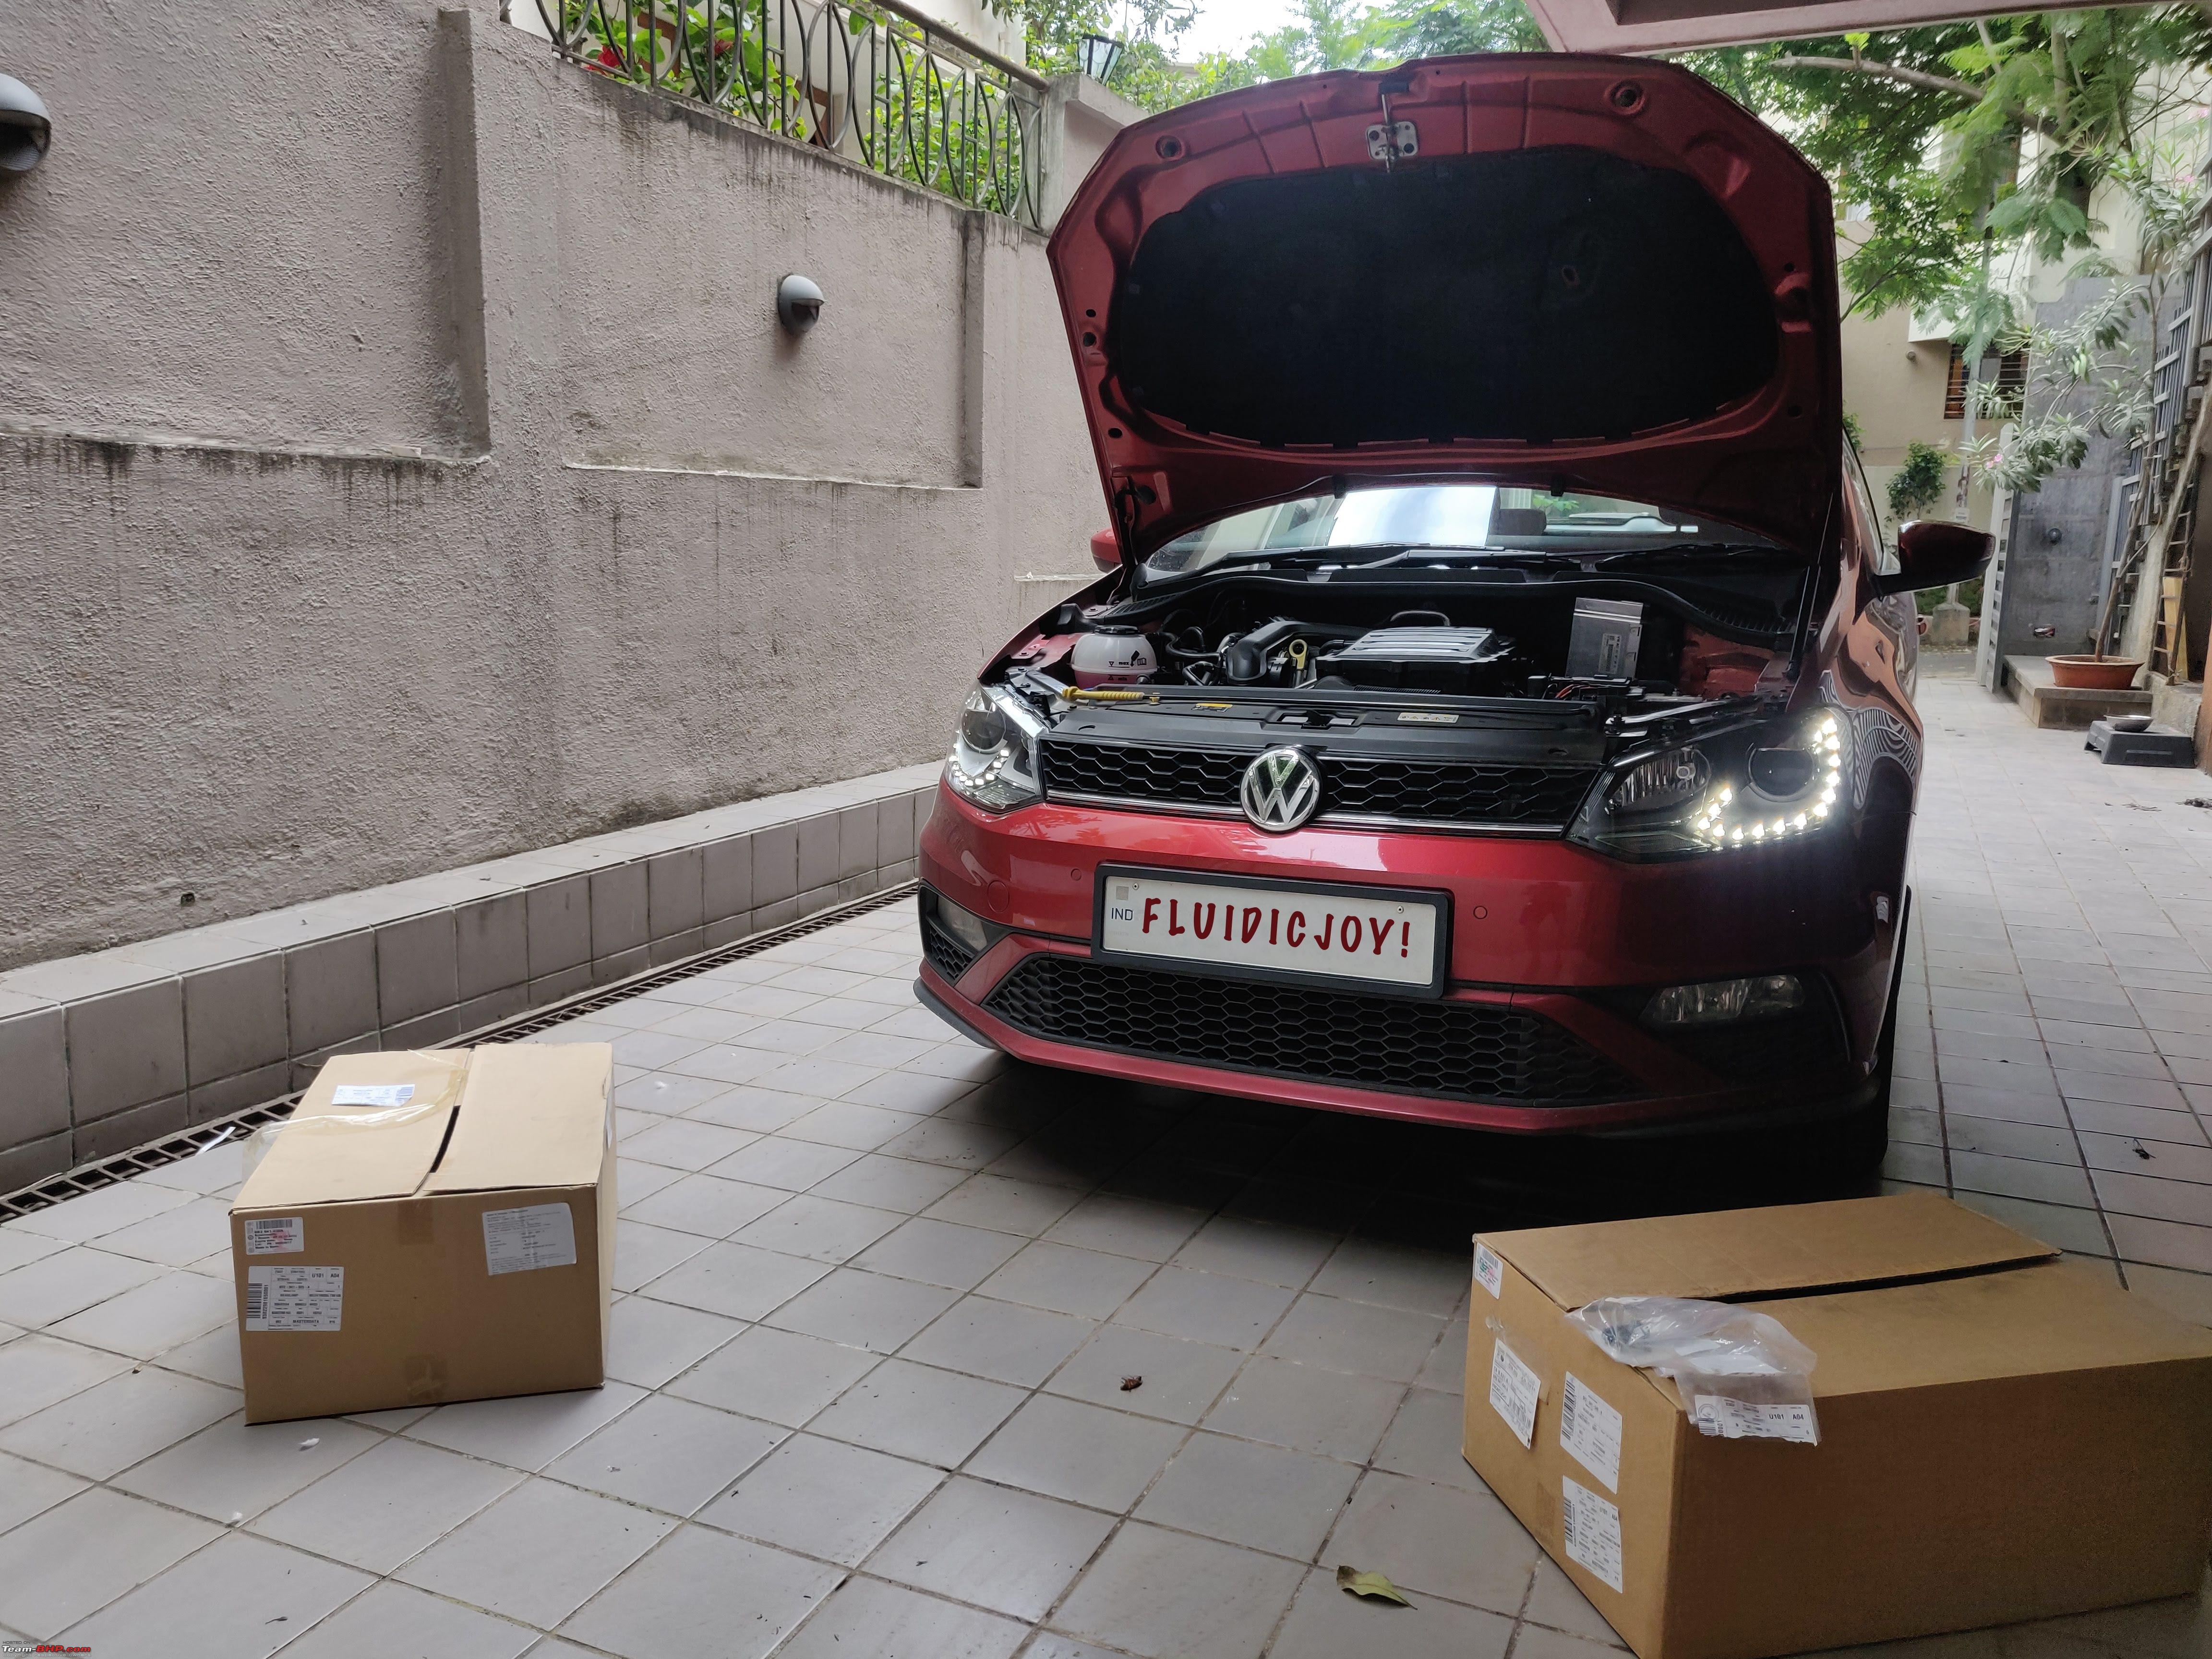  DRLs and Colour Scare 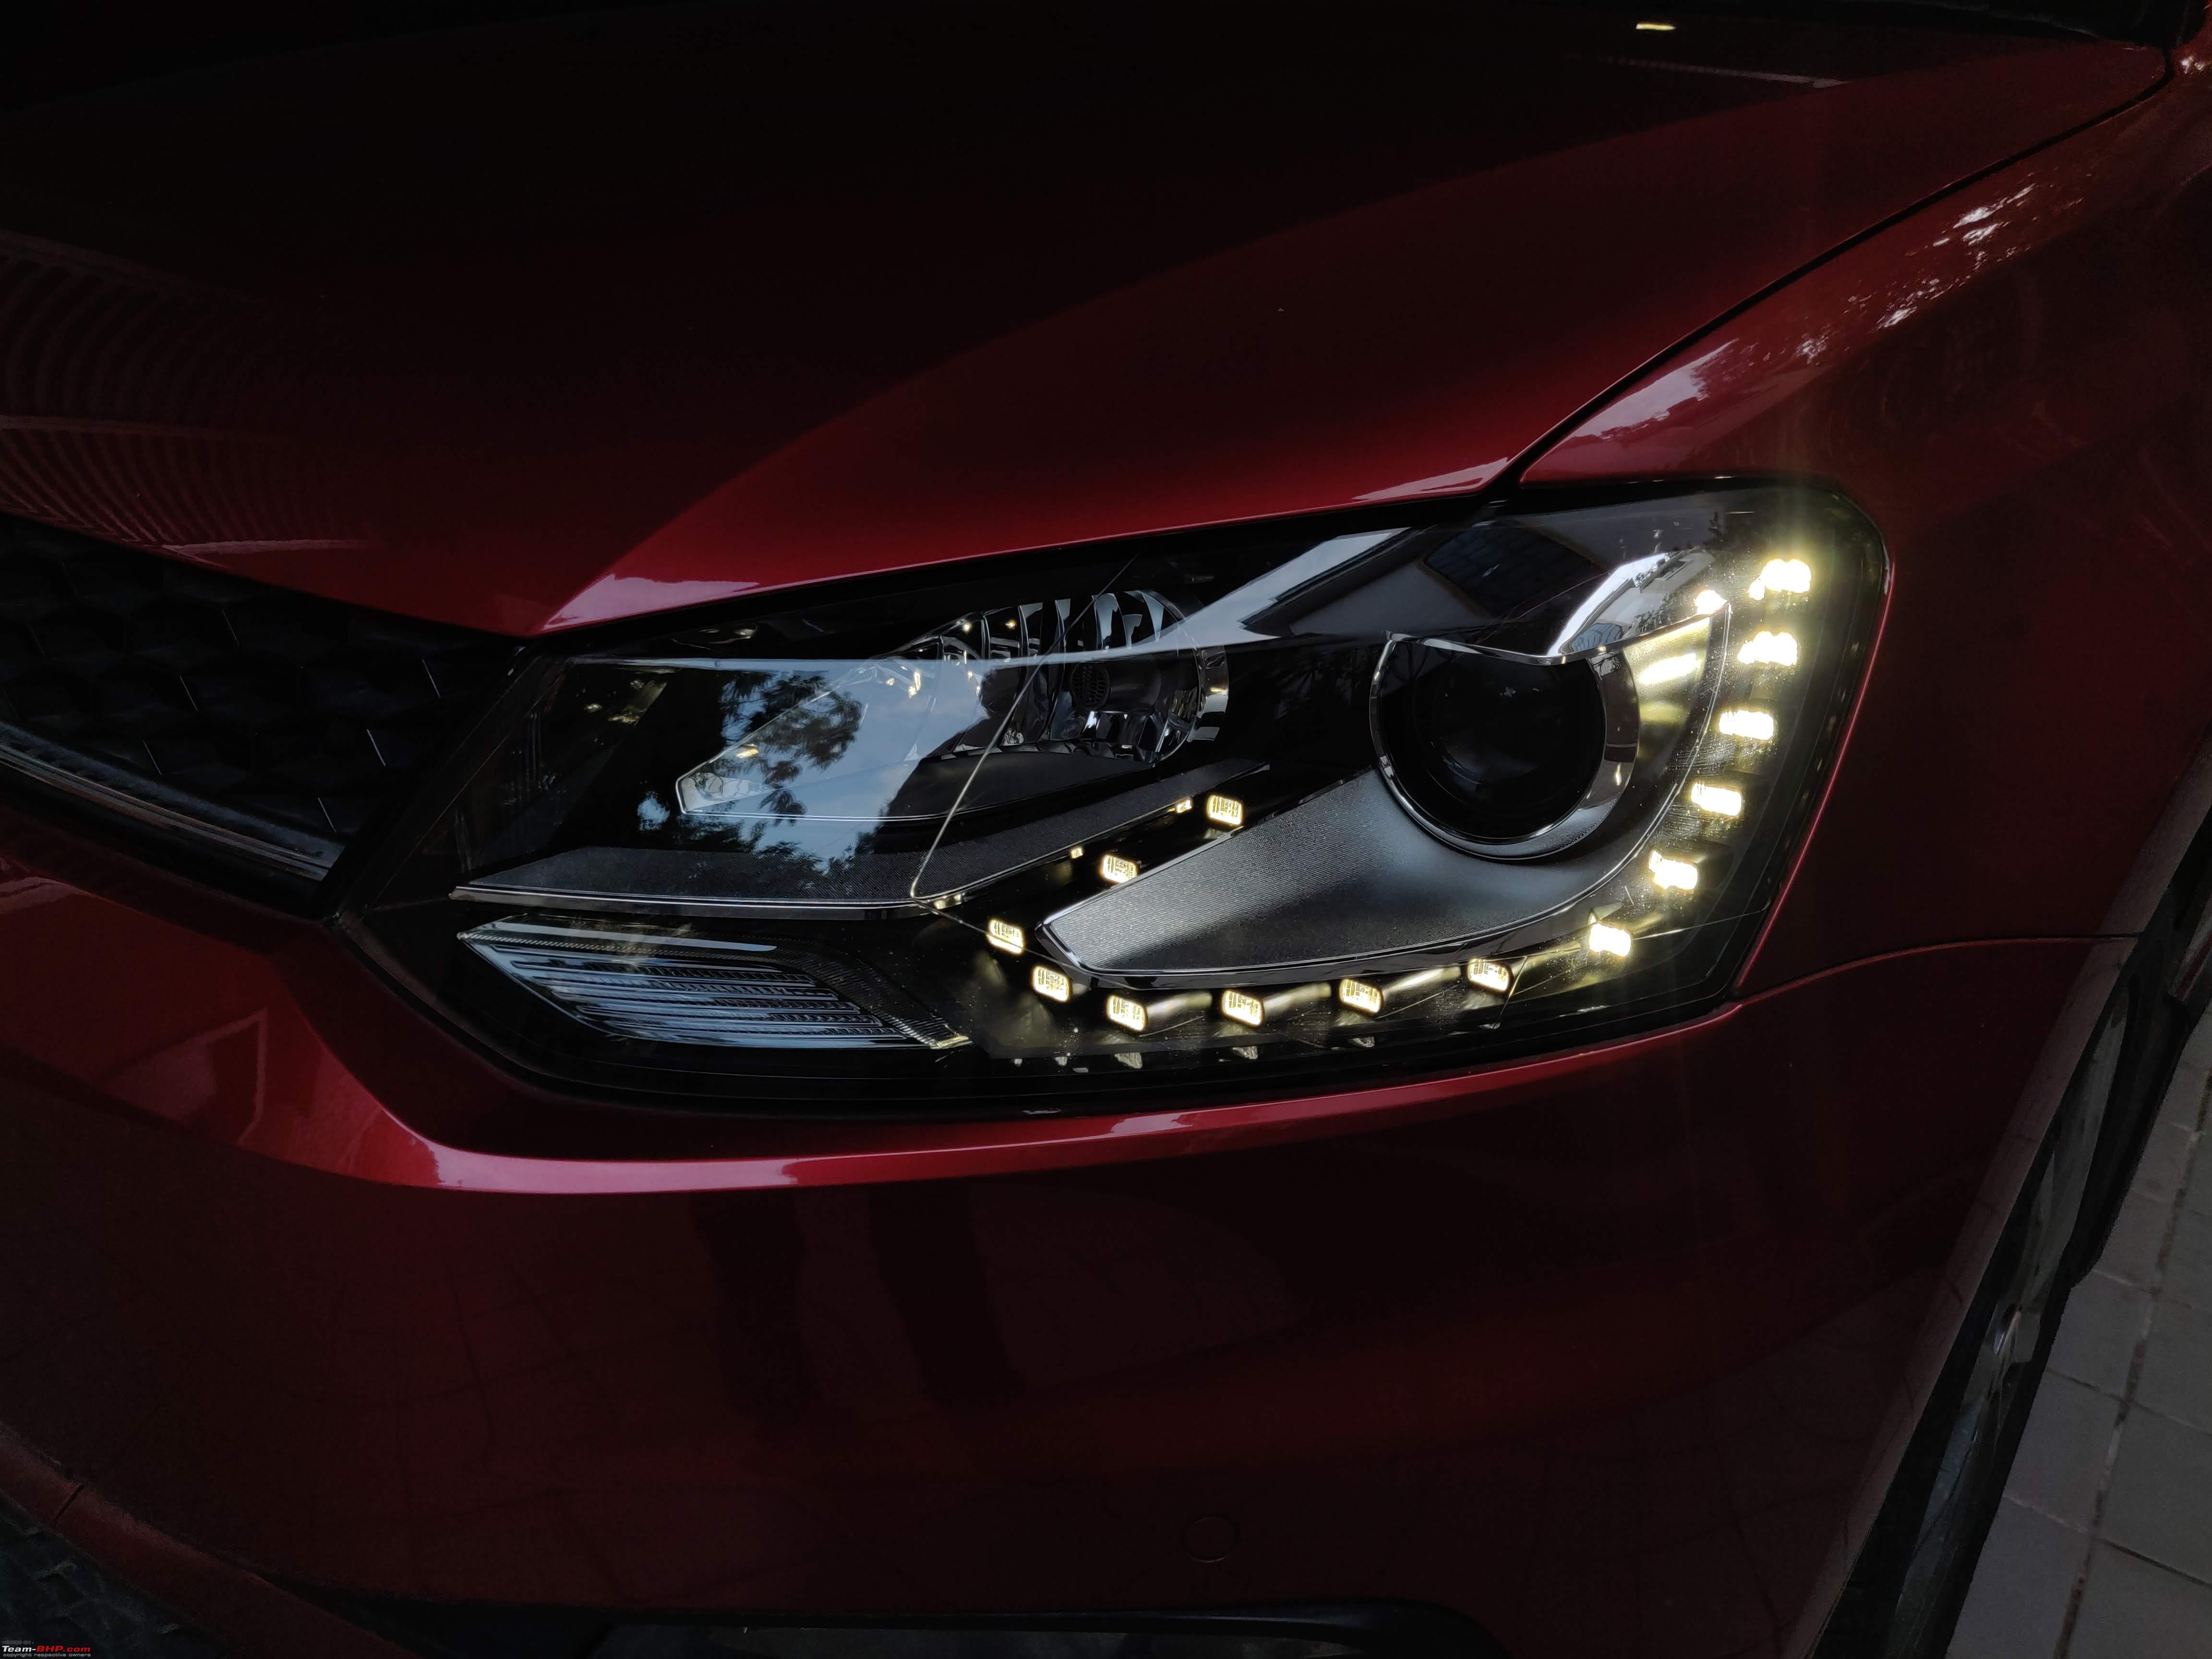 The Bi-Xenon DRLs I had seen on every other car looked white, and the ones I had looked Yellowish from a particular angle. This seemed quite weird, but we were quick to realise that this was just from particular angles. While Yellow isn't all that bad, it would have been disappointing had they been Yellow DRLs and not White. 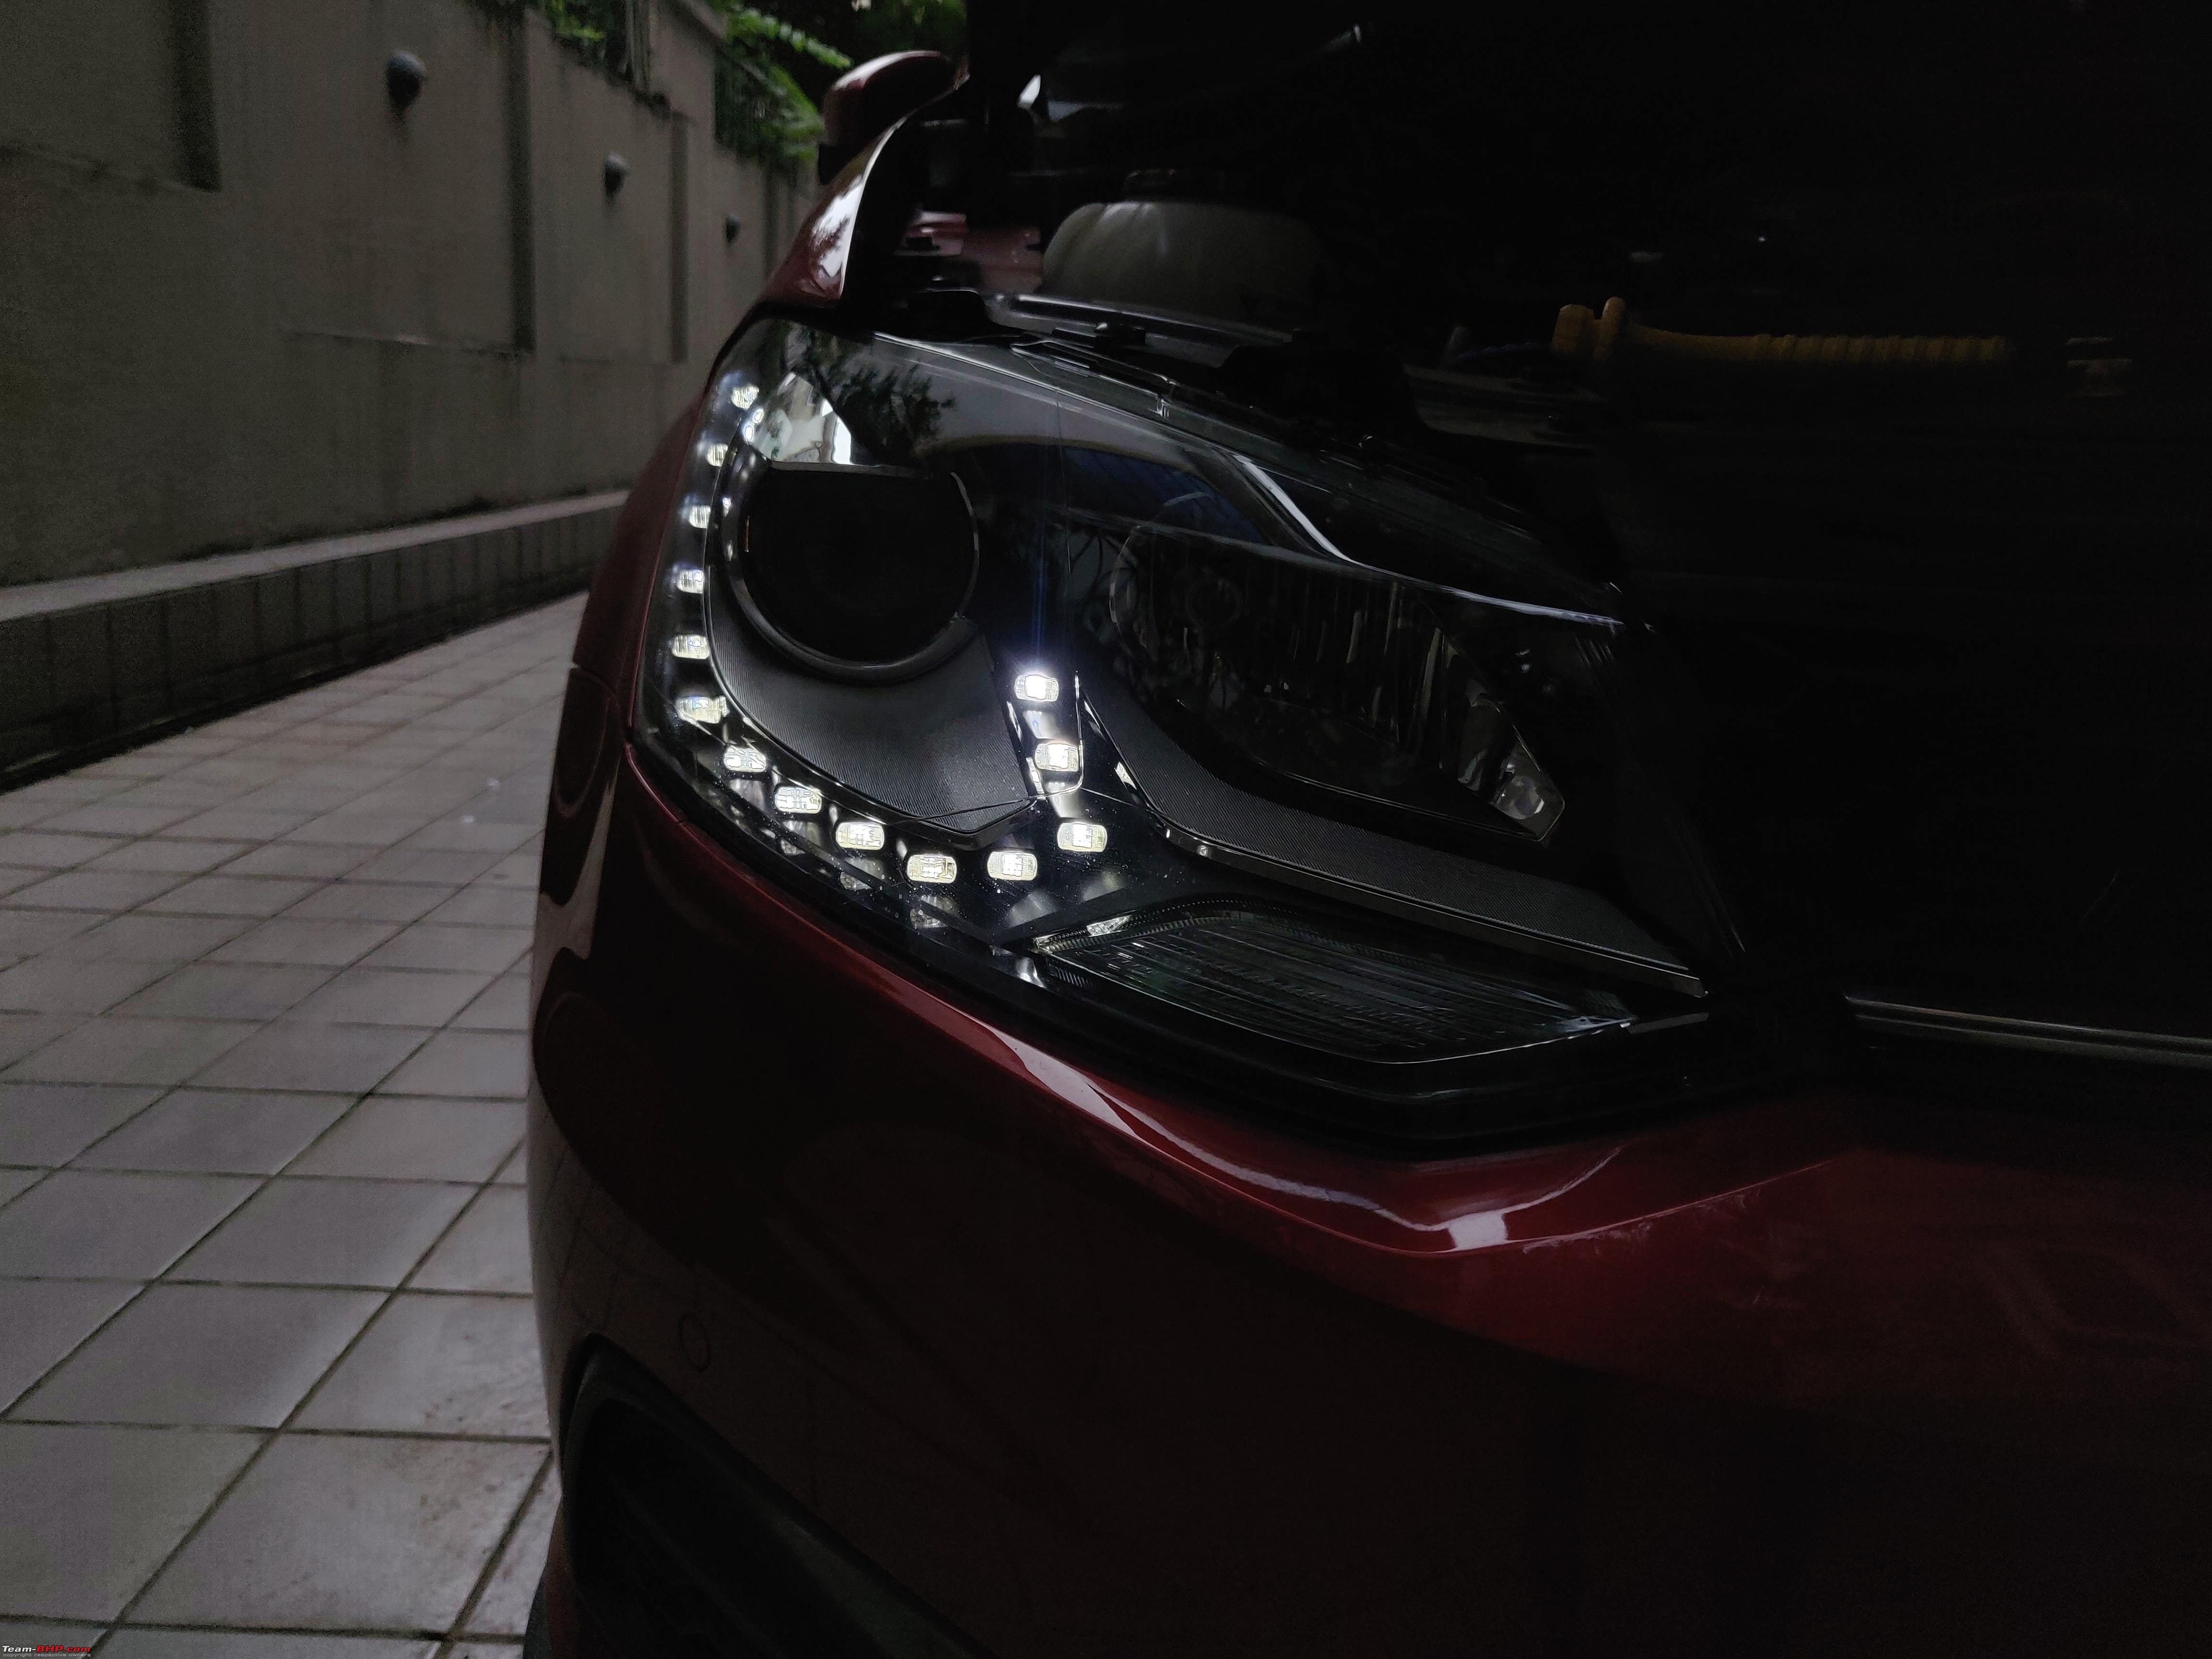 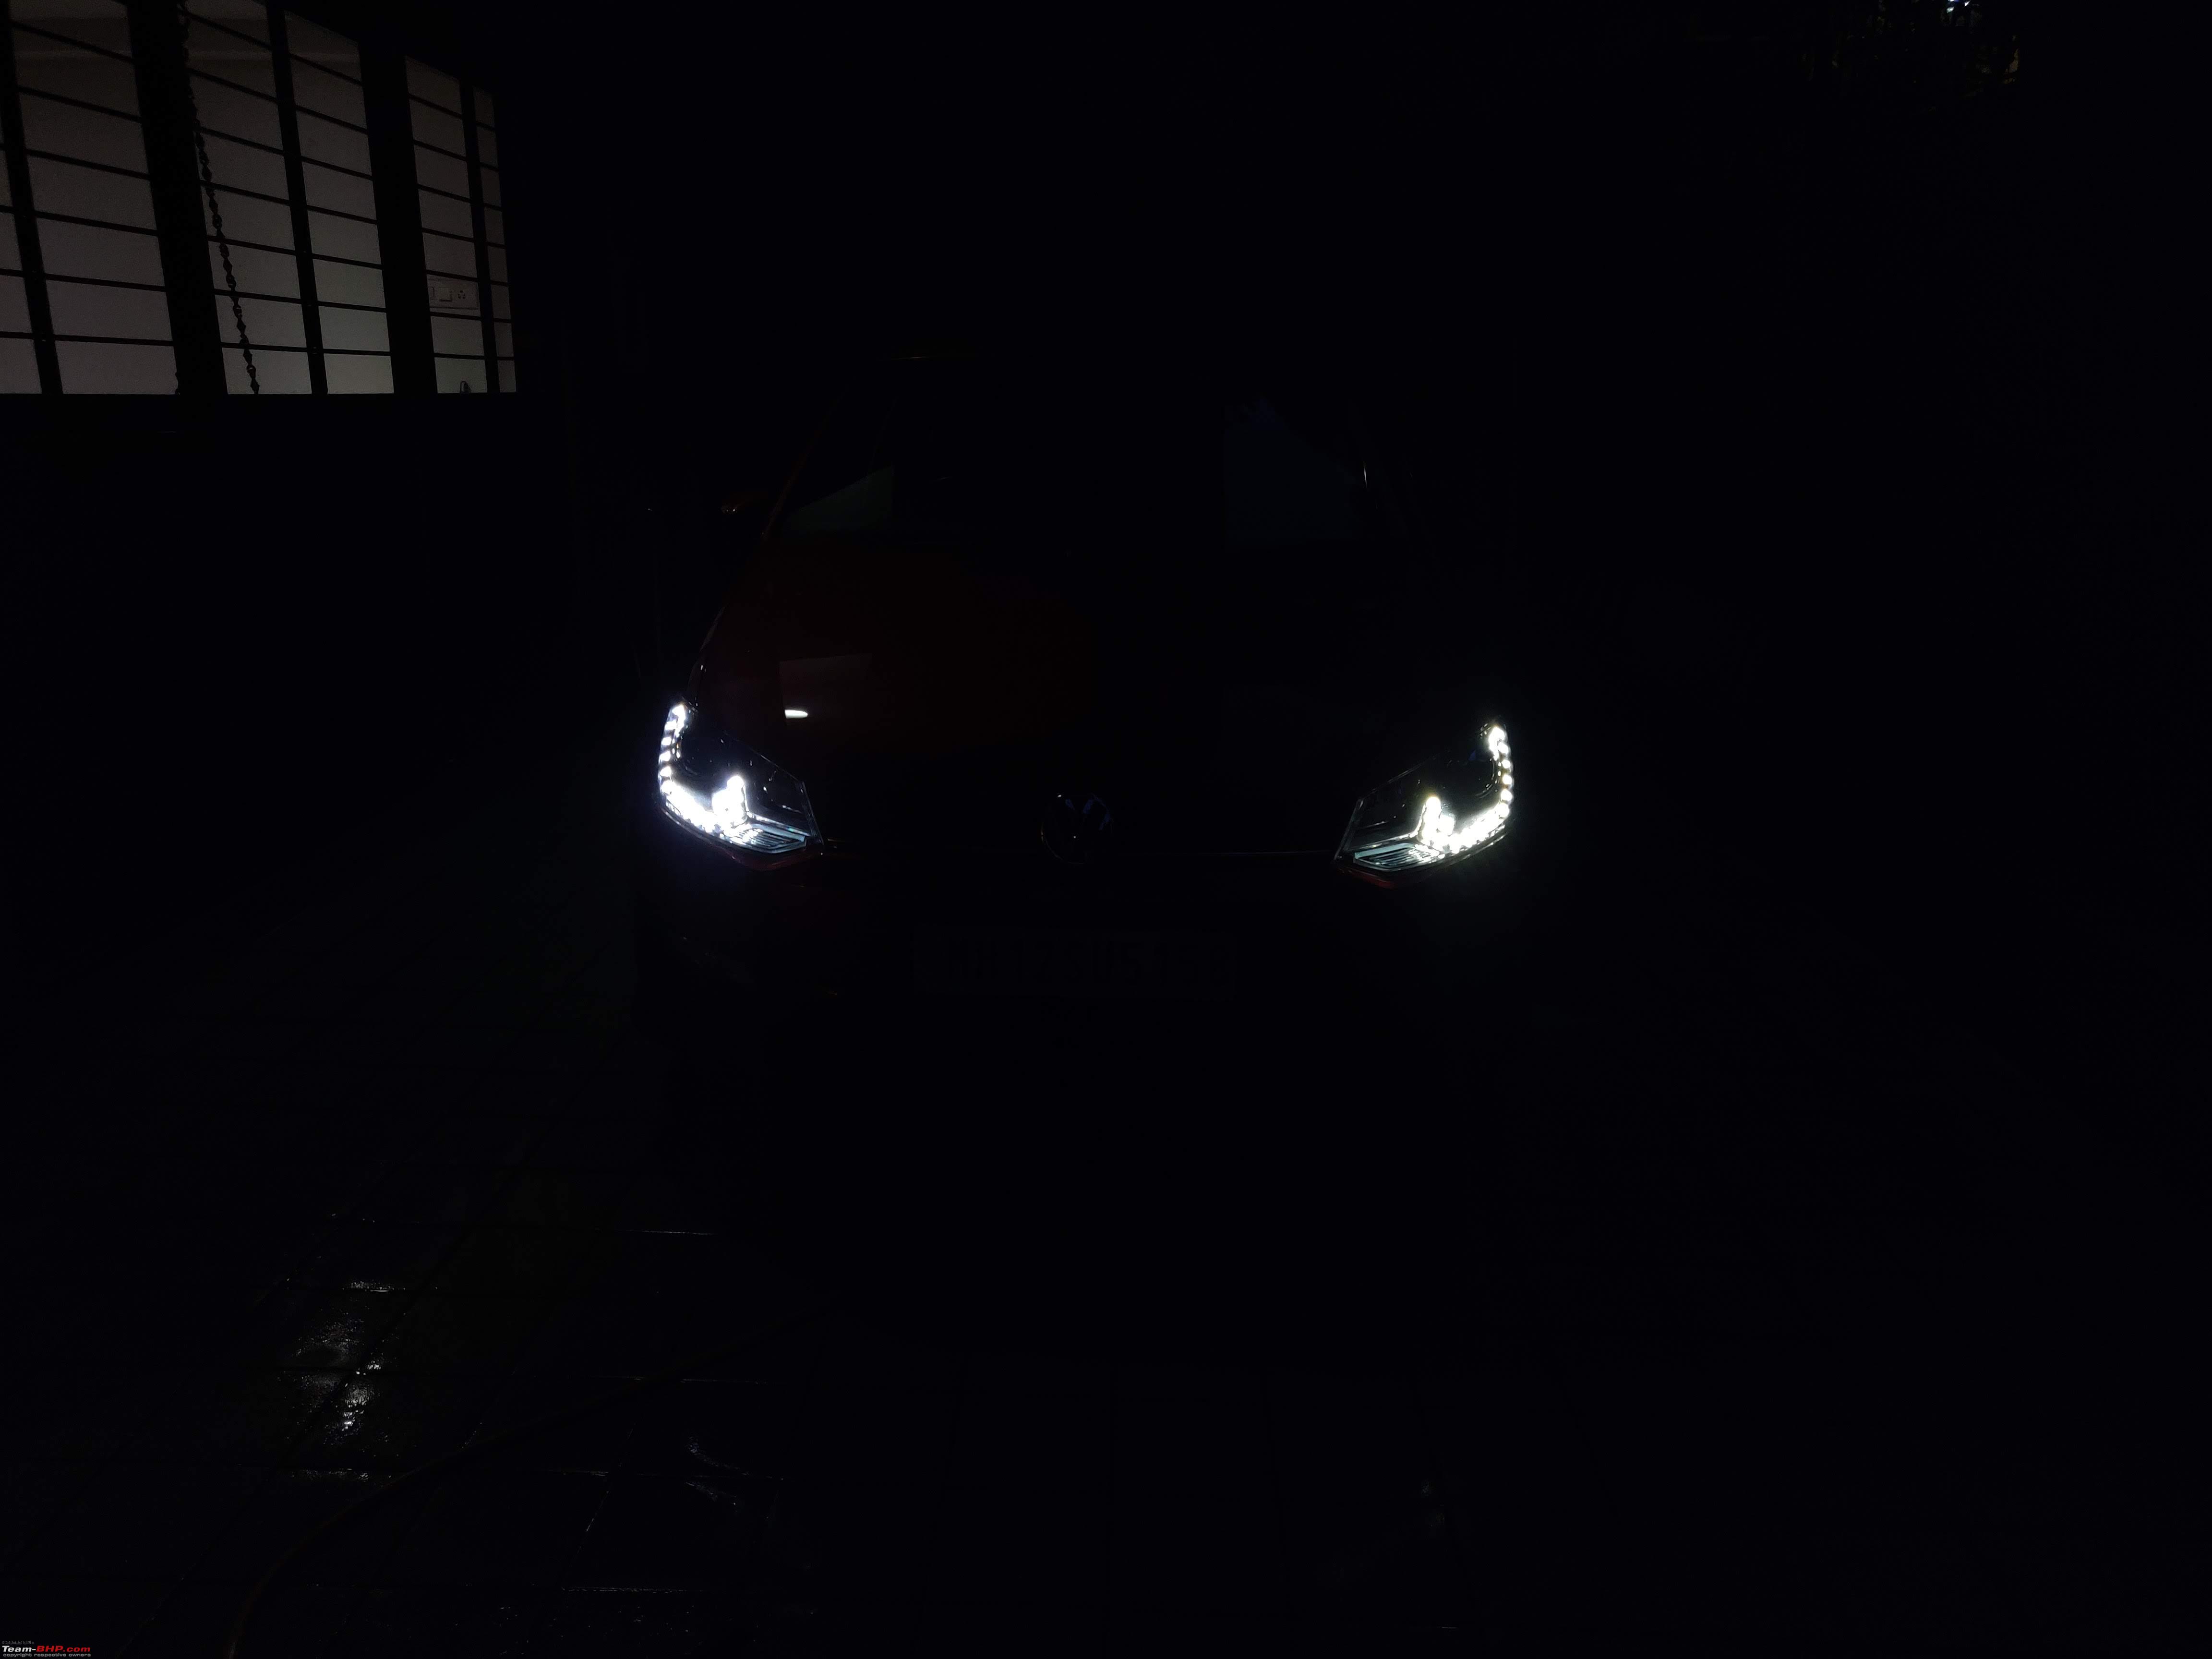 These DRLs change intensity depending on the position of the Headlight Switch. With a suitable BCM, these can be coded to be OFF with the Hand-brake engaged. Functionality With an emulator, most of the features of the Bi-Xenon headlights work like the DRLs dimming, Low-Beam, High-Beam, Cornering Lamps with turn signals etc and this is a huge win for non-BCM Max cars. Other than auto-levelling and some smart OEM level features like DRL winking etc. this emulator gets most of the things done and most folks would be very happy with it. Headlight Throw and Beam Pattern  The Xenon headlight is a lot brighter and has a stronger throw compared to the puny stock halogen lights. The cutoff is nice and crisp and can inspire plenty of confidence once aligned correctly. Here is a picture with the car standing a few feet from the wall.  For my initial setup, I tested the beam pattern from a distance of about 18-25 feet and manually levelled the projector beam against references on a wall. 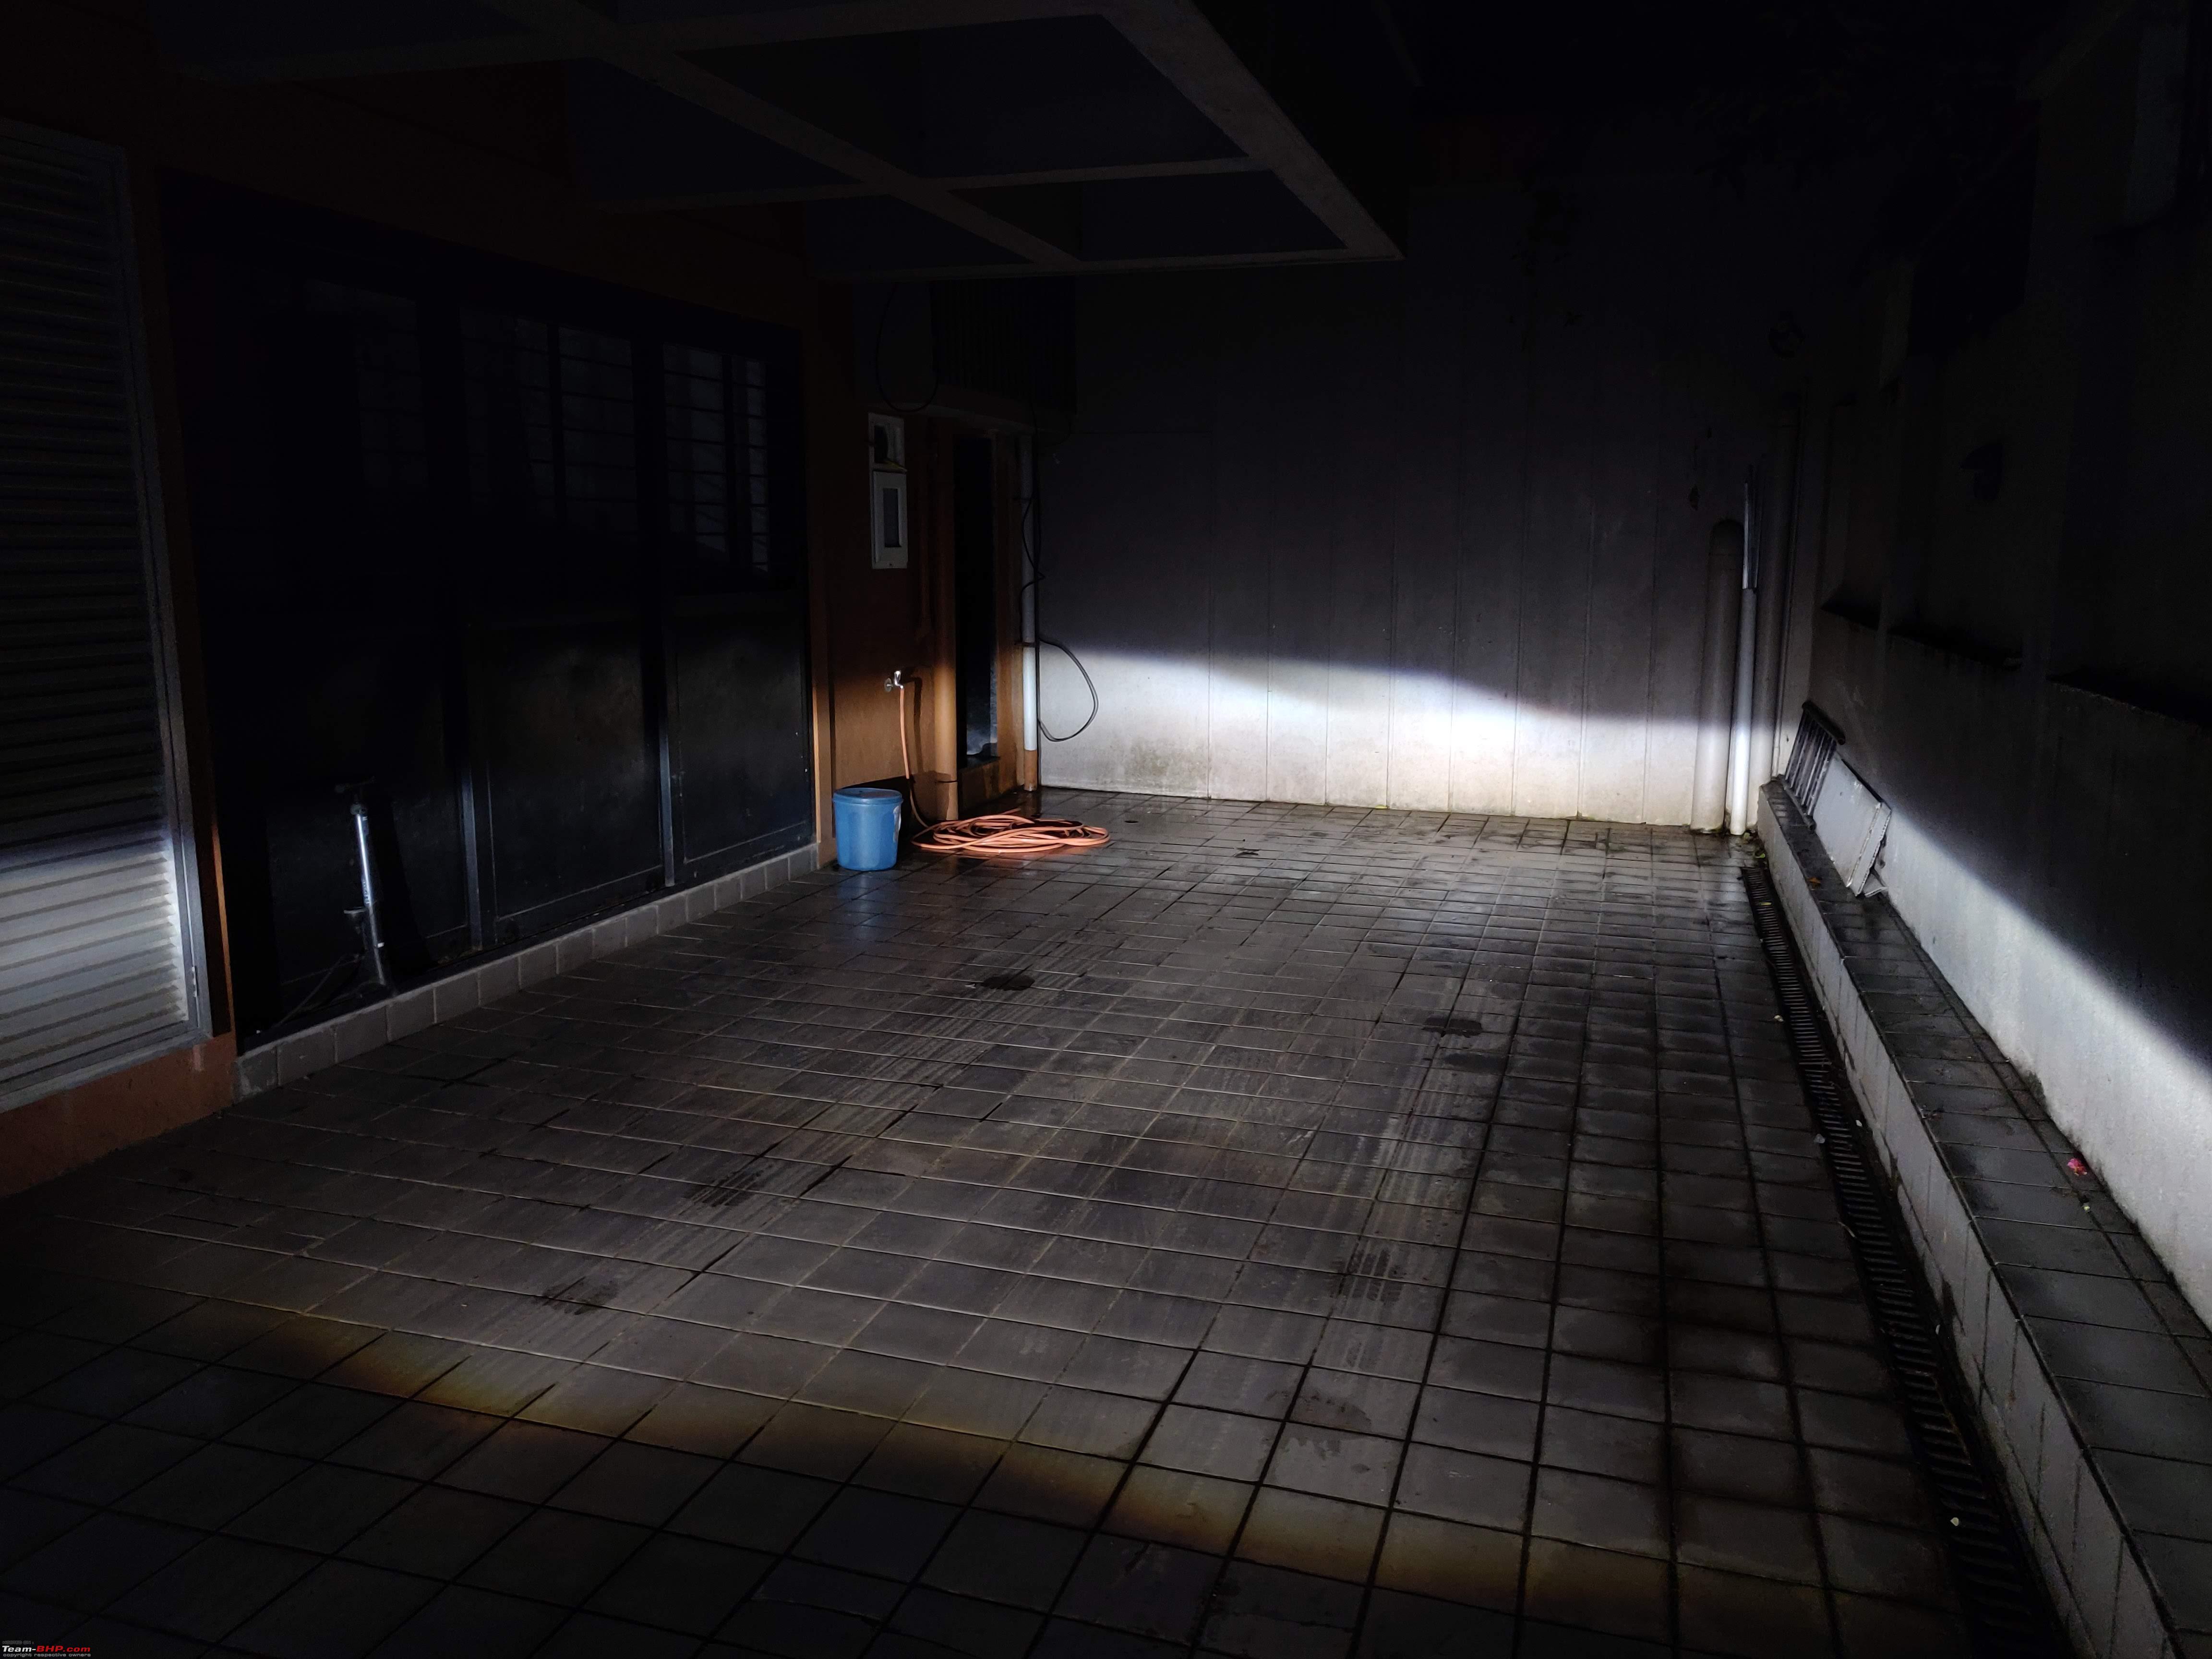 To see which side of the headlight was contributing to what part of the beam, I blocked out one of the lenses with a towel. This experiment helped get an idea of the horizontal spread of the projector bowl. 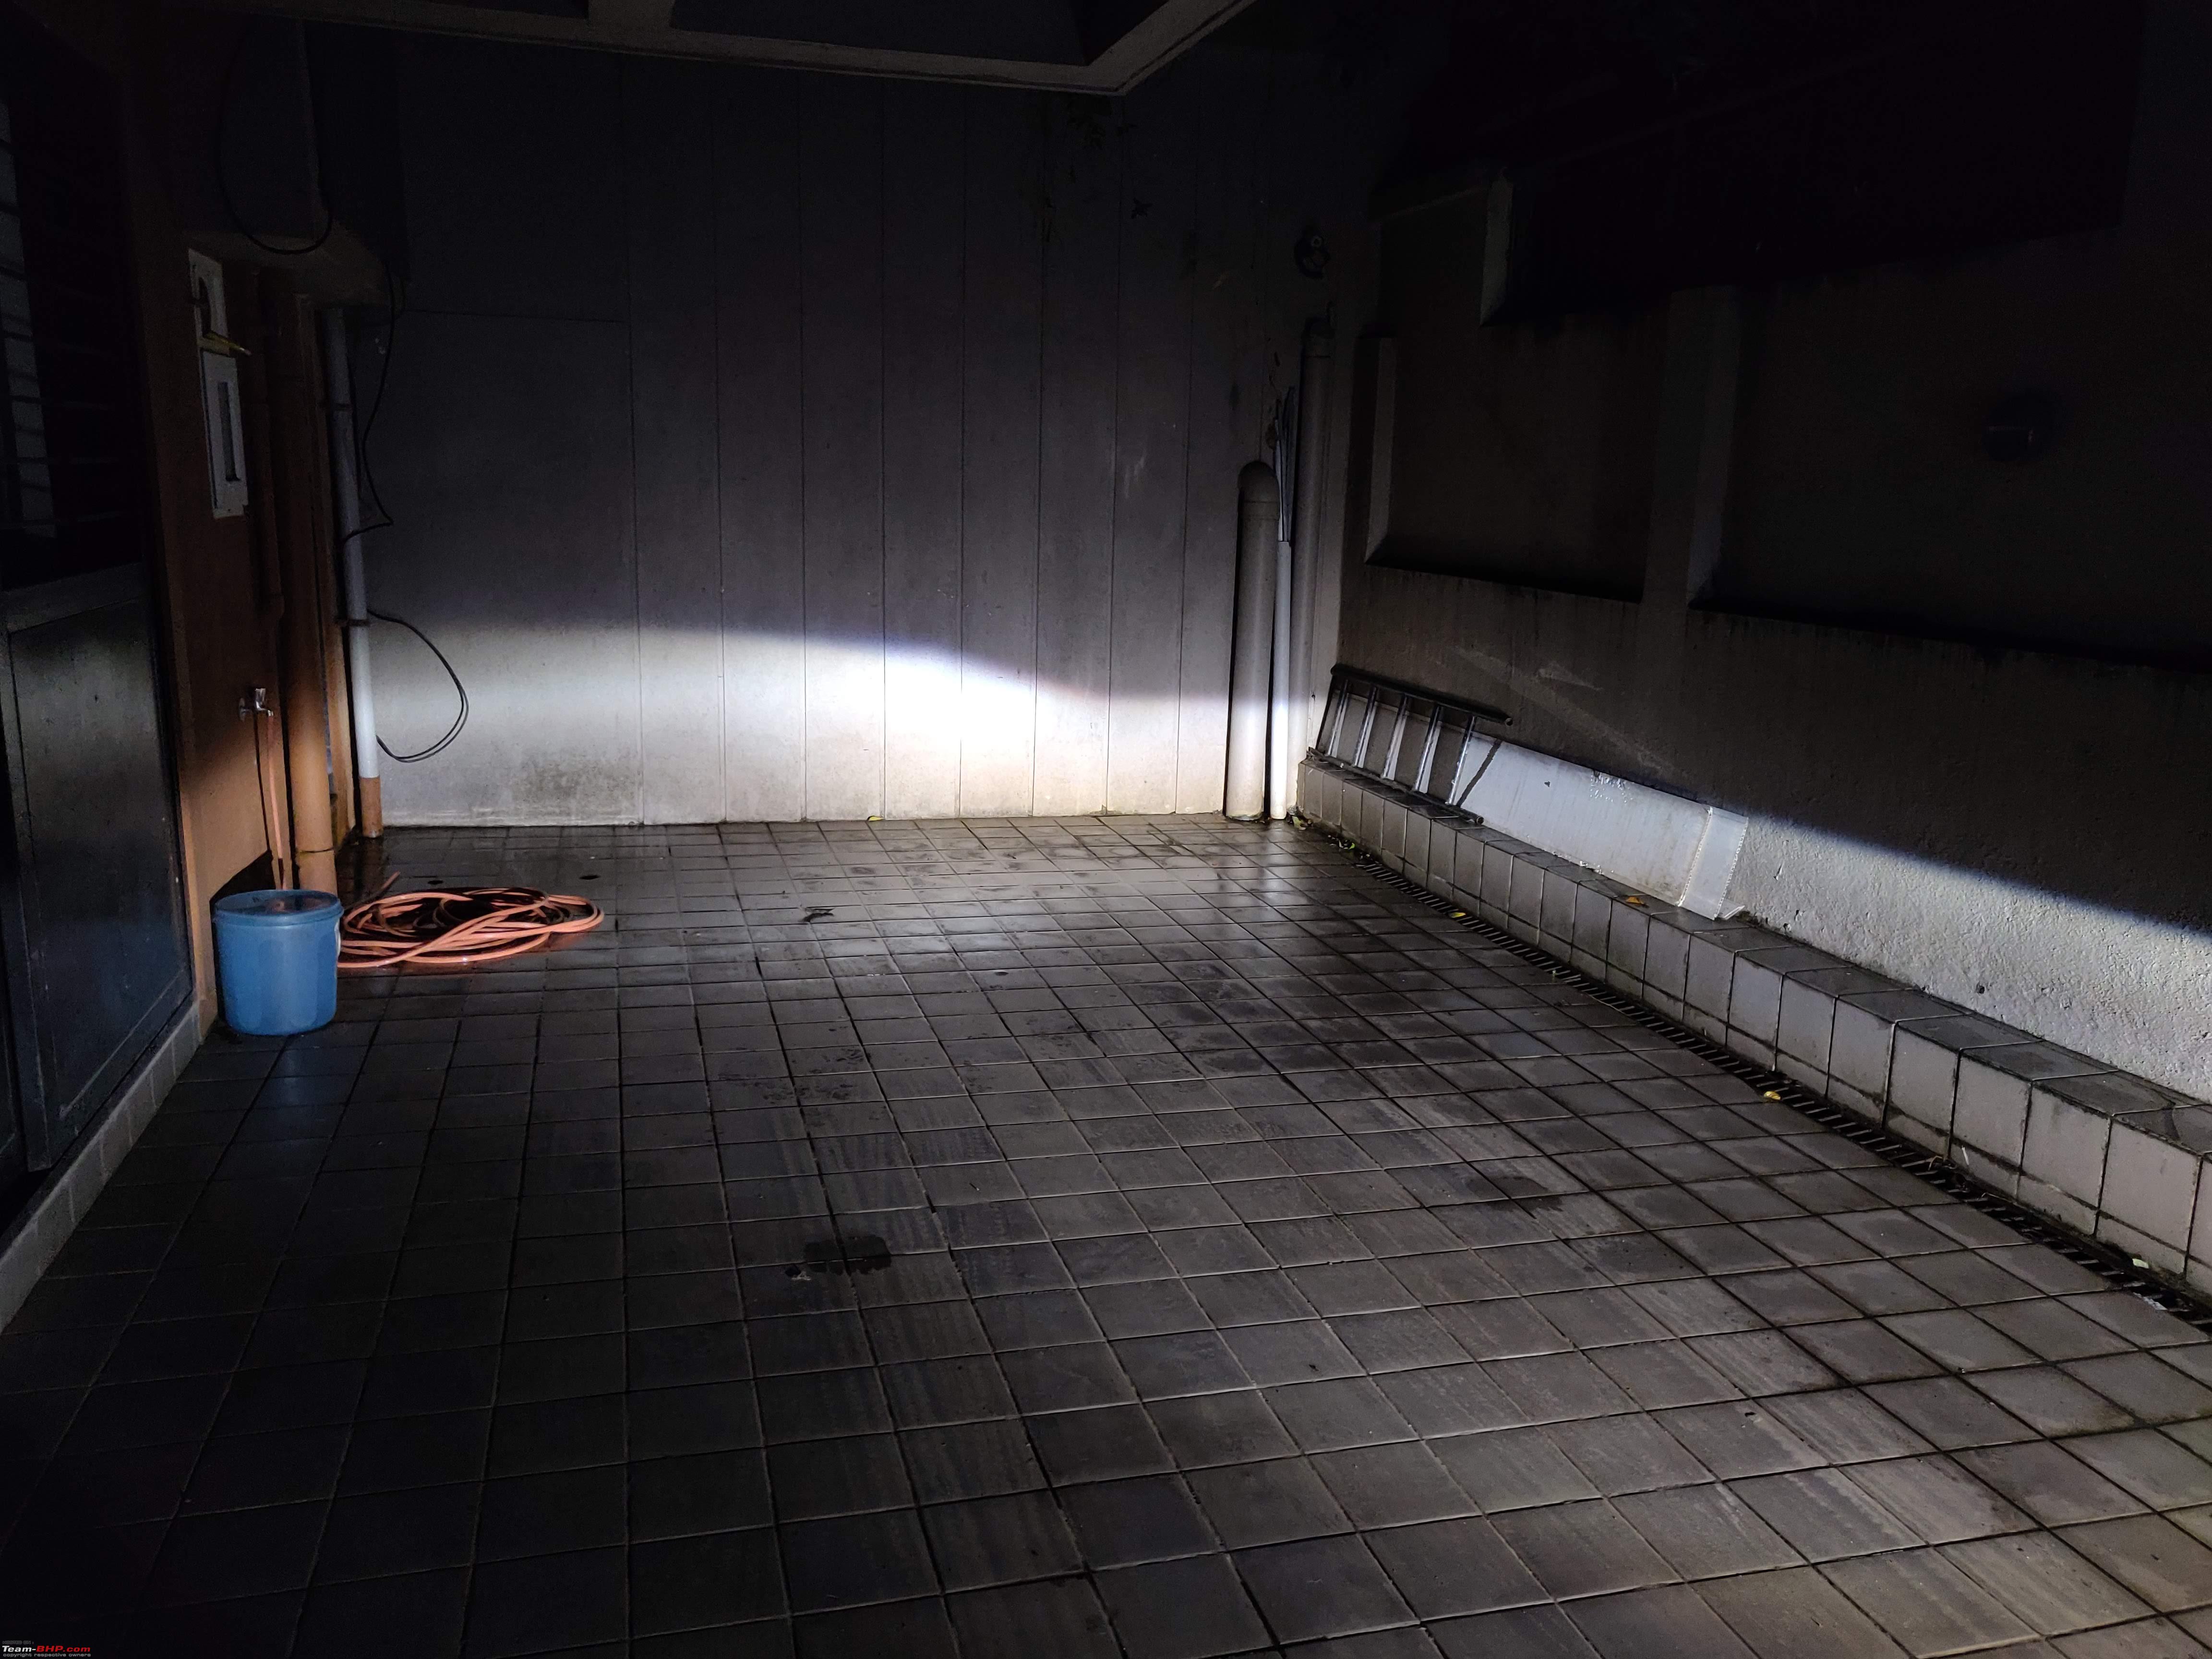  Low and High Beam 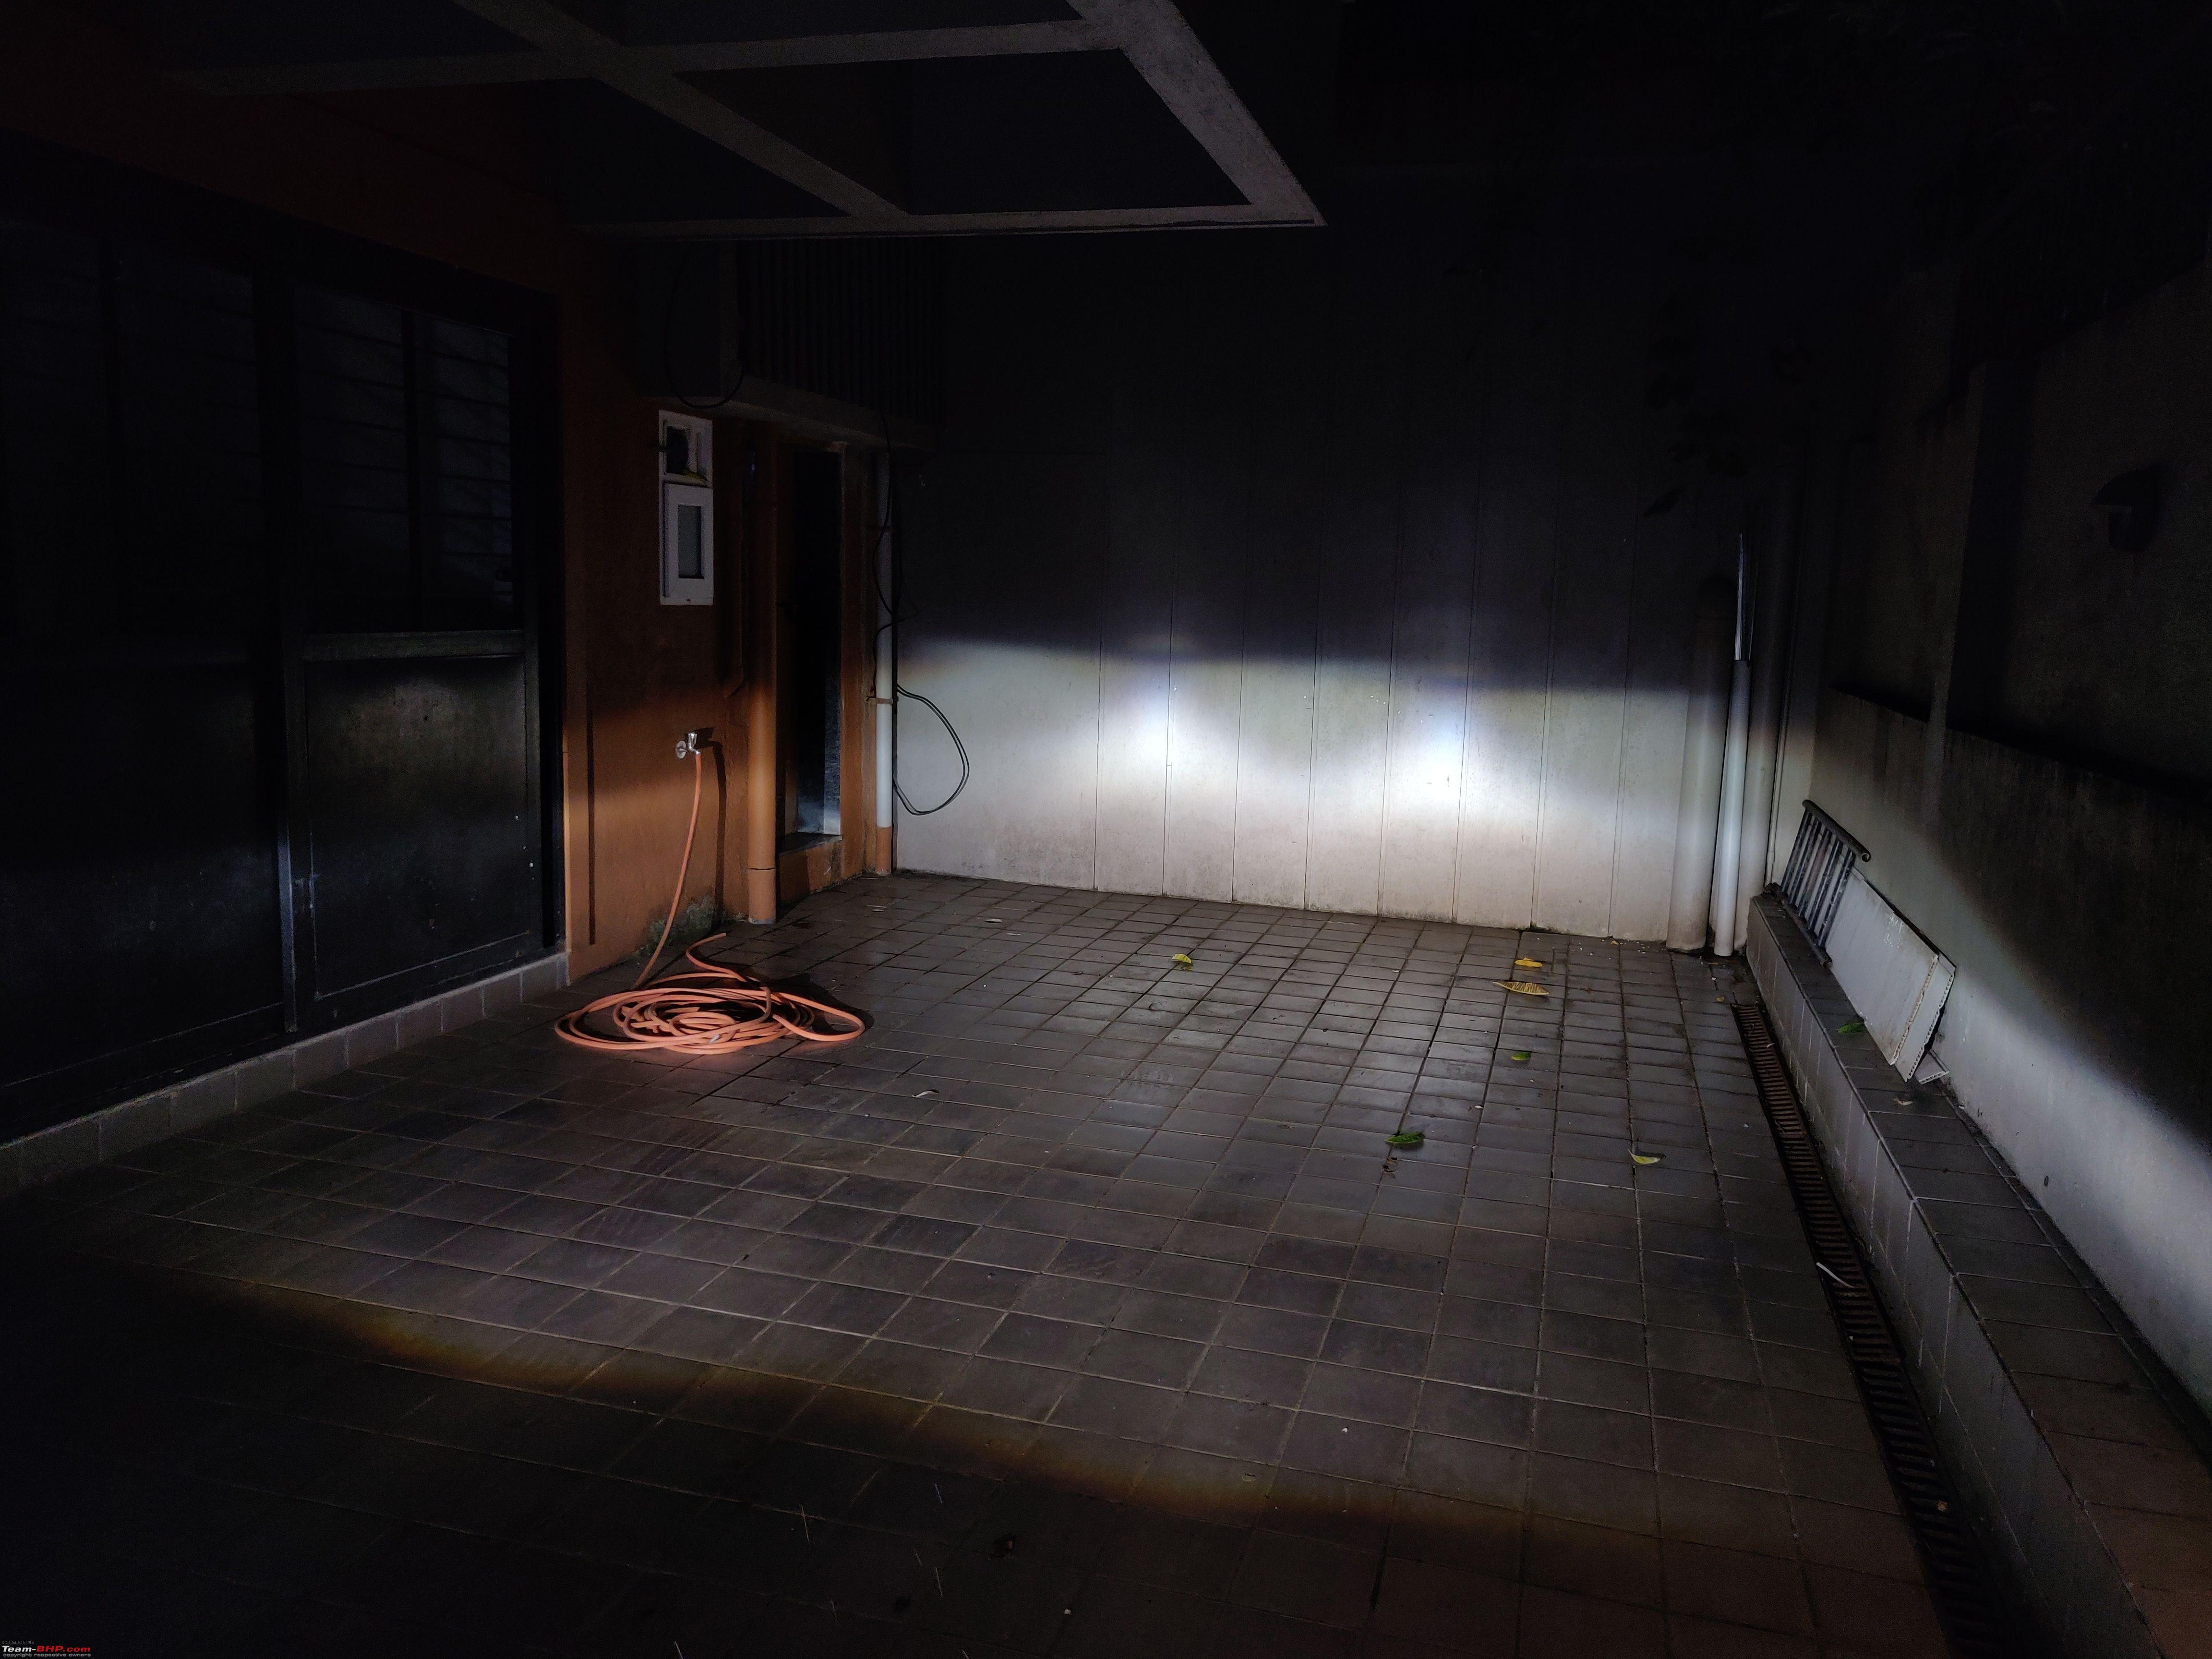 Headlight Videos Heres a small video I made to highlight some of the basic functionality of the headlights, but I am not very proud of this video and there are quite a lot of better videos which Ive left cards to in my video. Those videos have more extensive driving tests with these headlights to give you a feel of how they perform. Here is a link to another recent thread my BHPian Sarfraz (Ownership Review : Journey with my VW Vento 1.2 TSI Highline) which covers the Headlight performance. Auto-Levelling The experience with Bi-Xenons is great, but it can be a little disappointing without proper levelling if you keep having a variable load in your car. After wiring these in, the stock headlight leveller in the car stops working and for the few rare folks who use it, this can be an absolute bummer. In my case, I adjusted the beam with respect to the centre of the headlight, and while it never caused a glare, I ended up having a throw which was falling too short from the car. Eventually, I ended up installing an Auto-Levelling sensor and since then, this issue has been corrected. I will write about my experience installing the AFS system shortly. 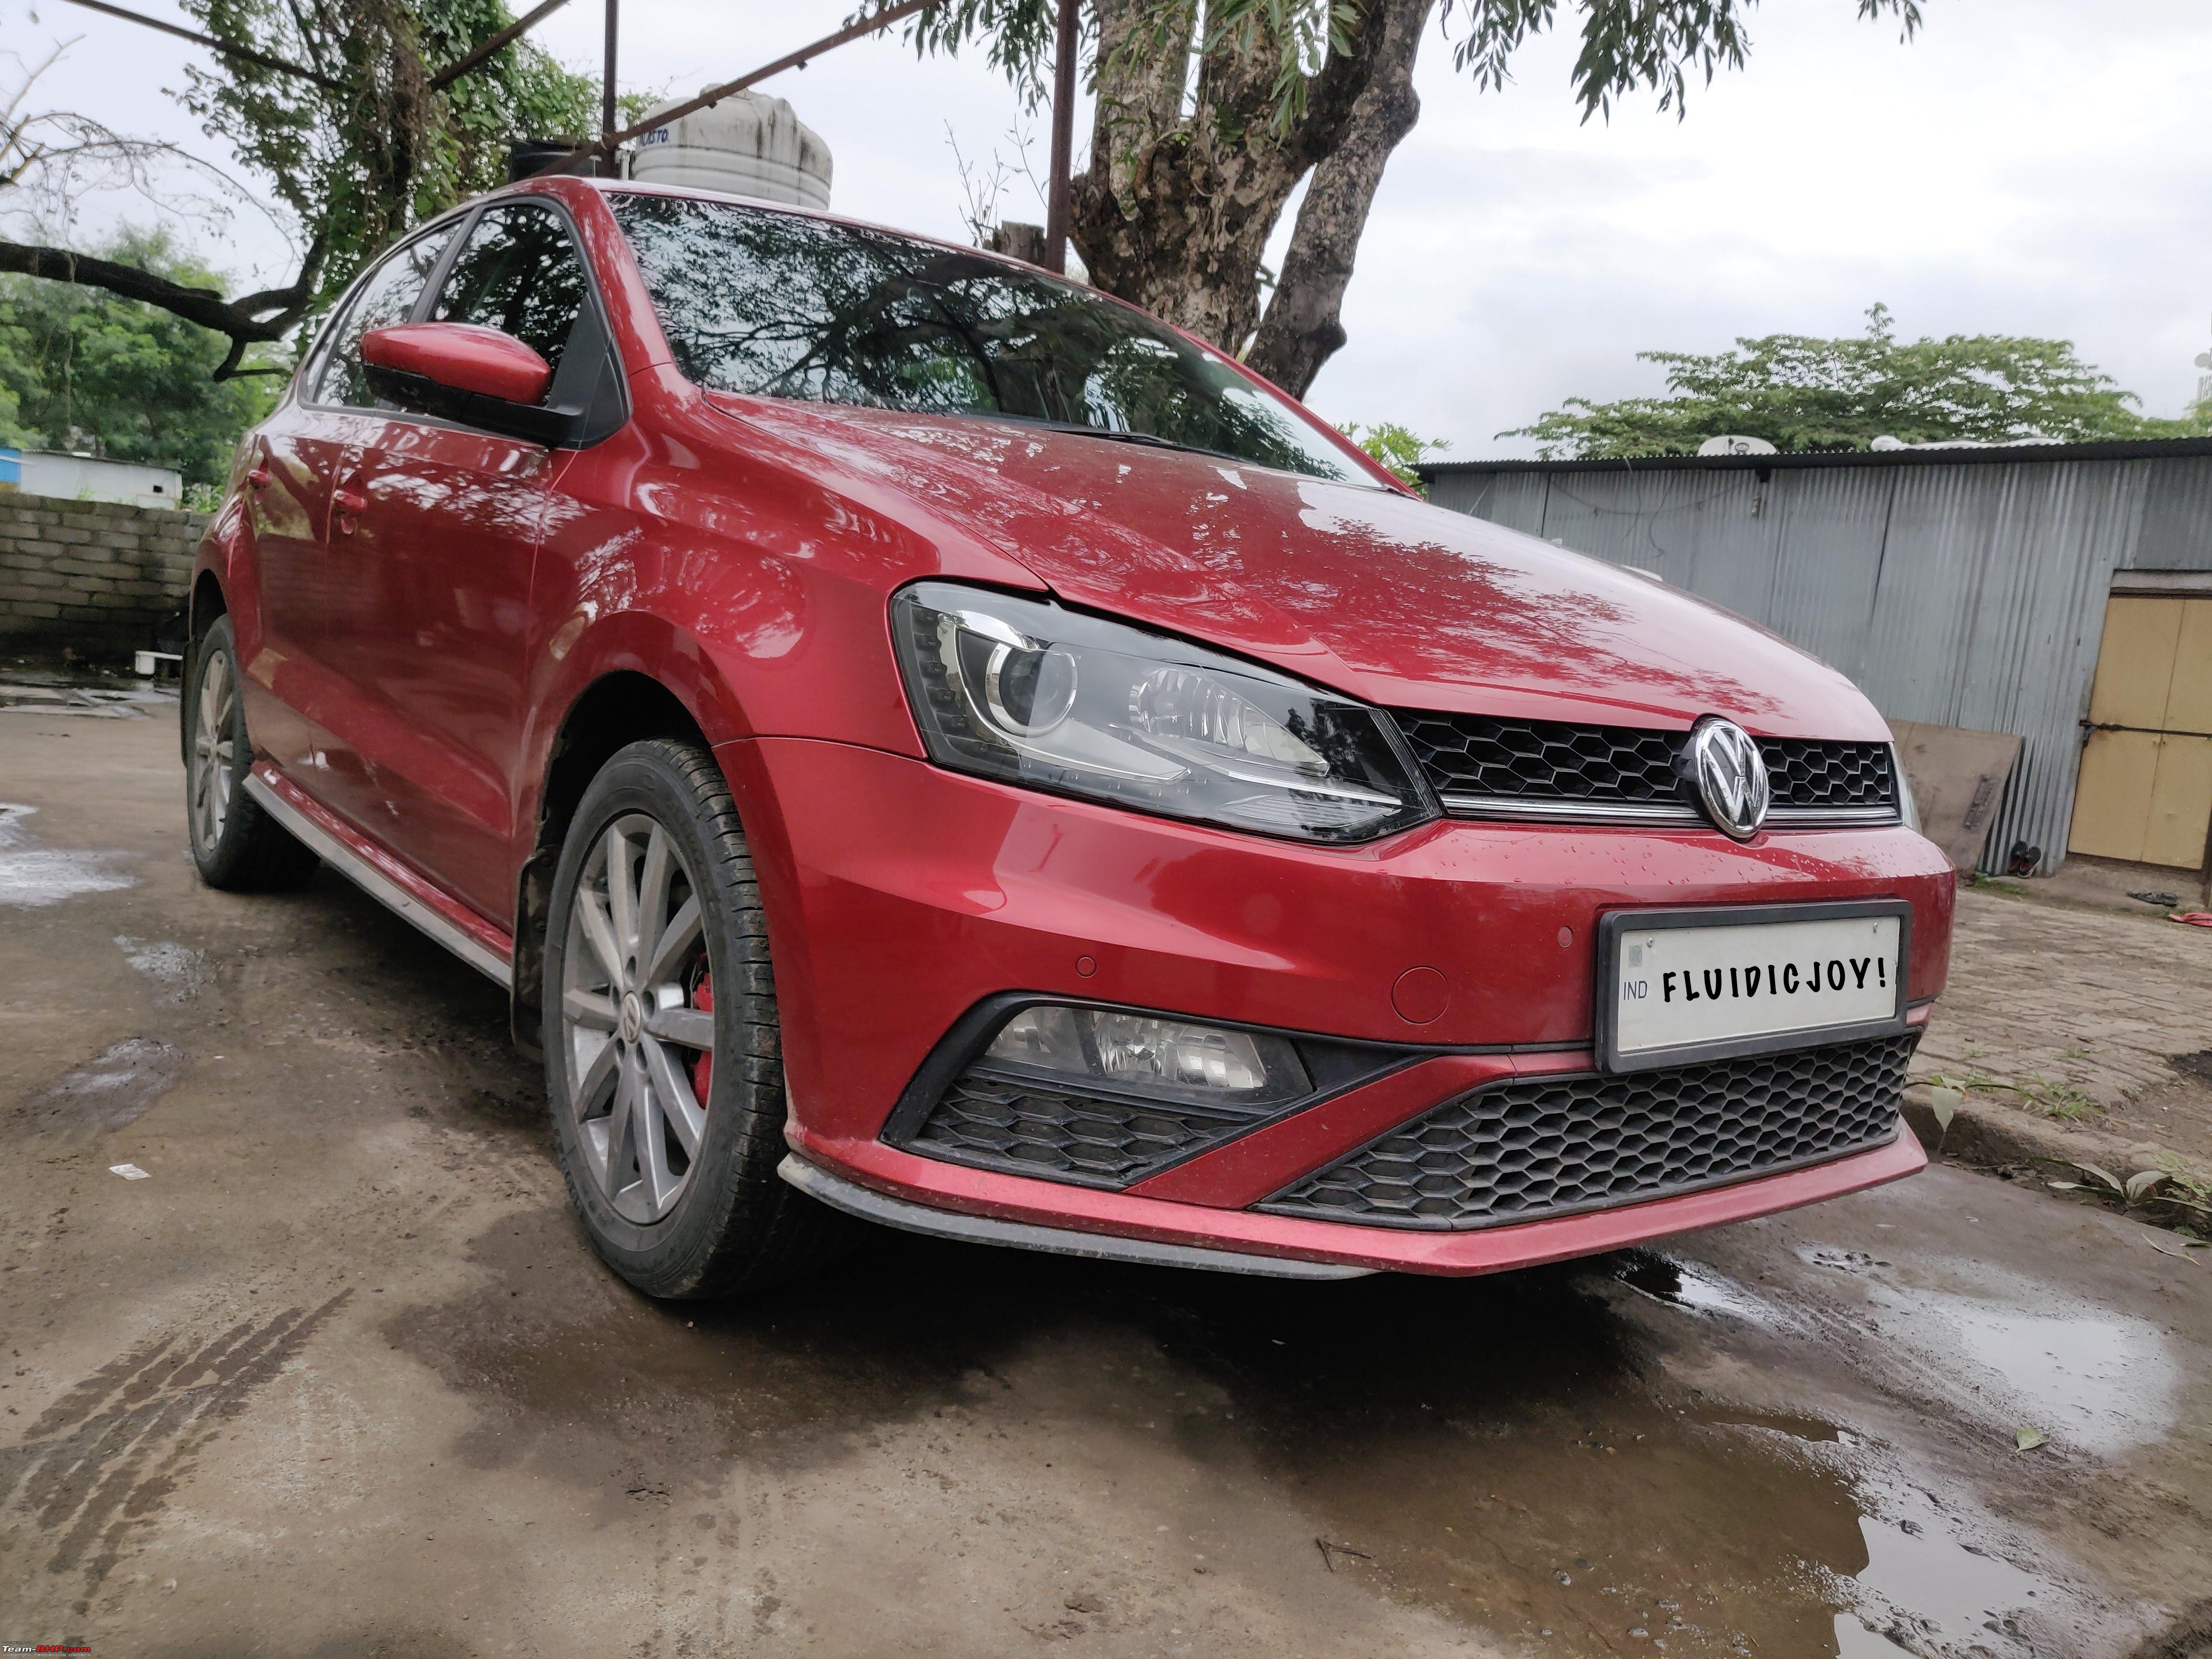  Many folks wonder if they're better than the Vento LED lights, and the answer in a few cases is YES, because of the warmer HID bulbs which perform better in many scenarios especially in foggy and rainy conditions. Do they look as pretty as the OEM GTI LEDs? My personal pick today would anytime be the Red-Striped GTI LED Headlights, which look a lot more modern and cutting-edge. Plus, for anyone looking to retrofit them, the LED Headlights are simpler to retrofit since most of the basic functionality will work, sure it won't work perfectly, the DRLs might not dim, and you won't be able to achieve Headlight levelling, but it'll still be pretty cool to have, if you find a great set. That's pretty much it for my small writeup on these headlights. |
|
| (30)
Thanks
|
| The following 30 BHPians Thank fluidicjoy for this useful post: | adityan27, androdev, Avikbrio, AYP, BigBrad, CEF_Beasts, Chaman K, d3mon, Dr.AD, GaryTSI, giri1.8, gt3t0uring, johannskaria, MayurS, Mi2un, OverKill, paragsachania, raihan, Researcher, s4ch, sarfraz1997, Sayan, skb1811, streetfighter, TSIboy, vamsi_k_b, Varun_HexaGuy, VivekCherian, vredesbyrd, yesyeswe |
| |
|
4th February 2023, 07:37
| #132 |
| BHPian Join Date: Oct 2020 Location: Pune, San Diego
Posts: 247
Thanked: 2,440 Times
| Polo 6R 1.0 TSI BCM Max Upgrade Experience, Part 1: Wiring The BCM on my Highline+ 1.0 TSI Automatic Polo was a BCM 6R0937087S and to be fair, the 87S BCM supports quite a lot of features to be honest. Other than Automatic Headlights and Factory style Coming Home and Leaving Home headlights, there doesnt seem to be a strong reason to necessitate a BCM upgrade. The BCM on what is perhaps this last lot of PQ25 Polo and Vento cars is Made in India by Continental.  The swap from BCM 087S to 7E0937090E for Polo Highline+ guys is not a straight swap and needs quite a few wiring changes. So whats fundamentally different between the two BCMs is how they handle the power and control signals for the headlight terminals. In the present Polo configuration, the headlights are controlled by the light switch. In the newer BCM, the headlights are BCM Controlled. This ability of the lights being BCM controlled is what allows the car to enable Automatic Lights based on the input from the Rain and Light Sensor. The second main difference is that the BCM Max runs on an independent CAN line. The Powertrain CAN line runs the Engine, Gearbox control units, Optical Parking Sensor (OPS) module etc, while the Radio and Auto-AC runs on CAN Convenience. To the best of my knowledge, quite a few Skoda Rapids and the Vento Highline+ come with 7E0 937 089 D which is not exactly BCM Max, but is a high version of the BCM which is wired from the factory to have Headlight Control. Swapping to BCM Max for these particular cars could be a fairly straight swap, but only experienced folks can tell if theres any more changes that need to be done.  PROs of a BCM Upgrade (From My Point Of View, A Polo Guy With A Hunger for Upgrades)
CONs
Tools I Used
 I wont be covering the entire upgrade since it has already been covered by BHPian Graaja a few years back when he installed OEM Bi-Xenon Headlights on his Polo. You can read about it here (Polo GT TSi Install: OEM Bi-Xenons with BCM Max Upgrade EDIT: 6C RLS + Auto-dimming IRVM installed!). Additionally, you might also want to refer to this nice thread on a BCM Upgrade (VW Polo DIY: Upgrading the BCM (Body Control Module)) by Moderator Gannu for some basic fundamentals about a BCM change, but this thread will not be a detailed guide to wiring modification to the BCM loom. Ill try and share new insights with respect to my installation. Unlike many others who have attempted a similar installation in the past, I must say that the task was slightly shorter for me since the recent Polos do come with a factory fitted Rain and Light Sensor, so I did not have to worry about fitting and wiring that in. Pre-Task Research So, before I started, I gathered all of my tools and put them in a tray for easy access. I took photographs of the wiring harnesses and labelled them on my iPad to ensure I knew which wire was to go in where. On many instances, I was liberally using the iPad's camera and relying solely on the iPad screen, and it was similar to an endoscopic surgery.  I cross-checked and labelled wiring harness to ensure I would be touching the right wires. Even if you have been given instructions, it's always better to do your own homework and be prepared for potential surprises. I printed out a list of my Official Fusebox from the factory and labelled all relevant Fuses for the Headlights, and Side-Lights. Next, it was important to identify the key relays on my car and engine.  Next I grouped the tasks and allotted about 3 hours each of my day to complete that task. Id typically start working around 4PM and end around 7:30PM when I was called for family dinner. This was perhaps not the best idea, but with the help of my phone and iPad flashlights, I managed to complete the task, even at these odd hours. Since I was moving to the US for higher education, and I was set to leave in less than 2 weeks, I genuinely had limited time to complete what I had set out to do, and the fact that shipping logistics were not on my side, was just another twist to the tale.
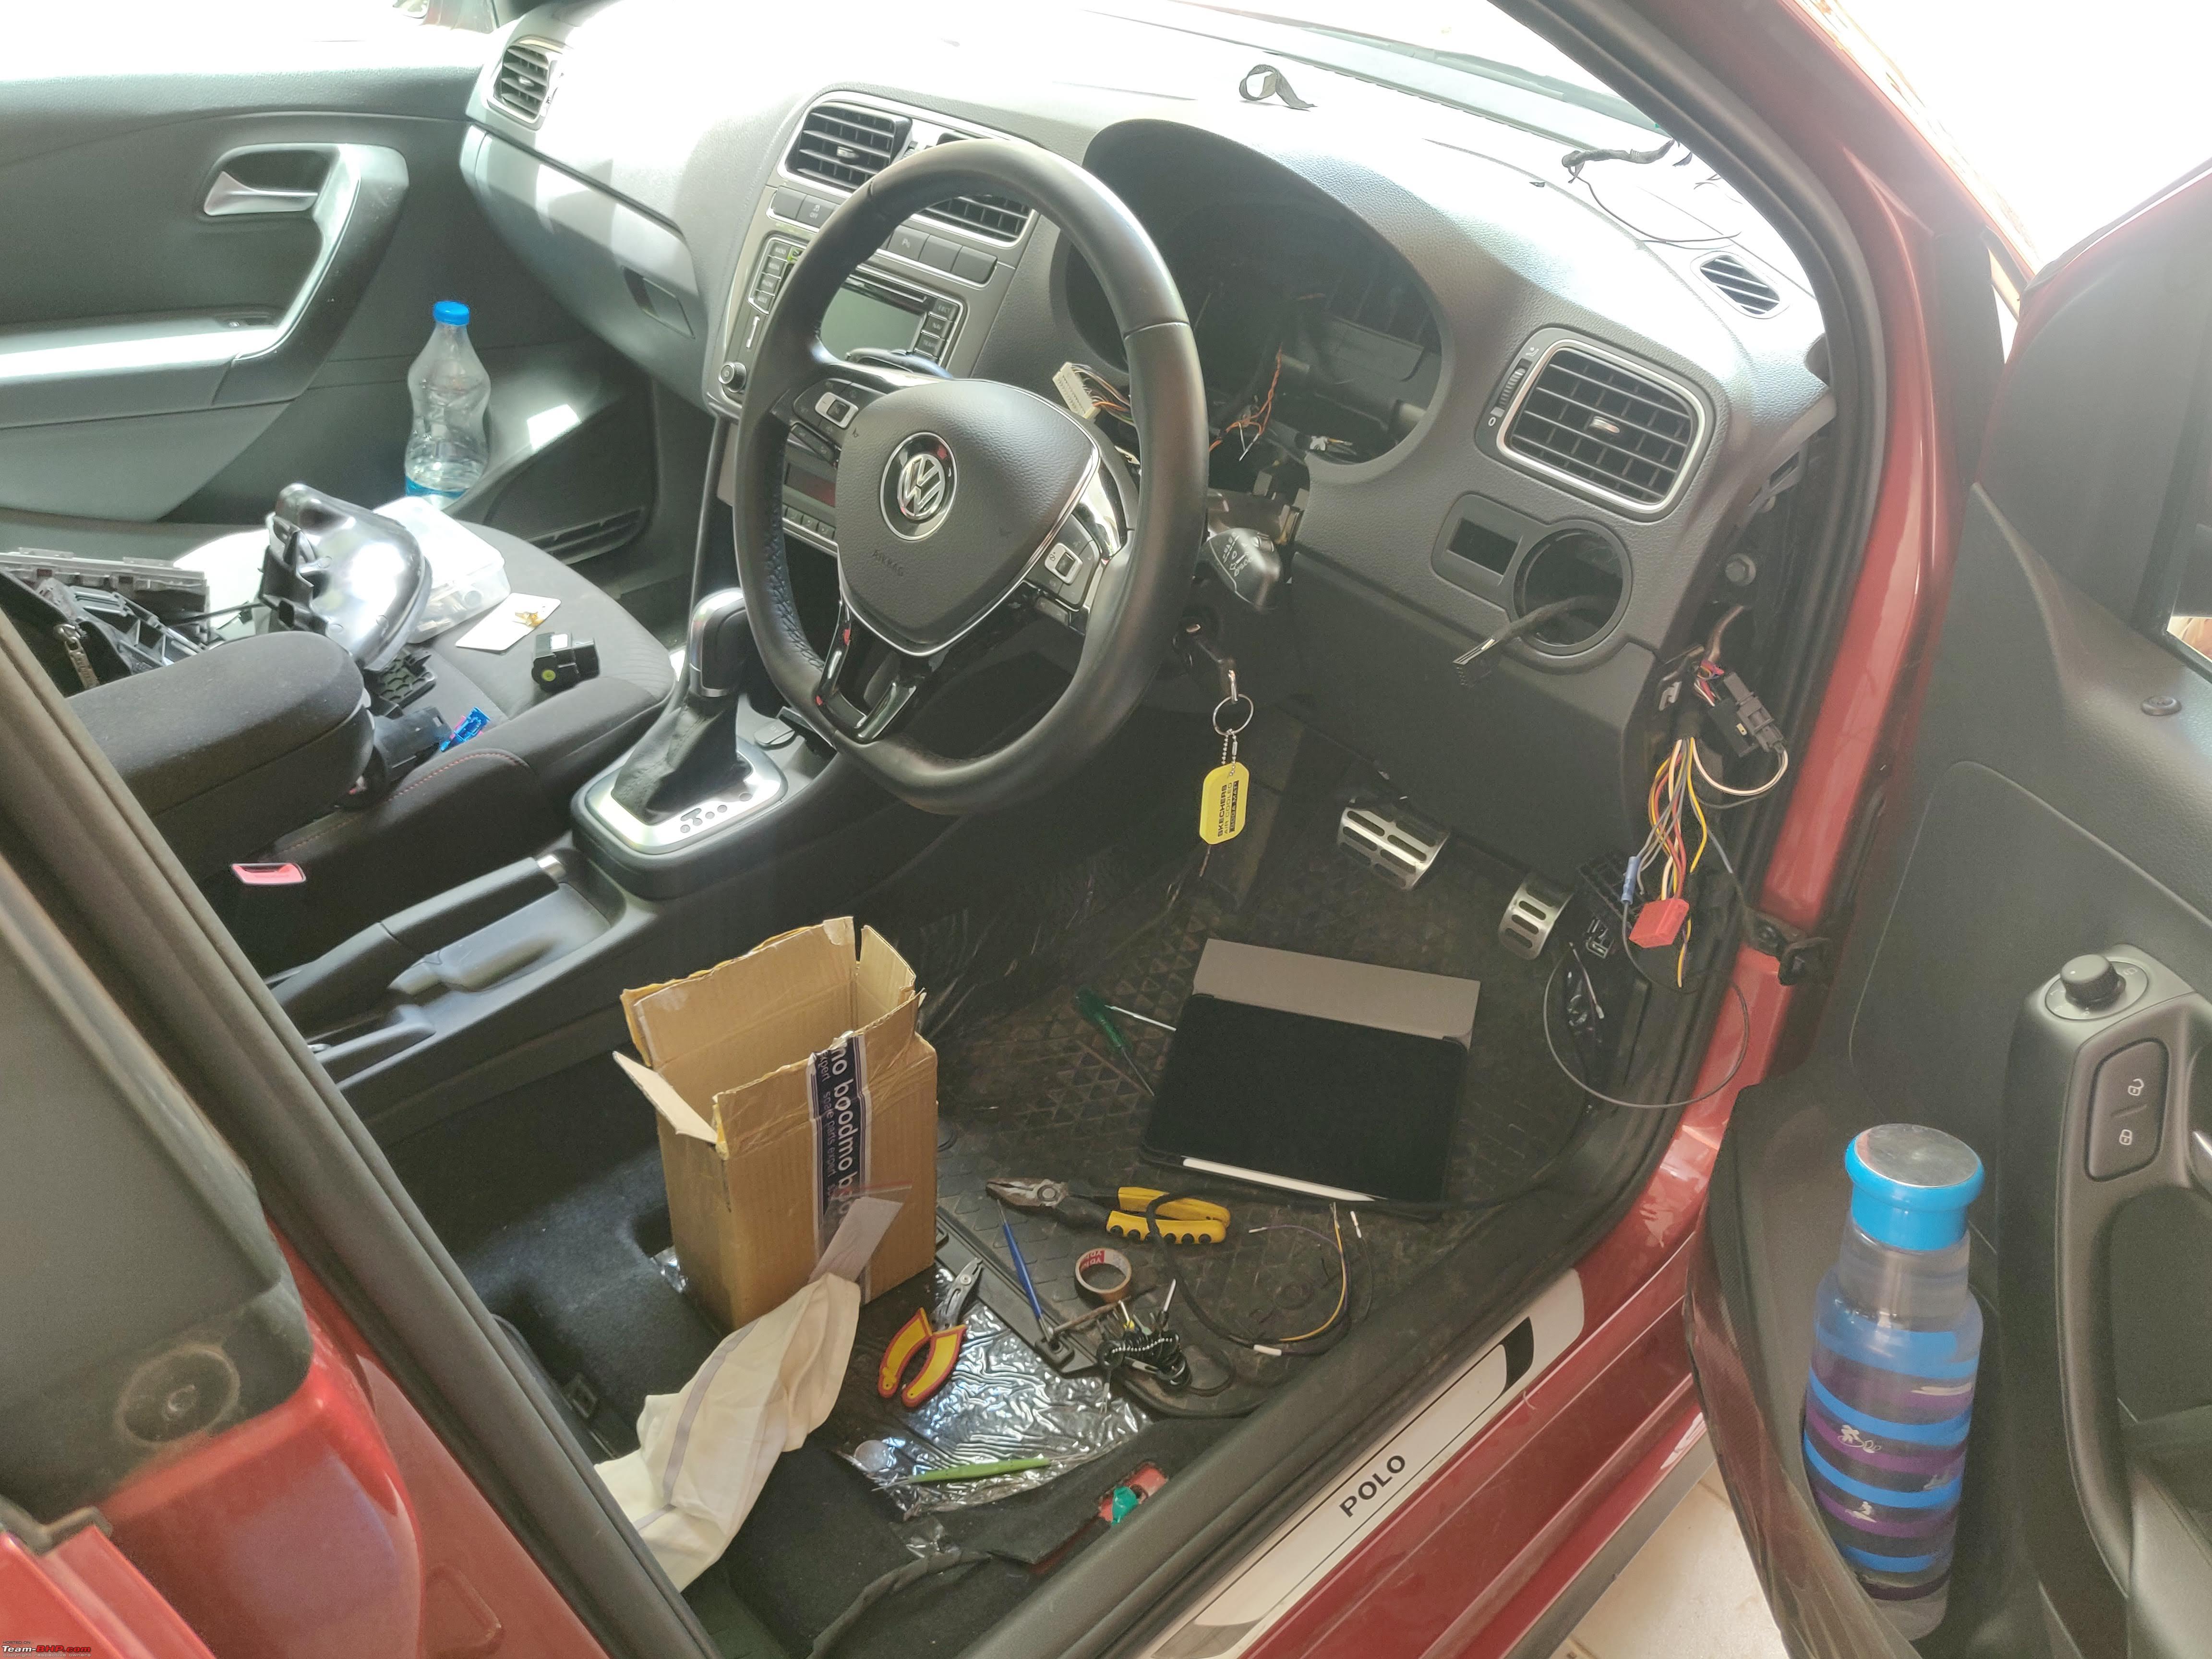
Each of these sub-groups had a few challenges, which were overcome with the right tools and a little bit of grit and spirit. Quite a few times, I felt stupid, felt like giving up, but I was in too deep, and there was no going back, and I kept going, and finally, it was done. Getting Started Swapping the BCM per se, does not need too much effort. In fact, since I have fairly long hands, I could remove the stock BCM with my left hand by sitting on the driver sill and stretching my left hand. However, it is not possible to easily make wiring changes in the BCM connector or the fusebox without taking the dashboard out. Now taking the entire dashboard out on a brand new car, less than a year old, was practically out of question, and so I had to do it the way most other men had. By moving trims, seats and as many trims as possible to create some more working room. Frankly, the difficulty of this BCM Max wiring would be halved if the dashboard was removed. It would have been a piece of cake to properly route wires, de-pin connectors, crimp wires and do it in the neatest possible way. However, this was not something I had ever considered and so I had to just keep going on the only feasible route I knew. 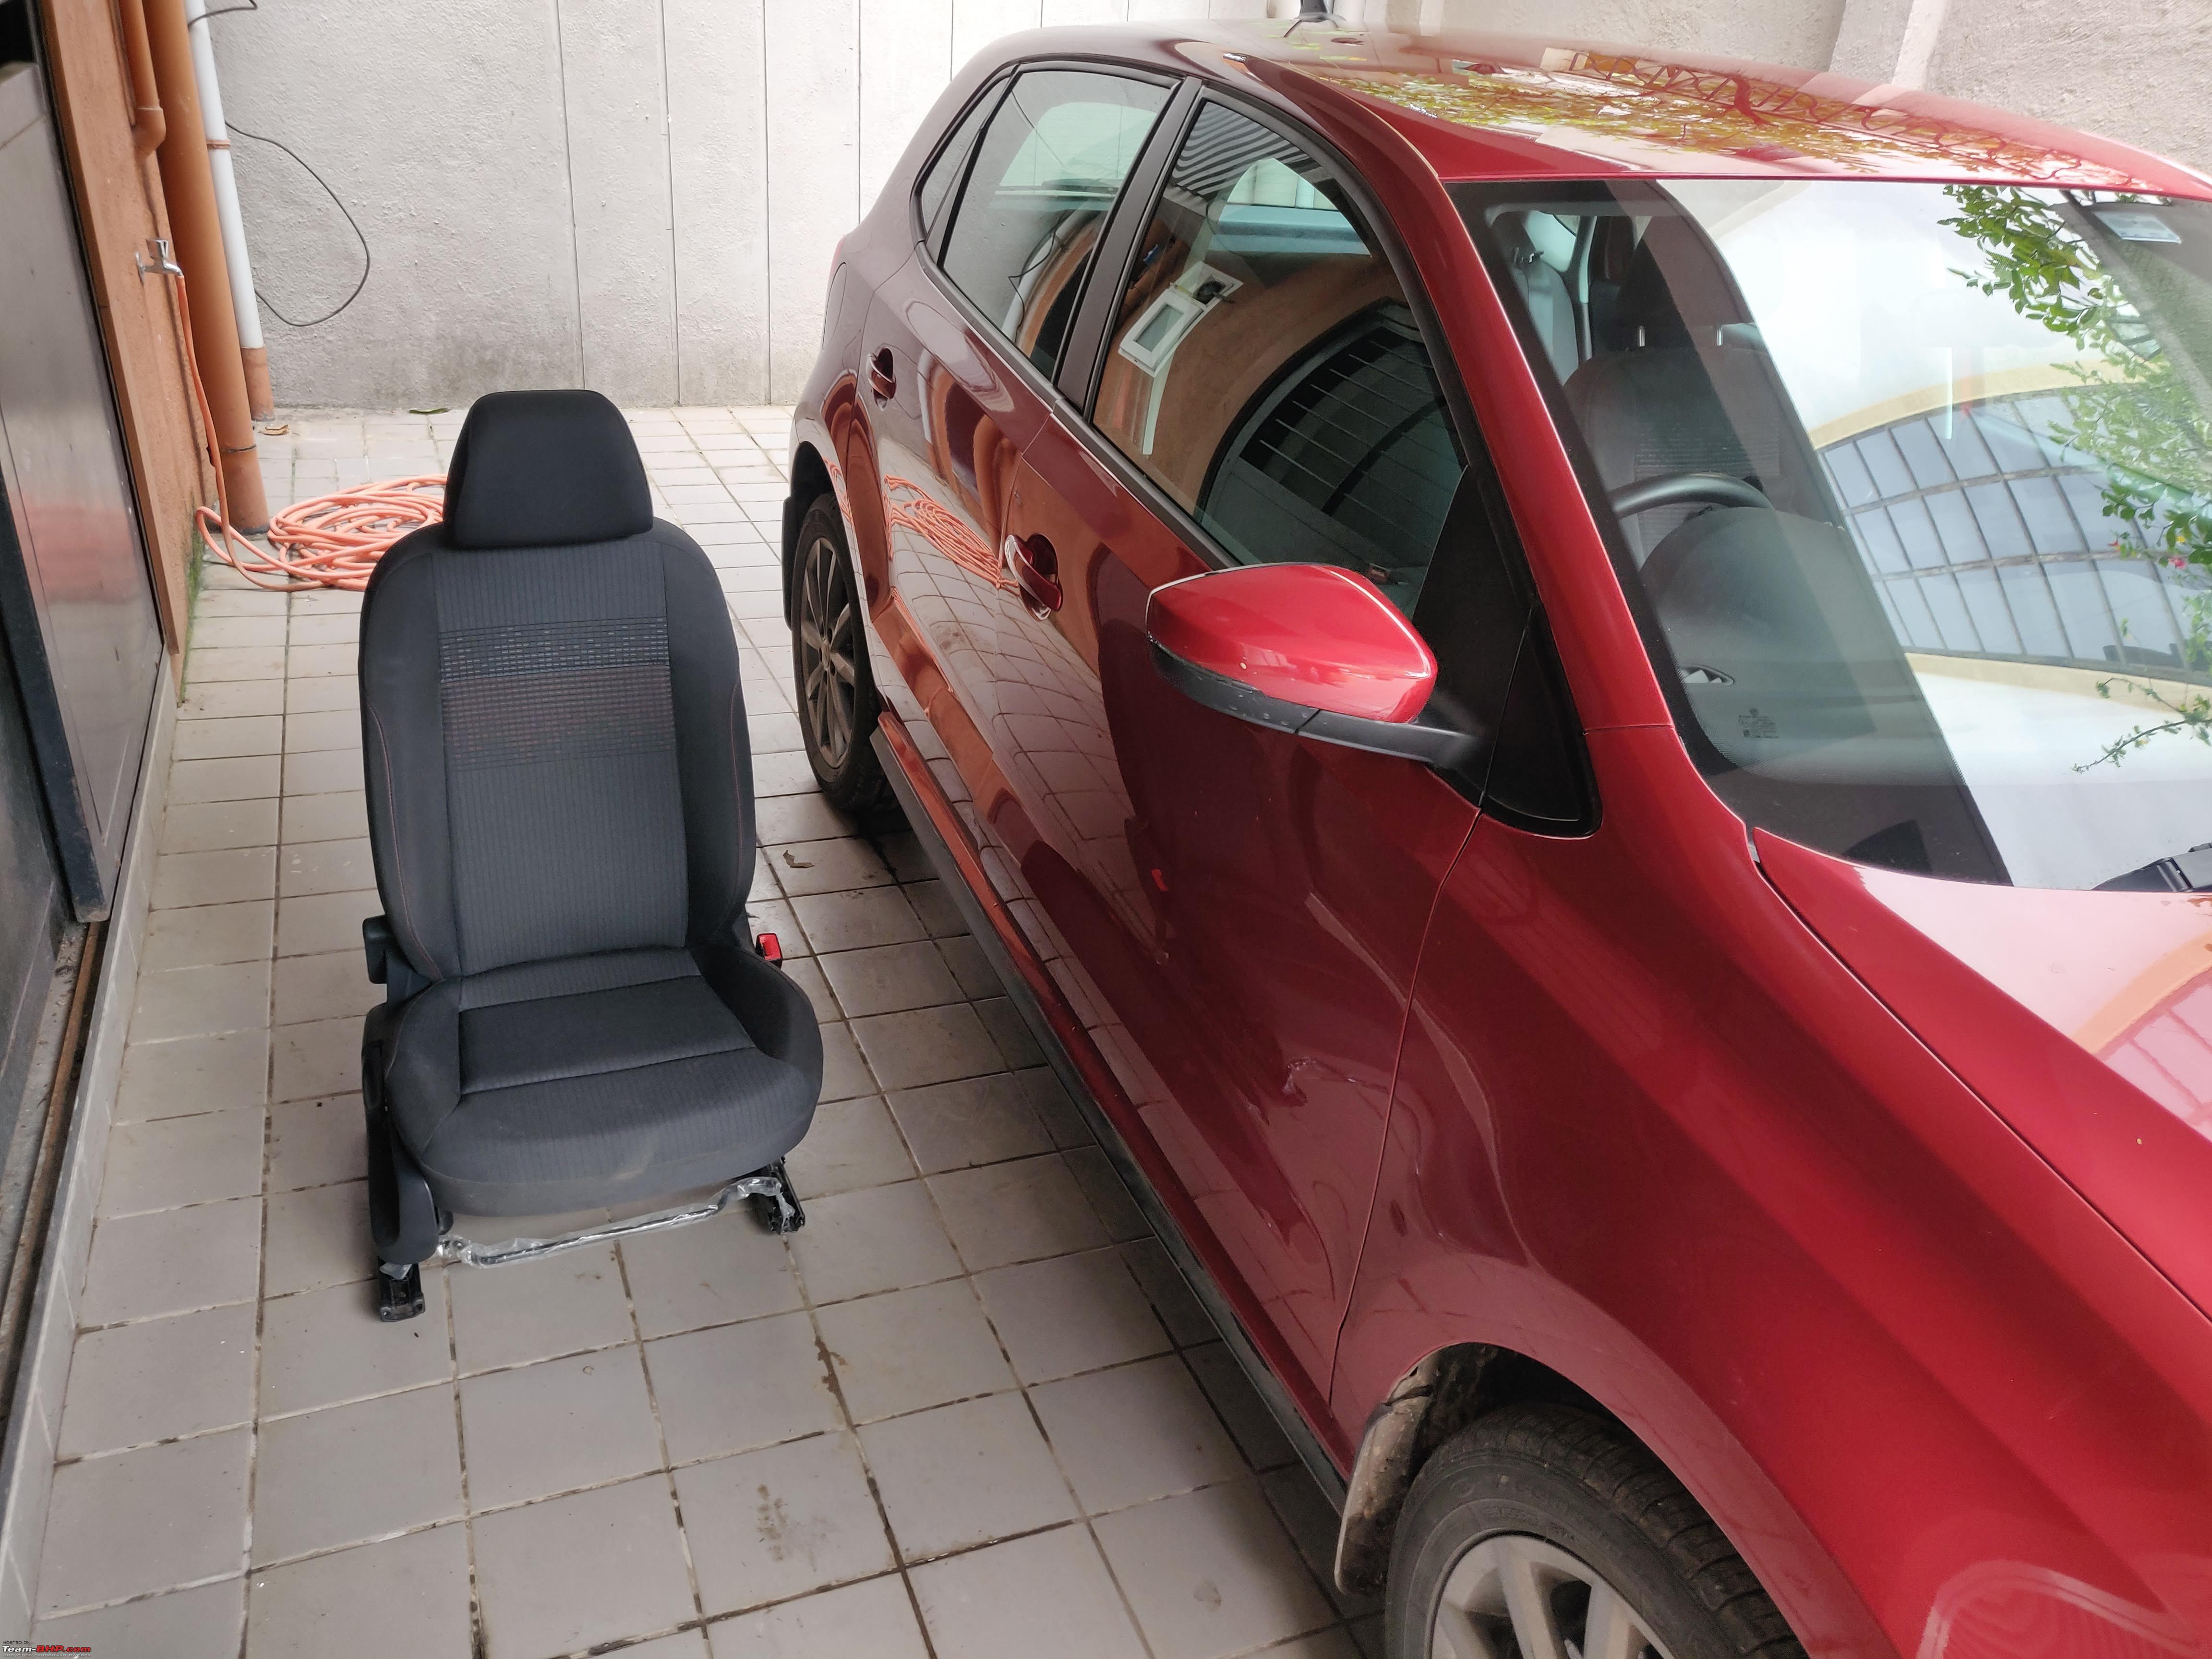 So using a Spline bit (an M10 if I remember correctly), I freed the four bolts which bolt the driver seat down to the cars frame. Theres a Green electrical connector, presumably the Seat Belt Buckle switch, going to the Airbag Control Unit under the seat which needs to be disconnected before the seat can be lifted out of the vehicle. The Connector has a small plastic tab on the side, so make sure you release that before trying to yank out the connectors apart.  I estimate the weight of the seat to be almost 1015kgs, give or take a few kilos. With the seat out of the way, theres now plenty of space to sleep along the driver side, like many men have in the past. However, this space is still not roomy enough to work on wires, but we have to make do with whatever is available. 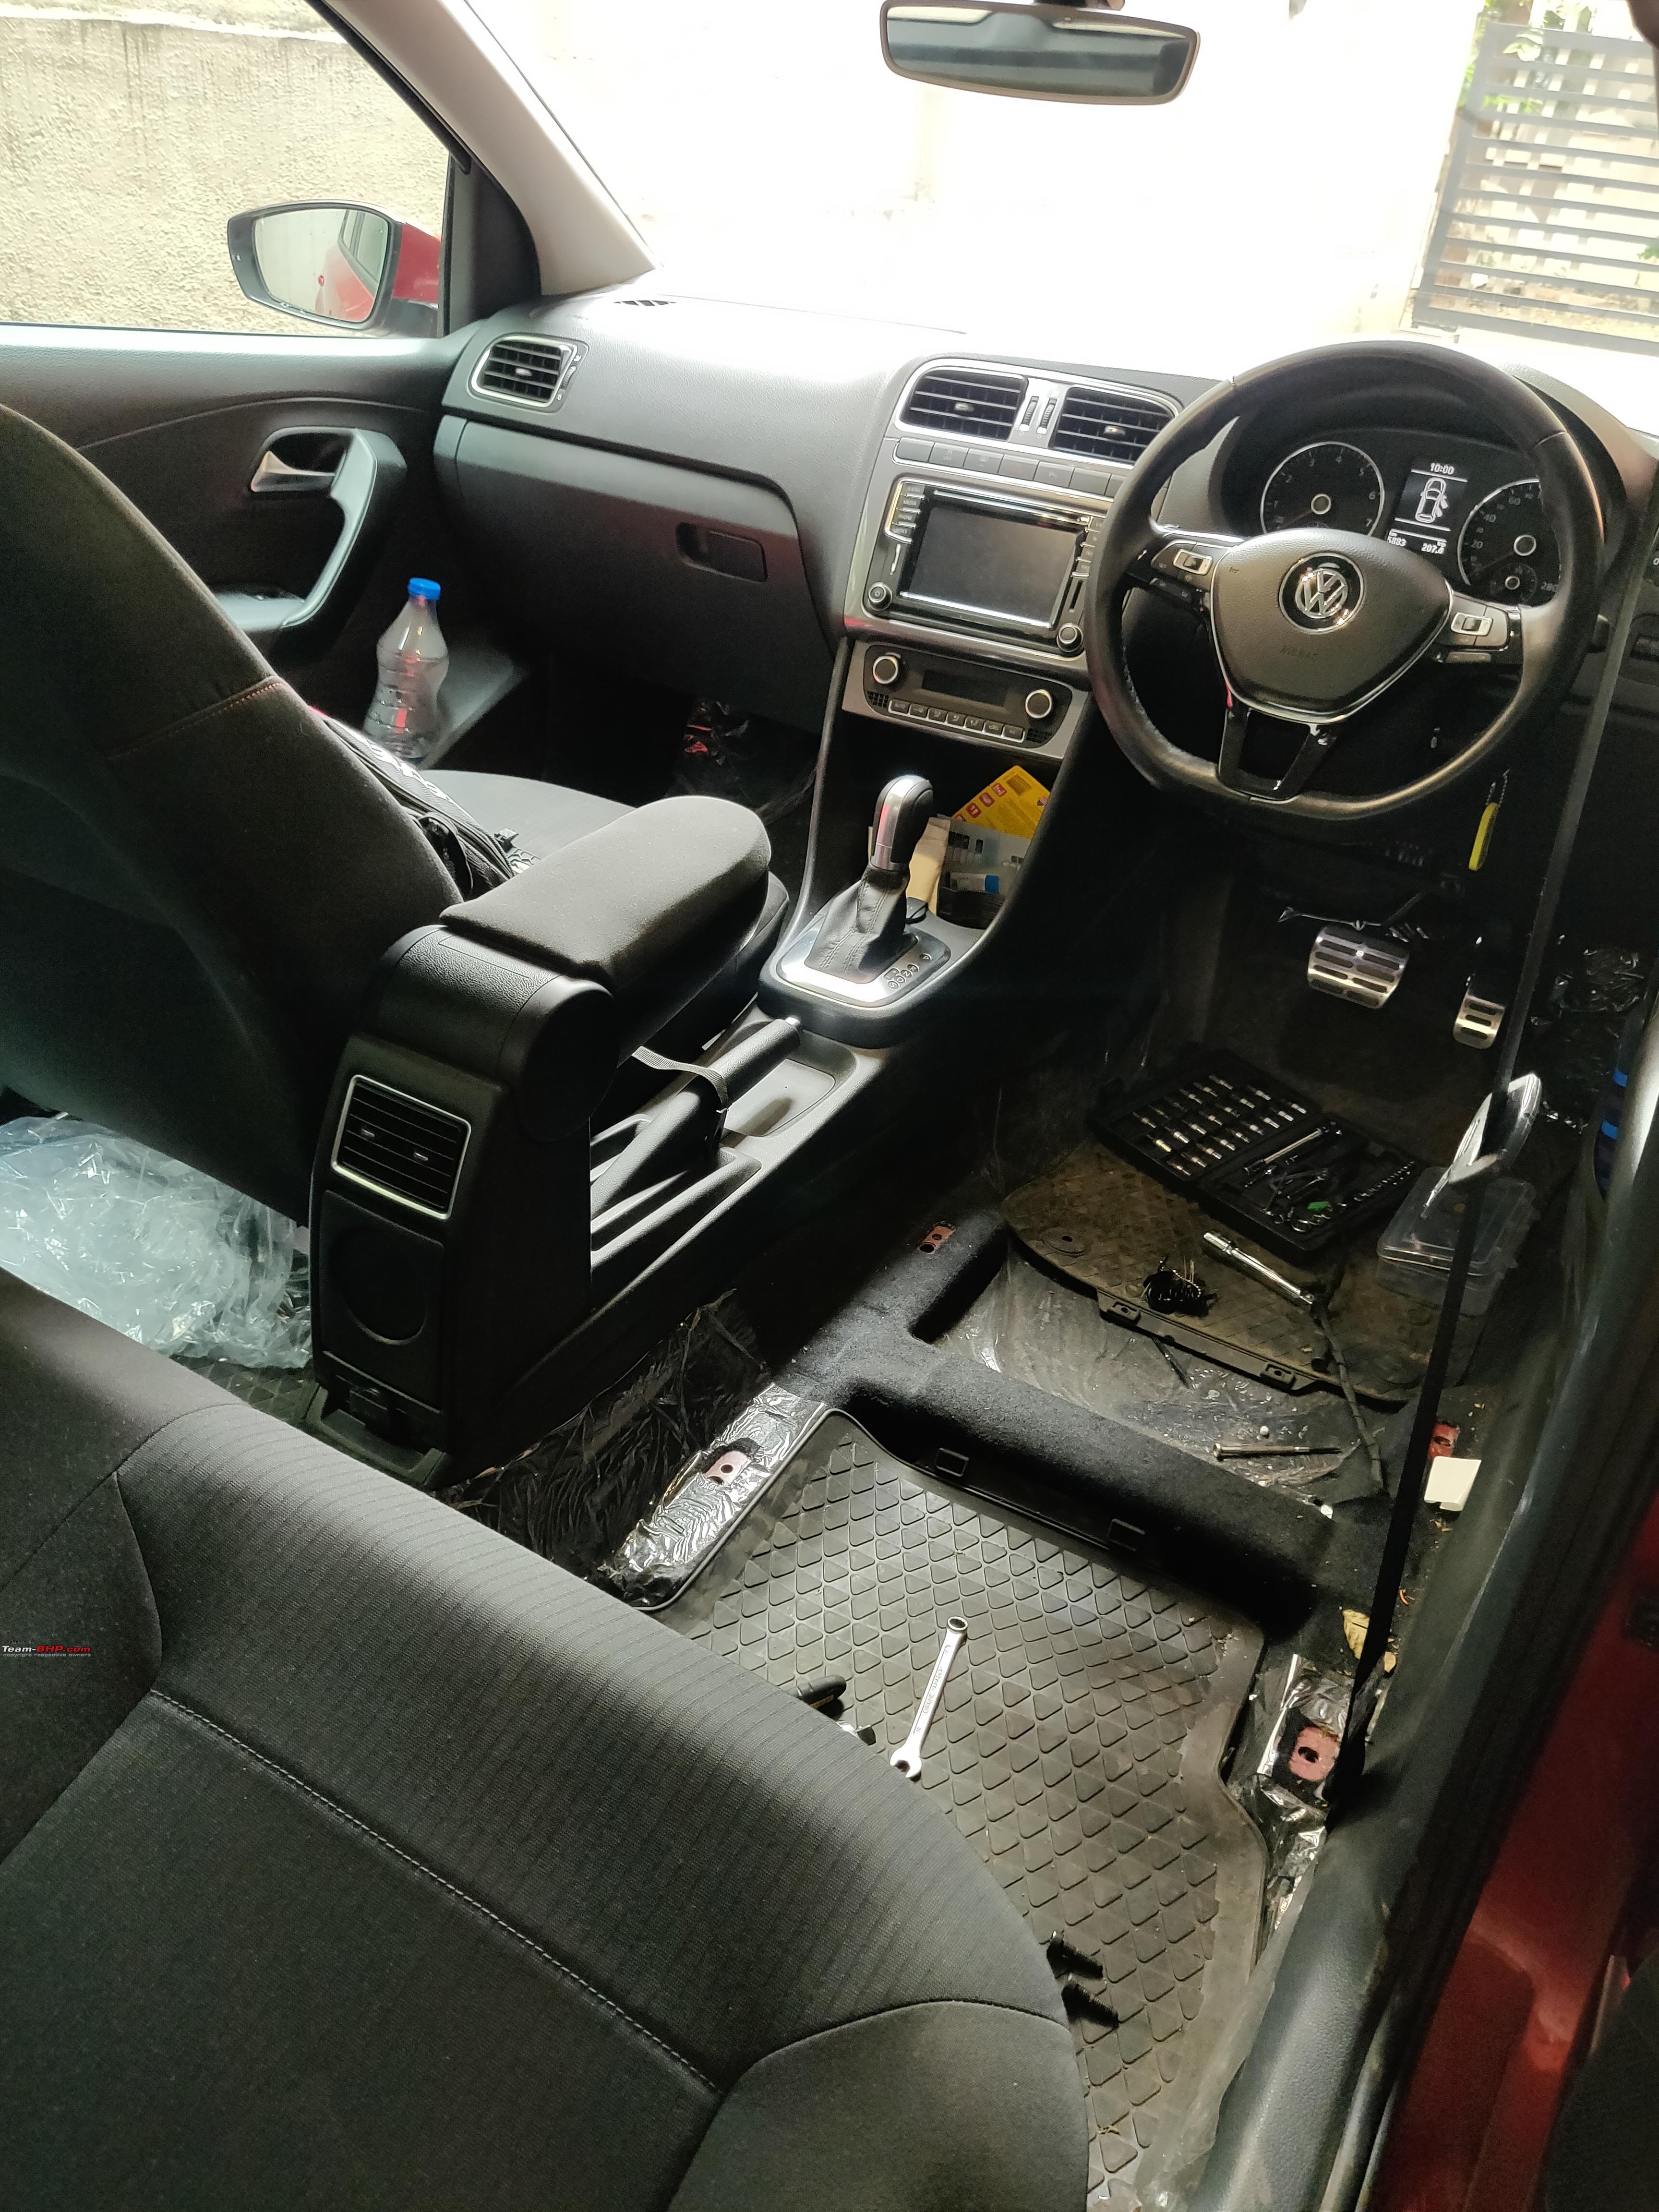 Instrument Cluster Wiring The Cluster houses one of the most important CAN lines, the CAN-Powertrain and BCM Max works with a dedicated twisted CAN-pair which needs to be connected in the T32 Cluster connector. This connector is where the Brake Wear Sensor and Windshield Washer Fluid sensor pins would need to be inserted before these features are coded in the cluster. 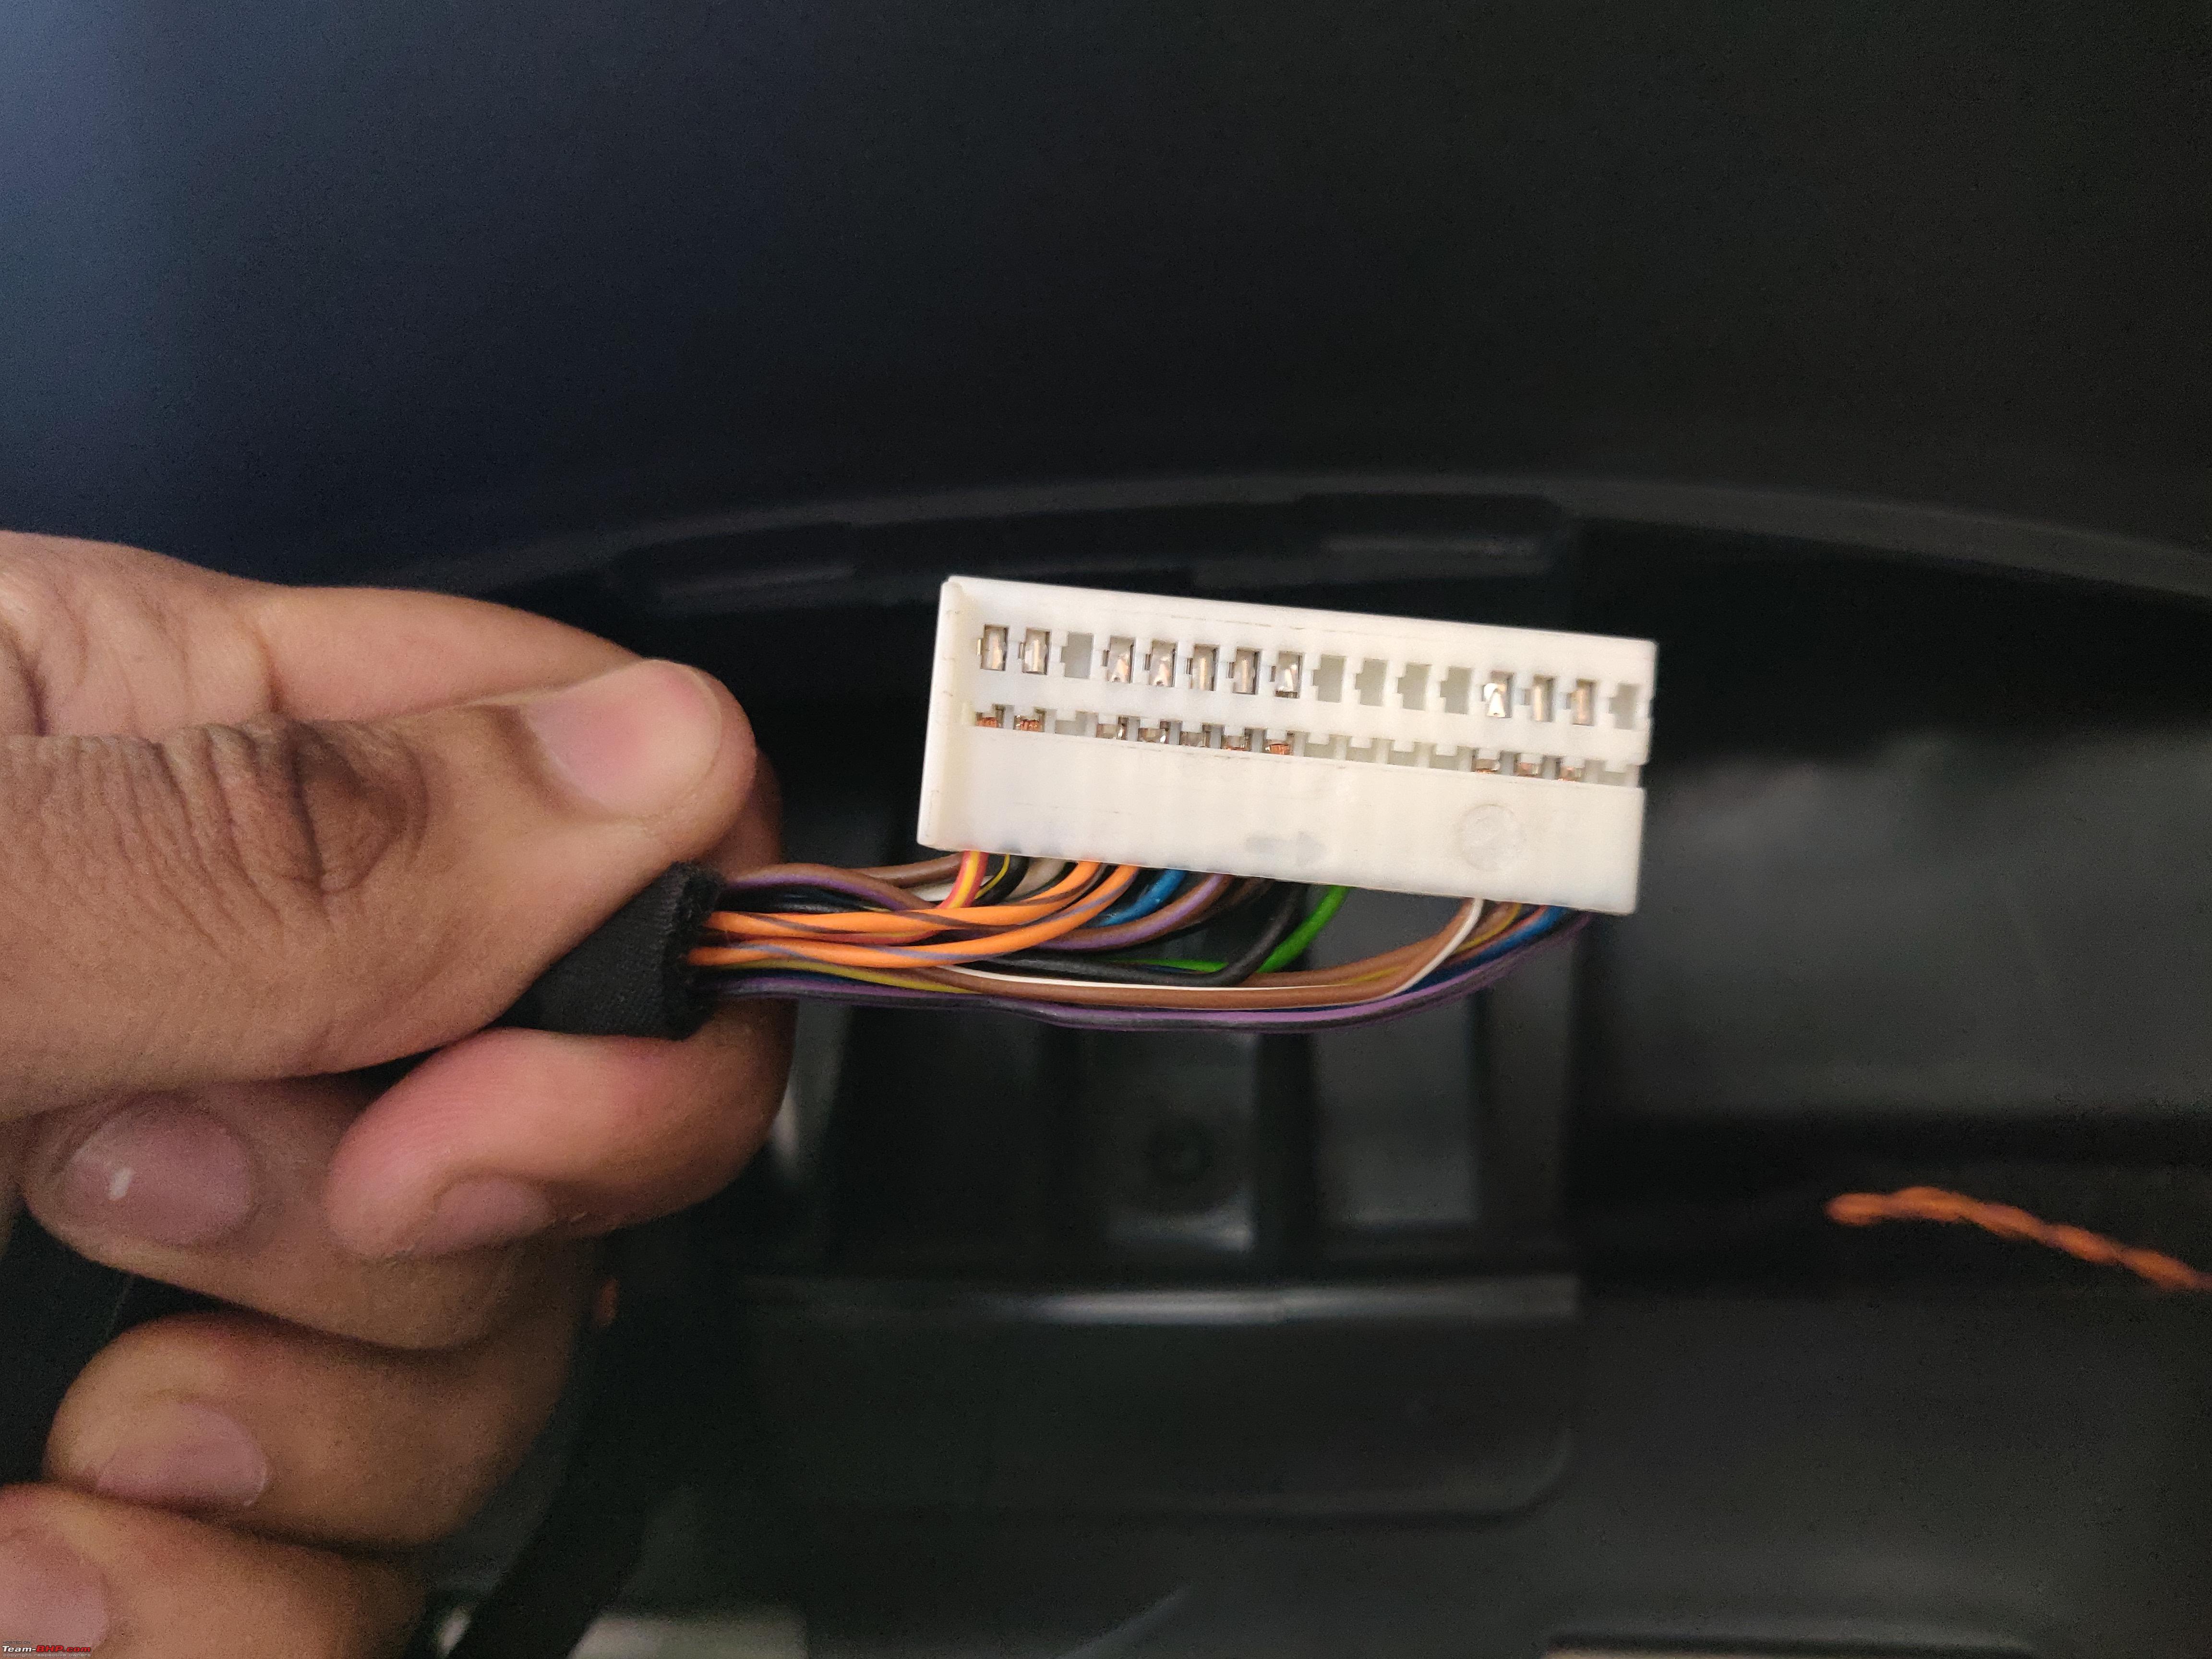 I had some trouble with de-pinning one of these cluster pins since it was touched during my OPS installation. To my misfortune, the crimp on one of the CAN pin broke entirely and got stuck in the connector. I tried a lot, but couldnt manage to unpin it. This is what happens if you end up using cheap wires and badly crimped connectors. You might just get stuck when you need them to be reliable the most.  This has never happened to me on any other factory wire during de-pinning which makes me certain it was the quality of the cheap wire crimp which gave up prematurely. I set this task aside, and attempted it the next day with a fresh approach and it was thankfully done. This time, I pushed the terminal from the front and pushed it out. Too much force can damage the plastic locking points and cause loose connections at the cluster end, so be careful whilst prying stuck crimps. Headlight and Dimmer Switch  The Polo comes with a 17 pin headlight switch. We de-pin this headlight switch by lifting a small tab on the top and inserting the appropriate terminal removal tool.  Some wires will now be isolated since their connected relays will be shorted in the eventual installation. T17/9 is the wire for the Rear Fog-Lamp and it is now driven by the BCM and so it will be cut and crimped. The sidelights (Fuses 57 and 58) are protected by a fuse on the Polo Highline, so they are isolated as well. Isolated wires were taped with few rounds of Tessa tape. T17/17 (Grey-Blue) is the pin for the interior lighting of switches and buttons and is referred to as Terminal 58d. If youre installing an interior illumination or ambient lighting accessory, then it can be tapped from this point. The wiring changes were introduced into a secondary connector, which was red in colour.  Lamp Diagnostics for License Plate lights was left Unchecked on my Stock Car. This is why retrofitting LED License Plate lights on a Polo do not leave an error at present. However, BCM Max is designed to power OEM LED License Plate lights and if not wired, they will leave a Bulb out error. Hence, T17/16, which is a thicker Grey-Blue wire which is the stock wire for the rear Number Plate lights. It must be isolated as well. We run a fresh wire from T73b/7 to the License Plate light wiring joint in the rear of the car, in the boot trim on the Polo 6R. 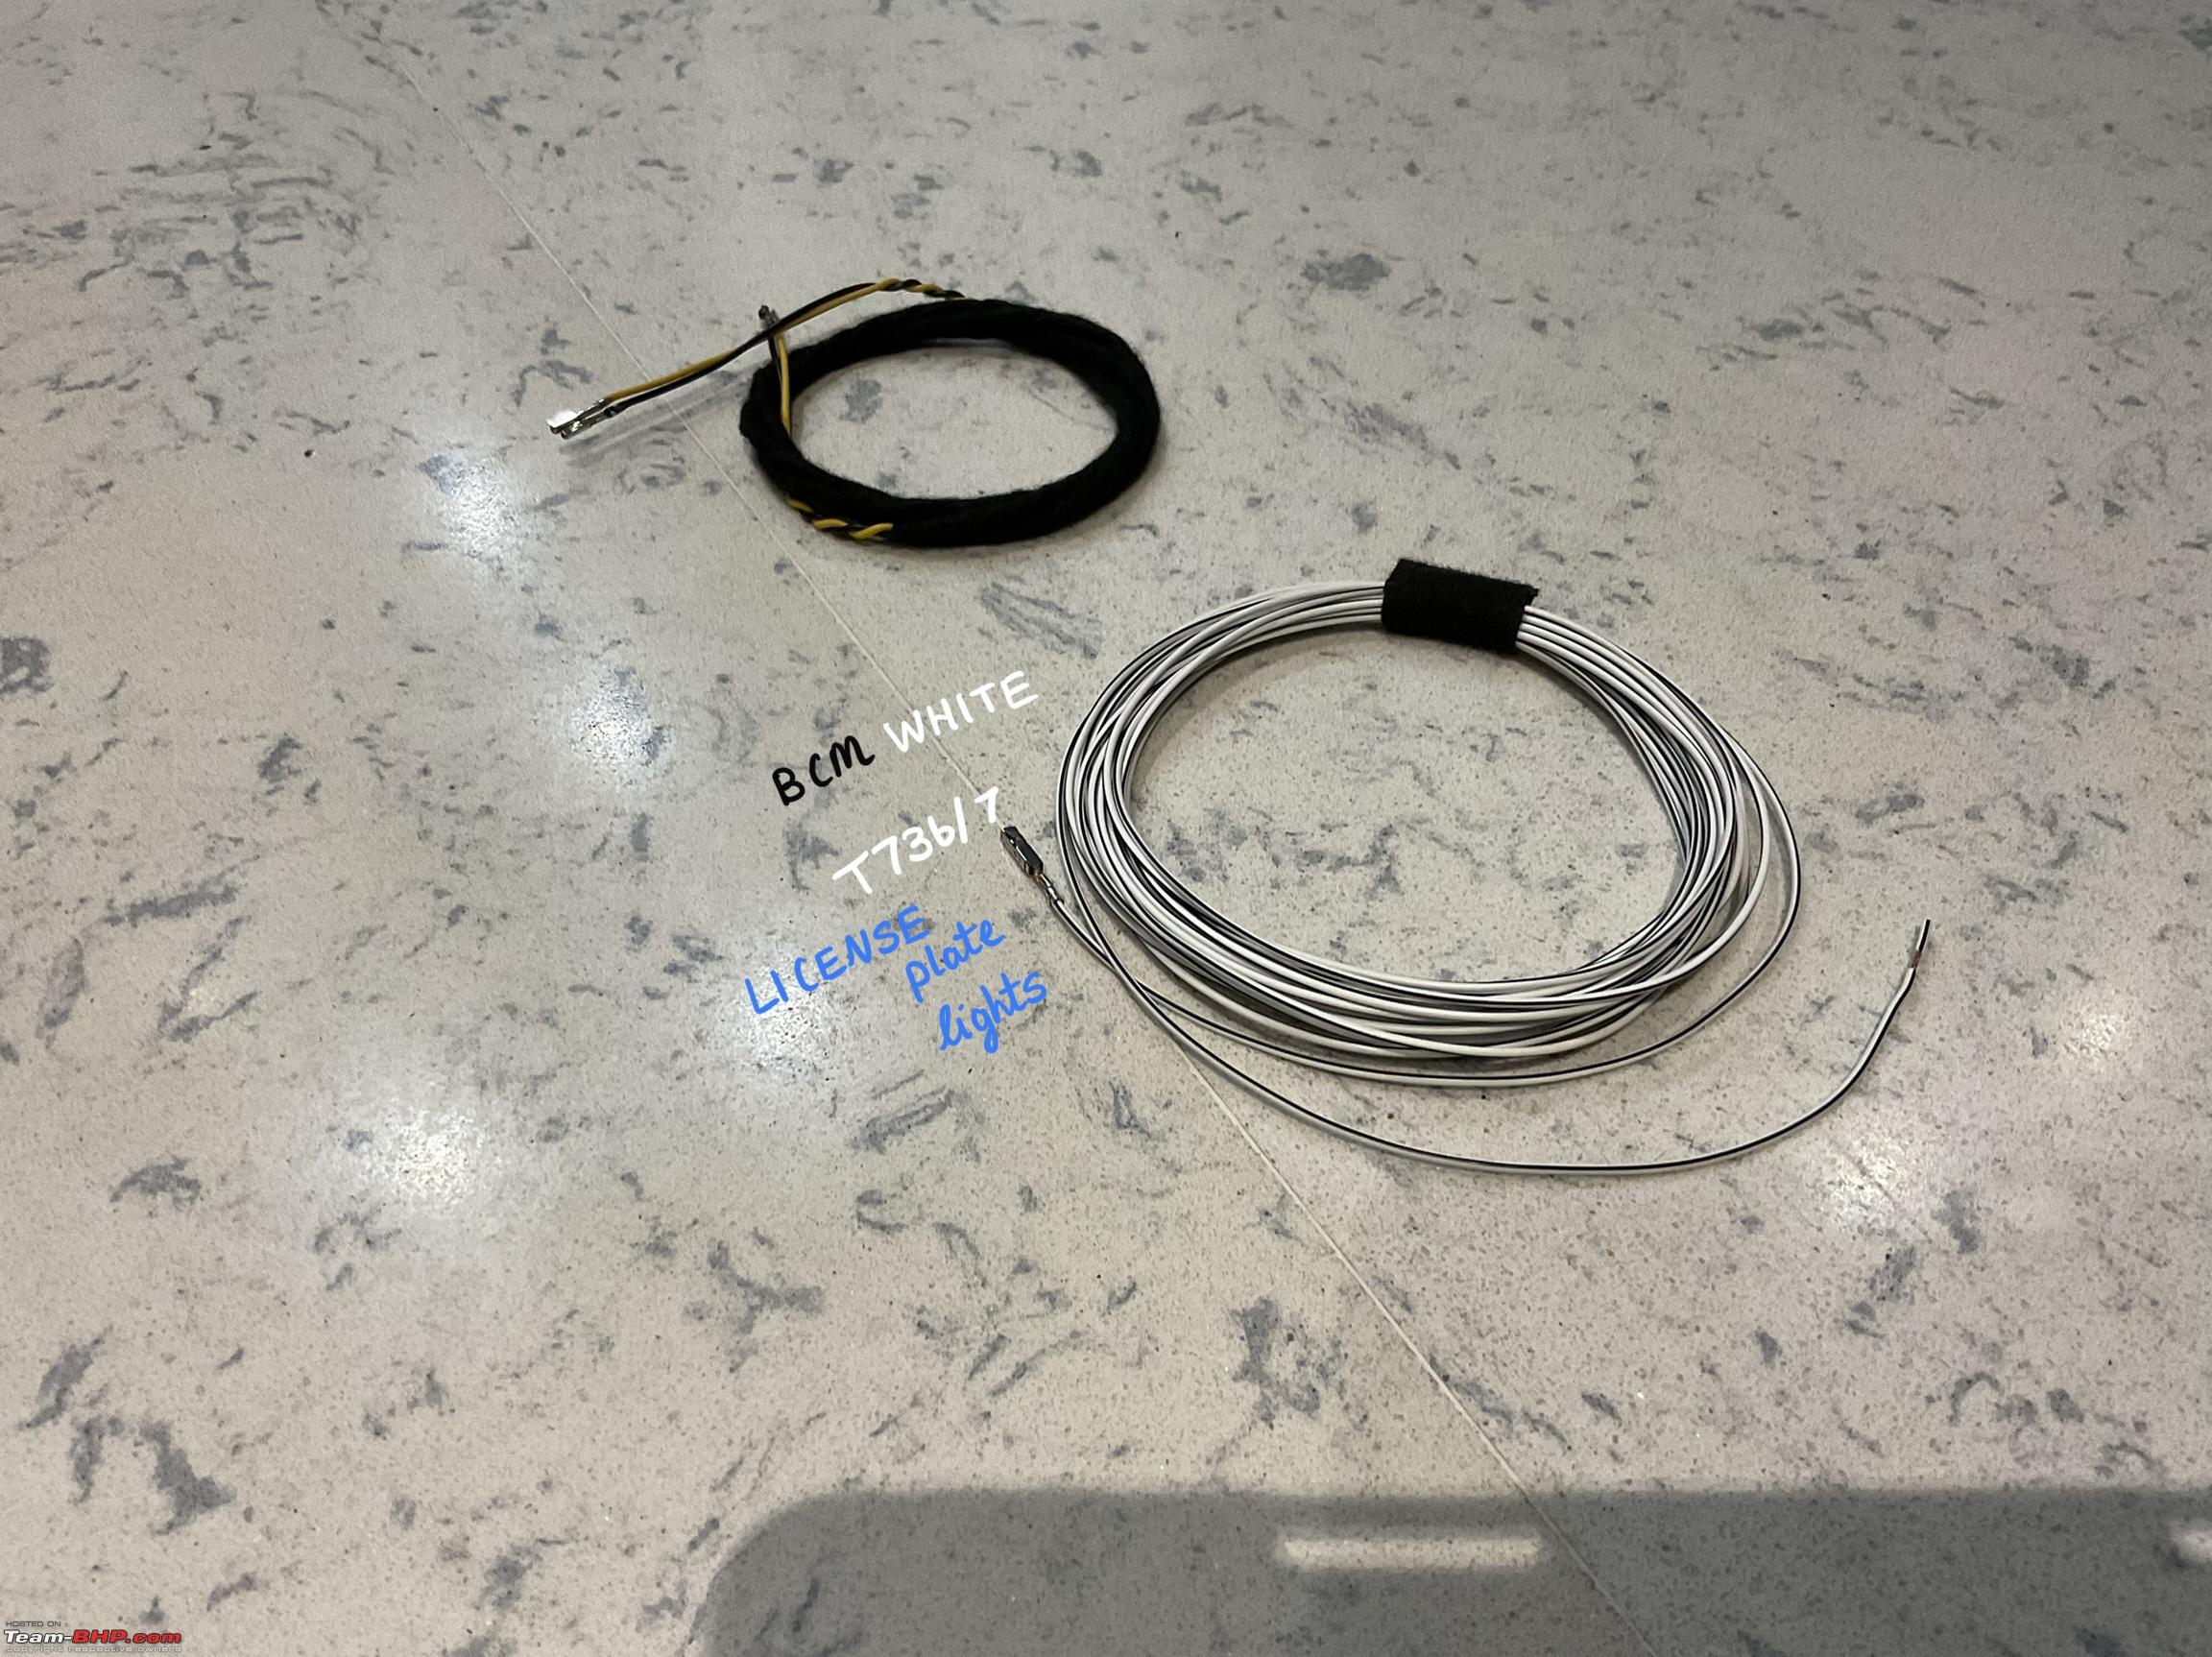 I also installed the Dimmer Switch which is now BCM Controlled as well. This switch was on my To-Do even before I was considering BCM Max and has been installed and documented by a few BHPians already. Here is the Dimmer Switch connector which I had to insert a few wires. 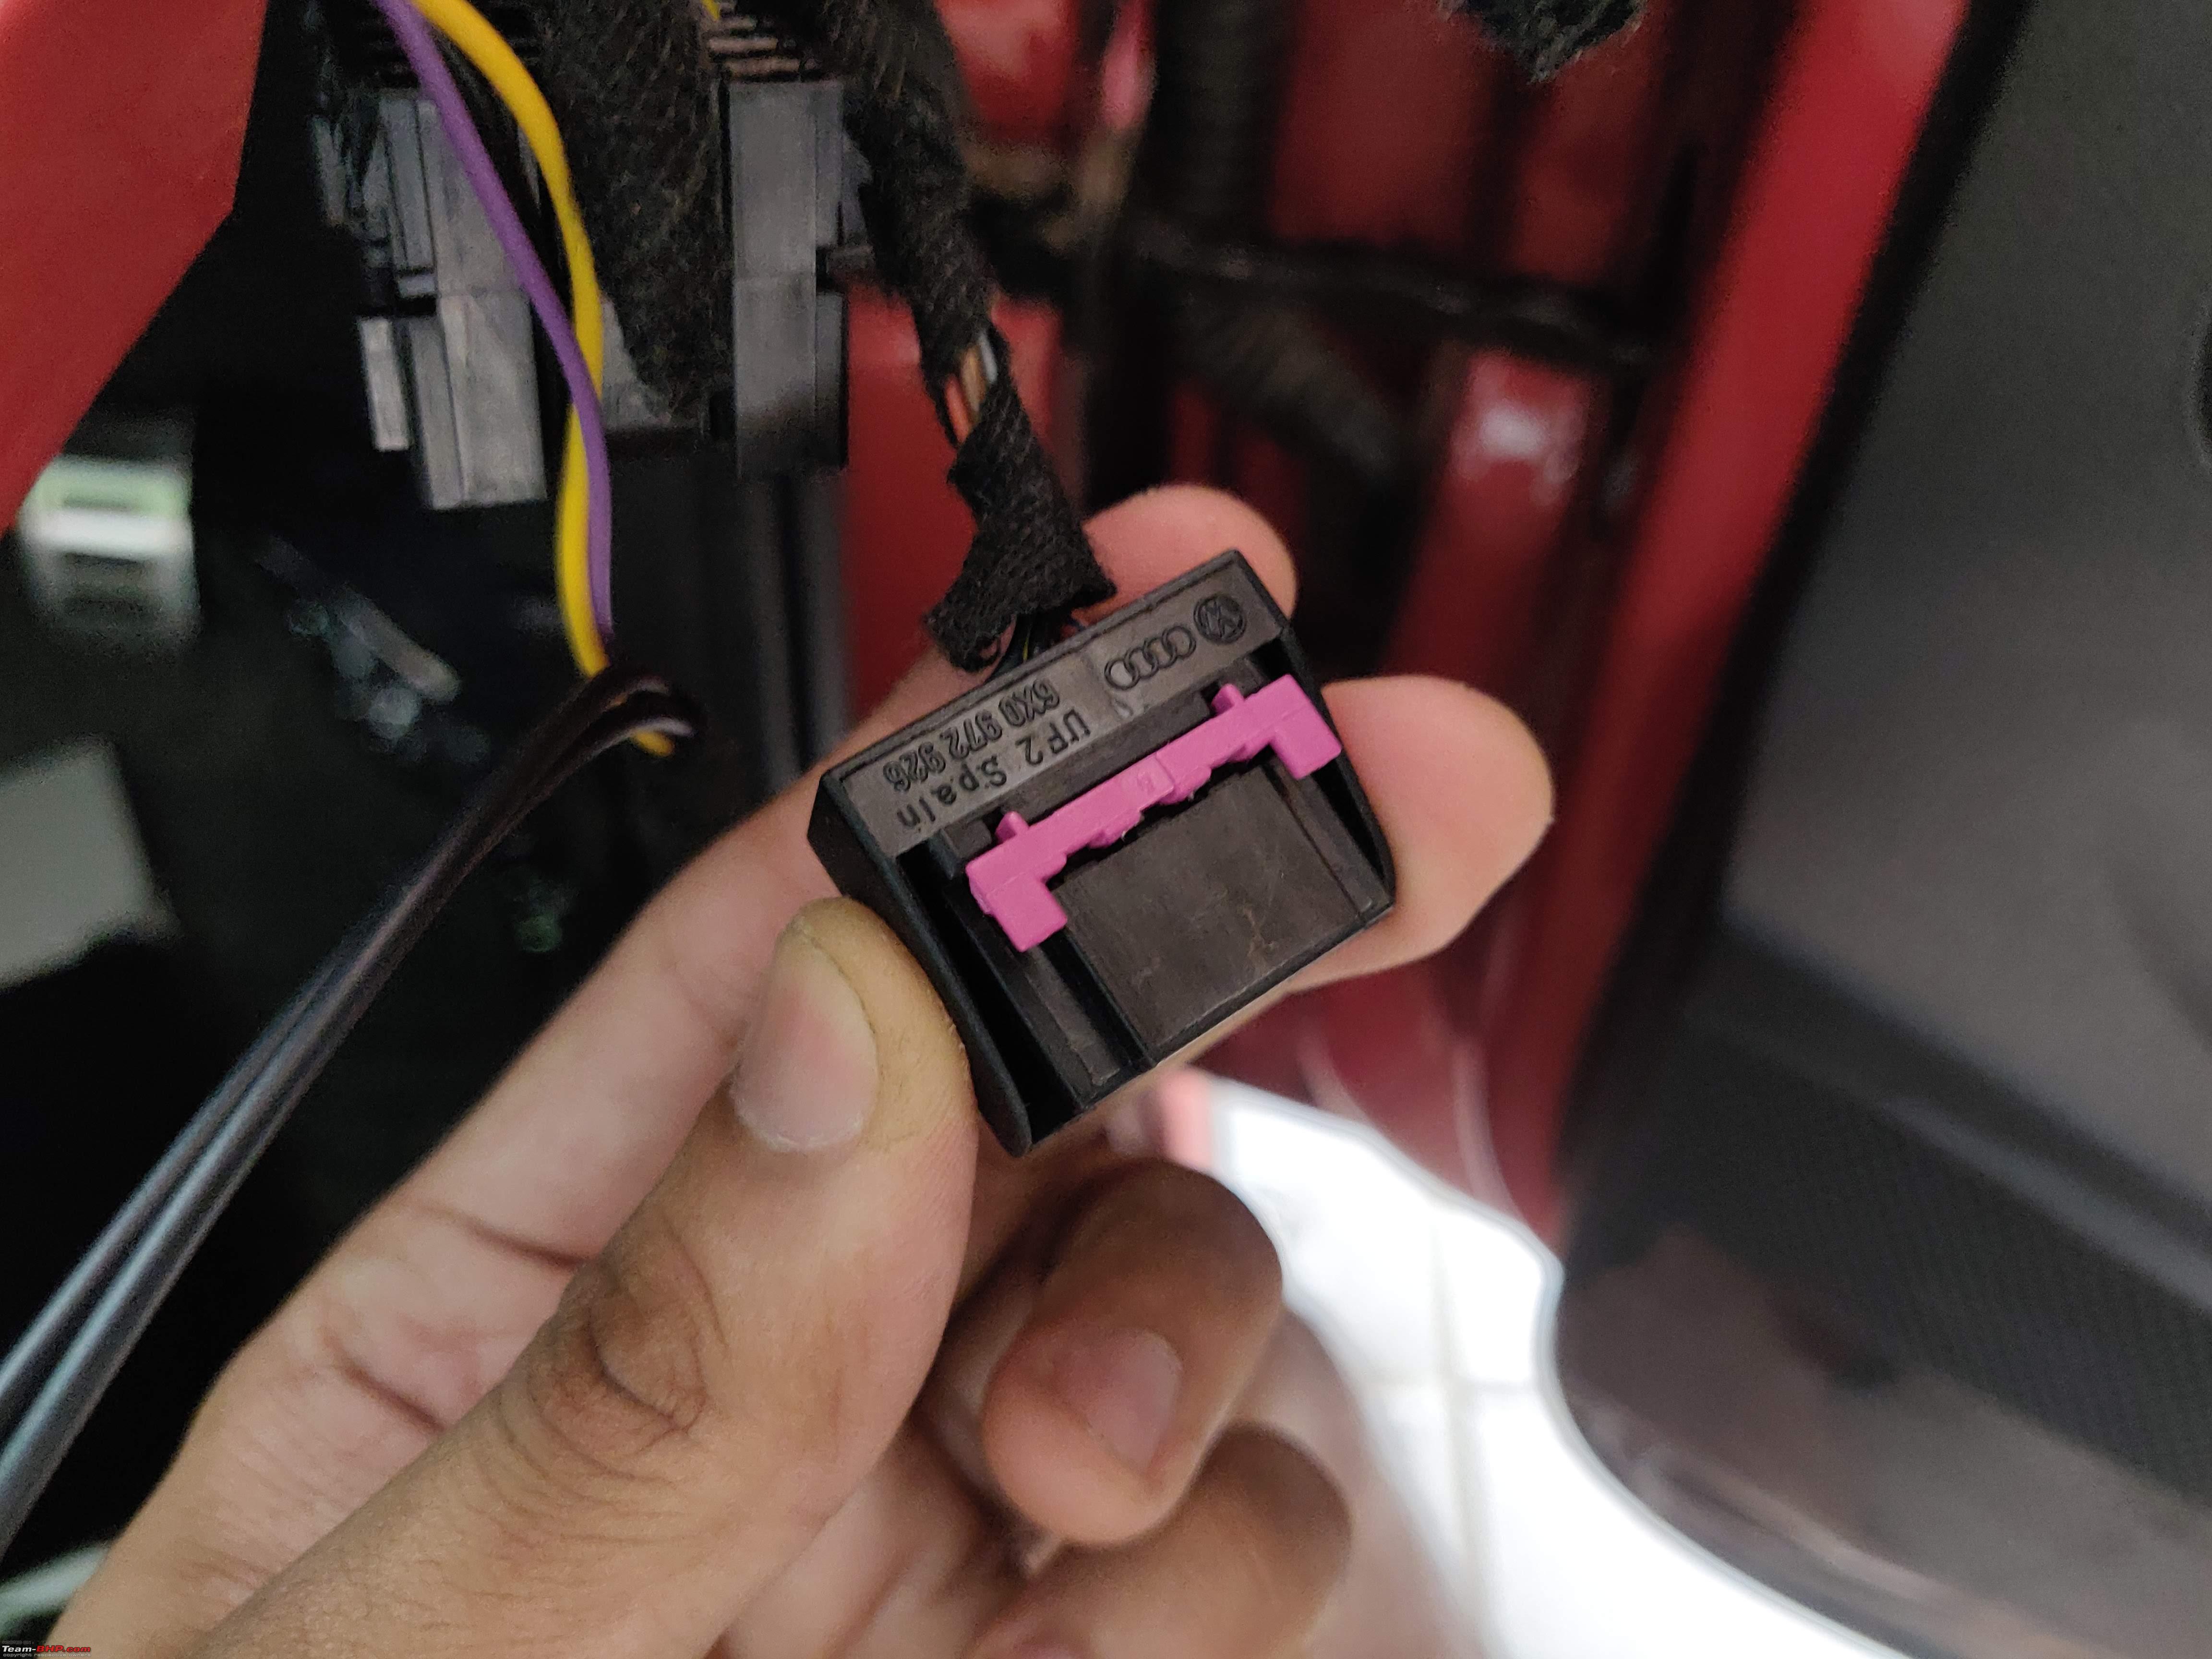 The dimmer switch comes in a two types. Dimmer with Headlight Range Control and Dimmer without Headlight Range Control. Since I was installing AFS (Automatic Range Control for Headlights), I decided to opt for the later part. 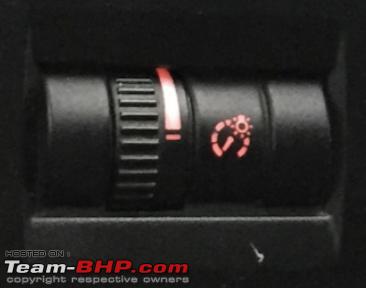 Without BCM Max, the Dimmer does not work as best as it can and if the License Plate Lights are not isolated, then they end up dimming with dimmer switch as well, which should not happen since License Plate Lights are meant to be consistently bright during night drives. There is a simple workaround for this, and that involves isolating the output to this circuit from the fusebox. After these small changes were made, new wirings and relays were introduced to support the Automatic Headlights. 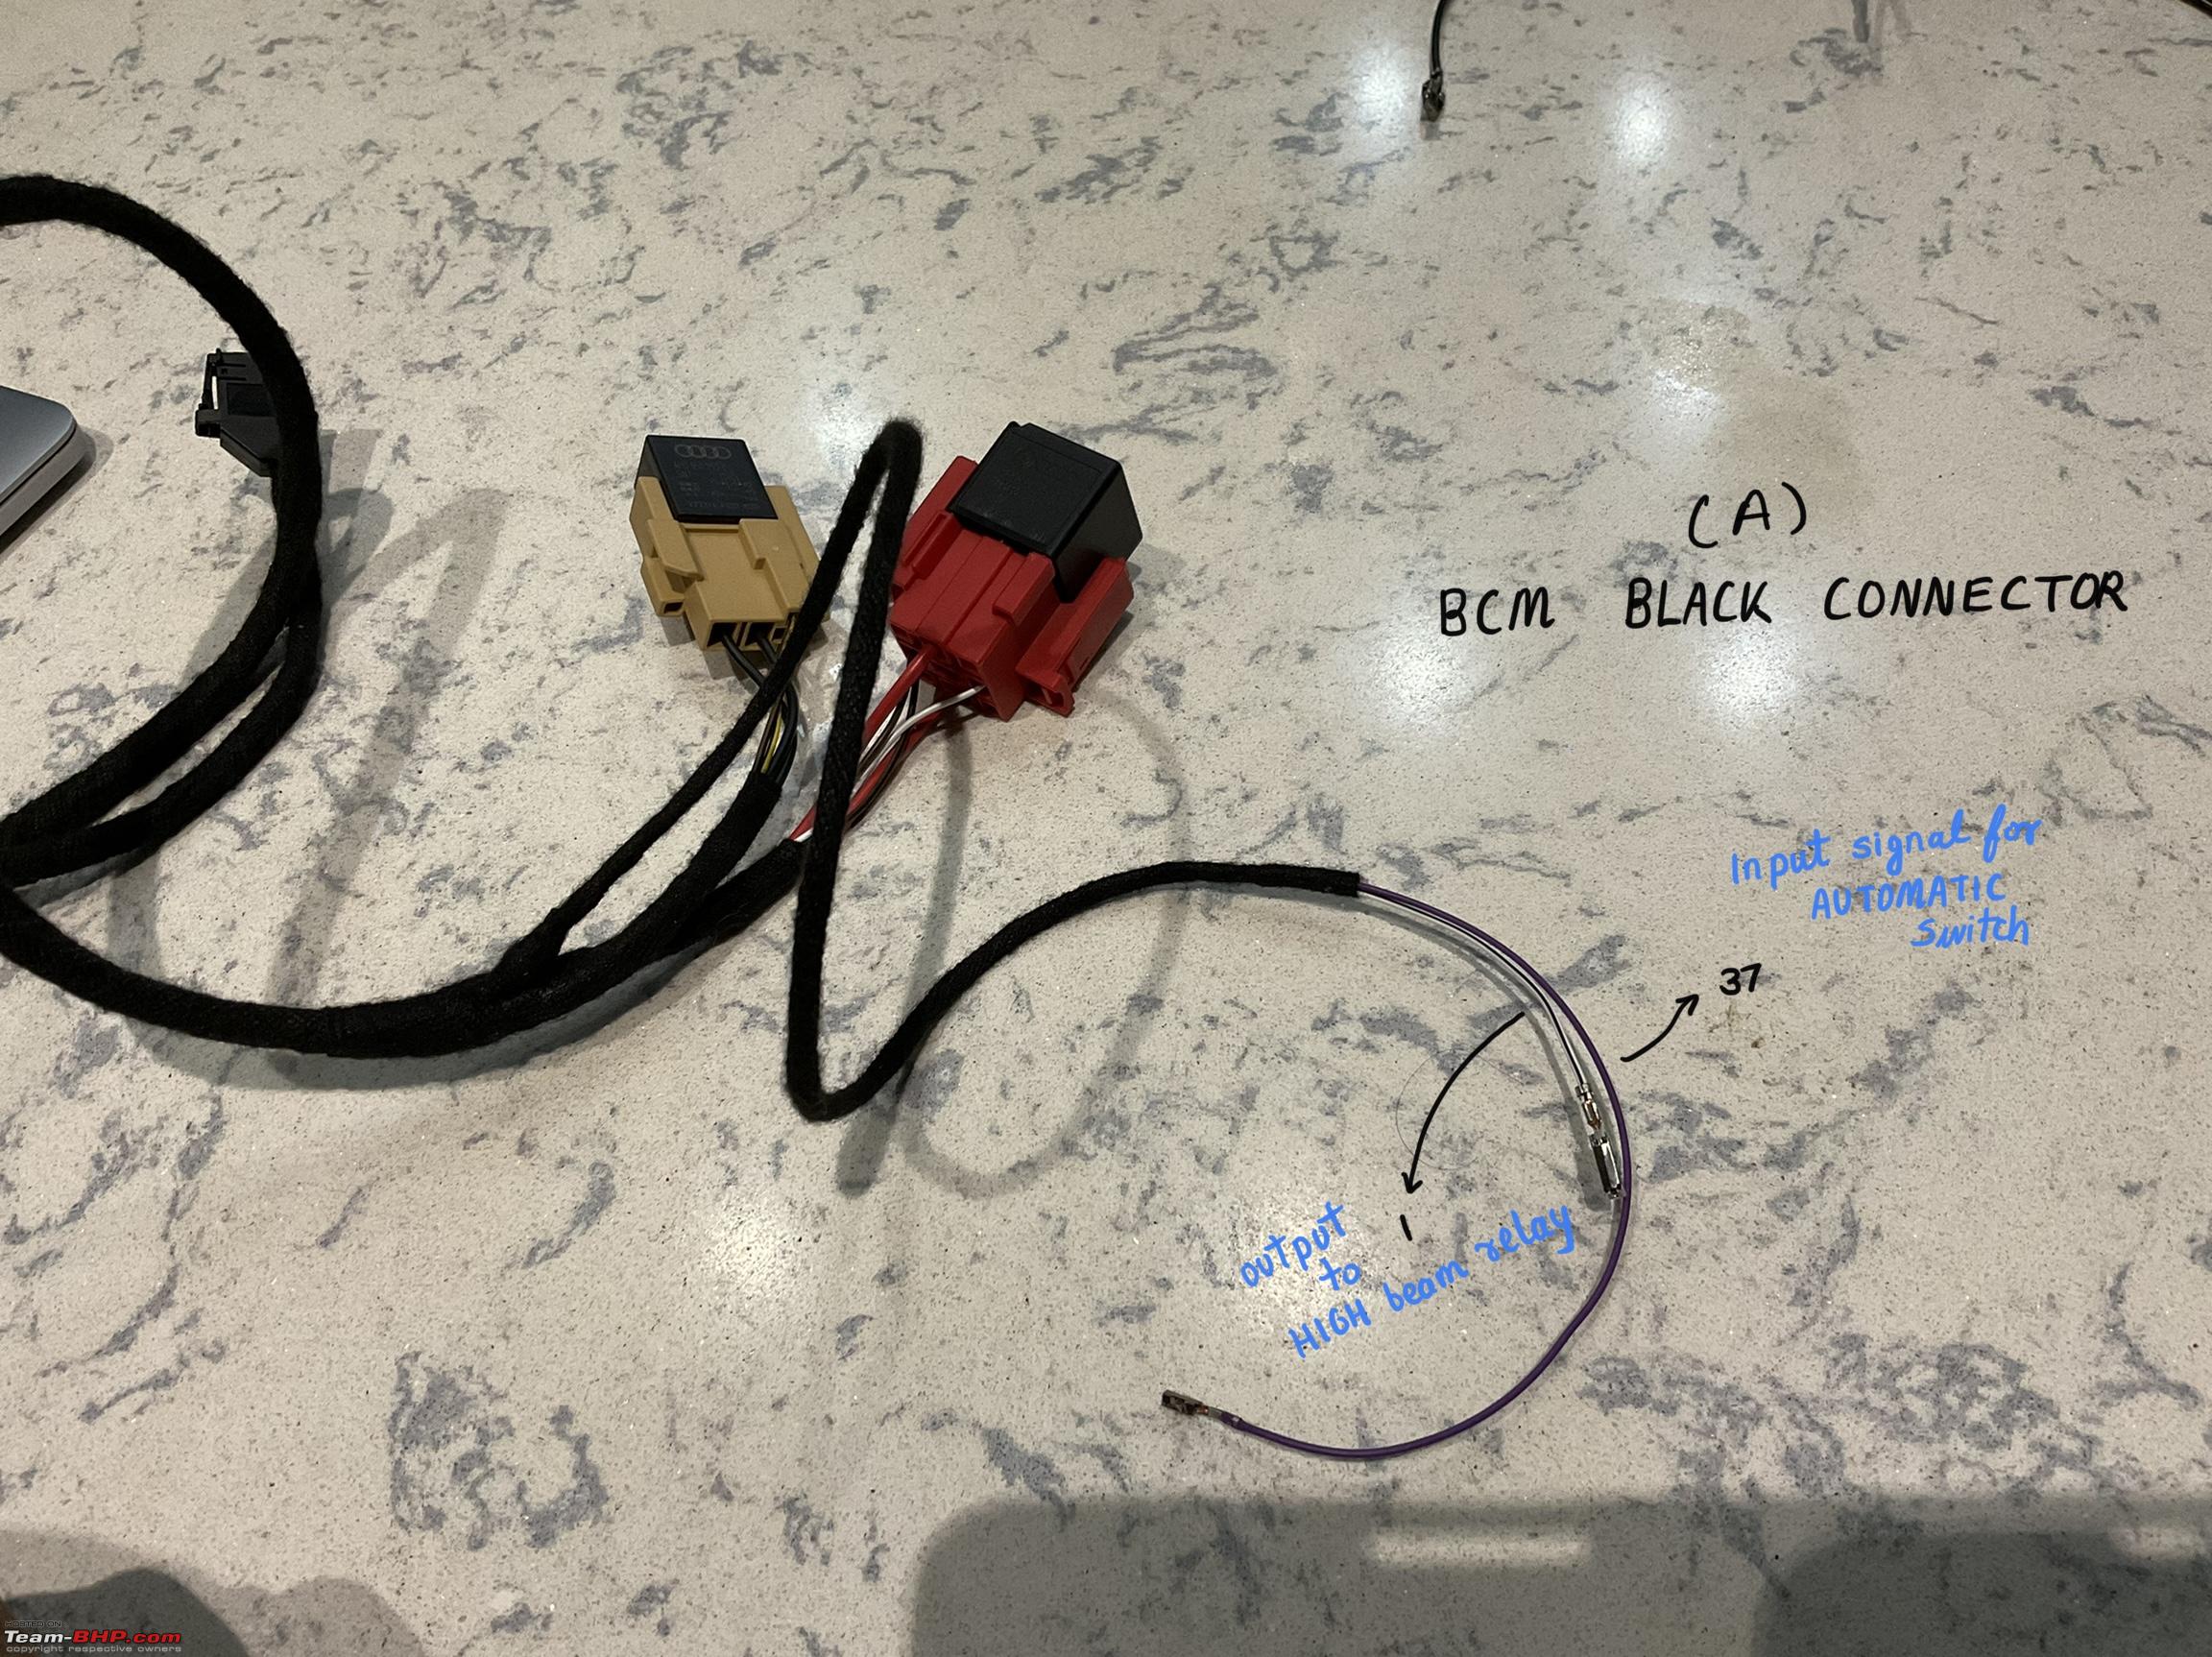 Some older headlight relays had to be removed and replaced to make the new wiring work. 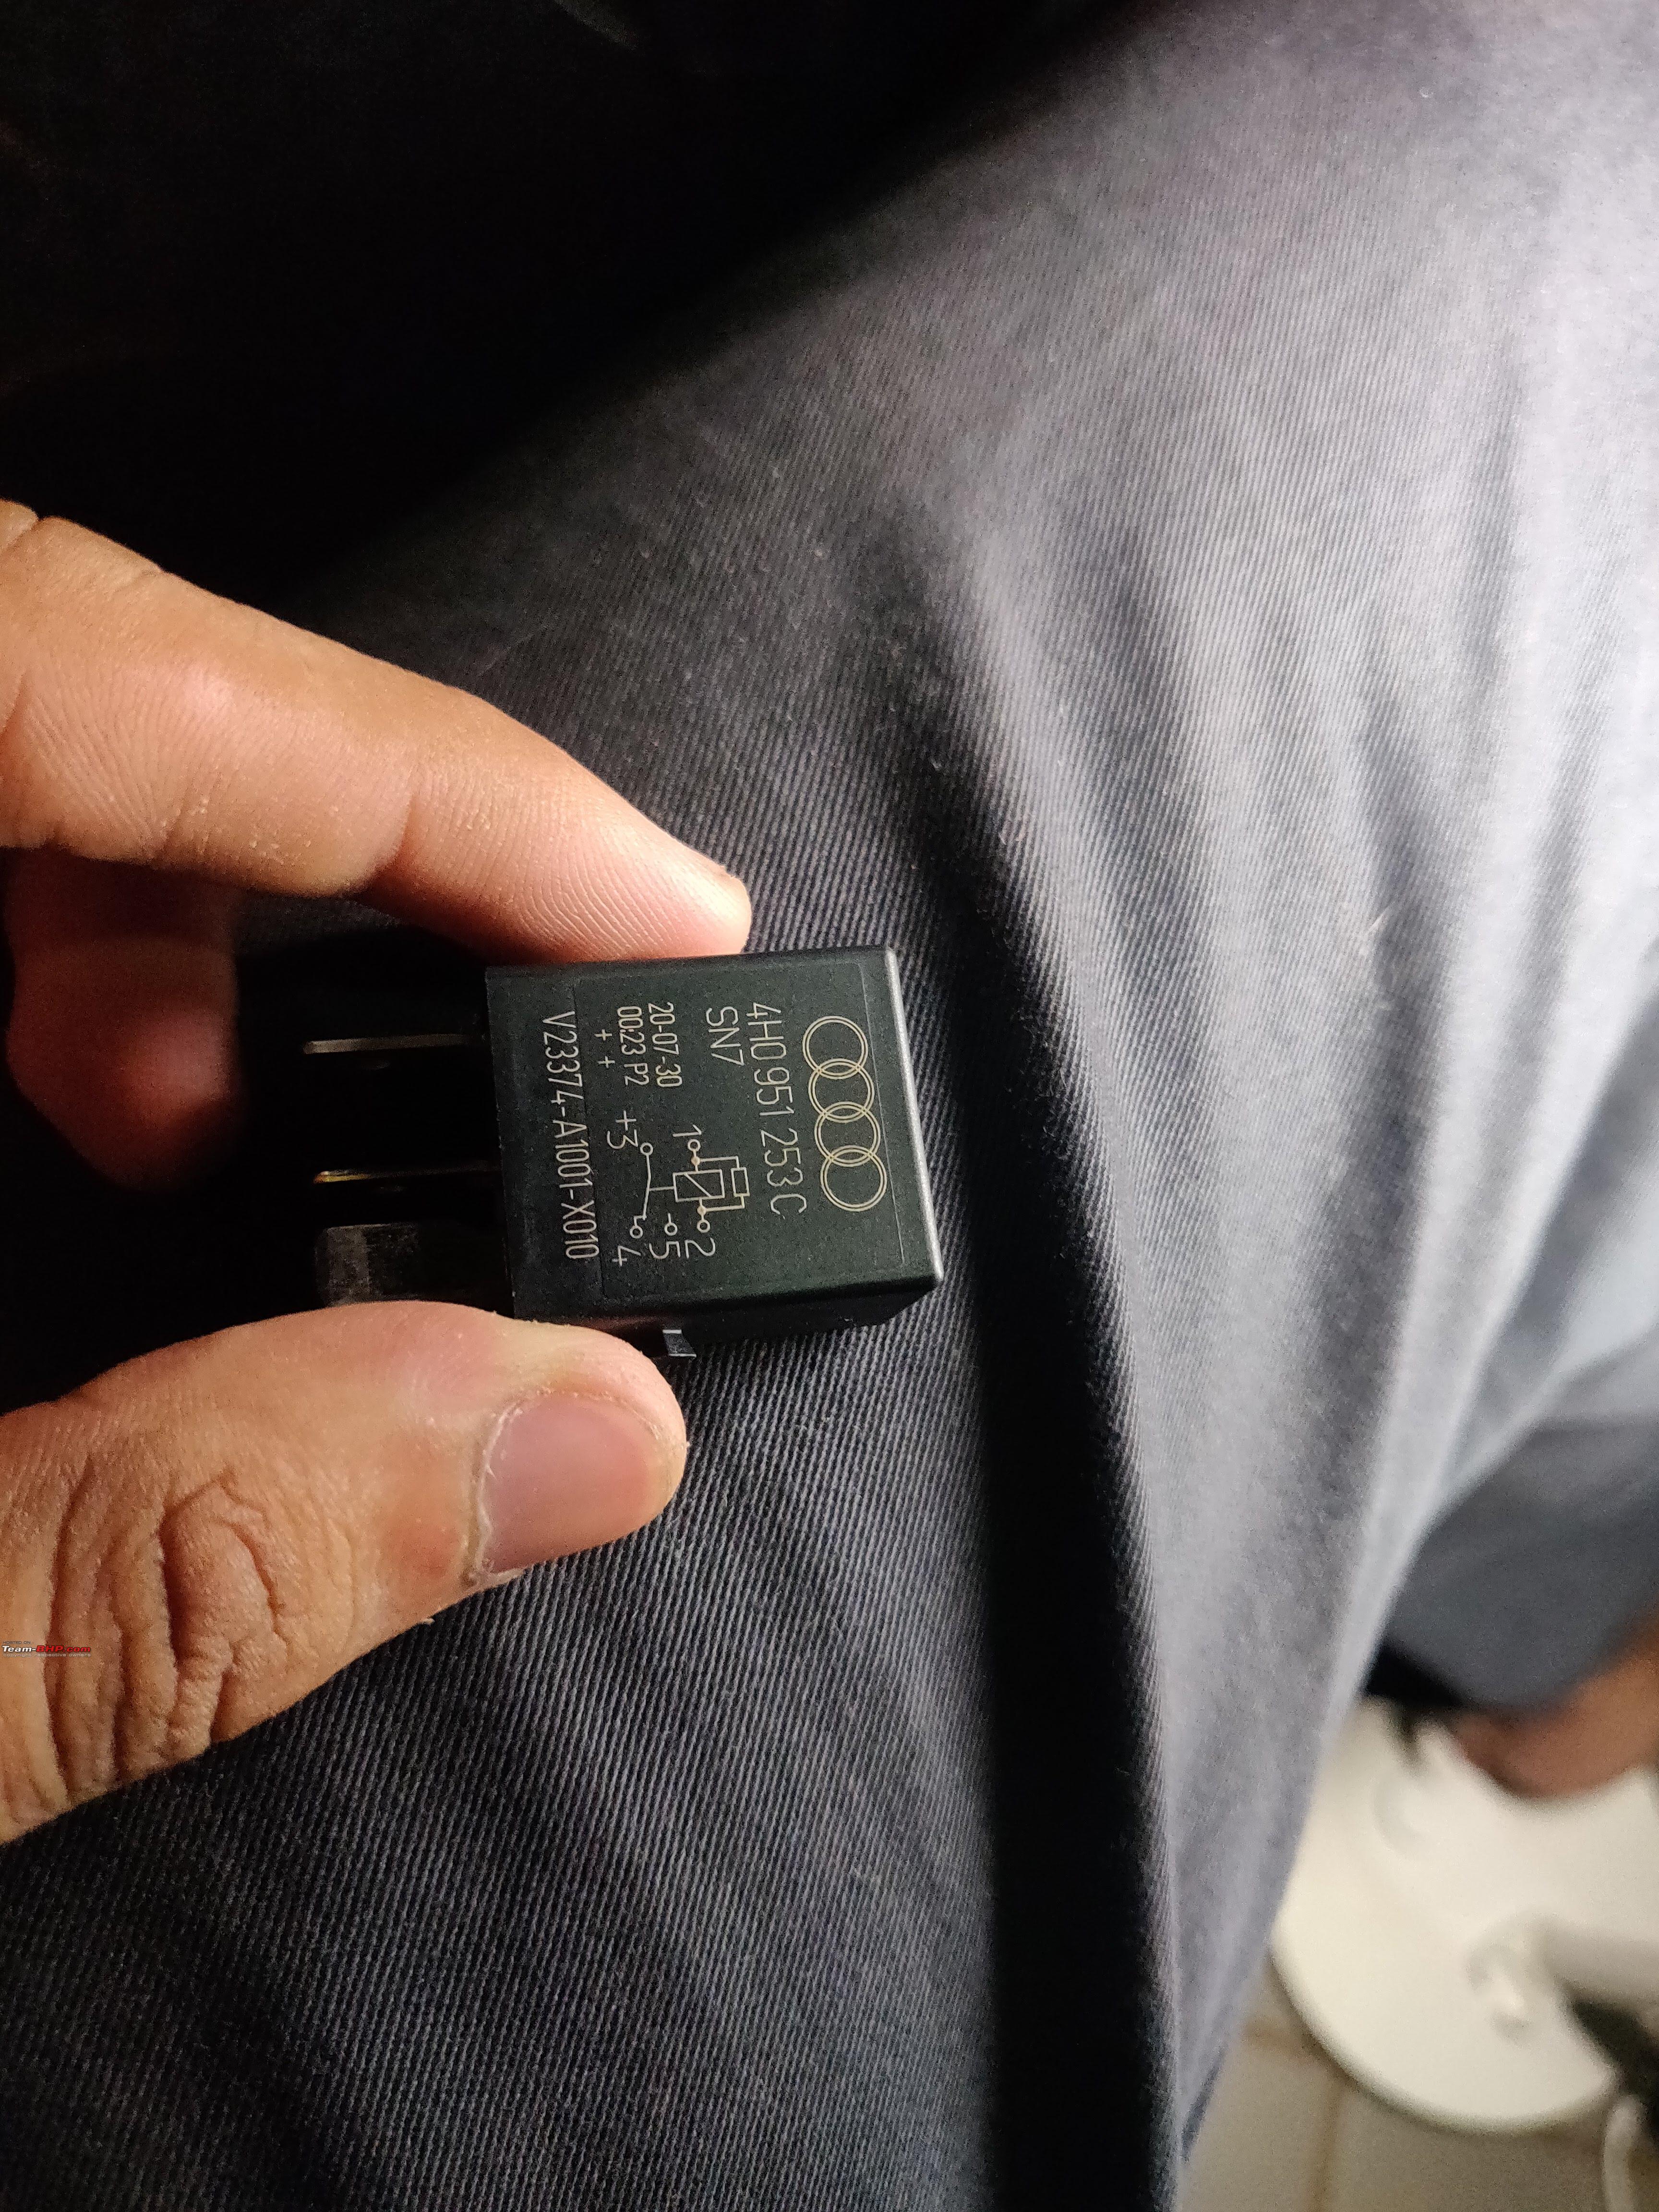  Fusebox Wiring The fusebox is the right place to wire any electrical accessories and this is the place where Ive crimped and inserted input and outputs of most of my Retrofits like the Flip Camera and the Direct TPMS Unit. To make changes to the fusebox wiring, you need to pull out two pink locking tabs, depending on what row you want to work on, and then insert an appropriate Terminal Removal tool to release the connector crimp out of the fusebox. 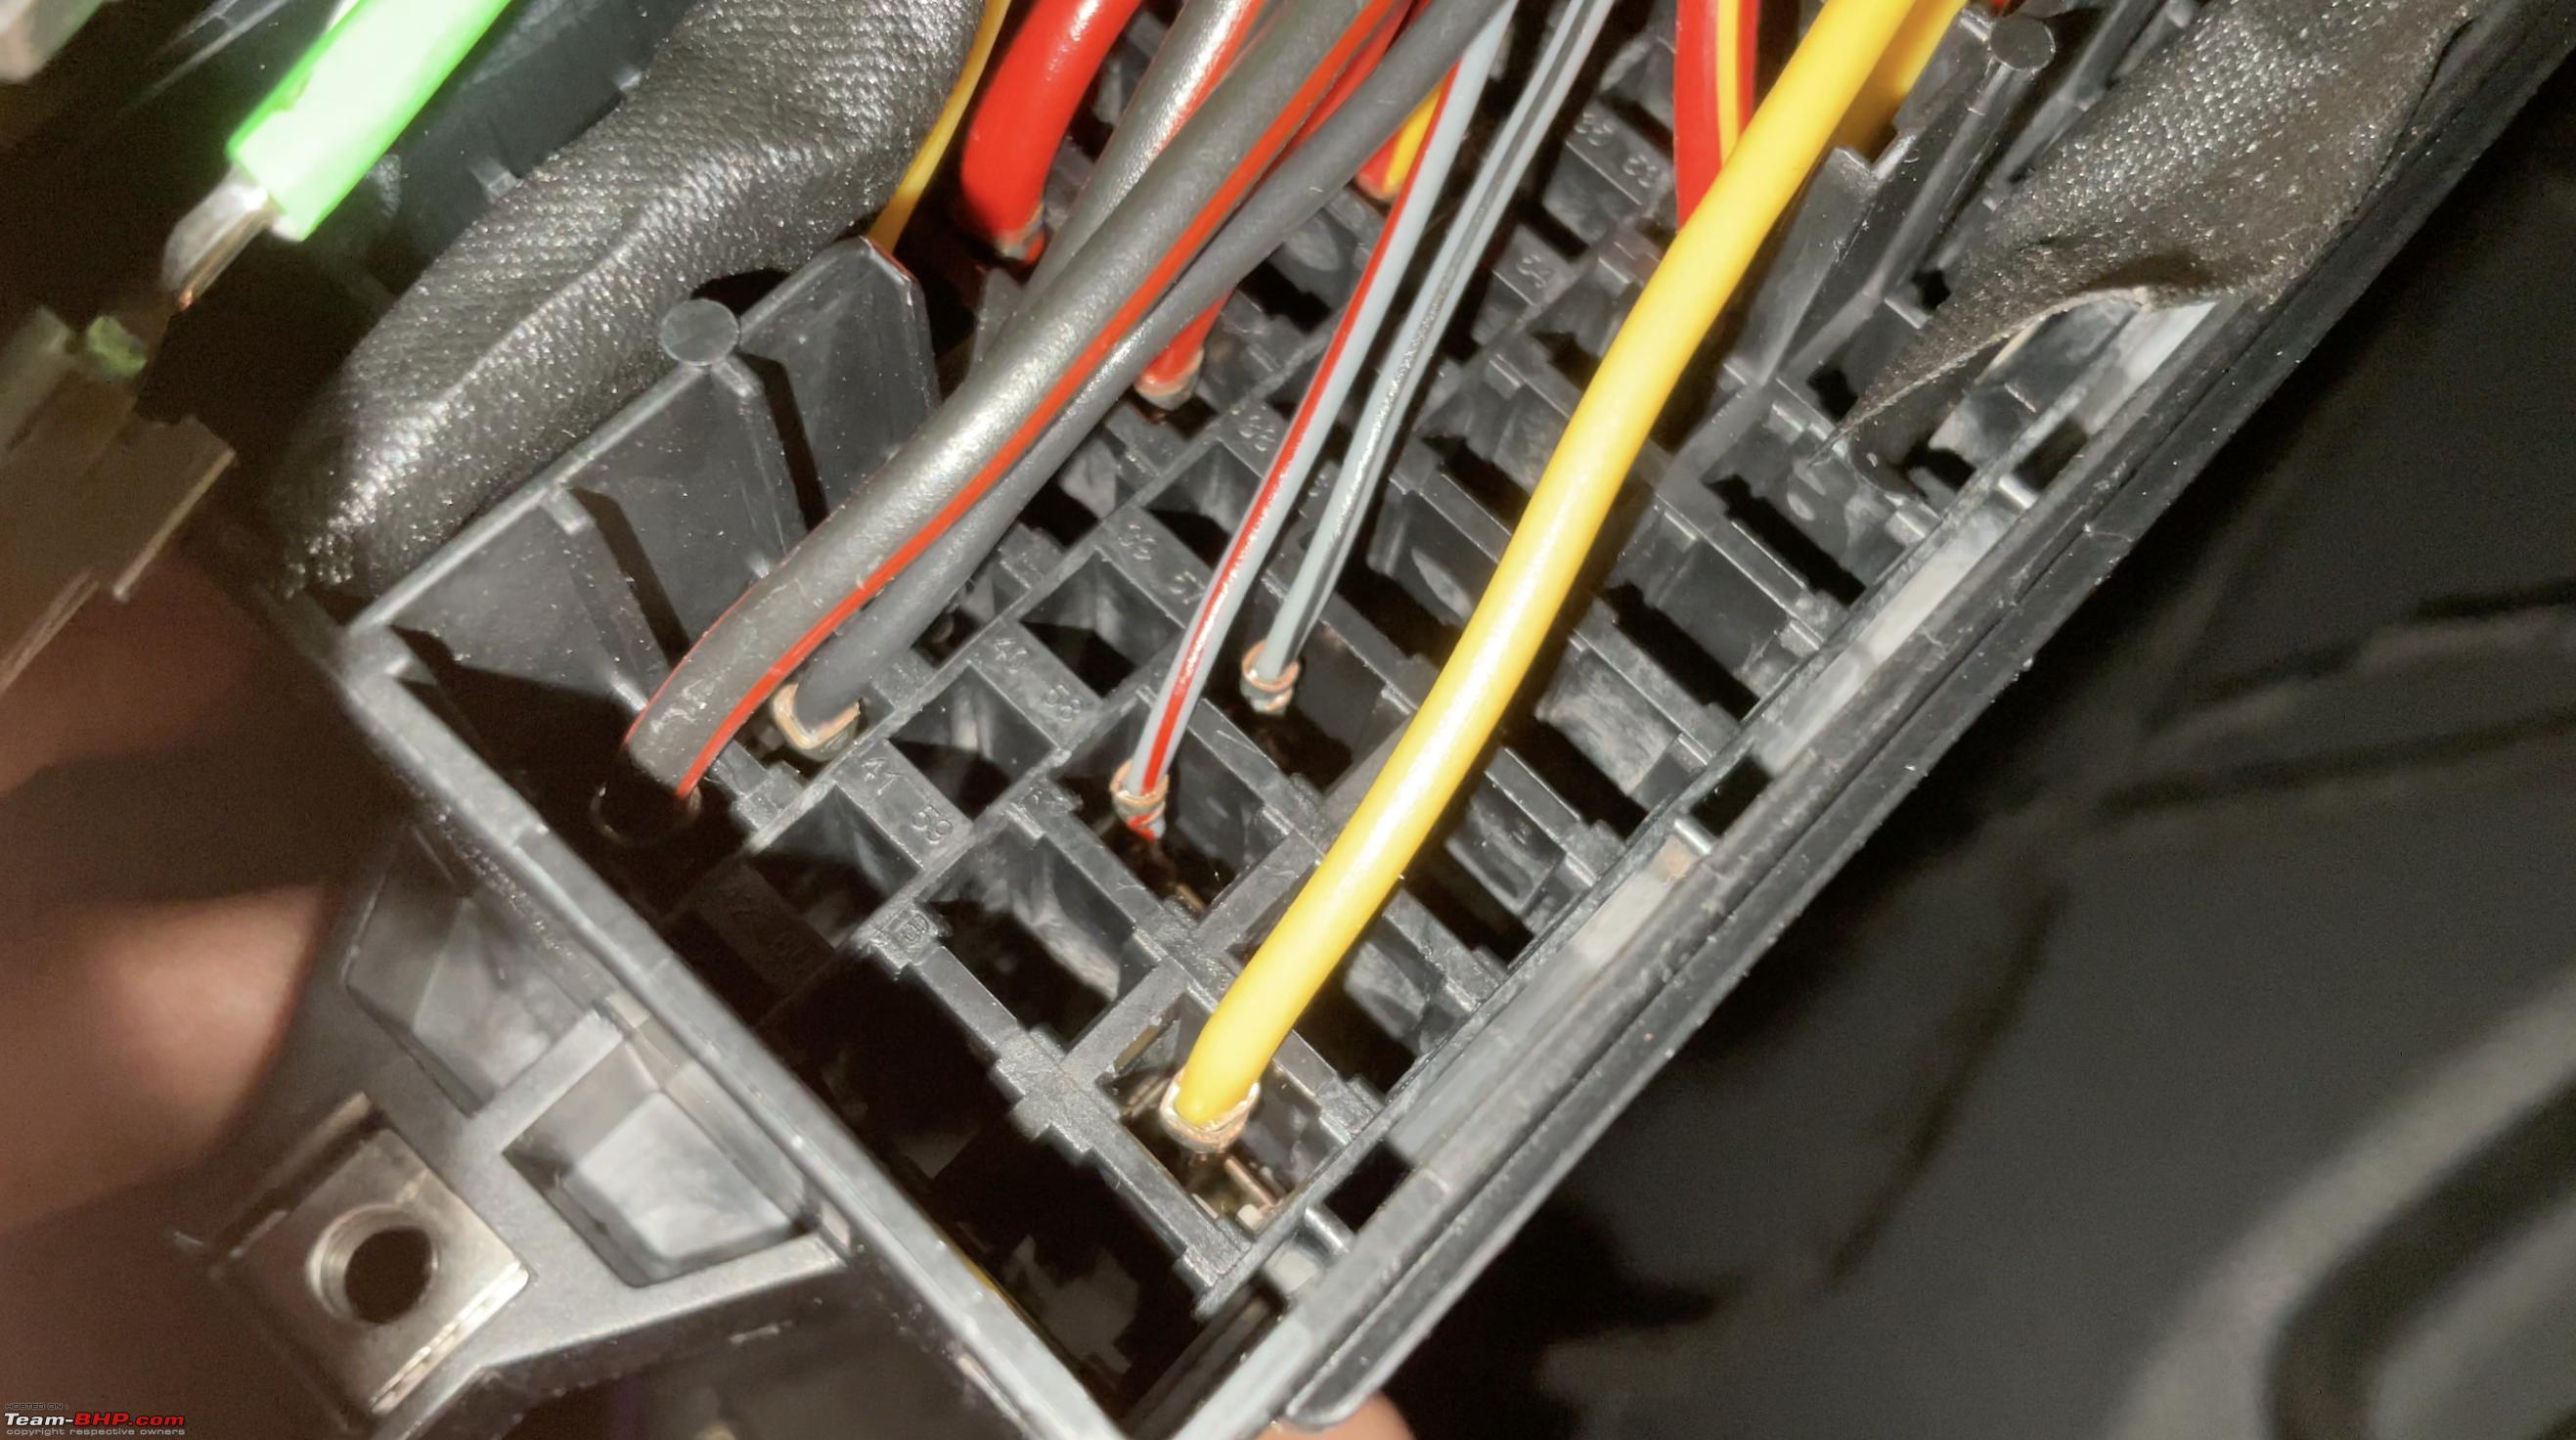 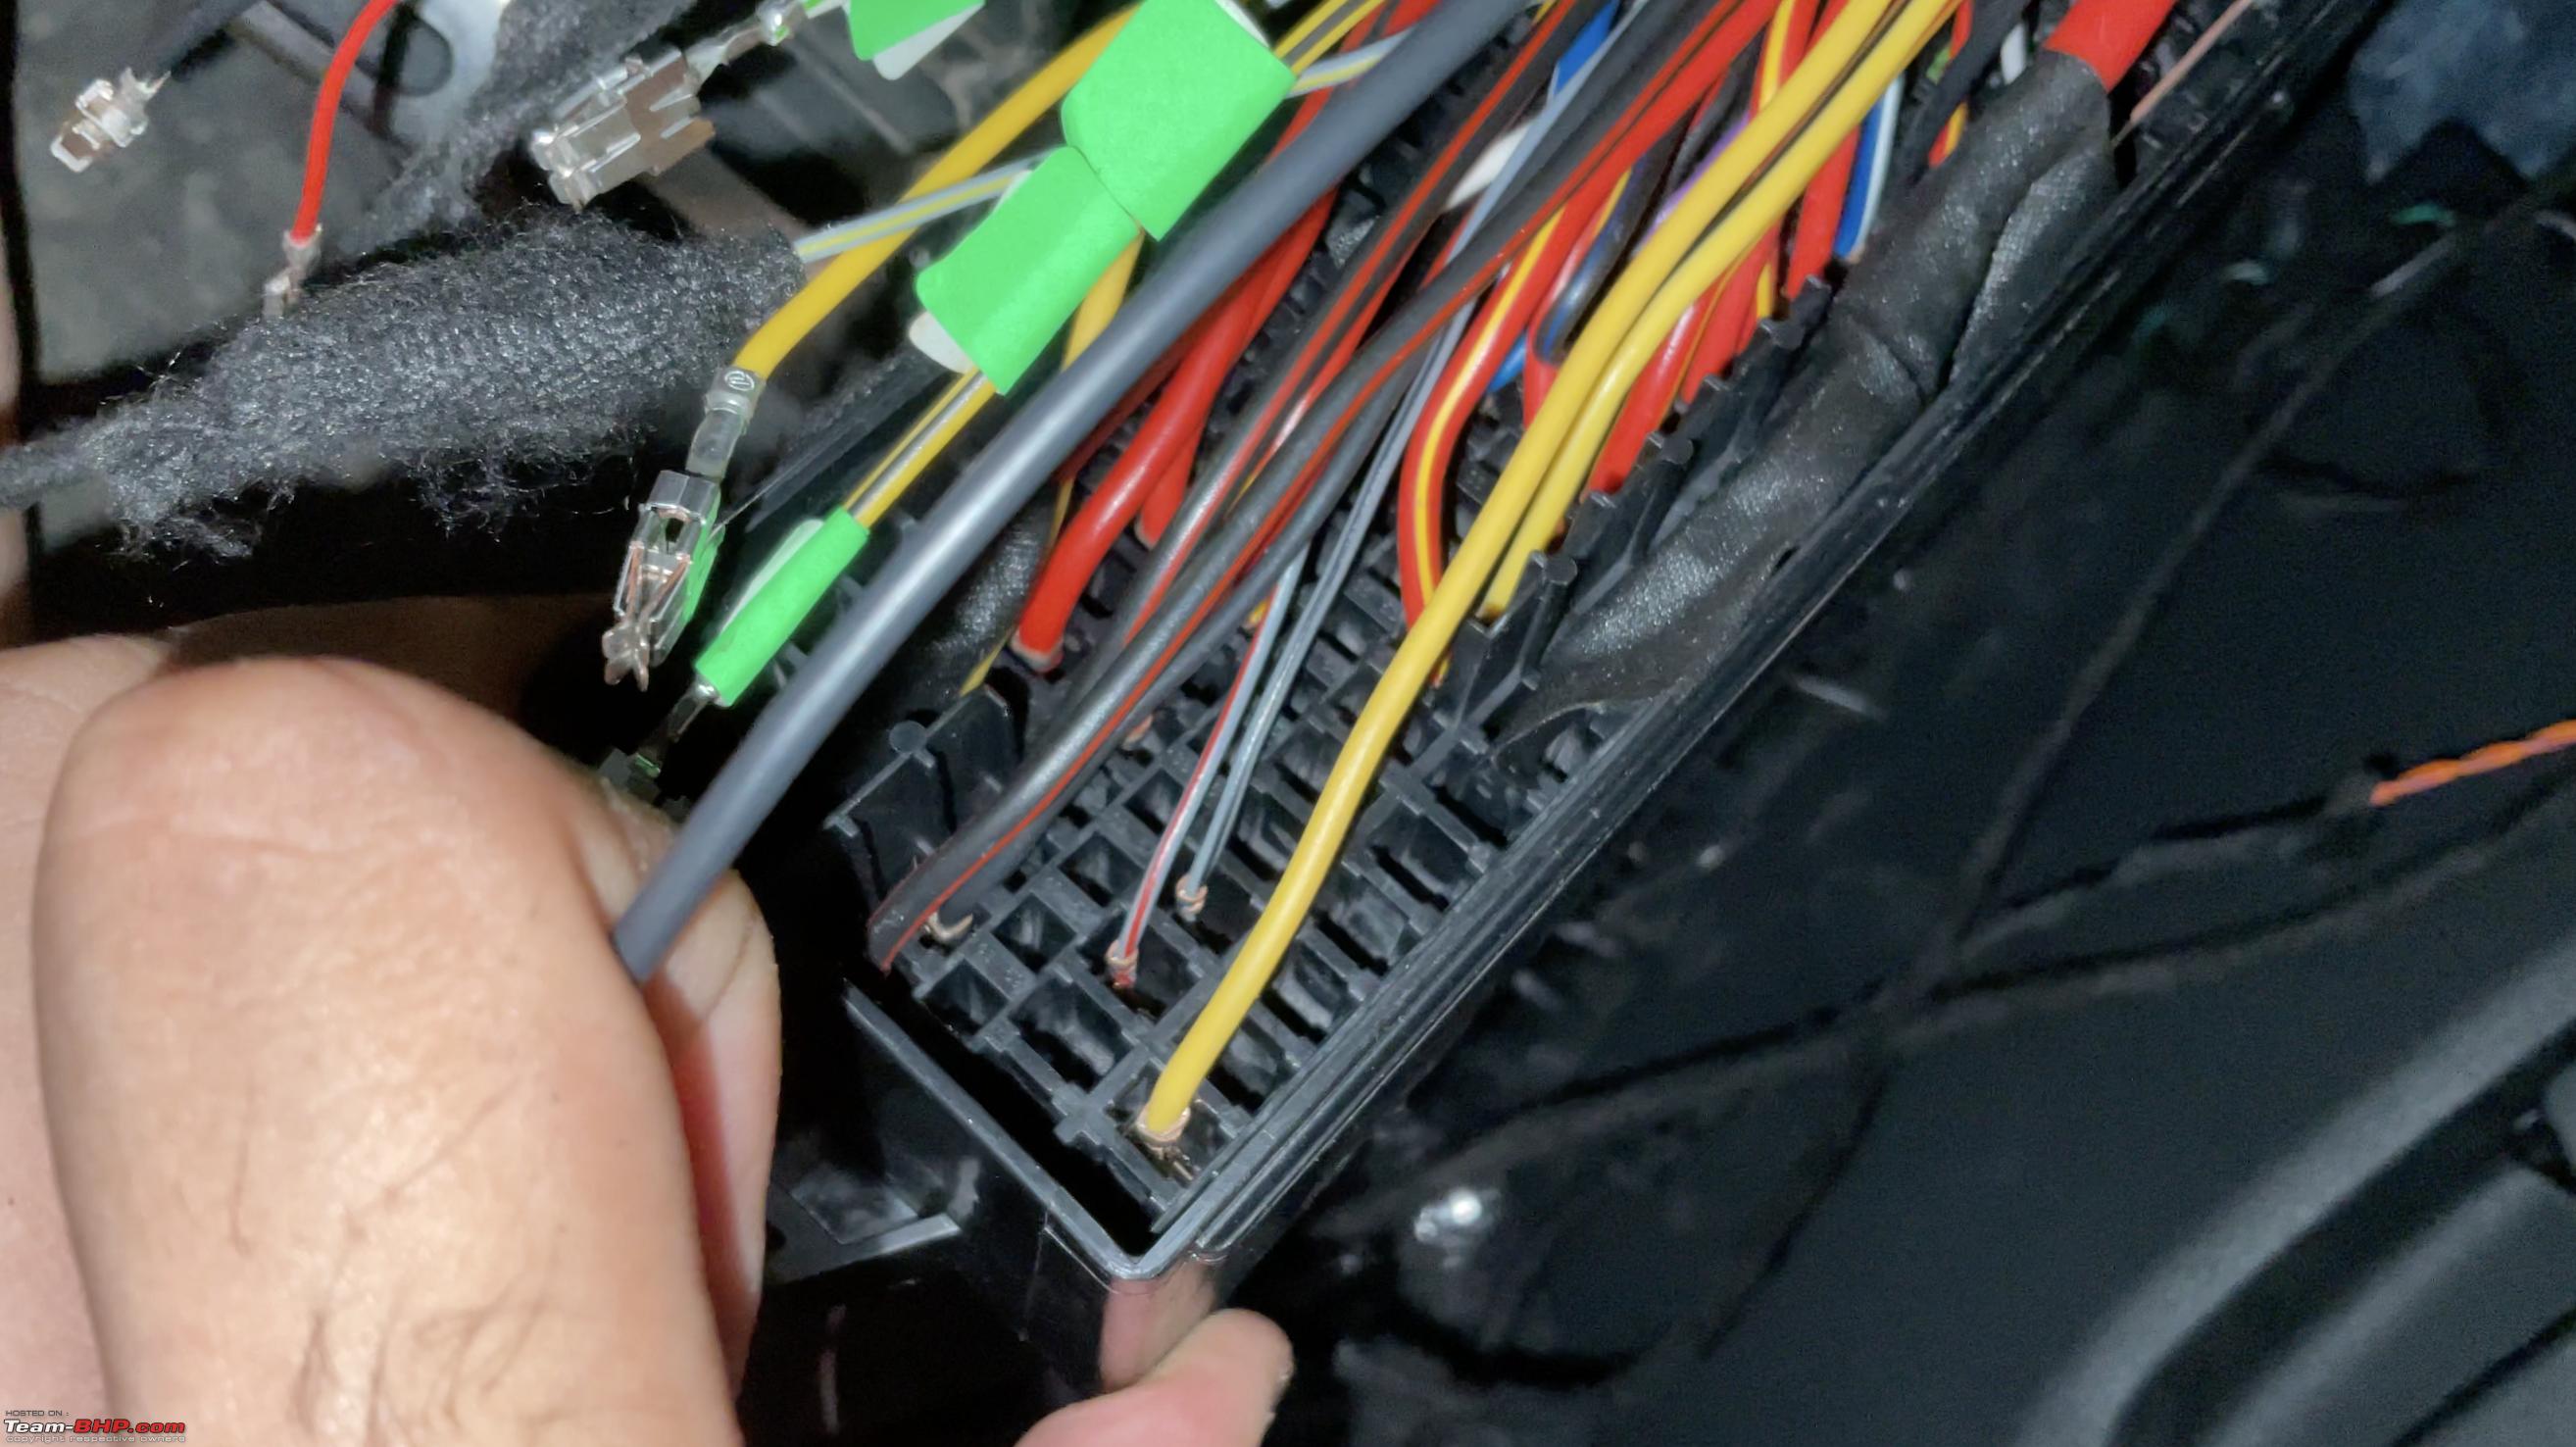 Usually folks and accessory shops who dont want to mess with the fusebox resort to a Fusetap, but for the BCM Max retrofit, there isnt any room for such shortcuts. Fuses 57 and 58 are for the protection of the Side lights, and these get routed to the BCM on the BCM Max. 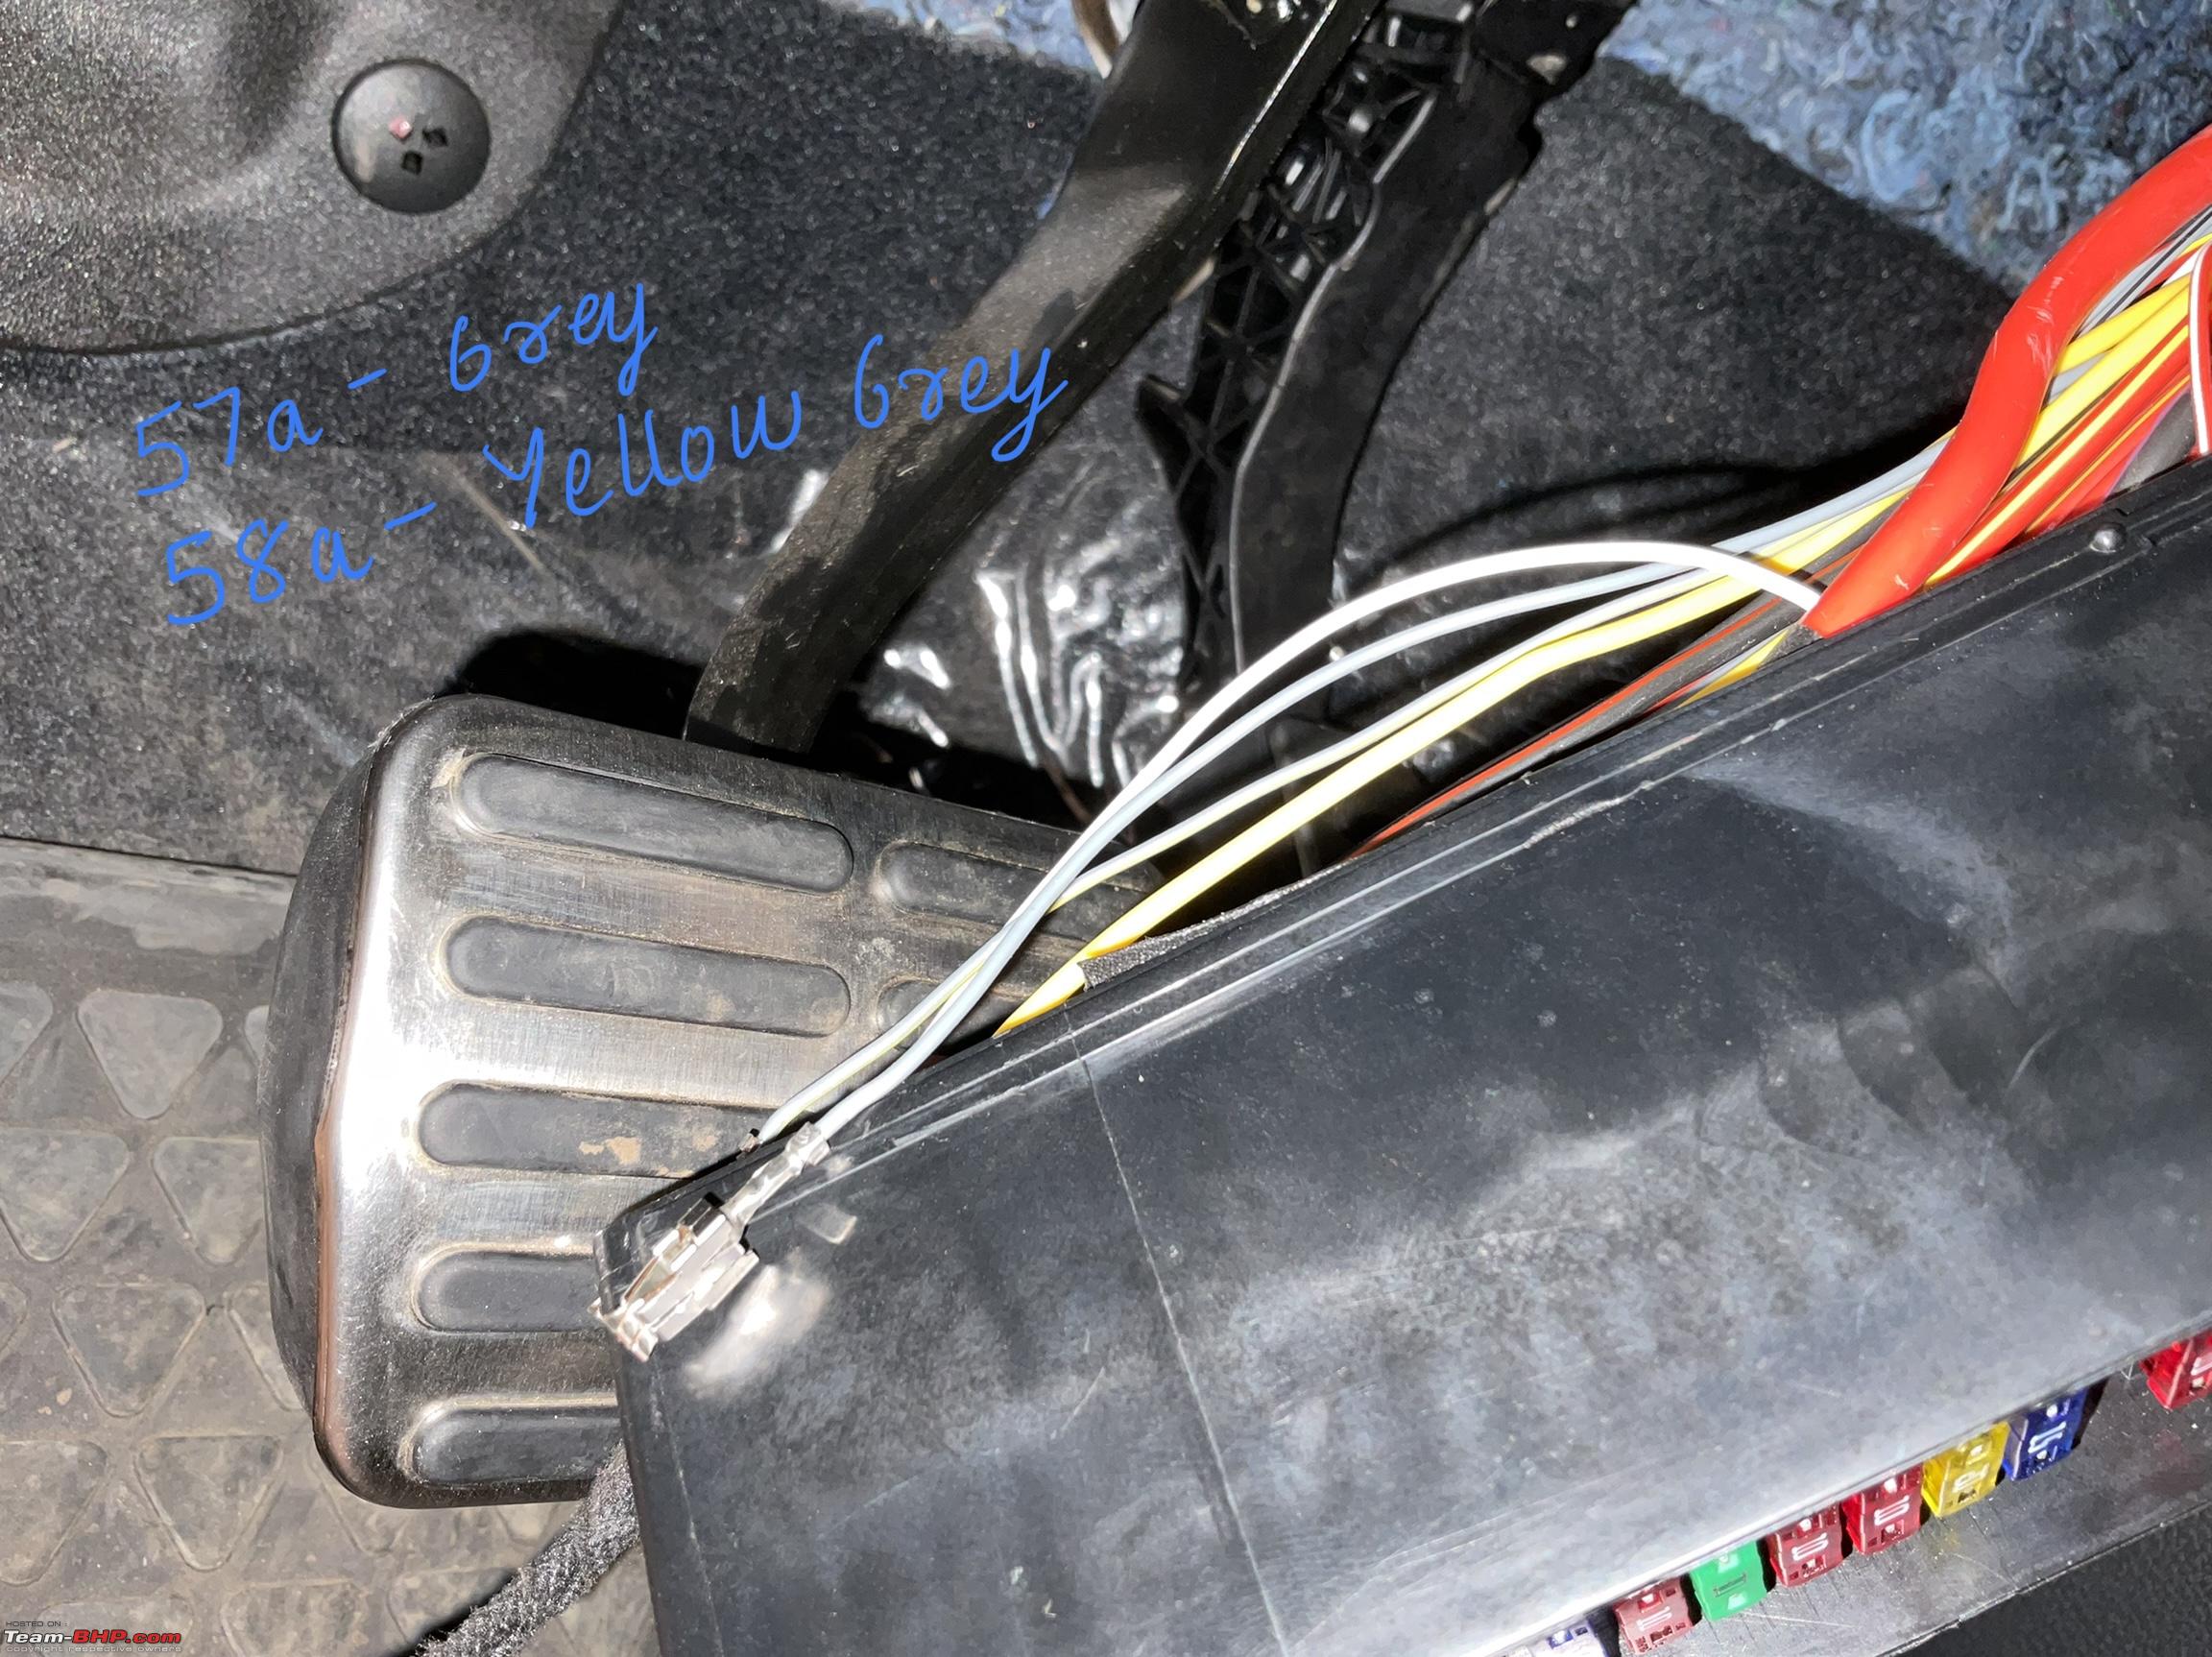 There were quite a few blanks on my Fusebox and so using some active fuse outputs, I was able to convert them into working fuses for future retrofits.  I have printed my updated Fusebox layout and kept a copy of it in the Glovebox for fault-finding and trouble shooting in the future. My regular service advisor has also been informed about the new installations, but the truth is service advisors keep changing. None of the factory fuses have been tapped or touched in any way to split power, and the fusebox looks clean, just the way it should be. 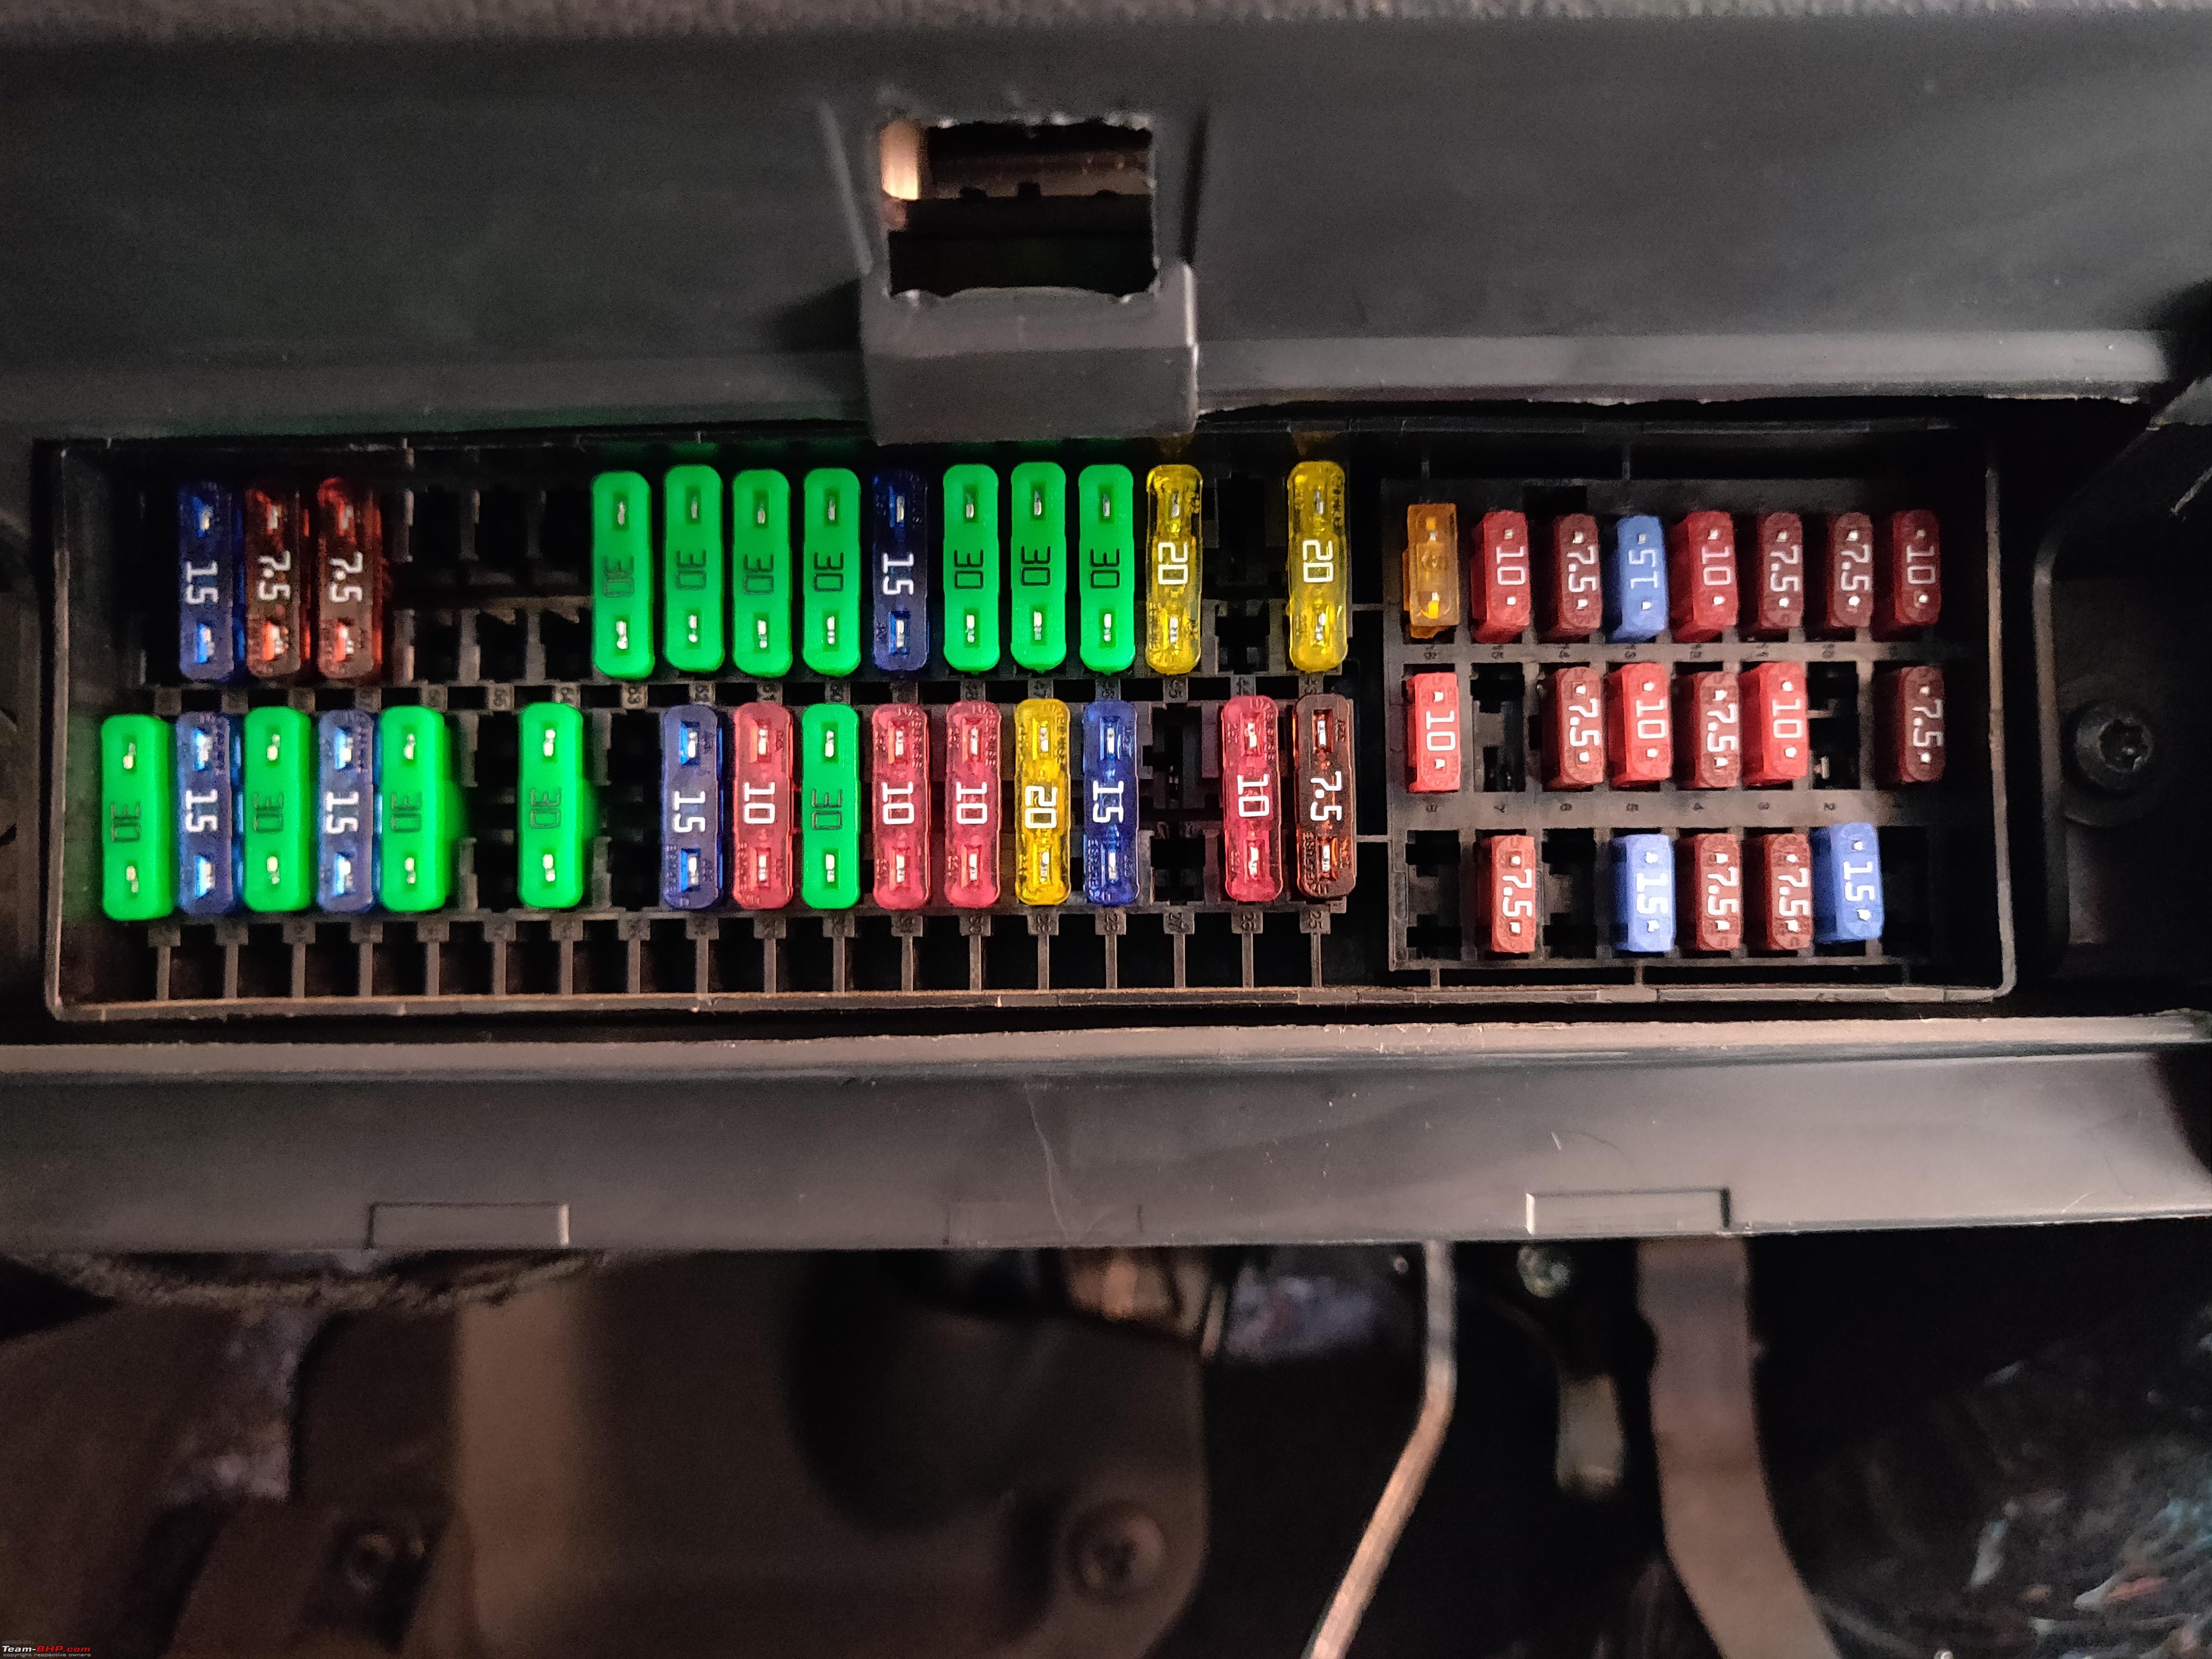 BCM Connector The BCM has two connectors, labelled A and B and they have a distinct sleeve in White and Black connector. Many installers refer to install locations by referring to BCM Connector colours, e.g BCM White Connector, BCM Black Connector. To add or remove wires, we need to release the BCM connector plastic sleeve and then refer to the pin-diagram of the BCM pins. Each BCM connector is like a lego which slides into one another. The wires in the inner rails cannot be accessed without sliding the lego connectors apart. 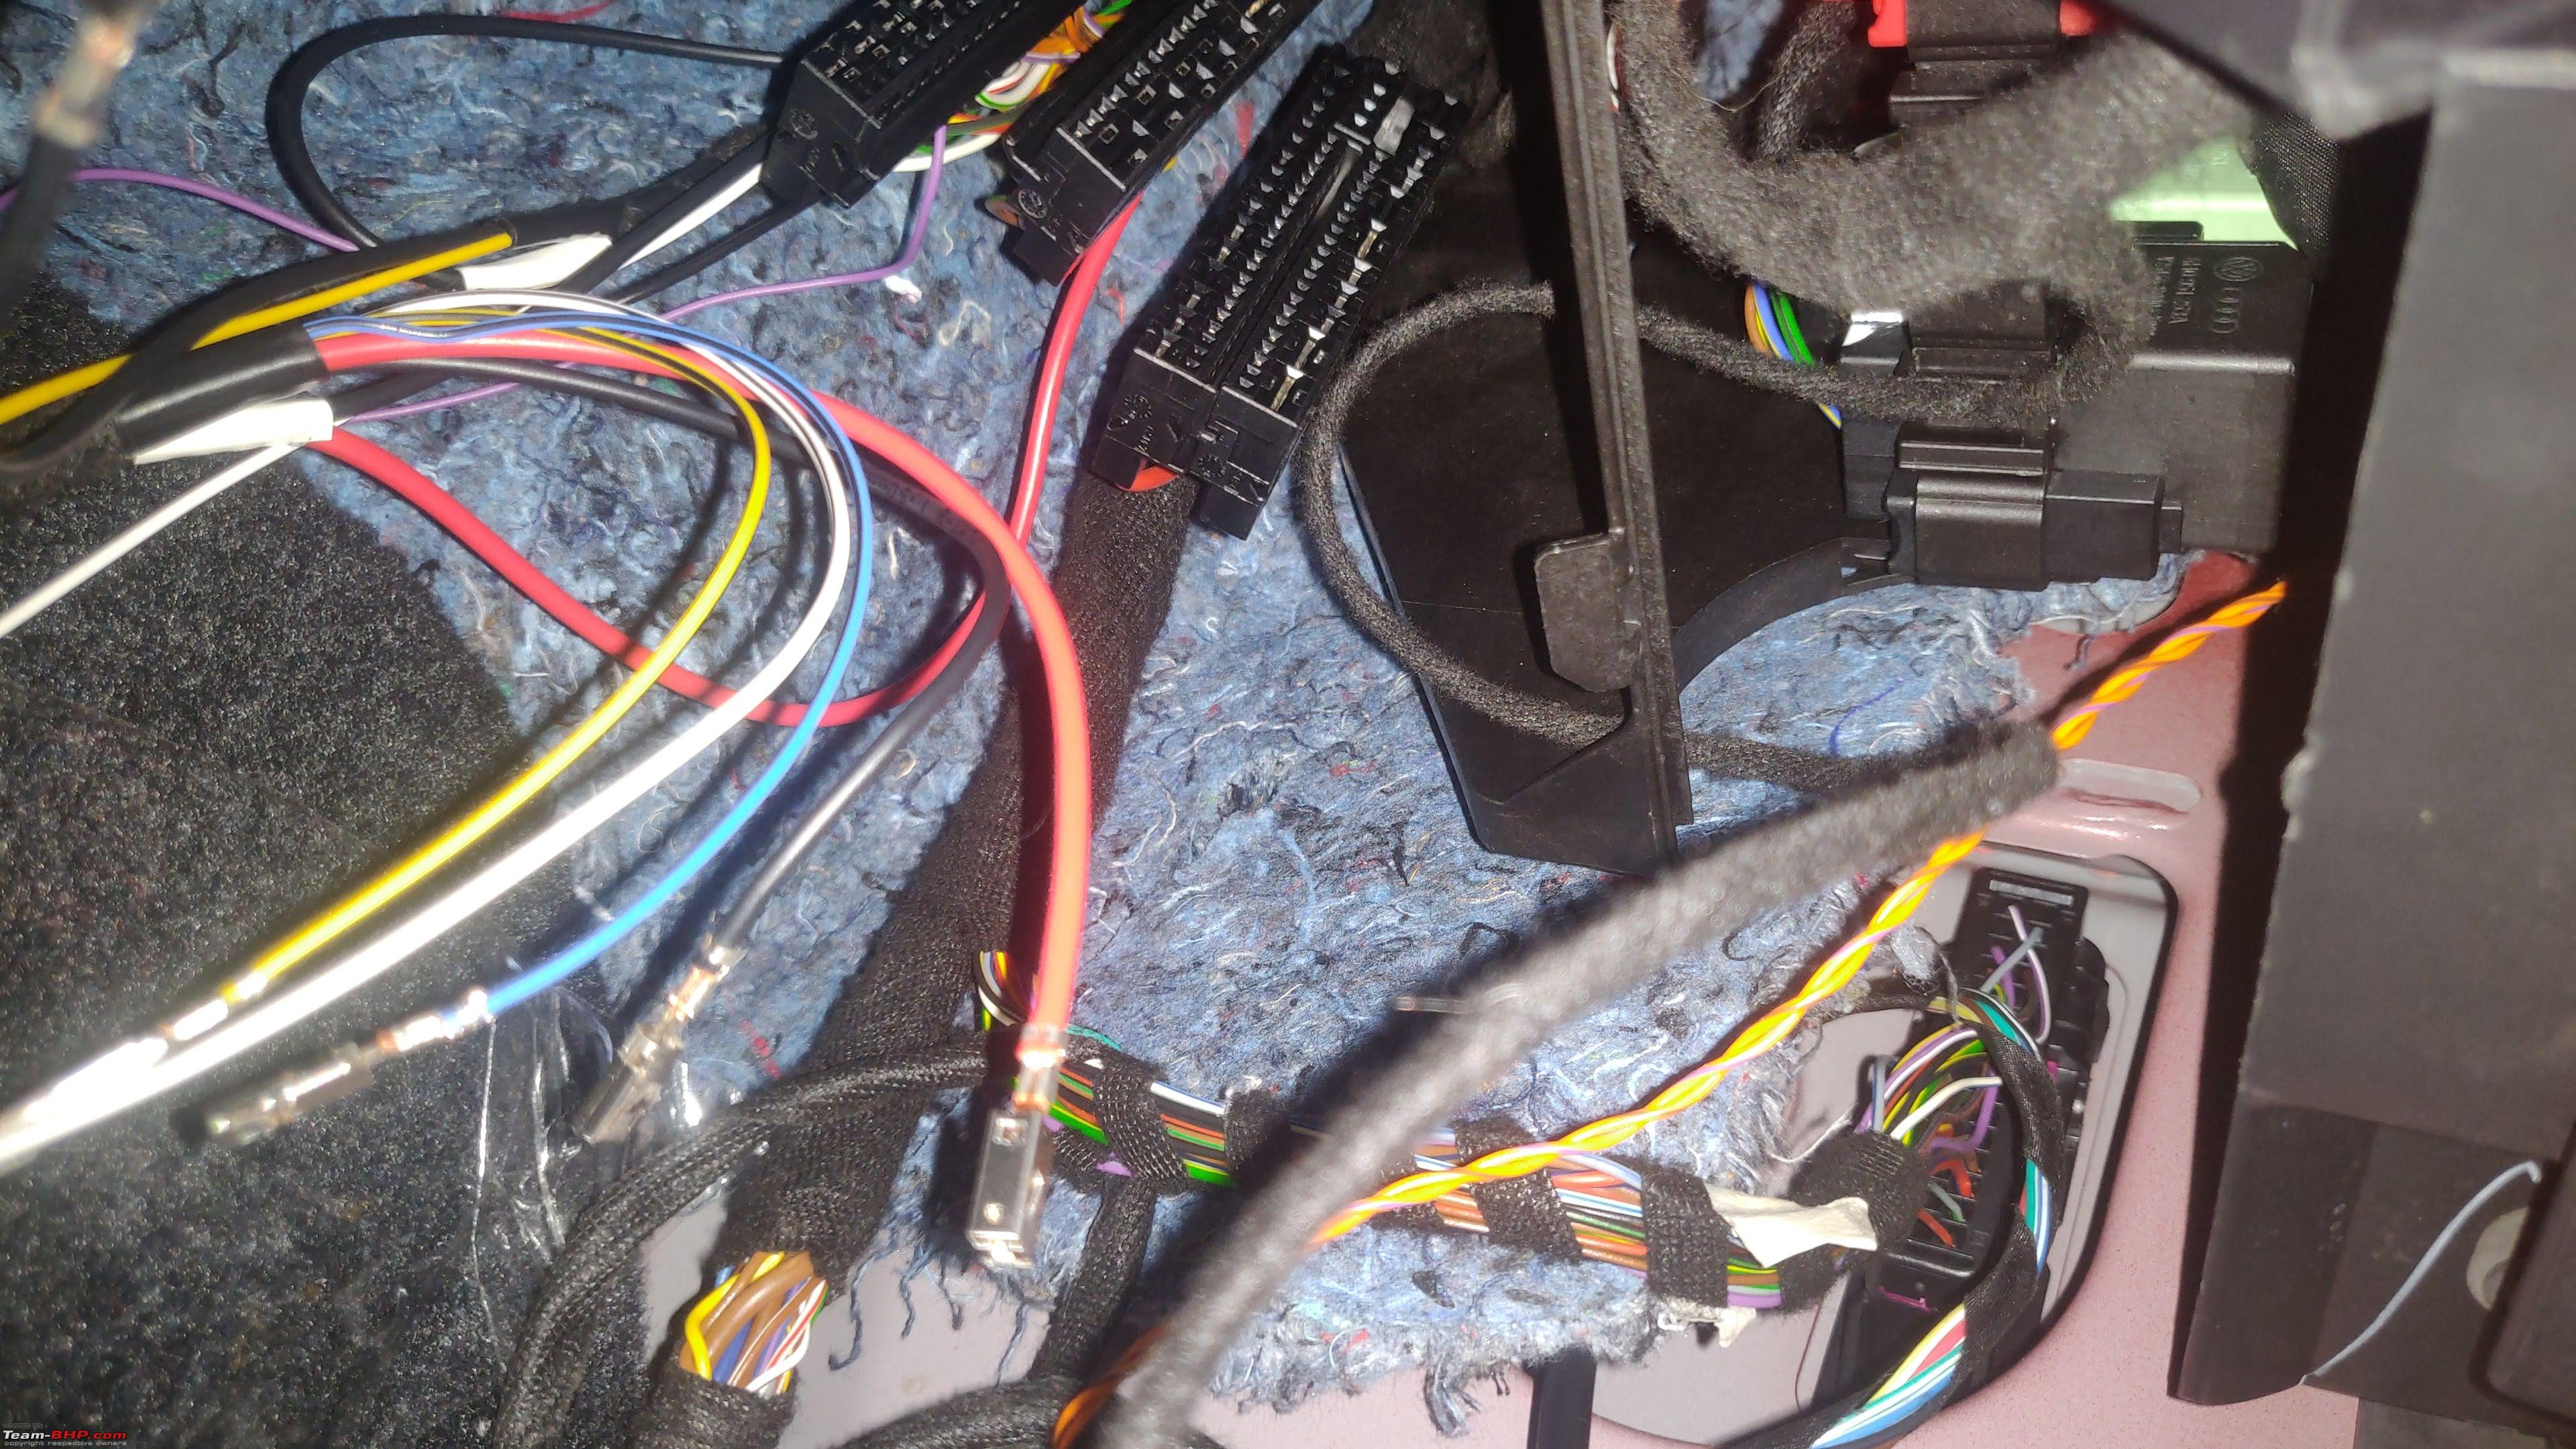 Using some force, these can slide comfortably, but its quite the struggle to put them back together since the harness is tightly taped with automotive tape. Once all the wiring was complete, I plugged the connectors back in and reconnected the battery, and with this step, I thought I was done installing a BCM Max, but there was still a long way to go. 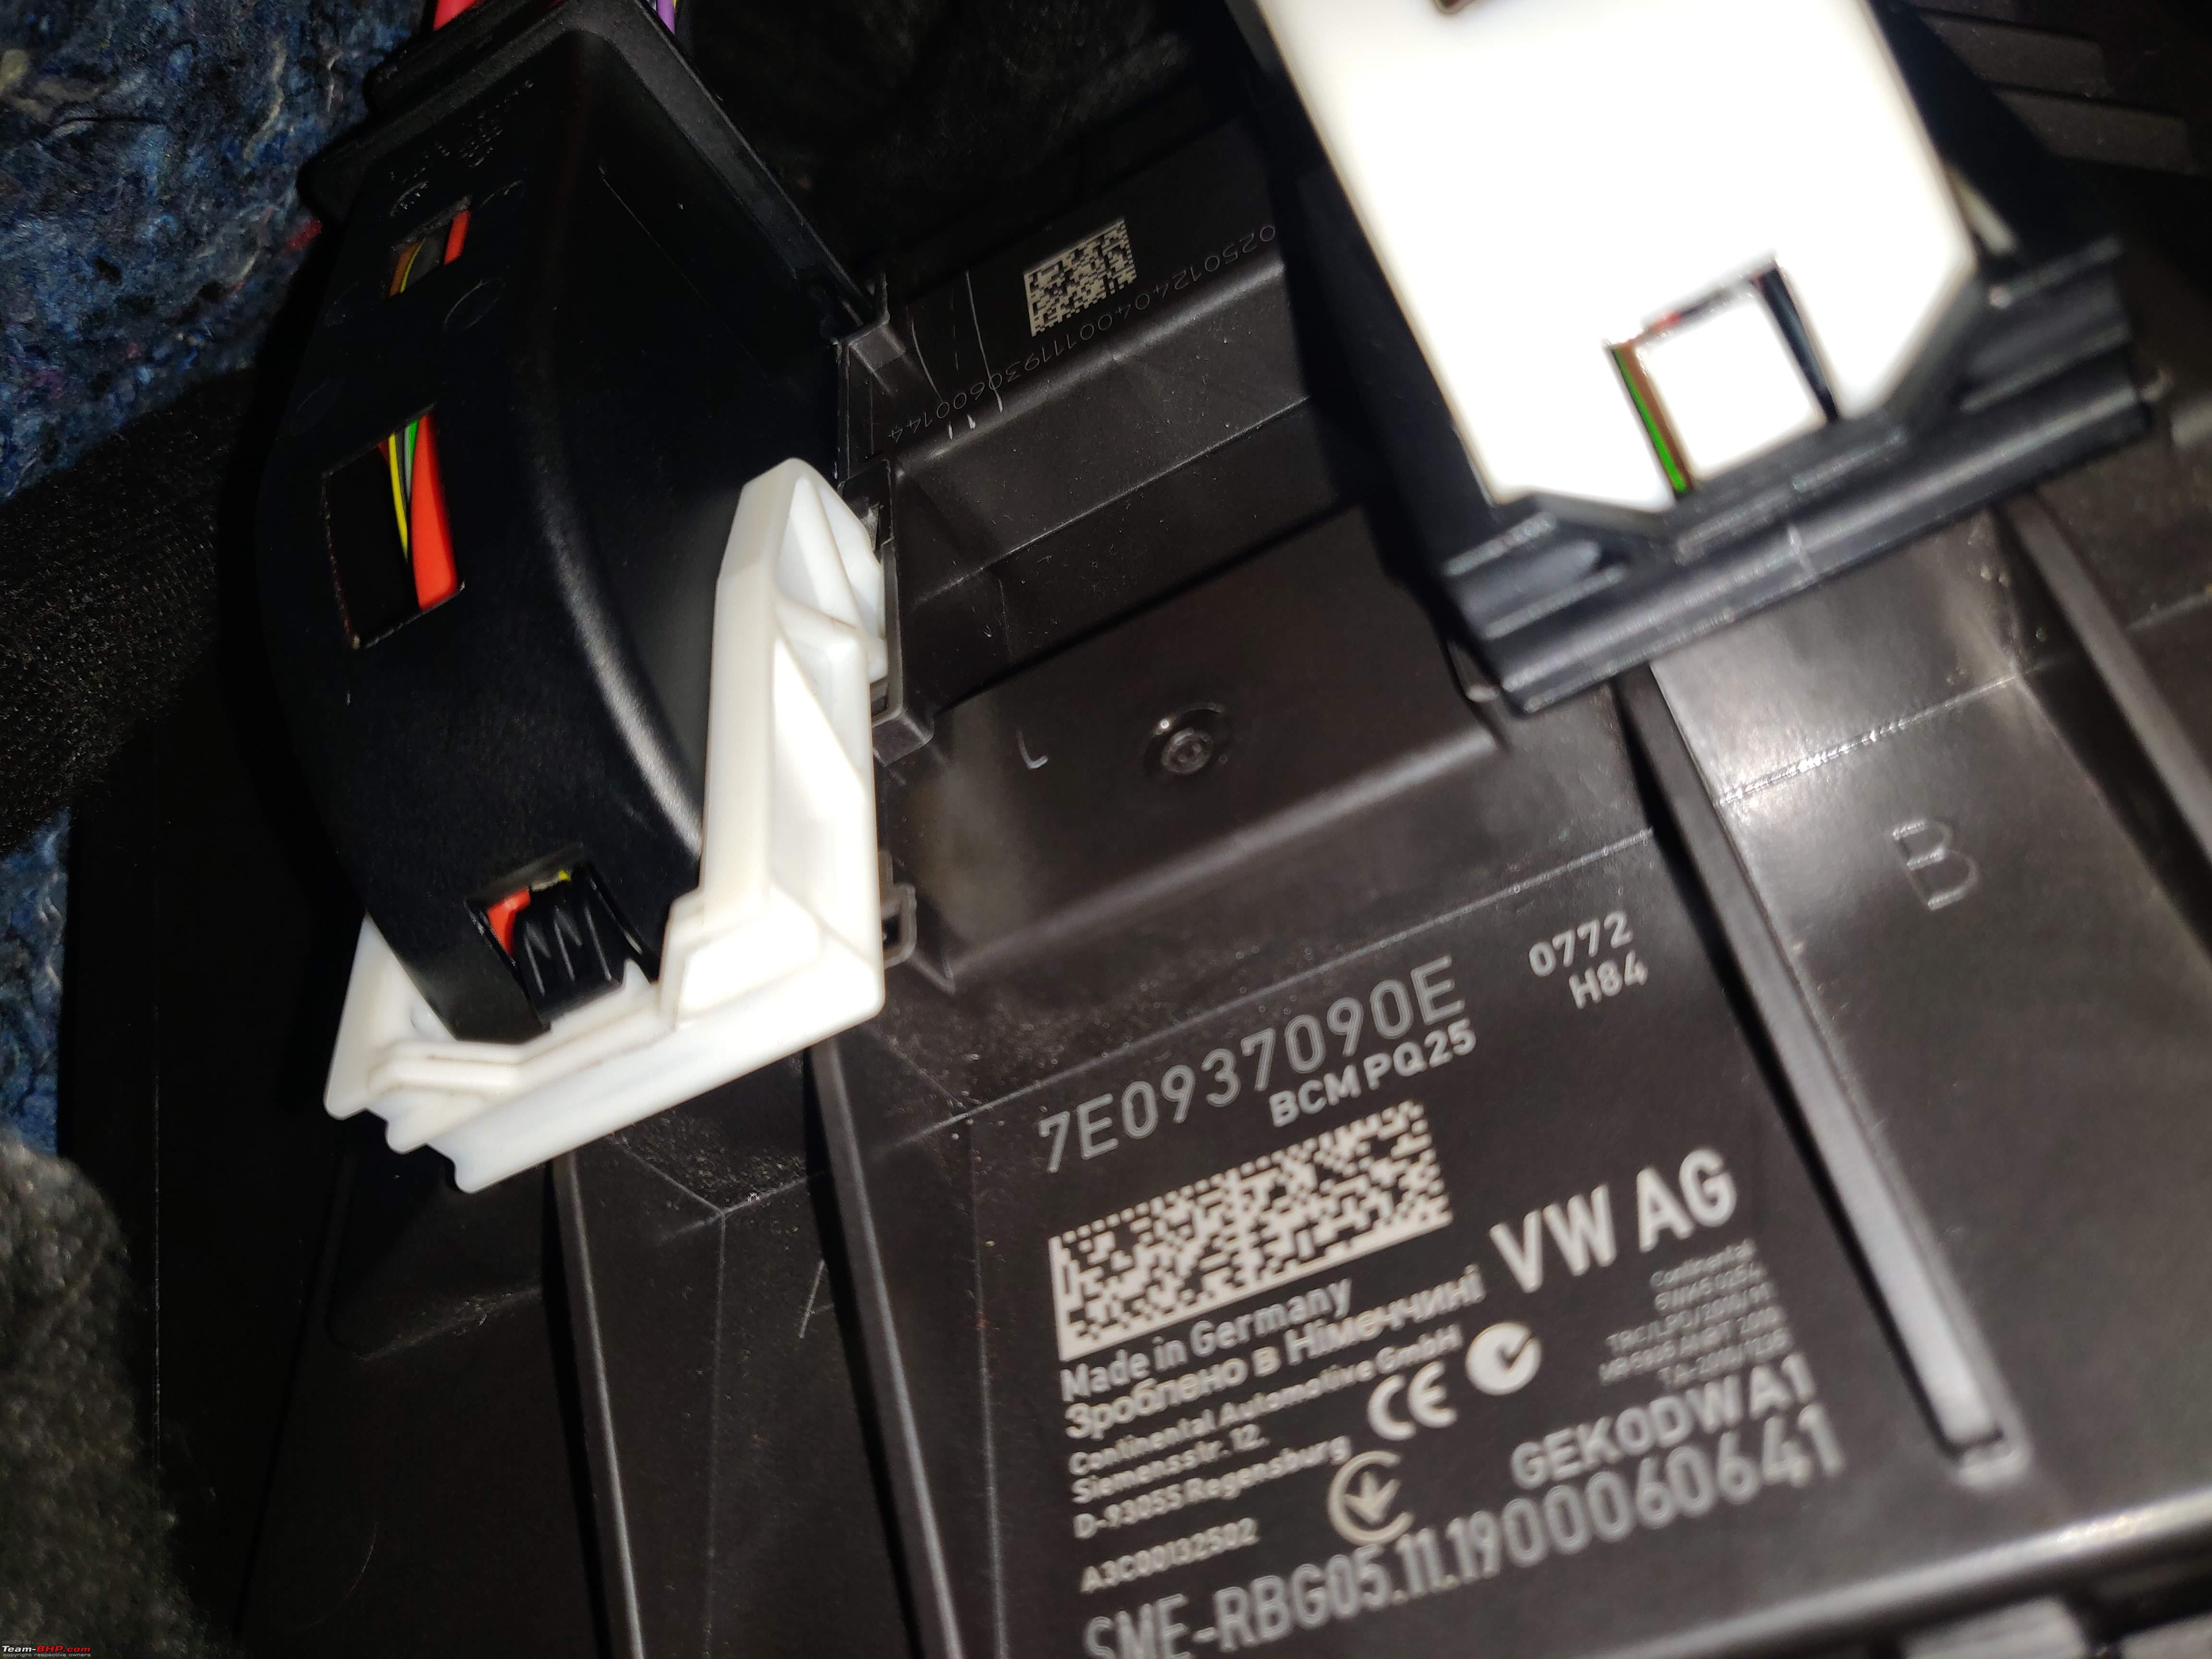 I will reserve my surprises for the next post. |
|
| (16)
Thanks
|
| The following 16 BHPians Thank fluidicjoy for this useful post: | adityan27, audioholic, Avikbrio, AYP, BigBrad, GaryTSI, govigov, gt3t0uring, keroo1099, MayurS, paragsachania, Researcher, sarfraz1997, Varun_HexaGuy, VivekCherian, yesyeswe |
|
5th February 2023, 02:59
| #133 |
| BHPian Join Date: Oct 2020 Location: Pune, San Diego
Posts: 247
Thanked: 2,440 Times
| Polo 6R 1.0 TSI, BCM Max Upgrade Finale : Lots of Learnings 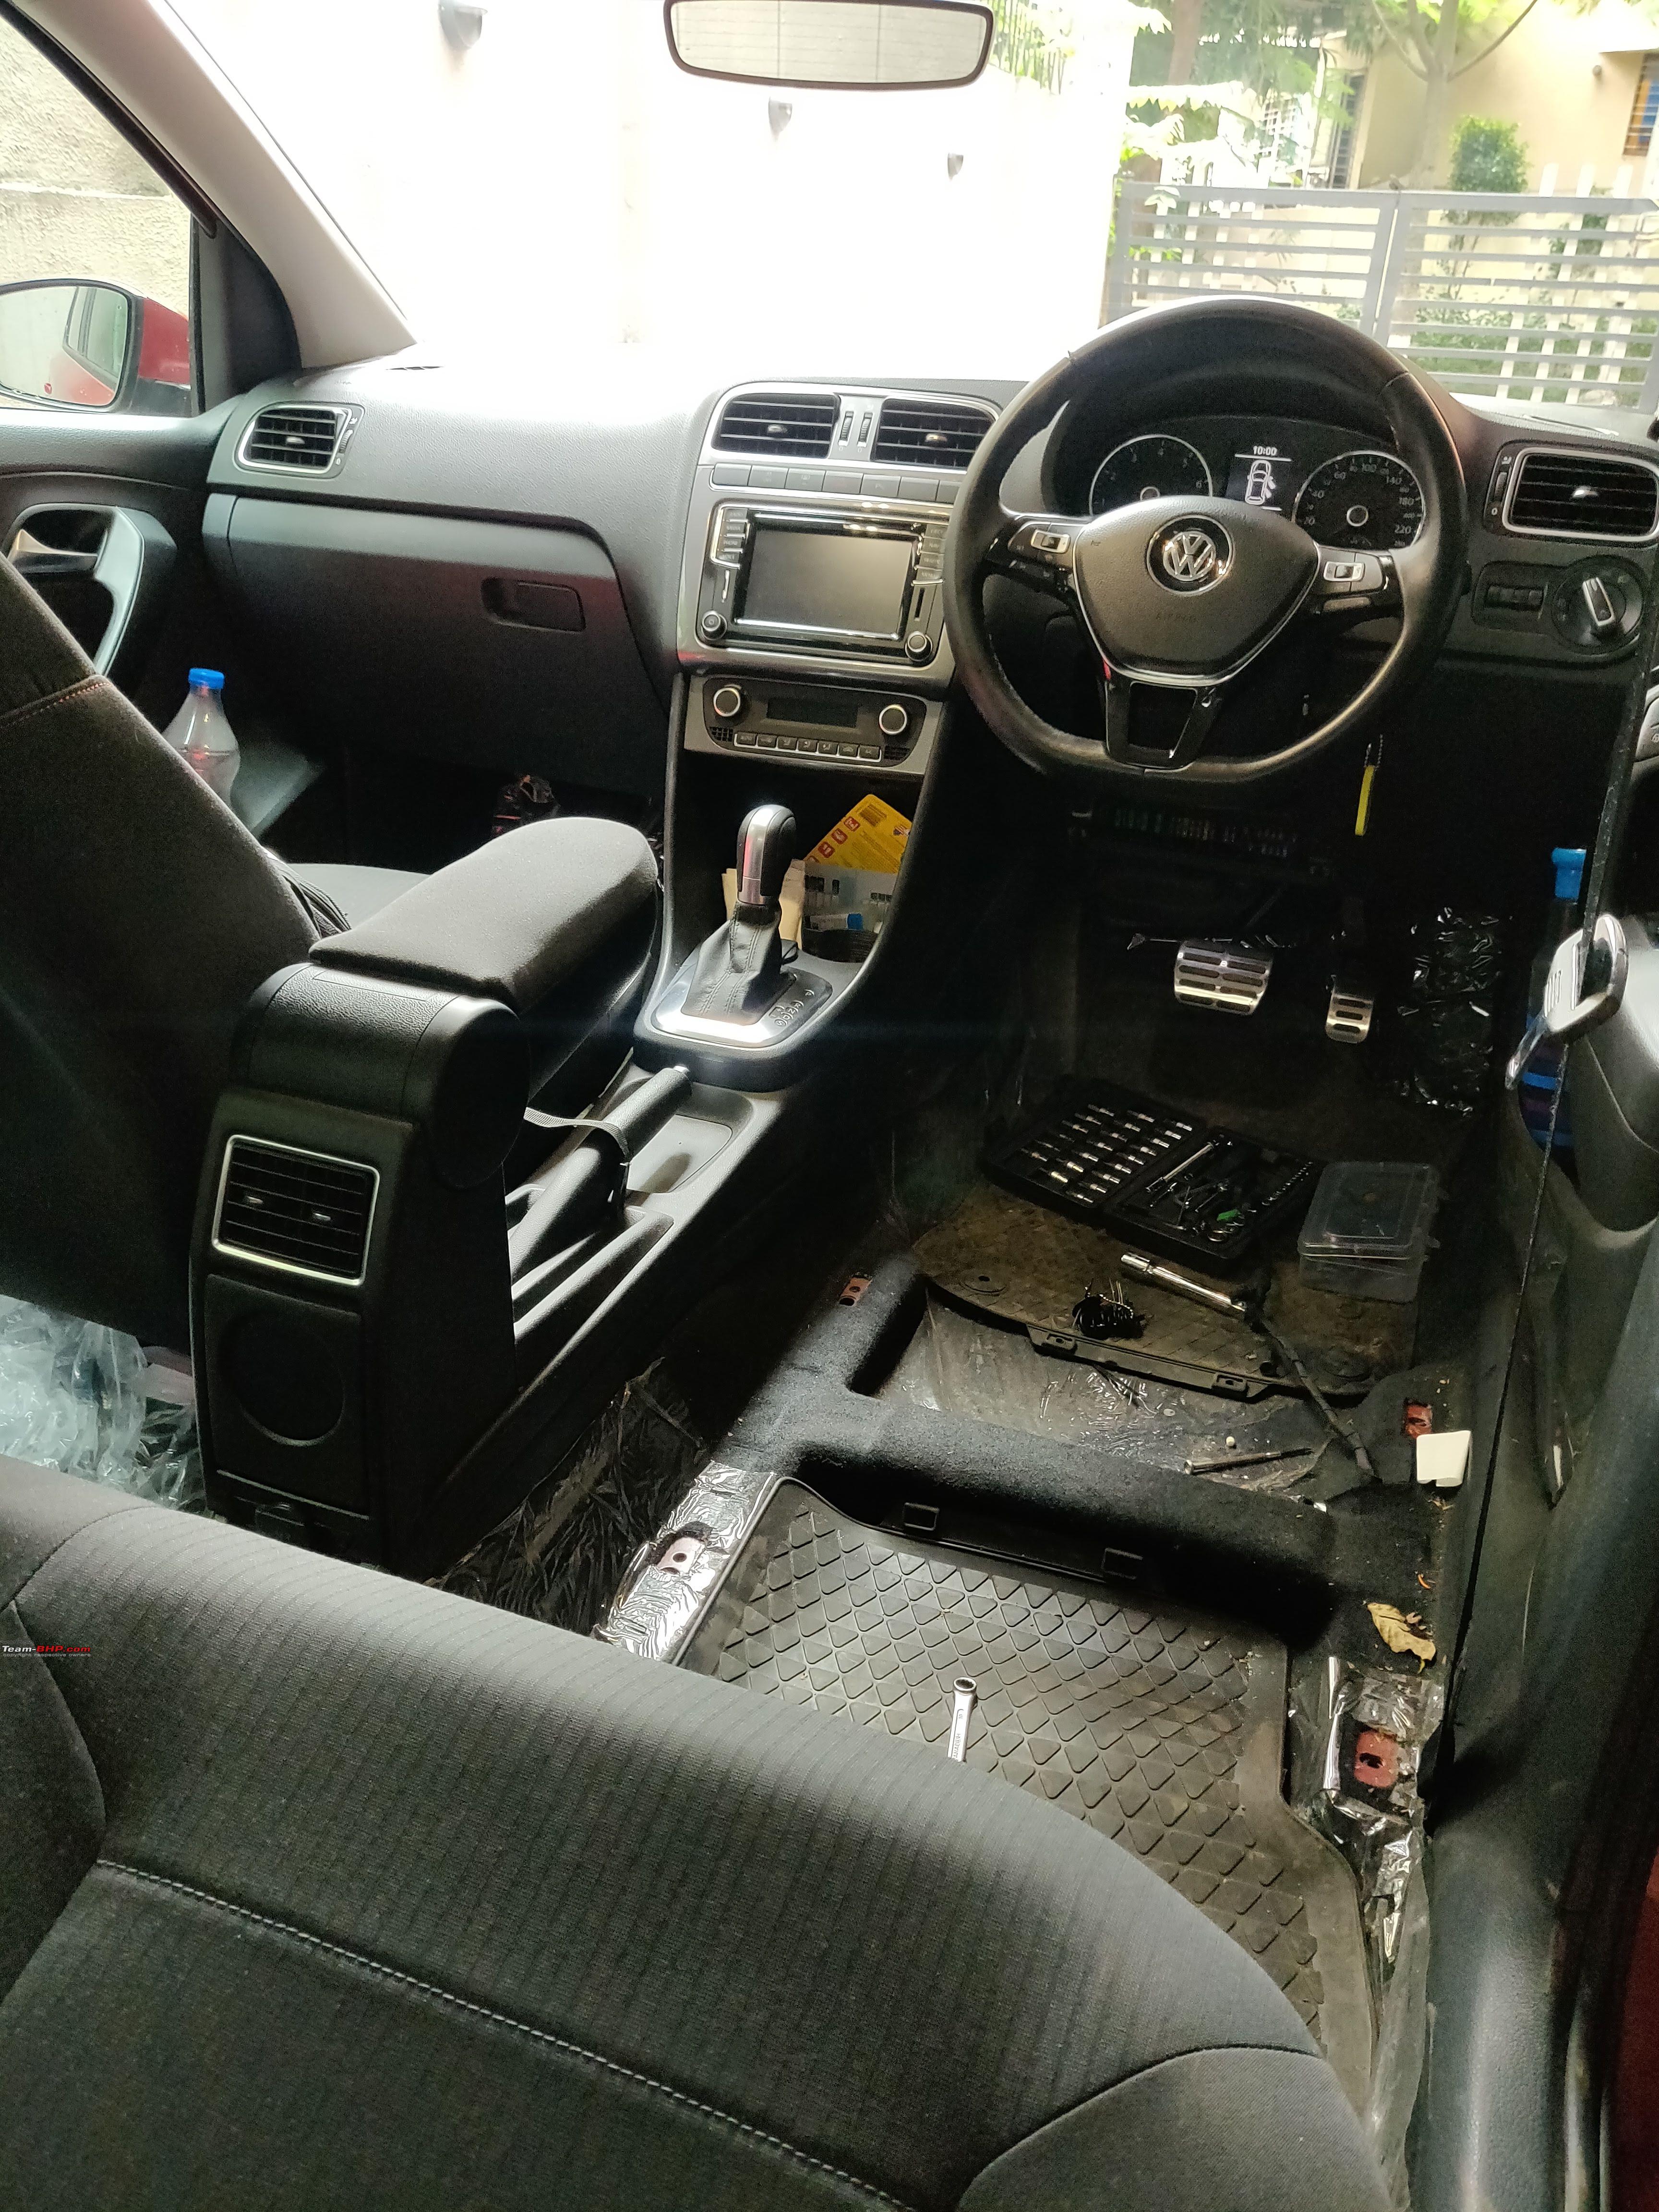 After a lot of acrobatics in my temporary workspace of August 2021, the wiring work was complete and the BCM was installed, it was time to connect the battery and complete the VCDS coding and adaptation work. 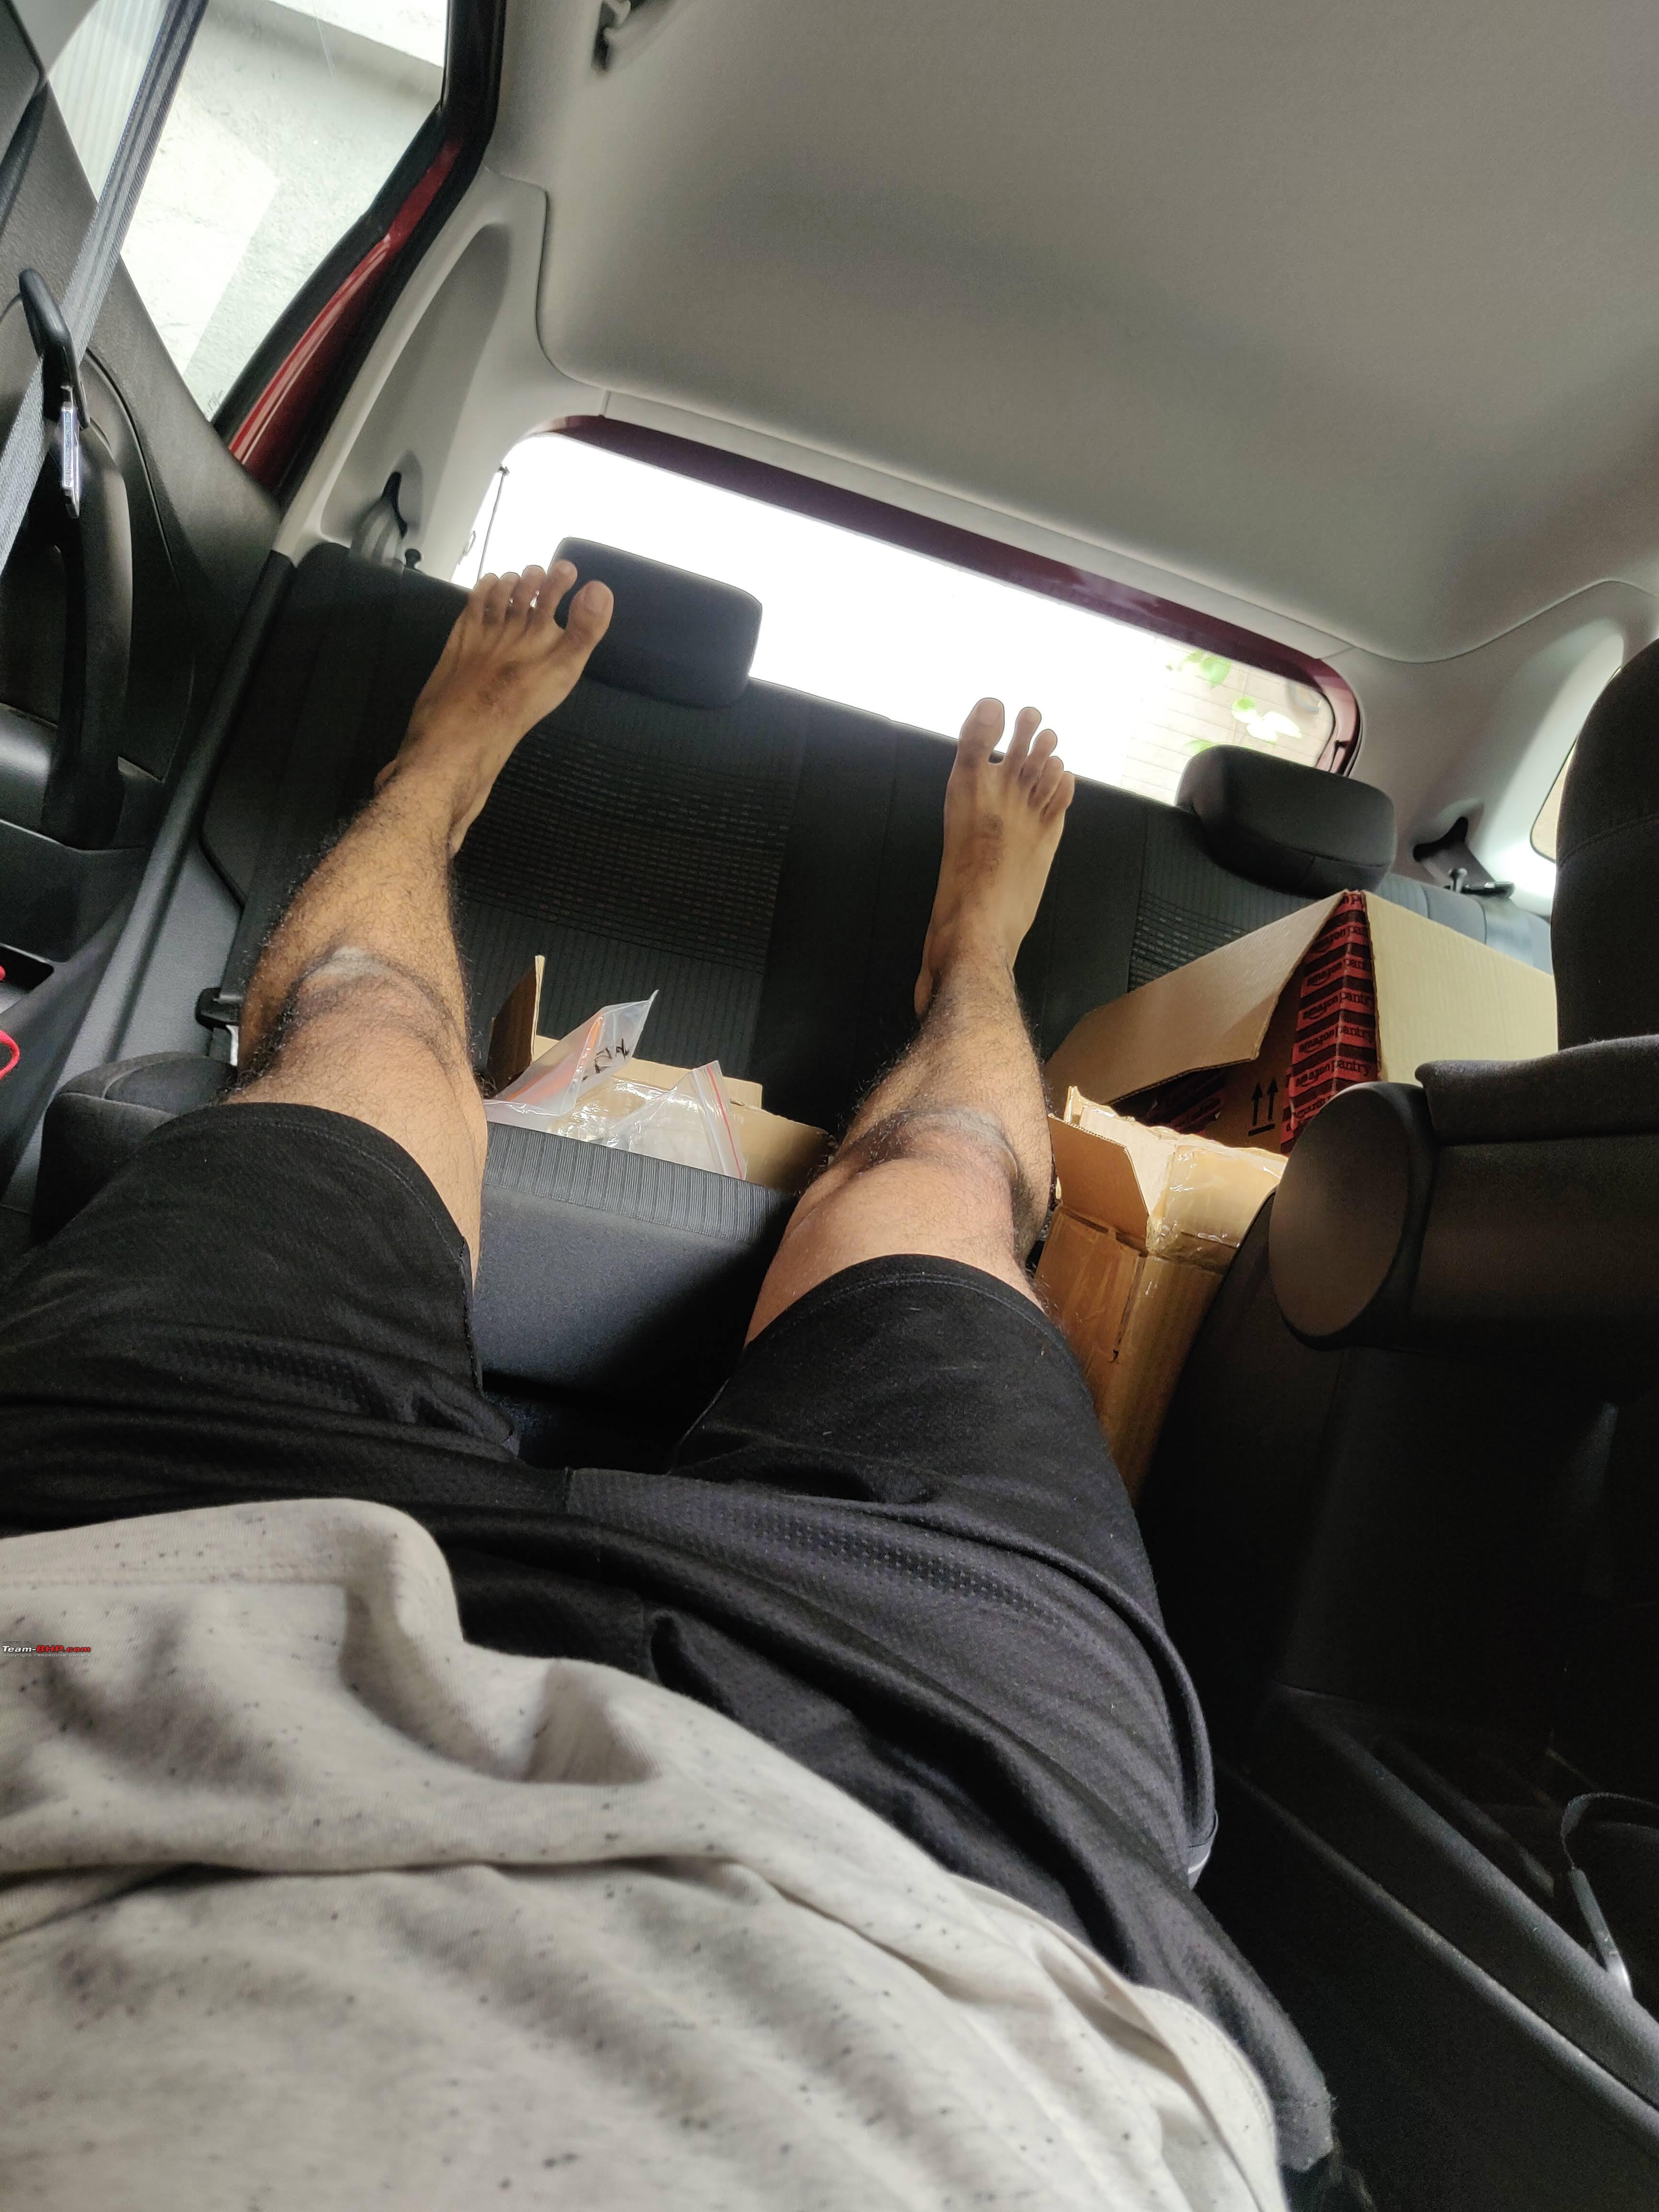 Factory Mode and Key Coding Most BCMs are shipped in the Factory mode and this needs to be deactivated before we can code it completely. You can read more about it here on Gannu's thread (VW Polo DIY: Upgrading the BCM (Body Control Module)). The instructions I found online on multiple platforms did not help me code the remote keys. So, I was without a working remote key-fob for quite a long time. Then my friend Shardul came to my rescue and remotely helped me complete the pairing of the key with the newer BCM. It was Shardul, who told me that most instructions were not best suited for the latest BCM and it was thanks to his experience that I could move ahead and adapt my keys. Batteries Don’t Fail To Amuse Before working with wires, I had taken the negative terminal out to prevent any drains. Then when I was done with all the work and it was time to test the coding and functionality, the car just wouldn’t crank. The voltage was 12.3V and yet the starter just wouldn’t crank. VCDS threw up a fault regarding the Ignition Signal being intermittent, and after checking everything, I realised that one of the BCM connectors was loosely fit. I reconnected the loose connector and the TSI motor roared back to life, making me give out a huge sigh of relieve. Before the BCM connectors were properly fit, I had some intermittent issues with BCM related functions like the Door Locks, Windows etc. Then, I got to test everything and it was all good. I ticked all installed modules in the Installation list and the Auto-Scan had no errors after the coding was complete. After that, the BCM was suitably parametrised to support the Headlights that I intend to use, without which it will not enable headlight control. This is a vehicle specific procedure, and hence BCMs cannot just be swapped, unless you have a matching parameter. I decided to wrap up the work the following evening, but then I noticed on one occasion, that the car was cranking slowly as if there was a drain. The battery dropped from 12.4V to 7.5V in a matter of five minutes so I was sure there was a drain somewhere. There were no blown fuses and parasitic drain tests came negative. Since, it was dark, I decided to call it a night. The next morning, when the battery was reconnected, the voltage was back to 12.3V. Now I was confused. In most cases, when the voltage is 12+ volts, the car in the least tries to crank. In this case, even at 12+ volts on the voltmeter, the car was just refusing to crank. It wasn’t even trying to crank, and so I was wondering what the issue could be. Again, I thought it could be an issue of loose BCM connectors, but this time, that did not seem to be the issue, as the BCM connectors were clamped as tight as they could be. 12.78V and no cranking, made me believe this was not a battery issue and so the witch-hunt was on. Most cases when it's been a bad battery, has been when the car tries to crank, but doesn't manage to start, but this was clearly different.  I called up all the experts I knew, and sadly they were all busy. I was convinced there was some mistake somewhere. So I rechecked all fusible links, fuses, wiring changes I had made and could not find a mistake anywhere. There was no short in the car that the multimeter could detect and so I was genuinely at a loss. The mindset and morale was low and I momentarily gave up trying to figure out what was wrong. Some friends thought it was a faulty BCM which was either malfunctioning or perhaps not connecting properly, but nobody I knew who had installed BCM Max had ever reported an instance like this. My only hope was to try another BCM, but BCM Max is not something which is commonly found lying around to try. The conspiracy theories roared in, like the BCM must have been factory rejected for having a battery drain and hence available on sale, but none of these theories highlighted a possible solution that I could implement. The next few days were not the best days of my week, as I watched my car sit idle in the parking lot. It was frankly a demoralising site. A perfectly drivable, enjoyable TSI was sitting idle in the garage because I was too obsessed with making it better. And to make things worse, I was moving abroad for my Masters the next week. I wanted to do everything right before I left, but I started doubting my choices. I thought I wanted to do too much in too little time. After some retrospection, I made up my mind to not fret and be upset before I was to leave home and was mentally prepared to face any consequences and conflicts with dad because of a job that seemed to not have gone so right. I quickly realised that for someone like me who was shortly about to leave home, a dead car should be the least of my concerns and so I began to get over it, and my dad's words, "Love living things, not non-living things" helped me feel comfortable in a tough time like this. Calling the VW Doctor A few days later, when Nikhil Patil was finally free, Nikhil, Sheethal and Joe, all passionate car lovers and my friends, came home to check the problem. Nikhil had a quick look, inspected some basic electrical components and frowned and asked me for a pair of jumper cables. His diagnostics did not take longer than a minute, as he checked different components and already had a confirmed diagnosis for me. 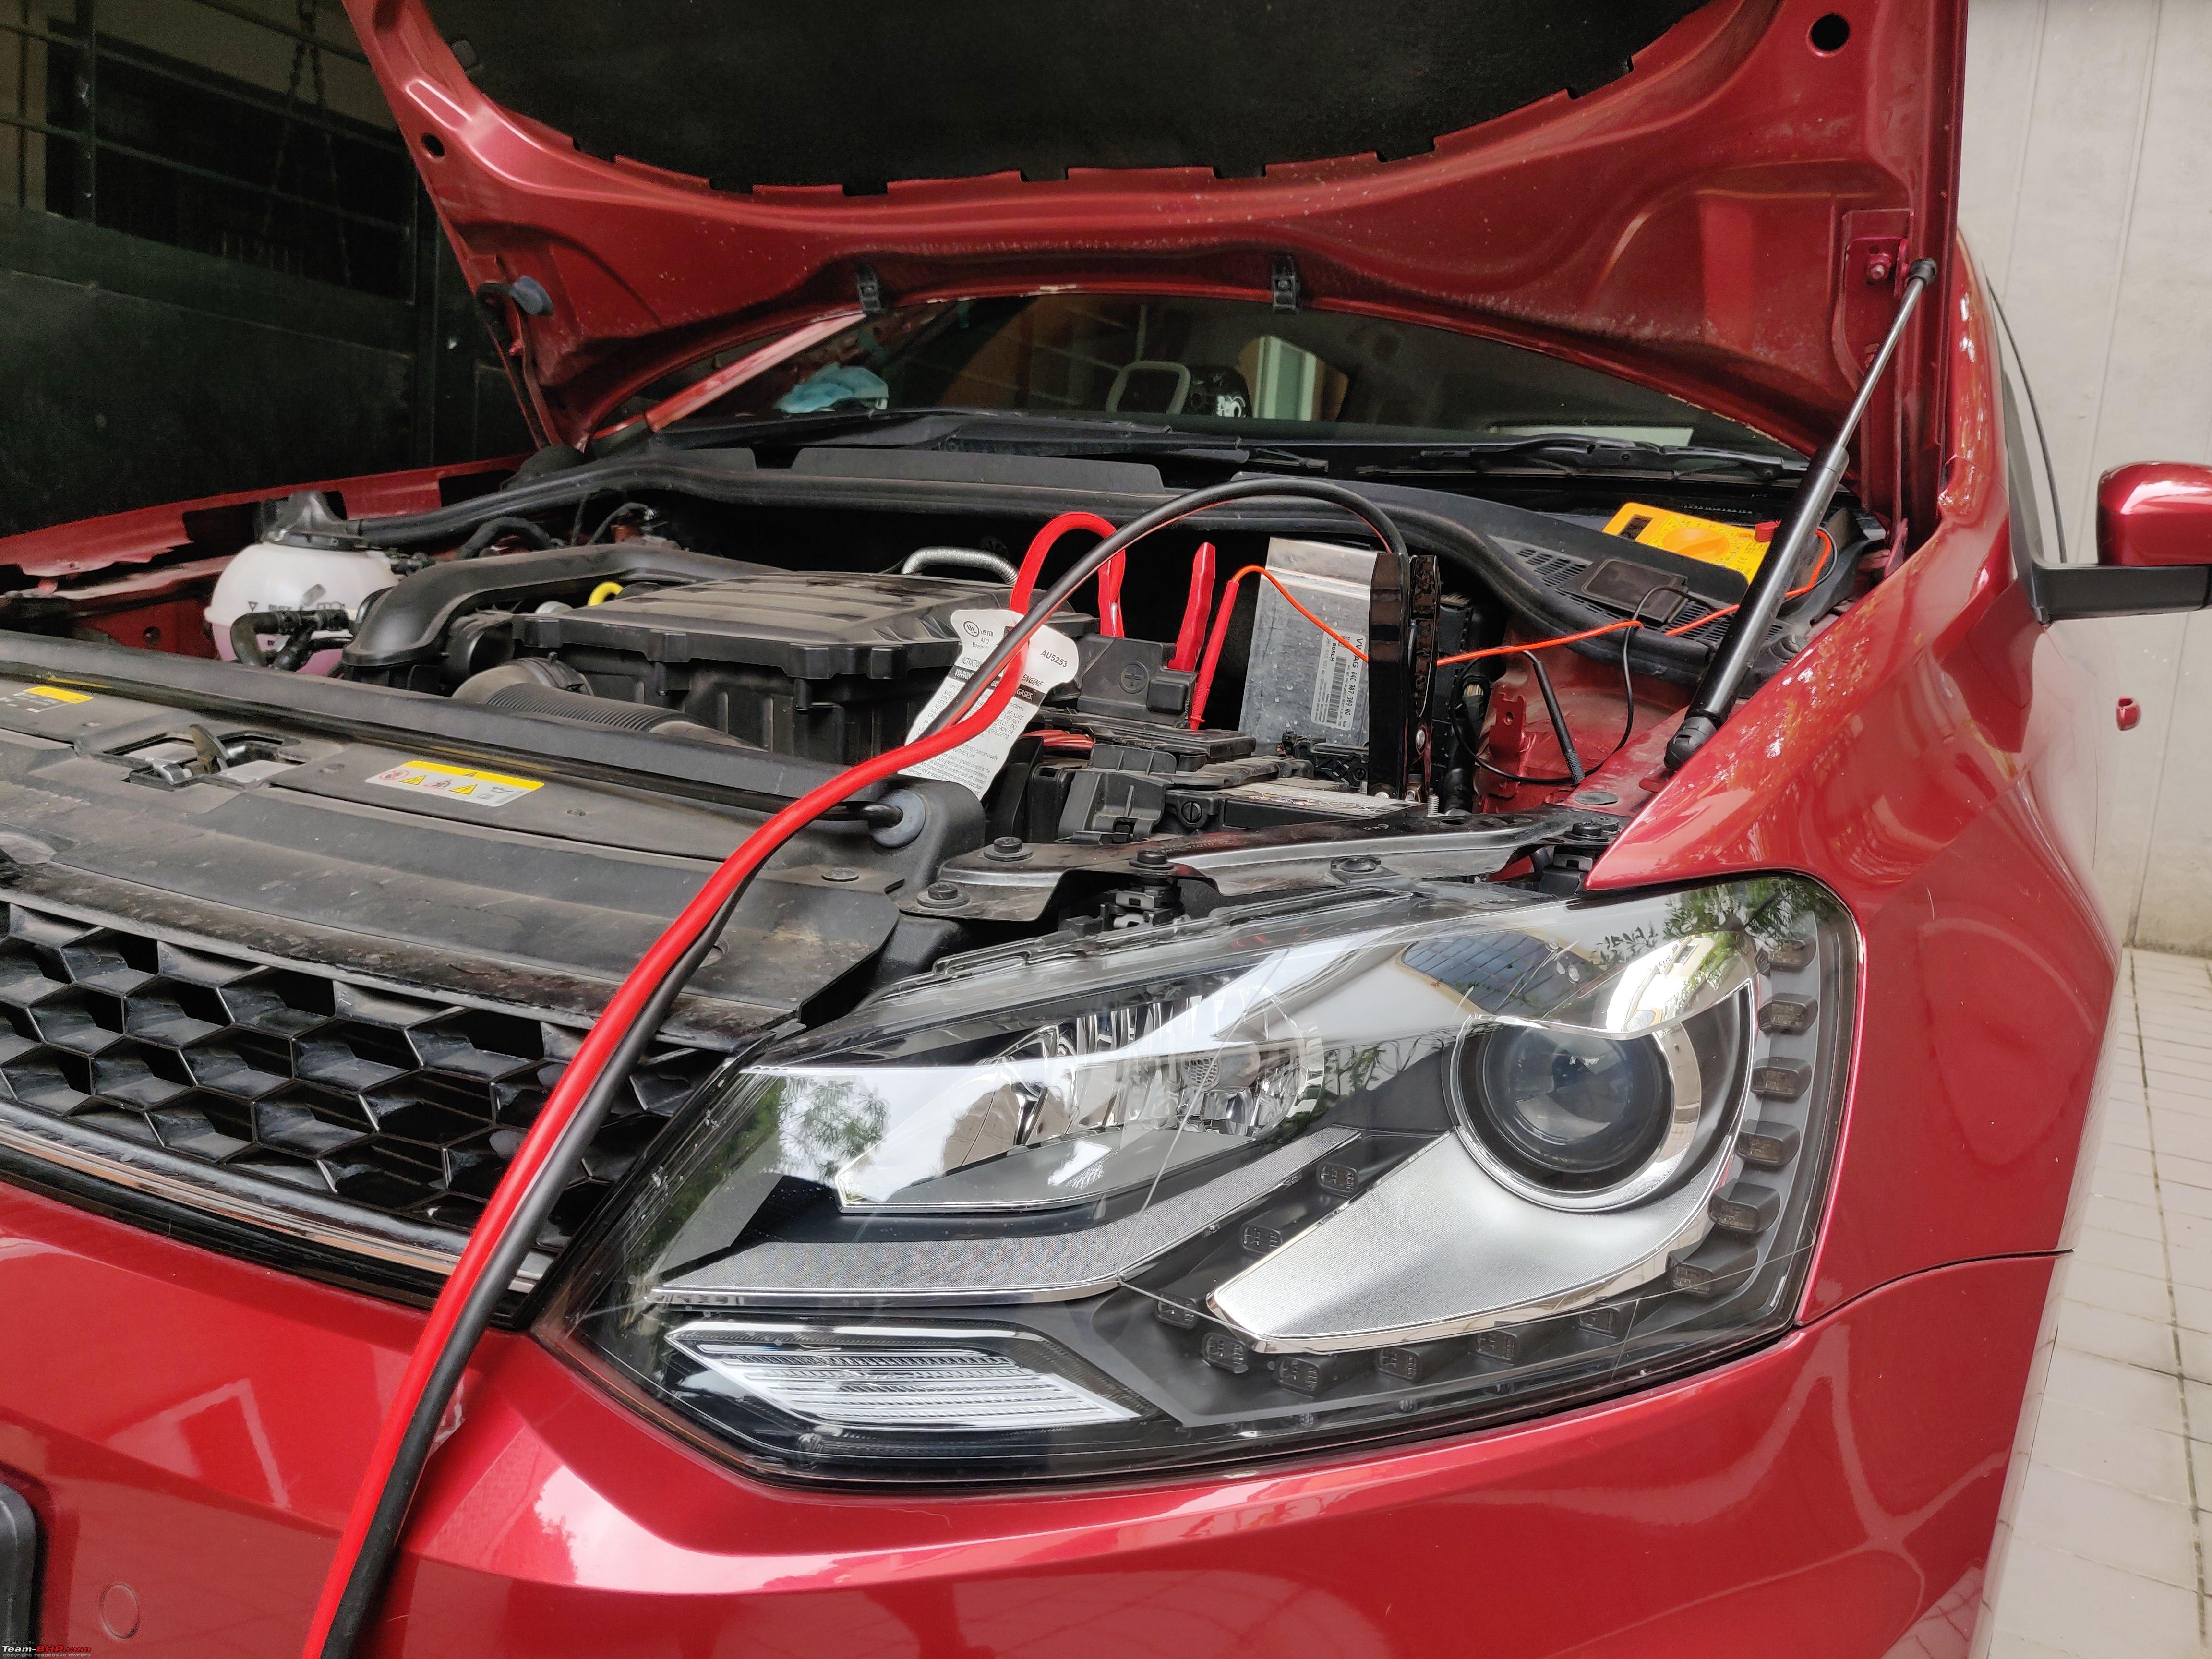 I was stumped. I thought of every possible problem, double-checked on it, and never even thought of jumping the battery. This is perhaps because the electronics were working fine and the voltmeter gave it a clean chit for voltage. Never in my right mind did I suspect I should jump the car first. I was so obsessed with finding a fault or a short circuit in the car, that I forgot the most basic step. The Polo's elder sibling was then roped in for a jump-start. 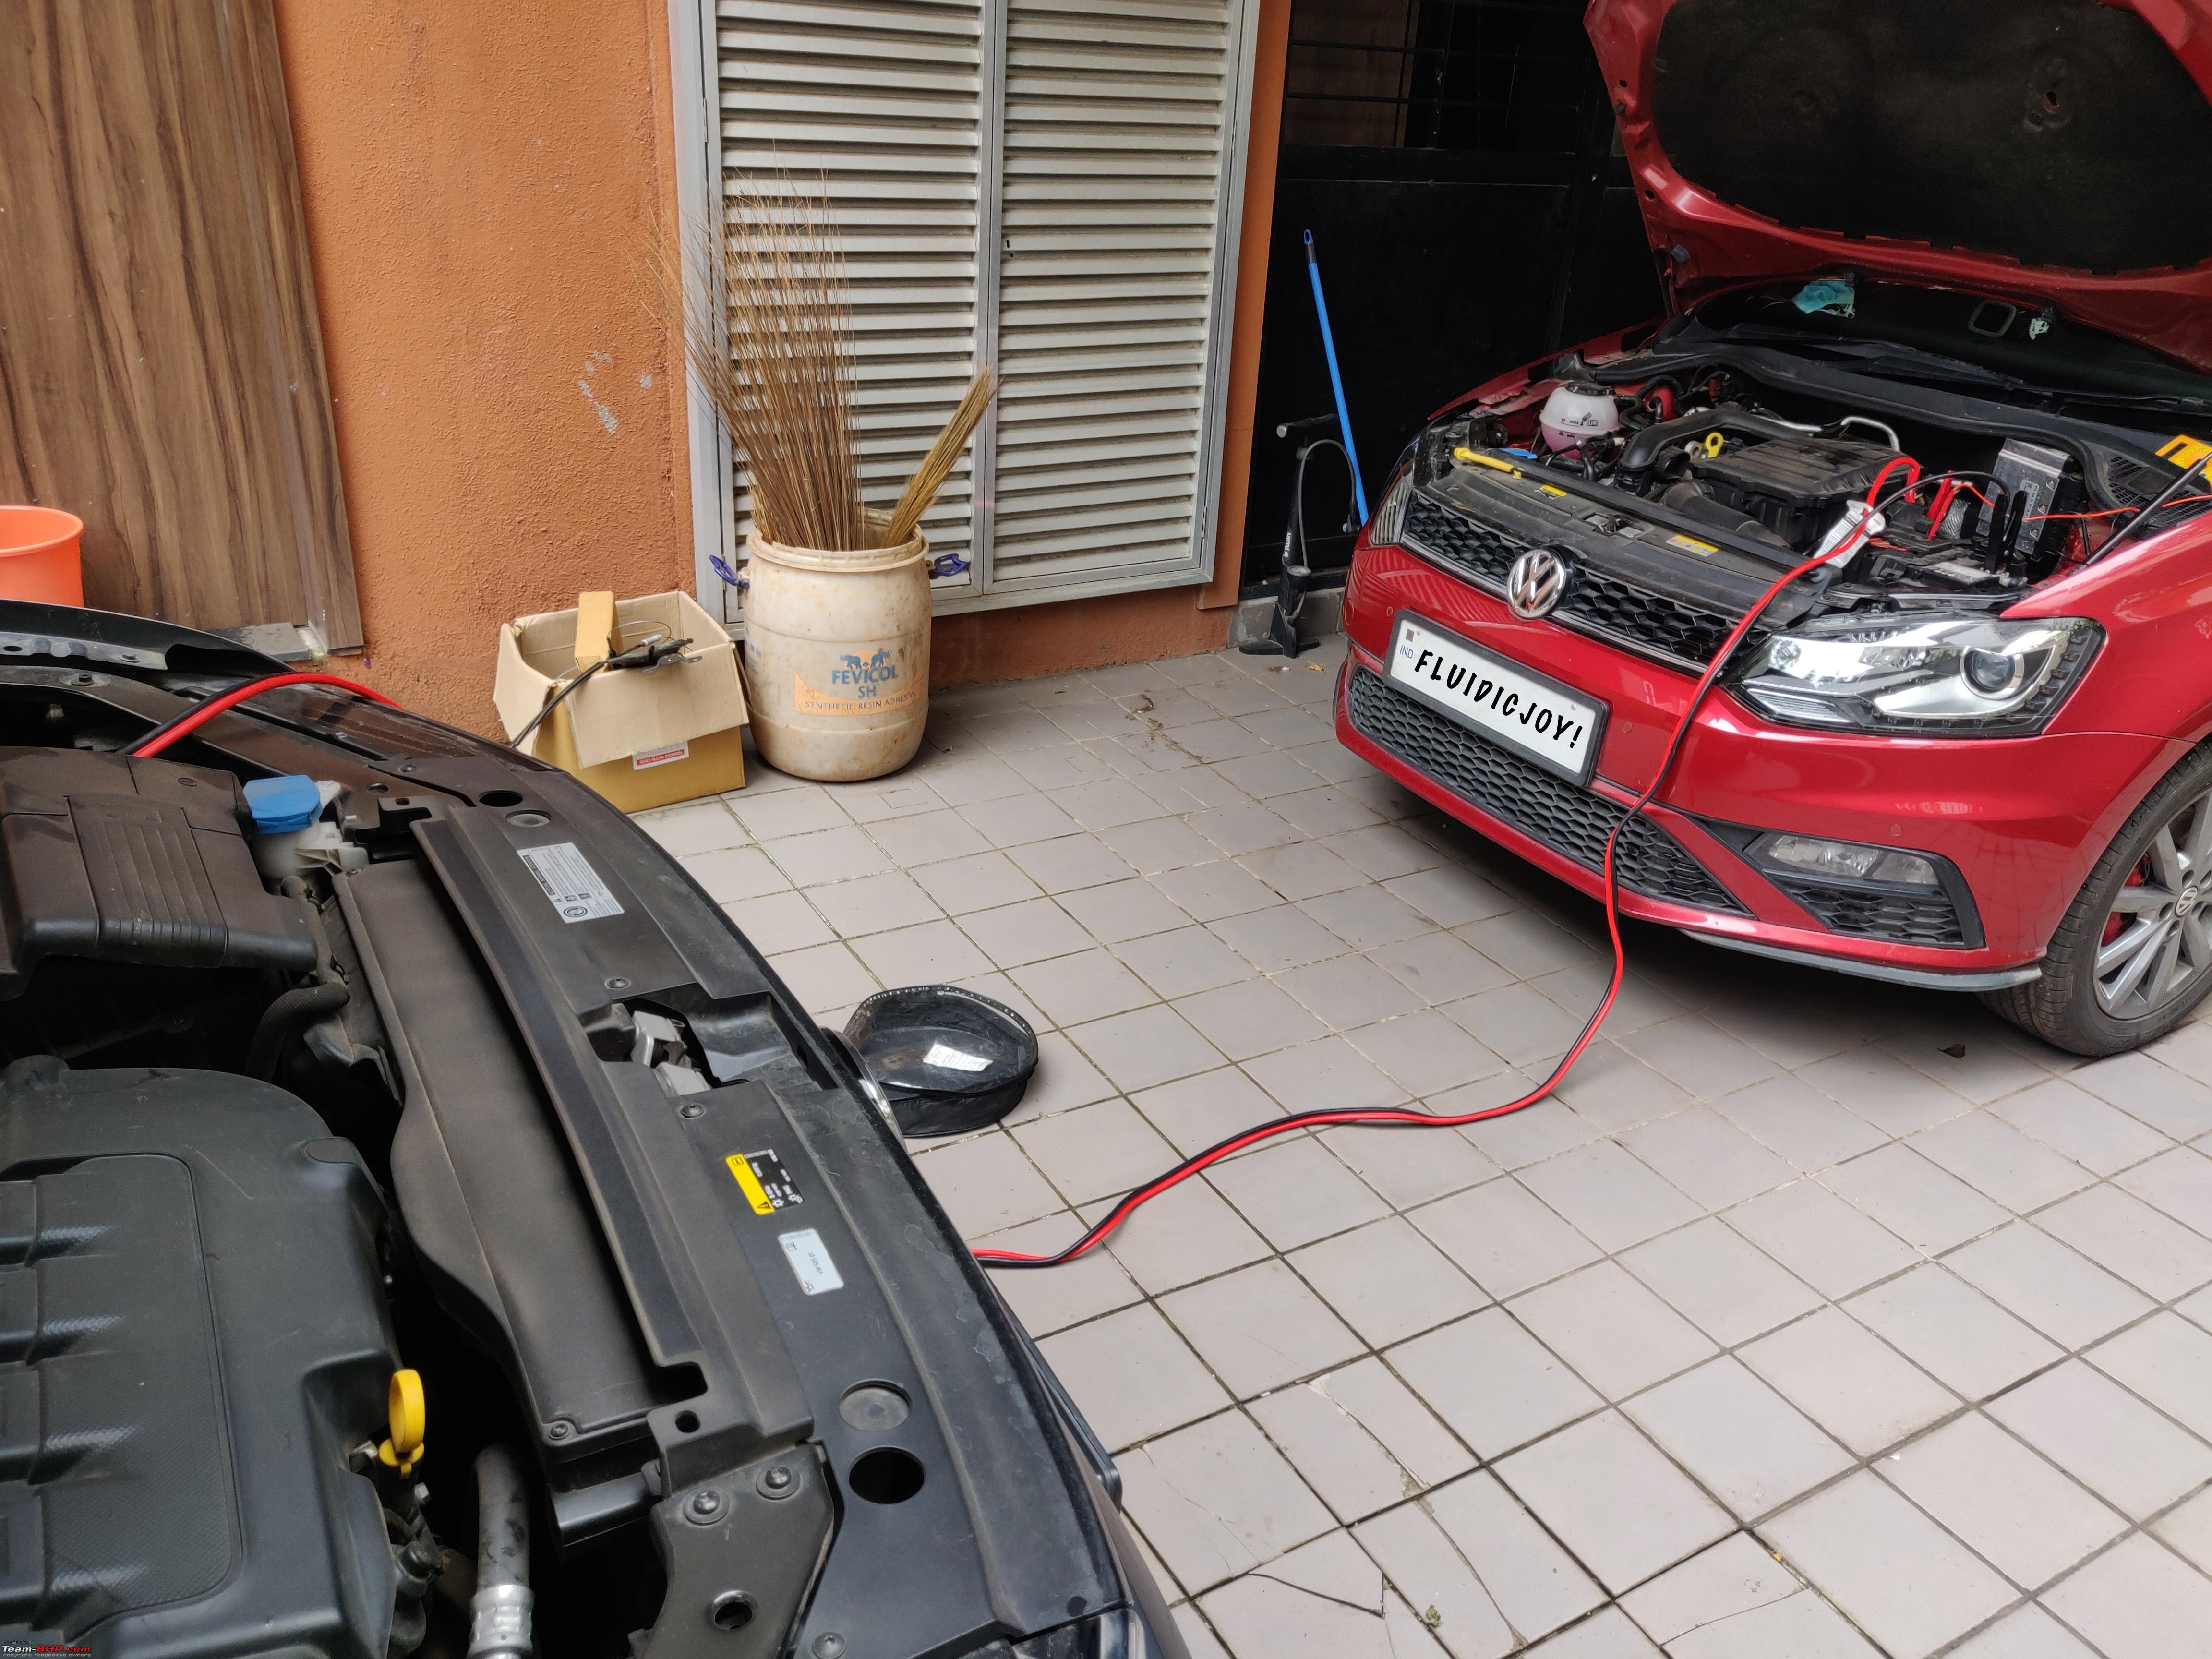 Well, some people are called the doctor for a reason, and Nikhil Patil is undoubtedly Dr. Nikhil Patil, VW Skoda Audi and beyond, for his passion, experience and expertise in German cars better than the manufacturer made them. Confidence inspiring issues like these, have made it a no-brainer for me to recommend Nikhil and his team for all retrofit tasks. I dug around a little after everything was up and running and realised that unlike the BCM High, BCM Max had an inbuilt battery management mode which was why most electronics like locks and windows were dead when the BCM detected a weak battery. That being said, the 1.0 TSI has a really small EXIDE battery which probably drained really quickly when I was busy working on the car. This minor hiccup took 2 days of my time but finally, my worst nightmares were behind me.  Wrapping Up, Total Work Time Wrapping up the wires and packing trims was a slightly boring task, but I completed it the next day, and the car was ready to roll out after being idle for nearly a week. I realised how much I missed this engine, when I was finally revving on the expressway, on my way to one of my favourite places, The Mechanix Automotive, Baner, with a new set of features on offer. 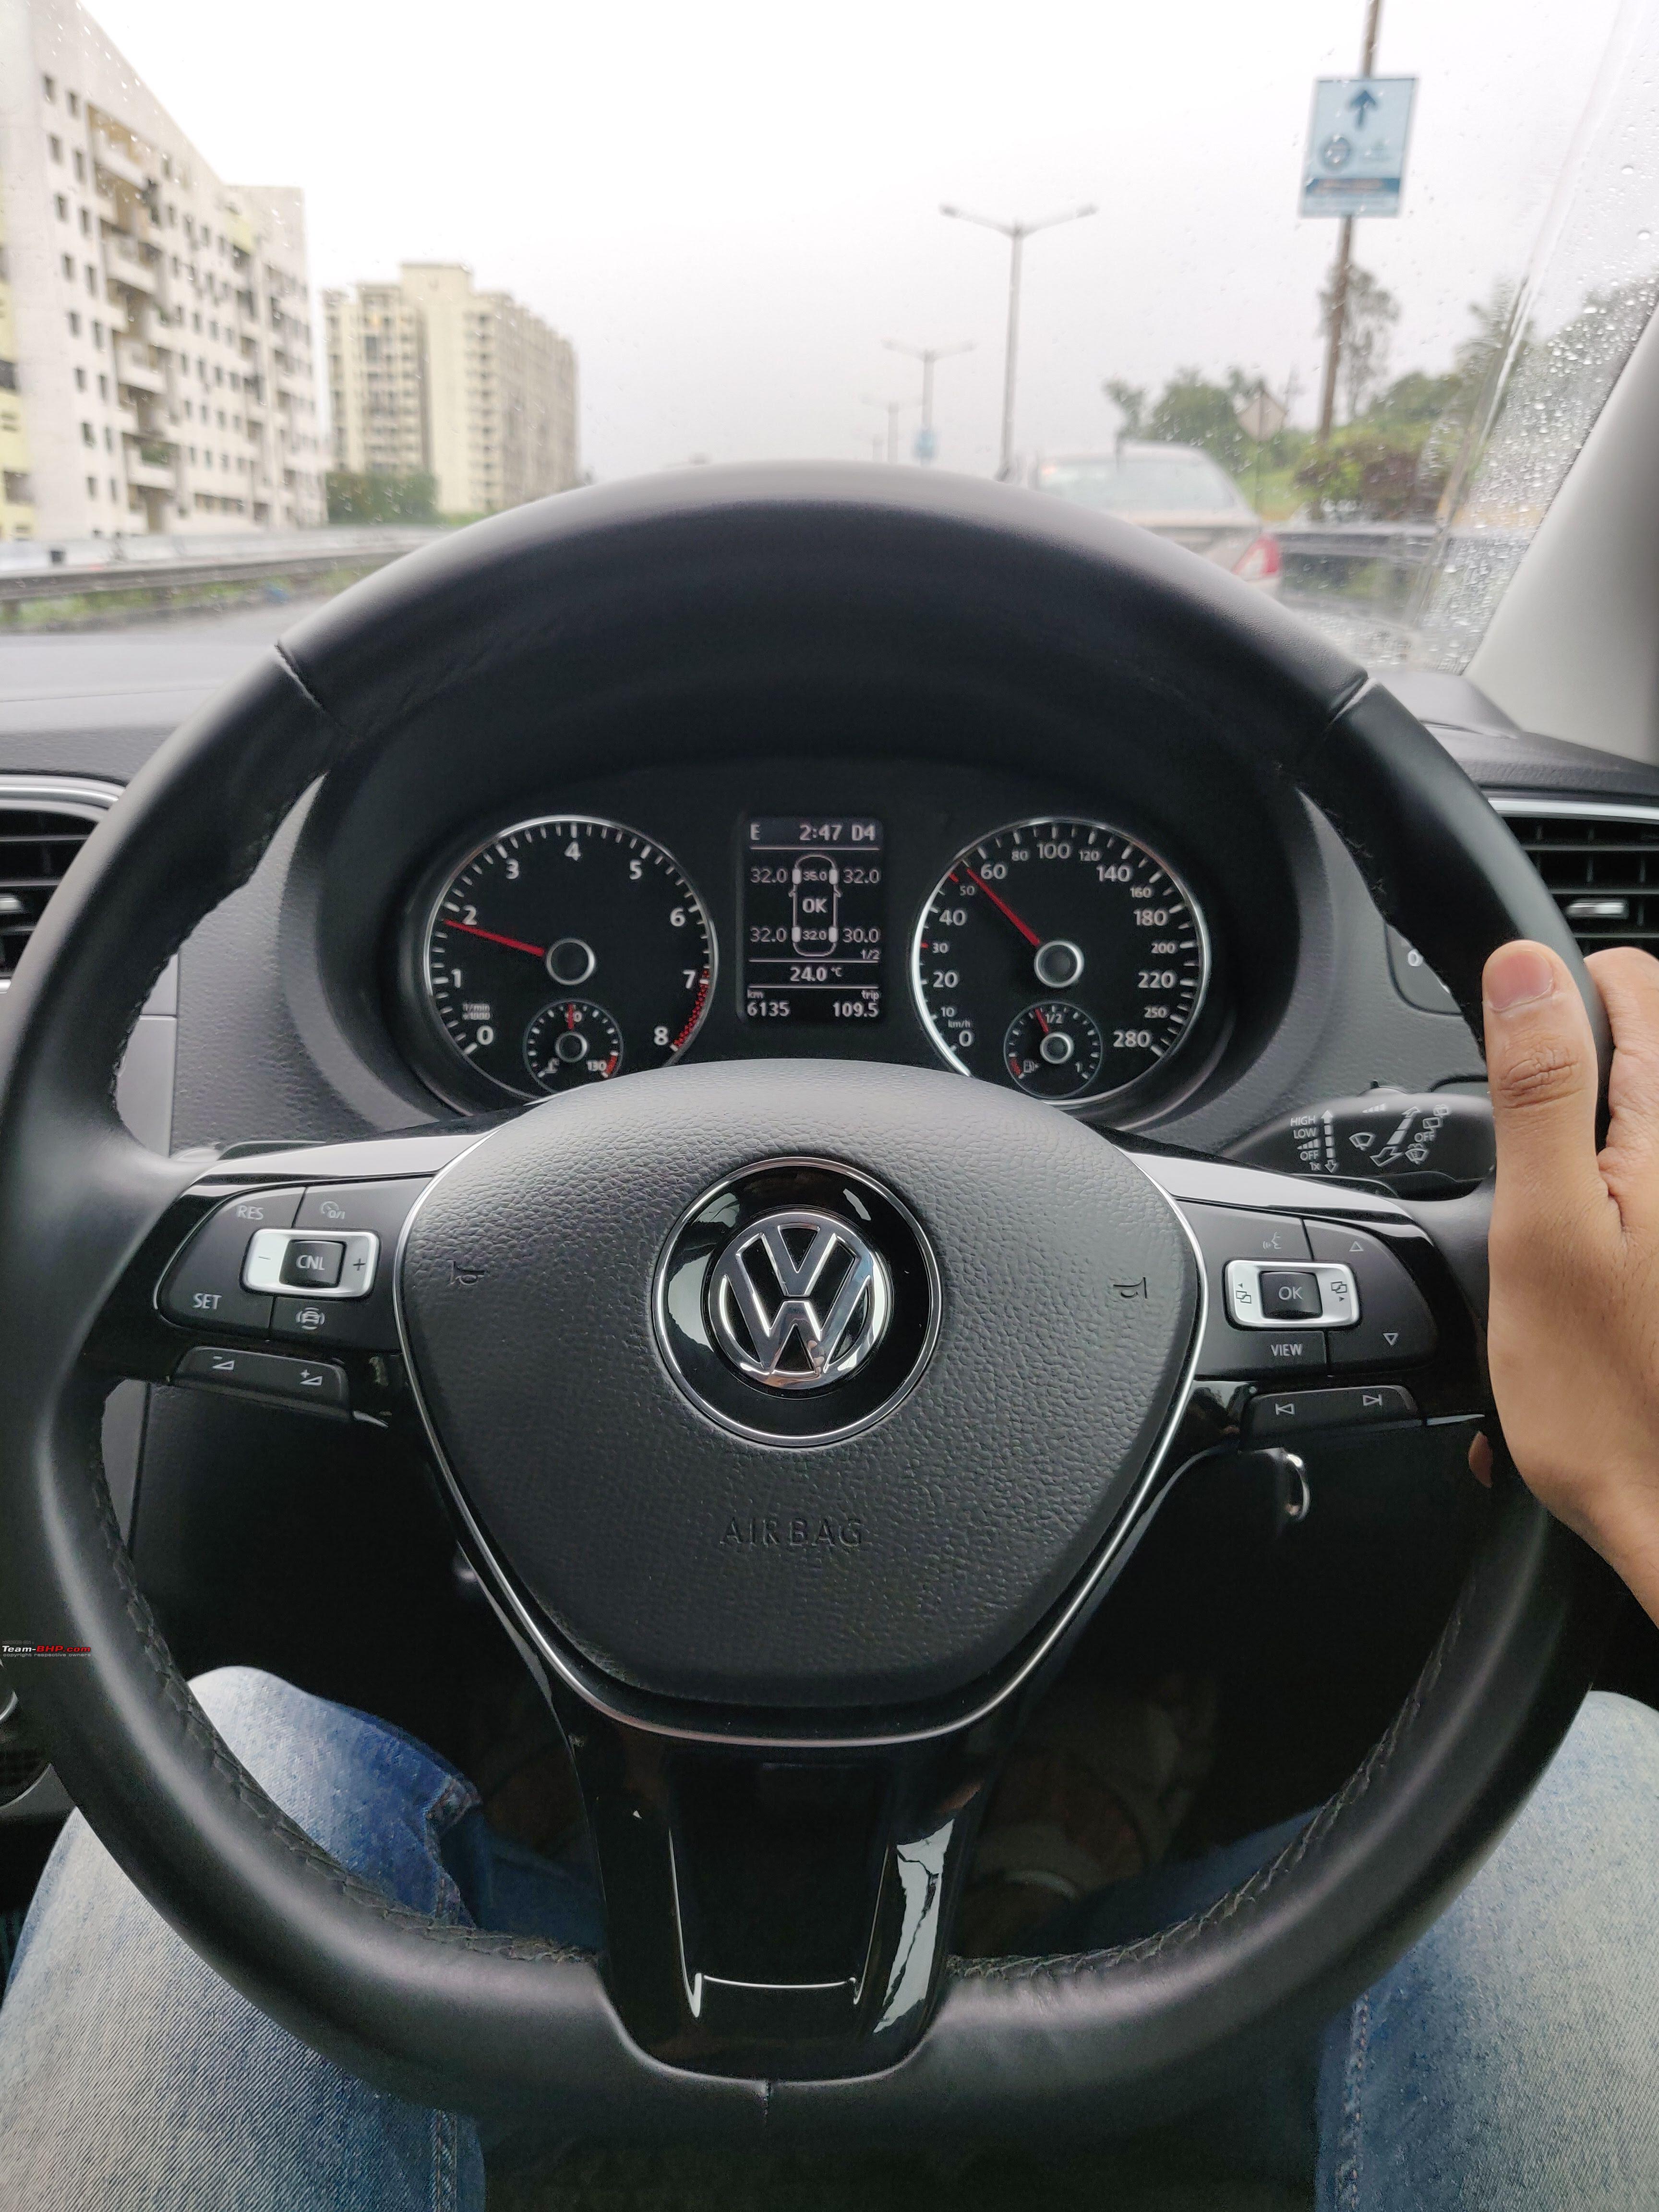 Sourcing The BCM Max is a fairly rare part, but I have recently seen a few BCM Max units available on eBay, both new and used. Unfortunately, most of them do not have the appropriate firmware for working on our headlight systems and radio frequencies, thus making it difficult to predict whether or not it will work, plus since this is not a plug and play upgrade, this is something majority of owners will not resort to, because of limiting resources available to diagnose and fix electrical issues related to such retrofits. I would have loved to discuss further about the parts and pricing of the wiring kits, but that would end up making this an unpleasant thread because of the disappointing experiences I've had with a few people on this planet, and I like to believe it is better to share good things, and avoid experiences which could propagate hate. The Polo 6R community around the world is beautiful, and they have performed some of the most exciting retrofits on the PQ25 platform, and this energy and sense of collaboration is one of the reasons, I continued to improve my car, and it is the reason why I continue to share updates about my car, because there could be a little something that I share, which could inspire someone else. I am thankful to all of the enthusiasts and friends I've worked with, and without their help at the right times, I wouldn't have been able to grow and improve my cars.  It is quite sad that this retrofit space is lately being highly commercialised by individuals, but I'll reserve my thoughts on this for a darker day. It is quite sad that this retrofit space is lately being highly commercialised by individuals, but I'll reserve my thoughts on this for a darker day.Net Experience The BCM Max upgrade ended up feeling like a full body workout, with a lot of sets of abs crunches. I’d say it is incredibly painful to do this upgrade on a Polo because of the limited working room. The entire task would have been a lot smoother with the dashboard off. If I ever have to take the dashboard off, I’ll definitely consider redoing some of the wire routing behind the dashboard. It seemed like a nightmare while I was doing it. It feels like the biggest mistake when there’s a big obstacle but at the end, the achievement is a car which is a lot more better than it was, a year ago. Completing this retrofit was about the satisfaction of performing a task of high difficulty, and the learnings I obtained as we faced and solved problems. Thanks to that hustle, my car is ready to pack in more features and it’s finally a car which is a proud asset to have in 2021 and the many years to come, because it feels technologically on par to the other offerings at present, if not, better in some places. I’m sure this thought resonates in the minds of many original PQ25 VAG users who aren’t proud of the cost-cutting Volkswagen has been doing on the MQB-A0-IN cars, and in the next few posts I'll try and share a few of the improvements I've made after this BCM upgrade, and for the benefit of potential enthusiasts, I'll perhaps post about Direct TPMS first. That's it for now folks, enjoy the backwaters of the Khadakwasla dam, in Pune.  |
|
| (20)
Thanks
|
| The following 20 BHPians Thank fluidicjoy for this useful post: | Atharva14, Avikbrio, AYP, BigBrad, CEF_Beasts, Clayton Crasto, d3mon, dailydriver, GaryTSI, gt3t0uring, johannskaria, JoshuaM, keroo1099, Researcher, s4ch, sarfraz1997, Sen, streetfighter, VivekCherian, yesyeswe |
|
5th February 2023, 03:10
| #134 |
| BHPian Join Date: Oct 2020 Location: Pune, San Diego
Posts: 247
Thanked: 2,440 Times
| Polo 6R: Fatigue Detection Advertisement One of the feature improvements that came in with the BCM Max was Fatigue Detection. This was more like a Software tweak which required flashing the Gateway to implement this feature. After the flashing is performed, there is a new Menu in the Maxi-Dot Cluster  and a warning of the following nature (image credits VW-Newsroom). This literature was perhaps prepared for the Volkswagen Polo 6C, and hence is naturally a retrofit on the Polo 6R platform. and a warning of the following nature (image credits VW-Newsroom). This literature was perhaps prepared for the Volkswagen Polo 6C, and hence is naturally a retrofit on the Polo 6R platform.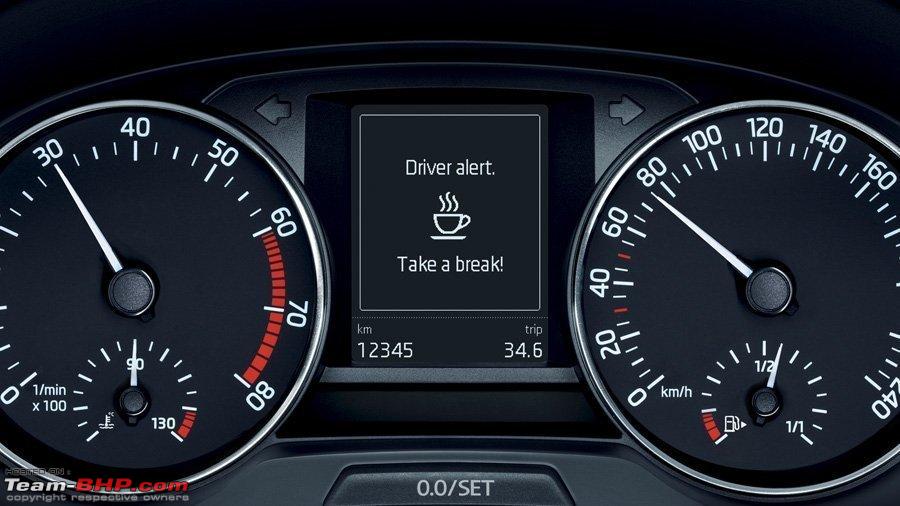 I found a few good resources on the internet related to this, including an ad from Volkswagen themselves, which helps explain the feature properly. |
|
| (17)
Thanks
|
| The following 17 BHPians Thank fluidicjoy for this useful post: | adityan27, Atharva14, audioholic, Avikbrio, d3mon, dailydriver, GaryTSI, keroo1099, Researcher, roshithr, s4ch, sarfraz1997, Sen, streetfighter, Vik0728, VivekCherian, yesyeswe |
|
6th February 2023, 11:53
| #135 |
| BHPian Join Date: Jul 2022 Location: Jamnagar
Posts: 105
Thanked: 381 Times
| Re: Review: Driving home our Sunset Red VW Polo Highline+ TSI Automatic Hello Fluidicjoy. I want to do a similar mod with the headlights but with a 2016 skoda octavia. The car comes with halogen lamps and I want to upgrade these to OEM projector lamps. I sourced a pair of headlights from a scrap dealer for 20K, only to realise that each headlight has 3 ballasts and an adapter harness will be required. I feel I may have bite off more than I can chew, but your post gives me hope. I have a couple of questions for you. 1. From where did you purchase the ballasts? 2. How do I find out if my BCM has autoleveling functionality? 3. If my BCM indeed does not have the autoleveling functionality, I will have to live without autoleveling functionality. Is it the only compromise? 4. Are there any persistant errors if you upgrade the headlights without BCM upgrade? 5. Does the retrofit require tweaking like disabling the halogen lights and enabling Bi-Xenon lights? 6. Can you please share component costs? |
|
| ()
Thanks
|
|