| |||||||

 |
| Search this Thread |  16,046 views |
 3rd August 2013, 19:02
| #16 | |
| BHPian Join Date: Jul 2013 Location: Bangalore
Posts: 44
Thanked: 14 Times
| re: Yet Another "Rewardful" Birding Trip to Gujarat Quote:
| |

|  ()
Thanks ()
Thanks
 |

| |
|
3rd August 2013, 19:25
| #17 | |
| BHPian Join Date: Feb 2011 Location: Bangalore
Posts: 500
Thanked: 1,352 Times
| Quote:
One humble request to everyone. Next time anybody sees me, pls walk up to say hi. It's always nice to meet fellow TBhpians in person. | |
|
| (1)
Thanks
|
| The following BHPian Thanks amolpol for this useful post: | Shome |
|
5th August 2013, 14:44
| #18 |
| Newbie Join Date: Jan 2013 Location: Belgaum
Posts: 23
Thanked: 13 Times
| re: Yet Another "Rewardful" Birding Trip to Gujarat Hi. Congratulations on the win along with excellent write up of the bird race with pictures of the beauties. Great insight on bird photography in LRK for new comers and to know more about the flamingos. It has been a long dream for me to travel to LRK, hopefully sometime soon i shall be able to take one ride.Happy clicking. |
|
| ()
Thanks
|
|
6th August 2013, 11:58
| #19 |
| Senior - BHPian | re: Yet Another "Rewardful" Birding Trip to Gujarat I waited till you finished Amol. I've no comments on the photographs as they render me speechless everytime. But yes I must mention that little Pozu, who I met as an infant in Pench, has now grown to be a confident little girl, giving you company on your gruelling tours. We will surely meet one of these days in one of the sanctuaries like we did in 2011. p.s: voted my rating Last edited by gd1418 : 6th August 2013 at 12:00. |
|
| ()
Thanks
|
|
6th August 2013, 17:50
| #20 | |
| BHPian Join Date: Sep 2011 Location: Mumbai/Gurgaon
Posts: 379
Thanked: 470 Times
| re: Yet Another "Rewardful" Birding Trip to Gujarat Quote:
Hey, it indeed is a small world!!! I don't remember if your safari had any stickers for ID, hence couldn't ID a fellow Bhpian. Incidentally, there was a youngish gentleman, probably in his early 20's who came over and spoke to me after seeing the stickers on my black swift. Was contemplating buying a Jazz and was a BHPian as well. Rated 5* | |

| ()
Thanks
|
|
7th August 2013, 15:27
| #21 |
| Senior - BHPian Join Date: Apr 2010 Location: Palakkad/Coimbatore
Posts: 1,226
Thanked: 1,079 Times
| re: Yet Another "Rewardful" Birding Trip to Gujarat Great thread, Amolpol. And congrats for winning the Bird-A-thon!! Rated full  |
|
| ()
Thanks
|
|
19th August 2013, 09:50
| #22 | |||
| BHPian Join Date: Feb 2011 Location: Bangalore
Posts: 500
Thanked: 1,352 Times
| Re: Yet Another "Rewardful" Birding Trip to Gujarat Quote:
 If you ever decide to come down south, let me know! If you ever decide to come down south, let me know!Pozu is now indeed growing up to be a wonderful travel companion and has taken interest in wildlife too. She even carries her own P&S camera for the safaris these days. Just as we concluded another father-daughter trip to Kabini last week, she had a little accident at home. She's currently wearing a cast on her right hand for the next 3 weeks - a result of her own monkey tricks which went awry. But that's not really deterring her from continuing to do more!  Quote:
 Quote:
Here are a few more pictures that I managed to find. Sunset at the Rann is always a beautiful affair. The big orange ball just sinks into the flat horizon and using a long lens you can actually capture it really big in the frame. I've waited enough number of times to have some birds fly by into the frame to have that awesome post card look, but I guess i have to save that for another visit. 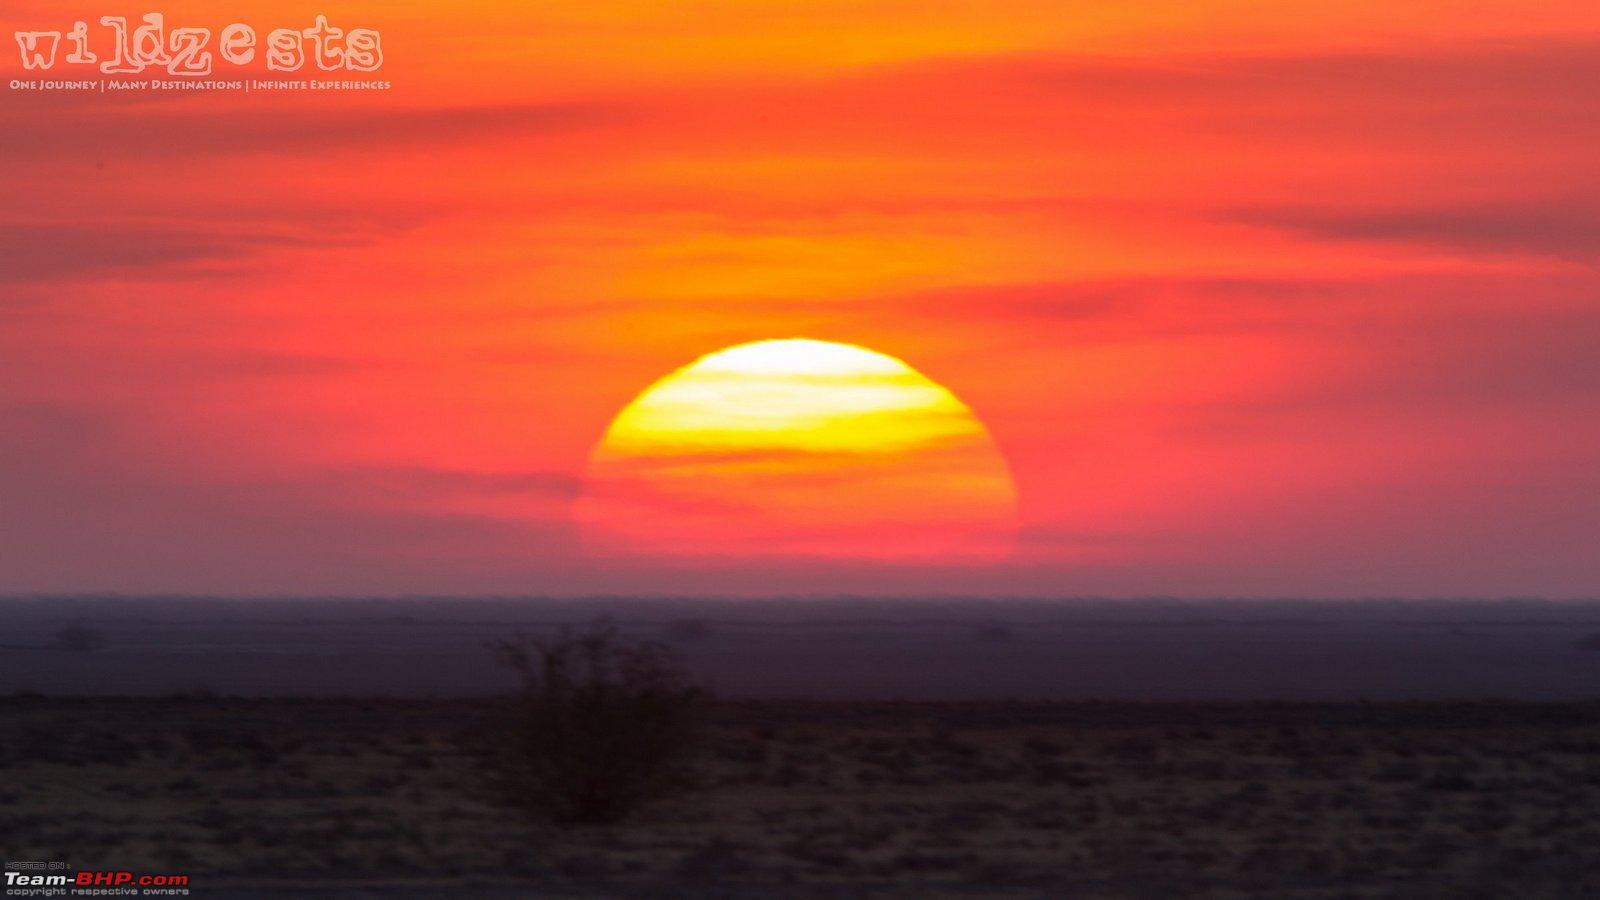 The Desert Wheatear is a small sparrow sized bird and a pretty quick one at that too. This one came right next to our jeep and perched on a small mound which made it possible to isolate it from the background, although a more contrasty background would have done a lot of justice to this beautiful bird. 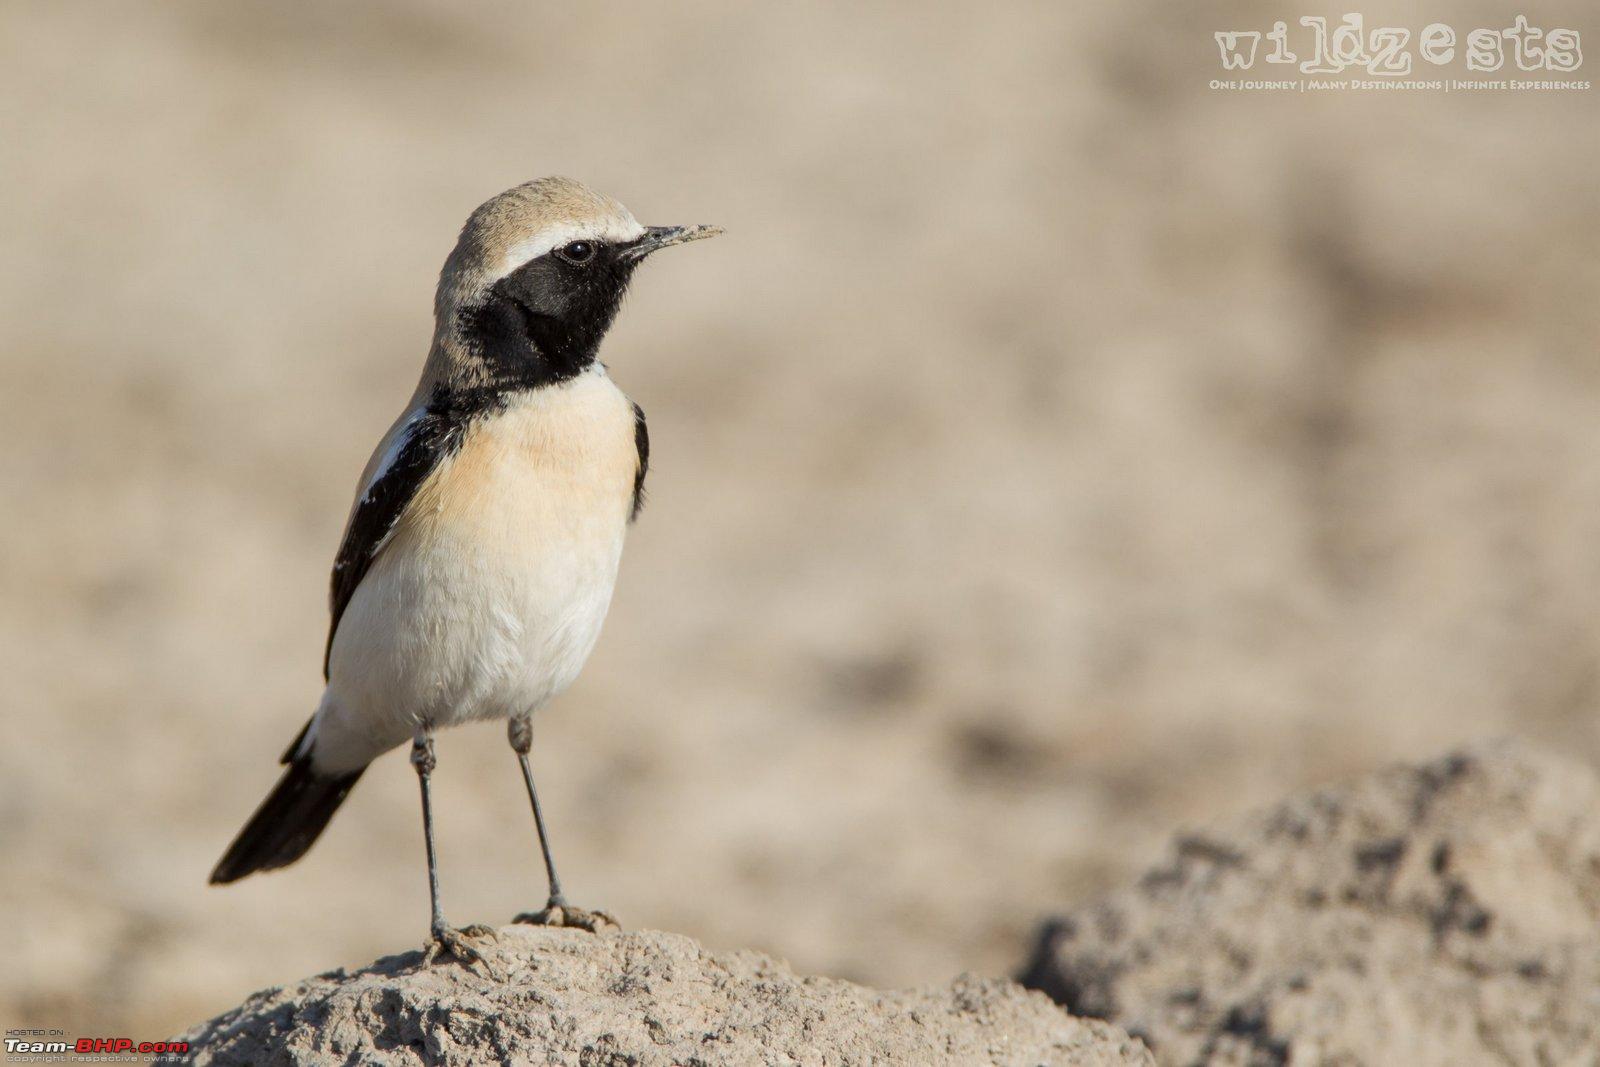 The Indian Nightjar is another master of camouflage and spotting it during daytime is very difficult. The use of spotlights after dusk make it easier with the shiny eyes glowing in the dark. 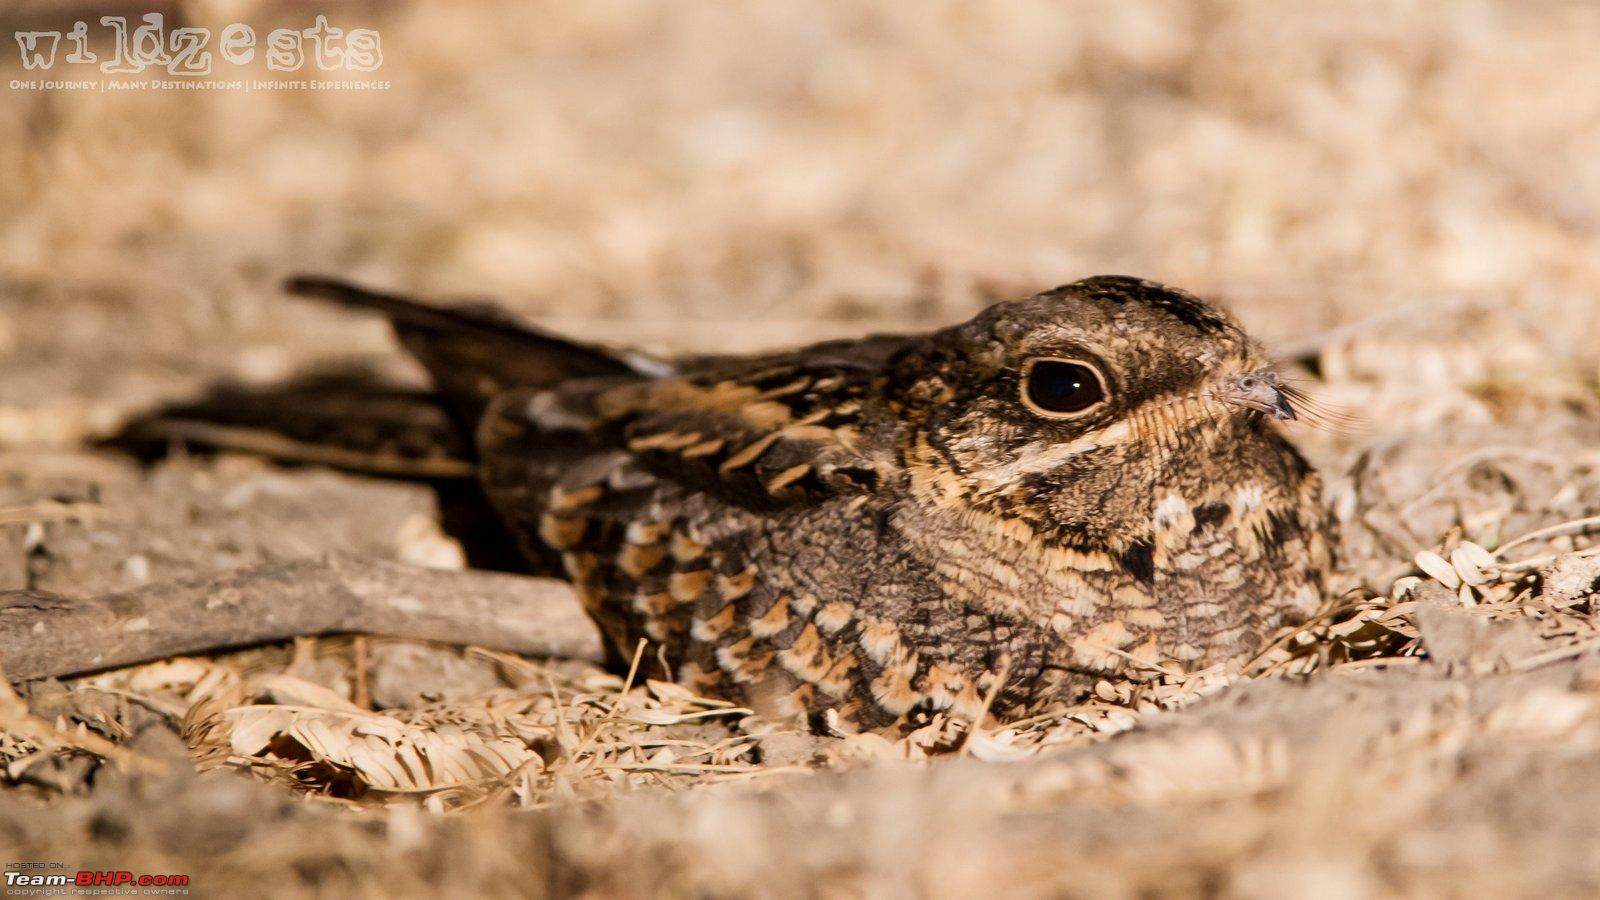 Khurs - stars of the Rann. They are the last standing population of the species in the world and the conservation efforts have been pretty successful to bring them back from extinction. Given the absence of large predators in the Rann, they have little fear of falling prey. The bigger threat is about survival through the adverse weather conditions in the Rann which helps in creating a natural balance for their population. 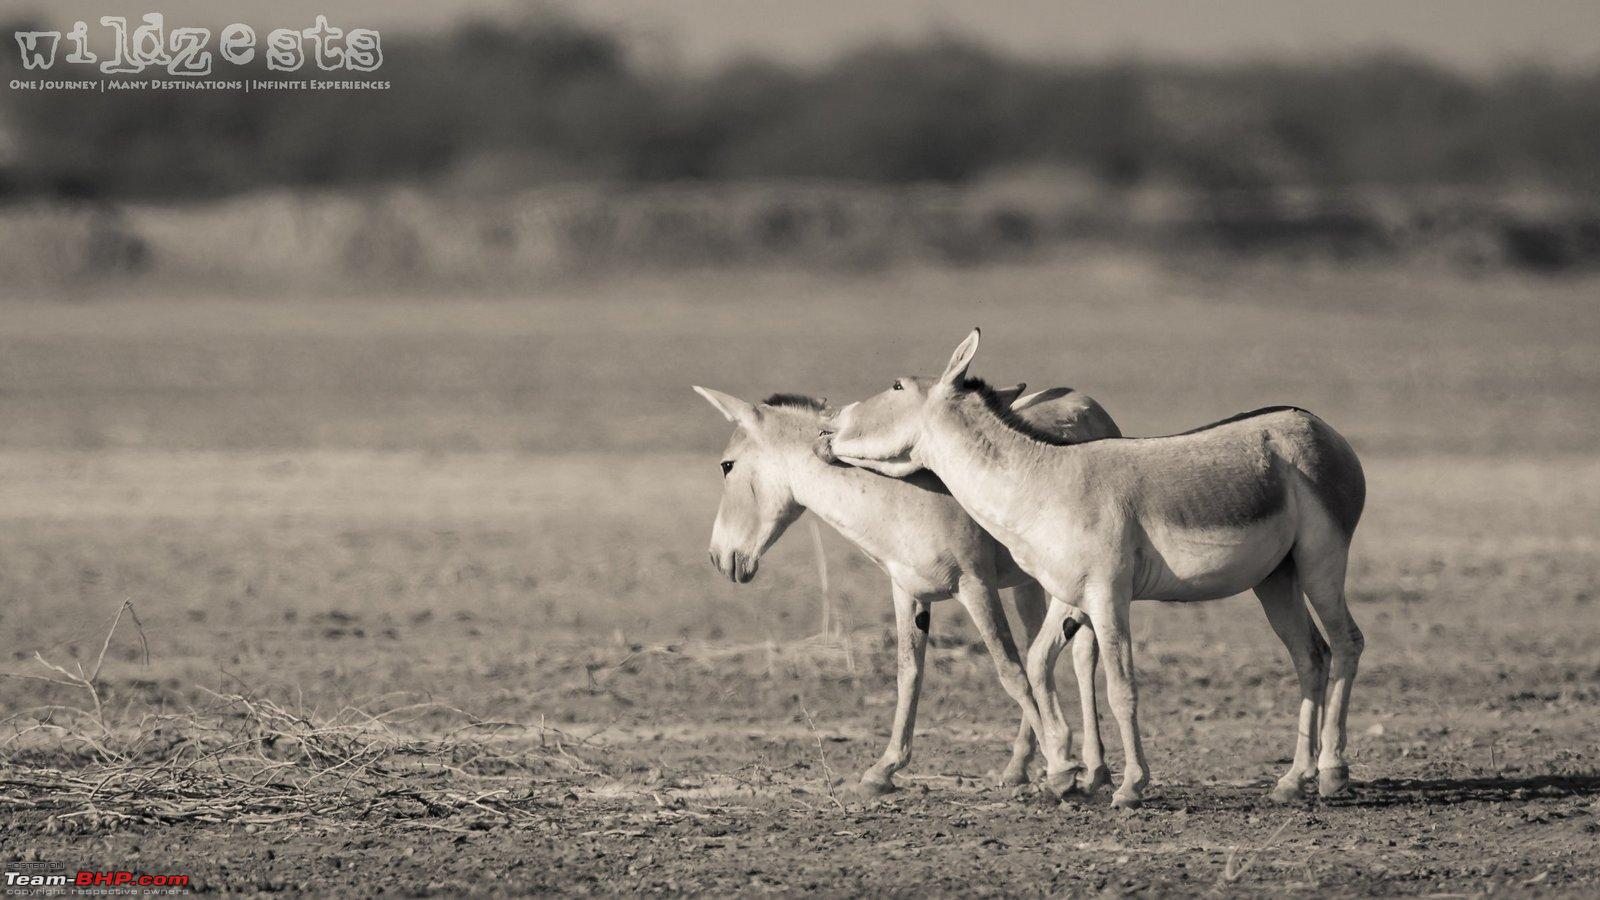 The Common Redshank was found at a nearby water drain and wasn't particularly shy of posing for the camera. This is a full-frame image with the 600mm lens where I had to reposition the car a couple of times to fit it all in the frame. Shooting from the car is always advantageous since most birds don't consider vehicles as a threat whereas approaching them on foot is an instant alarm. 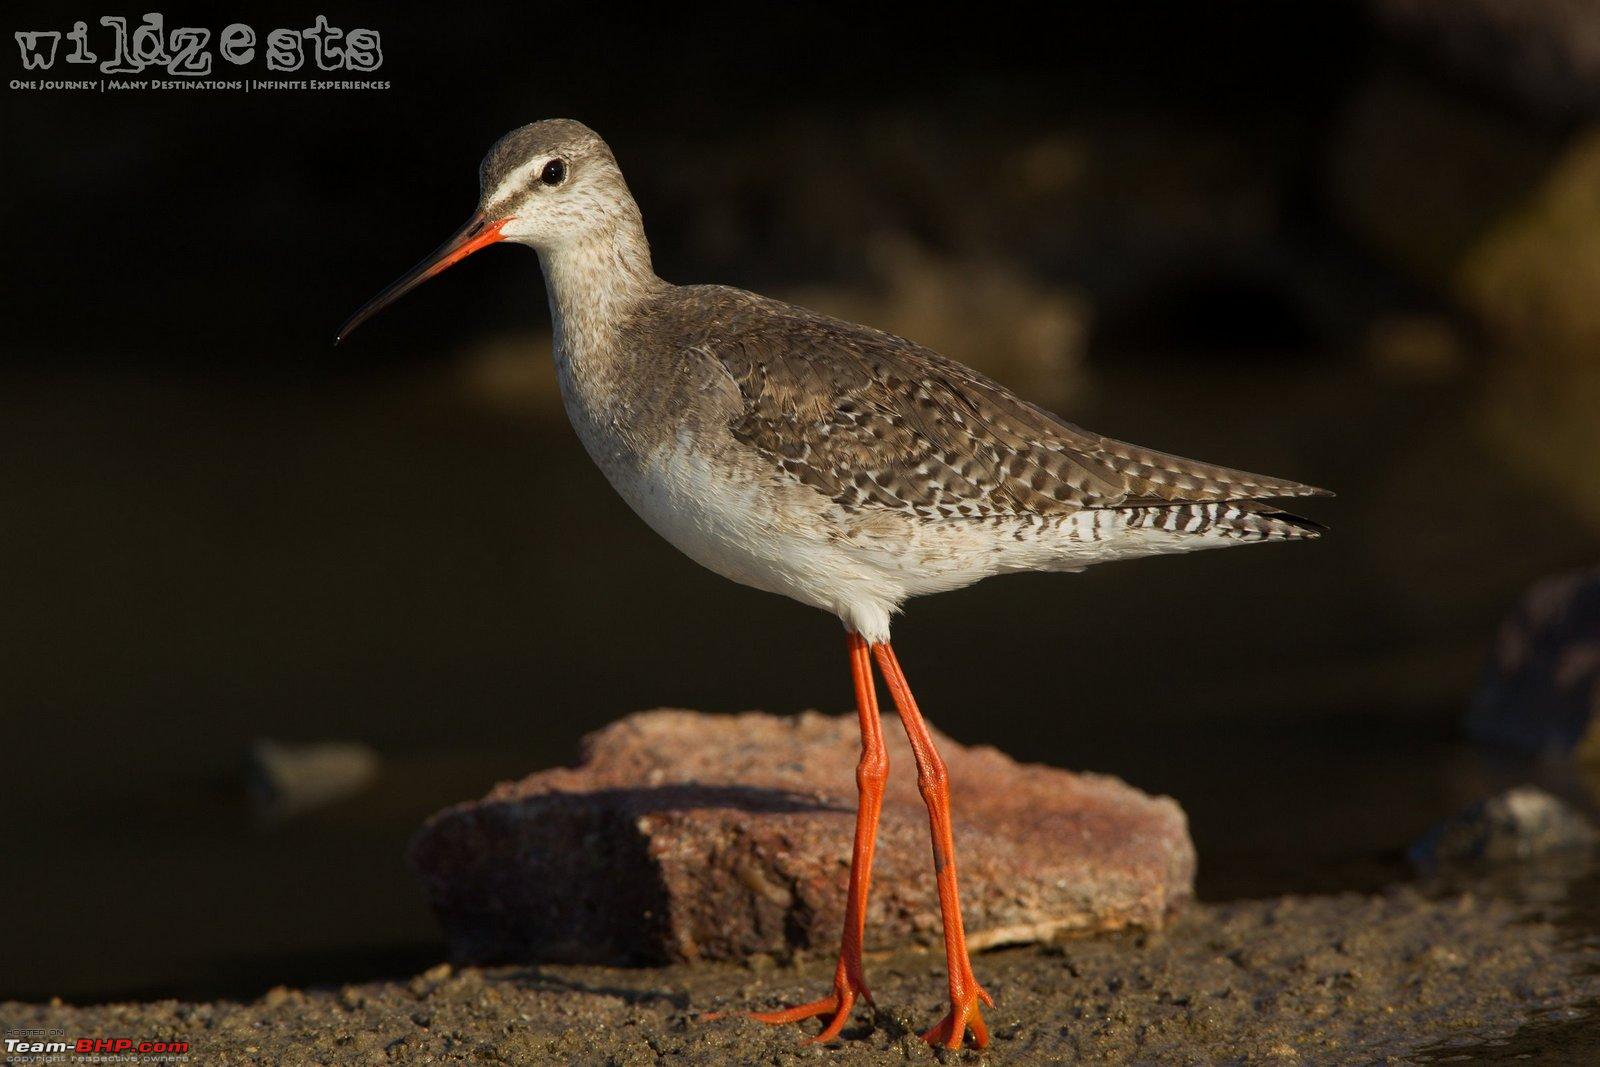 | |||
|
| (4)
Thanks
|
| The following 4 BHPians Thank amolpol for this useful post: | arvind71181, gurha, Shome, Venom_rider |
|
19th August 2013, 14:54
| #23 |
| Senior - BHPian | Re: Yet Another "Rewardful" Birding Trip to Gujarat Following is a link to my thread on TBHP. http://www.team-bhp.com/forum/travel...ml#post3004714 You should visit Bhigwan, you would be delighted by the variety of birds . |
|
| ()
Thanks
|
|
22nd August 2013, 15:49
| #24 |
| BHPian Join Date: Feb 2011 Location: Bangalore
Posts: 500
Thanked: 1,352 Times
| Re: Yet Another "Rewardful" Birding Trip to Gujarat Based on some requests I'm going to try and write down some of my learnings on bird photography so far. Hope you guys find it useful. Patience is the key: Bird photography for me is not about just clicking pictures of the bird. It's about getting to know the bird and learn something new, be it behaviour or flight pattern or even call sounds. It is very important to be patient when you're dealing with birds since they can fly and you can't. Sometimes it can be very frustrating as well since at many locations you'd find people just walking by and shooing away the bird that you were waiting for since the last half hour. Be Ethical: This is the most important advise to all enthusiasts who want to shoot wildlife/birds. There is absolutely no reason for you to get a picture that causes harm or any trouble to your subject in the process. A lot of bird forums strictly discourage nesting and/or feeding pics since the photographer usually compromises safety of the birds in getting these shots. Using baits and other such techniques are also not advisable since we're altering their natural instincts to hunt/find food. Set realistic expectations: As a photographer, I yearn for atleast 1-2 keepers at the end of the day. My way of identifying a keeper is whether I'd print a hi-res image and hang it on the wall. It doesn't matter if the picture is of a very rare bird or a very common one. I should be pleased with the overall result, thats all I need! Become a part of the environment: If you gain acceptance from the birds, you'd have better hit rates. It's very important to get the bird comfortable with your presence. So rather than starting to shoot the moment you see a bird, first observe it and understand the behavior patterns etc. Don't make any sudden moves and just watch the bird silently. If you're traveling with kids (like I do), make sure they understand how important it is to maintain silence and not run around etc. If the wait is going to be too long, engage your kid in some activity so that you can find some time alone to watch the bird. Wear dull colored clothes: This helps a lot in keeping a low profile and even though I don't think the birds get fooled easily by camo clothing, I'd still suggest it since you can dirty the army fatigues without any worries (plus they look cool). Wear a cap for protection from the sun while you wait! Be discreet: Walk slowly, avoid talking loudly and keep those cellphones away for a while. Using bird hides is an excellent idea, but in India you'd be the topic of discussion with every passer by and that causes more problems than what it solves. Choose the right camera gear: This is like the first lesson in bird photography. It is a known fact that a longer tele lens gives you better chances of capturing the birds without disturbing them. While one can argue that wide angle shots look way cooler than conventional longer lens portraits, there is no easy way to achieve it unless you use remote triggers etc. Lenses like the Canon 100-400 or Nikon 80-400 give you flexibility in composition when compared to the fixed teles like the 500 or 600mm where you would need to estimate the shooting distance required to get the correct subject framing. If there is extensive walking needed, then lugging around heavy equipment becomes a big issue and you'd need to plan accordingly. Understand your gear: Be very comfortable in making changes to the camera settings while you're in the field. More often than not, you'd get a window of 3-5 secs before you realize that you'd need to change the shooting mode or the focusing point or Exposure compensation etc. You should be able to make those changes once you feel the need. Also, you'd need to understand basics like the closest focusing distance of your lens, the metering systems it has, the max no. of images you can shoot in burst mode, the focusing points and whether you have enough memory to shoot RAW or Jpegs etc. Meter the scene appropriately: This is very important to get the correct exposure. I usually shoot in the evaluative mode but would switch over to spot or partial based on the subject and peripheral lighting conditions. One thing to consider is that if the bird or for that matter any subject you're shooting, isnt filling up a good portion of your frame, then you may need to apply compensation based on the amount of light in the frame and background elements etc. For best results, it is always good to have a the subject filling atleast 30-40% of your frame. Relying on heavy cropping isn't going to give you the results you expect even after post-processing. Avoid sky background: When shooting birds in flight we often try to click without thinking about the bright background which is the sky. The sky will impact the metering of the frame by a huge margin and though exposure compensation will help to an extent, one has to be cognizant about the contrast between the bird and the background. For example, if you're shooting a dark colored bird against the sky, it is going to be very difficult to get details on the bird without blowing out the sky. Such instances, it is better to produce high-key images rather than trying to be conventional. Choose a nice background: You should choose an angle of shooting which will enable you to get a nice contrasting background for your subject. Remember, the background makes a lot of difference when shooting birds and while getting focus on the bird etc is important, choosing the right background is equally critical. Isolate the bird: Often you'll find that the bird of interest is either sitting too inside in the tree or there are other elements or birds surrounding it. You can even identify a perch and wait for the bird to arrive. A lot of winning shots are made this way, but it needs a lot of patience and determination since sometimes you'd return empty handed. A faster and longer lens helps in creating a pleasing bokeh, but that won't happen if there isn't enough space in the background for the blur to happen. Get the DOF right: I usually stick to Av mode and may vary ISO and/or use a bit of exposure compensation if the shutter speeds are showing too less, but it's just because I'm very comfortable with it. Using similar techniques in the Tv (Shutter priority mode) should also yield results. Given that the birds are smaller/thinner and you'd be shooting them from a reasonable distance, it is okay to shoot at the widest aperture that your lens can provide. This helps in isolation of the subject and will also give you enough shutter speed to freeze motion. For me, the DOF is more important and hence I'm always on Av mode and very rarely do I move to the Tv mode, M is kept for experimental situations only. Vary the technique based on need: Contrary to the usual guideline on using 1/1000s shutter speed for birds in flight, I'd be okay even if the shutter were a little slower than 1/1000 if you're shooting bigger species. However, for smaller and faster birds, 1/1000 should work good. The key is to strike a good balance between getting the right exposure and keeping the ISO at a minimum. Sometimes you can also try getting artistic blurry shots of birds in flight with slow shutter speeds. Focusing is very critical: In bird photography usually you'd want to get the focus on the eye to make your image interesting and communicative. I am very used to having a single focus point and move it across to compose the picture accordingly. The center focusing point is the most sensitive due to a cross type focusing mechanism, but as you go higher in the series, cameras can have additional cross-type points which help in more accurate focusing. Know your cameras focusing point configuration thoroughly. Use Continuous focusing mode: The AI Servo mode does a much better job than the One-shot due to better tracking of the birds since they're rarely sitting still for you to photograph. Shoot in burst or continuous mode: This gives you the choice to select the best picture based on the focusing and the bird's action/motion etc. Typically I shoot a lot because of this and then end up with about 5-10% of the images in the final batch of processing. Don't rely on Noise reduction: Dialing up the ISO to get better shutter speeds isn't always the best thing. Noise reduction softwares will help to a certain extent, but it will also soften and also flatten the image. So you'll need to sharpen it a bit once NR is applied and you may still lose on image quality. It's best to keep the NR to the minimum by choosing the lowest ISO possible, although it isn't always a practical option. Lastly, use a good post-processing Software: Adobe Lightroom is a very good software, intuitive and does the jobs without destroying the image. Shooting RAW helps in the post-processing. You can choose to use the stock software that camera but they're usually very basic and not very user-friendly. Last edited by amolpol : 22nd August 2013 at 15:56. |
|
| (6)
Thanks
|
| The following 6 BHPians Thank amolpol for this useful post: | denver85, Divya Sharan, gurha, samm, Shome, stormerider |
|