Team-BHP > Vintage Cars & Classics in India
Register New Topics New Posts Top Thanked Team-BHP FAQ


Reply
  Search this Thread
63,383 views
Old 11th January 2013, 13:42   #16
Senior - BHPian
 
harit's Avatar
 
Join Date: Nov 2008
Location: Mumbai
Posts: 4,033
Thanked: 3,281 Times
Re: Rolls Royce Phantom II Continental Restoration

I thought Faster789's picture would look great here.
There are more, others could transfer them.

Cheers harit
Attached Thumbnails
Rolls Royce Phantom II Continental Restoration-rrj.jpg  

harit is offline   (8) Thanks
Old 11th January 2013, 15:51   #17
BHPian
 
Ragtop's Avatar
 
Join Date: Jul 2009
Location: Mumbai
Posts: 90
Thanked: 248 Times
Re: Rolls Royce Phantom II Continental Restoration

We began work on the car some-time in April-2012. We had decided to go through with a complete body-off, Engine-off restoration to do a really thorough job. Here are some pictures of the dismantling:
Rolls Royce Phantom II Continental Restoration-img_0209_450x600.jpg


Rolls Royce Phantom II Continental Restoration-img_0213_800x600.jpg


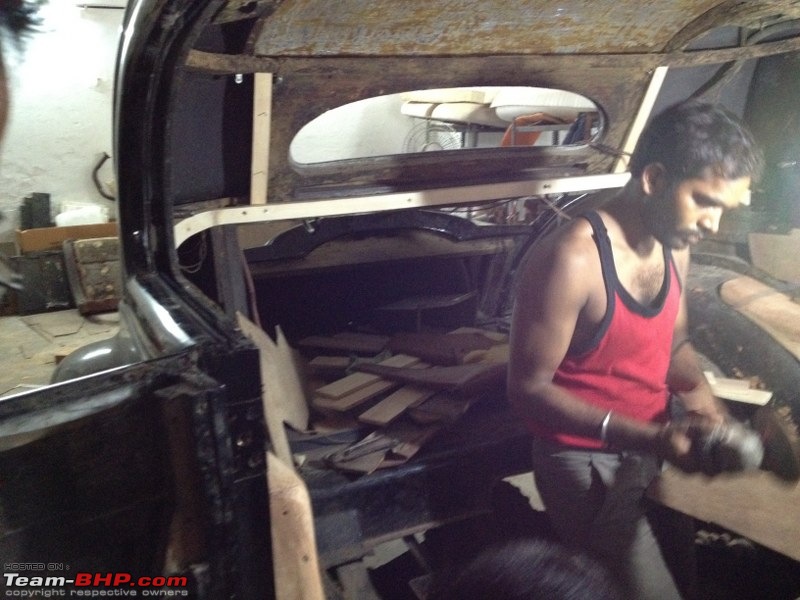
We decided to start looking at some of the interior woodwork at this stage as well:


Rolls Royce Phantom II Continental Restoration-img_0221_800x600.jpg


As we dismantled body parts, we came across multiple locations where we saw traces of the original green paint..


Rolls Royce Phantom II Continental Restoration-img_0224_450x600.jpg
Ragtop is offline   (8) Thanks
Old 11th January 2013, 16:02   #18
BHPian
 
Join Date: Dec 2009
Location: planet earth
Posts: 888
Thanked: 1,188 Times
Re: Rolls Royce Phantom II Continental Restoration

What wood are you working with? Ash or something else? How did you clean the chassis? Did you sand blast? What was the state of the aluminium once scrapped to bare metal? How did you measure its thickness? If you had to patch aluminium, what welding process did you use? AM I asking too many questions?? Apologies, but am very interested to know, thats all.
Bulldogji is online now  
Old 11th January 2013, 18:10   #19
BHPian
 
Ragtop's Avatar
 
Join Date: Jul 2009
Location: Mumbai
Posts: 90
Thanked: 248 Times
Re: Rolls Royce Phantom II Continental Restoration

Most of the details you would like will follow. About the aluminum, it was in great shape overall, we did not have to do any patchwork or welding, all it needed was a little beating out in a few spots. Did not measure thickness since it seemed ok, pictures that will follow will tell the whole story.

For wood, we used oak as per advice from some experts, again more information will follow.
Ragtop is offline   (2) Thanks
Old 12th January 2013, 00:12   #20
Distinguished - BHPian
 
Join Date: Mar 2008
Location: Ann Arbor
Posts: 2,934
Thanked: 8,551 Times
Re: Rolls Royce Phantom II Continental Restoration

Quote:
Originally Posted by harit View Post
I thought Faster789's picture would look great here.
There are more, others could transfer them.

Cheers harit
Interesting looking bumpers!
travancore is offline  
Old 12th January 2013, 08:14   #21
BHPian
 
Join Date: Nov 2012
Location: Bangalore
Posts: 31
Thanked: 12 Times
Re: Rolls Royce Phantom II Continental Restoration

Wow! This is just an amazing vehicle. Looked great before restoration and I can't wait to see how it turns out after.
miniwarmth is offline   (1) Thanks
Old 12th January 2013, 10:49   #22
BHPian
 
Ragtop's Avatar
 
Join Date: Jul 2009
Location: Mumbai
Posts: 90
Thanked: 248 Times
Re: Rolls Royce Phantom II Continental Restoration

Quote:
Originally Posted by travancore View Post
Interesting looking bumpers!
yup, those were added by my dad to protect the car, have been off for some years now. Regardless, with our chaotic traffic, I am always concerned whenever I drive the car without any bumpers at all so the plan is to fabricate something that will better suit the car.
Ragtop is offline  
Old 12th January 2013, 11:02   #23
BHPian
 
Ragtop's Avatar
 
Join Date: Jul 2009
Location: Mumbai
Posts: 90
Thanked: 248 Times
Re: Rolls Royce Phantom II Continental Restoration

Although most of the woodwork was still original, areas around the door hinge mounts were quite worn. Had we chosen to remount the doors as is, it was clear that in a short time the door alignment would suffer. We decided to insert metal plates in the back of the B-pillar (where the door hangs) so the hinges would now screw through the wood into the metal plates. This provided the hinges with a much stronger mount and will prevent the doors from drooping over time. Unfortunately I cannot locate the images but will post them when I come across them.

In order to meet our deadlines, we decided to begin work on multiple fronts. First off, we would start on the body and simultaneously work on the upholstery, woodwork, chrome fittings etc. For the body, we began with taking apart all the panels, removing the paint using paint removers and then sand blasting the surface to get the best results. Sand blasting ensured that we would end up with an even surface and would also save a lot of time. We decided to go with a home-grown sand blasting solution so ther first few panels were trial and error. It took a few days for us to figure out the pressure, sand consistency etc. Soon enough though it all came together.

The aluminum, when exposed, was in surprisingly good nick and is probably what saved this car in Mumbai weather over the years. Very little "tin work" was required on the main body, however, the doors did require some work to align all the mouldings and sharpen all the edges.

Sand blasting R&D:

Rolls Royce Phantom II Continental Restoration-img_0227_800x600.jpg


Paint removal using paint remover. During this process, we found traces of all the prior colours used on the car, black/cream, coffee/cream, dark green and the original green and cream.


Rolls Royce Phantom II Continental Restoration-img_0232_800x600.jpg


Paint removed (rear) and first round of sand blasting (front):


Rolls Royce Phantom II Continental Restoration-img_0237_800x600.jpg


Paint removal on the remainder of the body:


Rolls Royce Phantom II Continental Restoration-img_0241_450x600.jpg


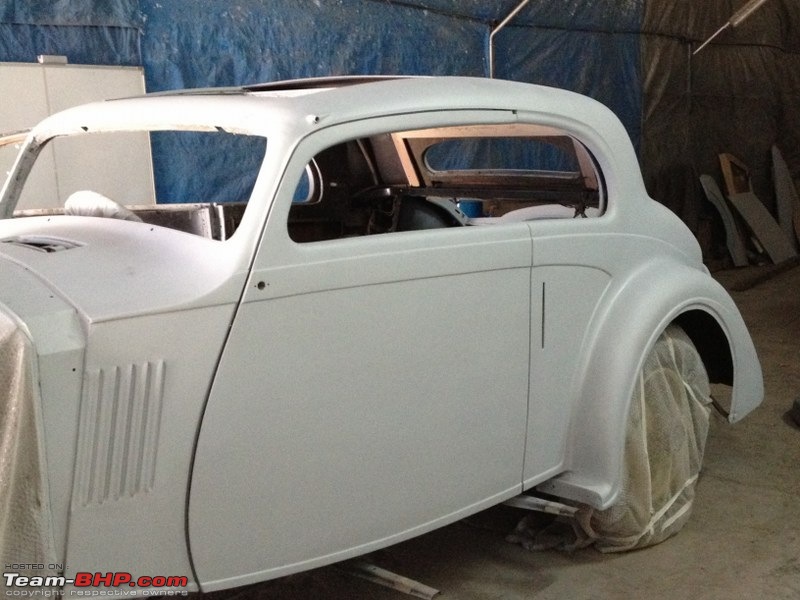
Body after first round of sand blasting:
Rolls Royce Phantom II Continental Restoration-img_0259_800x600.jpg
Ragtop is offline   (5) Thanks
Old 12th January 2013, 11:38   #24
DKG
Senior - BHPian
 
DKG's Avatar
 
Join Date: Feb 2008
Location: Hyderabad
Posts: 3,711
Thanked: 1,389 Times
Re: Rolls Royce Phantom II Continental Restoration

Truly a spectacular car and a personal favourite. I can imagine what a monumental task it is to work on this beauty. Sand blasting body panels is dicey as the process generates heat on the surface and causes the metal to become wavy, a nightmare later when painting to get a flawless finish. Soda blasting is a safer process and less abrasive. If you haven't encountered this problem on your car I am really glad, but do please be careful when blasting body panels with sand.

It is wonderful that you are sharing details of restoration here, just so much to learn from everyone's experiences. Thanks a ton.

Love your car !

Last edited by DKG : 12th January 2013 at 11:40.
DKG is offline   (2) Thanks
Old 12th January 2013, 11:45   #25
BHPian
 
Ragtop's Avatar
 
Join Date: Jul 2009
Location: Mumbai
Posts: 90
Thanked: 248 Times
Re: Rolls Royce Phantom II Continental Restoration

Hi DKG, good information but we did not encounter any such issue. We did play around with the granularity of the sand to some extent as well as with the pressure to get a relatively low intensity "blast" and then went over the panels a few times to get the paint off in layers. We also ensures that the blasting was done at a significant angle to reduce any damage. The entire body was done this way and has turned out pretty well, as you will see in images to follow.
Ragtop is offline   (1) Thanks
Old 12th January 2013, 12:12   #26
BHPian
 
Join Date: Dec 2009
Location: planet earth
Posts: 888
Thanked: 1,188 Times
Re: Rolls Royce Phantom II Continental Restoration

Can you share information on how you treated the bonnet hinge? Did you open the rivets to remove the hinge? Did you encounter rust on the Hinge pin? How do you plan on treating the paint on the hinges so that it does not wear/peel off after prolonged use? what is the system by which water drains out from the sun roof? Are there pipes? I noticed that your steering column is partly painted and the upper part chromed. Is that how it should be?
Bulldogji is online now  
Old 12th January 2013, 17:53   #27
BHPian
 
Join Date: Mar 2012
Location: Avignon, France
Posts: 93
Thanked: 169 Times
Re: Rolls Royce Phantom II Continental Restoration

Ragtop, I don't know if it was you driving the car, but you almost run me over at the beginning of last year. I was so in awe staring at the black and cream beauty that I froze in front of Crawford Market.
Please do use the car again, once it will be green and off white (have you been able to find some of the original white colour to establish its exact tone or only remnants of the green?).
I gladly volunteer to be (almost) run over again :-)
All the best for your remarkable endeavours,
Daniel
Philedonos is offline  
Old 12th January 2013, 18:56   #28
BHPian
 
Automaton's Avatar
 
Join Date: May 2012
Location: Mumbai
Posts: 249
Thanked: 208 Times

Hello

Love the lines of the car.
The sand blasted body in the last picture is bare aluminium or is there a coat of something? It's amazingly smooth and clean.
Sorry couldn't make out, and have not seen similar work hence asking.
Automaton is offline  
Old 12th January 2013, 19:48   #29
BHPian
 
Ragtop's Avatar
 
Join Date: Jul 2009
Location: Mumbai
Posts: 90
Thanked: 248 Times

Quote:
Originally Posted by Bulldogji View Post
Can you share information on how you treated the bonnet hinge? Did you open the rivets to remove the hinge? Did you encounter rust on the Hinge pin? How do you plan on treating the paint on the hinges so that it does not wear/peel off after prolonged use? what is the system by which water drains out from the sun roof? Are there pipes? I noticed that your steering column is partly painted and the upper part chromed. Is that how it should be?
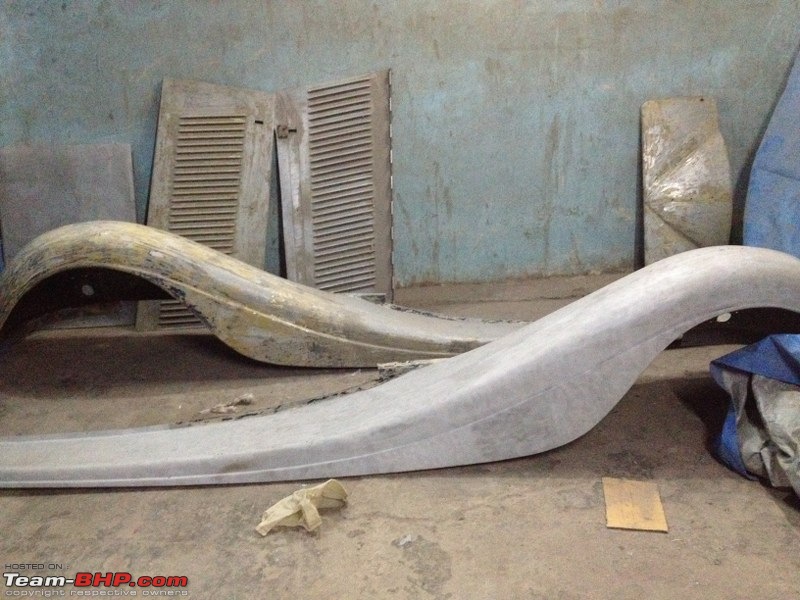
The bonnet hinge was completely dismantled, you cansee the image of the bonnet in parts behind the fenders in an earlier post. The hinge and pin is in great shape so all we are doing is giving it a good buffing. For the door hinges, although mine had paint on them, various images of concours PIIs show that the hinges are exposed chrome so that is what we intend to do.

Regarding the sunroof, it has four drainage points, the two in the front have run-off points just above the front top corner of the doors, you can see one in the image above. The two at the rear have pipes that run between the roof skin and the headliner and drain out onto the wheel from the rear mudguard, these pipes will be replaced.

The steering column is meant to be this way, the lower part black ad the top in chrome.

Why don't you stop by some time, we are not too far away from your office, I will be happy to show you everything we have done

Quote:
Originally Posted by Philedonos View Post
Ragtop, I don't know if it was you driving the car, but you almost run me over at the beginning of last year. I was so in awe staring at the black and cream beauty that I froze in front of Crawford Market.
Please do use the car again, once it will be green and off white (have you been able to find some of the original white colour to establish its exact tone or only remnants of the green?).
I gladly volunteer to be (almost) run over again :-)
All the best for your remarkable endeavours,
Daniel
Hi Daniel, I am the only one who drives the car so it must have been me, and I apologize! We have found some traces of white/cream but cannot say with any certainty whether or not its the original or the cream that was used in later combinations. Regardless, we have now found a cream that we are happy with.

Thanks for your kind words and yes, I do fully intend to use the car regularly like I always have.

Quote:
Originally Posted by Automaton View Post
Hello

Love the lines of the car.
The sand blasted body in the last picture is bare aluminium or is there a coat of something? It's amazingly smooth and clean.
Sorry couldn't make out, and have not seen similar work hence asking.
Yes, that is bare aluminum in that image. The sand blasting was very effective!

Last edited by karlosdeville : 12th January 2013 at 20:34. Reason: Consecutive posts
Ragtop is offline   (3) Thanks
Old 12th January 2013, 22:08   #30
Distinguished - BHPian
 
karlosdeville's Avatar
 
Join Date: Jul 2006
Location: Pune
Posts: 11,976
Thanked: 18,277 Times
Re: Rolls Royce Phantom II Continental Restoration

Possibly the most elegant Rolls I have seen, MRX 9358 remains my favorite. As a child I always keenly looked out for the car when crossing the house, and she would be standing stoicly next to the MGTD. Here are the first pictures I had taken when I saw the car after many years on the road.

Rolls Royce Phantom II Continental Restoration-rolls01.jpg
Rolls Royce Phantom II Continental Restoration-rolls02.jpg
Rolls Royce Phantom II Continental Restoration-rolls03.jpg

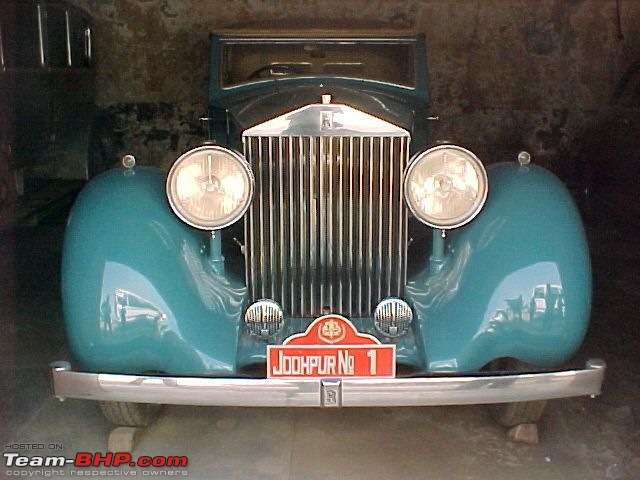
I was rather surprised when I heard that the car was being stripped 'nut and bolt' for a restoration - I mean just look at how gorgeous and presentable the car looks!

Rolls Royce Phantom II Continental Restoration-continental07.jpg

But the way the restoration is going about it will be well worth the effort. Cant wait to see the updates.

So have you thought about recreating the original Jodhpur plates? If so, here are some templates that could help.

Rolls Royce Phantom II Continental Restoration-01.jpg
Rolls Royce Phantom II Continental Restoration-02.jpg
Rolls Royce Phantom II Continental Restoration-03.jpg
Rolls Royce Phantom II Continental Restoration-04.jpg
karlosdeville is offline   (6) Thanks
Reply

Most Viewed


Copyright ©2000 - 2024, Team-BHP.com
Proudly powered by E2E Networks