Team-BHP > Vintage Cars & Classics in India
Register New Topics New Posts Top Thanked Team-BHP FAQ


Reply
  Search this Thread
43,810 views
Old 1st March 2008, 12:22   #31
DKG
Senior - BHPian
 
DKG's Avatar
 
Join Date: Feb 2008
Location: Hyderabad
Posts: 3,711
Thanked: 1,389 Times

[quote=vintageman;742075]
Quote:
Originally Posted by DKG View Post


Hello DKG ,

Could not have been this car , may be a similar one.
I had seen pictures of a 36 convertible sedan, light blue colour, one headlamp missing, with the wheels inside the car. I was told it was in Lucknow. Is that another car?
DKG is offline  
Old 18th March 2008, 00:37   #32
DKG
Senior - BHPian
 
DKG's Avatar
 
Join Date: Feb 2008
Location: Hyderabad
Posts: 3,711
Thanked: 1,389 Times
Rebuilding the engine

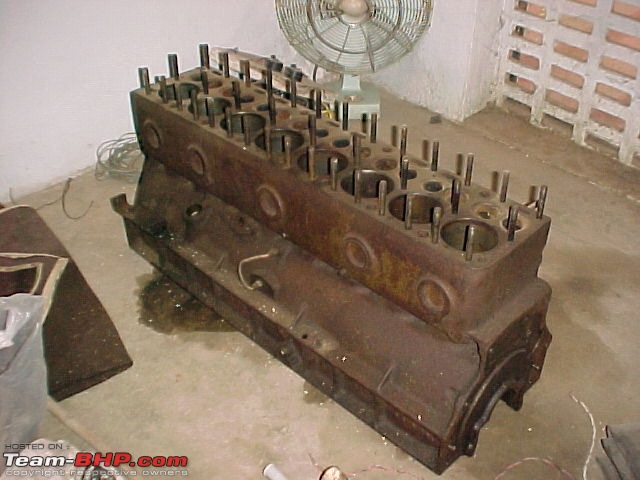
The previous owner had upgraded the engine to a 1948 super eight 5 main bearing 327 cu in eight cylinder engine. Original was a 282 cu in engine

With the car lying out in a yard open to the elements with its carb missing water had entered the inlet manifold and completely ruined the innards.

It was a nightmare prying the pistons loose as the rings had rusted into the sleeves causing a bad jam. The valves were a complete mess and some had corroded to wafer thin

It took me days to gently ease the pistons (I had to save them) and after loads of WD40, kerosene, diesel, thinner finally managed to remove them without damaging any
The Experience of Restoring a Vintage/Classic Car or Bike-mvc332f.jpg

The Experience of Restoring a Vintage/Classic Car or Bike-mvc333f.jpg

The Experience of Restoring a Vintage/Classic Car or Bike-mvc335f.jpg

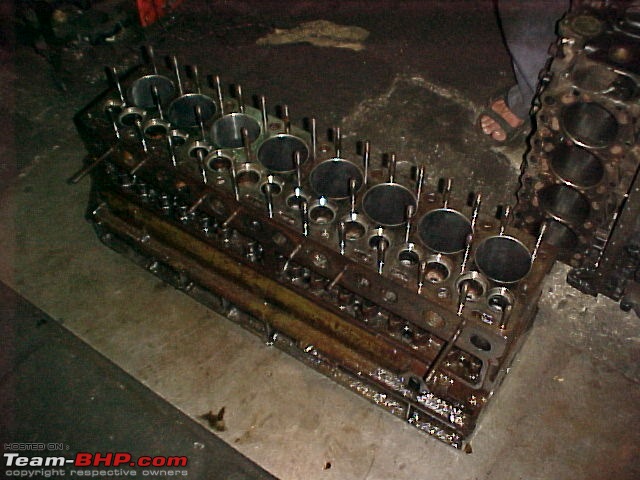
Once I had the entire engine dismantled I carted it to a machine shop to have new sleeves put in, new valves cut from truck valves, new guides, crank journals polished to new bearing sizes (luckily I had new bearings). The gudgeon pins were a problem so ended up hardchroming them and having them machined to spec. The pin bushes needed renewing, so I had fresh alloy metal cast to spec and new bushes made.

As I had the manuals I was able to work on the engine as per Packard recommended tolerances

The engine shop hadn't seen a petrol straight eight in years so the owner himself wanted to machine it with pride. That was fun watching their excitement. Before the machine work the water plugs were pulled out and the block chemically washed to remove all sediment.

The Experience of Restoring a Vintage/Classic Car or Bike-mvc416f.jpg

The Experience of Restoring a Vintage/Classic Car or Bike-mvc424f.jpg

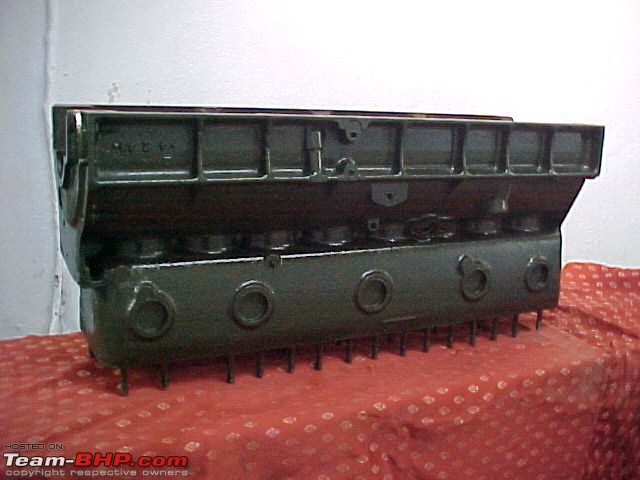
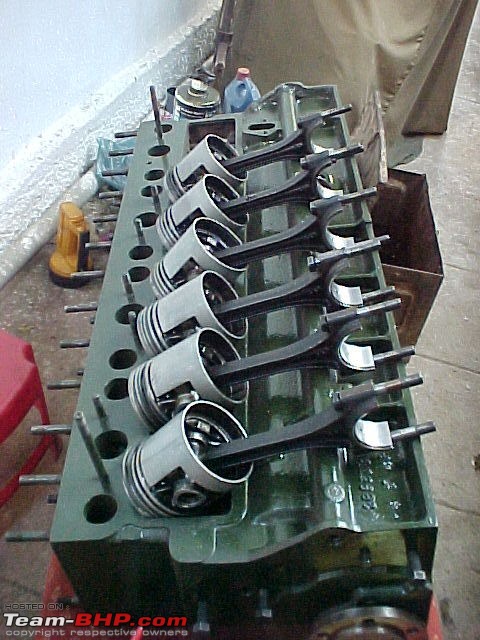
Once the block work was done, had new studs made (originals were weak and corroded), had both head and block surfaces machined and she was all ready to go home. Once home I painted the block and head in Packard green and started the assembly process. At the machine shop I had made sure the pins were a push fit by boiling the pistons and also the liners were lapped and honed keeping the recommended clearances in mind. It was great fun assembling the engine, went about meticulously following all the torque specs, no chances taken!
The Experience of Restoring a Vintage/Classic Car or Bike-mvc426f.jpg

The Experience of Restoring a Vintage/Classic Car or Bike-mvc428f.jpg

The Experience of Restoring a Vintage/Classic Car or Bike-mvc435f.jpg

The Packard engines had a balancer up ahead of the crank that was basically a circular weight encased in rubber. This was meant to work as a shock absorber and was critical in making the engines silken smooth as it ironed out vibrations.

Obviously the balancer rubber was as hard as wood so had to dismantle the contraption and with a great deal of persuasion and planning managed to make the moulds and convince the rubber guy to mould fresh rubber renewing the balancer to like new.

The oil pump facing was okay so didn't have to fiddle with that.

From the junk that it had become, bringing this magnificent eight to this level was a very satisfying journey. The engine was now assembled.
Attached Thumbnails
The Experience of Restoring a Vintage/Classic Car or Bike-mvc436f.jpg  

The Experience of Restoring a Vintage/Classic Car or Bike-mvc446f.jpg  

DKG is offline  
Old 18th March 2008, 11:31   #33
BHPian
 
vintagepoint5's Avatar
 
Join Date: Apr 2007
Location: Jeddah/Hyd
Posts: 421
Thanked: 64 Times

DKH, Great job, very detail description of engine rebuilt, I wish I would have been with you to see all these great excitement. Please write more
about restoration you have accomplished like fixing gearbox and chassis
body, paintjob. Some time you need worn out spare parts, did you get
from outside or custom made it to fill the requirement. Packards tyres
were available? or you have to fit nearest size. I think petrol consumption
also might awesome with these big cars. Because for our Buick-8, Chevrolet many years back, some time 10 ltrs of petrol in tank is just not reaching carburator.

Would love to see more interesting things with pictures.

Good Luck!

Regards,
vintagepoint5 is offline  
Old 18th March 2008, 16:39   #34
Distinguished - BHPian
 
karlosdeville's Avatar
 
Join Date: Jul 2006
Location: Pune
Posts: 11,976
Thanked: 18,275 Times

Fantastic

So what is the current status of the car? And about how long has it taken you to get here? Whats the next course of action?

Do you intend to paint the car yourself? Thats something Ive always wanted to master.
karlosdeville is offline  
Old 19th March 2008, 10:34   #35
DKG
Senior - BHPian
 
DKG's Avatar
 
Join Date: Feb 2008
Location: Hyderabad
Posts: 3,711
Thanked: 1,389 Times

Quote:
Originally Posted by karlosdeville View Post
Fantastic

So what is the current status of the car? And about how long has it taken you to get here? Whats the next course of action?

Do you intend to paint the car yourself? Thats something Ive always wanted to master.
It took about 4 hours a day for five months to take it from total junk to a rolling chassis that I drove on the road. This I did entirely on my own with no help. If I had used some help I'm sure it could've been done in a lot less time. I also needed to work to a budget so opted not to hire help.

The body workers said they needed one month, it took them six months!

Now all that remains is to complete the painting and upholstery. I would love to do the painting myself. As I work at a dealership which has a massive bodyshop I keep learning a great deal about the latest in painting technology and materials but now the biggest constraint is time. The one and half days I get at home are lost in biking, friends, and the RV project. So!!! wish I could retire and do just this

Considering the painters I have access to do an awesome job I just might leave it to the professionals, after all a great paintjob on that car would render it drop dead gorgeous.

But like you I too intend doing the whole painting routine myself. Perhaps the Merc or Hillman I have. Lets see. I've been acquiring all the tools needed for the job though

Last edited by DKG : 19th March 2008 at 10:38.
DKG is offline  
Old 19th March 2008, 11:05   #36
Distinguished - BHPian
 
Join Date: Jul 2007
Location: MUMBAI
Posts: 3,060
Thanked: 5,353 Times

Dear DKG - I admire your dedication. Congratulations. All the best and I hope to see the car brand new very soon.

Best regards,

Behram Dhabhar
DHABHAR.BEHRAM is offline  
Old 19th March 2008, 11:50   #37
BHPian
 
vintagepoint5's Avatar
 
Join Date: Apr 2007
Location: Jeddah/Hyd
Posts: 421
Thanked: 64 Times

Interesting write up about your efforts to restore to perfect conditions.
Can you share us how you are working for body work, did you remove
the body shell from chassis and given to body welding works to complete
the job and then welding body shell to chassis. For leather seats, lining
two tone colors, as seen in Mercedes, Lexus, Lincoln beige, light camel gives the looks of exclusive cars of celebrities. In the dash you can use chestnut design wooden panel strip, it is common in all expensive cars. Here I have seen pearl colour Lincoln giving a exclusive looks from outside, even if the car is parked in dark it is glowing, the paint finish is of very high quality.

Write what is the status now, still how much restoration work is go.
I think this is your third Packard project, write about your Mercedes
also, does this car also in need of restoration.

Regards,
vintagepoint5 is offline  
Old 19th March 2008, 22:56   #38
DKG
Senior - BHPian
 
DKG's Avatar
 
Join Date: Feb 2008
Location: Hyderabad
Posts: 3,711
Thanked: 1,389 Times

Quote:
Originally Posted by vintagepoint5 View Post
Write what is the status now, still how much restoration work is go.
I think this is your third Packard project, write about your Mercedes
also, does this car also in need of restoration.

Regards,
There's a lot to share, and I will in time. I'm trying to collate all pictures together so I can post relevant ones as each story is told. I have yet to scan old prints in as there's so many of them with great stories to tell

If you have old pictures of cars at home do please have them scanned and posted in a thread.

Thanks for the inputs
DKG is offline  
Old 20th March 2008, 14:27   #39
BHPian
 
vintagepoint5's Avatar
 
Join Date: Apr 2007
Location: Jeddah/Hyd
Posts: 421
Thanked: 64 Times

Great DKG, I am sure you are definitely man with wealth of knowledge treasure for people like me.

I also have lot of interesting information about vintage cars and exotic cars. But it is also scattered between Jed and Hyd, I did not imagine earlier we would have such a wonderful forum where we all can share our personal experience of vintage cars.

I already lost one generation, my uncles, my father who were great
asset of info. for cars, unfortunately very little is documented. I have some old snaps, now I am tring to gather all my collection old snaps and will soon share with related articles.

Here I am recording videos of vintage cars documentaries shown on some
channels like "Gear One". I suggest if you can record you important
restoration work on video, but I am afraid, do you have somebody to
assist, since I observe that you are taking lot of pain and doing single
handedly most of your restoration, which should be very commendable
job.

I remember the famous slogan of Packard "Ask the man who own this car"
and I want to add: one more "Praise the men who keeps the car in concurrs conditions even after so many years".

Great job, keep it up, hope to see more interesting stories from you.

Best regards,
vintagepoint5 is offline  
Old 20th March 2008, 22:07   #40
DKG
Senior - BHPian
 
DKG's Avatar
 
Join Date: Feb 2008
Location: Hyderabad
Posts: 3,711
Thanked: 1,389 Times

The next big challenge was the gearbox. Now I had once replaced the bearings on a Packard gearbox and they are brilliantly simple in design, but the one on the 38 Packard turned out to be an overdrive gearbox. Packard had introduced this as a way of promoting fuel economy.

As much of the mainshaft had picked up rust I had to take it apart. A lot of effort went into scouring bearing shops for bearing *****, everything is in inches and these days what you get is mm, so that was a huge problem. Finally I managed to replace all the bearings in the mainshaft and reassemble it. Next up was the countergear cluster. In Packard the counter gear runs on needle bearings and the inner shaft had worn lightly causing a slight play. This time finding the correct thickness of needle bearings proved impossible and work came to a halt. Then I resolved to alter the system and ended up creating bushes with oil channels to allow the system to work, just like your crank or connecting bearings. It works perfectly. I often consulted an aging genious of a mechanic by the name of Ali Taqi who had worked on hundreds of the older generation cars and he approved of this ploy.

The entire Packard engine gearbox assembly rests only on three mounts. They had to be new rubber if I were to return the car to its legendary silken smooth ride. Given the higher cost of importing parts I had to figure out a way of having new mounts moulded. Luckily I had found a rubber moulder who patiently allowed me to get moulds made to the required specs and new mounts were cast.

The clutch surprisingly was fine so only with that the gearbox assembly was ready to be installed

The Experience of Restoring a Vintage/Classic Car or Bike-mvc440f.jpg

The Experience of Restoring a Vintage/Classic Car or Bike-mvc441f.jpg


Sadly I don't have pictures of it dismantled but it was like a complicated puzzle once I had it apart. Even the manuals don't explain in full detail and I must have spent hours gazing at parts trying to figure out its function and fitting it back correctly. I got it right!!

PS: This is really funny, trying to describe a particular round object I used the commonly used term but the auto editor has turned it into **** assuming its foul language.

Last edited by DKG : 20th March 2008 at 22:10.
DKG is offline  
Old 20th March 2008, 22:49   #41
DKG
Senior - BHPian
 
DKG's Avatar
 
Join Date: Feb 2008
Location: Hyderabad
Posts: 3,711
Thanked: 1,389 Times

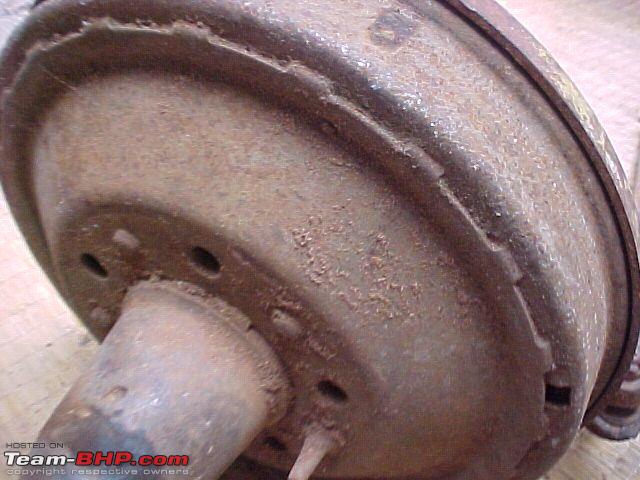
Next was the suspension, the differential carrier, wheel bearings, brakes, brake lines, shock absorbers and basically all other chassis components. Just to give you an idea I have some pictures of what stuff looked like with years of water and muck going into them

The Experience of Restoring a Vintage/Classic Car or Bike-mvc355f.jpg

Name:  MVC356F.jpg
Views: 1317
Size:  54.5 KB

The Experience of Restoring a Vintage/Classic Car or Bike-mvc357f.jpg

Using a wire brush attached to a drill I had to patiently clean every component after disassembling it. Cleaning took up a lot of time, and was laborious.

The Experience of Restoring a Vintage/Classic Car or Bike-mvc359f.jpg

The Experience of Restoring a Vintage/Classic Car or Bike-mvc368f.jpg

The Experience of Restoring a Vintage/Classic Car or Bike-mvc369f.jpg

The king pins were worn and as I couldn't locate new ones locally I had to fabricate them. Here one needs to choose soft metal EN 8 if I remember and have it case hardened. You need the inner material of a kingpin to be soft otherwise it snaps under the forces a suspension encounters. The exterior on the other hand needs to be hard to resist wearing. New thrust bearings were put in too

The Experience of Restoring a Vintage/Classic Car or Bike-mvc370f.jpg

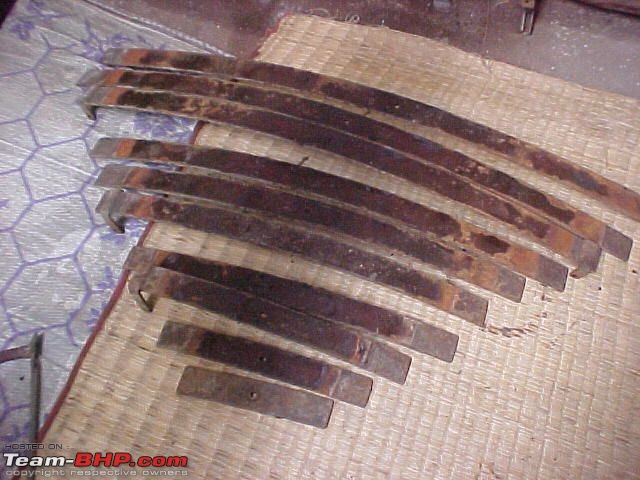
Every leaf was brushed clean and lightly buffed

The Experience of Restoring a Vintage/Classic Car or Bike-mvc372f.jpg

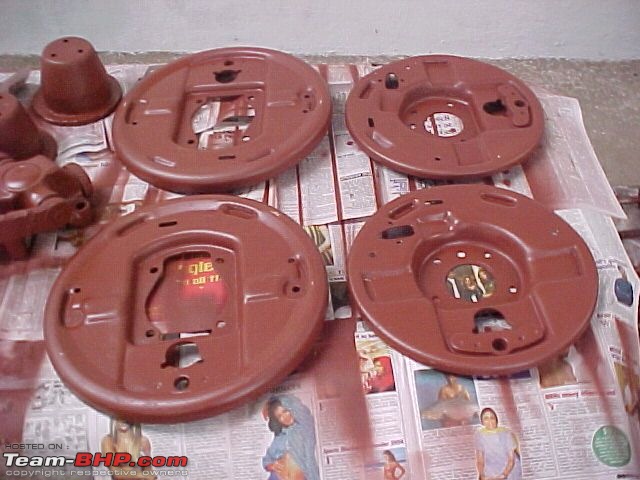
Once all components were cleaned, and renewed as needed they were ready to be painted

The Experience of Restoring a Vintage/Classic Car or Bike-mvc394f.jpg

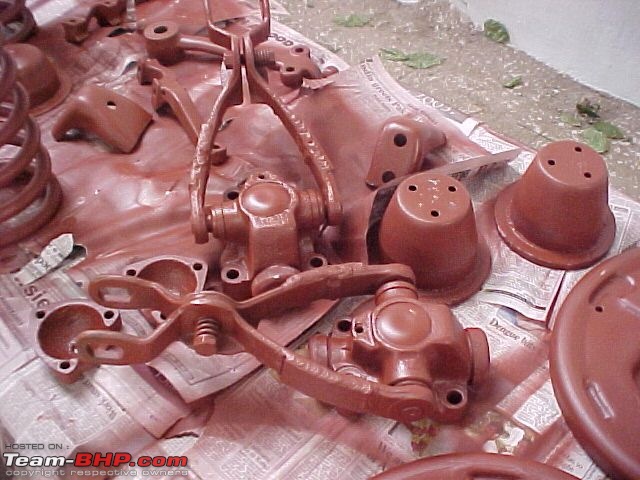
Like the chassis all other related suspension components were first painted in epoxy primer

The Experience of Restoring a Vintage/Classic Car or Bike-mvc400f.jpg

The Experience of Restoring a Vintage/Classic Car or Bike-mvc401f.jpg

The knee action shocks you see in the following picture had oil leaks and worn shafts. It was quite a challenge dismantling them, making new splined shafts, new o-ring seals and ensuring the compression and rebound valves working

The Experience of Restoring a Vintage/Classic Car or Bike-mvc403f.jpg

The Experience of Restoring a Vintage/Classic Car or Bike-mvc404f.jpg

The Experience of Restoring a Vintage/Classic Car or Bike-mvc405f.jpg

Next all the components were painted in the same matt finish black as the chassis and were ready to be assembled back to the chassis

The Experience of Restoring a Vintage/Classic Car or Bike-mvc407f.jpg

The Experience of Restoring a Vintage/Classic Car or Bike-mvc409f.jpg

The Experience of Restoring a Vintage/Classic Car or Bike-mvc442f.jpg

New brake lines were fabricated, new wheel cylinder pistons in aluminium were machined, new brake hoses and all rubber components in the brake system renewed. New liners were riveted.
DKG is offline  
Old 30th April 2008, 19:45   #42
Distinguished - BHPian
 
karlosdeville's Avatar
 
Join Date: Jul 2006
Location: Pune
Posts: 11,976
Thanked: 18,275 Times

DKG, whats the current status on the car? We are looking forward to more of your lovely descriptives on the DIY restoration.
karlosdeville is offline  
Old 1st May 2008, 00:16   #43
DKG
Senior - BHPian
 
DKG's Avatar
 
Join Date: Feb 2008
Location: Hyderabad
Posts: 3,711
Thanked: 1,389 Times

Quote:
Originally Posted by karlosdeville View Post
DKG, whats the current status on the car? We are looking forward to more of your lovely descriptives on the DIY restoration.
Ahh thought no one was interested

Will complete the story with many more pictures and details. Just got a new battery made for the beauty, intend taking her out on the break-in runs before she gets new paint and upholstery.
DKG is offline  
Old 1st May 2008, 01:00   #44
BHPian
 
Join Date: Feb 2008
Location: London UK
Posts: 709
Thanked: 254 Times

DKG, I haven't seen these posts before, just to say that you seem to be making a thorough job of restoring this Packard. I admire your tenacity in preserving this car for many decades to come. Not everyone will do the same. How's the fuel pump? Is it one of those mickey mouse metal (zinc alloy) 2 stage pumps that distort horribly? That might need attention.
Looks like you got the right green paint for the engine, reminds me of the Buick stuff. Did the Yanks have a thing for green engines?
Keep up the good work.
Who do you import your parts from?
PACKARD ENGINE PARTS have a lot of 37 on stuff.
Julian UK is offline  
Old 1st May 2008, 09:44   #45
DKG
Senior - BHPian
 
DKG's Avatar
 
Join Date: Feb 2008
Location: Hyderabad
Posts: 3,711
Thanked: 1,389 Times

Quote:
Originally Posted by Julian UK View Post
DKG, I haven't seen these posts before, just to say that you seem to be making a thorough job of restoring this Packard. I admire your tenacity in preserving this car for many decades to come. Not everyone will do the same. How's the fuel pump? Is it one of those mickey mouse metal (zinc alloy) 2 stage pumps that distort horribly? That might need attention.
Looks like you got the right green paint for the engine, reminds me of the Buick stuff. Did the Yanks have a thing for green engines?
Keep up the good work.
Who do you import your parts from?
PACKARD ENGINE PARTS have a lot of 37 on stuff.
Thanks Julian. This experience ranks as the ultimate for a car buff. I cannot adequately describe the joy of firing up that straight eight. I had a genious of a tutor who used to start the Nizam's RR occasionally. He always told me if the engine doesn't fire on quarter turn its not in tune! He always started RR's with just a swipe from retard to advance and prided in his ability to tune a car so.

I was his last pupil and I loved my 6 am drives to his house where we'd sit by the local tea shop discussing problems and how one should solve them. Excited he'd say, can we have a look at it. So off we'd go back to my house and my mother tells me we were like two school boys engrossed in toys the way we'd pour over a million bits of the puzzle on a table. He was my father's age 75 (at the time, now gone) and I was 40.

You will know this joy only too well! Being a completely solo effort the pleasure was immense. The day I drove the chassis on the road for testing it almost felt like I had scaled Everest

I've always ordered stuff from Kanter, but for this car many parts I fabricated locally. Yes the double action pump was a cinch, but as I had parts for my other cars I was able to renew the many valves. I also took the diaphragm apart and renewed with new material. Delicate job, but works like a dream now.

Will bring this thread upto date soon.

You know what they say about sometimes the journey being far more satisfying? Well this baby is something like that. A labour of love and perseverence

Cars have personalities and when they are in perfect tune, water dripping through their silencers, clean purr with absolutely no hiccup something magnificent about their aura (am a nutcase alright) By the way I think my Dad finally acknowledged I knew something about cars when the big eight started to let out water, and the carb would gather dew as it became ice-cold. Also I got the sound perfect (had to get a new silencer system made)
DKG is offline  
Reply

Most Viewed


Copyright ©2000 - 2024, Team-BHP.com
Proudly powered by E2E Networks