News
Maruti Alto: Useful Modifications & Maintenance
A few of these mods weren't part of my "top model" back then and the rest are maintenance works that were not readily found on the internet.
BHPian PratyushJaya recently shared this with other enthusiasts.
This thread is dedicated to some practical mods and part replacements that were be done on Maruti Suzuki Alto Type-2. A few of these mods weren't part of my "top model" back then and the rest are maintenance works that were not readily found on the internet. I would like to share these with fellow Alto owners. I don't have photos for everything so I will try to explain in depth where required.
This thread will only cover the procedure and parts required and most of these can be done at home with a toolkit. I enjoy doing work on my machines and some money was saved in the process. A few of these were carried out in a Friendly Neighbourhood Garage because I didn't have the required tools or experience.
Why I had to do some of these works will be talked about in another thread.
Each work is split into different posts and I listed them on the first post. Click on the desired item to jump to the particular post.
Modifications
- Install Latch Release for Boot/Tailgate/Dicky
- Install Adjustable ORVM (Outside Rear View Mirror)
- Install cabin filter
Maintenance
- Replace Air Conditioner Control Unit backlight bulbs
- Replace A/C button
- Service A/C blower unit
- Replace Speedometer backlight bulbs
- Replace battery tray and repair corrosion
- Change wiper arms
- Replace PCV Hose
- Replace Breather Hose
- Replace Exhaust Resonator
- Replace Steering Rack
- Clean Coolant Reservoir Tank
Most of the parts used are from the OEM or aftermarket parts of equal or better specifications.
Some of the parts weren't properly catalogued in the Service Booklet and not much information was available online so I thought my posts might help someone save time and effort.
If you see an item without a hyperlink to the post, it is because I am compiling the photos and the written material.
These works were done on Alto Type-2 but may also be done on Alto Type-1 and even Alto K10 Type-1 with slight part changes if any.
Modification
1. Install Latch Release for Boot/Tailgate/Dicky
Parts Needed:
- 83310M76G50 - Lever Compfuel Lid Opener (₹51) X1
- 82650M79G00 - Striker Back Door (₹38) X1
- 83350M79G20 - Cable Comp Back Door Opener (₹116) X1
- 75411M76G20 - Clamp for Cable (₹2) [Optional] X3

Total cost of parts: ₹205-₹211
Prices as of March, 2021
Tools Needed
- Phillips Screw Driver (Socket and Ratchet would be better)
- Hex Head Socket Set and Ratchet
- Combination Pliers
- Penetrating fluid (WD-40 might also work)
Time Required: 3 Hours
Procedure
- Spray penetrating fluid on the four bolts of the driver seat. Good time to check which socket will you need to remove them.
- Remove the clips for the driver side dash trim. Then remove the trim. To remove the clip push on the button at the centre till it depresses a bit and clicks into place. Do not push it further. Then pull out the clip body entirely along with the button. You may use a flat-head screwdriver to push on the button and then for prying out the clip body.
- Remove driver side door sill trim. Carefully pull it out by placing fingers towards the inside of the trim and pulling it upwards.

- Remove the rear seat cushion by pressing on the tabs at both ends of the seat and pulling the cushion upwards while holding the tab pressed. Pull the seat out of the car.
- Remove your parcel tray. Unscrew the parcel tray support on the driver side of the vehicle and remove the trim.
- Remove the clips holding the tail end trim. Then remove the trim.

- Remove the clips holding the carpet in place on the driver side of the car. They are located along the pillar near the taillamp and along the cabin side of wheel well.
- Once all the clips are removed, pull out carpet gently. They are held in place by Velcro strips on the pillars.
- Remove the 4 bolts holding the driver seat to the chassis. Penetrating fluid would have done the job by now. They are often quite tight. Use longer ratchet if needed. Remove the seat and place it outside the car.
- Now remove the clips on the door sill trim on the back door of the car. Slide out the trim.

- Lift the floor carpeting on the driver side carefully. Over the years the carpet gets stuck to the compacted sound deadening material and if you pull out too fast the layers will separate. I was unable to remove my driver seat as it was interfering with gear lock installed by the dealership. If you face such an issue, do remove the chair and lift as much carpet as you can under the driver seat and on the rear seat footwell.
- Remove the Fuel Lid opened Lever attached to the frame. You will need a Phillips head screw driver. Do not remove the fuel lid cable yet.
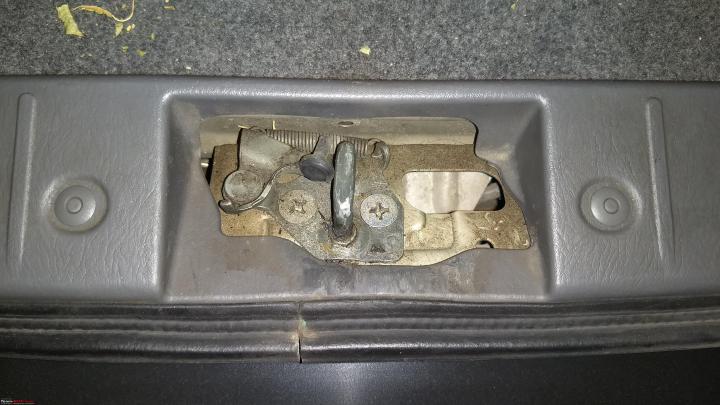
- Remove the old latch striker screwed on to the tail end member. They are pretty tight and I had to use my ratchet with Philips head attachment to break free the 2 screws. I didn’t want to strip the screw heads. You may use a Phillips head screw driver.
- The cable has different ends. The ball end of the cable attaches to the striker. Take the new cable and push it through the hole on the tail end member till it emerges on the spare tyre wheel well. Pull it out till you are left with a foot of cable hanging out of the tail end member.
- Attach the cable to the striker. I don’t have images for it. It was pretty straight forward.
- Now screw the striker to the tail end member. When standing at the rear end of the car, the cable will come out to the driver side. You will notice a small lever on your boot latch. The striker hits the lever to unlock the boot. So, install it accordingly. Do not tighten the screw yet. Just screw them enough to keep it in place.

- Now route the cable alongside the wires running along the driver side of the rear wheel well. You might notice that the clamp for boot door cable has already been installed from factory. It was pre-installed on mine. If you don’t want to take a chance, you can buy the clamp for cable. 3 pieces are required as per parts manual. I would suggest you buy at least 5. Pop the cable into those clamps. For those who didn’t have the clamps, you will know where to install them when route the cable.
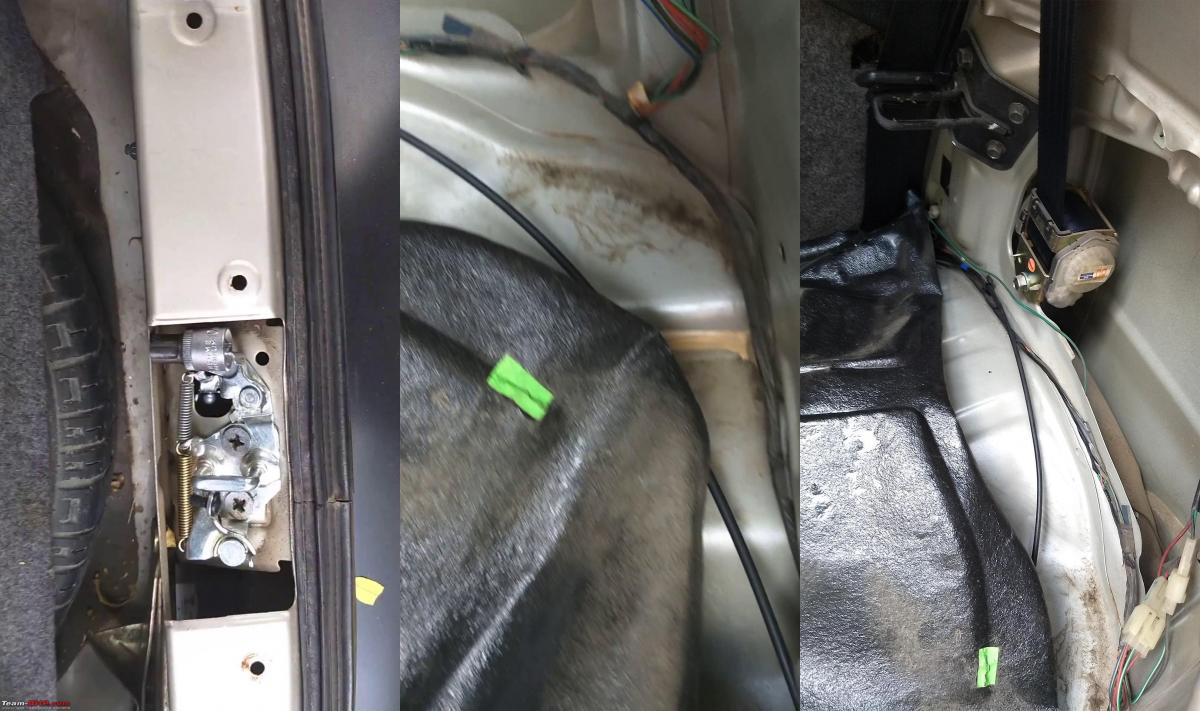
- Next, the cable travels along the rear seats and then takes a turn to the passenger side after the seats. There’s ridge running along the middle. The cable needs to be routed along this till it hits the cross member below the driver seat.
- Thread the cable through this cross member. Have a look the fuel lid cable going towards the lever. Do it accordingly. I was unable to remove the seats so I figured it out by running my hands over the floor pan.
- Observe how the fuel lid cable is connected to the old Lever. Remove it and connect the new Lever to the fuel lid cable and then the boot cable. The cylindrical end of the cable is attached to the levers. Make sure that the cables are not intertwined.
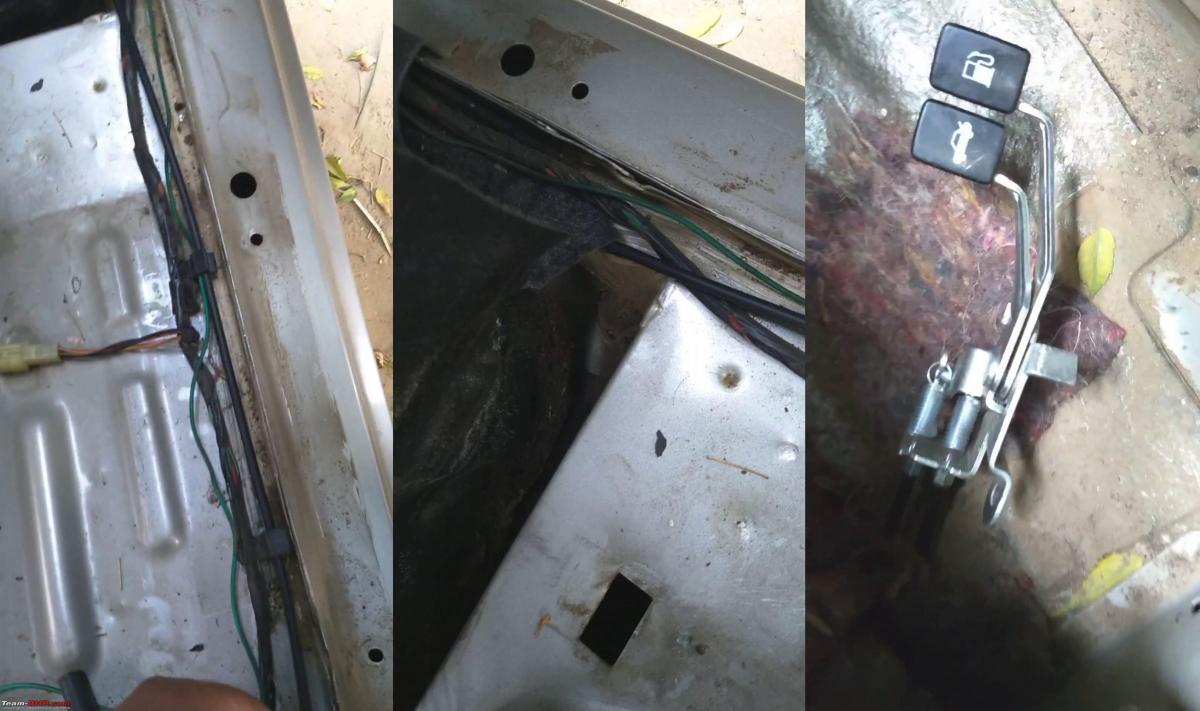
- Attach the new Lever to the frame by its single screw. There’s also a tab that keeps it in place. Make sure it is positioned properly. Now test the operation of the fuel lid door and boot opener by pulling on the levers and verifying if the striker is moving and the fuel lid opener pin is being pulled.
- Tighten the 2 screws on the striker completely. Make sure the cable is routed properly and pushed into the clamps.
- Close the boot and fuel lid and test the levers. I had to bend the striker a bit with combination pliers to make it move the lever sticking out of the latch.
- Attach the carpets back into place staring with boot and moving forward to the driver side. Make sure the carpet is laid flat and in its original position.
- Now push on the buttons on the clips from the other side so it sticks out a bit from the clips. Clip the carpet in place inside the boot. Push on the buttons sticking out to lock the clip in place.
- Attach driver side door sill trim piece. Make sure to slide it under the pillar trim.
- Attach the driver side dash trim. Push the clips in and lock it in place. Make sure this trim goes over the door sill trim.
- Attach the rear door sill trim and install the clips holding it in place.
- Attach the parcel tray holder trim piece.
- Attach the tail end member trim piece and install all the clips holding it in place.
- Inspect the carpet for any kinks or irregularities. Install the driver seat and bolt down the 4 bolts securely.
- Install the rear seat with back end into the frame first. Then push the rectangular hooks into the frame till the seat is affixed firmly.
- Installation complete! Clean your car, keep your sockets back in your toolkit.
Check out BHPian comments for more insights and information.
Find Car News
Just News


About Us


Buy & Sell
USED CARS