News
Refitting my 13-year-old BMW 328i's rubber door seal

I have decided not to lose sleep over this. If water ingress isn't happening when it rains, I am okay.
BHPian sandeepmohan recently shared this with other enthusiasts.
I searched all of YouTube and the Interweb and found nothing that speaks specifically about dealing with a failing rear door frame rubber seal on a BMW F30. I've not been 100% successful with this DIY. I still thought of documenting what I did and taking feedback on procedures.
I own a 2013 BMW 328i. I bought a car used a couple of years ago. I picked it up with an odometer reading 64,000. The odo now stands just shy of 91,000km. The car has been a reliable and fun drive so far. However, with age, things have started to fail. The first major failure was a blown front strut seal. Had to replace two front struts as you can't buy one and that set me back about Rs. 74,000 (converted from NZD). The next issue is a relatively known one among several BMW F30 forums and that is the failing vapour barrier. This is basically a seal inside the door card that holds back water from making its way into the cabin during rain or a car wash. All cars have such a seal but the implementation is different for this series of BMWs where they use a type of Styrofoam material glued to the door frame with some sticky-looking M Seal kind material. When the Styrofoam comes off the black rubber glue thing, water makes its way in and you end up with wet carpets. I sorted this as a DIY on 3 doors.
What I am documenting here is a particular issue with the rear right door frame rubber seal. With age, it tends to warp or go out of shape at the section just above the rear quarter glass. When it's too warped, there isn't a proper seal anymore (Pictures will illustrate that) and this lets in water. Water basically falls on the rear seat side bolsters and can end up soaking it. I don't know if it had been leaking longer. I noticed it once when I took the car into one of those automated contactless car washes where high-pressure jets of water hit the car to knock off dirt and soap. There was a noticeable leak from both doors at the exact same point, that is, right above the rear quarter glass. On visual inspection, the door seals were indeed warped out of shape at that exact point. I must have spent several hours looking for others' experience in dealing with this problem and even posted it on the F30 forums on Bimmerpost. I was advised that it was indeed the rubber seal as it was visually out of shape, however, no instruction on how to handle this. The thought did float on my mind to approach a body repair shop and have them sort this out. As labour is expensive here, I thought of giving it a go myself. I was successful at attempting this as a DIY, however, the issue isn't quite solved.
To start, I had to identify and source the part. I found a company called European Auto Spares based out of Auckland, New Zealand. They sell used and new parts. I walked in last week and described to them what I was after and shared a part number from the Internet. The label on the box read BMW F30 3 Series with the part number 51357258330. The part is titled Rear Door Frame Rubber Seal. This is a self-adhesive door seal. You can peel it off like a band-aid and stick it to the door frame. Sounds easy and does require a bit of planning and photo documentation of how the original seal was fitted so you know exactly where to stick and how to route the seal around the door. This seal is also a continuous loop. There is a cut mark but the rubber isn't actually cut. This means you need to remove an E-Torx screw on the rear door check to remove the old rubber (or just cut the old rubber seal) and slip the new one in.
The rubber seal cost a wallet bleeding $402 or Rs. 20,000! I could not source a used or second-hand seal and this was my only option. Besides; if it was a used rubber seal, I doubt if it would have had a self-adhesive tape around it which will make the job harder.
You need to remove the door card and a plastic window frame panel to access the seal. It may be possible to remove and fit the new seal without the removal of the plastic window panel. I decided to remove it anyway as it would make the job easier. The plastic window frame panel is secured with two metal plug-in retainers. One on either end of the door. This is a very flexible plastic part that wraps around the inner window frame. Care must be taken while removing and refitting. During refitting, it helps to lower the glass window a little to help flex the plastic so it slots into place.
Removing the door car was familiar territory for me as I had popped them out a few times when I had the vapour barrier leaks. You start with removing the inside door grab handle trim, take out two torx screws, remove and disconnect the power window switch, and pry open the door card using a trim removal tool. The door card is held by plastic clips like this. With age, these have a tendency to break so it's best to keep spares on standby in case they do. Once you unseat all the plastic clips, care must be taken by gently unhinging the door card from the top clips. Care must be taken to remove the door lock pins or the little lock protruding thing that tells you if the door is locked or unlocked. Then you unwire the wiring harness for the door light, speaker and ambient lighting. Finally, remove the door lock cable. All of this can be done by hand. No special tools are needed for cable removal.
Next up was removing the plastic window frame. This was relatively easy. You start by removing the window panel at the two corners of the door and then work your way around the rest of the window. Once again, no special tool is needed for this. Be gentle in handling.
With the plastic window frame off, you now have unrestricted access to the door rubber seal. You can pry it off by hand if you wish. I think a tool is better. I ended up with two sore thumbs and hurt undernails. 80% of the old rubber seal came off without an issue. The upper section which wraps around the window was stubborn and left a lot of glue on the surface. This is where I ended up using my thumbs to push up the stuck glue and that ended up hurting the tender skin under my nails. Some kind of sharp trim tool is necessary that won't damage the paint. Once I got the old glue removed, I cleaned the entire surface with Isopropyl Alcohol. When you are sticking something, you need to make sure the surface is absolutely clean.
I had slotted the new door seal in (Note unscrewing of the door check or door stop above), peeled a little bit of the tape and started fixing the new door seal from where the original one was fixed. Note that the rubber seal is one continuous loop. There is a mark, and incision present but the rubber doesn't really have an end. I decided to place this incision mark at the place where the old rubber seal incision was and that started right where the electrical wiring harness travels from the chassis into the door. I gently peeled more tape and just casually stuck the seal and routed it in short lengths, so if I get the routing wrong, I can peel it off easily and refit. There were several markers on the door that do indicate where the seal should be but it's best to video how the old seal was fitted so you have a reference of some kind. My son helped hold the top part of the seal around the window frame before I got to it else it kept falling which would have made the task harder. Once I managed to get around the window frame, the rest was okay. Just need to pay attention to routing the seal. Getting below the door is the hardest part as you sort of need to bend or lie down on the ground to get it right. Or, you unmount the entire door from the chassis.
From the visual appearance, it does appear I aligned and fitted the seal perfectly. I noticed that just above the rear quarter glass panel, the rubber seal is noticeably stiffer. This was there on the old seal too. You can feel this when you pinch the rubber seal.
With the new rubber seal in place, I started to refit things. Starting with the rear window plastic frame. This was easier to remove that refit. Not an impossible task but does need care and patience. This piece wraps around the window frame.
Refitting all the wiring for the power window, speaker, courtesy light, and door lock and mounting back the door card needs patience and care. Sometimes the plastic door clips don't align to the holes in the door so you need to move the door card a bit. Likewise for the metal hinges that basically hold the door card at the top. The slot is only if they are aligned. Careful of the lock pin too.
Was mighty proud of the end result. However, the true test was taking the car into a car wash and checking for leaks and here's where things did not go as planned. While there was no leak right above the rear window quarter glass, I noticed about 5 to 6 drops of water falling in from a different location. It was from a door seal point again but this time, somewhere midway from the top of the window glass. The test was once again carried out at a contactless car wash where the water pressure is high so I am wondering if that's a bit too much pressure. For now, I have decided not to lose sleep over this (I am trying hard). If water ingress isn't happening when it rains, I am okay.
The only option left now is to replace the rubber seal on the chassis as that's the only other part that makes a seal with the door frame rubber seal. Open to ideas on how to solve this issue.
I also noted that even though the old leak had stopped, there were signs of water and soap residue around the new rubber seal, right above the quarter glass section. Not sure if its supposed to be wet at that location.
Red circled section showing warped door seal. The seal on the left door is far worse and for some reason, did not let water in as much.

The blue circle is where the old leak was. The yellow circle is where the new leak has developed after fitting the new door frame seal. The alignment of the new seal is perfect at this position and compares to how the old one was fixed.

Yellow circled section showing the incision point or starting point of the rubber seal. You could either cut the seal and work with two ends or just take the rubber seal around the frame without making a cut. I did the latter.
The E Torx screw head. I did not know there was such a thing called E-Torx. Wasted one hour and $50 buying new bits. I had to unscrew this bolt to take out the old rubber seal and slot in the new one. Unfortunately, I don't have a torque wrench so the torque nm is purely on feel. I don't know the correct nm to be applied.


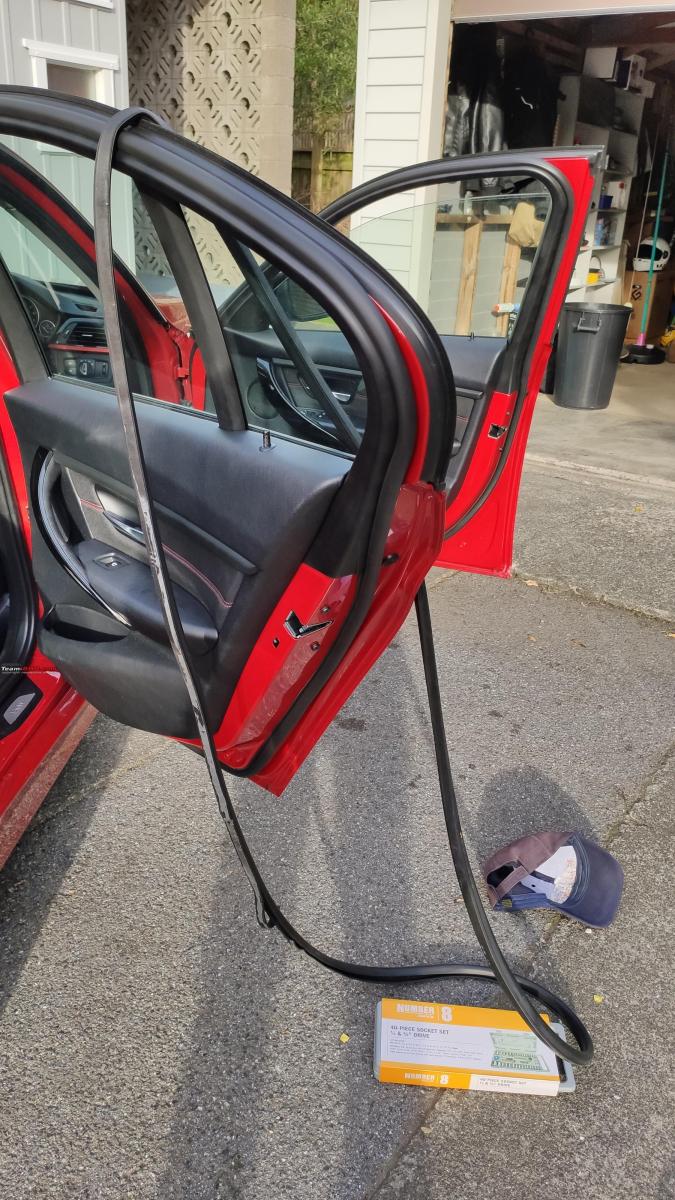
New rubber door frame seal fitted. The old one hanging from the door. Note how the new seal stays flush with the plastic window frame and just above the rear quarter glass window.
Check out BHPian comments for more insights and information.
- Tags:
- Indian
- Member Content
- bmw 328i
- Doors
Find Car News
Just News


About Us