Hello again everyone!
This one needs no introduction to Laura owners, pretty much everyone with a Laura thats over 5yrs old is having this issue or starting to experience this. For those who don't know what this is all about, I'll explain it. In Skodas & VWs, the AC fan blower speed is set/controlled using a rotary knob like all other cars with one significant difference - the don't have fixed steps for speed. They rotate 360 degrees and depending on the direction of turning, it'll either speed up or slow down the fan. Of course there is a speed indicator. This is good(?) for ergonomic reasons, but the technical side of this is quite complex. This kind of setups use something called a 'rotary encoder' which detects the direction of turning and the number of rotations. They're commonly used in car stereo volume controls. This will work as intended for quite some time according to VW. But, in our climatic conditions we might need to adjust the temperature & fan speed to either sides of the temperature spectrum in the same day itself! That takes its toll on the control knobs.
In Laura(L&K Versions), there are 3 such knobs - Driver side temperature control, Passenger side temperature control and the fan speed control. The fan speed control knob is the one that is used more often. When this fails, It'll become hard to adjust the speed of the fan to our liking, the speed will jump up/down irrespective of the direction of knob turning. It'll become extremely hard to adjust & will require a lot of patience. A replacement fix would cost around 10k as they'll replace the whole climatronic control unit which has a couple of LCD screens, seat heating controls and others. I know how these rotary encoders fail & often times they're irreparable. Initially I thought about removing the passenger side temperature control encoder and swap it with the fan speed control encoder. Since the passenger side temperature control is not used often, it was a logical decision. But once I got to the encoder, the German engineering revealed itself! The encoder is completely repairable & requires no swapping! Just a bit of cleaning with a bit of rubbing alcohol did the job and it works good as new!
This is a good read if you'd like to know more:
http://practicalusage.com/side-proje...tary-encoders/. Our cars use the same principle but uses superior quality components.
If you're going to try out some kind of DIY on a German, you'll need a Torx tool set. A generic one would do. I use the following tool set & it has quite a lot of tools. This is sufficient for everything interior.
 Disclaimer:
As always, attempt at your own risk!
Steps
1) Remove the plastic trim around the stereo and the climatronic controls. To do that, open the cigarette compartment in front of the gear knob, pull the trim out from the lower side:


Be careful when you pull it out from the top side. Use a bit of caution and DO NOT pull hard, just use a bit of pressure and have patience!

2) Once the trim has been removed, you'll get to see the climatronic control unit. Remove the torx screws that are annotated by the red arrows:

3) Once the screws are removed, the control unit will come off easily. Now comes the tricky part! Removing the electrical connectors from the unit. These are NOT the usual push and pull type connectors. In the below image, have a look at the red plastic tabs. Pull those up first and then remove the connector. I've annotated where to pull. Just pull the red tabs up, and the the connector itself. They'll come off easily:


4) Once the unit is out, put it out on a flat surface with adequate lighting.

Turn it over to reveal the screws behind:

Once again, use the torx set and remove the screws. Once the screws are out, the unit can be opened up.
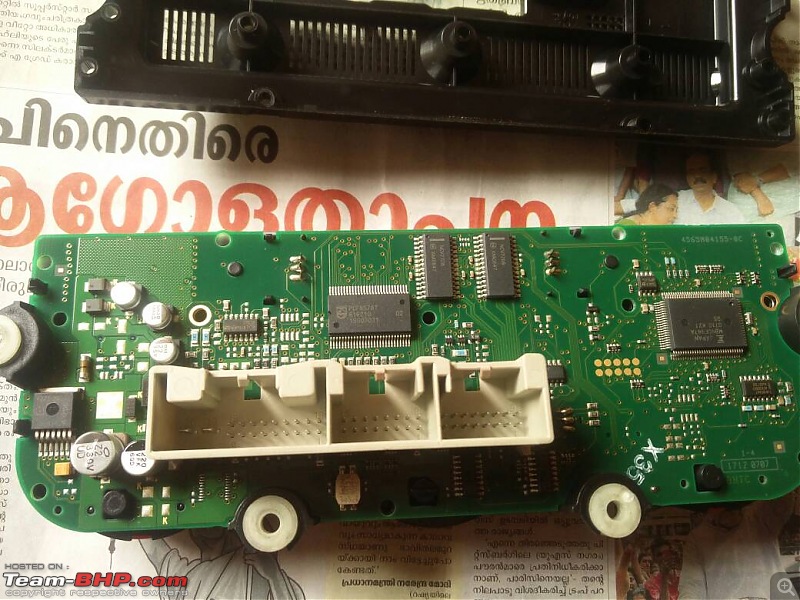

5) There are 3 encoders and the one annotated in red is the one we're after. They're tiny and not at all like the generic ones. These are well engineered surface mount encoders that use metal tracks and high quality plastics.

We can take apart the encoder to clean the inside. To do so, take of the metal caps on them. The caps can be removed easily, use a safety pin or a long paper pin to pry up the cap out of the locks. Refer the below image, use less force, they're delicate and will come off easily:

Simply use a tiny force and the cap will come right off:
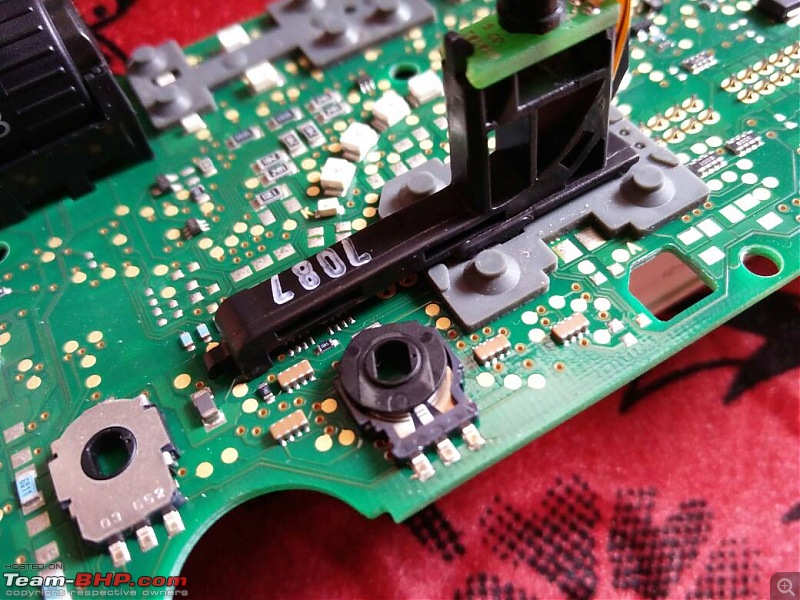
Be sure not to bend/flex the metal cap during handling.
6) Remove the part that is in the middle of the encoder. This part rotates and is partially responsible for the issue we're having.

Using a bit of rubbing alcohol, clean the tiny metal fingers annotated in the image. Also, use the safety pin to slightly pull up the fingers to restore them.
Now use a bit of rubbing alcohol and a clean cloth to wipe the tracks on the encoder body. Make sure that you'll wipe the tracks multiple times to clean up well.

Once you're happy with the clean up, put the centre piece of the encoder back, and then the metal cap.
7) Putting it back together requires a bit of trickery. On the second half of the control unit, there are tiny tabs that align with the rotary encoders on the circuit board. The encoders have rectangular holes while the plastic pieces on the other half have tiny rectangular projections. Annotated below. Make sure that all of them can go in and lock into place:

Once that is done, make sure that all 3 knobs are turning. Put the screws back in and assemble the unit.
8) Putting back the connectors requires the red tabs to be in pulled out position. Put the connectors back one by one and then push the red tabs to lock them in place.
9) Put the unit back into the car, tighten the screws by 2 threads, but DO NOT tight them up yet. Make sure that the unit is in place, take the radio trim and verify alignment. You might have to adjust the unit by moving slightly to the left or right. Once you're happy with the fitment, tighten everything up.
Thats all! Now you have a perfectly working ac blower speed control knob!
Notes:
1) DO NOT use a lot of force while removing the radio trim
2) DO NOT touch the tiny components on the circuit board with wet/sweaty hands.
3) DO NOT take out the LCD displays out
4) Have patience while putting it back!
While working on this car, I've learned that it takes a lot of patience to put something back once it has been removed from the car, quite strange!

Thank you for reading!


 18th June 2017, 19:13

 (26)
Thanks
(26)
Thanks


