Team-BHP
(
https://www.team-bhp.com/forum/)
-
4x4 Vehicles
(
https://www.team-bhp.com/forum/4x4-vehicles/)
Visit to Mayapuri
Hi Every one,
Yesterday I had gone to Delhi for a day and made a short trip to Mayapuri. Met Mr Hukum Singh on suggestion of my friend and Mentor from the Navy. Mr Hukum is an expert in Jeeps, but now primarily deals with Army disposable Gypsy"s. I found out that I cannot make an upgrade to hydraulics clutch as I have only four gears(one reverse and three forwards)
I also went to a Jeep specialty shop Khairatilal. You can name it and you can get the spares here. I picked up Jeep logos, stickers, indicator lights, map light and instrument lights. Will load pictures and videos tomorrow
New NDMS Tyres
Bought two MRF NDMS Tyres
Quote:
Originally Posted by BABABOT
(Post 5868696)
New NDMS Tyres
Bought two MRF NDMS Tyres
|
Please note, these tyres have a lot of flat surface on them on the contact patch. This makes them skid and hydroplane on wet flat pavement even though they are good in mud and sand.
When these types of tyres lose traction they tend to lose it big. In such a skid your steering wheel is useless and you just go along for the ride. It's like being on glare ice. I speak from hard expensive experience on this.
Find yourself a safe quiet spot, do some swerves and some heavy braking at low speed on wet smooth pavement and see how these tyres behave. Then do it again at only slightly higher speed until you are confident you know how the vehicle will react. Later, if you want, you can buy some A/T tyres (All Terrain Tyres) such as Geolanders. These are a compromise between highway and off-road tyres.
Quote:
Originally Posted by DirtyDan
(Post 5868841)
Please note, these tyres have a lot of flat surface on them on the contact patch. This makes them skid and hydroplane on wet flat pavement even though they are good in mud and sand.
|
THANK YOU VERY MUCH Dan
The Advice from such an experienced Jeeper will be followed. As advised, will soon take him out for a spin an do the brake testing as stated
RESTORATION COMMENCES
Dear Members
I had focuses so far only on getting used to the Jeep, driving it around ,understanding how it behaves, arming it with new tyres and so on. I in this phase had only focused on
1, Mechanical Fitness. As part of this I has carried out detailed servicing to include oil changes, checking the brakes, checking and repairing the wiring.
2. Documentation. As this i a old jeep I was very particular about the documentation of the jeep. It included updating all data correctly and veryfying the same from Parivahan website including MV tax, Regn Validity, PUCC and Insurance.
Now that i was satisfied with the documentation and understanding the vehicle. Today I left my Jeep at the Garage. The next step are Firstly
Denting and other Welding Works
The wiring of the Jeep will be removed first tomorrow and the denter will take over. the following is being planned
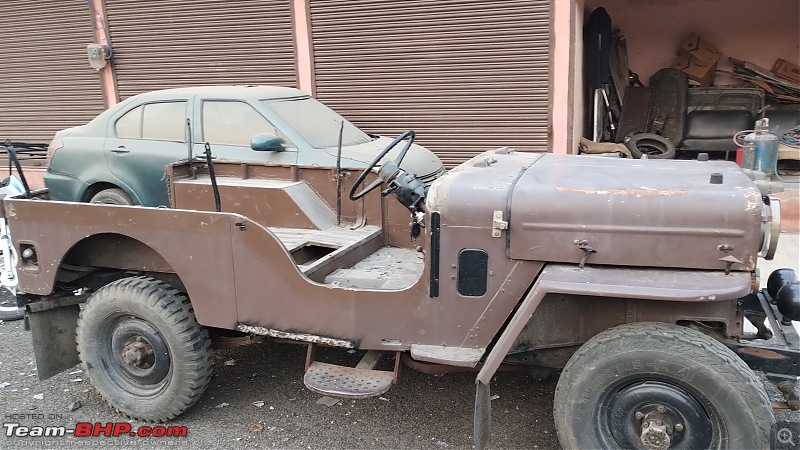
1. Removing the body (tube) . After the wiring etc are removed , the tube will be removed from the chassis. Thereafter the entire paint will be scrapped off from the tube, bonet, fenders. The Paint from the chassis and the engine will also be removed.
2. Denting. where ever minor denting work needs to be done, will be carried out. It will also include adding extra strength in the form of Iron Frames to strengthened the bonet so that people can stand on it.
3. Roll Cage. A roll cage will be fabricated and installed.
4. Innova front Seat. Frames will be made for Installation of two Innova front Seat
5. Engine and Body Mounts. All the engine and body mounts will be checked and necessary strengthening will be done. All rubbers (don't know what it is called) on the mounts and on the shocker will be changed.
6. New Canvas Frame. A new Canvas frame will be fabricated so that it can be easily dismantled and the Jeep can be made Open. Facility to get the windshield down completely and attachment to hold it to the bonnet will be made
This completely process will take approximately 7-10 days. I will not be making the rear seat front facing. I believe pictures will tell the story properly hence once the work starts from tomorrow, i will upload the process on picture story form.
Quote:
Originally Posted by BABABOT
(Post 5876326)
RESTORATION COMMENCES
1. Removing the body (tube) . form of Iron Frames to strengthened the bonet so that people can stand on it.
5. Engine and Body Mounts. All the engine and body mounts will be checked and necessary strengthening will be done. All rubbers (don't know what it is called) on the mounts and on the shocker will be changed.
.
|
In American English it is called a "Tub" not a "Tube". (Rhymes with "rub".) A tub also usually means a big metal bucket kind of thing that people wash dogs and apples in...not at the same time. "Tub" is kind of an American slang term for a jeep body, but good usage.
The rubbers are usually called bushings, if I understand you. I think previously I suggested you check them, so, GOOD!
Sounds like you are progressing in an orderly manner. Good luck.
Update
The old wiring is being removed completely. This is required to remove the Tub. Moreover complete rewiring will be done post painting. Some of the pictures of the process
Update
Today the Tub was separated from the chassis. All the engine mounts and joints were checked and found to be in good condition. Minor leakage points has been identified and they all will be rectified. The chassis will be washed with caustic soda and then rubber paint will be applied. The bushing will be changed completely. The tub was also found to be in pretty good condition. the entire paint and rust will be removed. Thereafter tinkering/denting works were required will be carried out. the underside will be painted with rubber paint. The pictures are attached
Update
The denting work has been completed.
Today Identified the painter who will execute the Paint Job
1. The chassis. After washing with caustic soda, rubber paint will be applied through spray paint.
2. The Tub. Firstly, paint remover will be applied all over it to remove all old paint,putty etc. There after a coat of primer will be applied. Then putty work will be done. After rubbing paint will be applied. I have asked for Du Point. A total of three coat of Paint will be done.
A new tool box of major jeep has been procured. One of the front seat will be mounted on top of this tool box.
Quote:
Originally Posted by BABABOT
(Post 5878911)
A new tool box of major jeep has been procured. One of the front seat will be mounted on top of this tool box.
|
Suggest you check with your mechanic...might your new seats install easier without this box? It is not really necessary to have it under a front seat unless you are a purist restorer. You could put in the rear somewhere, you could modify it or not use it at all....What I am saying is, there are options.
Very interesting. I have a 1984 Cj which is still being maintained stock. Few points:
1. Let that tool box be. It’s unusable and will only value add rusting and nothing more. Also installing the Innova seats would be a bigger pain on top of it.
2. Since your jeep has already lost originality, I suggest removing the oil bath air filter to a dry type.
3. Check your oil pressure meter, if it’s a live type please change to an electrical one.
4. Open the steering box and grease and oil it.
5. For tyres check out the MRF/ Ceat lugs for camper. Radials with tube.
Will appreciate the address and contact details of that jeep accessory shop.
Quote:
Originally Posted by DirtyDan
(Post 5879352)
Suggest you check with your mechanic...might your new seats install easier without this box?
|
Dear Dan,
The idea to install this box came yesterday only when I was with the denter for designing the frame for the seats. So the idea was why not have this box of the same size as the frame, the box is being resized to the approx frame size which the denter was extremely confident to execute it to perfection. Of course if it doesn't work out we will not install
Quote:
Originally Posted by wanderernomad
(Post 5879578)
Very interesting. I have a 1984 Cj which is still being maintained stock.
|
point 2. Oil Filter. I will discuss this and make the necessary change
Point 3. I was not at all aware of this. Will discuss and try and implement it.
Point 4. Yes. This again was never on my mind. Will do this
Point 5. Oh i have already procured MRF NDMS 6.00x 16
Will appreciate if you share the address and other details of the Shop. I was impressed when I visited a shop Khairtail in Mayapuri too.
I would request all experts and Gurus to keep on guiding me
Quote:
Originally Posted by wanderernomad
(Post 5879578)
3. Check your oil pressure meter, if it’s a live type please change to an electrical one.
4. Open the steering box and grease and oil it.
|
Modern WORKING meters get my vote....oil pressure, water temp, voltmeter.....if you can easily do it. Gages, meters, are not too expensive and many come back-lit so they can be seen at night. Ask your mech if it can be done for this vehicle.
Steering boxes on old Mahindras are "touchy". One school of thought is that, unless you have a bad feel in the steering, don't open it, if it ain't broke, don't fix it.
The other school of thought is to open it, check it, clean it and grease it. This last gets my vote. The problem is steering boxes tend to seep and leak. Opening one may, or may not start a leak. If you do get leakage these leaks are hard to stop permanently. (Been there, done that, bought the T-shirt) and, steering boxes are a little expensive to replace. Ask your mechanic what he thinks about this. Then, if he suggests it be opened and it later leaks, you can beat him about the head and shoulders with a stout piece of bamboo.
I've noticed that the floor cleaning holes in the tub have been welded, don't make this mistake, open both the holes on the driver and passenger side, as well as the back portion. Also check the holes in the firewall, should never be closed.
You can close these holes with rubber grommet/stopper.
All the best.
Quote:
Originally Posted by DirtyDan
(Post 5879958)
Modern WORKING meters get my vote....oil pressure, water temp, voltmeter.....if you can easily do it.
|
Dear Dan,
Not only are your suggestions and recommendations technically good, I am so impressed by how well you express it with humour. The meters are modern I suppose as it has those mini lights that illuminate the dial. However, it is a good recommendation and I will get it checked.
Quote:
Originally Posted by Vinod_nair
(Post 5879971)
I've noticed that the floor cleaning holes in the tub have been welded, don't make this mistake, open both the holes on the driver and passenger side, as well as the back portion.
|
Dear Vinod,
There were many mini holes there so I asked him to seal all the hole and make a new big one. I will share the pictures today. Thank you for your keep observation
| All times are GMT +5.5. The time now is 12:34. | |
