Team-BHP
(
https://www.team-bhp.com/forum/)
-
4x4 Vehicles
(
https://www.team-bhp.com/forum/4x4-vehicles/)
- -
My MM540XD upgrade
(
https://www.team-bhp.com/forum/4x4-vehicles/49375-my-mm540xd-upgrade-15.html)
Hi Arka,
Even as I type, the clock reads 2.20AM. I read the entire thread in 3 hours non stop. Very enlightening. Is pickup front and rear axles a direct bolt on on the 540 or does it require any mods? I am envying your wide axles. would like to know whether your axles are from an FC or pickup. I hear from Jammy (MM440 on TBHP) that FC axles wears out very fast,is it so? Will keep bothering you now and then.
Thanks in advance
Regards
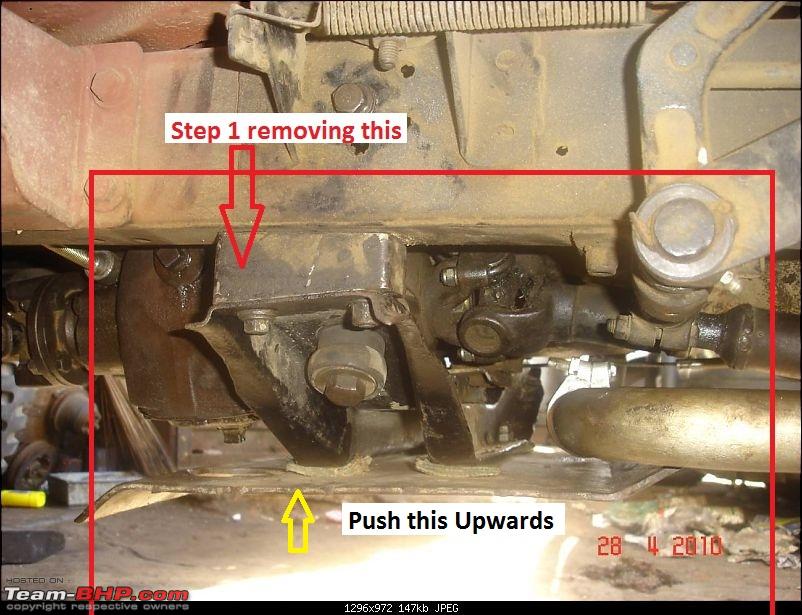
Hi Arka , please tell me can the following be done .
some background : I have always seen the 540 getting bellied on the GB mounting crossmember , because its so low .
Question : Now if we push the crossmember upwards to create more ground clearance what will happen ? specifically with the Prop shaft angles ? ( other issues like Clutch linkage, making room in the floor pan for the GB seem to be managible )
I think this can be done in 2 stages
1) remove the spacer bet chassis & crossmember ( for initial trials)
2) making a completly new cross member . ( a good tougher than stock crossmember can be made/fabricated using old chassis material from other vehicles )
I am using one of your pictures to explain :D

Sudarshan
Quote:
Originally Posted by Sudarshan
(Post 2202677)
Hi Arka , please tell me can the following be done .
some background : I have always seen the 540 getting bellied on the GB mounting crossmember , because its so low .
Question : Now if we push the crossmember upwards to create more ground clearance what will happen ? specifically with the Prop shaft angles ? ( other issues like Clutch linkage, making room in the floor pan for the GB seem to be managible )
I think this can be done in 2 stages
1) remove the spacer bet chassis & crossmember ( for initial trials)
2) making a completly new cross member . ( a good tougher than stock crossmember can be made/fabricated using old chassis material from other vehicles )
I am using one of your pictures to explain Attachment 479555
Sudarshan
|
Hi Sudarshan JEE,
You can try out the following.
1) Remove the Cross Member Spacer (Aluminium)
2) Cut the spacer, keeping only the Triangular Profile, at the bottom.
3) Weld/Bolt U-Channel on the Chassis to bolt on the Cross Member (NGCS)
I have tried out the First 2 Option and there was a lot of drive line vibration, the Second option was slightly better, but I fit back the Original Spacer.
Since you Vehicle is a Longer Wheel Base, the vibration will not be so pronounced.
Please ensure you have the Spike Arrestor fitted from the Cross member to the Bell-Housing.
This will prevent the engine moving forward into the Radiator, especially, off-road.
Regards,
Arka
Quote:
Originally Posted by ex670c
(Post 2202790)
Since you Vehicle is a Longer Wheel Base, the vibration will not be so pronounced.
|
Longer wheel base ~ Longer propeller shaft ~ More whirling ~ More Vibrations.
Spike:D
Quote:
Originally Posted by Grace
(Post 2202597)
Hi Arka,
Even as I type, the clock reads 2.20AM. I read the entire thread in 3 hours non stop. Very enlightening. Is pickup front and rear axles a direct bolt on on the 540 or does it require any mods? I am envying your wide axles. would like to know whether your axles are from an FC or pickup. I hear from Jammy (MM440 on TBHP) that FC axles wears out very fast,is it so? Will keep bothering you now and then.
Thanks in advance
Regards
|
Hi Andy,
Front Axle
The FC van uses 58" CKKP (Closed Knuckle King Pin) Type Front Assy, the Later Vehicles use a 57" OKBJ (Open Knuckle Ball Joint) Type Assy.
The 57" OKBJ was fitted on a variety of Vehicles, I was Lucky to find one with Drum Brakes otherwise I would have to do a Booster Brake Conversion.
The Front Axle is a Straight Bolt on, but you have to keep in mind the NGCS Vehicles have a Wider Leaf Spring.
Though the Leaf Spring Pack Centre Bolt gets aligned, there is a Gap in the U-Clamp Plate, between the Leaf and the U-Clamp.
You will have to make a Spacer to endure there is No movement, otherwise the Leaf Spring U-Clamp will get bent or even come out.
Please DONOT Try to Change the Leaf Spring Pad/Saddle on the Axle Tube.
The Front Axle works best with the MRCBT Steering, otherwise there is a lag, while the Sterring turn Lock-To-Lock the knuckle will not. Rear Axle
I have used a Bolero Differential FFRA Assy with FC Van Hubs.
The catch is the Bolero Differential Off-set is to the Left and for the MM540 we need it to be on the Right, so the Axle Tubes have to be Switched.
This was done by Truck Mechanics who are proficient in this kind of alterations.
Once the Hub is assembled, and Leaf Spring and U-Clamp; Plate is bolted on the the Differential Pinion Angle has to be adjusted via the Leaf Spring Pad/ Saddle.
Then the Saddle has to be welded properly to the Axle Tube, In my case this was not welded properly and the and differential rotated, tearing the the Rear Propeller Shaft in Avalakonda 2010.
Tini (4x4addict) and Me are running the above configuration.
Regards,
Arka
Quote:
Originally Posted by SPIKE ARRESTOR
(Post 2202795)
Longer wheel base ~ Longer propeller shaft ~ More whirling ~ More Vibrations.
Spike
|
Hi Spike,
You are right, that is the Reason Tata uses the 2 piece Prop Shafts with Carrier bearing, used in most trucks.
driveshaft.jpg (image)
Also Longer the Wheel Base the Prop Shaft angles are shallower :D.
Regards,
Arka
Quote:
Originally Posted by ex670c
(Post 2202790)
I have tried out the First 2 Option and there was a lot of drive line vibration,
|
Hi Arka ,
well need to go deeper in this issue .
What happens when people do a SPOA on the 540 , what do they do to reduce vibrations ( there must be so many )
What I am trying through this is , I am trying to create clearence bellow chassis as an alternative to SPOA , thus I wont be playing with the suspension & steerig geometry & the CG .( so normal handeling behavior wont go in to toss )
I think the root of vibrations is the flanges not being perfectly parrallel to each other ? do we need to tilt the diffs a little to manage this ? (not the front one as it will disturb the castor )
Anyways my guess was correct as I thought that you Must have done somthing ( work ) on this issue .:D so I asked .
Also I have plans for my jeep ,its actually dads & if it lands in my total controll I will be stripping it completly ,getting rid of that horrible body & try few things like this . so suggest few things ( I may open a thread for that )
Sudarshan
Quote:
Originally Posted by Sudarshan
(Post 2202815)
Hi Arka ,
well need to go deeper in this issue .
What happens when people do a SPOA on the 540 , what do they do to reduce vibrations ( there must be so many )
I think the root of vibrations is the flanges not being perfectly parrallel to each other ? do we need to tilt the diffs a little to manage this ? (not the front one as it will disturb the castor )
|
Hi Sudarshan JEE,
The Catch with SPOA on an MM540 is to Setup the differential pinion Angle for Both Front and Rear Diffs,
If the Rear is setup perfectly the Front will go for a toss, will become too steep (without rotating the front diff due to Caster/Camber/KPI issues)
This is because the Gear Box/T-Case output has to slope into the Rear Diff-Pinion, thereby increasing the Angle for the T-Case front yoke.
Jeepwire.Com Presents: Setting Your Pinion Angle
You can also make a custom prop-shaft, and change the Rear Diff-Pinion Yoke to a Companion Flange, and use the Tata Safari type Double Cardan Prop-Shaft.
Regards,
Arka
OT : The mechanic in the pics , is he from pudupet ? faintly remember Seeing him a couple of times at Border thottam dealer who deals exclusively with jeeps .
Quote:
Originally Posted by greatmana2000
(Post 2202894)
OT : The mechanic in the pics , is he from pudupet ? faintly remember Seeing him a couple of times at Border thottam dealer who deals exclusively with jeeps .
|
Hi Greatmana,
The Mechanic is Mhd.Ali, now shifted to GP.Road.
Regards,
Arka
Hi Guys,
Did some work on the MM540XD.
1) The Front Axle UJ were damaged. In the OKBJ the Front Axle UJs are open; hence exposed to the elements, unfortunately these cannot be re-greased, as a result the needle bearing were ground to dust and a couple of bearing caps had cracked.
2) Changed the TRE Set. First TRE kit was Replaced in Jan 2009 before MGE48 and Munnar OTR. Lasted 2.5 yrs with 2 wheel Alignments.
3) Changed the Knuckle Ball-Joints. Since the OKBJ was second hand unit installed in Dec 2008, I never the Ball-Joint Kit. This is my first Overhaul, steering has become noticeably smoother.
4) Changed the Shackles to Silent Block-Bush. Wanted to try this for some time, and works well, the body roll is also reduced a bit and suspension feels much better, and tight.
5) The Rear Locker was making a little more noise (Lock/Unlock).Opened the diff. and found that the locker Side Gear tooth had chipped and got stuck in the pinion, which in turn ground the crown wheel gear.
So I had to Replace the Crown & Pinion and re-shim the Lockers.
Regards,
Arka
Quote:
Originally Posted by ex670c
(Post 2381565)
4) Changed the Shackles to Silent Block-Bush. Wanted to try this for some time, and works well, the body roll is also reduced a bit and suspension feels much better, and tight.
|
You must be aware of the 'tightning procedure ' of shackle bolts when they ( silent blocks ) are being fitted new .
Sudarshan
Quote:
Originally Posted by Sudarshan
(Post 2381615)
You must be aware of the 'tightning procedure ' of shackle bolts when they ( silent blocks ) are being fitted new .
Sudarshan
|
Hi Sudarshan JEE,
I don't know any thing specific, but I tightened them myself fully, till the centre tube just about goes into the shackle/touches the bolt hole in the shackle.
Regards,
Arka
Quote:
Originally Posted by ex670c
(Post 2381624)
I don't know any thing specific, but I tightened them myself fully, till ==
|
What do I say on this , is a Q for me ,
dont know if you are not pulling me :D
but I assume you are ' Innocent ' :D & try to explain
jokes apart --AFAIK when new silent blocks are fitted do the following
1) fit the leafsprings assy to axles the normal way ( vehicle on jacks )
2) also assemble the shackles the normal way ( when the chassis is hung up on jacks ) BUT
Do not tighten the shackle bolts fully .
3) after ' slight' loosely tightening the shackle bolts , take out the jacks & lower the vehicle fully ,let the leaves take the load
4) tighten fully the shackle bolts in the normal position of shackle ( after the vehicle sits fully on its wheels & the leaves take full load of the car )
This enhances the bush life as the center tube is not kind of pre rotated before the vehicle assumes the normal position . ( on its suspension )
Sudarshan
Quote:
Originally Posted by Sudarshan
(Post 2381670)
What do I say on this , is a Q for me ,
dont know if you are not pulling me
but I assume you are ' Innocent ' & try to explain
jokes apart --AFAIK when new silent blocks are fitted do the following
1) fit the leafsprings assy to axles the normal way ( vehicle on jacks )
2) also assemble the shackles the normal way ( when the chassis is hung up on jacks ) BUT Do not tighten the shackle bolts fully .
3) after ' slight' loosely tightening the shackle bolts , take out the jacks & lower the vehicle fully ,let the leaves take the load
4) tighten fully the shackle bolts in the normal position of shackle ( after the vehicle sits fully on its wheels & the leaves take full load of the car )
This enhances the bush life as the center tube is not kind of pre rotated before the vehicle assumes the normal position . ( on its suspension )
Sudarshan
|
Hi Sudarshan JEE,
I didn't follow the exact procedure. :D
I Greased the bolts and shackle bush, the leaf spring eye and the shackle mount on the chassis thoroughly with Nulon L80 Grease (PTFE) and raised the leaf spring, after securing the vehicle on jack stands; then tightened the Bolts fully by hand (with out cheater bar or rod extension).
After the vehicle was removed from the Jack stand, checked all the bolts.
Regards,
Arka
| All times are GMT +5.5. The time now is 23:51. | |