Controlling the android phone/head-unit using hardware knobs/buttons
The primary interface to this android device is through its touchscreen, through which any required user-input can be provided.
This is actually very adequate for most people. Almost all nexus7 in-car installations only use the touchscreen.
In an environment of a car, it is very important to have specialised buttons. You wouldn't want to turn on the headlamps, by browsing through menus right?! Things that are important to the driver should be quick and simple, so as to prevent distraction.
With respect to the audio system, the important things for me are as follows:
1. Volume control and mute
2. Track control (next/prev)
3. Navigation commands
Finally, here is the video which shows the knobs in action

I have also added an external mic to give voice commands (Google voice). I will move the mic to a different location later.
Initially I intended to have the 2 knobs, and 4 more buttons. In the end, I decided against it, since adding the buttons was becoming cumbersome from a space point of view. Also the homescreen with the large text buttons (Music, Maps, CarData etc) served the purpose I was looking for.
Anyway, in this post I will focus on how I managed to add these external knobs/buttons and what is required for anyone else to do so.
Arduino Uno
This is a simple hardware prototyping board. There are different variants, Uno is just one of them.
It has a bunch of general purpuse Input/Output pins, which means these pins can be configured as either input or output, it depends on the code that you write. It also has some ground pins, 5v power supply pin and serial communication pins.
The beauty of this is that you don't need to know anything about writing assembly language code (or whatever it is) that chip level programming requires. You write code in C language, first to configure the pins as Input or Output and then respond to the inputs or generate some outputs on those pins. It cannot get easier than this if you know some kind of programming and a bit of electronics.
For example, you can create an LED blinker by doing the following:
I am taking this example from the arduino website -
https://www.arduino.cc/en/Tutorial/Blink
The connections:
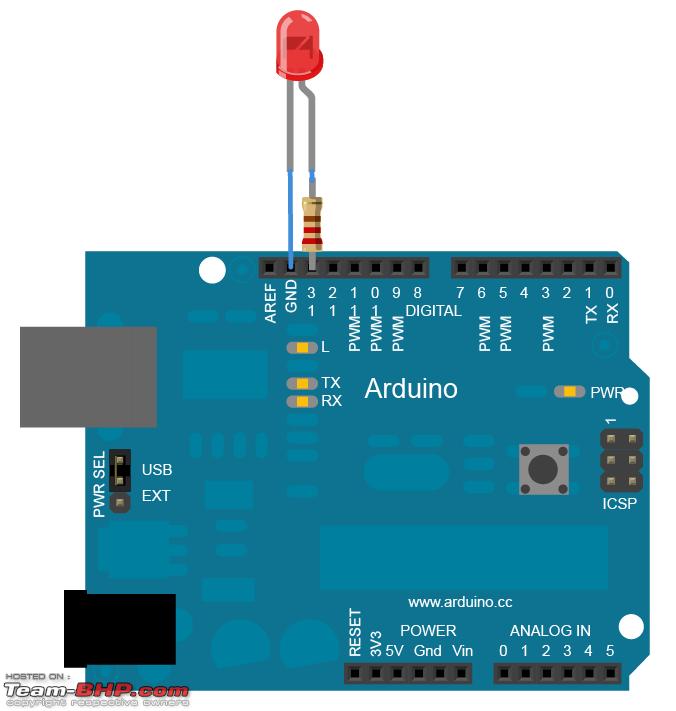
The code:
// the setup function runs once when you press reset or power the board
void setup() {
// initialize digital pin 13 as an output.
pinMode(13, OUTPUT);
}
// the loop function runs over and over again forever
void loop() {
digitalWrite(13, HIGH); // turn the LED on (HIGH is the voltage level)
delay(1000); // wait for a second
digitalWrite(13, LOW); // turn the LED off by making the voltage LOW
delay(1000); // wait for a second
}
This is the arduino from my setup.

The vertical chip is the bluetooth module.
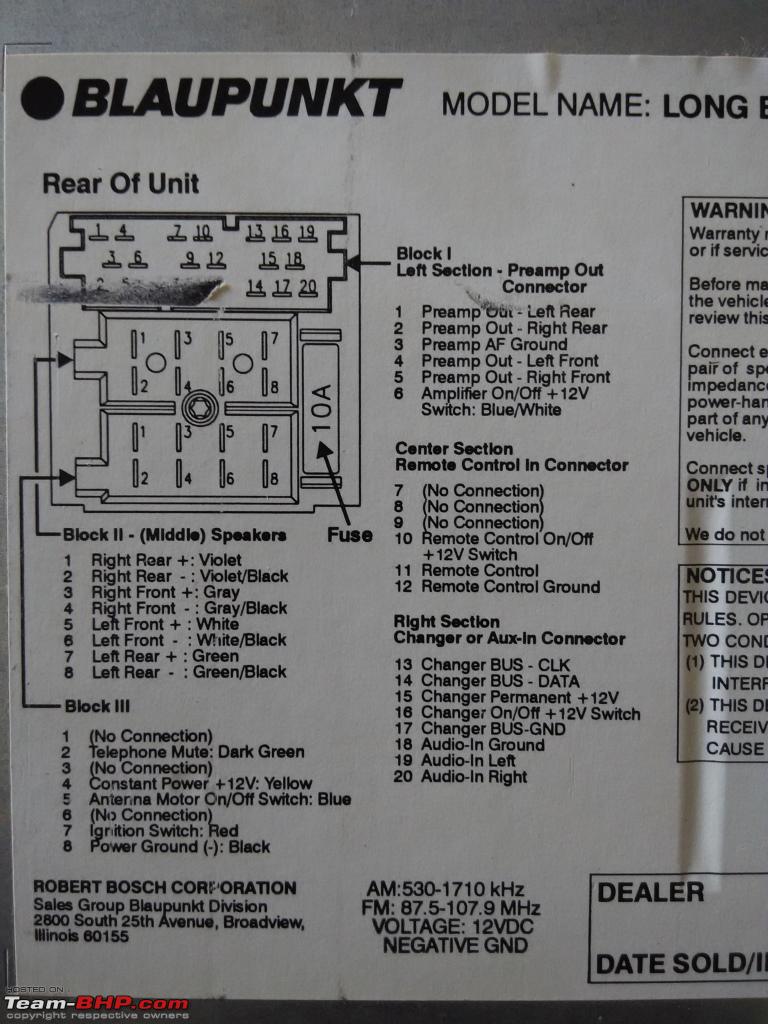
The long red wire is connected to the Remote-input of the blaupunkt head unit. (Pin 11)
Also, the arduino receives 12v power from the blaupunkt head-unit itself.
This blaupunkt model, like many others, has 12v power ouptuts which is activated when the unit is turned ON, which is perfect for my use case. See diagram below.

Pin 10 provides power to the remotes like RC-10 and pin 16 provides power to cd-changers. The current on these lines would not be much, but we need very less current to operate the arduino. So I have taken power from Pin 10.
So the arduino powers UP whenever the blaupunkt head-unit powers up. In Palio, this happens only when car Ignition is ON.
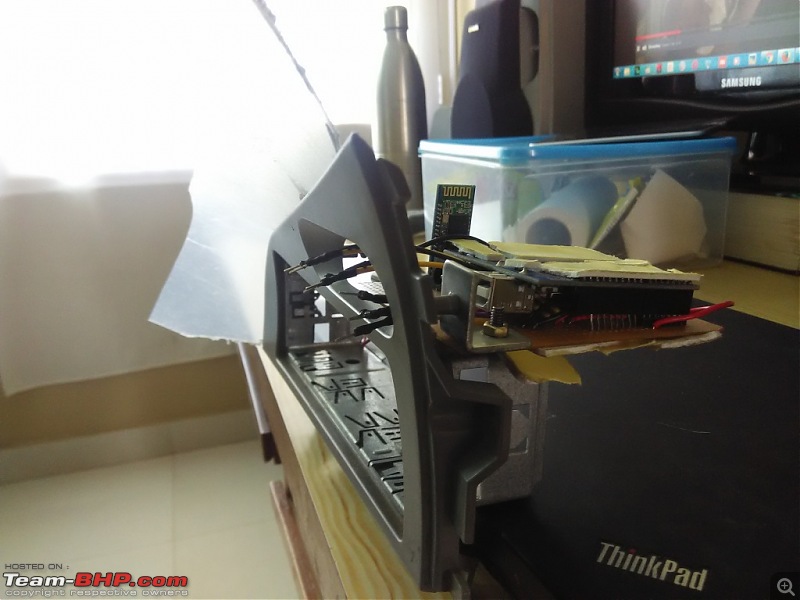
Installed behind the dash using mounting holes provided for the stock clock.

You can take a look at my code here to understand what I am doing in this project:
https://github.com/Vimal-Krishna/Ard...oth_rotary.ino
There are also a plethora of arduino software libraries available to support various sensors and hardware. For example, you do not need to know how to send a message over serial communcation, you just call serialWrite("message"). The underlying library will take care of whatever hardware level configuration is needed.
The main libraries in my code are:
#include <rotary.h>
this processes the outputs of the rotary encoder knobs, and just tells me in which direction it was turned
#include <blaupunktremote.h>
this is an emulator for a blaupunkt remote controller, which I wrote myself. This is used to control the volume of the head unit
Basically it sends HIGH signal for a certain no of seconds followed by a LOW signal, which the blaupunkt head-unit understands and responds to. This is exactly what a Blaupunkt RC-10 remote would be doing.
Rotary encoder:
It is like a volume control knob, but it is a digital device, meaning it sends out digital bits to represent in which direction it was turned. Also, it rotates endlessly, so the previous state is not known. For ex, this will be telling the android phone " whatever was your last state, change it by one", instead of say, "change the value from x to y".
It also has a center push button. You can find such knobs on microwave ovens etc, which rotate endlessly. Recently, I have seen it used in many cars for volume control.
So now if you read my code, you will follow, that when the rotary encoder 1 is turned, I send R1R (right) or R1L (left). If the button was pressed, I send R1B. Similarly, I send R2R, R2L, R2B over bluetooth.
One exception is that R2L and R2R are meant for controlling the volume of the Blaupunkt head-unit and does not have to be sent over bluetooth. So for this, I am directly calling rc10.volumeUp() and rc10.volumeDown(). Other messages are sent over bluetooth and the android program listening to this device, will respond accordingly.
For ex, android program (running in background) will do the following:
if (data.compareTo("R2B") == 0)
{
raiseMediaKeyevent(KeyEvent.KEYCODE_MEDIA_PLAY_PAU SE);
}
else if (data.compareTo("R1R") == 0)
{
raiseMediaKeyevent(KeyEvent.KEYCODE_MEDIA_NEXT);
}
else if (data.compareTo("R1L") == 0)
{
raiseMediaKeyevent(KeyEvent.KEYCODE_MEDIA_PREVIOUS );
}
else if (data.compareTo("R1B") == 0)
{
raiseMediaKeyevent(KeyEvent.KEYCODE_MEDIA_FAST_FOR WARD);
}
The events in capital letters are standard media control events, which are usually invoked when you use the buttons which come with earphones.
Android programming is a bit more elaborate and time consuming to understand, here is the code if you can follow
https://github.com/Vimal-Krishna/And...erService.java
If you need help in modifying any of the code to suit your projects, feel free to ask, I'll do what I can. I want to be able to generalise the above code so that anyone can install it on their phone and configure it - like if 'x', then do 'y'
Some work that still needs to be done:
Currently, I am starting the bluetooth program on the phone each time I turn on the car. This needs to be changed, so that the tasker app can control it when it receives power.
Turning the volume knob too quick results in no change in volume, it has to be done a bit slowly. Arduino code that handles this needs to be improved.
Thanks,
Vimal


 29th February 2016, 14:32


 (7)
Thanks
(7)
Thanks