I've been thinking of replacing the fuel filter of my Swift diesel myself for some time now and I finally succeeded in converting thought to action.
The Runup
The first thing I do before any DIY is try to find out - What is the worst that could happen if things go wrong. This is accompanied by a lot of time spent simply peering under the hood at the part in question, and it related umblical cords to the engine. How is it attached, what else should I remove to gain access. This is accompanied by research on the internet, a lot of comparison of pictures.
The important thing is often figuring out how the part is attached to the car.
Some parts also need you to invest in the correct tool. In this case i had to buy a filter wrench.
 Access
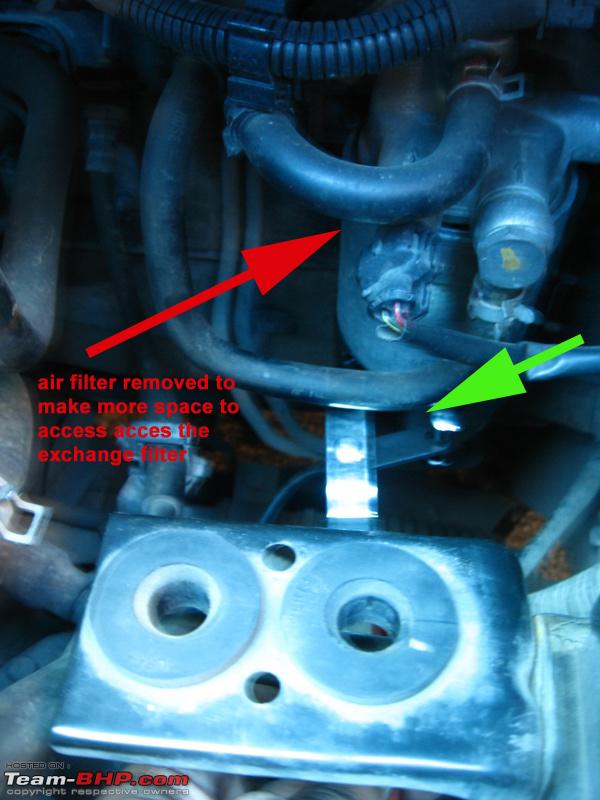
Unlike most Japanese engines access to the fuel filter in the Swift diesel is a little difficult. I found that I had to remove the air filter assembly out of the way. Removing the battery as well would free up much more space but I did not do that.
The filter is located just behind the air filter on the firewall. The water if fuel sensor is screwed onto the bottom of the filter indicated by the green arrow. Disconnect the sensor.

Fuel Filter Removal
1. Disconnect the wire of the Water in Fuel (WIF) sensor. This sensor is screwed to the bottom of the fuel filter and senses water in the diesel.
2. Place the wrench around the fuel filter and unscrew the filter. Place the wrench around the filter so that the wrench tightens around the filter when you move in the direction that loosens the filter. Once you have loosened the filter you can unscrew it by hand

3. WIF (Water In fuel) sensor
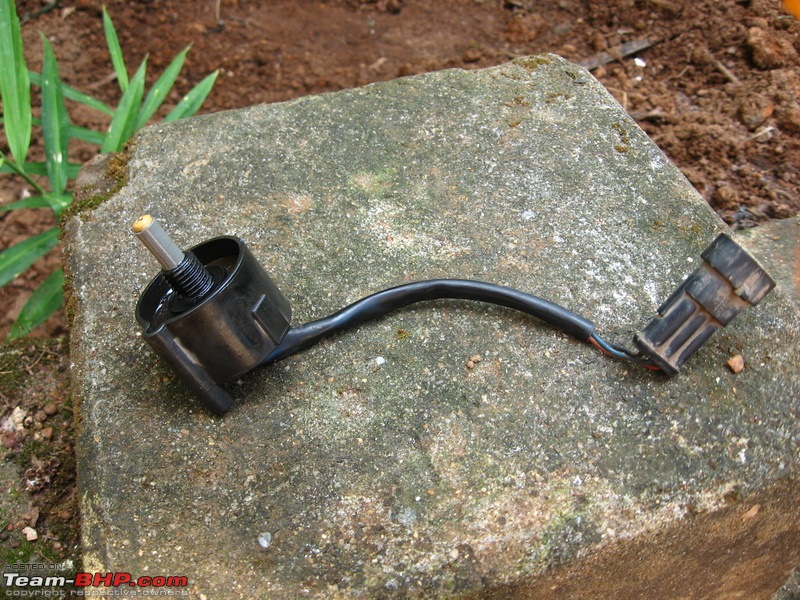
4. Unscrew the sensor from the bottom of the old filter and screw it into the new filter.


5. Screw the new fuel filter into the filter assembly BY HAND. Once you have tightened the filter as much as you can by hand use the wrench to tighten it further. Do not overtighten - a reasonable tightness without using any extra leverage is fine.
6. Attach the sensor wire.
7. Turn the key in the ignition. DO NOT START THE CAR. Just twist the key to ON position. The diesel pump works to build up the pressure in the fuel system in this position. Check the filter to spot any leaks - if there are any leaks tighten it a bit more.
8. Reattach the air filter assembly.
9. Make a final check for any loose nuts or parts. If everything is fine, start the engine and make a final check for any diesel leaking out from the filter area.
Caution - when screwing the fuel filter back on, take care to ensure that you do not strip any threads. This is a general DIY caution. The best way to ensure this is to tighten by hand initially. Till it approaches the point where it starts to get tight, the screw or nut should spin smoothly - if not chances are you make have the screw or nut on wrongly.
Drive on,
Shibu.


 7th November 2011, 22:59

 (7)
Thanks
(7)
Thanks


 I love getting my hands dirty doing these kind of stuff on my car. Everything else is just a bonus.