Team-BHP
(
https://www.team-bhp.com/forum/)
Hello fellow Petrol Heads,
Its been very long I did or wrote anything on the forum due to some other commitments. Please forgive me Mods and other Members; for not being online too often to contribute except for random commenting here and there. I had a free Sunday after a lot of useless and mindless thing what we called as Closing. :)
The Patient a.k.a Bakra
My 12 years old m800.
Problem/Diagnostic
With new diesel commuters around I still use my 800, atleast once in 15 days. It has been observed for past many months it was returning very poor mileage, petrol smell (overflow) and carb back pressures (i don't know the exact term) which in turn causes negligible petrol return. Hence very poor mileage of about 10.
Synopsis
It was not a problem but i hardly had any time to do the work in all those months. And believe me there are no proper mechanic (even in my friends SS). They have a panic attack when they hear Carburetor. I have seen they simply cannot take the chance to open it and resemble it again properly. Other main factor is labor. It consumes too much time, pain for so little money. Also thinner/cleaner irritates your hand like crazy, good its summer now, or it feels extremely cold dipping your hand in the chemical for prolong period. If you tell any mechanic to service your carb they will just clean the outside, top and bottom, make it look shiny. Very few will disassemble completely.
Tools and Essentials
1. Open spanner 10, 12, 13
2. A good (Taparia) Flat head Screw driver with proper grip
3. A good (Taparia) Philip head Screw driver with proper grip
4. Zero emery paper
5. Blades, saving wala will do
6. Two liter pure thinner.
7. Sewing Needle and Sleeve removed wire (Copper electrical wala 1/10 guage)
8. Home Paint brush 1 inch wala will do.
9. MGP Carb gasket kit. Mine was Mikuni UCAL type. Now this is tricky as my friend who owns a M.A.S.S. took more than a week to source this as they simply are not available.
Images
Enjoy and comments are welcome, also suggestions too.
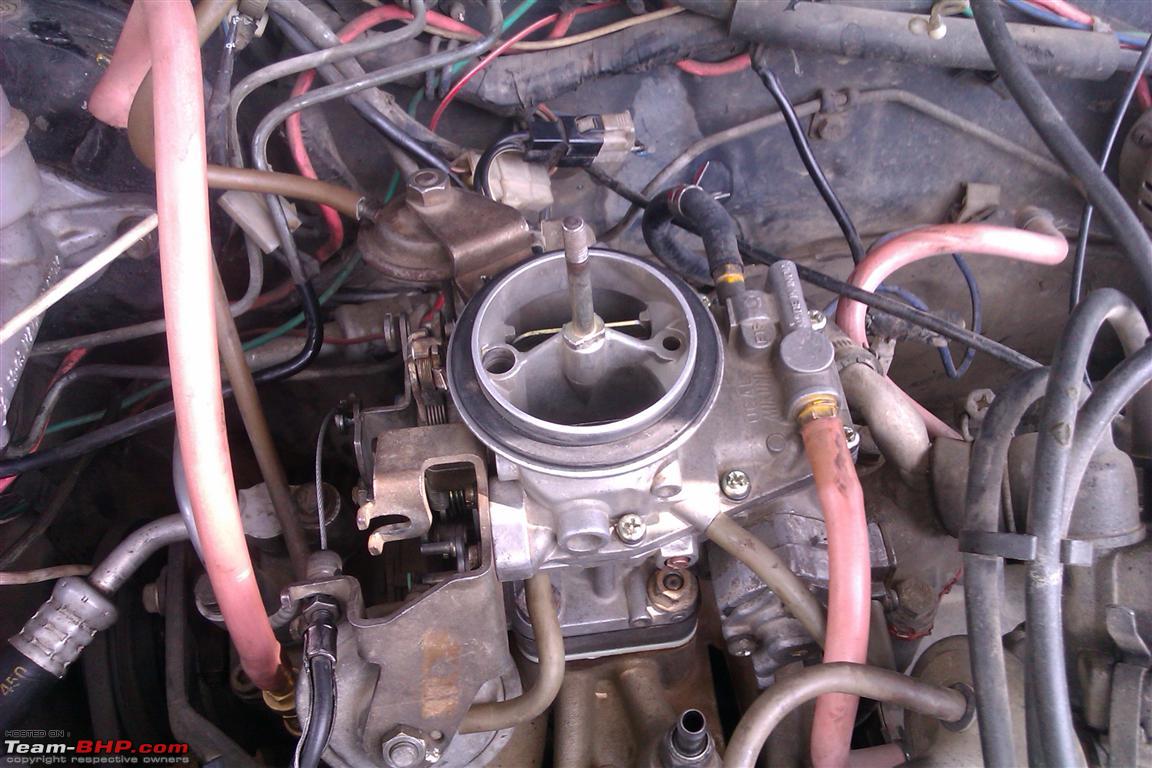
Carb Installed


Residue, this is what a transparent thinner turns to.

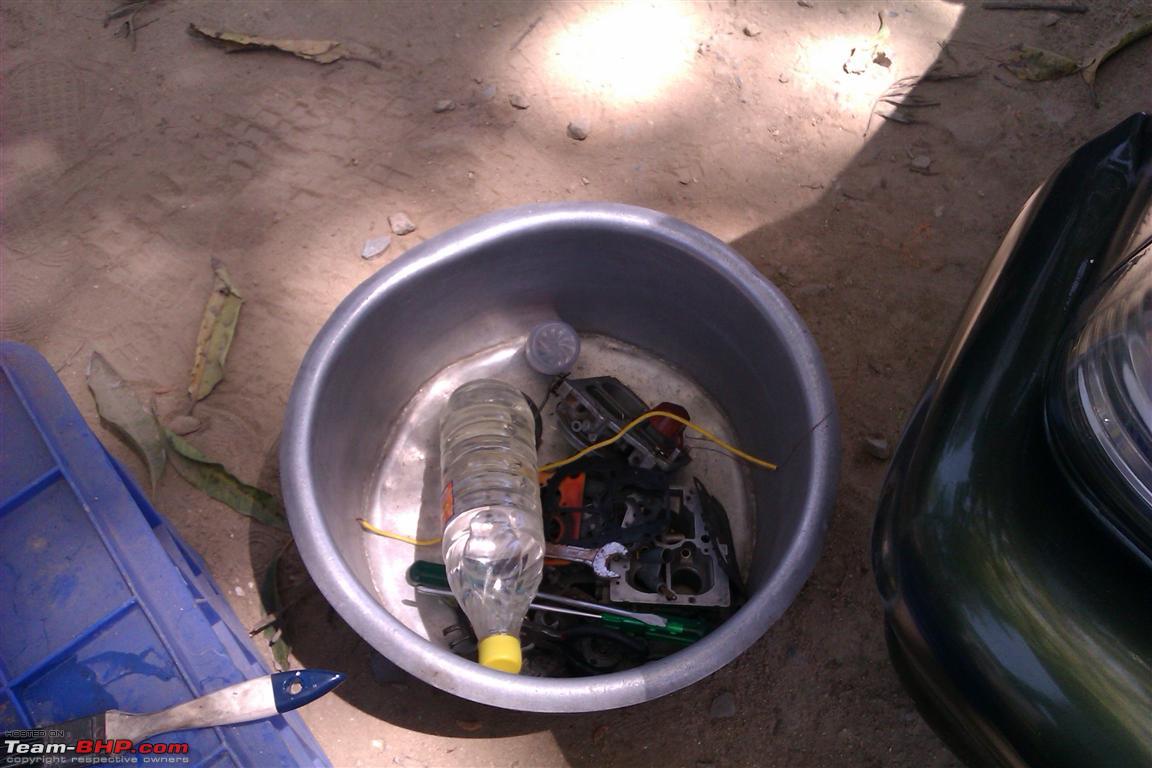
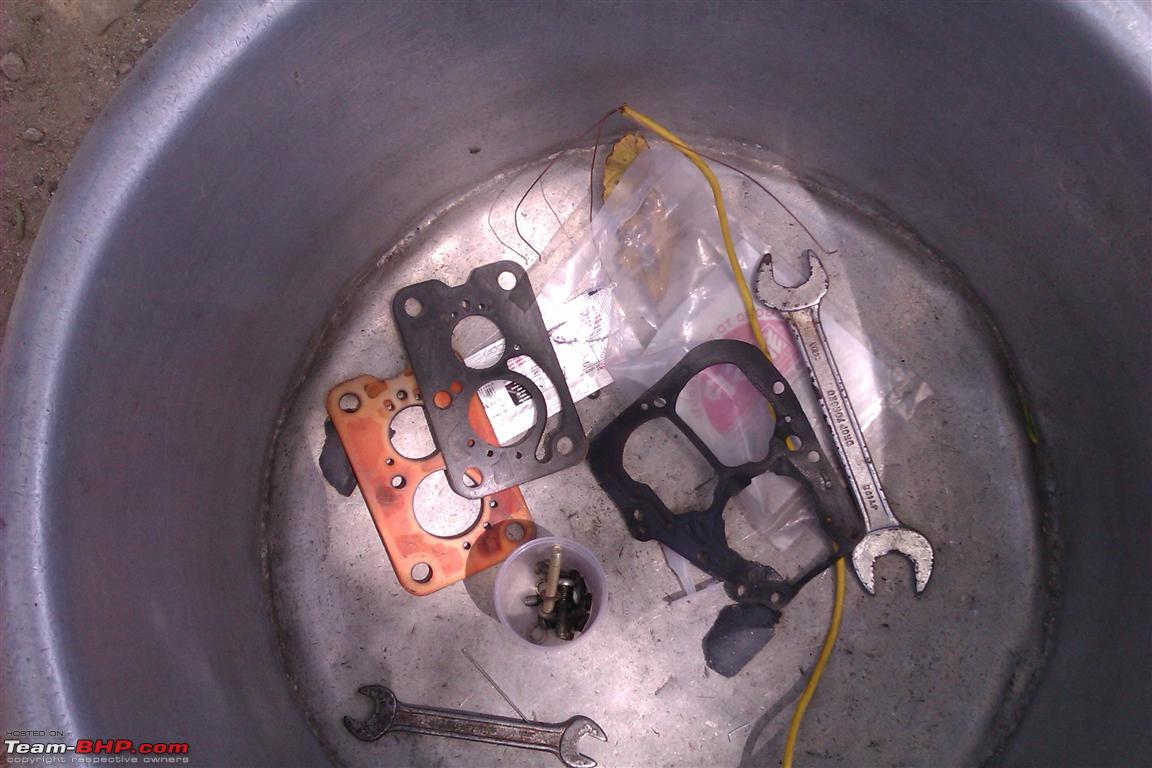
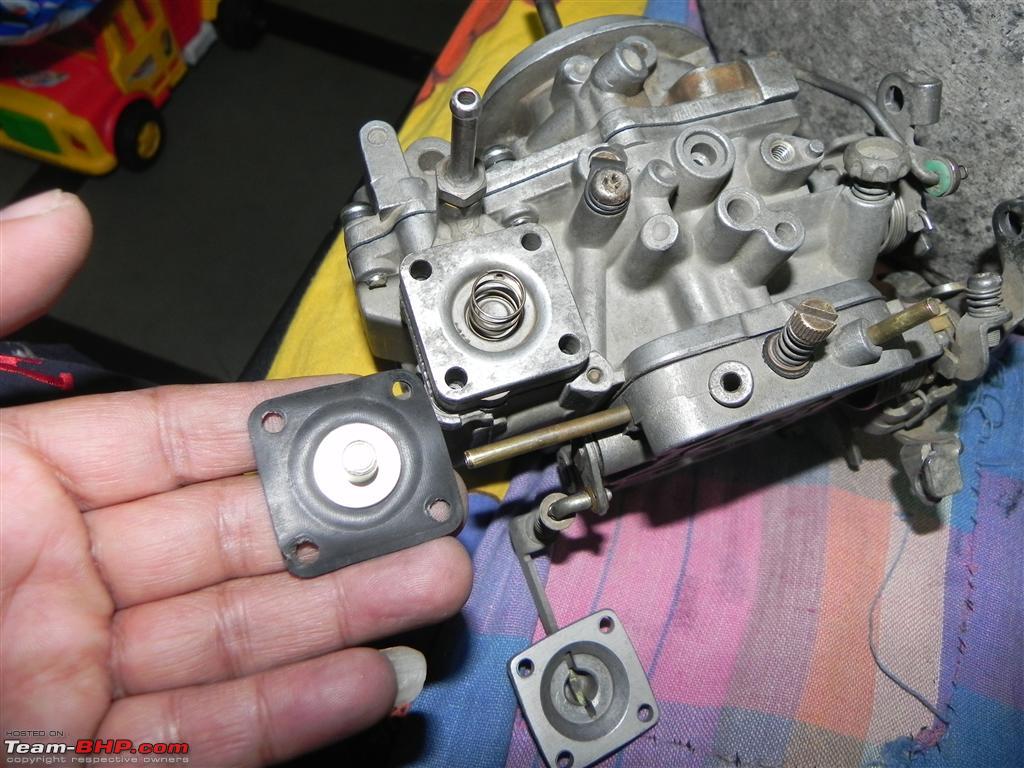
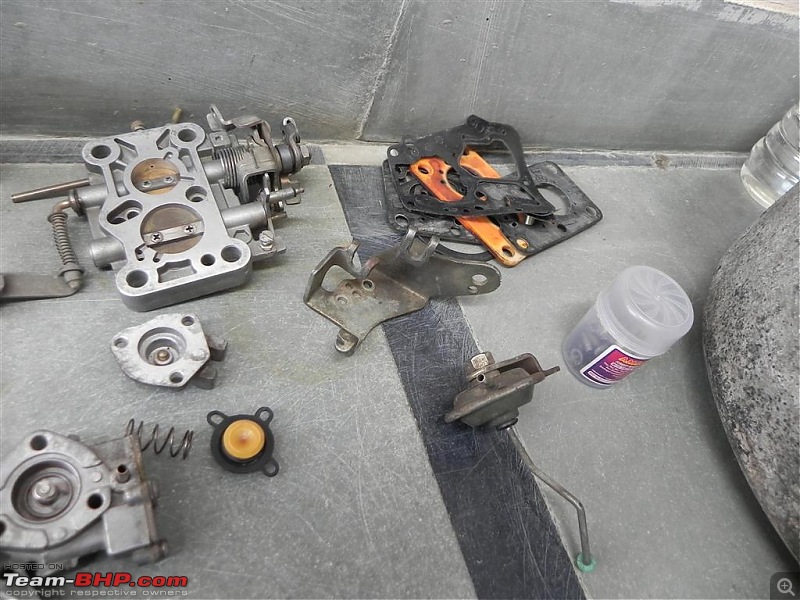
Very important, put your disassembled parts, screws properly. It does not matter if you have to use your moms old discarded kitchen thingy. Fact of the matter is that you should not loose any tiny bits and pieces.


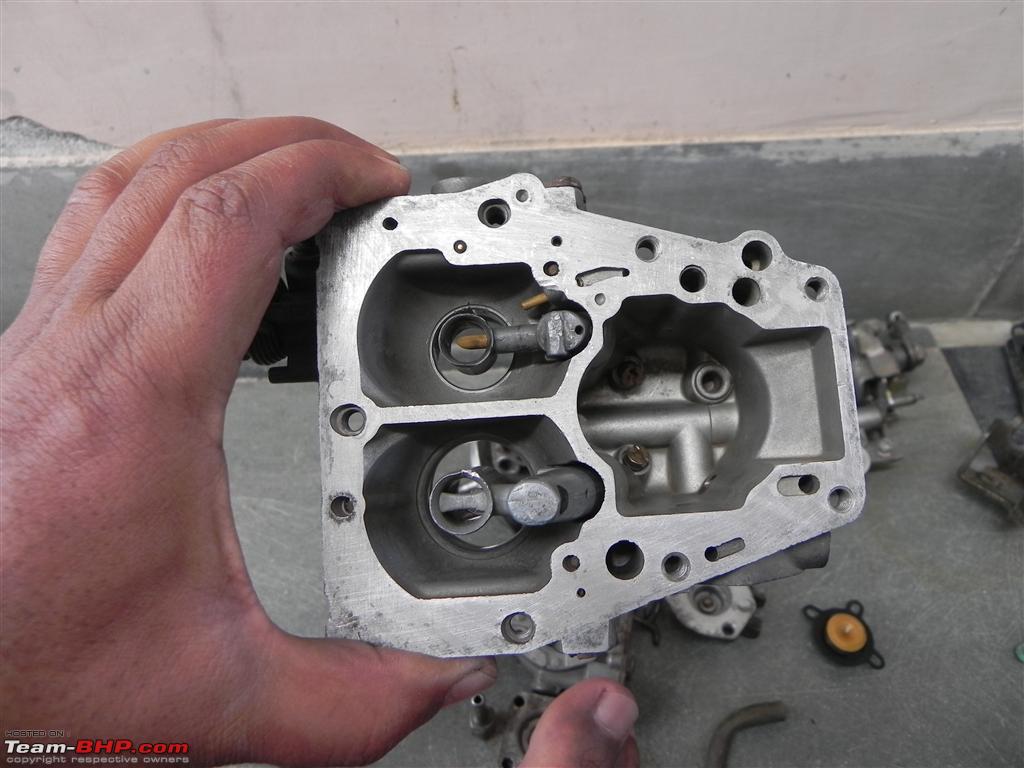
Clean and Dry


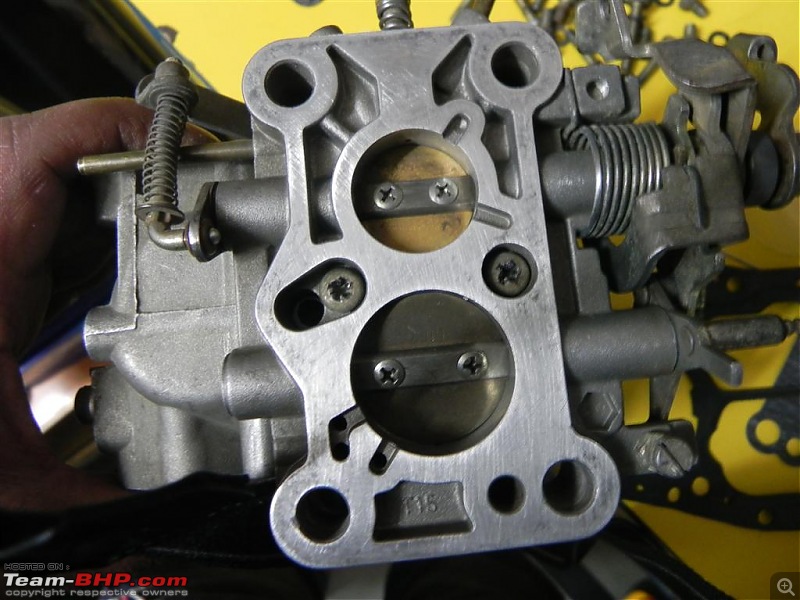
Spotlessly cleaned (not exactly) carb body. The two venturi/sleeve and two jets.


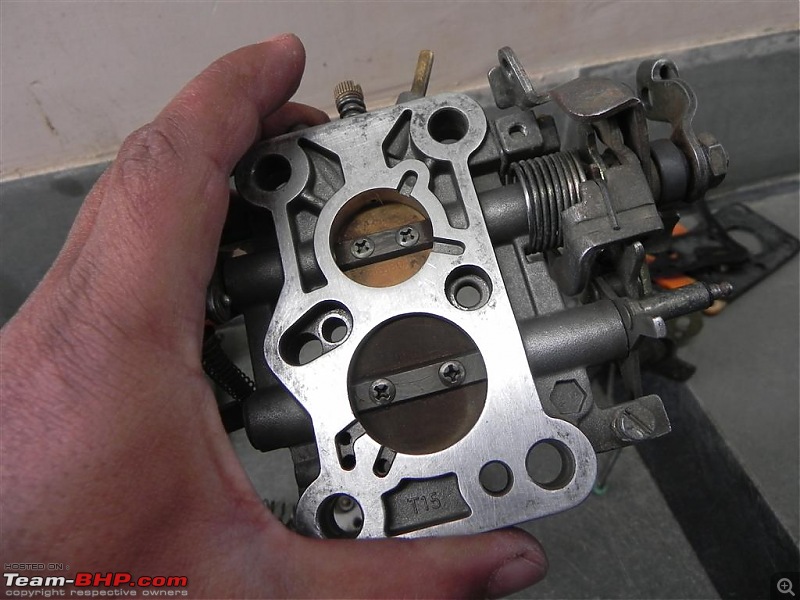
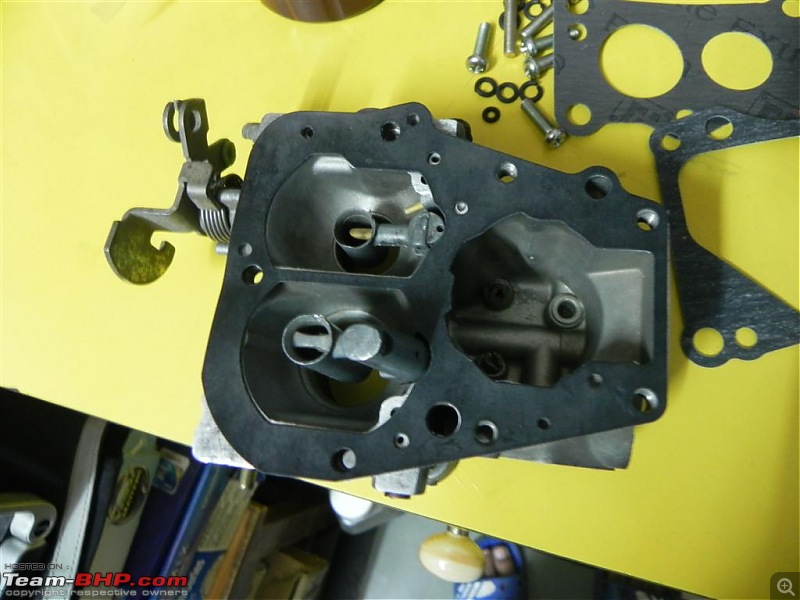
Float Chamber upper cover, this is where the air filter housing goes, That bolted brass pipe is main petrol supply from mechanical fuel pump.
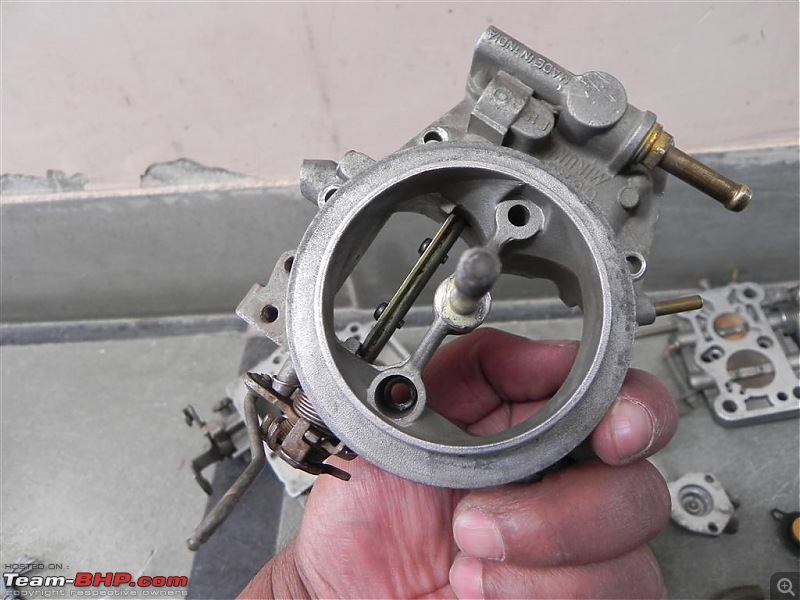
Throttle housing, down most part of carburetor. This part comes in contact with intake manifold. The air fuel mixture is sprayed from here.

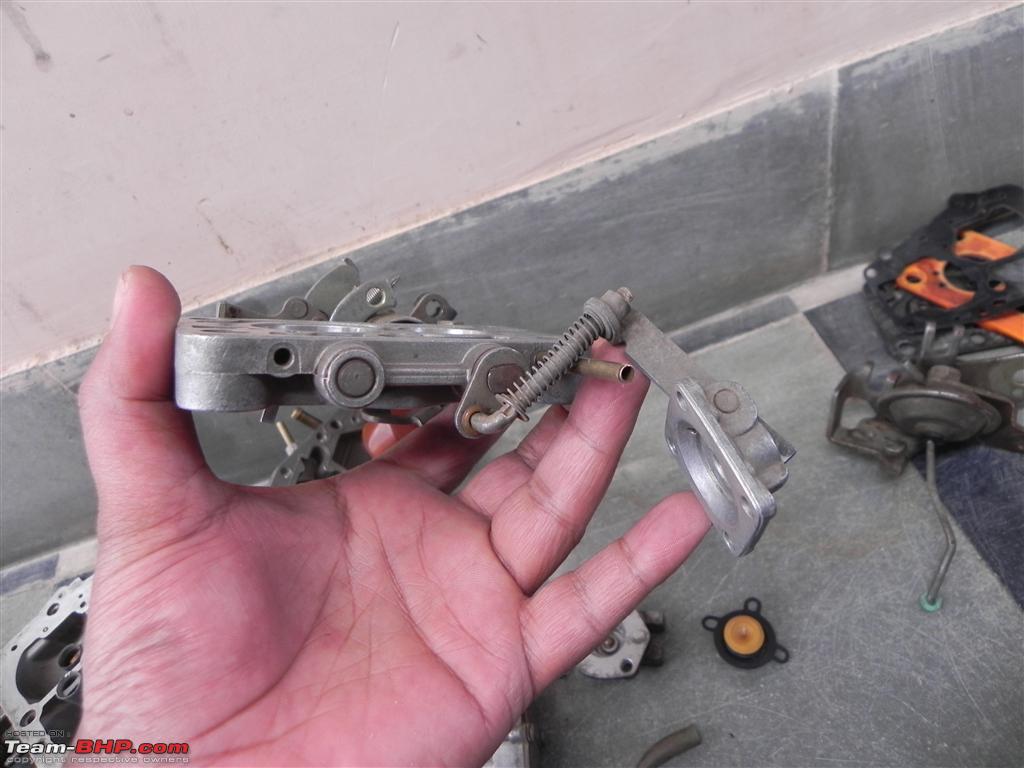
Primary (small) and secondary throttle valve. While primary is directly connected to the accelerator pedal, the secondary is connected to depression chamber, yeah that things that look like a small bell (Temple Ghanta).
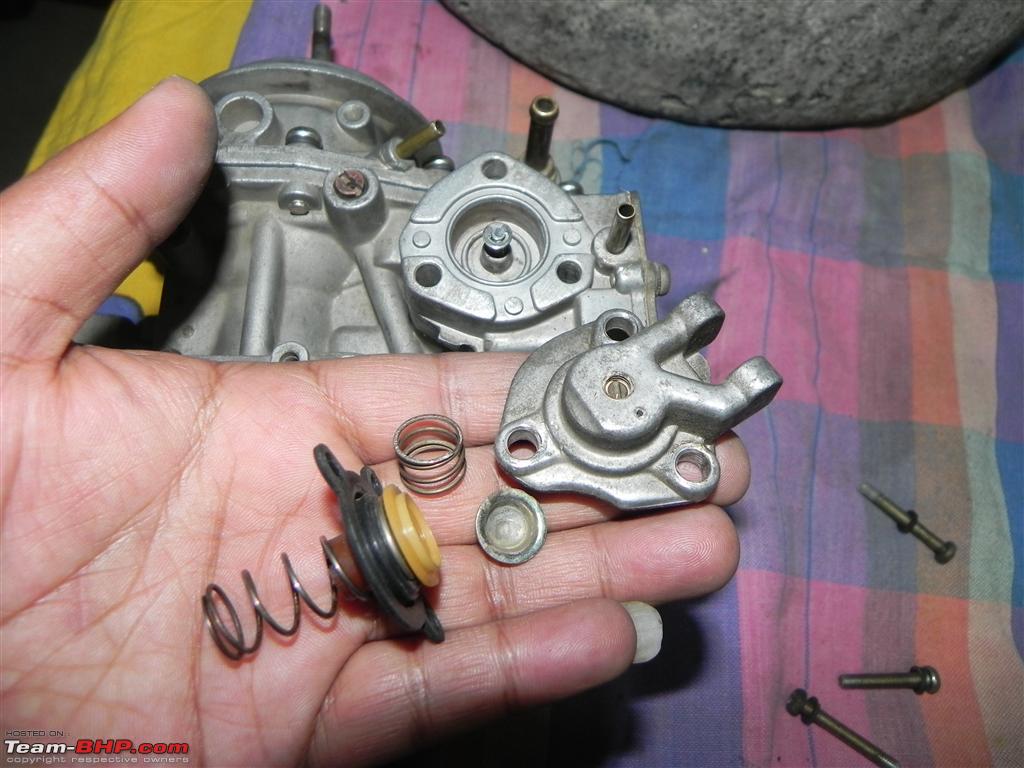
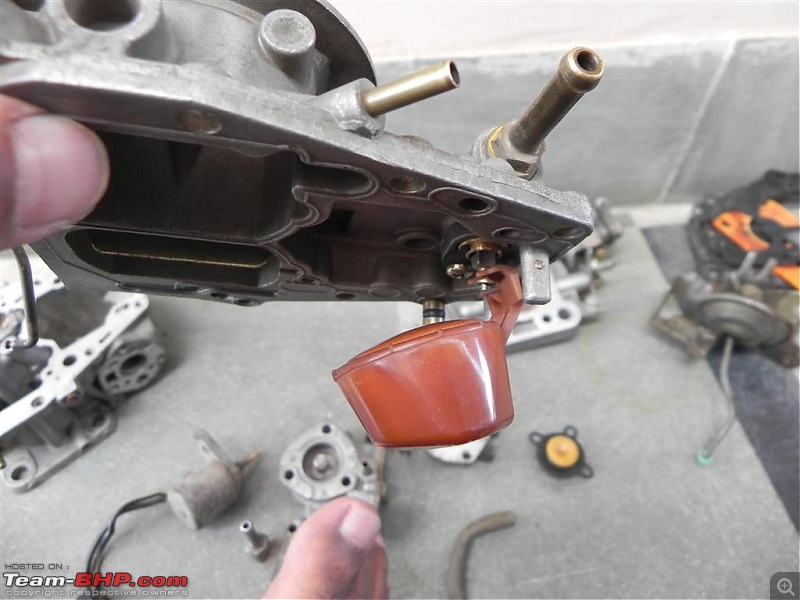
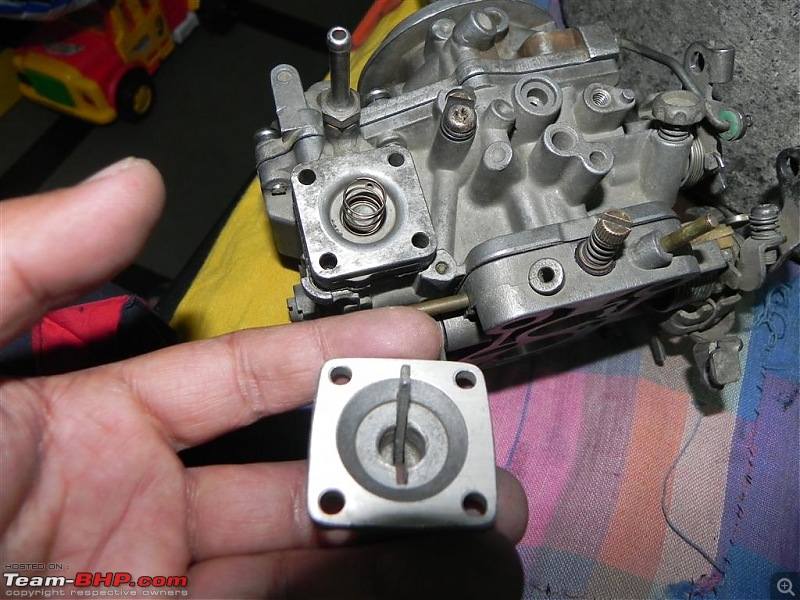
Fuel Cut Solenoid Valve

Continued..
Float, Please note this should be about 31mm. There is an adjustment screw. In Solex type you have to bent the float arm to set it.

Check the needle valve connected to float arm.
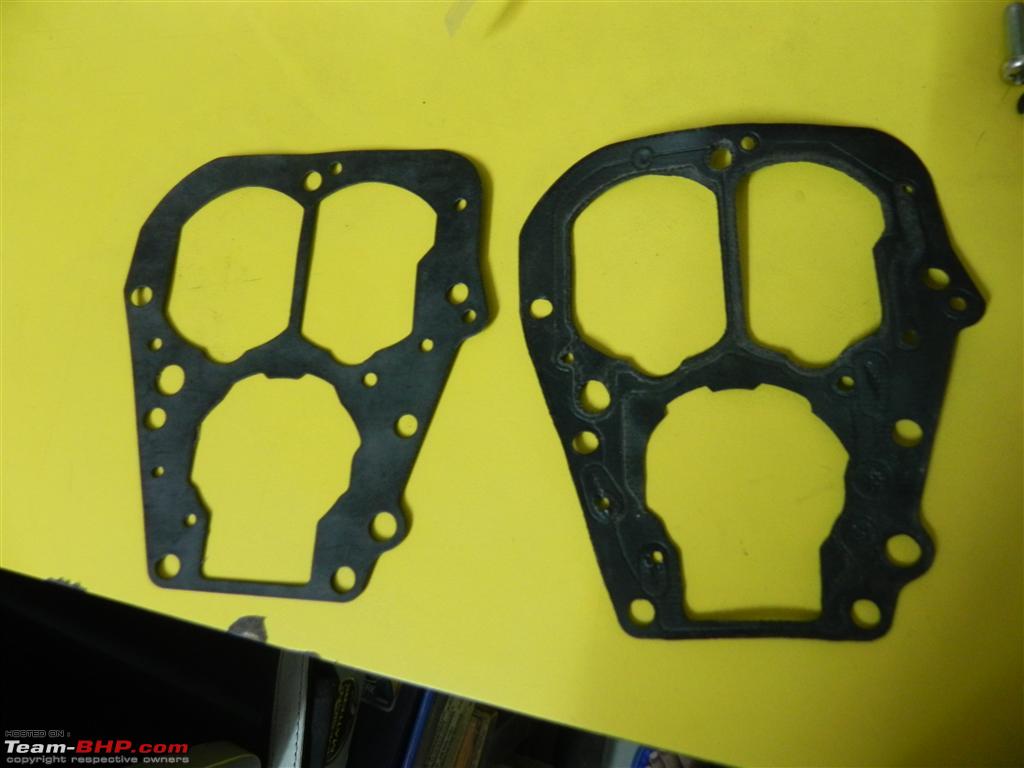
New set of gasket


Difference between old and new

Worn out, check the markings.

Installed purfectly
Secondary jet pump


Accelerator pump.


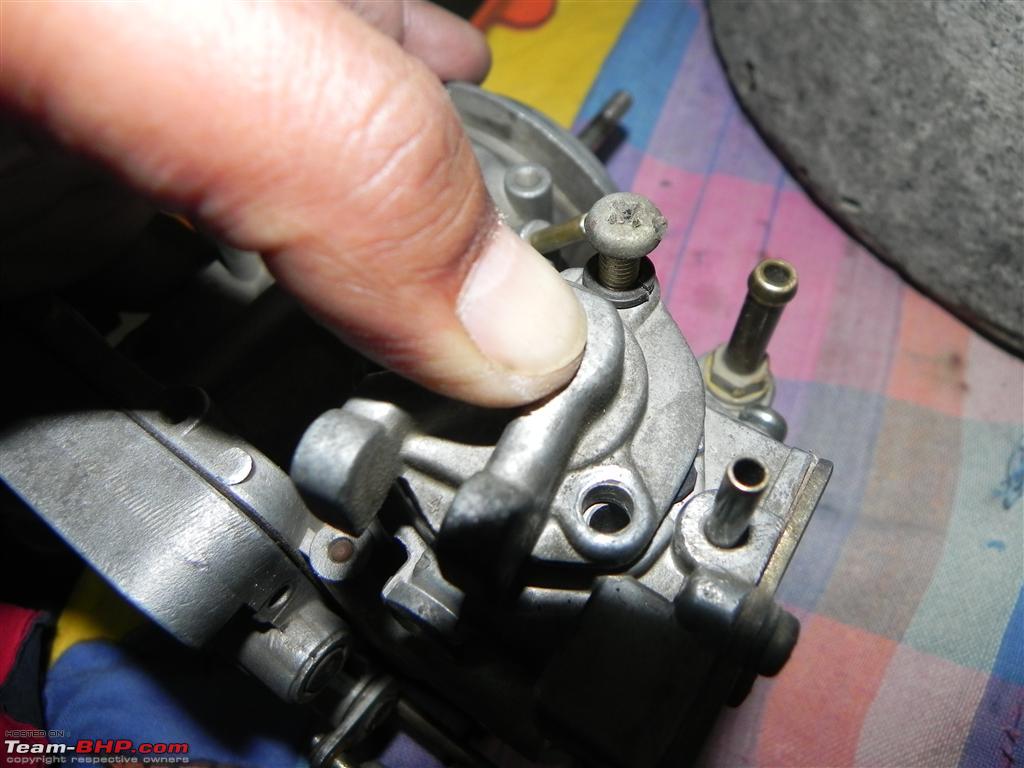
Accelerator pump installed, check the idle mixture screw, this is the back side of carb.

Throttle/housing installed on main body. Check the two screw that hold it to the main body.
Assembled Completely


Thanks for reading.
Disclaimer
Carb Assembly is not easy, Tuning it is equally difficult. Even if you chose to tread on this path of madness and spoil your perfectly relaxing Sunday or your Car author and owner of this wonderful site holds no responsibility whatsoever. :D
SirAlec, Thussi Great Ho! Salam khubul karo!! lol: seriously! A great sunday time pass. I now seriously miss my bike. So, how long does this whole process take?(assembly and disassembly). Regarding drying - can it be left to dry directly under sun or should it be kept under shade?
Quote:
Originally Posted by SirAlec
(Post 2732944)
Disclaimer Carb Assembly is not easy, Tuning it is equally difficult. Even if you chose to tread on this path of madness and spoil your perfectly relaxing Sunday or your Car author and owner of this wonderful site holds no responsibility whatsoever. :D
|
For those actively considering opening up their carburettors after reading SirAlec's thread, please remember that if you haven't done it or seen it done closely before, DO NOT attempt this. There are too many little bits and pieces in a carb, and opening or setting something wrongly may permanently damage the carb.
That's a seriously complicated DIY :thumbs up. BTW what are the changes you felt in engine characteristics after this project? Any change in sound or pick-up? I know its too early to gauge any change in fuel economy figures, but do let us know soon.
OT: The 'bakra' must be thanking you that you cured his lungs instead of turning it up as 'bali ka bakra'! :Cheering:
Quote:
Originally Posted by AlphaKilo
(Post 2732959)
SirAlec, Thussi Great Ho! Salam khubul karo!! seriously! A great sunday time pass. I now seriously miss my bike. So, how long does this whole process take?(assembly and disassembly). Regarding drying - can it be left to dry directly under sun or should it be kept under shade?
|
Its just thinner. so it will dry on its own as its volatile in nature.
It took me whole day to do two jobs. Before opening the carb up I also installed power brake system on it. I was alone in the morning. SO i could not take too many images of that work. I wish i had, maybe next time. But i will explain the two image in another thread. Also i am working on a one man brake bleeding DIY. Lets hope i get some more time and parts to do it.
Quote:
Originally Posted by Blow Horn Ok
(Post 2733173)
That's a seriously complicated DIY . BTW what are the changes you felt in engine characteristics after this project? Any change in sound or pick-up? I know its too early to gauge any change in fuel economy figures, but do let us know soon.
OT: The 'bakra' must be thanking you that you cured his lungs instead of turning it up as 'bali ka bakra'!
|
There is an instant change in acceleration. and petrol return pipe is flowing as if its peeing. :)
Its not properly tuned as of now. As i have to take it to my friends service centre which is 30 kms away.
It was a complete puzzle to me just to put back the jack/spanner/spare tyre in its place on my Figo yesterday.
And you assembled the carb? stupid:
Thats a sunday well spent SirAlec and a nice way to introduce the "simple" carb to the injection generation!!
I (my father put in teh money actually) had the good fortune of owning quite a few carb vehicles and having the liberty, and an equally enthusiastic father, in performing some "cleaning" operations. Most of the times successfully :I Rule:
Glad to see there are people like you who still want to try their hand at opening up the carb.
Dear Sir Alec - In two out of my four restored Fiat cars, I have the MIKUNI carburettors so I do this cleaning work quite regularly. I hope your carburettor's secondary throttle plate was not jammed solid due to non-use in city mode drive condition, means part throttle opening. The vacuum operated second throttle plat cannot open till the first throttle plate opens minimum 80%. There is a cam to prevent it from opening. If it opens in your car, it is good, if no, there is a very cumbersome and delicate process to free it, I have done it. By the way, did you count how many cross holes are there in a Maruti 800 carburettor throttle plate / main body? How many of them did you clean by using carburettor cleaner spray? From how many holes did the spray liquid come out in brown color? With what force did it come out? If you repeat the spray next day, does the spray liquid still become brown? How many gaskets did you have to scrape through to clear all the cross holes? How will you ensure that the seal between the throttle plate and the main body is 100% effective?
I used my 1987 model Biscuit Colored Maruti 800 car BLB6986 for 88000 kms before I sold it (I am still repenting). There are two very very important things that you must do to the MIKUNI carburettor to make the Maruti 800 zip and fly without any flat spot at all. At 88000 kms, my car was flying. Let the discussion begin. What are these two things?
Also, did you fit the KBX / Bosch Chassis Systems manufactured 5.5" brake booster kit? How have you routed the vacuum hose? Did you change one front bundy pipe? What is the master cylinder clearance with the air cleaner? Please post some photographs of the installation.
Best regards,
Behram Dhabhar
Quote:
I hope your carburettor's secondary throttle plate was not jammed solid due to non-use in city mode drive condition, means part throttle opening. The vacuum operated second throttle plat cannot open till the first throttle plate opens minimum 80%. There is a cam to prevent it from opening. If it opens in your car, it is good, if no, there is a very cumbersome and delicate process to free it, I have done it
|
Yessir! I did face this situation about two years back on my '94 M800. The experienced buddy mechanic I had it serviced by disappointingly had told me that the secondary throttle plate (or just 'secondary' in garage lingo) had sealed shut. We tried everything like pliers/ grease/ hammers(!) and even went to a machine shop guy who quoted a sum which was roughly 25% of my car value!
Dejected but not willing to give up, I put the entire body in a can of thinner overnight, rigourously tooth-brushed it next day, took a spanner to wrench it open and voila! the heavenly door opened up! ("open sesame" as aladdin wouldve said) My friend was truly surprised and also claimed divine intervention in the opening of the gates! On my way back to work in Pune, expressway top speed of car jumped up from exasperated 80-90kph to a roaring 130+kph! But more than that, could feel my baby breathe so much better (sniff) that I actually cruised along at a brilliant 100kph all along. (Miss the little one...)
I promise to put up pics and a small before/after of that cleanup. And not to forget- Thank you for posting this thread SirAlec! Inspirational!
Quote:
Originally Posted by DHABHAR.BEHRAM
(Post 2743139)
Dear Sir Alec - In two out of my four restored Fiat cars, I have the MIKUNI carburetors so I do this cleaning work quite regularly. I hope your carburetor's secondary throttle plate was not jammed solid due to non-use in city mode drive condition, means part throttle opening. The vacuum operated second throttle plat cannot open till the first throttle plate opens minimum 80%. There is a cam to prevent it from opening. If it opens in your car, it is good, if no, there is a very cumbersome and delicate process to free it, I have done it. By the way, did you count how many cross holes are there in a Maruti 800 carburetor throttle plate / main body? How many of them did you clean by using carburetor cleaner spray? From how many holes did the spray liquid come out in brown color? With what force did it come out? If you repeat the spray next day, does the spray liquid still become brown? How many gaskets did you have to scrape through to clear all the cross holes? How will you ensure that the seal between the throttle plate and the main body is 100% effective?
I used my 1987 model Biscuit Colored Maruti 800 car BLB6986 for 88000 kms before I sold it (I am still repenting). There are two very very important things that you must do to the MIKUNI carburettor to make the Maruti 800 zip and fly without any flat spot at all. At 88000 kms, my car was flying. Let the discussion begin. What are these two things?
Also, did you fit the KBX / Bosch Chassis Systems manufactured 5.5" brake booster kit? How have you routed the vacuum hose? Did you change one front bundy pipe? What is the master cylinder clearance with the air cleaner? Please post some photographs of the installation.
Best regards,
Behram Dhabhar
|
Dear BD sir,
Thanks so much for taking interest in this thread. Its a great honor. I have to confess. :) i am not an automobile engineer. But do like to open up things now and then.
I used pure thinner and a multipurpose spray to clean it. I cleaned it until the thinner came clean. Also to clean the jet i used a big size syringe with modified needles of different thickness filled with thinner. and sprayed many times.
Quote:
There are two very very important things that you must do to the MIKUNI carburettor to make the Maruti 800 zip and fly without any flat spot at all. At 88000 kms, my car was flying. Let the discussion begin. What are these two things?
|
Sir! we would really like to know your input on this.
But my 800 has done 2.17 lac kms. Last rebuilt project was done in the end of 2008.
Details of which are documented here.
www.team-bhp.com/forum/modifications-accessories/48634-2lac-kilometers-m800-engine-rebuild-project.html
But it zip pass any bigger engine cars on our hilly roads.
About the brake system, the Booster assembly was found by a friend with a kabadi. So i checked for any leaks and it was perfectly all right. All the markings are worn out. Its a possibility its a Kalyani one.
I make use of a T that i found and use the vacuum supply from input manifold. Yeah the same place the input is given to miniature AC pump.


Can you post me some instructions of how to dismantle and assamble the carb of my maruti 800 MK1 ( 1991 ) ? as it needs cleaning. Diagrams are appreciated.
I would like the diagram of a maruti 800 carburetor so that i can dismantle and assemble it again. Instructions of how to do the job are welcome. Thanks. Urgent please . Thanks again.
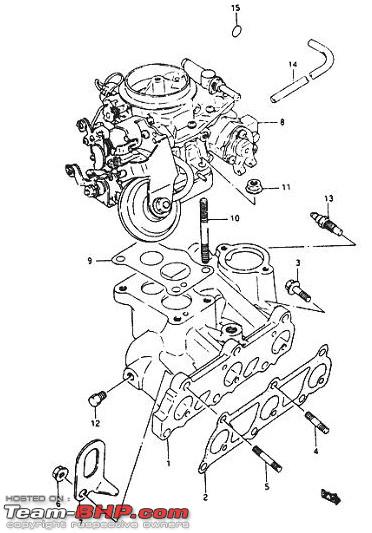
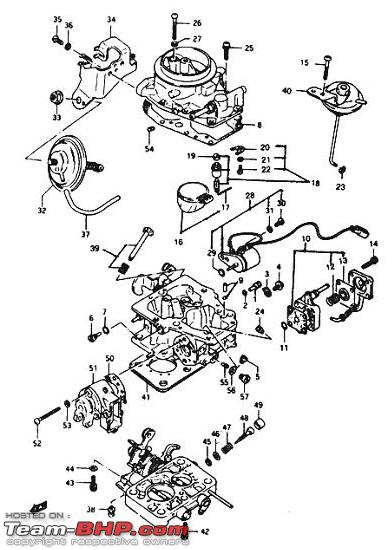
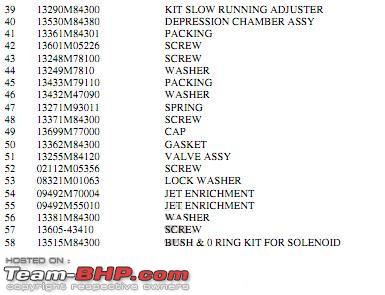
The complete carburettor assembly and part numbers...
| All times are GMT +5.5. The time now is 14:14. | |