| |||||||

| Search Forums |
| Advanced Search |
| Go to Page... |
 |
| Search this Thread |  37,303 views |
 1st October 2014, 23:33
| #1 |
| Senior - BHPian Join Date: Dec 2006 Location: Mysore / B'lore
Posts: 1,720
Thanked: 4,461 Times
| DIY: Flush / Bleed the clutch & brake fluids In continuation of my brrrraaake week, I got the front brake pads swapped as well as flush/bled the brakes on my car. I got a brake upgrade around 1.5 years ago with bigger discs in front and bigger drums from the Palio Adventure. All brand new parts used and zero jugaad. The brakes were never bled fully then. I had no complains since the brakes were super sharp and a huge step above the earlier tired stock setup. I had instructed the mech to do the same in my previous service. I got a bit suspicious when I saw that I was billed just 250ml of brake fluid. Ever since I had this wish to drain and bleed the whole brake system on my car. A month or so after my brake upgrade, I got to hear that Brembo has setup an official distributor in India based out of Goa. Contacted them and lucky for me, they had ready stock of the pads which would fit my upgraded setup. Didn't flinch, immediately ordered a set with them. A week later, lo and behold!  I never got to use them since I was using Magneti Marelli pads (which by themselves cost Rs 3200 - GULP!) and there is the stingy me who wanted to swap pads only when the current set was worn out. Last week when I was at Madhus, Bangalore for a routine WA/WB visit, I noticed the brake pad being wafer thin.  Others would start cursing their luck thinking grrrr I need to change pads now, additional expense; on the contrary I was over the moon! The time for Brembos is here! Drove down to Mysore on Monday night and next day propped up the front left using the jack, opened the wheel and I was all charged to change the pads. I then noticed that the car wasn't fully stable and it isn't wise to stick your head under an unstable car. Decided it's a job best left to a FNG till the time I buy myself couple of jack stands. I then proceeded to swap the hoses on my bike which I have covered in my other thread. Come today morning, I headed out to a Fiat aware FNG who promptly changed the pads. Bite was lacking since the pads hadn't bedded in yet, but the pedal was mushy and hadn't sharpened as I thought it would post the brake pad change. This made my resolve to flush and bleed stronger. I already had a 500ml can of DOT4 brake fluid thinking that is enough but picked another 500ml can of brake fluid on the way back. Barrrrrrembooooos! An Italian hot hatch with proper Italian brakes!  The texture of the pads felt like it's made of Sintered metal. Yay!  Post lunch, started work. Popped the hood and opened the brake fluid reservoir cap. What greeted me was absolute horror! Fluid was dark!  Not blaming anyone but I always noticed the fluid level outside and had never bothered to check the fluid quality during my ownership of the car. I then used my 20ml syringe to drain the old brake fluid from the reservoir. Yuckiness guaranteed  The reservoir held 250ml and all of it looked this bad. The design of the Palio brake reservoir is such that the pipes connecting the dual channel brakes and clutch had a plastic wall partition such that even if the main reservoir ran dry, there would be minimum level of fluid above the pipe openings and prevent leakage. To clean these areas, I poured in about 150ml of brake fluid left over from yesterday's experiment. Fluid stayed clear, so sucked it back in the syringe and pressed it back inside the reservoir with full force. This forced the fresh fluid to mix with the old fluids lurking in the corners and drawing it out cleaned the tank further. However this wasn't enough, I poured in 100ml of fresh fluid from sealed container, flushed the reservoir and it was acceptably clean. Topped up the reservoir with fresh fluid till the neck. Brake fluid collected from cleaning just the reservoir:  I would follow the farthest first principle - The wheel farthest from the reservoir must be bled first, then second farthest and eventually the closest would be last. First wheel of attack was the rear right. Snuck up underneath and there was enough space to connect the drain pipe to the bleed nipple and loosen it. On opening, the orange coloured fluid started flowing out. The idea of the one man bleeder is to have a bench setup where the highest point of the bleed hose and bottle lies between the horizon line of the caliper/wheel cylinder and the brake fluid reservoir. The drain bottle must be atleast 25% full so that the tip of the drain pipe is fully immersed in brake fluid. When the brake pedal is released, there is a tendency to suck back through the drain pipe, it's better to have brake fluid sucked back rather than air. By having a long enough hose, the risk can be mitigated but why take risk? On opening the bleed valve, let the hose first fill up with brake fluid. DO not press the brake pedals at this moment, let it fill up naturally.  When the hose is full, insert it into the drain bottle with 25% of old spent brake fluid. This way there is no air in the drain pipe and no chance of air getting in through the hose. Next, start pumping the brake pedal. No random or frantic pressing, rather I pressed the brake pedal fully, withdrew slowly; so that less fluid gets sucked back. Wait for 5 seconds, repeat the process. Remember to check reservoir level after every 10-15 presses. Top up as required. Brake fluid is finally clear and the bottle is nearly full; it took ~400ml of fresh brake fluid to clear the first line. There is still some bubbles in the line, I just let it be with bleed valve open so that all these tiny bubbles can take their time to come out. 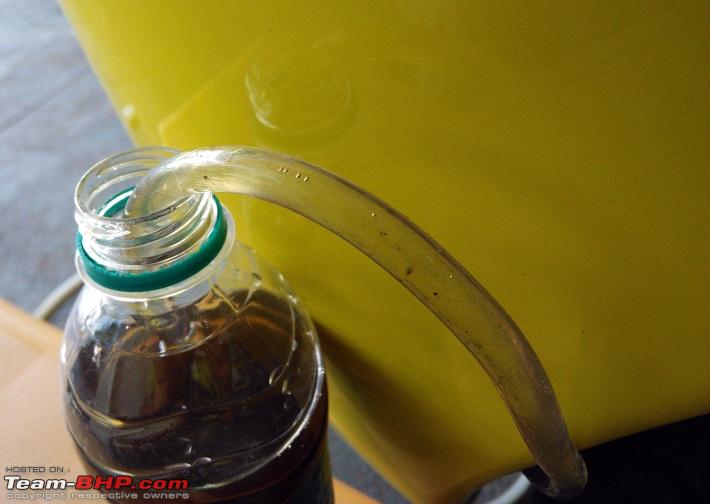 After 5 minutes, gave it a final press and closed the bleed valve. In the meanwhile, I could not bleed the rear left wheel since the muffler was in the way. Jacked up the car, took off the wheel and started bleeding. Managed to capture this picture of dirt coming out along with air bubbles  Line all clear! Close bleed valve and put the tyre back.  By this time, Chethan dropped in. I tried opening the bleed valve on front calipers and noticed something strange, the 8 Ring spanner was small! I didn't have a size 7 ring spanner! I got a 6-7 open ended spanner and was able to crack open one the front right bleed valve. Tragedy struck when I tried with the front left, it rounded off the nipple. Sigh looks like my car got the case of a nip slip  However bled the front right caliper and was able to tighten back then bleed screw with just the open ended spanner. However bled the front right caliper and was able to tighten back then bleed screw with just the open ended spanner.Yours truly sneaking under the car to open the bleed valve on front right caliper:  I was running out of brake fluid, Chethan offered to go in his car to pick up a 6-7 ring spanner and more brake fluid. What would be a simple 15 minute drive took us over an hour because of all the road closured thanks to Dasara in Mysore. UGHHHHHHHH Once I was back, tried again with the ring spanner and it still slipped. Left it to tackle later, started working on bleeding the clutch. The hydraulic clutch on the Palio has the bleed nipple on the Clutch Slave Cylinder. Since the height differential between the Slave cylinder and Reservoir is less, the fluid will come out slower compared to others. I was HORRIFIED looking at the fluid coming out, it was BLACK! This was shocking since the residual fluid from the reservoir/brake lines was dark orange whereas this was just black. Black fluid coming out from Clutch Slave Cylinder:  Bleeding the clutch took longer since the pedal initially wouldn't return back smoothly after pressing. After 20 presses, the clutch freed up and the action could be described as springy! It became much smoother and took less effort to press with every stroke. CLosed the valve after the line was all clear. Black fluid from the clutch. PUUUUUKE  The reservoir finally is all clear. Since it was dark, used my torch to light up the reservoir and check for debris. Mmmm I love dasara  Called it a day since it was dark and no light around. I still have the old calipers with me, I can salvage a bleed nipple from one of them for the front right caliper. Task for tomorrow all set, need another 500ml can of brake fluid since the clutch alone took ~400ml to clear. 3 x 500ml of spent brake fluid for today  At the end of day, I am delighted to know that my brakes now have fresh clean fluid and willing to forget the horrible stuff that was in before. This has been a good experience! I can only say for sure that the clutch has massive improvement since I haven't started the car since bleeding began and currently have no idea how the brake pedal feels with the brake booster operational. I'm sure it will be lovely |

|  (34)
Thanks (34)
Thanks
|
| The following 34 BHPians Thank SunnyBoi for this useful post: | aah78, arunphilip, ashpalio, Ashtoncastelino, CoolCarNi, dailydriver, dark.knight, dpat17, DrANTO, Eddy, ElantraGT, FINTAIL, Gannu_1, GTO, HappyWheels, IcarusMan, IndigoXLGrandDi, john doe, johy, JoseVijay, khoj, lemedico, lucifer919, Neil Roy, Nimish anthony, paragsachania, Rehaan, RSR, Sankar, shyamhegde, Soumyajit9, theredliner, vaasu, Wildy |
| |
|
2nd October 2014, 09:34
| #2 |
| Senior - BHPian Join Date: May 2005 Location: Location
Posts: 5,784
Thanked: 9,251 Times
| re: DIY: Flush / Bleed the clutch & brake fluids Nice writeup SunnyBoi, i enjoyed reading it. How do the brembos bite have they bedded in? Any idea of what the pad composition is? I see that there is no slot on the brake pads. I've bought a set of TNG ceramic brake pads, but haven't put them till now. Brembos look great quality wise. Did you buy it from Laxmikant & Co? Last edited by Sankar : 2nd October 2014 at 09:40. |
|
| (3)
Thanks
|
| The following 3 BHPians Thank Sankar for this useful post: | Rehaan, RSR, SunnyBoi |
|
4th October 2014, 12:11
| #3 |
| BHPian Join Date: Sep 2009 Location: Chennai
Posts: 469
Thanked: 1,786 Times
| Re: DIY: Flush / Bleed the clutch & brake fluids Got to just love a guy who spends his holidays working up his car (read passion). My Service Advisor has been threatening me with the ill effects of "obsessive bleeding". His rationale was that the nipples when removed and refitted have the tendency to wear more than the conventional bolt on, and some things are better left alone as long as it stops. From your post I can safely infer that you just dont want your car to just stop but stop precisely where you want..... And that my friend can be called as an obsession Here I am debating about whether to bleed my Duster on my own as I usually do not trust that the Service centers do a committed job of bleeding, when you boldy bleed the Palio whose spares are not known to be available off the shelf. Is the nipple a one size fits all type or does it vary from car to car? Have to admire your grit in trying to bleed single handed. |
|
| (4)
Thanks
|
| The following 4 BHPians Thank Neil Roy for this useful post: | Rehaan, RSR, SunnyBoi, Taha Mir |
|
5th October 2014, 18:10
| #4 | |||
| Senior - BHPian Join Date: Dec 2006 Location: Mysore / B'lore
Posts: 1,720
Thanked: 4,461 Times
| Re: DIY: Flush / Bleed the clutch & brake fluids Sorry guys for the late update, didnt drive the car these many days so didnt have anything to update. Took out the car to a far off petrol pump to fill fuel The brakes, unfortunately they've worsened a bit. They are mushier than before, cannot for the life of me wonder why. I think the brakes need another round of bleeding, will proceed with reverse bleeding this time. I have a drive to Bangalore tomorrow and right now brakes are working well so that I can safely make the journey. I haven't yet bled the front left yet, maybe that ruined the rest of the brake setup? Not sure. Once I've driven ~150KMs tomorrow I'll check up on the brake fluid and see if they are cloudy in any way. The clutch on the other hand has had a MASSIVE improvement. My biggest grouse with the clutch was that when I let go of the pedal completely, the clutch would still be engaged for a millisecond and it made shifting gears in fast driving a pain. Now the moment I let go of the clutch, it just kicks back in a way I'd feel with a new clutch! The feel has improved massively, its springy and can predict completely when the clutch is going to get disengaged with more accuracy. Quote:
Quote:
I'll probably get a set of Mintex pads from the UK for my next set. I did buy my pads from Laxmikant & Co back in March 2013. They had only one pad variety for sale then and it fit mine Like you've mentioned, the quality is outstanding.Quote:
In my honest opinion, if it ain't broke, don't fix it. Get a syringe or something similar, open the reservoir cap and drain ~5ml and check the colour. If its transparent, don'b bother with bleeding the brakes. There is a lot that can go wrong with bleeding brakes and thankfully enough my brakes are still serviceable. Next time I'll have to double check on my technique. Thankfully the parts that can go wrong while bleeding brakes are available aplenty for the Palio | |||
|
| (2)
Thanks
|

| The following 2 BHPians Thank SunnyBoi for this useful post: | Rehaan, Sankar |
|
5th October 2014, 18:38
| #5 | |
| Distinguished - BHPian  | Quote:
Couple of thoughts and comments. You always need to bleed all brakes. And you should do it in the correct order. Essentially you go by length of the brake line. Shortest first, then the next, longest length last. I don't understand the correlation between the colour of the brake fluid and the need to bleed or not. Just because its clear doesn't mean anything. To be blunt; there is no correlation. There is absolutely nothing you can conclude from the colour of the brake fluid. Other then, when it is clear/transparent its fairly new. Just because its dark doesn't mean anything. You need to test it for water content or other. Any new clear/transparent brake fluid will go dark in a matter of months, sometimes even quicker. Its a good idea to flush the brake system every 2-3 years for no other reason, the brake fluid is hydroscopic so it attracts water. As such that doesn't affect braking as it is just another liquid, but it does cause additional wear/corrosion. If you know what you are doing there is very little that can go wrong with bleeding brakes. If you think a lot can go wrong, for God sake, don't bleed your brakes, because obviously you don't know what you are doing! Lastly, if you want to bleed ypur brakes yourself you might consider investing in some brake bleeding tools. For instance an Easy Bleed or similar. Much better then having to pump the pedal! Jeroen | |
|
| (5)
Thanks
|
| The following 5 BHPians Thank Jeroen for this useful post: | DrANTO, john doe, lemedico, Rehaan, SunnyBoi |
|
5th October 2014, 18:49
| #6 | |
| Senior - BHPian Join Date: Dec 2006 Location: Mysore / B'lore
Posts: 1,720
Thanked: 4,461 Times
| Re: DIY: Flush / Bleed the clutch & brake fluids Quote:
All OEMs mandate a complete flush of brake fluid every 2 years, however if the brake fluid goes bad earlier, it must be flushed sooner. This time I'll try the shortest first route as well as use tools rather than pumping brakes  I'll update the thread as and when I complete the activity. I'll update the thread as and when I complete the activity. | |
|
| ()
Thanks
|
|
5th October 2014, 19:15
| #7 | |
| Distinguished - BHPian | Re: DIY: Flush / Bleed the clutch & brake fluids Quote:
So how do you determine it has gone bad earlier? The colour doesn't mean a thing. And it is not moisture that turns it dark at all. It's dirt and minute parts of the seal. Moisture (water) is transparent too! Your brake reservoir is open to the atmosphere. So it attracts air, with everything in it, dust, moisture etc. There are very simple tester that allow you to test for copper or for moisture content. http://www.amazon.com/Phoenix-System...id+test+strips http://www.amazon.com/Brake-Fluid-Te.../dp/B005HVG4GQ The price of the tester is about the same as a complete flush! Jeroen Last edited by Jeroen : 5th October 2014 at 19:17. | |
|
| (1)
Thanks
|
| The following BHPian Thanks Jeroen for this useful post: | Rehaan |
|
5th October 2014, 19:51
| #8 | |
| Senior - BHPian Join Date: Dec 2006 Location: Mysore / B'lore
Posts: 1,720
Thanked: 4,461 Times
| Re: DIY: Flush / Bleed the clutch & brake fluids Quote:
 For what its worth, I'm convinced that brake fluid does turn murky with presence of water and is an indicator to change the fluid. Do note that I'm speaking out of my experience and your mileage may vary. I'm not aware of any such brake fluid testers available for purchase in India. Please inform us if its available, it will make a great addition to my list of tools | |
|
| (2)
Thanks
|
| The following 2 BHPians Thank SunnyBoi for this useful post: | Rehaan, Sankar |
|
5th October 2014, 20:18
| #9 | ||
| Senior - BHPian Join Date: May 2005 Location: Location
Posts: 5,784
Thanked: 9,251 Times
| Re: DIY: Flush / Bleed the clutch & brake fluids Quote:
 I mean the groove on the pad. Quote:
| ||
|
| (1)
Thanks
|
| The following BHPian Thanks Sankar for this useful post: | Rehaan |
|
5th October 2014, 21:06
| #10 | |
| Distinguished - BHPian | DIY: Flush / Bleed the clutch & brake fluids Quote:
You can not compare adding water to your brake fluid to what happens from a hydroscopic point of view. The latter takes place at a molecular level and you are adding a whole drop at a time. They are two different things all together. You can order anything on Amazon.com irrespective of where you live as far as i'm aware. You just need to seller to ship international. Im ordering stuff on amazon.com and ebay.com here in india with no problems. http://www.modtechengg.com/products.html http://catalogs.indiamart.com/produc...e-testers.html Jeroen Last edited by GTO : 7th October 2014 at 16:25. Reason: There is absolutely no need to be so rude! | |
|
| (1)
Thanks
 |
| The following BHPian Thanks Jeroen for this useful post: | Rehaan |
|
5th October 2014, 21:51
| #11 | |||
| Senior - BHPian Join Date: Dec 2006 Location: Mysore / B'lore
Posts: 1,720
Thanked: 4,461 Times
| Re: DIY: Flush / Bleed the clutch & brake fluids Quote:
I'll fill the vial again with brake fluid and leave it in the open air for a week. That should clear things out I guess (or make it murky )Quote:
Customs and shipping are going to double if not more so the original cost. I'd rather pay a garage to flush/do it myself and have clean fluid instead of paying big bucks to know if my fluid is good or bad. I'll have to spend more on changing the fluid anyway if its gone bad EDIT : Found the same brake fluid tester on eBay China for 15$ with free shipping to India. Anyone interested can order : http://www.ebay.com/itm/5-LED-Brake-...item3f38fdbf3c Quote:
Last edited by GTO : 7th October 2014 at 16:27. Reason: Quoted post has been edited for personal attacks | |||
|
| (1)
Thanks
|
| The following BHPian Thanks SunnyBoi for this useful post: | Rehaan |
| |
|
5th October 2014, 22:23
| #12 | |
| Distinguished - BHPian | Re: DIY: Flush / Bleed the clutch & brake fluids Quote:
Try this. Fill a cup with brake fluid. Leave it sitting on your desk for two years and report back what the colour is like. That's as close as you can get to real life simulation. Jeroen Last edited by GTO : 7th October 2014 at 16:27. Reason: There is absolutely no need to be rude! | |
|
| ()
Thanks
|
|
6th October 2014, 15:53
| #13 |
| Distinguished - BHPian Join Date: Dec 2012 Location: India
Posts: 4,839
Thanked: 14,736 Times
| Re: DIY: Flush / Bleed the clutch & brake fluids SunnyBoi, Personally, I would advice you to bleed the wheel farthest from the master cylinder first, typically, working towards the closer ones in the sequence; unless the owner's manual suggests a different order. So for our RHD cars, the left rear should be bled first. Also, if you have a good reverse bleed kit, then great. It is probably the most effective method of taking out air from the hydraulic system. Else, no harm in going for tradition 2-men press & hold bleeding system. It is easy & gets the job done to very acceptable levels. Lacs of cars are running on our roads bled by that technique! Also, use proper caliper grease for the caliper pins. Regular grease can corrode the seals. Also, don't go by colour in deciding whether the system needs bleeding or not. May be you meant flushing, but presence of air in the system & colour of the fluid are not co-related. A freshly flushed system will have crystal clear transparent brake fluid (in case of DOT 4 as Dot 3 & previous versions of DOTs are not transparent) but can certainly have huge amount of air. Do update us with the result. Hope things are back in order soon. Regards, Saket Last edited by saket77 : 6th October 2014 at 16:12. |
|
| (1)
Thanks
|
| The following BHPian Thanks saket77 for this useful post: | Rehaan |
|
6th October 2014, 16:33
| #14 |
| Senior - BHPian | Re: DIY: Flush / Bleed the clutch & brake fluids Note from Support - Please avoid getting into arguments and personal attacks. The very essence of this community is to share knowledge and experiences and this needs to be done in a civil and polite manner for the benefit of the community members and readers. |
|
| (2)
Thanks
|
| The following 2 BHPians Thank n_aditya for this useful post: | GTO, Rehaan |
|
6th October 2014, 18:49
| #15 | ||
| Team-BHP Support  | Re: DIY: Flush / Bleed the clutch & brake fluids Quote:
If you regularly do DIY work that requires you to spend time under the car then I'd definitely recommend investing in a pair of jack stands. Leaving the car on a jack - hydraulic or mechanical for extended periods is not advisable. Quote:
I've always had a better experience with OEM pads for normal street use than aftermarket pads. OEM pads require a minimal or no bedding in period and are designed to work well from cold-starts. | ||
|
| (1)
Thanks
|
| The following BHPian Thanks aah78 for this useful post: | lemedico |
|