| |||||||

| Search Forums |
| Advanced Search |
| Go to Page... |
 |
| Search this Thread |  11,284 views |
 20th April 2022, 10:21
| #1 |
| BHPian Join Date: Jun 2019 Location: Kolkata
Posts: 396
Thanked: 2,880 Times
| DIY: Fan setup for car camping DIY fan setup for car-camping Disclaimer : All voltages mentioned are for direct current or DC. All prices are true to the best of my knowledge and belief. I do not have an academic background in natural sciences and I am not very knowledgeable about electronics/electricals. My son has a background in Mathematics but he too is not very knowledgeable about this stuff. So we had to do quite a lot of research. The planning was done jointly by myself and my son while the execution of this project was largely done by my son. If you want to replicate this DIY project yourself then please do so at your own risk. And kindly bear with me since the following is a long read. This post is about how we upgraded the fan setup in our car for car camping and reduced our regular brick and mortar home's electricity bill by approximately 20-30% in the process. It had been quite some time since we had done some changes or upgraded the abilities of our dear Blaze aka our 1st generation prefacelifted 1.6 petrol Creta AT thanks to the pandemic. Summer is here and things have somewhat started limping back to near normalcy after the scourge of the pandemic. So we thought of indulging in car camping again. But as you know, summers here in India can be scorching and hence fans are an absolute necessity to beat the heat. However, car fans need electricity and we did not want to keep a lead-acid battery in the cabin of my car as those release fumes and my car's cabin also serves as my living/sleeping space. The ones that do not release fumes are quite expensive and nearly impossible to get in a desired shape/size. Moreover, lead-acid batteries are expensive to the tune of approximately INR 100 per Ampere Hour (AH) and do not last long either.  The earlier setup We already had a fan setup in our car. It consisted of a Xiaomi 20000 mAh power bank (actual capacity after accounting for conversion losses is around 14000 mAh) to power two USB powered 3.6 watt 3-speed car fans for atleast 8 hours or more while the engine is off. We used to use Xiaomi's Qualcomm Quickcharge 3.0 compatible 18 watt fast car charger to recharge the power bank through a high capacity micro-USB male to USB male cable converter cable. We can even recharge this when the car's engine is off with the help of the 50 watt monocrystalline solar panel connected to a PWM charge controller in my car during the day. So the maximum usable power from the solar panel would be approximately around 40-41 watts since we were using the cheaper and less efficient PWM (pulse width modulation) technology. This fan setup was rudimentary to say the least and hence we were looking to upgrade to a more reasonable/effective one. Please note that when the weather would be very hot we would use 750 millilitre (mL) ice bottles from our car's fridge/freezer as cuddle toys while sleeping in the car. We would take care to wrap the ice bottles with towels or else frostbite is inevitable. Moreover, without the towels, the ice would melt very fast within 3-4 hours. With towels the ice does not melt for approximately 8-9 hours which is enough for a good night's sleep. Anyway, let us not digress further. We started looking at 12 volt car fans. We were surprised to find that the designs of car fans had not changed much from the ones that we had installed in our earlier HM Mark 4 petrol Ambassador nearly four decades ago. I distinctly remember that those used to draw a lot of power, made a lot of noise, ran quite hot and didn't have a proper spread of air due to their 4-6 inch blades. And those didn't last long either. Upon enquiring further, we found that now these fans draw a continuous current of 1.2 Amperes at 12 volts which translated to 14.4 watts of power each. This is quite high and unsuitable considering the fact that we wanted to connect two fans to our car's sole 45 AH or 540 WH (watt hour) stock battery. We know that this is risky but more on that later. We didn't even look at the puny imported car fans since my existing USB fans pushed out more air than those imported plastic car fans. It seemed that we were stuck but we refused to believe that fan technology had not improved much even after almost 4 decades. Choosing the fan Time flew by and we got busy with other work when one day my son had a brainwave. He suggested that we should look at non-car DC fans including solar fans. We jumped onto researching DC fans and the more we delved into the subject, our prospects became brighter. We came to find out that DC fans (especially the solar ones) are very power efficient. After considering a few varieties, we decided to get two table fans with 9 inch diameter blades since this is the smallest diameter of fan blades that can cover the width of an average adult human. We found a variety of brands selling 12v solar table fans both online and in regular brick-and-mortar shops. The price is usually between INR 400-500 each. But we also found that fan kits (without motor) can be purchased between INR 200-250 each and can be assembled easily at home with a few basic tools like a screwdriver, a pair of pliers, a wire insulation stripper and a cheap low power soldering iron. For consumables, some electrical insulation tape, lead solder wire and 2 pin connectors are necessary. Choosing the motor 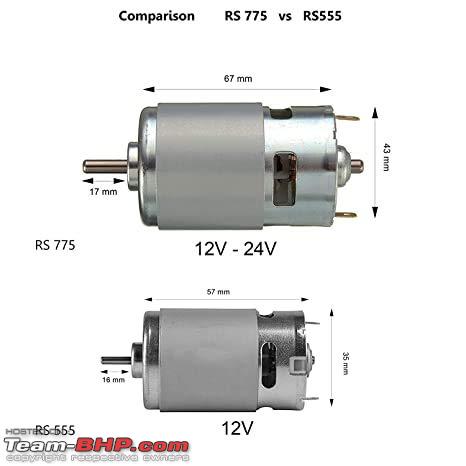 Determining the usable amount of energy Ideally, regular lead-acid batteries do not last long if they are drained below approximately 50% of their charge levels. This meant that technically, we could only treat our 45 AH car battery like a 22.5 AH battery which would have to run the 2 fans and start the car's engine all within this 22.5 AH or 270 WH. Even though our car runs on petrol and takes way less power to start the engine, we chose to go with the diesel engine starting power figures for the worst-case scenario. A typical diesel car can draw upto 600 amperes of current for around 3 seconds before starting the engine which translates to (4 x 600 x 12 x 3)/(60 x 60) or 24 WH for 4 engine starts. We assumed the starting voltage to be 12v here even though the actual voltage while starting the engine is lower by 2 volts at around 10 volts. Hence, we had a maximum of around (270 minus 24) or 246 WH for our fan upgrades. This was great considering the fact that technically, we could run the fans with the car's battery for more than 16 hours. We also have a DIY USB fan setup that acts as ventilation fans for the cabin. These ventilation fans have a combined draw of only 5 watts of power (60 WH in 12 hours). Now we had (246 minus 60) = 186 WH for our fan upgrades which translated to approximately more than around 12 hours for the combined load (14.4 watts) of the two solar fans. This was still more than enough for 8 hours of sleep. This meant that we would have quite a lot of charge left in the battery before the Sun would come up and start charging the battery through the 50 watt solar panel in my car. Hence, there was no need for any additional battery. Shown below is a chart showing the approximate voltages of car batteries under various states of charging/discharging :-  So ideally, we would have to ensure that the load is disconnected when the battery voltage drops to 11.8 volts. The battery would then recover slightly and the voltage would increase by around 0.2 volt to settle at 12 volts. There was a slight problem. The solar charge controller will only disconnect the load if the battery voltage reduces to 11.5 volts. Sadly, the solar charge controller cannot be set to cutoff the load at 12 volts which is not a big issue since the engine can get started even when the battery voltage drops to 11.35 volts in my car. But we intend to avoid permanent sulfation in the battery as much as we can. We can set the solar charge controller to reconnect the load when the battery voltage increases to 12.6 volts. This would make it seem that we would have to keep a constant eye on the battery voltage to disconnect the load manually when the battery voltage drops to around 12.0 volts. However, realistically speaking, the combined load of the two solar fans and the USB fan mentioned below is not enough to drop the voltage of the fully charged 45 AH battery to 12 volts within 9 hours. If the voltage of the fully charged battery drops to below the starting voltage of the engine with the load of the fan setup within 9 hours then that means the battery is at the end of its life which would not be surprising since this Exide Matrix 45 AH battery came with the car itself in 2017 and has performed flawlessly since then. The battery warranty had expired in 2019. If the battery dies or its voltage drops below the engine starting levels then we already have backups in the form of jumper cables with clamps and a lithium-based car jump-starter kit. These backups are especially important if we get stranded in the middle of nowhere which is quite likely in a car-camping situation. The lithium-based jump starter kit  Jumper cables with clamps  Increasing the efficiency We did a bit of research online and found that the 555 motor with the 9 inch diameter blades can operate at their maximum efficiency at 0.5 amperes at 12v. This meant that we could increase the efficiency substantially by slightly dropping the voltage resulting in a drop in current flow by 0.1 amperes. This would lead to a very slight decrease in air delivery rate while reducing the fan noise substantially. However, when we tried looking for a DC fan regulator we could not find any at reasonable prices. Still we kept on looking and thankfully stumbled upon something called a pulse width modulation or PWM motor speed controller. This is available in 1, 2, 3, and 6 ampere varieties or more. We chose to go with the 2 ampere ones which can operate between 1.8 volts and 12 volts with a maximum 2 ampere output. Since the fans require a starting current of upto 1.2 amperes each with the 9 inch diameter fan blades, our choice was satisfactory. Keeping the speed controllers at 80-90%, we can control the current at 0.5 amperes which means that the fans would consume only 6 watts each instead of 7.2 watts. These 2 ampere rated PWM motor speed controllers cost approximately INR 60-90 each.  Upgrading the solar charge controller Although the existing 10 ampere rated solar charge controller in my car was working fine and could have easily handled the load of the new fans, it was intended primarily for lead acid batteries like flooded batteries, sealed maintenance free batteries (SMF) and gel batteries. Additionally, since these solar charge controllers consume around 0.3 watts of power on standby, we used to keep it disconnected from the battery when not in use. Since this particular charge controller didn't have a memory function, we would have to enter the settings every single time it was reconnected to the battery. Also, it didn't have a backlit display which was a hassle if we wanted to look at the battery voltage at night while sleeping in the car. Moreover, we have some plans of making a DIY lithium power bank for our car's cabin area which would render the existing solar charge controller useless unless we did some extensive modifications to it.  Installation-1 This was a breeze. All we had to do was assemble and install the motors inside the fan kits. We could not find DC wires of adequate thickness and hence had to go for AC wires which resulted in a further drop in efficiency. We had some 1.5 mm wires lying around and decided to use those. All wiring was connected positive to positive and negative to negative. If you decide to do this then please be careful of the input (marked as IN) and output terminals on the fan speed controllers. Then we marked the positive and negative terminals of the 2 pin connectors with some nail polish. The wiring was then organized a bit with some zip ties and the motor speed controller was attached to the fan body's stem with some more zip ties.  Testing and results : This test was done sometime in early April 2021. We borrowed a 35 AH Amaron Eco Flo car battery from a local garage shop for testing purposes. The battery was approximately 3 years old at the time. The rent was INR 100 for one day with a refundable security deposit of INR 3500. We kept the battery directly under the Sun to somewhat mimic the temperatures of the hot engine bay of the car which would later cool down when parked as you can see from the time figures of the day. The ambient temperature at late afternoon was 38 degrees centigrade which later cooled down to 33 degrees centigrade well after sunset into late night. The battery was fully charged to 14.4 volts before this and then allowed to reach a nominal voltage of 12.6 volts before starting the test. Here are the test times with a 35 AH battery with a 1-1.1 ampere load (both solar fans together in parallel) connected to the solar charge controller at approximately 80% PWM motor regulator speed with no source of charging connected to either the battery or the solar charge controller :- 1) Connected load at 1:50 PM and then immediately voltage was 12.6 volts 2) 5:50 PM 12.2 volts 3) 6:08 PM 12.1 volts 4) 6:56 PM 12.1 volts 5) 7:50 PM 12.0 volts 6) 8:55 PM 12.0 volts 7) 9: 38 PM 11.9 volts 8) 10:16 PM 11.9 volts 9) 10: 58 PM 11.8 volts 10) At 11:50 PM the voltage starts jumping between 11.8 volts and 11.7 volts. 11) Load removed at 11:50 PM and the battery voltage immediately jumped to 12 volts. Please note that all of the above timings are for a single calender date. The battery was then left to rest overnight. The next morning we checked the voltage again and found it as we had left it at 12 volts. We then attempted to start our car with this 35 AH battery after removing the stock 45 AH battery. Unsurprisingly, the car started with a single crank within a split second. Although we expected a little better timings for the loads of the running fans, I would still call this a success because the 35 AH battery performed very nicely and would have definitely satisfied our requirements despite the efficiency losses. This meant that the 45 AH battery would be more than enough for our requirements just as we had calculated despite the efficiency losses. And we could always replace the existing battery in our car with a larger one. However, we wanted to avoid any unnecessary expenses. So why pay extra for a larger battery if the existing one serves us fine, isn't it ? Installation-2 We installed the new solar charge controller in the same place as the earlier one and the battery connection was made very similarly as earlier through an aftermarket 12v cigarette lighter socket connected directly to the battery through a 10 ampere fuse and a 20 ampere switch. We still installed an additional 5 ampere DC fuse in series for the combined loads of the new solar fans. One issue that we faced here was that the fans wouldn't run for as long as they should have in the car. This was slightly surprising. We initially assumed that the 2017 manufactured battery was dying but after a few checks with a voltmeter and a refractometer, we were able to confirm that the battery was working perfectly fine. Here is the refractometer used and its inner view :-   The culprit here was a voltmeter + dual USB port combo (image below) that we had installed in our car earlier in conjunction with an on/off switch and that was drawing some power from the battery.   We replaced it with a 12v cigarette lighter port exactly like the ones on the sides and the issue was resolved immediately. This was very easy since we had used female spade connectors for the connections. So it was just a matter of disconnecting the spade connectors from the dual USB + voltmeter combo and reconnecting those same spade connectors to the male ends of the spade prongs on the new 12 volt socket. We can place the fans on the boot area near the boot door on the fans' bases or we can remove this base shown below and place the fans between the headrests and the corresponding front seats after folding the front seats forward. The fans would be facing towards the rear of the cabin in a downward angle perfect for the people sleeping on the rear seats after folding those seats down. The removable base of the fans  And below is a video of one of the fans in operation. All that is left is to organize the wiring a bit. Conclusion Our greatest concern was that will this be enough and I am very happy to tell you that this fan setup is more than enough for a good 8 hours of sleep and more. We had some apprehensions as to sizeable current draw by some of the car's systems like the body control module, immobilizer, etc (when the engine was off) that could affect the runtime of the fans but our apprehensions were unfounded. We have tested them for more than a year including during the day when the ambient temperature was 40 degrees centigrade. I can say with 100% confidence that these fans are flawless as far as fans go. In fact, we even use them at home with two old UPS (Uninterruptible Power Supply) batteries connected in parallel instead of the ceiling fans. This has resulted in an average savings of around INR 260-280 per month. And this is if we use our home electricity to run the solar table fans with an AC to DC power adapter. If we use the solar panel to run these fans then the savings become much more. The total investment cost of this DIY project was approximately INR 2000 (for 2 fan kits, 2 motors, wires, electrical insulation tape, two pairs of 2-pin plug-socket combos, 2 PWM motor speed regulators and a 30 A solar charge controller) and we have already recovered all of it and more in terms of savings since we have been testing this for a year. Our home ceiling fans consume around 80-90 watts of power and pull a lot of heat from the ceiling made of reinforced cement concrete or RCC. Our home stays a lot cooler ever since we started using these solar table fans. It is very obvious that these DC fans cannot replace air conditioning. But I have my ice bottles in my car and an air conditioner in my home for that. Both fans can run at full speed for hours before the solar charge controller disconnects the load from the battery. Overall I am very satisfied and I hope that you enjoyed reading this. A small request, please feel free to mention all of your criticisms about our DIY fan setup upgrade below. Wish you all happy and safe drives ahead  |

|  (25)
Thanks (25)
Thanks
|
| The following 25 BHPians Thank Chhanda Das for this useful post: | @og_adi, AdityaDeane, asbshyam, catchjyoti, digitalnirvana, Dr.AD, GTO, ijeff, ike, InControl, JagMan, nikhil.neon, norhog, One, PowerSpike, Prakritij, pun337, Ravi Parwan, SS-Traveller, Venky03, vishy76, vredesbyrd, Vyas, windrider, ysjoy |
| |
|
21st April 2022, 12:01
| #2 |
| BHPian Join Date: Mar 2020 Location: Chennai
Posts: 48
Thanked: 119 Times
| Re: DIY: Fan setup for car camping Hi, I was thinking of ventilation as well since the summer heat has come knocking. I'm looking to forcefully cross ventilate a living area of my house as a crude solar experiment. Was looking at the same motors as well, would love to know from where you had source the fan kits (hopefully online) ? |
|
| (2)
Thanks
|
| The following 2 BHPians Thank asbshyam for this useful post: | Chhanda Das, PowerSpike |
|
21st April 2022, 12:32
| #3 | |
| BHPian Join Date: Jun 2019 Location: Kolkata
Posts: 396
Thanked: 2,880 Times
| Re: DIY: Fan setup for car camping Quote:
https://www.team-bhp.com/forum/diy-d...n-chimney.html (DIY: Car ventilation / exhaust fan / chimney) For your home, I would suggest using the 775 motor mentioned and shown above since that can operate within 24 volts. So you can avoid the costs of the battery as well as the charge controller by directly connecting the fan to a small 40-50 watt solar panel that usually produces a current between 16-22 volts. Sadly, these DC fan kits are not common here and only a few specialized shops sell them in areas like Kolkata where regular home electricity is available 24x7. I could not find them anywhere online either  We had planned on mounting the motors on wooden planks/boards but luckily stumbled upon the fan kits in a shop while on a trip to rural Bengal where power cuts are the norm. I hope this helps Last edited by Chhanda Das : 21st April 2022 at 12:50. | |
|
| (3)
Thanks
|

| The following 3 BHPians Thank Chhanda Das for this useful post: | asbshyam, digitalnirvana, PowerSpike |
|
21st April 2022, 15:40
| #4 | |
| BHPian Join Date: Apr 2017 Location: NCR
Posts: 312
Thanked: 1,554 Times
| Re: DIY: Fan setup for car camping Quote:
| |
|
| (2)
Thanks
|
| The following 2 BHPians Thank Blooming Flower for this useful post: | Chhanda Das, SS-Traveller |
|
21st April 2022, 16:27
| #5 | |
| BHPian Join Date: Jun 2019 Location: Kolkata
Posts: 396
Thanked: 2,880 Times
| Re: DIY: Fan setup for car camping Quote:
And this is if we use our home electricity to run the solar table fans with an AC to DC power adapter. If we use the solar panel to run these fans then the savings become much more. Our home ceiling fans consume around 80-90 watts of power each and pull a lot of heat from the ceiling made of reinforced cement concrete or RCC. Our home stays a lot cooler ever since we started using these solar table fans instead of the ceiling fans. And this has resulted in lesser air-conditioner usage as well. This is primarily what we gathered from the electricity bills for the last 2 years (before the solar fans' testing year) of our regular brick-and-mortar home. We calculated the total amount paid for those years and divided them by 24 to arrive at the monthly average. Then we compared it to the monthly average of the solar fans' testing year to arrive at the conclusion that our average monthly savings was indeed approximately around INR 260-280 which roughly translates to 20-30 % of our home electricity bill on an average. I hope that this clarifies things Last edited by Chhanda Das : 21st April 2022 at 16:29. | |
|
| (3)
Thanks
|
| The following 3 BHPians Thank Chhanda Das for this useful post: | digitalnirvana, irs_2s, Sushil Pingua |
|