Team-BHP
(
https://www.team-bhp.com/forum/)
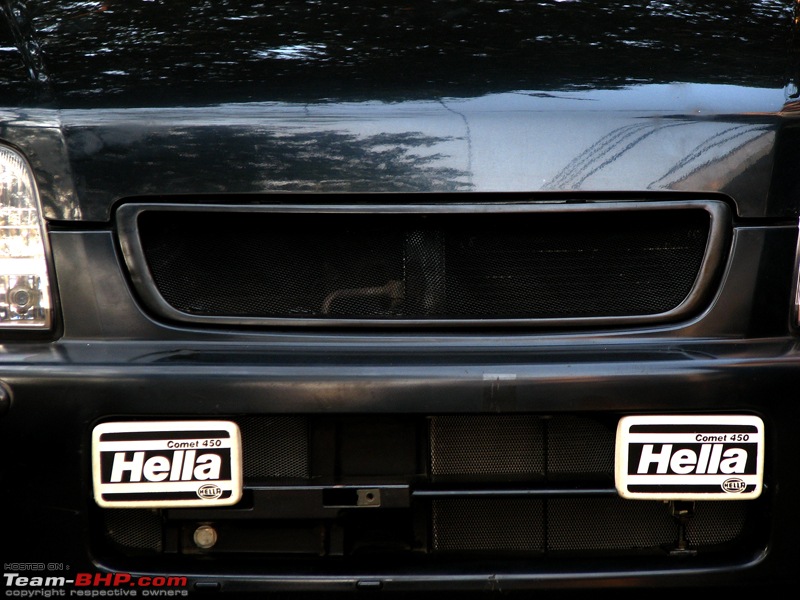
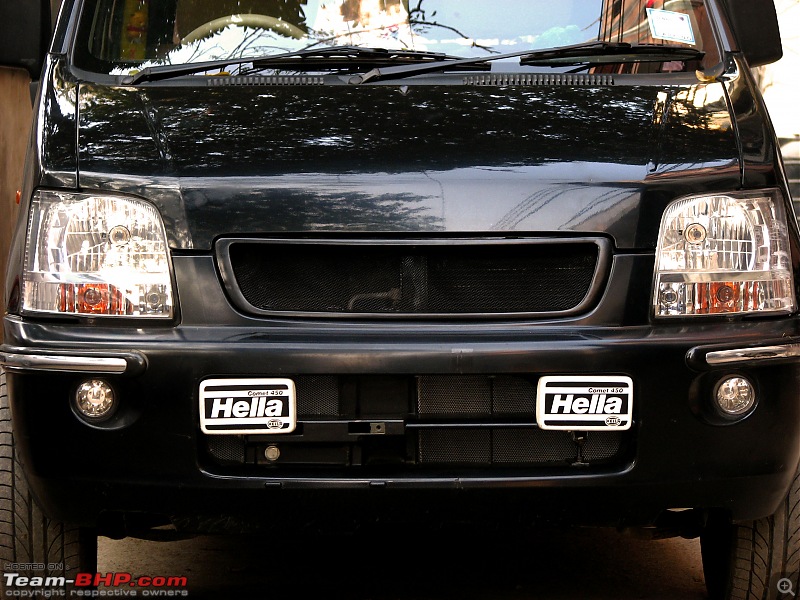
There's nothing much that you can do with a WagonR to make it look sporty, but what the heck, there is no harm in trying. So decided to make my own mesh grille and cut the bumpers to install the fog lights. This is how it looks right now, yet to install the front number plate and planning to attached a smart logo on the grille. :D
 Let there be light...

DIY steps coming soon.
nice DIY mate!!
waiting for the step now. did you paint the mesh black or was it black only? plan to use some mesh in the bumper also?
WOW!! The car looks AMAZING!! I love a Black Wagon R, and yours looks perfect.
Quote:
Originally Posted by white_vdi
(Post 1106721)
nice DIY mate!!
waiting for the step now. did you paint the mesh black or was it black only? plan to use some mesh in the bumper also?
|
Thanks. If you look closely, the bumper already has the mesh behind the lights and fins, I didn't want to cut all the fins.
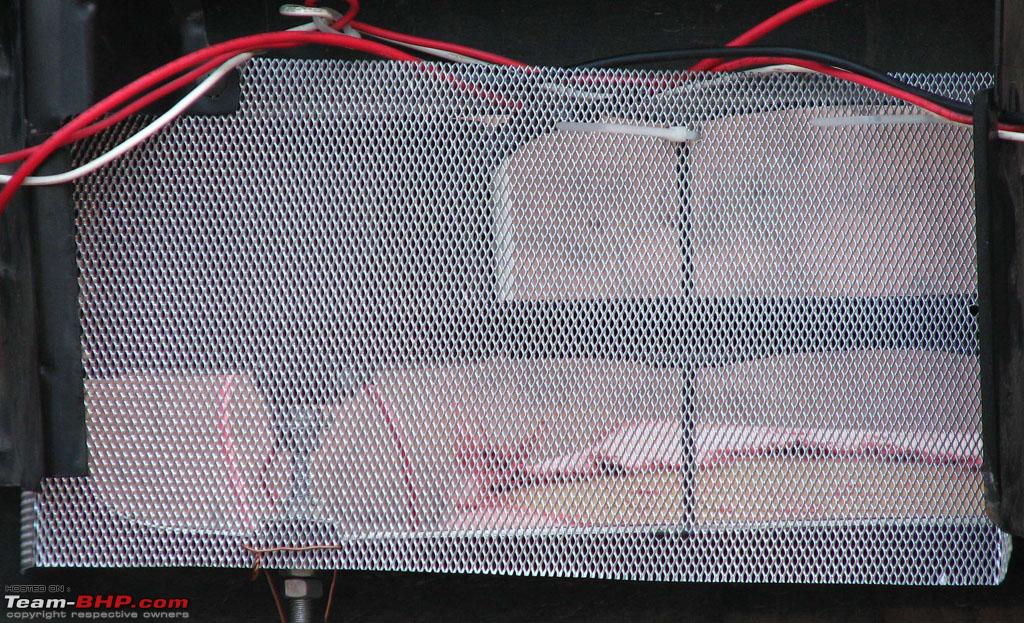
This is a closeup of the mesh.
And the mesh used.

on the bumper, did you screw it on directly using a washer and a screw? was it black or you painted it? where did you source the mesh from? cost? and also the tools required for the job. too many questions i know stupid:
great job nonetheless!!!!
i wouldn't mind doing the same on my swift's bumper.
A guide on how you went about the job be great.
looks great, looking forward to a detailed writeup!
cheers:
Here is the DIY guide. Please note that
no proffesional tools were used, I only used the tools which were available with me. Also there is a risk of injuring oneself while working with the wire mesh, so precaution should be taken.
Tools used in the project.

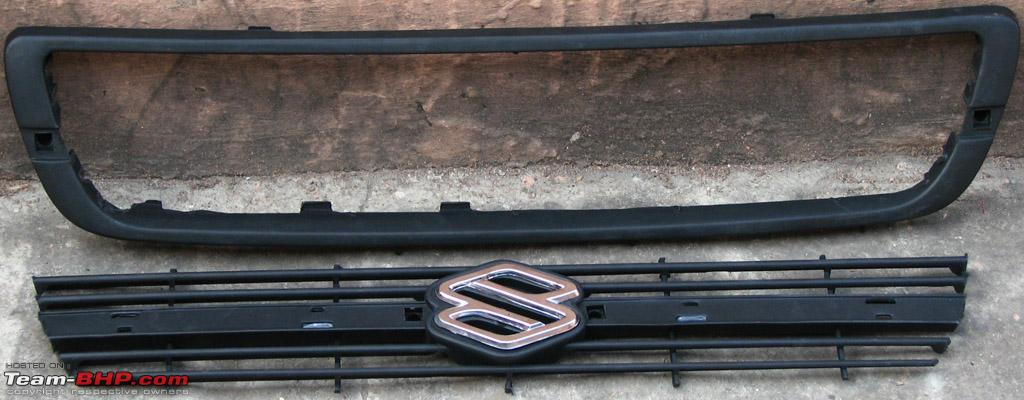
First step was to buy a front grille from the local spare parts shop. I did not want to try the DIY experiment on the original OEM grille, if anything went wrong and also to retain the original grille for future use if I got bored with the mesh grille.


Next step was to remove the chrome strip and suzuki logo, cut all the fins, plastics inside the grille. All the cutting in the grille and bumper was done by the hacksaw blade with hand. Used the mini blade wherever the big blade could not get through.

This was the easy part. Once you cut out all the fins, it'll leave ugly gaps and scars in the grille frame.

Used M-seal putty to fill all the gaps, make sure not to excessive putty as you'll need to file and smoothen the surface. Leave it overnight to harden.

Now begins the tough part. Using the file, I had to file away the excessive putty and smoothen the surface, also used different numbered sand papers. Once satisfied that this is the best I can do, applied body filler over the area and left to dry.

Again using sandpaper no. 100/150, smoothen the surface, body filler is much more easier to sand paper than m-seal.

Once satisfied, sprayed 2 coats of black com-paint over the area. Even though my car color is midnight black, I used the regular can of black color as the difference was hardly noticeable. There is a more proper procedure of applying primer and all, but I used the shortcut method.

This was the wire mesh used. The mesh was strong and proper care needs to be taken while cutting the mesh. I used the metal scissors to cut the mesh. The difficulr part was in cutting the mesh and bending it to shape to fit the grille frame. The mesh was bent using the pairs of pliers.


Once the mesh was cut and the edges bent to fit the grille, grilled holes for the screws using the screwdriver, I applied m-seal along the sides. One thing to keep in mind while applying m-seal is to leave gaps where the grille fits the bumper. You should align the grille with the bumper and check where to apply m-seal. I had to scrape away all the putty on the top side after it dried as it was not fitting into the bumper.


This is how the the unfinished grille looked like. After its done you start painting the entire grille with atleast 2 coats of paint.

Next the bumper was cut to install the fog lights. Again only the hacksaw blade was used.

....continued.

Use little amount of rubbing compound and polish it as a final touch.

And finally its done. Even though its crude and turned out to be a little expensive and time consuming process, I'm satisfied. Now I'm searching for a small front number plate design and a matching logo to go with the grille. And how will green neon lights look behind the grille ? :D
brilliant work Shakensoul.
the quality of the work is top class.
congrats.
beautifully done man :)
Fantastic DIY. Well Done Mate!!
In my opinion, the grille looks a little empty, so how about adding the Suzuki 'S' logo on the grille? You can find a really small logo from the Suzuki bikes in India(used on the petrol tanks like seen
here).
Super stuff! The fit and finish looks like its no-DIY but a complete professional job :)
Superb. Very well done. I am only concerned about the L bracket for the Hellas. All said, if you take it to ladakh, or just wade through the muck we call good-gaon monsoons, then you can potentially end up cracking the bumper/getting it misaligned. That's the only danger. Else laavlies.
Bahut mehnati ho yaar! clap:clap:
| All times are GMT +5.5. The time now is 08:10. | |