Pre-wired, not pre-installed!
Why this car comes from the factory without an alarm system is beyond me but at least it comes with all the wiring in place, just in case the owner decides to install one.
If you buy an alarm system from the dealer, have them install and activate it you will end up paying around $650.
If you buy and install the alarm system yourself you can save $200-$300 depending on how much you buy the alarm system for and the activation cost.
This is what you need to order -
BMW P/N: 65 12 0 403 658
Try to get your vendor to send you a copy of the official installation instructions - they're really helpful. You can have your dealer's Parts Department fax you a copy, or just download a copy off the net.
(As far as I'm aware - no aftermarket system will work with the car.)
Please check compatibility with your car beforehand.
RealOEM.com BMW Parts Catalog is a good place to verify part numbers and see what's the right P/N for your car.
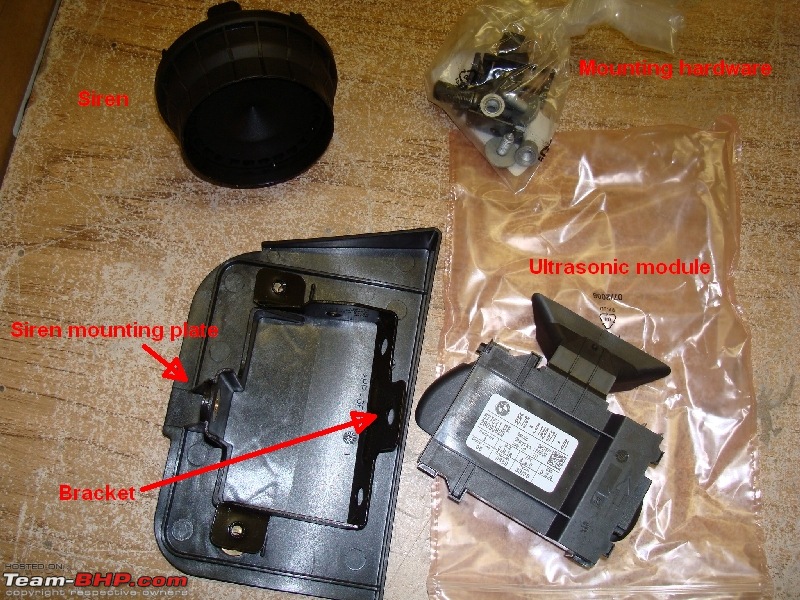
Here's what you get in your retro fit kit:
- 1 x Siren
- 1 x Siren mounting plate
- 1 x Hex-head nut w/plate for mounting siren
- 2 x Hex-head screws for siren mounting plate
- 1 x Mounting bracket
- 3 x Hex-head nuts w/plates for mounting bracket
- 1 x Ultrasonic module for car interior
- 1 x Hood-switch (or bonnet-switch)
- 1 x Notched mounting bracket for hood-switch
- 1 x Screw for notched mounting bracket
 Tools required:
- Jack.
- 17mm socket wrench for wheel bolts.
- 10mm deep socket wrench.
- Philip-head screw driver.
- Small flat-head screw driver.
- Not necessary - T20 Torx screw driver.
- Not necessary - plastic prying tool.
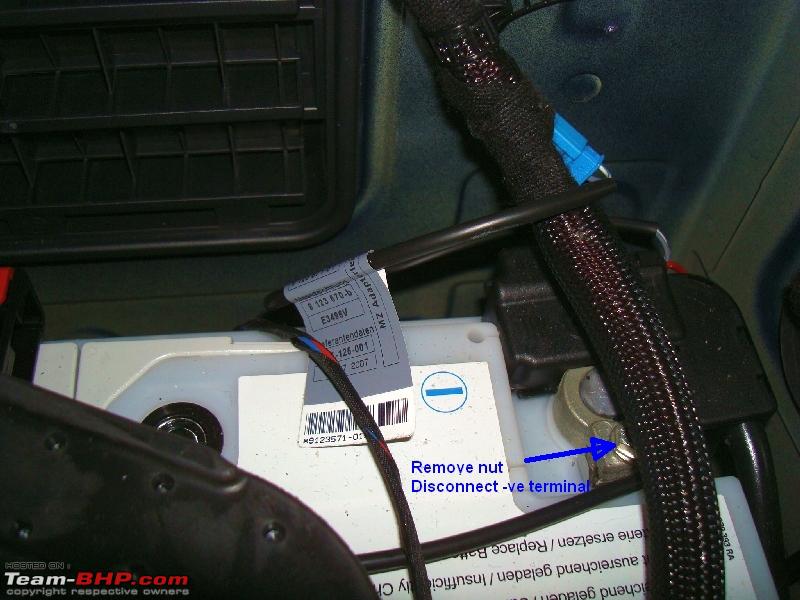
Important: Whenever installing any electronics in your car it's always a good idea to disconnect the negative (-ve) battery terminal
Remove the -ve battery terminal using the 10mm socket wrench. You may have to wiggle the terminal off the battery (Don't try to yank it off as you risk unplugging some other connector by accident).
Place the -ve terminal on an insulater (such as a towel) so that it doesn't come in contact with the +ve battery terminal.
 Interior
It's a good idea to start with the interior as you're cleanest at this point.
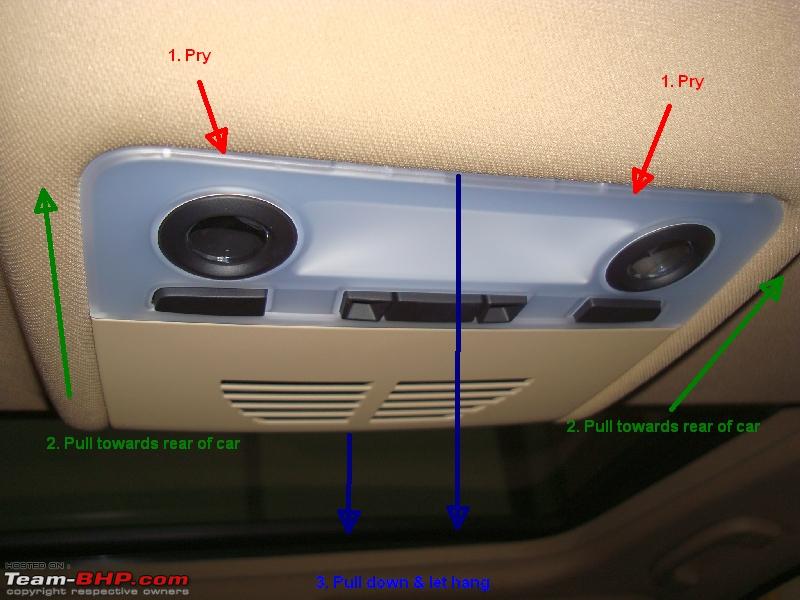
Get in the back seat and remove the rear interior lamp assembly, as shown.
Pry the front a little using a soft plastic tool to so you don't scratch anything but you can get away with a small flat-head screw driver too as you don't need to pry anything hard.

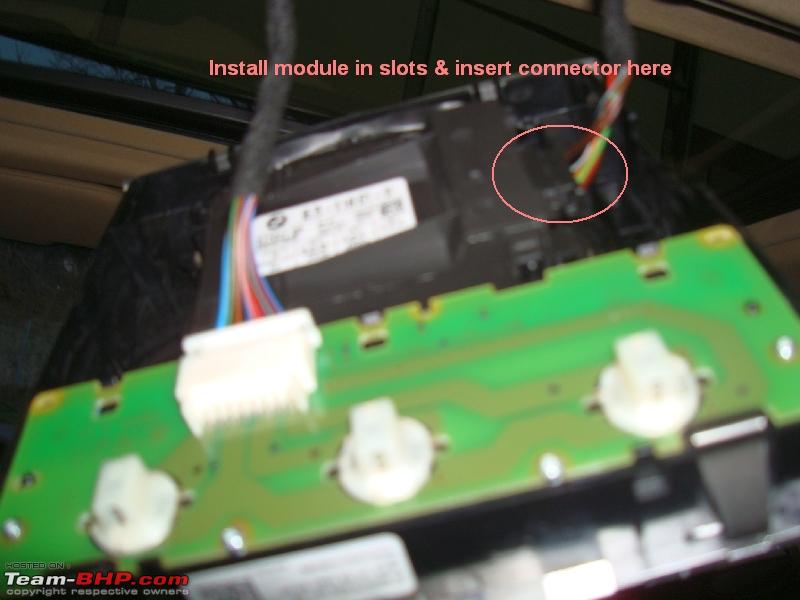
Remove the circled connector.

Instert the Ultrasonic module into the empty slot and connect the connector (that you just removed) to it.
The module will only go into the slots one way so don't force it in or you risk breaking the tabs.

Snap back the hanging lamp assembly into place and you're done with the interior.
Under the bonnet / hood
Open the hood.
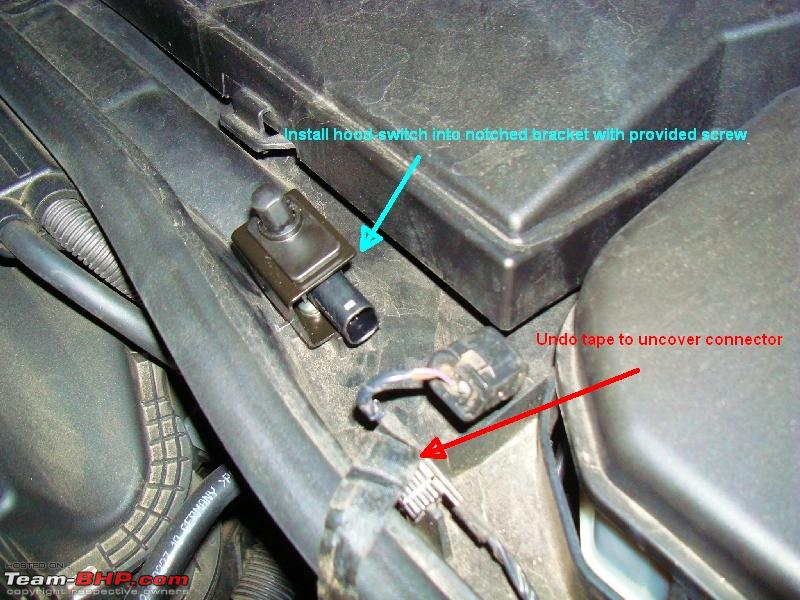
Mount the notched hood-switch mounting bracket into the provided mounting location and insert the hood-switch into it (Note the directions of the bracket and the hood switch). The bracket will fit onto a notch in the mounting location, which unfortunately, I didn't a picture of.
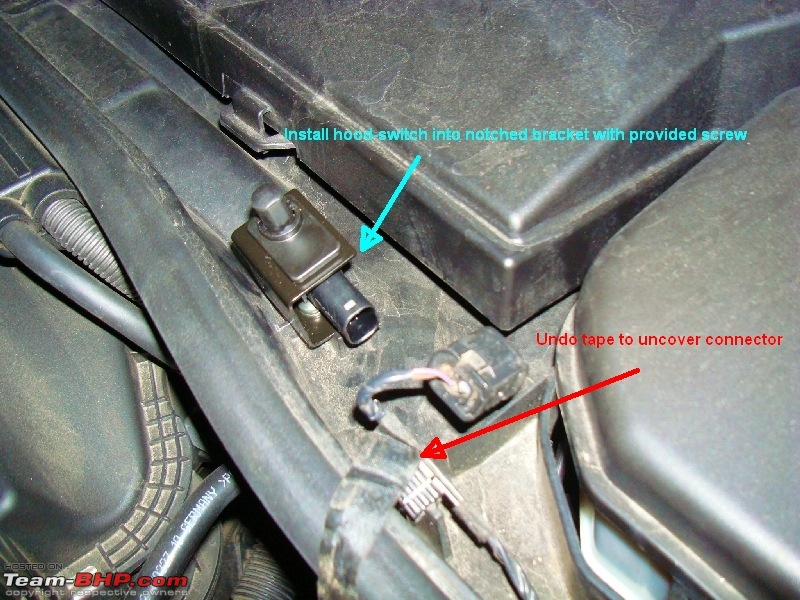
Remove plug from connector and insert the connector into hood-switch. It'll only go in one way.

Note:
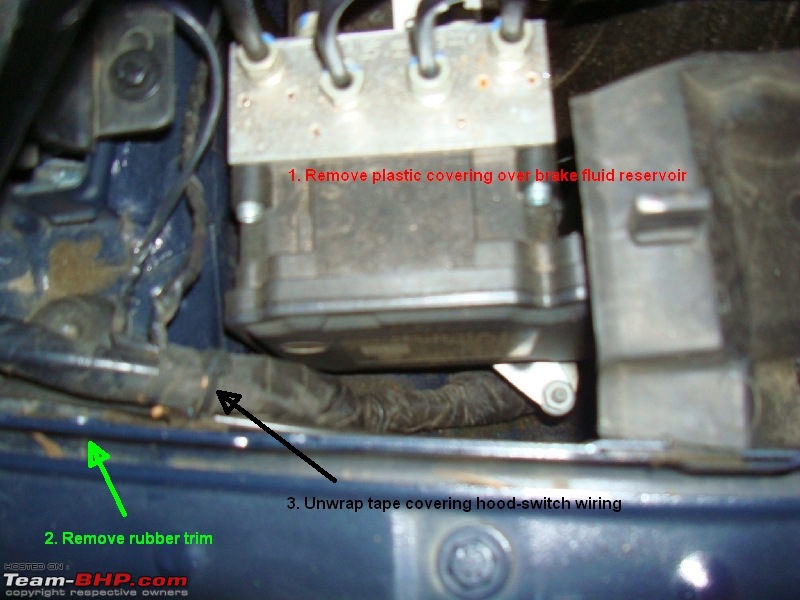
If your E90 is an earlier model (atleast before 2008), then you might have to remove a piece of rubber trim and the plastic cover of the brake fluid reservoir to get to the folded connector. Then unwrap the tape to free the connector that goes to the hood-switch, straighten out the wires and insert them into the mounting tabs provided.
In my case I
did not have to remove the plastic cover and a small piece rubber trim on the bonnet as the connector was already routed to near the hood-switch mounting location.
Here's a pic.
 Take a break...
...and mount the siren onto the mounting plate provided using one hex-head nut w/plate
 Getting dirty
Loosen wheel bolts and jack up the rear left side of the car.
Remove the wheel.
Remove the bolts as marked in the picture, using your 10mm socket wrench.

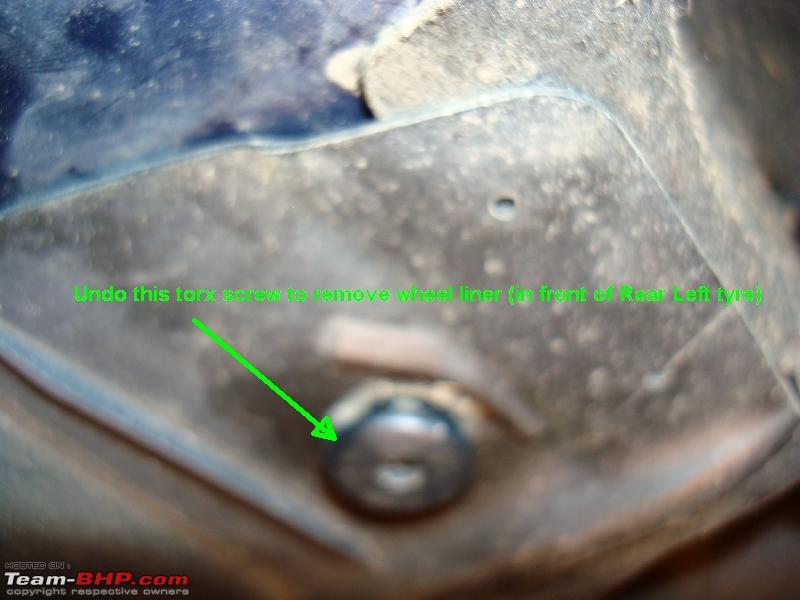
Remove the sole torx screw that holds the tiny wind deflector in front of the wheel - under the car.
This is what you should end up with. You can remove more bolts from the wheel liner if you wish to but you really don't need to.

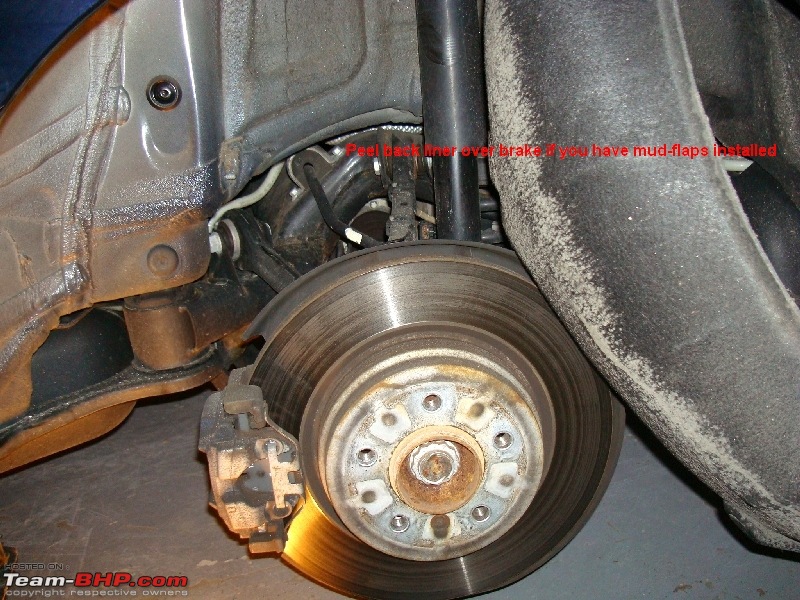
After removing the 4 bolts and the torx screw, peel back the wheel liner over the brake and leave it there.
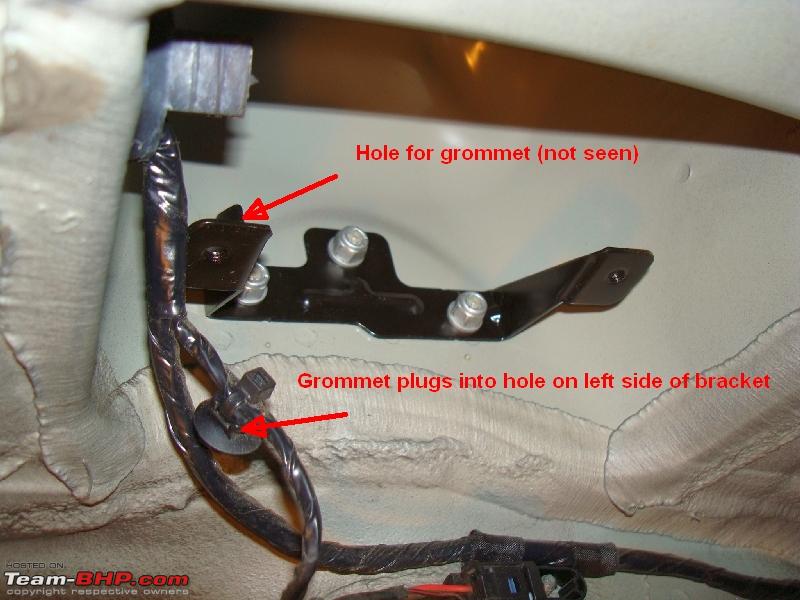
Look up and under.

Mount the mounting bracket using 3 hex-head nuts w/plates, in the provided location, and insert the plastic grommet into hole on the left side.


Plug the hanging connector into the slot on the siren - it'll only go in one way.
Fasten the mounted siren plate, to the mounting bracket using the remaining 2 hex-head screws. (Make sure that wires aren't pinched between the bracket and the mounting plate).
 Reverse
- Re-install the wheel liner (4 bolts + 1 torx screw). The torx screw won't tighten so don't keep trying to tighten it.
- Mount the wheel & wheel bolts.
- Lower the car.
- Don't forget to torque the wheel bolts (130Nm / 90lb-ft).
- Reinstall your battery -ve terminal.
That's the installation dealt with. It should take around 1.5 hrs on average.
Some of you might find that certain features of the alarm do work on installation but you need to get the car programmed to have all the features activated.
Now, make an appointment with your dealer and have the car programmed to activate the alarm system. The dealer will charge you an hour's labour.
For cars with i-Drive - you can customise alarm settings to an extent.
For cars without i-Drive - all the features will be enabled by default.
Thanks for reading and hope my write-up helps!
Due credit to the very helpful write-ups of E90POST.com members.


 25th March 2010, 20:27