Hello Bhpians , this is my first long post here in Team-Bhp, after being an avid reader for almost 10 years i have recently received the keys to be a member of this elite forum and i thank team-bhp team for accepting my application.
My background. I am an accountant by profession, an auto-motive enthusiast and a bit tech savvy guy having very basic understanding of how tech works, this article shows my level understanding (which is very low) on the project in hand. So, members who are experts in this felid i am apologizing beforehand for doing the same in a very basic way.
Now coming to the work in hand, we now live in a world were data has become the new oil, the new gold and the new weapon for nations and has become assets for individuals, and this data (photos, videos etc...) In hand is increasing day by day. My personal data itself is around 1.9 TB and counting. Also the days of getting our marriage photos and videos on Albums, VHS, CD/DVD/Blu-ray are numbered (My marriage data was given to us on an hard drive). And storing them in an external hard drive is not prudent, i have lost 340 GB of data recently hoping to recover them through some recovery services.
The ideal scenario is to have our data in the cloud, companies like google, Microsoft are providing cloud storage services but are very expensive Rs.6500/Yr for 2TB. And I am unable to trust these companies who feed on our data for their revenue. So the next best thing is NAS (Network Attached Storages), companies like Synology are providing these hardware but are very costly. So decided to build one.
Ideal scenario for data to be safe is 3-2-1 ie.. Three copies, in two different media and one copy kept offsite. But my end goal is to have three copies (in same media) in two places, two copies with me and another copy in the server at my native place.
For the first step I am staring with a single NAS capable to store the data and can automatically sync with my mobile and able to access from anywhere.
Requirements
1.Any old windows PC Laptop/desktop.
2.Hard drive for storage.
3.Any desk application for remote access.
4.Mi File manager app for browsing the shared folder.
5.Tailscale application (on mobile and PC) for access to your server from anywhere around the world.
6.Foldersync app on mobile to schedule the synchronization of data between mobile and NAS.
My setup
An old desktop computer from HP , model HP-Compaq DC7900 Small form factor ,bought for around Rs 3500. A 1TB hard drive extracted from an old laptop.
Specifications of the device
Intel Core 2 Duo CPU @2.93 GHz.
4 GB DDR 2 RAM.
160 GB boot drive.
1 TB HDD for storage.
We need one boot drive and one storage drive, connect both hard drives to the PC with SATA connector and connect the power cable for the same.
Steps for configuring NAS Step 1: Create a Microsoft account and login using this credentials in the old PC that you want to convert to server.
Settings> Accounts> Emails and accounts > Login to your Microsoft account.
 Step 2
 : Setup network share for the folder you want to be as your cloud destination.
Right Click on your NAS folder/Drive
Properties> Sharing (tab) > Advanced sharing > tick Share this folder> permissions >full control.
 Step 3
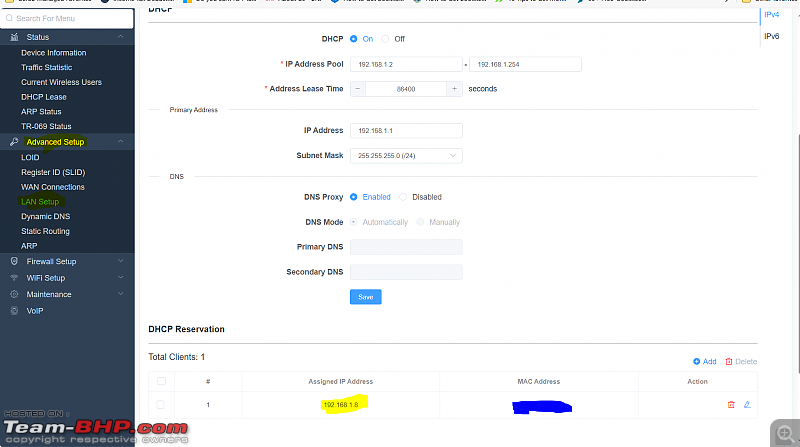
 : Reserve an Local IP address for your server.
Go to your router settings usually it is 192.168.1.1 or 192.168.1.0 (type in your browser and login).
Advanced Setup>LAN Setup> DHCP reservation.
Type your server mac address and reserve any IP address within the range available.

This step may be different for different routers please refer your manual/web for clarification.
Step 4: Create a tailscale account, signup here
www.tailscale.com Step 5: Download and install Tailscale and any desk application
Both can be googled and downloaded.
Step 6 :
Login to your tailscale application using your credentials on the server.
 Step 7
Go to tailscale dashboard by logging in with your account and you can find your server.

Note down your IP address here it is 100.123.220.25.
Step 8:
Install Foldersync and tailscale applications on your android device, login to your tailscale application using your credentials and press active on the top left corner.
 Step 9:
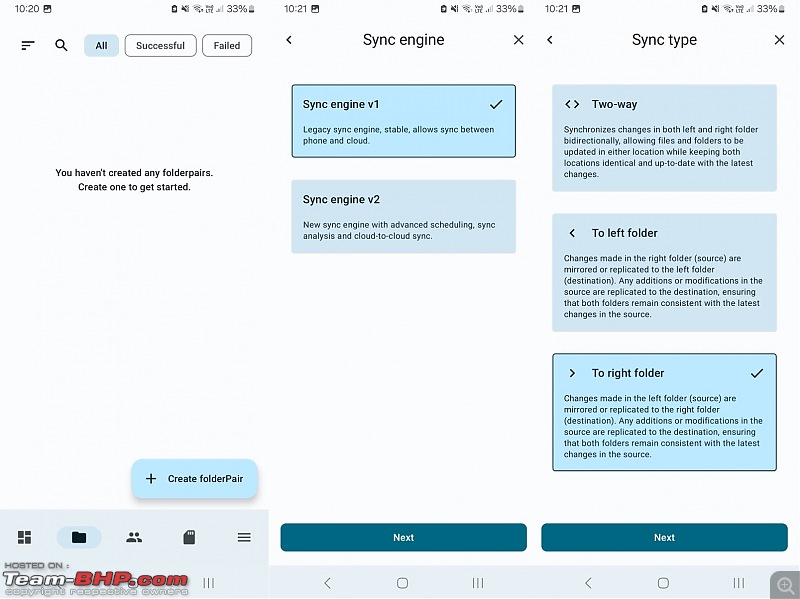
Configure sync in the foldersync application.
Add account> SMB>SMB1
Give sever address from tailscale dashboard, and Microsoft credentials and press test.
 Step 10 :
Create a share by selecting source (from your mobile) to target (your cloud folder).


That’s it your own cloud storage is ready and you can schedule the sync and enjoy your cloud storage.
Kindly note that tailscale is a VPN application that helps you to connect to your home network from outside and this app should be active to connect to your server.
It can also be your VPN server if you use exit node function.
Now you have two IP address for the server for example in my case 192.168.1.8 when you are trying to connect to server when you are on same network and 100.123.220.25 for when you are trying to connect from outside of your home network,so use address accordingly.
I have not explained about anydesk but you can configure the same for unattended access and have a control of your computer for some other works.
Mi file manager can be used to browse your data remotely and can be configured accordingly.
I understand that there may be some elegant solutions to achieve the same like TrueNAS , but those are way ahead technically that I can handle.
Thank you all for reading and thank you team-bhp for the membership.
My next upgrade would be addition of mSATA SSD as a boot drive and keep two 2TB hard drives on mirror mode.
This is my current setup.

PS: My English proficiency is not that great my apologies for any grammatical mistakes.
 (62)
Thanks
 (4)
Thanks
 (4)
Thanks
 (4)
Thanks
 (2)
Thanks

 (1)
Thanks
 (3)
Thanks
 (1)
Thanks
 (1)
Thanks
 (4)
Thanks

 (1)
Thanks


