Team-BHP > Motorbikes
Register New Topics New Posts Top Thanked Team-BHP FAQ


Reply
  Search this Thread
25,294 views
Old 19th April 2020, 10:30   #1
BANNED
 
Join Date: Nov 2016
Location: Kollam
Posts: 2,018
Thanked: 6,636 Times
DIY: Fabricating a Paddock Stand

Hey Guys,

Just sharing details of a paddock stand I got made some months ago since I wasn't satisfied with the ones available in stores or online, the good ones were unreasonably priced and the cheap ones were flimsy at best, hence decided to get the job done with the help of fellow enthusiast Sarin from my hometown biking fraternity.

Requirements:

1. 1.5 Inch 16 Gauge Square Tube x 7 Feet.
2. Air Compressor Wheels x 2 Nos.
3. 16mm 3 Inch Bolt x 2 Nos and Nut x 4 Nos.
4. 14mm 2 Inch Bolt x 2 Nos and Nut x 4 Nos.
5. Spacers

Blueprint:

DIY: Fabricating a Paddock Stand-paddock.jpg

End Product:

DIY: Fabricating a Paddock Stand-imag0029.jpg

DIY: Fabricating a Paddock Stand-imag0028.jpg

DIY: Fabricating a Paddock Stand-imag0030.jpg

Notes:

1. The length of the pipe(13 Inches in my case) between the 24 Inch pipes should be determined after measuring the distance(outside) between the legs of your swing-arm, you can go wider and use longer bolts but you cannot go narrower for obvious reasons.

DIY: Fabricating a Paddock Stand-imag0020.jpg

Above you can see Sarin confirming clearance with a template stand that our fabricator already had at their shop.

2. You can make L brackets and get them welded to the 16mm bolts like below;

DIY: Fabricating a Paddock Stand-imag0031.jpg

In the picture you see only 1 bolts used on either legs, if I'm hauling a narrow motorcycle then I can extend and use 2 bolt on each leg to ensure that there is no play, play is bad.

3. Ask the fabricator to weld support tabs wherever possible, and if on the same pipe support tabs need to be welded on both sides you need to make sure that it is not welded on the exact opposite location as this could affect integrity of the pipe.

DIY: Fabricating a Paddock Stand-imag0032.jpg

Also you'd notice that the legs are fixed 4 inches away from the wheel end, this is done so that the paddock stand stays put and prevents the possibility of the motorcycle rolling off the stand when you're working on it.

4. You need the handle, do not skip it. It prevents the paddock from crushing your fingers, also makes life easy when dismounting your motorcycle.

Happy DIY'ing!
A.P.

Last edited by ashwinprakas : 19th April 2020 at 10:32.
ashwinprakas is offline   (18) Thanks
Old 19th April 2020, 15:27   #2
BHPian
 
Vignesh_N/A's Avatar
 
Join Date: Jun 2016
Location: HSR/MAS
Posts: 186
Thanked: 294 Times
re: DIY: Fabricating a Paddock Stand

I fabricated a similar paddock stand. But, a small error in height calculation made it a two person job to mount the motorcycle. More the height more the leverage required to lift the motorcycle. Had to improvise to this. Still paddock stand will be more secure than this.

DIY: Fabricating a Paddock Stand-img20200321wa0013.jpeg

DIY: Fabricating a Paddock Stand-img20200321wa0019.jpeg
Vignesh_N/A is offline   (4) Thanks
Old 20th April 2020, 02:34   #3
BANNED
 
Join Date: Nov 2016
Location: Kollam
Posts: 2,018
Thanked: 6,636 Times
re: DIY: Fabricating a Paddock Stand

Quote:
Originally Posted by Vignesh_N/A View Post
Had to improvise to this.
Do use with caution, I used to use jack stands when working on the motorcycle all was well until the motorcycle fell on me while I was working a breaker bar to take the subframe off, which was the final straw that led to getting the paddock stand fabricated.

Regards,
A.P.
ashwinprakas is offline   (2) Thanks
Old 20th April 2020, 20:26   #4
BHPian
 
Join Date: Dec 2005
Location: bang
Posts: 878
Thanked: 3,117 Times
Re: DIY: Fabricating a Paddock Stand

Good one Ashwin. From what i can see , the bike is lifted on the swing arm as the support base(?). In that case, just a noob question : What prevents the bike from rolling off if someone accidentally lifts the handle bar?. I don't see any lock on the caster wheels.

@Vignesh: That is outright dangerous man. Especially when you want to work on the under frame.

Last edited by srini1785 : 20th April 2020 at 20:28.
srini1785 is offline   (1) Thanks
Old 20th April 2020, 21:39   #5
BANNED
 
Join Date: Nov 2016
Location: Kollam
Posts: 2,018
Thanked: 6,636 Times
Re: DIY: Fabricating a Paddock Stand

Quote:
Originally Posted by srini1785 View Post
What prevents the bike from rolling off if someone accidentally lifts the handle bar?. I don't see any lock on the caster wheels.
You can turn the bars or even push the motorcycle forward, the motorcycle would not come off the stand and instead the stand would roll along with the motorcycle if you use excessive force.

This is due to the vertical bar set 4 inches away from the pivot point i.e the wheel.

So unless you lift the paddock using the handle, the motorcycle will not dismount.

Regards,
A.P.
ashwinprakas is offline   (1) Thanks
Old 20th April 2020, 21:56   #6
BHPian
 
Vignesh_N/A's Avatar
 
Join Date: Jun 2016
Location: HSR/MAS
Posts: 186
Thanked: 294 Times
Re: DIY: Fabricating a Paddock Stand

Quote:
Originally Posted by srini1785 View Post

@Vignesh: That is outright dangerous man. Especially when you want to work on the under frame.
This is good enough for cleaning and lubing chain. For major works, I also have a fabricated paddock stand (visible in the second photo) which can be slot in after we lift the motorcycle to the required height using jack.
Vignesh_N/A is offline  
Old 22nd April 2020, 10:03   #7
BANNED
 
Join Date: Jan 2006
Location: Cochin
Posts: 2,195
Thanked: 268 Times
Re: DIY: Fabricating a Paddock Stand

Kudos for a great job!

Quote:
Originally Posted by ashwinprakas View Post
1. The length of the pipe(13 Inches in my case) between the 24 Inch pipes should be determined after measuring the distance(outside) between the legs of your swing-arm, you can go wider and use longer bolts but you cannot go narrower for obvious reasons.
Can you explain more?

Some questions:
  1. What was the total cost involved including labour?
  2. We can get some paddocks in Amazon for Rs.2000 + delivery? What are the advantages of yours versus theirs?
  3. Doesn't P220 comes with a central stand?

Last edited by mithun : 22nd April 2020 at 10:05.
mithun is offline   (1) Thanks
Old 22nd April 2020, 16:11   #8
BHPian
 
Join Date: Jul 2010
Location: Bangalore
Posts: 245
Thanked: 621 Times
Re: DIY: Fabricating a Paddock Stand

Quote:
Originally Posted by mithun View Post
Kudos for a great job!


Can you explain more?

Some questions:
  1. What was the total cost involved including labour?
  2. We can get some paddocks in Amazon for Rs.2000 + delivery? What are the advantages of yours versus theirs?
  3. Doesn't P220 comes with a central stand?
Sometimes its not always about the cost or where you can find it cheaper. Sometimes its the thrill of DIY.
vishwasvr is offline   (2) Thanks
Old 22nd April 2020, 16:24   #9
BANNED
 
Join Date: Nov 2016
Location: Kollam
Posts: 2,018
Thanked: 6,636 Times
Re: DIY: Fabricating a Paddock Stand

Quote:
Originally Posted by mithun View Post
Can you explain more?
You need to make sure that the paddock is wide enough to accommodate your swing-arm. So basically the width is determined by the outer distance between both legs of your swing arm.

DIY: Fabricating a Paddock Stand-de35bc1319064500835520923768ed8d.jpg

Or make sure the width is the same as your rear wheel axle bolt if you have a spare one at hand, or measure it anytime you swap tyres or get your current one puncture repaired etc.

Quote:
What was the total cost involved including labour?
It was around 1k, do not recall the exact price.

The meat of the price depends on how much you pay for the tubes, which varies on the gauge of the tube used also where you source them from.

The wheels cost less than 50/- per piece and the labor costs about 500/-

Quote:
We can get some paddocks in Amazon for Rs.2000 + delivery? What are the advantages of yours versus theirs?
I'm not a fan of off-brand hardware which I know is ironic, but I did go and have a look at the nearby stores, the cheapest ones from a known manufacturer was Gallop which was priced at over 3k and the design wasn't convenient due to lacking a proper/elevated handle.

The ones that I liked were spotted at a workshop owned by fellow enthusiasts, I do not recall the brand but it was priced at around 6k and were from an international manufacturer.

So I put off getting paddocks by using regular car jack stands but once the motorcycle fell on me I decided to get strong ones fabricated and that is how we ended up here.

Quote:
Doesn't P220 comes with a central stand?
Yes it does, but mine runs on several parts from different motorcycles and the rear suspension being one of them the main stand is useless due to the increase in height, it simply doesn't touch the ground, so it had to be removed.

To give you an idea;

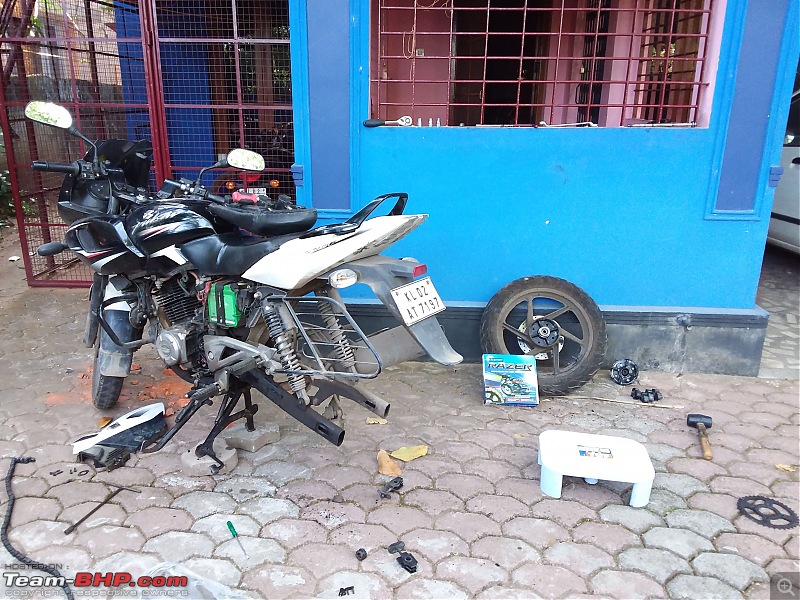
DIY: Fabricating a Paddock Stand-20200318_084159.jpg

Due to the lock-down(stuck at Kollam, paddock stand at Trivandrum) I had to reinstall the main stand and use concrete blocks so that the rear wheel clears the ground and can be taken off the motorcycle.

Quote:
Originally Posted by vishwasvr View Post
Sometimes its not always about the cost or where you can find it cheaper. Sometimes its the thrill of DIY.
That and trust issues.

Cheers,
A.P.

Last edited by ashwinprakas : 22nd April 2020 at 16:28.
ashwinprakas is offline   (2) Thanks
Old 22nd April 2020, 22:43   #10
BHPian
 
wheeledwanderer's Avatar
 
Join Date: Dec 2019
Location: Dubai/Coorg
Posts: 104
Thanked: 254 Times
Re: DIY: Fabricating a Paddock Stand

Gentlemen, i came across this company in my search for aftermarket parts. I have no affiliation nor am i promoting them here. Their pricing was good compared to many other brands and quality looked seamless. Please try out

http://www.zanainternational.com/sea...x=0&input2.y=0

Quote:
Originally Posted by ashwinprakas View Post
Hey Guys,

Just sharing details of a paddock stand I got made some months ago since I wasn't satisfied with the ones available in stores or online, the good ones were unreasonably priced and the cheap ones were flimsy at best, hence decided to get the job done with the help of fellow enthusiast Sarin from my hometown biking fraternity.

Requirements:

1. 1.5 Inch 16 Gauge Square Tube x 7 Feet.
2. Air Compressor Wheels x 2 Nos.
3. 16mm 3 Inch Bolt x 2 Nos and Nut x 4 Nos.
4. 14mm 2 Inch Bolt x 2 Nos and Nut x 4 Nos.
5. Spacers

Blueprint:

Attachment 1995361

End Product:

Attachment 1995366

Attachment 1995365

Attachment 1995368

Notes:

1. The length of the pipe(13 Inches in my case) between the 24 Inch pipes should be determined after measuring the distance(outside) between the legs of your swing-arm, you can go wider and use longer bolts but you cannot go narrower for obvious reasons.

Attachment 1995364

Above you can see Sarin confirming clearance with a template stand that our fabricator already had at their shop.

2. You can make L brackets and get them welded to the 16mm bolts like below;

Attachment 1995369

In the picture you see only 1 bolts used on either legs, if I'm hauling a narrow motorcycle then I can extend and use 2 bolt on each leg to ensure that there is no play, play is bad.

3. Ask the fabricator to weld support tabs wherever possible, and if on the same pipe support tabs need to be welded on both sides you need to make sure that it is not welded on the exact opposite location as this could affect integrity of the pipe.

Attachment 1995370

Also you'd notice that the legs are fixed 4 inches away from the wheel end, this is done so that the paddock stand stays put and prevents the possibility of the motorcycle rolling off the stand when you're working on it.

4. You need the handle, do not skip it. It prevents the paddock from crushing your fingers, also makes life easy when dismounting your motorcycle.

Happy DIY'ing!
A.P.
wheeledwanderer is offline   (1) Thanks
Old 13th June 2020, 19:44   #11
BANNED
 
Join Date: Jan 2006
Location: Cochin
Posts: 2,195
Thanked: 268 Times
Re: DIY: Fabricating a Paddock Stand

Is it tough to fabricate a front paddock(example) than a rear paddock?

Also I've heard that its not possible to change the front tyre using a front paddock stand? It can only be used for inspecting/cleaning the tyres, is that true?
mithun is offline  
Old 13th June 2020, 20:11   #12
Senior - BHPian
 
bigron's Avatar
 
Join Date: Sep 2007
Location: NSEW
Posts: 1,309
Thanked: 2,706 Times
Re: DIY: Fabricating a Paddock Stand

Quote:
Originally Posted by mithun View Post
Is it tough to fabricate a front paddock(example) than a rear paddock?

Also I've heard that its not possible to change the front tyre using a front paddock stand? It can only be used for inspecting/cleaning the tyres, is that true?
If you have good DIY skills and are aware of the measurements and angle it is not a very tough job.

Just need a 15/20 mm ( 1.5/2 inch) gauge pipe ( I dont remember the exact thickness now) with a pair of wheels/nuts/bolts. A good welder and some paint. You biggest expense would be what the welder charges.

Some uses of a front paddock stand are:
Change and service tyres
Puncture repair
Cleaning and avoiding flat spots.

So yes, you can use the front paddock stand to change the front wheel.

Last edited by bigron : 13th June 2020 at 20:13.
bigron is offline   (2) Thanks
Old 13th June 2020, 20:19   #13
BANNED
 
Join Date: Jan 2006
Location: Cochin
Posts: 2,195
Thanked: 268 Times
Re: DIY: Fabricating a Paddock Stand

Quote:
Originally Posted by bigron View Post
If you have good DIY skills and are aware of the measurements and angle it is not a very tough job.

So yes, you can use the front paddock stand to change the front wheel.
My DIY skills are very poor, any specific advice?

In the Amazon review, a reviewer has mentioned that it can't used for changing the front tyre, so was confused!

Last edited by mithun : 13th June 2020 at 20:36.
mithun is offline  
Reply

Most Viewed


Copyright ©2000 - 2024, Team-BHP.com
Proudly powered by E2E Networks