| |||||||

| Search Forums |
| Advanced Search |
| Go to Page... |
 |
| Search this Thread |  51,888 views |
 6th June 2021, 23:28
| #31 |
| Newbie Join Date: May 2021 Location: Ahmedabad
Posts: 14
Thanked: 392 Times
| Re: An enthusiast's journey to the most modded Royal Enfield Himalayan Thank you all for the appreciation. I have read all the requests for sharing the pictures of each mod against each line item. Will probably do that by the end of the thread (if the modding ever ends). In the mean-time you can always reach out to me on social media. Just look for Souvik Basu on FB and souvik.bikeasu on Insta. So, before I continue further with details on the next stages. First a news. The Himalayan seems to have a parasitic draw at the battery. Probably most bikes have it, but the Himalayan seems to do it with a bigger straw. I couldn't crank the bike for 2 weeks. Tried to start the motorcycle on Saturday and nothing. The instrument console wouldn't light up, the injectors weren't priming, just my H4 LED which seemingly draws 35watts was barely lighting up. The Lithium Battery had drained out (not due to any fault of the battery). So, I swapped with the stock battery that was laying around. Thankfully, it had just been 2.5 months since the battery laid disconnected so it was full of juice. Ordered a multimeter and a Optimate Duo charger (Works on Lead Acid as well as LiFePO4 batteries). The multimeter showed that the Lithium battery had 7.18 Volts. Fingers crossed, once the charger gets delivered will try to revive the battery. Now then, back to our original set. (This post may be devoid of pictures since most of the mods are packed in boxes, but I will try and post pictures from catalogues available online). We had stopped at 51. With the lithium battery, which was a weight saver. So I started thinking on the lines of reducing some weight. Till now, we reduced the following: # RK Takasago 520 pitch chain and sprocket set ~1.4 kgs lighter than stock # YSS rear suspension ~ 1.8 kgs lighter than stock # Imp8x lithium battery - 2.5 kgs lighter than stock # Exhaust End Can (Powerage) - 1.3 kgs lighter than stock So that was approx 7 Kgs less, but 60-70% of that weight saving was probably just off-setting all the accessories I added. Time to go Major. As I read about, I realized the benefits of Unsprung Mass. I could go about doing a lot of weight reduction, but that Rotating mass, if reduced, would yield way better results. (If anyone is interested in reading a simple example of it on Himalayan, Search for "Adventure Motorcycling Handbook - Unsprung Mass"). First on the cards? Aluminum Rims. Excel would just cost bonkers, unless I got the ones from Malaysia. I was able to find a vendor for the cheaper Malaysian manufactured Excel Rims. However, at the same time, I found HDT customs Aluminum rims. I ordered a pair of those. 52. Aluminum Rims  For additional info for anyone looking for Aluminum Rims. # Excel Rims - Motousher # Excel Rims Malayasia - Speed Mottorad # Malaysian / Chinese Imports - HDT Customs # Indian Made Aluminum Rims - Dismotech B'lore (They actually provide a warranty on their Aluminum Products, but presently they have limited sizes available. They have just started test production) Dismotech guys even make 7075 Billet Aluminum Hubs (Crazy light and strong) and also provide warranty on it. But, obviously expensive and presently only available for limited motorcycles (including KTM 390). Now, back to my motorcycle without divulging further. The Rims reduce nearly ~4.5+ kg approx, in rotating mass / unsprung mass. Next was the Heavy Tubes in the Himalayans. (Plus I had Formule X in them). Even without the FormulaX the tubes combined, roughly weight 1.8-2.2 Kgs. So eliminating them sounded like a good idea. So, tubeless conversion then. 53. Outex Tubeless Conversion Kit Interesting fact about the above. The Part number is FR21XT is actually for Yamaha 660XT Tenere. Himalayan shares the kit. Now we have nearly 6.7 KGs reduced in rotating Mass and a total weight reduction of 13.7 KGs overall. (Might be 14 if I consider the Carbon Fiber Heat Shield reducing the weight of the stock heavy Exhaust and header pipe heat shield) Now moving towards performance and making things better and simpler. The Himalayans come with a secondary Air Injection at the outlet side of the head. This is to meet the emission norms by pumping some air at the exhaust end and making a complete burn before letting the gases go through the 2 Cat-Cons. Hitchcock motorcycles UK has a ready kit available. You can infact get one made, if you have the dimensions and details but I decided to procure the one from Hitchcock. 54. Air Injection Delete Kit 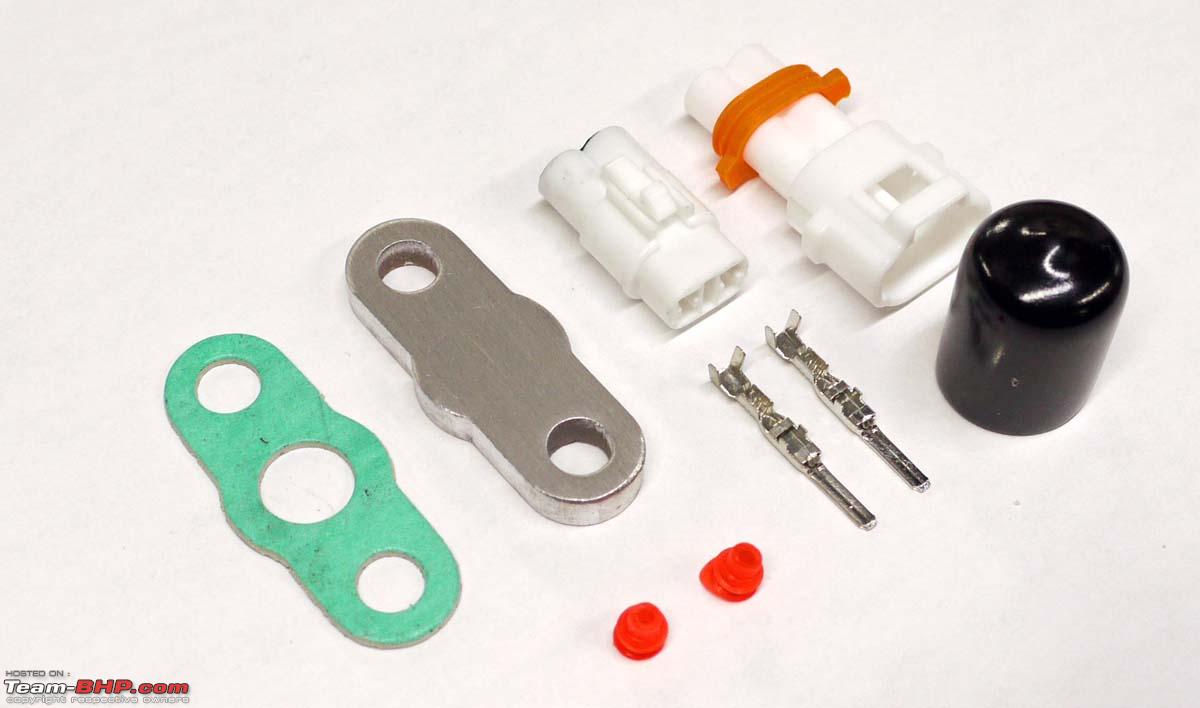 This removes the solenoid and the piping that goes to the header. A few more grams reduced. While I was ordering from Hitchcocks and paying for DHL shipping (big mistake), I thought I might as well order something else. So I found another small reduction in rotating mass. The Rear Disc. Hitchcocks had a Contoured (wave) Disc for the rear. Saves some weight, better cooling and supposedly better braking (at the cost of quicker pad wear). 55. Hitchcock Rear Contoured Brake Disc  I selected DHL in the eagerness of getting the parts delivered to me quicker. But those guys are professional and they make sure that they pay the customs duty. So, I ended up paying twice the cost. But, then I learned something. "Royal Mail" So, I wanted to have a taller gearing ratio without having to adjust the chain much (removing / adding links). So, I decided to get the front sprocket to be 16 T as against the 15 stock. However, there was a challenge. I was running 520 pitch and no-body made the sprocket for Himalayan in 16T with 520 pitch. Hence, started researching. I kid you not, I googled and googled for days across brands, countries (where Himalayan is sold) and almost gave up. Then luck struck. The Himalayan front sprocket inner diameter and teeth was the same as "Ktm Adventure 790". And then, found a 520 Pitch 16T front for the Adv 790 and placed the order. As I wrote earlier that I learnt about Royal Mail, well, this courier arrived via Royal mail and 0 customs. 56. 16T front Sprocket  This will require a slight modification on the Lathe, since the width at the mounting point is a bit more (or may be can be mounted in the opposite direction) Only time will tell. But after the efforts, I was happy to have found this. Stock is 7mm width and JT one is 11 MM, will have to get that section shaved at a Lathe (highlighted below)  Now, moving on to something bigger. Big Bore. It is well known that Hitchcocks manufacturers a 462cc Big Bore which is a 82.75 mm Piston. But the price of that kit is just impossible. So, I started looking for alternatives. Came across a German living in India (Rishikesh) who had made a 450cc, 477cc and a 510cc Himalayan. The 510cc was just a project and not something he planned to do again anytime soon. But the 477cc was and is on his cards of being a product that he wants to sell. There literally are less than 5-6 users in the entire world at present who have the 477cc kit. The Piston is designed by ex Ducati engineer and was initially forged in Italy. Then Gunnar (German) contracted with the suppliers of piston for Kia in India and got them Cast. The Rings still come from Germany. While there isn't anyone who has a 477cc kit with more than 500-800 kms, I did decide to take the opportunity and ordered myself one. 57. Big Bore Kit 477cc 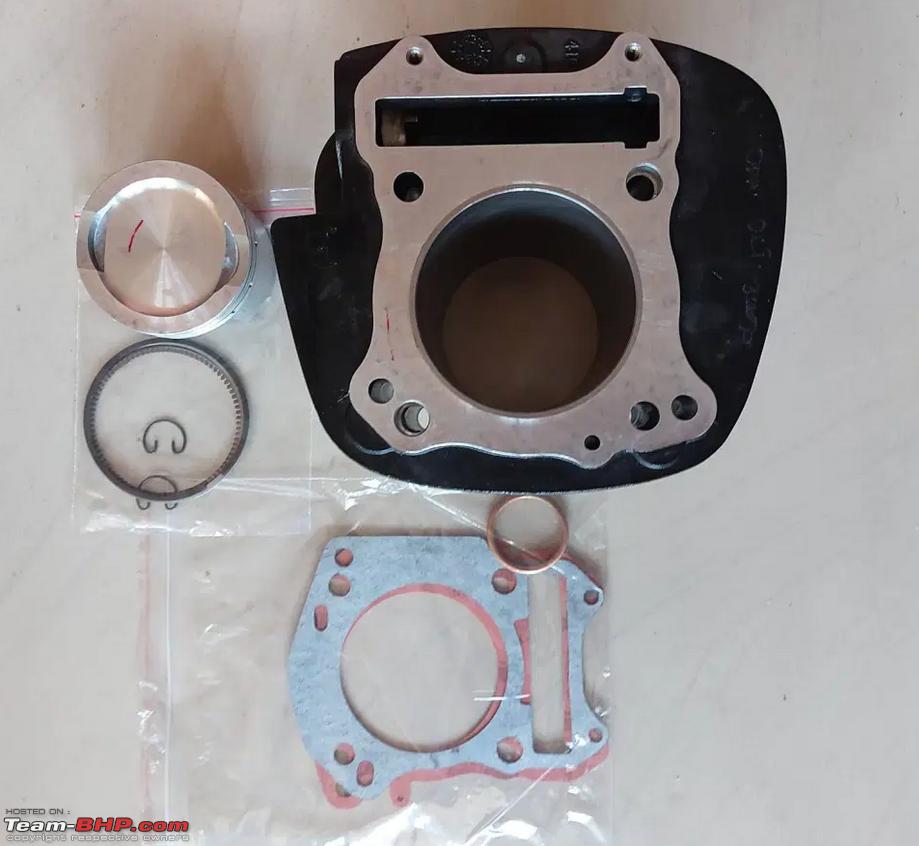 The design is as such, that it is expected to give nearly 7 Bhp more than the stock at the wheel with a PowerTronic Map update. Here is a dyno comparison between the 462 (hitchcock) and 477. around 2hp difference. But the Map honestly isn't optimized. It might dip a bit with our fuel RON rating. This was with 98 RON.  So, to counter the RON issue, I started reading up again. Options? # Use Octane Boosters # Get Highlift Cams # Change the Inlet & Exhaust valve to slightly angled ones, to improve the gas flow and may be reduce the possibility of knocking. Octane Booster - I went with STP Racing series (Seems to be able to increase upto 3 points). Highlift Cams - Only TEC performance UK is planning to make one for the Himalayan but they were supposed to have it ready by last quarter of 2020 but presently, no news of any progress. So That is a dead end for now. (I am running an enquiry for a custom Cam, down south with a guy who works on Rally Builds of Himalayan. But the lockdowns haven't helped with planning something out). Valves - Luckily, hitchcock already made performance valves that are recommended for the 462 big bore. That would have to do right now for my bike. (This time I chose Royal Mail and guess what happened. ZERO / NADA additional charges) Since these valves are slightly angled, they will also require a slight change to the Valve Seat. They also claimed to be pulse plasma nitride treated which results in less friction and less valve guide wear. At 66g, it is very slightly lighter than the originals so can be used with the standard valve springs. So, 58. Performance Inlet Valve 59. Performance Exhaust Valve   Getting all these and not having the proper ability to translate the power, due to increased possibility of Clutch slippage, would be a big bummer. First I thought to source the Clutch Plates from Hitchcock, but realized that it is rather better to just get the Performance / Stiffer Clutch Springs, since the plates aren't really some special compound. They were just slimmer than stock with added count of plates. Hence, just decided to go with the Stiffer Springs 60. Stiffer Clutch Springs Stiffer Springs on our lovely Himalayan, would mean a stiffer pull at the lever. Hydraulic Clutch options are not easily available and infact I am still reading up on it. RCB has 17mm Clutch Master Cylinder (Actually Left side Brake Master Cylinder), but they only have a 14mm Clutch Pump. Not sure if I can merge those two to make a Hydraulic clutch setup. Hence, Pro-Spec Easy Clutch. Just simple science of creating a lever / pulley system within a small aluminum housing and Viola, nearly 50% reduction in the effort of pulling the Clutch. 61. Pro-Spec Easy Clutch Long (Please note, the Easy Clutch short will also work, but the long is specifically made for RE motorcycles)   With all the above Mods, there was one-thing still on my mind. The BS6 header pipe had an additional huge Cat-con. I couldn't eliminate it entirely since I would need some back-pressure. Ordering a bendpipe from Delkevic was too costly. Getting the BS4 bendpipe was possible, but the RE guys couldn't give me a timeline. As I continued my research I ended up finding a youtube video titled as "2.5 Lakh worth Modification" (Nope I didn't break the news about my mod list), but I did find out that the bike had a custom header pipe. Reached out to the guy on youtube, got no response. Found him on instagram, yet no response. Then I realized he didn't own the motorcycle so he had no clue where it was from. So, I saw his insta post and saw a comment from someone that had the same Himalayan. Realized he was the owner. Pinged him on Insta and got the detail about the manufacturer. Motowings performance. They make a custom Header for the Himalayan with a small Cat-con as well. Placed the order for it (yet to be delivered). But here is a pic for the same. 62. Motowings Header Pipe  In the middle of all this, I also decided that the Zana Crash Guard I was using, was too much for the city and I wasn't planning to go any long ride anytime soon. So decided to change to Bandidos Pitstop Crash Guard Small. It may not be the best, but it still would work out in a simple city crash or topple. Also, will reduce the weight by a notable amount. The Zana is just too darn heavy. I will still keep it, for when I go for a tour. 63. Bandidos Crash Guard Small  Now back to the Big Bore and Aluminum Rims. I knew I would need some spares from RE. I would have to Run-in again and there were specific guidelines for run-in of the big bore. I also definitely would need an upgrade from the Stock Oil used by RE. So, I bought 2.5 L semi synthentic Shell AX7 for the first 500 kms run-in once I do install the bore. And then on sale bought 6*1 ltr Fully Synthetic Shell AX-7 15w50 Grade (stock grade). I also bought a bottle of Polytron MTC that I would use with the fully synthetic oil. Question: For all the knowledgeable ones here. Should polytron be used for the first 500 kms as well? or Once the piston settles in and we do the second half of 501-2000 kms break-in, it would be best to use then. The BigBore had a high possibility of running at temperatures that go higher than stock due to increased compression. The Polytron MTC is to help with that along with the Fully Synthetic oil, however, I wanted to keep a check. Option was to either get a oil temp meter or to get sometime like a trailtech tto cylinder head temperature meter. The Later was not available in India (as far as I know) but the former was. This replaces the stock oil top-up notch (or whatever it is called). While it isn't easy to read on the Go, I would still prefer stopping and doing a quick check during the Run-in phase. 64. JMP Oil Temperature Meter  I also stocked up oil-filter, filter element and Spokes for the Aluminum conversion. This is when I realized, I would need new Tyres. You see, during my trip to MP, I had a flat tyre where I had to take the nearly fully loaded bike, till the next town 3 kms away. The Timsun rear tyre actually came off the bead. I am not really sure how good of a condition it is in to run as a Tubeless tyre. So, I started first with simply looking for another set of Timsun. But alas! Timsun was not providing 120/90-17 for the rear at this time. They only had 120/80-17. I was by no means going to downsize at the rear. So I looked and looked and looked for options. Came up with nothing. I then did ask myself if I should go for MRF, but I don't think I would find them as grippy and lucrative as the Timsun. It was either to go better or stick with Timsun. So I had to go better. I honestly knew that in reality, my onroad usage was nearly 95% or more and barely any serious off-road. I thought about all the ADVs that come with 80-20 or 90-10 (Road - offroad biased tyres). I looked for available options with manufacturing not earlier than 2020 and was able to source Pirelli Scorpion Trail II to suit my need. 90/90 - 21 front and 130/80-17 for the rear (while that's a wall height dip, the more round profile makes the change as low as -1.07%, which if required, I can alter with the height adjustment of upto 5mm on the YSS rear shock.) These tyres had great reviews and are actually used on the Ducati Multistrada by default. 65. Pirelli Scorpion Trail II  With all the reduction in Rotating Mass and lighter rims etc, came the thought of ensuring the biggest bottleneck in every himalayan. The Stock cone set bearings. They are just bad. Hence, decided to get a pair of NTN bearings (same for top and bottom bearing). And also a Nylon Cap for the cone-set from AOM (Art of Motorcycles), since Monsoon is coming. I didn't go for the waterproof grease from Maxima, because it would be too many fail-safes. 66. NTN Bearing  67. AOM nylon Cap  Now moving forward to one of my favorite mods on nearly every motorcycle that I have owned (other than KTMs with Ride by wire). QUICK THROTTLE. I just love having smaller movements of the wrist for quicker response on the throttle. Hence, I ordered Nibbi Racing USA Quick Response Throttle 68. Nibbi Racing USA Quick Throttle Attachment 2164665 Now, here's the challenge. I already have cramped up my handle bar and the Quick Throttle actually needs more space than the stock grip length. Below is a very poorly bifurcated image of the right side of the bar. The RED line indicates the Guesstimate of how much the quick Throttle will take. And the Blue is the remaining section of Switch panel. Attachment 2164663 As you can guess, the stock switch panel wouldn't fit no-matter what I do. So, I went back to Google. Domino is a brand that makes expensive quick throttles and switches. Since Ali-Express is out of question, I found an alternate through regular googling and found Keenso Switch panel. 69. Keenso Switch panel Attachment 2164664 Now, even though I was modding the bike for all performance, doesn't mean I didn't plan on touring. One thing I wanted for touring was the ability to rest my wrist. I never liked the idea of having a throttle lock that sits on the Brake lever or the one which requires the palm to rest on. I recalled one lovely product that was probably released in 2019 or 2020 by an innovative guy. "Atlas Throttle Lock" While the name says throttle lock, It doesn't really LOCK it. You can actually rotate to increase or reduce it. Its really a simple solution that uses a pad to lock the throttle in the position of your choice, when you press the button. It pushes the pad against the body of the switch Panel (In my case it would be the quick throttle body). 70. Atlas Throttle Lock - Cruise Control   The Atlas is not being shipped, a friend is planning to travel back from UK to my town, so thought to get it here with him at the end of June. Also ordered a few other accessories. 71. Carbon Fiber Fender Risers 25mm The original risers I had installed, the bolts have started rusting badly and also the inner side of the risers.  72. Indicator Blanking plate When you install the Pannier mount, you have to move the indicator mounts to the rear and that leaves the stock slot, well just there. Hence took the change to get this.  73.GPS Mount (2mm Aluminum body and 22mm Carbon Fiber tubing mount with Dual USB Charger: 1A and 2.1A) Just wanted to move the XRam mount from the handlebar to a better visible position while riding.  With the plan on implementing the 477 which adds ample of torque, I felt that moving from 15-38 to 16-38 wouldn't justify much. Hence I started looking for 16-36 option to make it taller. Honestly, the stock torque of the Himalayan is adequate enough, hence the decision. I had read about sprockets that have dual metal. Aluminum at the center and carbon steel at the edges. These last as long as stock if not more but are lighter than the regular metal sprockets. The only genuine and good manufacturer for this was "Supersprox" You need to give them the exact specific of the sprocket including PCD and other details. Below is an example of their sprocket. I am still waiting for mine to be delivered.  You can find more details about the product and its manufacturing here. This pretty much sums up all that is presently stored at my place in a cupboard or something that is being shipped or due to arrive via my friend. Due to the lockdown couldn't get any of the things installed. But I plan to implement these updates and mods after a few weeks. Honestly, there isn't much left for me to Mod further, though the thought process and research never stops. I will definitely update all the details post and during installation. I hope you guys liked all the updates. Feel free to let me know if there are any questions that I can help with. |

|  (17)
Thanks (17)
Thanks
|
| The following 17 BHPians Thank MadMotoMods for this useful post: | AlQuazi, CarManMotorcycl, Cyborg, keroo1099, lancia_fanboy, neil.jericho, rakesh_r, sdubey23, Shubhendra, shyamg28, sole_rider, swiftnfurious, tchsvy, Torq, TorqueMonster, vijaythacker, Vinod_nair |
| |
|
7th June 2021, 09:31
| #32 |
| Senior - BHPian Join Date: Nov 2009 Location: Pune
Posts: 2,095
Thanked: 3,464 Times
| Re: An enthusiast's journey to the most modded Royal Enfield Himalayan Way to go, this has to be the most purposeful modded Himalayan I have come around. PS- If you are trying to further reduce the weight, you can remove the jerry can holders and mount the headlight on the fork using headlight clamps either from the Interceptor or the TBX. AOM has a very robust meter console base plate, completely laser cut in one piece, i purchased one couple of months back. Last edited by rakesh_r : 7th June 2021 at 09:32. |
|
| (3)
Thanks
|
| The following 3 BHPians Thank rakesh_r for this useful post: | MadMotoMods, surjaonwheelz, swiftnfurious |
|
22nd June 2021, 00:24
| #33 | |
| Newbie Join Date: May 2021 Location: Ahmedabad
Posts: 14
Thanked: 392 Times
| Re: An enthusiast's journey to the most modded Royal Enfield Himalayan Quote:
While I am working on some weight saving, I do want to retain the original look of the Himalayan that I so dearly love, hence avoiding the change. Some additional updates for those still following the thread. Quick overview: Mod list addition - 74. Battery Disconnect Switch 75. Highlift Camshaft 76. Open Air Intake Now the Details. First: The Lithium Battery didn't survive. I did charge it with a Optimate LiFePO4 charger and it reached its optimum voltage, but it didn't retain it after 10 days. Not really the battery manufacturer's fault, but rather seems to be an awkwardly common issue seen with Himalayan. The stock battery was 7AH so it dies out in 3-3.5 weeks, while the Lithium was 5Ah so died out earlier. Since it dropped below 8 volts it was damaged permanently. The battery manufacturer had clearly stated to not let the battery drop below 8 volts. However, the manufacturer did help out. He will be having the cells checked. In the meantime, the Stock battery is doing its job well. But, this leads me to the next required Mod: 74. Wunderlich BA-18 Battery Disconnecting Switch  Second: The Sprockets that I was waiting for have arrived and thanks to Mr Anand Reddy from Hyd, who helped me get these. He was also cool enough to weigh each of these out. Let me share the images with details. 1) My Current 520 Pitch RK Takasago 38 T rear sprocket  2) The SuperSprox Bi-Metal 36T rear Sprocket. Aluminum center and Carbon Steel outer.  3) The SuperSprox Aluminum 36T rear sprocket. Lightweight anyone?  4) For comparison, below is the weight of the 520 Pitch RK Takasago 15T front sprocket. The Aluminum rear is just 75 gms more #JawDrop. Obviously, I don't expect the Al to last that long and only practical use will tell how long it actually lasts.  5) Also, the 520 pitch 110 link RK chain (remains unchanged, will remove a link or two as required with the new sprocket)  Will try out the sprockets and update what worked best. Will mostly start with keeping the current 15 front and 36T aluminum rear. See how that gearing works. My not so technical brain just says that the current front is used for 5.5k kms and the Aluminum sprocket might last at best 5-6k kms (no claims from manufacturer). So I will use these two together. If not this, then will go to 16T front and 36T rear, in which case both are a new pair and are Hardened carbon steel (Front is full carbon steel, rear is just the teeth part), so they should last equally well together. Third: Couple of updates on existing Mods Small update on Mod Number 62. Instead of going for the Motowings Header pipe, I am going to use the BS4 headerpipe. It had a small catcon near the brake pedal, so it should keep adequate back-pressure and also the peace of mind that its a factory part (even if for BS4). Mod Number 57, the BigBore Kit. A fellow rider from Australia updated the PowerTronic map and ran the Dyno. Below is the updated result. 28 Wheel HP. (Including Airbox delete, Free flow full system exhaust, valve upgrade).  Fourth: New Upgrades As I waited for finding a few set of leaves to be able to get the stuff installed, in came the good news. Hitchcock Motorcycles had released the first Performance Camshaft for the Himalayan along with a Air Intake Mod (removes Snorkel). 75. Performance High-lift CamShaft 76. Air Intake Open Filter (More frequent cleaning of the K&N) I will let the Dyno Results of the CamShaft on a Stock motorcycle speak for itself. The Dyno is posted by Hitchcocks and is compared against the stock graph. # The Stock peak torque of ~21nm to the Camshaft peak torque of ~24nm  # The stock peak HP of ~20.6 to the Camshaft peak HP of ~24.5  # Here's the view of the Camshaft  # And the Air Intake  I presume, with the above set it should be possible to reach a healthy 30 whp mark or something around? Eitherway, the performance should be notably better than the stock. Will update as I make progress. Plan is to get some installation done during the weekend of 4th of July. | |
|
| (5)
Thanks
|

| The following 5 BHPians Thank MadMotoMods for this useful post: | cataclysm, keroo1099, sole_rider, swiftnfurious, tchsvy |
|
22nd June 2021, 06:37
| #34 | |
| Senior - BHPian Join Date: Nov 2009 Location: Pune
Posts: 2,095
Thanked: 3,464 Times
| Re: An enthusiast's journey to the most modded Royal Enfield Himalayan Quote:
| |
|
| (1)
Thanks
|
| The following BHPian Thanks rakesh_r for this useful post: | MadMotoMods |
|
22nd June 2021, 09:21
| #35 |
| BHPian | Re: An enthusiast's journey to the most modded Royal Enfield Himalayan Since you're going to use a high-lift camshaft, what about the springs and retainers? Did you upgrade them as well? |
|
| ()
Thanks
|
|
22nd June 2021, 09:28
| #36 | |
| BANNED Join Date: Nov 2016 Location: Kollam
Posts: 2,018
Thanked: 6,658 Times
| Re: An enthusiast's journey to the most modded Royal Enfield Himalayan Quote:
Hookup an Ammeter and start pulling fuses to find what's causing the drain. Since you're into mods, an idea could be adding an Ammeter from the Bullet series of bikes, do give it a thought. Would set you back by around 300/-. Regards, A.P. | |
|
| ()
Thanks
|
|
25th June 2021, 20:51
| #37 | |||||
| Newbie Join Date: May 2021 Location: Ahmedabad
Posts: 14
Thanked: 392 Times
| Re: An enthusiast's journey to the most modded Royal Enfield Himalayan Quote:
Quote:
Fun Fact, they are sold-out with the CAMs in a matter of few weeks and all Initial impressions on Stock motorcycles, is a better surge on and after 4K rpm and the ability to retain speed on steep hill-climbs. Quote:
I did review with a Multimeter. But couldn't get about identifying. However, based on Himalayan Forums across the globe, the drain is associated with the Meter Console and the clock or with the Gear Indicator. Apparently RE Europe did issue a statement for it (though I couldn't individually find it) Below is an excerpt from one of the forums. I haven't honestly tried on the below suggested lines, but just sharing. Quote:
| |||||
|
| (2)
Thanks
|
| The following 2 BHPians Thank MadMotoMods for this useful post: | swiftnfurious, TorqueMonster |
|
27th June 2021, 18:05
| #38 | |
| BANNED Join Date: Nov 2016 Location: Kollam
Posts: 2,018
Thanked: 6,658 Times
| Re: An enthusiast's journey to the most modded Royal Enfield Himalayan Quote:
Set your Multimeter to Amps mode, change the (+) lead to the appropriate socket. Then ensure that it runs in series with the Battery. Now you will get the current draw, if it's the same as mentioned in the extract you've shared, you STILL pull the connector to make sure it is at fault and confirm for good what is causing draw. As for rewiring, as the wires have been identified for you all you need is a fuse tap and some wire if at all you want to cause the least interference possible to the wiring harness, which personally is the right way to go about. Otherwise you can simply tap two wires and get the job done, as commonsense would state you'd need to tap into a wire that's controlled by the ignition switch which would be a walk in the park to find with a multimeter. Hope that helps. I understand that installing a battery cut-off might seem easy and less invasive BUT, from where I see things you are operating under assumptions and that is something that has over time proven to bite people on the hiney when they least expect it. Ride Safe, A.P. | |
|
| ()
Thanks
|
|
8th March 2023, 21:58
| #39 |
| Newbie Join Date: Feb 2023 Location: Bengaluru
Posts: 5
Thanked: 16 Times
| Re: An enthusiast's journey to the most modded Royal Enfield Himalayan Hey there, I am myself looking for a aluminium sprocket. I contacted Rolon Manufacturers who supply to bajaj as OEM, mailed their sales and product teams requesting an aluminium sprocket, have not heard back yet. Thinking of getting it done myself, have contacted a few Custom CNC Component Manufacturers and they do have aerospace grade aluminium. What is the update regarding your sprocket and is there a noticeable difference in the acceleration of the bike and the inertial pull. Also do u know any journals or published papers where the benefits of this mod has been defined. My first Reply in TeamBHP, so if i've made any mistakes pls let me know and help me learn. Thanks |
|
| ()
Thanks
|
|