| Brake Switch Replacement DIY | TVS RR 310
While holding the front brake lever, the brake lights stopped working. RR310's ASC mech told me that the brake switch which resides under the front brake lever got cut. As you can see from the pic below, there is no way of reconnecting the cut wires from the brake switch. 
So in this post I'll show you how to remove and replace the brake switch and cable. I have already vlogged it on my channel, so those who want can watch it here
So let's start. One of the biggest problem apart from this part never being in stock at the dealership is the fact that, you need to remove the entire right side fairing to replace this single brake switch wire. You could also just splice and reconnect the new wire to the old one already on the bike. But if you have OCD like me, you will go with the complete fairing removal route.The new brake switch wire costs 350 Rs. Step 1: Remove the complete right side fairing. You can find the tutorial here https://www.team-bhp.com/news/diy-re...s-apache-rr310 Step 2: Remove the faulty brake switch. The brake switch resides under the front brake lever and is held in place by 2 tiny allen key screws. You need the smallest allen key to remove these screws. This is not available in our toolkit, so you need to purchase it separately. 
The other end of the brake switch wire is near the coolant reservoir as shown in below pic. Disconnect it with the help of a tester. 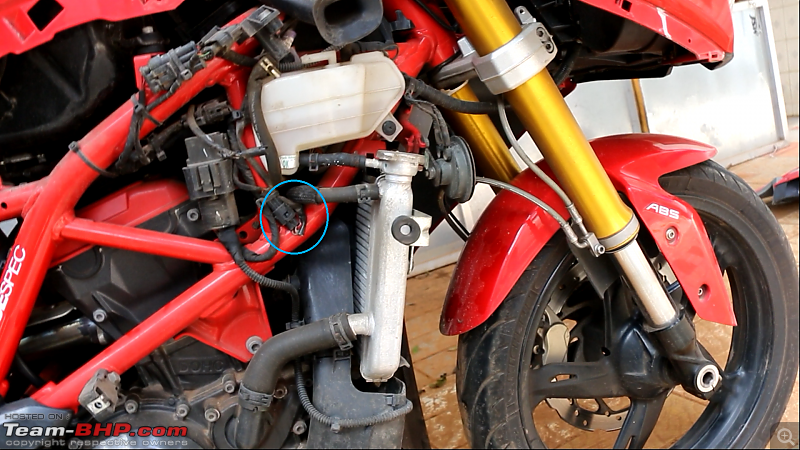 Step 3 Step 3: You need to cut all the wire tags and rubber clips that hold this brake switch wire, so that you can remove it completely from the bike. Step 4: Route it properly in such a way that you have enough slack near the handlebar, so that when you move the handlebars left and right, the wire has enough space to move around. Else , it will cut easily and you have to do this all over again.  Step 5 Step 5: Before you zip tie all the wires back in place, just connect the brake switch at both ends and check if the brake light is working. If yes, then zip tie everything and refit the fairing.
And that's it. Hope you guys found this DIY useful. | 

 26th August 2022, 18:02

 (5)
Thanks
(5)
Thanks


