| |||||||

| Search Forums |
| Advanced Search |
| Go to Page... |
 |
| Search this Thread |  35,024 views |
 1st October 2014, 08:51
| #1 |
| Senior - BHPian Join Date: Dec 2006 Location: Mysore / B'lore
Posts: 1,666
Thanked: 4,111 Times
| DIY: Upgrade to Stainless steel braided brake hose Its going to be a brrrraaake week for me! ( Excuse the pun  ) I swapped the rubber hose for a SS braided hose on my bike yesterday, today I will be swapping front brake pads on my car to brembos and flush/bleed brakes on my car. For now, lemme start with the bike. ) I swapped the rubber hose for a SS braided hose on my bike yesterday, today I will be swapping front brake pads on my car to brembos and flush/bleed brakes on my car. For now, lemme start with the bike.So I'm writing a small guide here today for swapping brake hoses on a motorbike, especially from a normal cotton braided to a steel braided hose. Advantages are apparent, for me it's the better brake feel and sharpness which is sorely missing with a regular hose. Other advantages are covered in detail here : http://biketrackdayshub.com/motorcyc...d-brake-lines/ SS Braided likes from HEL and others are sold here around 2650, however a cheap option is out there for us, viz the front brake line of the Pulsar 220 which costs exactly Rs 1107. Length of all Pulsar series of bikes is the same and hence it's a direct fit. Hero Honda bikes use brake hoses which are an inch longer. While this doesn't sound like much, but it is significant. It is possible to use the Pulsar hose in these bikes and it will be a tight fit. Ashwin is using the same on a HH Hunk and I'm using it on a ZMA. Below picture is Pulsar hose on top and ZMA hose on the bottom.  Although I have a Yamaha RX, the front end is lifted from the old gen Pulsar 200 and hence what I have here works very well for a Pulsar setup; however the process is the same regardless of the bike. The process requires first to drain/flush old fluid, swap hoses and bleed the brakes back. Tools/Fluids Needed:
Step 1 : Preparation Cut the petrol pipe about ~50cm. Pass the petrol pipe through the ring spanner hole which fits the bleed nipple ( Size 8 for Honda Nissin calipers and 11 for Pulsar ones). Insert the other end into the softdrink bottle and place the bottle sufficiently far away so that you don't knock it down during the process. Spread out some cotton waste around the wheel and under the caliper the soak up any spilt brake fluid. Spread cotton waste under the master cylinder/painted parts underneath. DOT4 fluid is extremely corrosive to paint and takes it off in a blink of a second. Undo any clamps holding the hose to the chassis/forks. Use ring spanners/T rods as applicable. Use the philips screw driver to open the Master Cylinder reservoir cap Top Tip : If the screw is stuck, use a plier to increase leverage. Keep one hand on the plier, other on top of the screw driver. Give a gentle push on the plier and the screw should crack open.  Step 2 : Drain old brake fluid. Crack open the bleed nipple. Old brake fluid should start flowing out. Let it drain out. Top Tip : If you're converting from DOT3 to DOT4, when the reservoir is about to finish, add fresh DOT4 fluid into the reservoir. Keep adding fresh fluid till you see clear fluid come out of the bleed pipe. Once it happens, let it drain out completely. Put in a piece of cotton waste in the reservoir to soak up and remaining fluid.  Step 3 : Remove hoses Open the Master Cylinder Banjo bolt and take it off. Repeat the process for the caliper banjo bolt as well. DO not lose the copper washers! Top Tip : Once the caliper banjo bolt is out, put the needle on the 20ml syringe. Insert it in the caliper bolt hole and draw out any remaining brake fluid in the caliper. This will ensure all fluid in the system will be all fresh. Hose has come off  Old black hose v/s shiny new SS hose  Step 4 : Put in new hose. Essentially reverse steps while removing the hose. Ensure the copper washers are present around the hoses. Keep it tight but do not overtighten! Step 5 : Bleed the brakes. When it comes to bleeding brakes, I always prefer the reverse bleed method. This video helps in detail, I did not take enough pictures to explain the process. Top Tip : Use the 50ml syringe to push the fluid up and the 20ml syringe to drain the reservoir on top. Ensure you fill up the 50ml syringe in FULL and send almost all the fluid (never let the 50ml syringe run dry!) through the system. This helps in flushing out any remaining old fluid. Ensure the brake fluid reservoir has the correct amount of brake fluid. Do not overfill, it will spill out and corrode the paint around the master cylinder. Top Tip : Take a piece of dry cotton waste , roll it up in thin strands and shove it down the bleed nipple once fully tightened. This will absorb any brake fluid remaining within the bleed nipple and prevent corrosion. Use a sewing needle to stuff the waste into the nipple, I made a contraption out of a wire tie to clear the wiper nozzles on my car, I reused it for the same.  Your lever should feel this way once the brakes are properly bled and no air is present in the system. You can see that I'm using all of my strength to press the lever after the play and it barely moves  If the lever feels mushy, there is still air in the system. All done! Take a test ride (slowly! ) to make sure the brakes are functioning properly.  Hope this helped! Cheers, Sunny. |

|  (22)
Thanks (22)
Thanks
 |
| The following 22 BHPians Thank SunnyBoi for this useful post: | arunphilip, ashpalio, ashwin.terminat, Desmosedici, Diesel_convert, Divya Sharan, dreamseller, FINTAIL, GTO, InControl, john doe, man_of_steel, Nicky, phamilyman, PISTONS, Rehaan, samschenker, Sankar, Tejas@perioimpl, The Great, theexperthand, vivtho |
| |
|
1st October 2014, 09:48
| #2 |
| Senior - BHPian | re: DIY: Upgrade to Stainless steel braided brake hose Well put SunnyBoi. Thanks for sharing! |
|
| ()
Thanks
|
|
1st October 2014, 10:42
| #3 |
| BHPian Join Date: Mar 2004 Location: Pune
Posts: 156
Thanked: 169 Times
| re: DIY: Upgrade to Stainless steel braided brake hose Thanks for sharing. I understand that SS braided hose from Pulsar 220 is a bit short in length, but would you know if it will fit the Gladiator disc setup on RX? Thanks. |
|
| ()
Thanks
|
|
1st October 2014, 13:25
| #4 |
| Distinguished - BHPian  Join Date: May 2010 Location: Bengaluru
Posts: 4,213
Thanked: 5,881 Times
| I have also changed my Pulsar 180 UG3 brake lines to steel braided ones from Pulsar 220, thanks to sunny's recommendation and there is a noticeable difference in braking force and especially in the brake feedback. One of the best upgrades that I have done. Besides 220's steel braided lines are the cheapest available in the market with good quality to make a good amount of difference in braking . Last edited by sagarpadaki : 1st October 2014 at 13:27. |

| (1)
Thanks
|
| The following BHPian Thanks sagarpadaki for this useful post: | GTO |
|
1st October 2014, 14:03
| #5 | |
| Senior - BHPian Join Date: Feb 2011 Location: Bangalore
Posts: 1,711
Thanked: 2,192 Times
| re: DIY: Upgrade to Stainless steel braided brake hose Quote:
I'm glad I gave you further practice to help you perform this feat.  That said, yes, the steel hose is a tad shorter than expected. I used a cable tie to secure the Brake Hose thereafter. But since then, the braking has improved immensely. I warn people about the brakes before I lend the bike to them hereon. Earlier, it used to be for different reasons pertaining to the brake. I guess the safest option for everyone would be the front brake hose from the Duke brothers. They may cost more, but you'd rather spend 1000 more and get something that fits rather than spend 1100 and watch it go to waste. | |
|
| (1)
Thanks
|

| The following BHPian Thanks ashwin.terminat for this useful post: | GTO |
|
7th May 2017, 01:48
| #7 |
| Senior - BHPian Join Date: Dec 2006 Location: Mysore / B'lore
Posts: 1,666
Thanked: 4,111 Times
| Re: DIY: Upgrade to Stainless steel braided brake hose I recently acquired an Apache which had pretty bad front brakes. It was lying idle for ~2 years now, the fluid inside would have definitely gone bad. The front brakes on this bike needed more than a simple service/cleanup which included swapping the hose to the SS hose as indicated in this thread so I hope this is thr right thread for the update. I did not intend to post a proper guide hence I don't have too many pictures. I hope everyone can understand the process I followed. First step was to dismantle the brakes on the bike. Crack open the banjo bolts for the master cylinder and caliper, then hand tighten them back. It is much easier to open them when they are on the bike. Remove the mirror from the master cylinder if you have a hero honda/TVS. Take off the 8/10mm bolts holding the master cylinder onto the handle. Hold the mas cyl in such a way that the banjo bolt is facing upwards and remove the bolt with your fingers. The objective is to remove the banjo bolt without the brake fluid from mas cyl leaking out. Once the banjo is removed, drain the fluid from the mas cyl into an empty bottle designated to store old brake fluid. Crack open the bleed nipple and hand tighten them back. Remove the caliper bolts and remove the hose+caliper. Remove the banjo bolt on the caliper and drain all the old fluid. Start dismantling the caliper. Remove the brake pads, dismantle the caliper carrier and the pins. If this is the first time / not too confident, take plenty of pictures before dismantling tricky sections to understand how the parts fit back. This is how my Apache caliper looked after dismantling.  Clean all the parts using a solvent. Avoid using sharp objects and resist the temptation to scrape off debris with a blade as it will cause harm in the long run. This is how the caliper pins looked. The caliper must have sezed in the past and an idiot mechanic has scraped off the dried grease with a blade causing these scratches.  Never use normal grease for calipers You can get TVS caliper grease packets at Maruti part stores, part numbers available in the fantastic thread maintained by Leoshashi. Thoroughly clean the channels where the caliper pins slide. One channel will be in the caliper and the second inside a long rubber bubble. Cleaning the rubber bubble is possible and thats what I did however in hindsight its better to replace the part. The honda equivalent of the part cost only Rs 17; bajaj/TVS/etc part should not cost more.  There will be a spring clip on the caliper pressing the pads horizontally towards the rotor. Remove the clip, clean the area behind, give the clip a thorough clean and put it back. The caliper will be having old fluid, to flush it out, load a 10ml syringe with fresh brake fluid. Point the open end of the syringe into the banjo bolt hole and press the syringe with a lot of force so that the new fluid goes in with pressure. Once the caliper is full, drain the fluid into an old container and repeat couple of times/as needed till the drain fluid is clear. After the innards have been cleaned, pus back the pistons on the caliper by applying a large and consistent force on the piston surfaces. Recessing the pistons will make installation of the caliper back on the bike much easier.  Once the cleaning process is done, wash your hands thoroughly/put on new pair of gloves before handling the caliper grease. Plan and buy proper caliper grease to use in the pins. I had a can of Permatex Ceramic Extreme grease and used that, the TVS caliper grease should be available. I loaded some into a 10ml syringe so that it can be used better with minimal wastage. Using the brush from the bottle/individual sachets can be messy and tricky at times.  I applied a thin layer of grease on the pins, a line of grease around the inside edge of the channel. When you insert the pin, it will spread the grease evenly around the channels if done properly. Fix back the rubber boots on one end. Once you slide the pin in, stretch the open lip and fill the bellows with as much grease as you can. This will ensure the pins dont run dry and there is sufficient lubrication. Apply a thin layer of the grease on the moving portions, I have tried to highlight the portions with a red marker on my pictures. This will prevent and squeaks or noises from the calipers when braking. 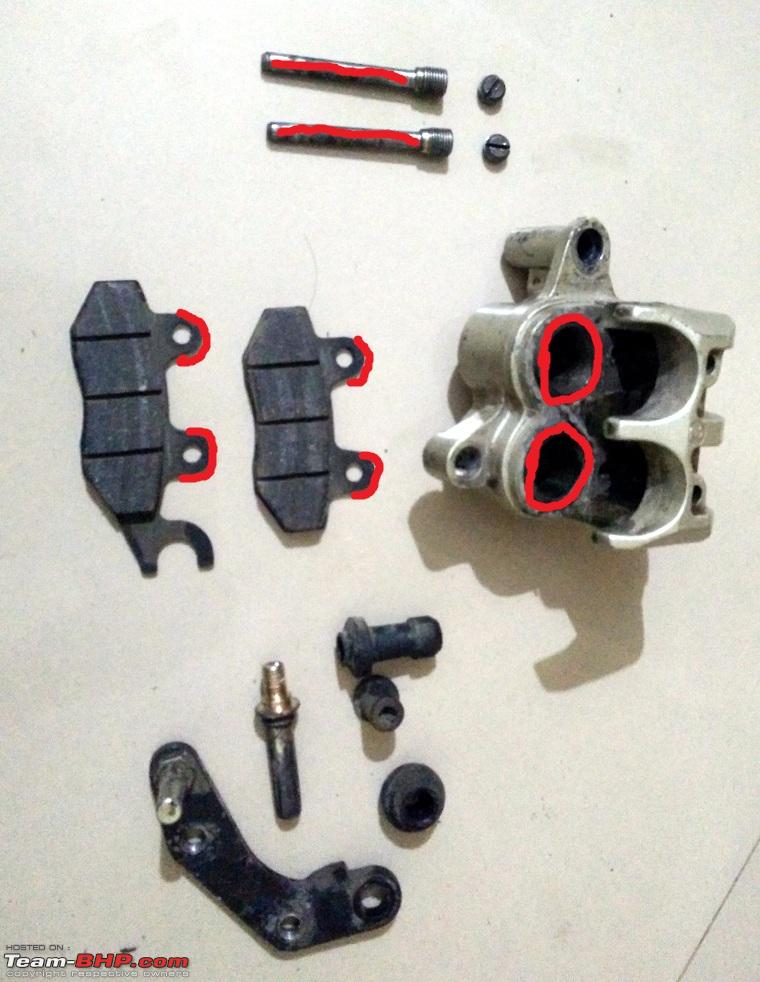  Assemble back the caliper parts. This is how my caliper looked after assembly.  I took a leisurely 2.5 hours to dismantle the caliper alone, clean it and pit it back. Take your time and ensure you do the steps properly as minor details contribute in a big way. Next morning, I assembled all the parts together and bled the brakes as per instructions in the first post. I swapped the TVS master cylinder with a Karizma Master Cylinder I rebuilt 5 years ago and it was lying unused in my attic. The TVS master cylinder needed a rebuild and swapping the master cylinder instead saved me a lot of time.  It took me 10 minutes from start to end in the bleeding process to have brakes feeling like this : PS : Either ends of the banjo hoses should have copper washers to prevent leaks, however Hero Honda/TVS/others skimp on this step and use normal MS washers. I've only seen Bajaj use proper copper washers. Top washers are the ones that came off the banjos from my bike, bottom ones are brand new copper washers. I bought 4 of these; 2 for each banjo bolt from a Bajaj showroom for 20 rupees.  |
|
| (5)
Thanks
|
| The following 5 BHPians Thank SunnyBoi for this useful post: | greenhorn, Leoshashi, Mr.Boss, Rehaan, swiftnfurious |
|