Team-BHP
(
https://www.team-bhp.com/forum/)
GPS systems have become a part of our life. There is GPS in your car, in your phone, and maybe even in your toilet seat.
However, most systems in use depend on maps, and how good are the maps.
You enter an address or a landmark, and then you follow the instructions to that point.
However, its a big planet, and a large part of this planet does not have roads, or has roads which are not yet mapped.
So how do you navigate the big bad wild, and live to tell the tale?
This article will first address the concepts and then give you a run down on some common software on various platforms.
GPS
GPS stands for
Global Positioning system
Click on the above link and it will tell you all you need to know about GPS, and even more.
To give a gist, a GPS is nothing but a timer.
A GPS satellite broadcasts the following information
1. The time
2. Precise orbital position of ephemeris
3. Rough orbits of satellites and health of system.
Using this the receiver computes the distance to each satellite, and then via "triangulation" to put it crudely, simply tells where you are.
Two locate your position on a plane, you need to have 3 satellite "lock".
however, we live in a 3D world, and its not just the position, but altitude also which is important, esp when you are flying. So 4 satellites give you fix with altitude.
That said, you have heard "the more the merrier". More satellites locking means better accuracy. For example, the 4 satellites visible to you may be bunched together, that means you get a fix, but your "error" increases.
Technically, DOP or Dilution of Precision is used to measure error. Many software simply use this DOP value and give you a more meaningful value in terms of "meters".
So with 7-8 satellites in view, you may have an error of 3-4 meters. Can't go below that. If you see 4-5 satellites, your error can be as high as 20 meters, or even more. In the USA, many "WAAS" or ground stations augment the GPS system, resulting in much greater accuracy of even 1 meter. They are mostly used by Aircraft, however many mid range receivers incorporate WAAS chip also, so when WAAS is enabled, your accuracy increases.
That said you have GPS systems which are 12 channel (can lock upto 12 satellites), 24 channel, and even 36 channel.
But do not be fooled, even if you have a receiver which can lock 100 satellites simultaneously, you won't get to see more than 7-10 in the sky. So 12/24/36 does not make a difference.
What matters is the power of the equipment and sky visiblity. Often around buildings(highrises) or under thick forest cover, you will find your GPS losing signal. This means you have a low power GPS chip inside. Mostly phones and the cheaper units have this problem. Trekking handhelds usually have powerful receivers.
On many car navigation units there is a small MMCX or MCX port at the back, where you can connect an external antenna. I use one, and they are available for around 10$ from eBay or dealextreme.
All your GPS receiver will do is get the time, and then output something called a NMEA sentence, which is latitude/longitude/current time/Altitude and a host of other information
But let us concern with Latitude/Longitude/altitude and time, because that's what matters.
Now there are various ways of representing lat/lon
For example there is the decimal notation this is 23.43543 78.5435353 with positive numbers indication East and North, and negative numbers meaning West and South.
Longitude 0 is GMT, west of which will be negative.
North of equator will be positive, and south will be negative for latitudes.
Similar to decimal notations there are other ways also, like Degrees/Minutes/seconds. But do not fret with that. Various sites are available on the net which do on the fly conversion.
Now is this enough? If I tell you that you are at 23.4545645N 78.545353E at 2388m at 14:00:45 11/09/2011 is that enough.
Can you navigate with that?
Well, unless you have a built in mapping function in your brain, that information is totally useless. So that brings us to the next topic. "MAPS"
MAPS
When most people talk about GPS systems, they are actually talking about the maps. Every GPS system in the world, from the 700$ garmin, to the 10,000INR Mapmyindia to a 50$ dealextreme unit will tell you Lat/Lon/Alt/Time.
what makes the difference is the map database.
Maps are nothing but a way to give "reality" to the GPS coordinates.
For example. If I told you.
28.612864, 77.229306 is a nice place to visit. You would scratch your heads. But if I told you "India Gate" is a nice place, it would instantly make you understand.
This is what MAPS do. They tell you what is where. When GPS receiver calculates that you are at 28.612864, 77.229306, on the map you will be shown standing at India Gate.
Different sources like Garmin/Mapmyindia/Satguide have their own maps, and their own fans.
There are community driven open formats like Openstreetmap, and the big daddy of all, the Google map. However, we will not concern ourselves much with that, we are moving into the domain of "No Map Land" or "where the streets have no name". Before that, a lowdown on the GPS hardware
GPS Hardware
All GPS receivers have a "GPS Chip" which does the above job, and supporting hardware which allows running operating systems, mapping programs etc., etc.,
GPS Hardware can be of 4 types
1. Dedicated GPS systems
These are the handhelds from Garmin, Lowrance etc., Some Car GPS systems also fall into these category. Most Car GPS systems appear to be in this category. They have a proprietary OS, and limited capability. All you can do on these is do GPS stuff. Many good quality units from Garmin/Lowrance/Magellen are waterproof, allow waypoint and track nagivation, as well as advanced stuff like perimeter scouting etc., They are built for the wild. However they their problems. You are limited by the software installed on your device. Multi tasking is not possible, and if the mfr does not have maps for your country, you will be staring at an empty white screen.
For most of these units, except Garmin, making India maps is a big task
2. PND - Personal Navigation Devices
These are the ones you use in the car. Usually with 3.5-7" screens, they appear to run proprietary software, but actually they run Windows CE under the hood. If you search online, you can find many sources with information on how to unlock your device, i.e. expose the Windows CE Shell of your device, and then install any Windows CE application you want. Till the advent of mobile phone GPS, these used to be a rage, esp in the west, but now they are on a back foot thanks to the cell phone.
In India MMI/Satguide make these, and you can also source Garmin Nuvi etc., Most of these are difficult to unlock, and this makes many of these useless for offroad navigation, as softwares like Destinator(Satguide), Mireo(MMI) are useless for offroad navigation.
Some Garmin PNDs have track and waypoint support with offroad mode, but they are expensive. If you are in the market for a GPS and do not care about routing and all, but mostly about making your own route, or using google JPEG maps and then calculating route yourself. I would suggest you buy one from ebay or dealextreme.
A 4.3" screen will set you back some 60$, and for 100$ you can get a 7".
If you want somewhat better quality, get a Mio C320 or Mio C520 from some friends in US (Prices range from 90-200$ and keep fluctuating faster than onions).
For you beginners, I suggest spend 50$ and get a cheap ebay unit with Windows CE. That way you can experiment, and later decide what you really want.
That said, many of these units can run Windows Mobile apps too, since underlying OS is very similar
3. Mobile Phones
The name itself is self explanatory. I have clubbed mobile phones under one category, but to be honest there are 5-8 smartphone OS out there. Every one has their own app support.
iPhone and Android have the most number of apps, followed by Windows Mobile and Symbian.
But do note that the screen will be small(unless you use a tablet) and if you get a lot of phone calls, you will be disturbed frequently and your navigation app will pause momentarily.
4. Dongles and loggers
These are small things which can fit into a childs hand. All they have is an on-off switch, an internal battery, and a charging+USB port. The start logging from the time you switch them on. There are some units with bluetooth support.
They are used for two purposes
As loggers - Many of them have memory to support 1 million track points, and even on a curvy mountain road where track point frequency will be high you can get 10,000kms of logs. Some dump a trackpoint every second, and on such units you can have 1000-5000km log depending upon your speed.
As external GPS - What if you want to navigate on your laptop. You can install navigation software but how will you get GPS signal. These "loggers" also called bluetooth GPS dongles come to the rescue here. with bluetooth or NMEA cable interface, they will send trackpoint details to your PC, and the software there will give your position in real time.
For example. if you look at Google Earth menu, you will see an option for "connecting GPS".
Now we move on to the next topic, Offroad Navigation.
Offroad Navigation : Concepts
Offroad Navigation can be of three types
1. Discovery type
In this you do not know where exactly you want to go. All you know is that if you keep on heading northwards, you will find a path in the mountains and then you can cross it. This obviously involves lot of hit and trial. Here your offroad navigator will keep on plotting your track. So if you get lost, you can retrace your path, or you can keep watching your track progress so that you do not keep hitting the same points again.
That said, doing this is pretty rate. Tools like Google Earth give you excellent satellite coverage, so you can get a pretty fair idea of "Where I should be". So we will come to the second part
2. Waypoint Navigation
This involves a certain lat/Lon combination, or a set of lat/lon combination. So you have an offroad terrain where you are standing at. You know you want to be at XX.XXX/YY.YYY
Your navigator will tell you direction and distance as the crow flies. Its upto you then to form the easiest path.
3. Trackpoint Navigation
This is the easiest and the most dangerous. It means your friend has done a track, and given you the tracklog. You load that track in your offroad navigator, and just follow the path. You do not have to use your brain much.
That brings the danger.
I may have crossed a minor stream few months back, and now its a slush trap after the rains. Following my track can lead you in serious trouble.
I will not cover discovery navigation in detail, as covering Track and Waypoint navigation will teach you a lot of things about doing discovery navigation.
In the next post we will look at Waypoint navigation in detail.
This is probably the most common type of navigation you will do when you are going to a remote place. All you have here is a set of coordinates.
Now the first question, how did you get a set of coordinates. Did you dream them?
Well the answer is no. The most common method used is Google Earth or similar software.
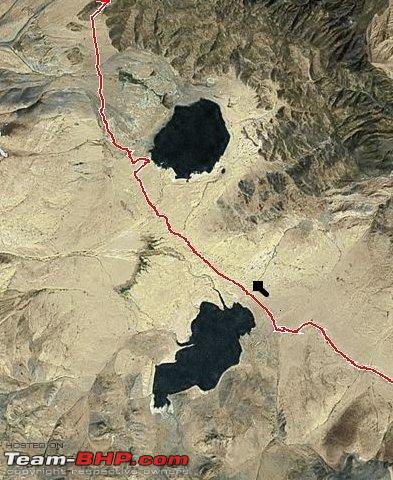
For example, lets say you want to go to a remote lake. Somebody has told you that a track does go there, and its motorable. But offroad there are no roads or signboards to follow.
So you bring up the are in Google Earth, and zoom to the best satellite imagery that particular location has. Different places have different kind of satellite imagery available.
On the Satellite view, you can simply click on that particular landmark, and then save it as KML.
Lakes are easiest, as they are well defined water bodies. Mountain passes are tricky. Ditty for other stuff like forests etc.,
Actually if you do not want to bother with Google earth, and waypoint saving and loading, you can simply browse to a place in Google maps, right click on the place you want to go, and say center map here.
Then in Google maps on your browser, right click on "Link" and "Copy Link location".
For example, for Kyun Tso lakes you get
Google Maps 
Strip out the junk, and you get 32.95164N 78.598938E
This is your waypoint.
Similarly, you can do such stuff in various software.
Now you have the waypoint. All you got to do is fire up a offroad mapping app and simply start navigating?
Well not exactly.
Before you embark on your journey, you need to "prep" your software.
This means you use a software like Mobile Atlas creator, and download the required map(Google Map, Satellite Image etc.,) for that area, and store it in memory card of your device in the requisite directory.
I will cover these steps in detail when we discuss software, but for now go along with me.
Now you may ask, why the map? The answer is simply. Where you are going there are no roads, but 50-100kms from there they may be roads. So having a JPEG map image saved, will give you a good idea about where you are.
Moreover, even where there are no roads, rivers etc., are marked as blue lines, and forest areas are marked in green. Water bodies are marked in blue. So you have a good idea about the location.
Last but not the least, since all we are downloading is an image, we can download the Satellite image for that area. If you have a Zoom Level 14(In Google speak) satellite image, it will give you a fair detail of the terrain.
Alternatively, you can download contour maps, elevation topo maps etc., for many locations. This is esp useful for trekkers, and they can follow a low altitude contour to follow the path of least resistance.
So once your device is prepared, all you need to do is fire up your navigation program, and simply tell it to "Navigate to" the waypoint.
It will then draw a straight line to the waypoint, along with host of other information on the screen.
Lets look at what Oruxmaps (An Android app) does.
WE will not elaborate on the entire range of information, but on the most important ones. Different software show different info.
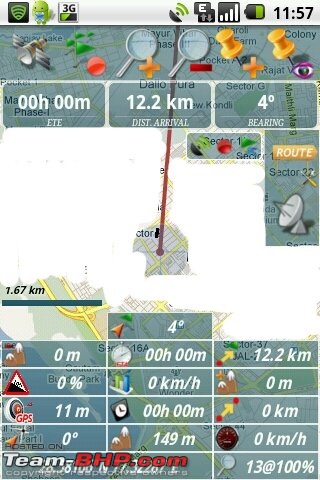
The important piece of information for this particular navigation is
1. Direction of waypoint - Its showing 4 degrees. North is 0 degrees, and as you go clockwise degrees keep increaseing. E is 90 degrees, S is 180 and W is 270.
This tells you where your waypoint lies from your current position
2. Distance to waypoint - This shows how far is the waypoint as the crow flies.
apart from that you have information like
1. Elapsed time since you started navigating
2. Approximate ETA (Calculated based on your current heading and speed)
Oruxmaps also tells you elevation of current point, and elevation gain or loss when you start navigating.
This kind of waypoint navigation can also be used in a city.
For example, I wanted to go to Paharganj from South Delhi.
Ndrive could have plotted me a route and guided me via the main roads.
I decided to mark the location as a waypoint, and then navigate to it as the crow flies, and started following my own route from the overlayed Google map I was using.
This helped me avoid Ashoka Road, which was seeing a big traffic Jam due to some rally at Jantar Mantar.
Offroad, I used this technique to navigate to Kyun Tso From Hanle.
From Hanle, there is one track, which bifurcates into other tracks at some points.
At one point, we took the wrong track, because it was most closely aligned with "direct line of sight to destination".
After some time the track started turning way, and soon it was clear that its not the right track. We went some 6kms into the wrong direction.
From there we turned back, and resumed on the other fork.
So this particular kind of navigation gets painstaking in the wild. Its easiest in places like deserts and salt flats, where multple paths can converge, and obstacles are usually cross-able or by-passable.
In the hills, if you take a wrong track, you may reach a point where you may be looking at a high mountain with your destination on other side. So you need to retrace your steps and follow alternate routes.
There is no exact science, you go with gut feeling, and knowledge of the area.
For example, if you know that your route runs close to a river, and river eventually passes close to your destination.
In that case you just keep navigating trying not to get very far away from the river. The river may follow a longer path, but if you can follow the river approximately, you will eventually reach your destination.
So to Summarize, here are the steps you need to do for Waypoint navigation
1. Get your waypoint
You can manually enter the coordinates in your software, or load a kml file saved from Google earth
2. Device preparation
Downloading maps from the internet for your device and storing them on SD card so that you do not need data internet connection in the wild. Maps can be "normal", "Satellite view". "Topographical maps with elevation data", "Contour profile" etc.,
3. Navigation
You load waypoint in your device, and simply say "Navigate to waypoint".
Advanced Waypoint navigation
This is a more advanced routing technique.
Lets say I want to get to a lake, and I know on the way I will find a smaller lake, and a flat.
So I create three waypoints, and then in my device, simply add all these waypoints to a "route" in a particular order.
So the device will navigate to the first waypoint and as you reach within a certain proximity, it will start navigating to second waypoint and so on.
This makes your job easier, as instead of navigating to a place 50kms away a crow flies, you navigate first to a point 10kms away, then to a place 20 kms away and so on.
Not all software support this the most good waypoint navigation software have this feature build in where you can create a route.
That brings us to an end in this topic. Next up "Track navigation"
This is the easiest way to navigate.
Here you have a track from a friend, or self created on Google earth. You just convert it to a gpx file using free software like gpsbabel, and load it in your software.
So what you see on the screen is like this

The Track is shown in a bright color, usually red. Many software allow you to load multiple tracks, and then show each in a different color.
Apart from that your current position and heading is also shown.
So how do you navigate.
Well, you simply keep traveling along the track, simple.
This method is good for beginners, but there are pitfalls too. What if in this season part of this track is under water?
What if a landslide has blocked the current track?
Apart from using pre-made tracks, you can also scout the area and create a track in Google earth. Then save it as kml, and finally convert it to GPX.
Trekkers use this method in situations like river side tracking. On Google earth they can mark the river, and relevant tributaries and make a track.
Then you walk along the river.
Alternatively, if detailed satellite imagery is available, you can make out existing tracks, and mark the relevant one and save the GPX.
This can then be loaded on your device and you can follow the track.
This ends the concepts, now we will discuss some come GPS software used by offroad navigators around the world.
So what is the best software for doing all what we discussed above?
The answer has been debated on gps forums worldwide for eternity, and we cannot find one answer.
The fact is that there are hundreds of offroad GPS navigation Software around the world, and explaining each and every one of them is not really possible.
So we will cover some on different platforms, but before that lets look at what do you need in a offroad Navigation software.
MAPS
Most of these software use static maps, most of which are different image related formats.
So your basic map for all of these is a JPEG, and a calibration file which tells which point in the JPEG corresponds to which GPS location.
The software will then simply show your location on this particular JPEG. Now if we were to use simple PNG or JPEG on a tiny handheld device, you are going to have lots of "memory" problems. As you zoom in and out, it will kill the CPU. So different mapping programs use some kind of conversion. Some use SQLLite DB, some like oziexplorer use ozfx3 format which is proprietary and so on. But the starting point is same.
So when you go out for an app, whether free or paid, make sure that there is an easy way of downloading maps for that device.
A good place too look at is the
Mobile Atlas Creator
This software can create maps for a host of softwares, so if
1. Your software is listed on the above webpage
2. Or your software uses one of the formats mentioned in the above webpage
you are good to go.
I am yet to find a popular mapping software which did not use one of the formats dumped out by MAC(Mobile Atlas Creator).
So I suggest you look at MAC documentation, download maps, and then copy it to SD card of your device in the required folder of your mapping software.
NAVIGATION
Now we come to the main application. Navigation. Any good offroad software should support
1. Waypoint Navigation - Ability to navigate to a waypoint, show bearing, heading, ETA etc.,
2. Ability to load tracks and show them in real time
3. Ability to record tracks so that you can retrace your path if you get lost
4. On the field route creation by giving a set of waypoints
With that out of the way, lets look at the most common apps on various platforms.
Even though Android cell phones are the rage, and you have millions of apps floating around, a lot of people do use PNDs which stands for Personal Navigation Devices. some of these run proprietary OS, but most of these are Windows CE based and are unlockable, allowing you to install any software you want.
Windows CE/Windows Mobile Devices
For those of you who have MMI etc., well I don't really have much info on how to unlock these, but those with Windows CE based navigators, like the cheap ones available on Dealextreme or ebay.com its an easy task
1. First you unlock you device. Google is your friend
2. Then you install any of these softwares
Windows Mobile - OpenStreetMap Wiki
some commonly used software are GPSDash, maplorer, trekbuddy,(all free), Oziexplorer(40$)....
Out of these Oziexplorer CE is said to be the best but at 40$ its not cheap.
Then there are softwares like OSMtracker, Cachebox, which you can try.
Google is your friend here. After lot of hit and trial, you may find a software which suits your needs. I use Oziexplorer CE, and it has served me well.
If you have such a device, I would recommend trying out maplorer, GPSDASH and osmtracker. If you can read german, try out glopus. It has an english version, but sadly the website is in german
Symbian
AFtrack is a good free software. Then there is the Nokia Sports Tracker, but thats more geared towards tracking your runs.
I do not have much experience in this platform, but AFtrack looks very promising.
Iphone
Not much idea about this platform. I guess iphone users can chip in with information, which can be added later
Android
My favorite platform.
the number of apps is simply mind boggling.
I have evaluated two very promising apps, which differ mostly in use model and interface and both of them allow you to do everything you want w.r.t offroad navigation
1. Androzic - This is an oziexplorer clone, and I frequently use it. Since I have oziexplorer CE on my PND, I can reuse the maps and do not need to download maps twice on my PC. It supports route creation, waypoint navigation, track loading and saving
2. Oruxmaps - More featured than Androzic, but learning curve is little steeper as number of options is quite a lot.
You can try any of the two and decide what works for you. Apart from these two there are apps like mytracks, alpineGPS, trekbuddy... the list goes on and on.
Conclusion
This brings us to an end. So its time to get out and make your GPS devices do what they were designed to do.
I have given you the direction, and its upto you to find the GPS app which suits you and use.
But remember, GPS is just a tool, it just shows you the way, whether the way is doable or not is your judgement. So use it as a walking stick, not a crutch, and always remember, technology can fail, your device can conk out, your phone can freeze up.
So always carry a classic compass, and some paper maps when venturing out in the wild! Good luck.
Track Log Management
So now you have an offroading GPS software which dumps out track logs with latitude/longitude/timestamps in its own native format or universal format(eg gpx). What do you do with it?
Historically, people mostly use free software like gpsbabel to simply convert it to kml or gpx, and then view it in Google Earth.
You can replay your trip over satellite imagery.
Other than that you can also use online services like utrack and gpsvisualizer to create Elevation profiles, Speed Profiles and a host of other statistics.
Some Android applications like mytrack can do it for your tracks on the fly.
However all this is data visualization. You are not doing anything with your tracks except converting them and then viewing data.
This brings us to a related topic of track log management and editing.
You may ask the question Why?
The answer is simple. Often you may travel 10 hours in a day covering a large amount of destinations. What if you are interested in segments and not the whole track. What if you want to break your track into 5 different tracks and then view them individually or create profiles individually?
So here comes free software to the rescue. I have evaluated some softwares in the market, but the best free alternative I have found is
viking.
This software allows you to load your track, and view it against the backdrop of google maps/openstreetmap or your custom map.
Then you can edit your track, split it, join two tracks and so on.
For a serious GPS user, this software is a must have, and is available on both linux and windows platforms.
Geotagging
Have you ever taken a picture, and then months later wondered where was it taken?
What if the EXIF information inside the picture told you exact latitude and longitude, or even altitude at which the picture was taken?
Welcome to the world of geotagging.
A lot of people currently buying cameras often choose a model with lesser features and higher price just because it has an in built GPS. Well you do not need to do that.
All you need is
1. Camera which takes pictures and every picture has accurate time in the EXIF. This includes just about every camera in the market today
2. A GPS software which can write out a track log with timestamps.
3. A geotagging application like gpicsync
So how does it work.
The principle is simple.
Lets say you are walking around with a camera and GPS, and taking pictures.
Every picture has a time associated with it. Lets as 13:30:00
At the same time your gps software is writing a track with each location tagged with a time.
Since most software dump track logs in UTC(GMT) time, you will see 08:00:00Z in the track log file.
The geotagging software will match the time of the picture with the point which is closest to that time, bounded by an upper limit.
For example you can select 30 seconds as your time range.
So the software will find all trackpoints dumped within 30 seconds of 08:00:00Z and then append latitude/Longitude/Altitude of the closest point to the picture.
Simple, right?
Before you embark on this, you need to do the following
1. Some GPS systems dump out tracks with odd time if the system time is not properly set. So make sure your device gets time from network or GPS satellites and its accurate. Time zone does not matter. you just need to know the time, and the zone for which that time is there
2. Fix your camera time. If your GPS is set to GMT, and it shows 12:00:00, make sure your camera says 17:30:00 if its set to Indian Standard Time(IST)
3. Fire up Gpicsync, and add 5.5 offset (5 and a half hours) in the settings, load your track and then load the pictures folder, and you are good to press go.
you can play around with settings if you want to.
What if you went to a 5 day trip and have 500 pics and 22 tracklogs?
Fret not, fire up GPSbabel, load all 22 tracks, and ask it to write out one big tracklog file which is a combination of all 22 tracks.
Then just load the folders with your 500 pics, and press Go.
Depending upon your system speed, you will see the results after a few minutes or an hour(slow systems).
GPICSYNC also tries to get location information from the web, so having a fast internet connection is a bonus.
Go through the documentation, and select the options which are most relevant to you.
For example I use
1. Altitude : Absolute value (For flights)
2. Geonames and Geotagged in IPTC header, and Geo information in EXIF. This means smugmug can automatically tag the pics and the EXIF information has fields latitude/longitude and altitude
3. UTC offset 5.5 - My camera is on IST, and Oziexplorer dumps tracks in GMT, so I use 5.5
Useful Links Oziexplorer - Windows CE navigation program(40$)
androzic Android Oziexplorer Clone
GPSDash Windows CE navigation program
Oruxmaps Android navigation program
GPS Visualizer Online Track Profile viewer
utrack Online Track Profile viewer
GPSBabel conversion utitlity, can convert tracks and waypoints across all common formats(hundreds of GPS systems supported)
Mobile Atlas Creator Offline Map download utility for many software
Gpicsync Geotagging utility
Viking Track log management and editing Program
Great article for an off-road adventurer, TSK. I think these days, having a GPS device for off-roading is becoming a must have (at-least in the group, if not individually).
I have GPS tracks of most of the OTR's we have done and believe me, many a times they have helped us -- especially in the nights when there is no way to find a trail in the wilderness.
Many a times I have navigated based on the GPS track, at night, even though we have done that trail numerous times.
In my experience, having a dedicated handheld GPS device helps and have found these to be way better than the city-gps navigation devices.
Also, these trail/off-road dedicated GPS come with in built software to automatically track route, mark waypoints, convert logs to route etc etc..
tsk1979,
A very informative thread.
With my very limited attention span you managed to keep me glued to your first post, I completed that and will come back for your later ones soon.
Regards,
I have tried different map applications on my Android phone, but was not fully satisfied with any of them. I will now try to use this information and try OruxMaps and Androzic. At present I am using BrutMaps. That is quite good too, but for normal city driving. Thanks TSK.
Quote:
Originally Posted by khan_sultan
(Post 2283868)
Great article for an off-road adventurer, TSK. I think these days, having a GPS device for off-roading is becoming a must have (at-least in the group, if not individually).
I have GPS tracks of most of the OTR's we have done and believe me, many a times they have helped us -- especially in the nights when there is no way to find a trail in the wilderness.
Many a times I have navigated based on the GPS track, at night, even though we have done that trail numerous times.
In my experience, having a dedicated handheld GPS device helps and have found these to be way better than the city-gps navigation devices.
Also, these trail/off-road dedicated GPS come with in built software to automatically track route, mark waypoints, convert logs to route etc etc..
|
Handlhelds are designed with trekkers in mind so they have features like waypoint logging, and track logging, and backtracking. Some even support scout mode which allows you to define perimeters.
But do not discount car GPS systems. These Windows CE systems can run many offroad navigation software, and the advantage is a bigger screen.
Only disadvantage, these are not waterproof, and in an open top vehicle it may be an issue
Quote:
Originally Posted by pjbiju
(Post 2283969)
I have tried different map applications on my Android phone, but was not fully satisfied with any of them. I will now try to use this information and try OruxMaps and Androzic. At present I am using BrutMaps. That is quite good too, but for normal city driving. Thanks TSK.
|
Brutmaps is primarily a city application.
I suggest you try oruxmaps. Use MAC to create tiles for area you are interested in and then put it into the oruxmaps folder.
It won't give you turn by turn directions, but it will show you your heading speed etc., and position on the map.
Try the beta version, it comes with new features like one click backtrack, better routing over gpx etc.,
Quote:
Originally Posted by tsk1979
(Post 2284063)
Handlhelds are designed with trekkers in mind so they have features like waypoint logging, and track logging, and backtracking.
|
Exactly, so ready to go without any additional software configuration etc etc. This option can be very useful for folks who don't want to get into the hassle of configuring software etc etc.
Quote:
But do not discount car GPS systems. These Windows CE systems can run many offroad navigation software, and the advantage is a bigger screen.
|
Yes, that's a good option. I carry both in the trails -- just for fun :D
Quote:
Only disadvantage, these are not waterproof, and in an open top vehicle it may be an issue
|
I have observed that dust can be an issue, battery life is limited compared to the hand held GPS units, the handheld can take more rough use/abuse & the smaller size is a boon -- just slip it in your pocket.
Amazingly detailed and well written article Tanveer! :thumbs up
Some settings for
OruxMaps that are useful in deciding how accurate you want the track to be, or how much battery life you want (especially when on hikes, when you wont have a power source)
1. Minimal Time : the time that the software waits between two location requests on the GPS. Setting this to a low value will give you a greater level of detail, and at the same time drain your battery faster.
When on a drive (in a vehicle with a charging point!!), this could be set to the lowest possible values (1 or 2 seconds appropriate).
However, if you're on a hike, you should set this to 1 minute or higher; logic being - you're going slower and hence don't need to record as frequently as when driving. Plus, you won't have sufficient power to record the entire trail. An accuracy of two minutes gave me battery life of close to 10 hours (in flight-mode, and used for nothing other than the GPS)
2. Minimal Distance : the distance between two points to be recorded (once the software has the location from the GPS). This can be decreased to as low as one would want.
Drawback of setting this too low (read "less than the GPS accuracy setting") would be points getting recorded even if you haven't moved an inch. There was one occasion where I had to sit in my parked car for over half an hour - the GPS showed i had travel close to 2 km in that time!!
3. GPS Accuracy : minimum accuracy to be reported by the GPS device so as to record a point on the track. If this is set to 20 meters and the device reports 40, the point won't be recorded.
Best to set this as low as possible (currently, OruxMaps allows a minimum of 20m, though i would have liked them to let the user type it in manually). Under the open sky, my phone gives me anything between 15 and 31 feet (4.5m - 9.4m).
These settings can be found under
Menu -> Settings -> Application.
Just to highlight the practical aspect of using GPS on a smart-phone, I've attached a screen-shot of a track i recorded this morning. The green arrow points to the start of the track, while the orange one is the end.

GPS Accuracy was set to 20 meters. Minimal time was at 2 seconds and minimal distance at 40 meters. This is the part where u can see 3 straight lines that don't follow the road exactly.
I soon changed the minimal distance to 10 meters (though you can go as low as 5, or record every point irrespective of the distance from the last point). Here, you see a much better tracing of the road I took. In fact, at the bottom of the image, you can see me cross over to the other side of this 10 meter-wide road!! Towards the end of the track, you see me going around the building where i live.
This was recorded when i was out on a walk with my pet dog... Not something for which you'd be using the GPS, but i hope this shows GPS on phone is pretty accurate.
PS : I use a Motorola Milestone running CyanogenMOD 6.1.2 (by nadlabak@xda-developers). Your mileage may vary according to the handset and the OS / customization version you use).
Note : there are bugs in the software. i was once on a hike (climbing
harishchandragad). The software showed that i had scaled the peak thrice on one trek. Actually, jumped some 1500 feet to the top of the hill-fort!!:deadhorse
Nice article tsk.
I have a basic garmin model on which I run Satnav maps. Good enough for roads. Offroad (such as this morning) it is quite useless.
It is my understanding that the hand held trekking ones like Garmin 60Cx require topo maps. Where does one get these for India/Is it possible to load images into such maps
@Khan: What hand held do you use and what maps in that.
hand held garmin ones can use any garmin compatible maps. Topo maps are just one type of maps.
You can use them without maps also, in which case it will show a white background.
No issue when all you want to do is log a track and follow it back.
That said, cloudmade(downloads.cloudmade,com) release garmin format img files based on openstreetmap database on their website.
Its updated ever week
@no_enthu_da, minimal time and distance actually are the minimal values. If you are going in a straight line, most intelligent software do not keep unnecessarily dumping track points. This is to shorten track log length.
For example, if I am going straight, I would need only 2 track points, one where I start, and other where I turn. Oziexplorer does that.
Lastly, about the bug, usually around high structures, accuracy waivers, and esp when climbing a narrow hill, the GPS can show you at different places(high error) therefore giving the impression of wrong log.
Thats why trekking in forests etc., is useless with phone gPS systems, because 30meters of accuracy is not very useful.
Handhelds have more powerful antennas, therefore get you 4-5m accuracy in the most challenging terrains.
In the vehicle I always have the external antenna hooked up, which gives me around 1.0 DOP
@tsk: Nice information there.:)
BTW, could you please elaborate on 'How to project points using GPS?'.
For e.g. I mark my current location in GPS, and noe from this location I want to mark another point 40-50meters ahead at an angle of 120 degrees? How will I do that? I have Garmin Etrex-H and so far have not been able to use this feature due to lack of knoweldge.
Quote:
Originally Posted by tsk1979
(Post 2284511)
For example, if I am going straight, I would need only 2 track points, one where I start, and other where I turn. Oziexplorer does that.
|
agree:
i guess Orux isn't really intelligent then! I've seen it create much larger files when setting a low minimal time or distance on a route with long straights (a route that i take everyday)
Quote:
Originally Posted by tsk1979
(Post 2284511)
Lastly, about the bug, usually around high structures, accuracy waivers, and esp when climbing a narrow hill, the GPS can show you at different places (high error) therefore giving the impression of wrong log.
|
i call it a bug because despite a 20m accuracy level setting, the recorded point was way off mark. i mean over 3-4 km away from where i was standing!! These were some off-track points, though the overall route was accurate.
Quote:
Originally Posted by tsk1979
(Post 2284511)
In the vehicle I always have the external antenna hooked up, which gives me around 1.0 DOP
|
what is DOP?
| All times are GMT +5.5. The time now is 06:36. | |