Wonderfully detailed thread Anurag. Am sure you must be enjoying the all new set-up and listening to your favorite numbers and smiling
more as you drive! Good job on this.
The most important element I loved in this set-up is the MGA Wiring Harness - It's made your job less time consuming else you had to route wires from the Amplifier to all the 4 Doors and reach the speaker. A simple yet brilliant addition this is which came along with the Amplifier. A major deal breaker if someone wants to retain everything as stock.
It was way back in 2008 when without any knowledge and some extra bucks in my wallet I headed to install a Subwoofer and an Amp for my WagonR to an accessory shop. Spent 12K then and came drove home, completely dissatisfied!!
Reason: I could only hear Bass while rest of it was playing with a feeble volume in the background and was astonished if this is what I needed at all.
Being a total novice at this, took some time to entirely go through the connection diagram to understand what each input meant and figured out what had gone wrong.
The installer realised that my Pioneer DEH Series had just one pair of RCA while I had picked a 4 Channel Amplifier. Apart from this, my WagonR had limitation to have just 4" speakers for front, thus the option of powering these small speakers with Amp was ruled out obviously.
Few more days and I decided to make my hands dirty and only because of this I picked up socket spanner kit since I had to remove the seats to do all the wiring again. Since our family belongs to furniture industry, I got speaker boxes done for front that I could place them below seats (and rear)
and finished all the wiring. I still powered the front speakers with Amp using RCA splitters. A good learning experience that was - No Whatsapp, Not much of FB but plain forums like these including
www.crutchfield.com. that I heavily relied upon then.
Reading your thread takes me back to those days

.
I thought I would add some more important points to benefit the reader and I hope you wont mind that here:
- At first, the good thing today is that most of the amplifiers come with both RCA (low level) as well as Speaker (High level) inputs. Back then, most models just had RCA Inputs, thus mandating one to use RCA Cable Pair or a combination of RCA + Hi-Lo converter. These options make installation very flexible and in your case it became more easier due to the wonderful MGA Wiring harness
- REM (Remote Signal): It is mostly the after-market HU's which have a signal wire as part of the wiring with a REM signal that goes to the Amp's REM input. One would not find this in stock systems and may have to try some work-around (mentioned below). However, REM signal would not be necessary when you are using High-level speaker output as Input to Amplifiers
- Power Line: Since Amplifier draws a lot of amperes by default, the high gauge power cable is connected directly to the Positive terminal of the battery with an inline AGU Fuse that would protect the Amplifier. This is the usual way to connect the Amplifier to power supply
I have illustrated the same in the diagram below so it can help those planning such an upgrade go through the same and then decide what is more suitable for them based on whether they are attempting a DIY or getting it done through an installer or in doubts whether the installer can fool around too (which has happened with me):
Basic differences between using Low-Level (RCA) and Hi-Level (Speaker) inputs to the Amplifier:  Using a Hi-Lo Converter along with RCA for Stock Systems:
 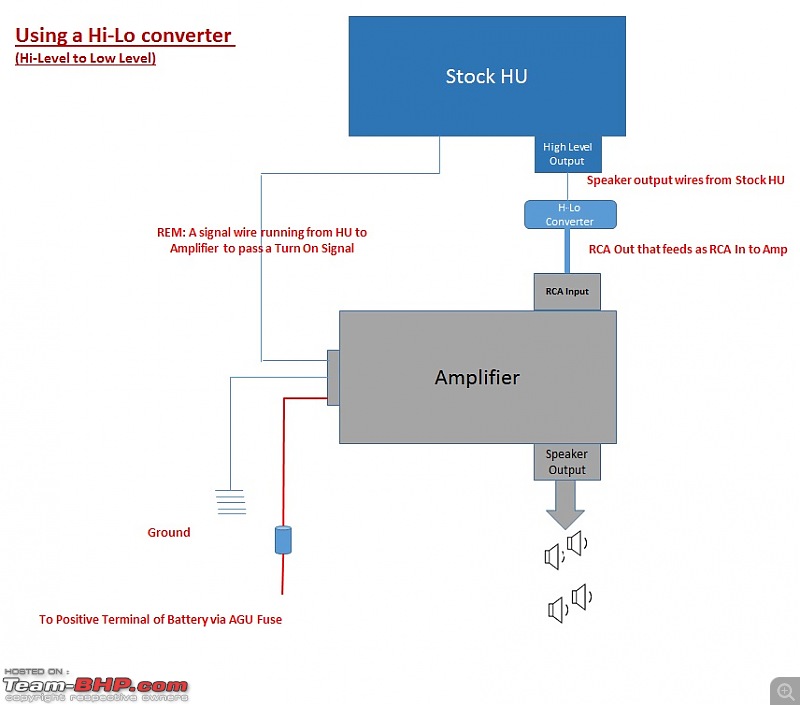 The most likely manner in which the MGA Harness is constructed:
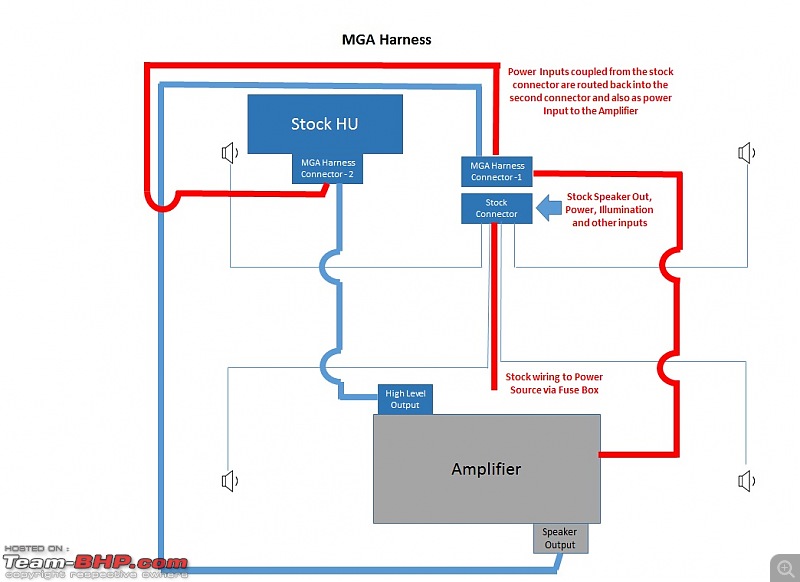
From your pic of the harness, I noticed that the power cable has one end while the other end is part of the Kit. It simply means that this power cable is drawing power within the harness where it is leveraging the 12v power supply from the Stock HU which is coming from the Stock HU's connector.
Typical set-up that I mostly notice is that the power wire runs to the positve terminal of the battery via in-line AGU Fuse - This is when you get it installed at the friendly accessory shop.
Quote:
Originally Posted by a4anurag  I have a 4-gauge Amplifier wiring kit on the way from USA that should come in a month or so plus will be adding a 'sub-woofer' when I migrate the setup to the next car. |
Hertz Kit + Imported Kit + Stock system of your next Car:
If you are planning to install this imported 4 gauge kit, will you retain the same Wiring Harness from Hertz? I ask this because most Imported (or local) wiring kits come with RCA cable pairs (which itself are the costliest element in the kit along with the power cable) and if you say you would like to retain the stock system of your next car (assuming S-Cross), you need to make sure that the stock system comes with RCA out. Else you would hardly make use of this kit completely.
If you want to use RCA with Stock System - You will need a Hi-Lo Converter but that would also mean that the speaker harness you got as MGA would have to link speaker output wires to the Hi-Lo Converter first, then the RCA Cable Pair running from this converter to the Amplifier. Essentially you will end up using too many cables here.
And with this set-up (RCA with Hi-Lo converter), your next plan should be to trigger the Amp to turn on when you turn the Head Unit On. With your current set-up, the High Level output (of speaker wires) is taking care of this and turning the Amplifier On. This kit has also ensured that you saved good time by not routing all new wires from the Amp to all 4 speakers.
As you may have known, stock systems mostly won't have REM signal. The closest workaround I see here in case if the stock system is missing REM is to wire from ACC with a Fuse and connect to REM Terminal on the Amp. That means the Amplifier would turn on everytime your car's key is in ACC. An in-line switch here can take care of it further because there will be times where you don't want to listen to music and the Amp would still be On.
Again, too many cables, and still the MGA Harness.But as you have mentioned, the MGA Wiring Harness will only make your task easier where you dont have to route speakers wires originating from Amplifier and running to all 4 Doors.
Completely get rid of the MGA Kit and use only the Imported wiring Kit:
I am sure you have this in your plan rather than a combination of using both the MGA and the Imported Kit as above. And since you mention that you want to retain everything as stock, you may only want to use a Hi-Lo converter and make complete use of this Imported kit. Additional tasks for you would be to route all the wires originating from the Amplifier to all the speakers and the subwoofer from underneath the carpet neatly by removing all the 4 seats, the panels around and the final routing. With such an investment, Good quality speaker cables will do more justice to your set-up in your next car than retain the stock wires. Hence, I would suggest you take this route only and compromise on retaining stock set-up which are nothing but your wires.
Quote:
Originally Posted by a4anurag Stock Nippon Tweeters vs Polk Tweeters
Stock Tweeters |
From the pics, I notice that the stock tweeters have a plastic clamp and then holes for screws to mount the tweeter in place. How did you mount these Polk Tweeters? Also, these Polk tweeters look larger in diameter? Or is that just an illusion created. I am asking because when I installed this in the Ertiga which never had any stock tweeters anyway, I drilled a larger diameter hole and then fit them through the threaded ring that fits onto the tweeters and secures it. Due to the design of the grille on the tweeter cover in your Swift, you may not be able to do it this way but would still like to know how the final mounting was and if that could be accommodated there.


 7th August 2017, 23:06


 (11)
Thanks
(11)
Thanks


