Team-BHP > In-Car Entertainment
Register New Topics New Posts Top Thanked Team-BHP FAQ


Reply
  Search this Thread
65,923 views
Old 5th August 2017, 01:30   #1
BANNED
 
Join Date: Oct 2011
Location: Hyderabad
Posts: 12,350
Thanked: 21,411 Times
Upgrading my Swift's ICE system

A total noob when it comes to audio related stuff so please pardon me for any errors in the thread.

I am NOT into English songs or any kind or Rock, Pop, Trance, House etc etc. I listen mainly Hindi, Tamil, Malayalam and Telugu Film songs. Very less English may be 6 or 7 in a collection of 1500 songs. So wanted clarity plus decent thump (read bass) from the audio setup that would get into the car.

Actual plan was something else and in reality something else happened. This is in terms of installation and attention to detail. As per plan the I was going to keep the Swift till it reaches 2,00,000 kms but almost a week back dad told that we'll be changing both the Ertiga and the Swift in Jan/Feb 2018 which is 6 months from now. I didn't find it worthy to pump in money on the car that would go in such a short while (May sound silly to many but I am thinking practically and financially).

My Actual plan was:

HU must be stock as I hate the aftermarket look when the HU is changed. Sorry but that is how I am also the speakers/tweeters must be in the OEM position which will make it easy for me to disconnect and transfer this setup to the next car and re-plug in the OE audio setup that I received from the factory.

Budget for the setup in my mind:
  • Speakers (Both front and back included): ₹ 13-15,000
  • Amplifier: ₹ 9-10,000
  • Damping: ₹ 9-12,000 (Consists of 2 sheets of Dampmat Exceed and 1 sheet of carpet like material for each door x 4 doors)
  • Wiring and all items: ₹ 7,000 - 9,000 (Like OEM integration kit, power wire, ground, Fuse, MDF rings, fuse holder, connectors, terminals etc)
  • Total: ₹ 46,000 (max) 
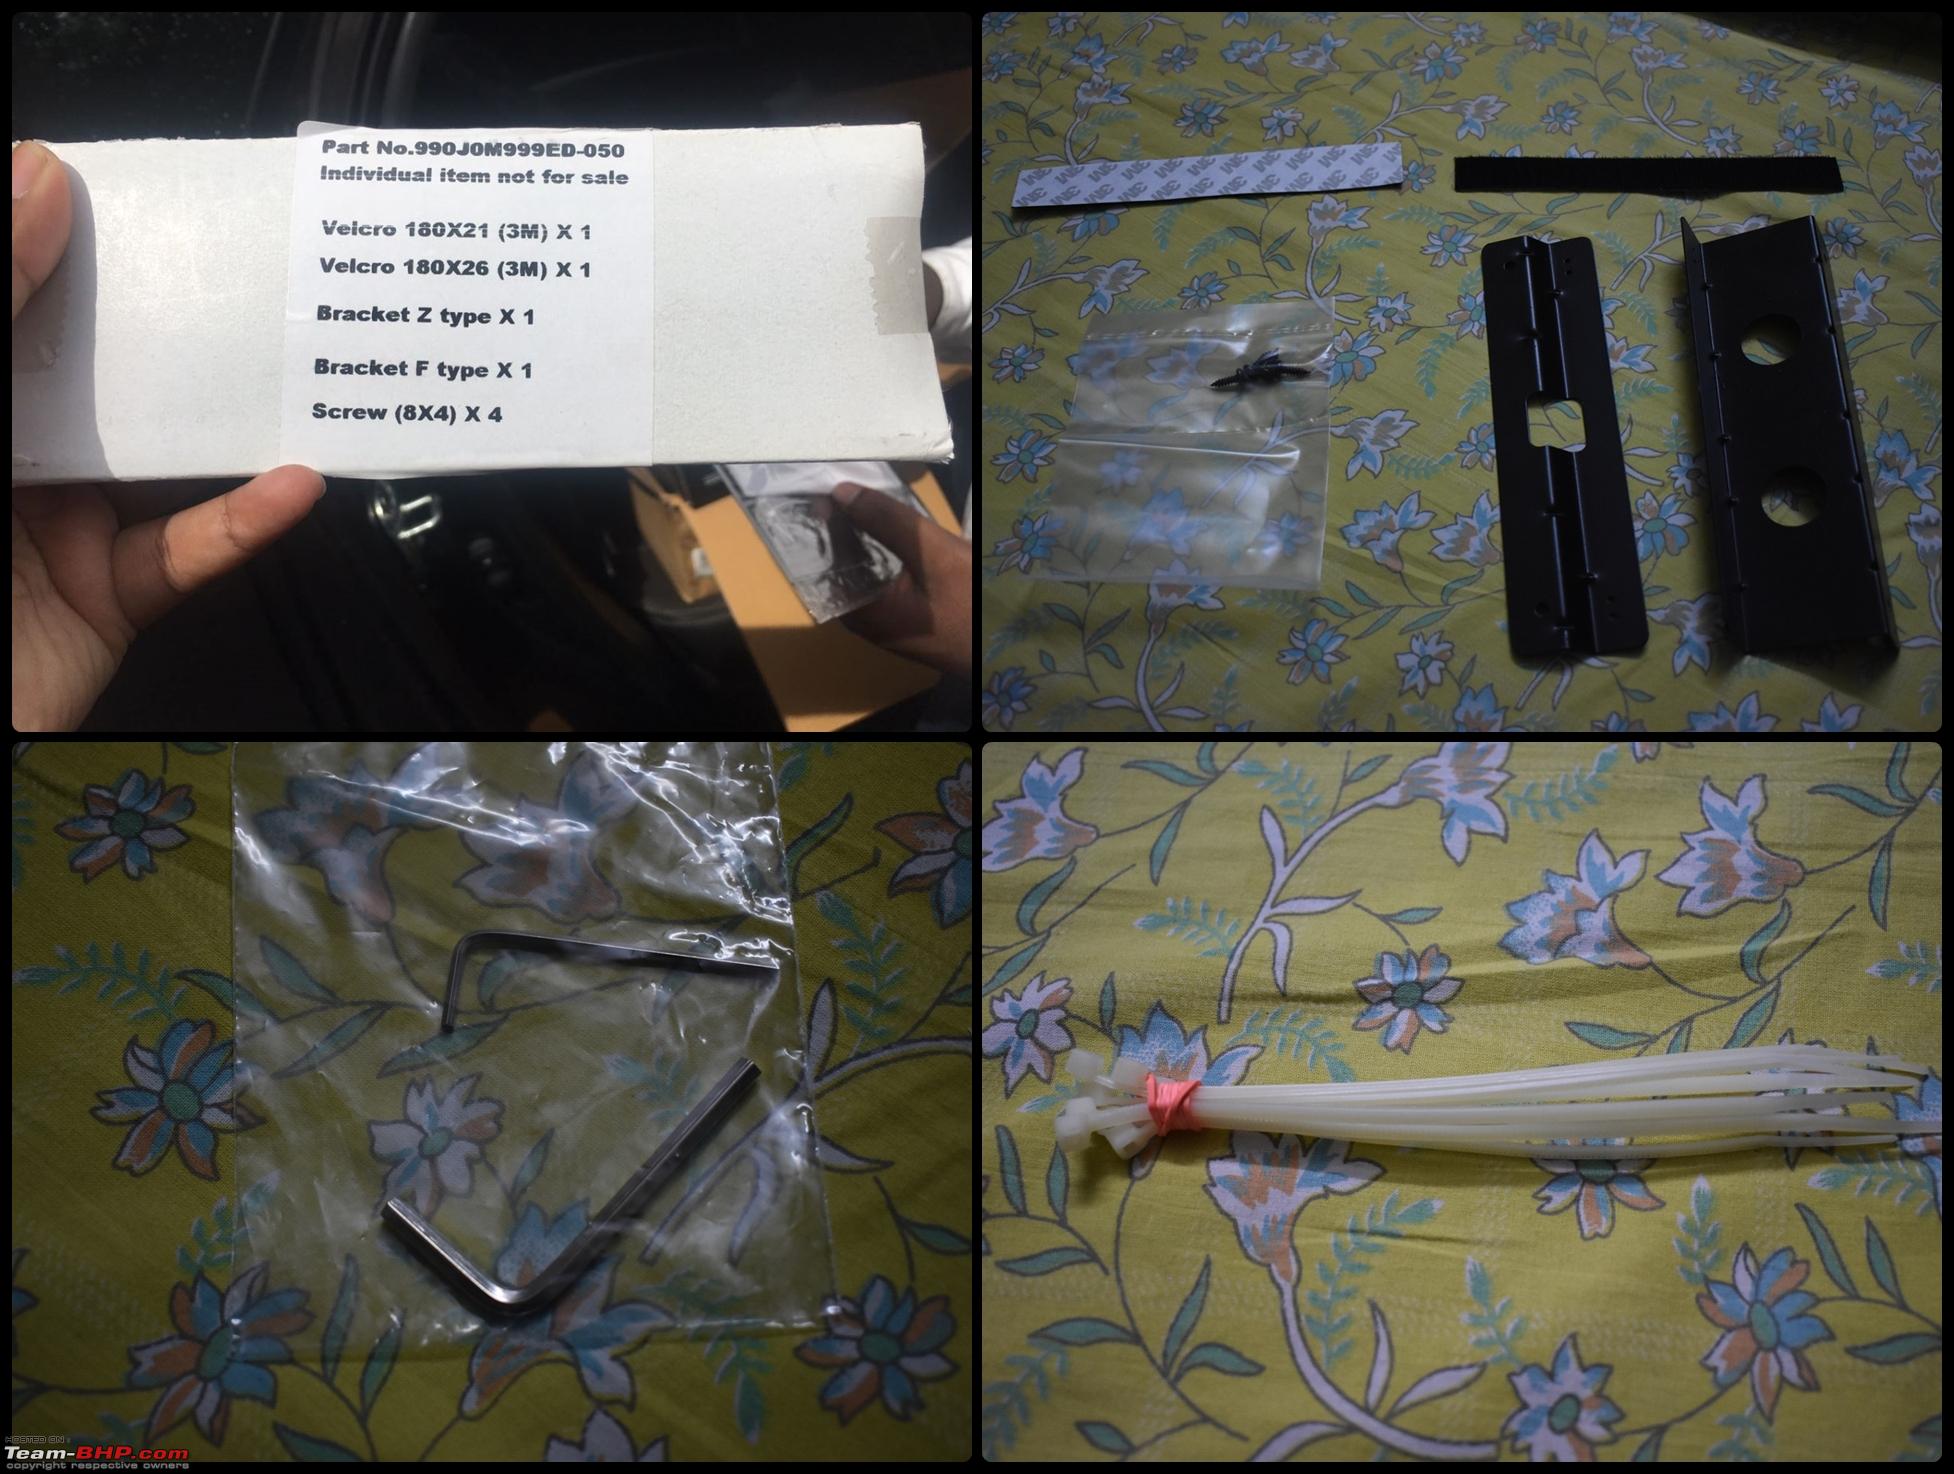
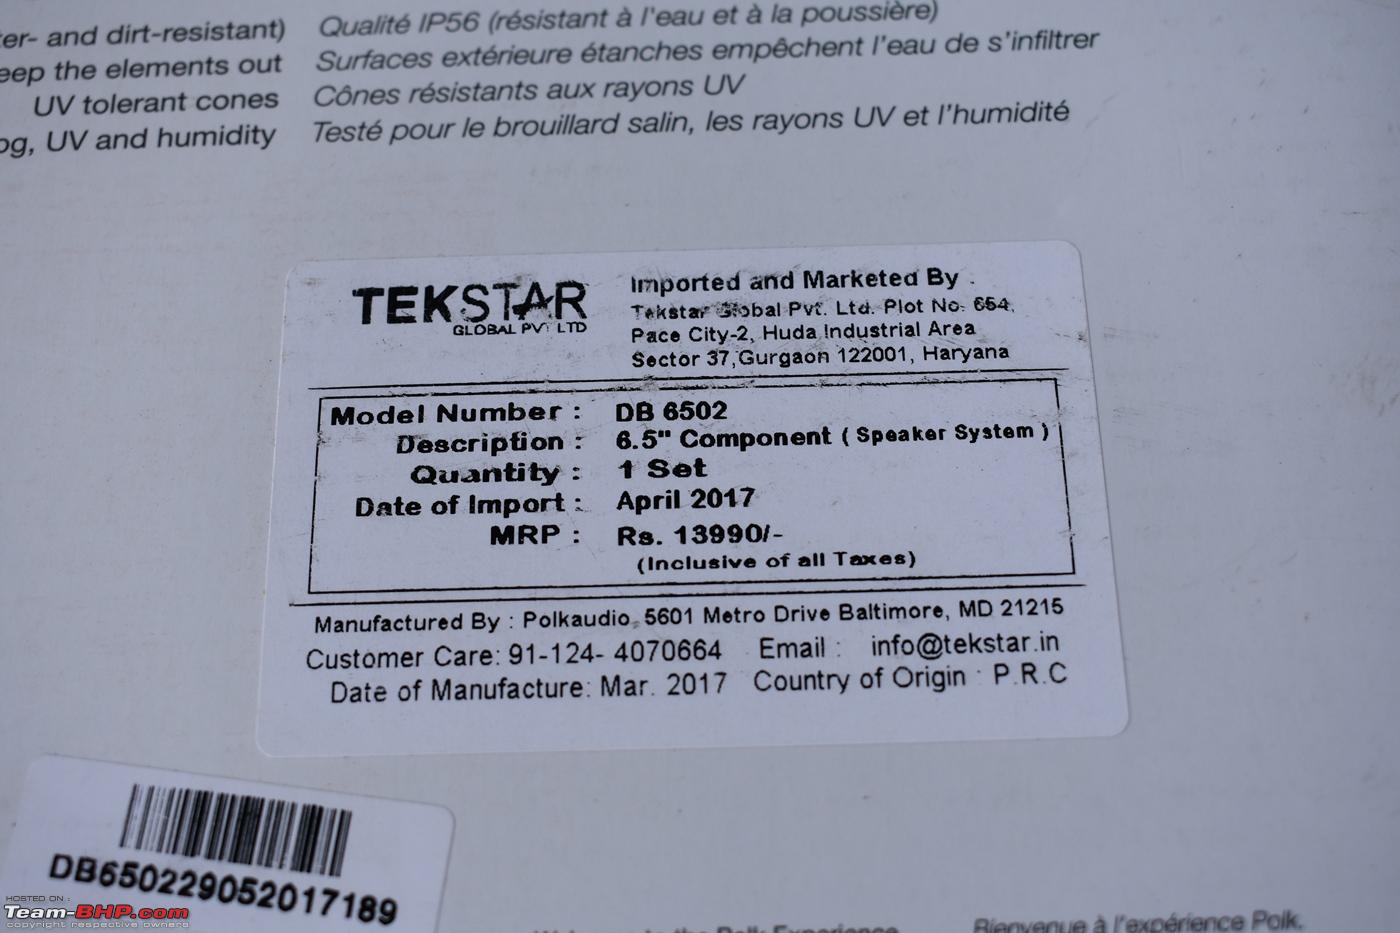
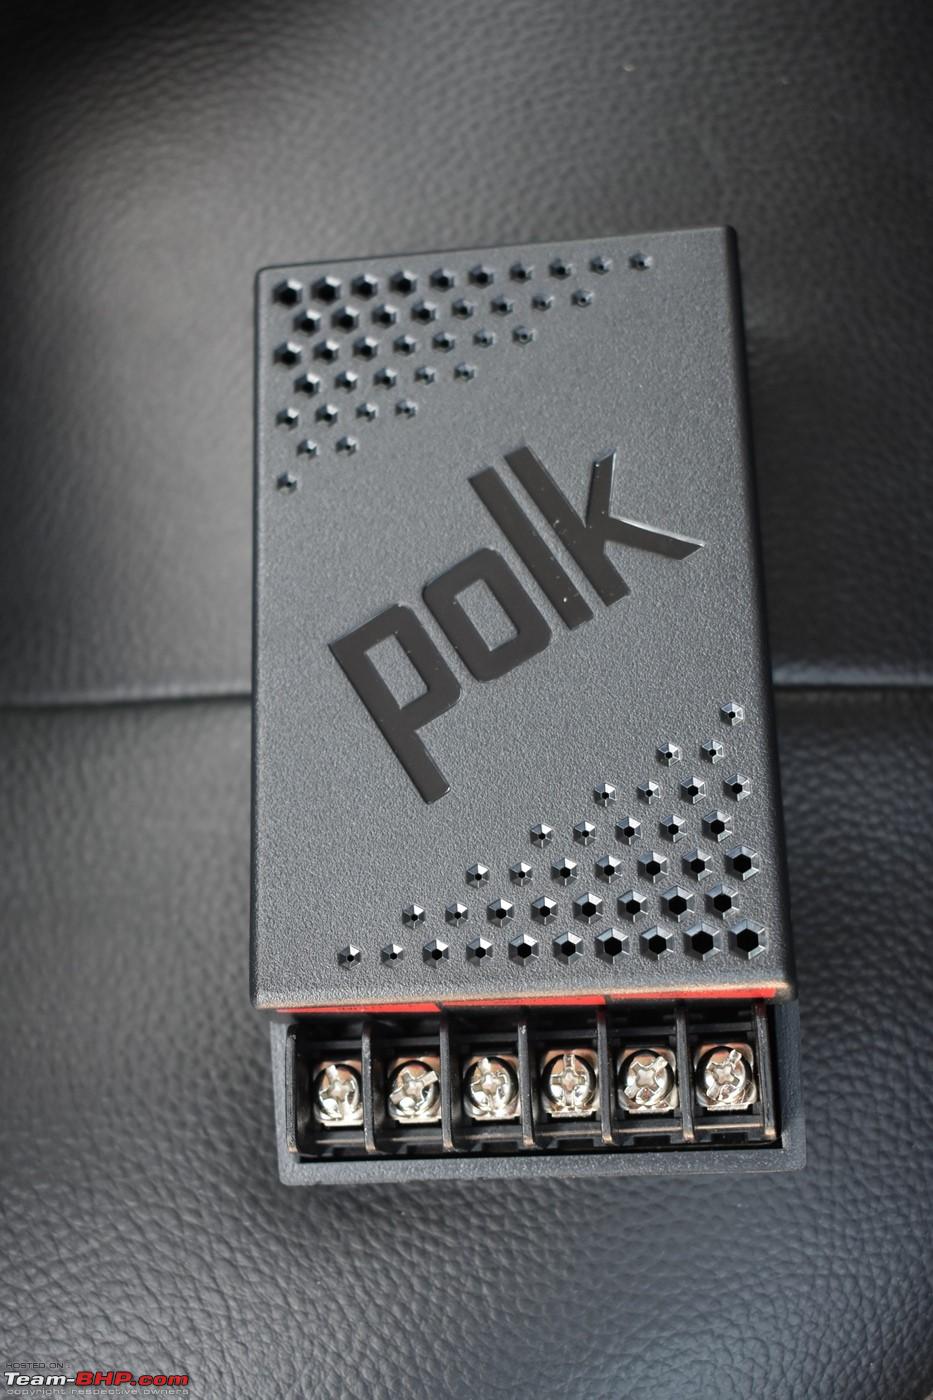
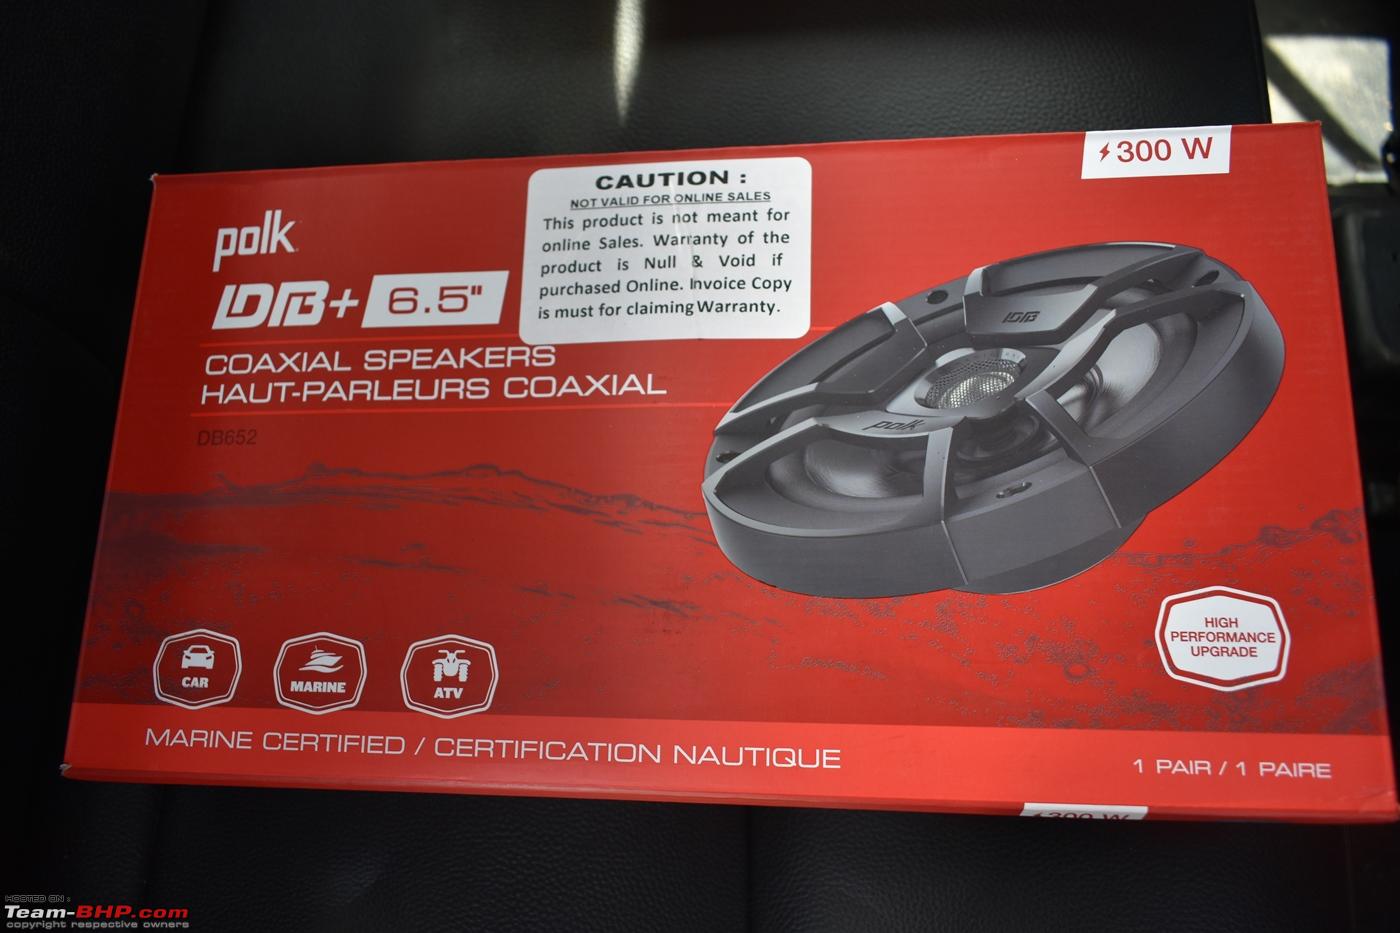
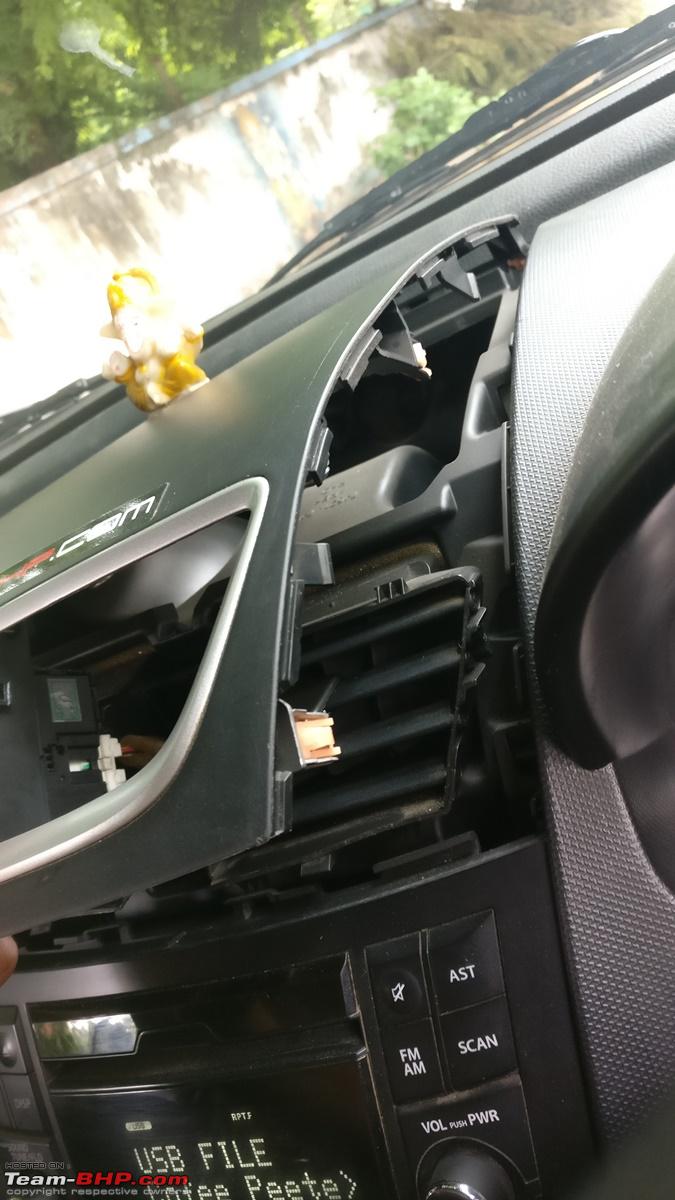
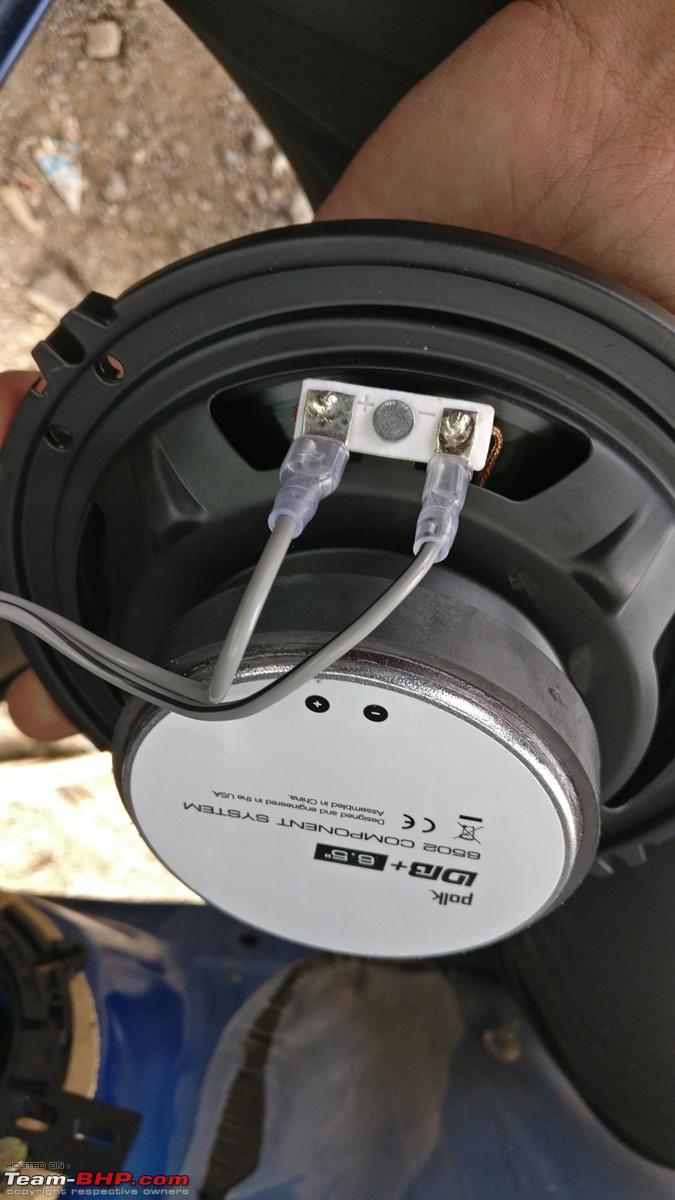
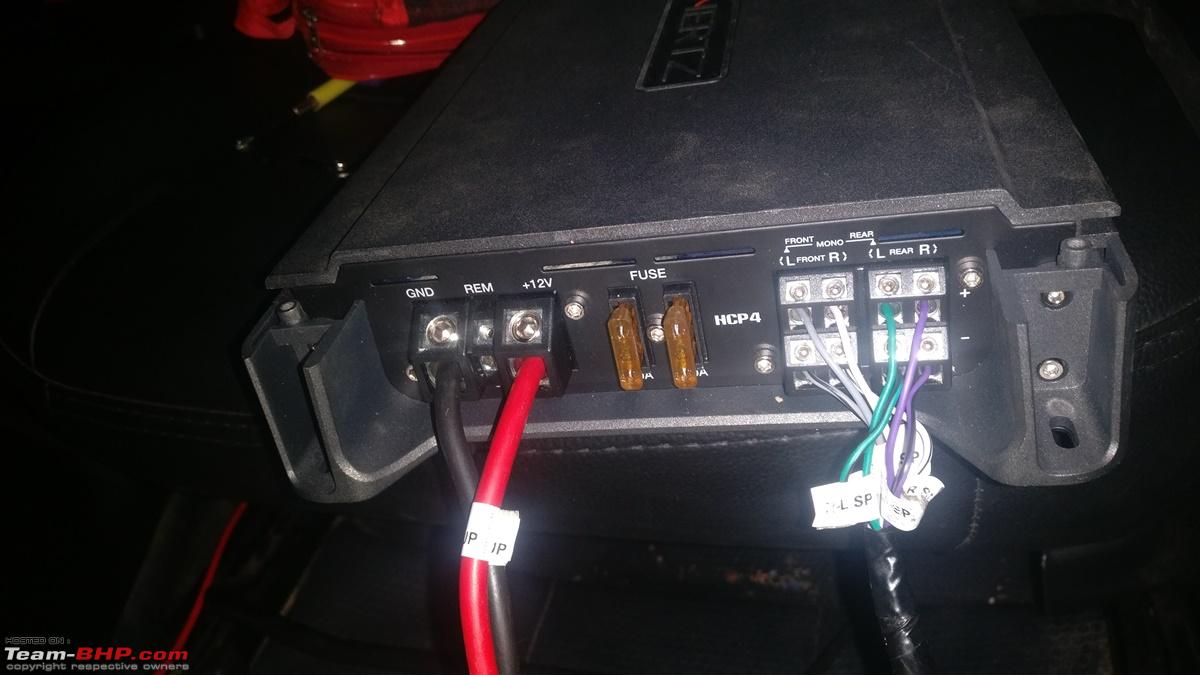
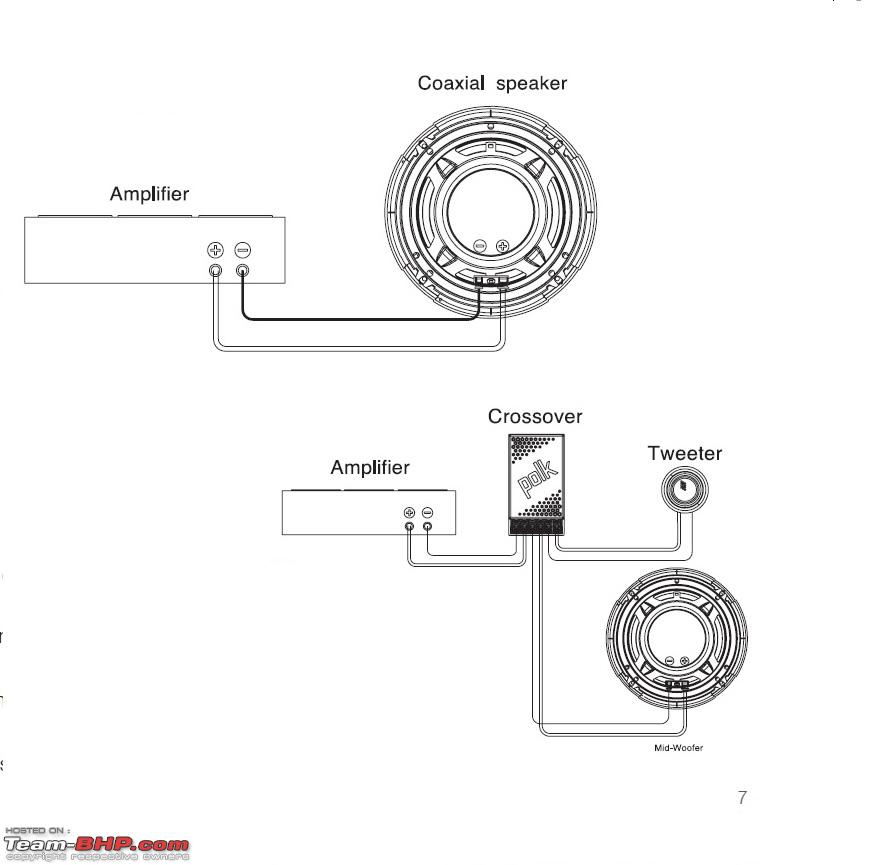
(Had a sane budget of 30K but...I know the sticky thread in ICE section.)
___________________________________

Coming to the Options:

HU: Stock
Front Speakers (Components): Morel Maximo 6 6.5" 240W 2-Way
Rear Speakers (Coaxials): Morel Maximo 6C 6.5-Inch
4 channel Amplifier: Wasn't in the list but somehow got it into picture.

Suggestions for 4 channel amplifier were:
  • Pioneer GM-A6704
  • JBL GX A646SI
  • Sony XM-N1004
  • Hertz HCP 4
  • Blaupunkt - GTA 470 SF
  • Blaupunkt EMA 455

Had even posted on the forum but got no proper response plus no place in Hyderabad where I could audition so went with reviews and feedback received from friends/BHPians who were using it plus knowledgeable in the audio field.

Not one dealer had Morel Speakers, tried Minister Road, couple of shops in Banjara Hills but no use. So had to strike those two speakers off the list and search for something else. Of the shops that I checked in Minister's Road, was discouraged completely from buying Morel. I was being pushed for Pioneer and Sony.

As days passed by, the amplifier list became smaller and smaller till I reached a point of battle between Blaupunkt GTA 470 SF and Hertz HCP 4.

As I wanted to keep everything in stock as possible, I was enquiring with all if it was possible to get a harness that plugs into the HU of my car and that will connect into the amplifier from where using new speaker cables, I'll connect the amplifier to the individual speakers. Amidst the discussion stumbled upon MGA kits of Hertz that consisted of speakers and Amplifiers. The excited me, enquired for the 4 channel one in Hyderabad and it was at ₹ 15,290 post GST and listening to that price there went my budget of maximum ₹10,000 on the amplifier. The advantage of getting the MGA one was it has its dedicated wiring harness which is "Plug and Play".

As time progressed, my plan changed completely and this is what is now in my car.
  • HU: Stock
  • Front Speakers (Components): Polk Audio dB+ 6502 (300W)
  • Rear Speakers (Coaxials): Polk Audio dB+ 652 (300W)
  • 4 channel Amplifier: Hertz HCP 4 (760W)
  • No damping;
  • MGA wiring harness

The Setup that would make into the car is resting in its respective boxes
Upgrading my Swift's ICE system-set.jpg

Yes, I know what is running the minds of you all since I haven't damped' the car so the sound quality will be a waste due to panel vibrations etc. I accept the fact but spending 12,000 worth money on 6 month to-be-retained car is meaning-less. The car in question that I look to replace my Swift with is, the S-Cross 1.6 (Facelift) which will be in October or so. Things will be clear by then if the 1.6 is to stay or not!! If I get my hands on that car, good enough else I go to my original plan of retaining the car till 2,00,000 kms and the first thing I will do is damping the 4 doors.

I have a 4-gauge Amplifier wiring kit on the way from USA that should come in a month or so plus will be adding a 'sub-woofer' when I migrate the setup to the next car.

Being a D.I.Y work, I took the help of Mr. Warun during the installation. For suggestions plus continuous brain eating on WhatsApp it was BHPian Lovetorque (Mr. Jiji), Mr. Krish, BHPian interc00led, Mr. Sandeep Thadani, BHPian Keynote (Mr. Nagarajan), BHPian Sudeepg, BHPian CrAzY dRiVeR, BHPian Abhinav.s and BHPian Leoshashi.

Sincere thanks to you all for being in support always.

Last edited by a4anurag : 7th August 2017 at 00:41.
a4anurag is offline   (24) Thanks
Old 5th August 2017, 01:59   #2
BANNED
 
Join Date: Oct 2011
Location: Hyderabad
Posts: 12,350
Thanked: 21,411 Times
re: Upgrading my Swift's ICE system

Here's what went into the car:

1. Amplifier - Hertz HCP 4 (760W) 4 channel

The Packaging
Upgrading my Swift's ICE system-1.-box.jpg

Beautiful Logo
Upgrading my Swift's ICE system-2.-beautiful-logo.jpg

The Amplifier (Sturdy and well made - feels like VW's )
Upgrading my Swift's ICE system-3.-amp.jpg

Base of the Amplifier
Upgrading my Swift's ICE system-4.-base-amp.jpg

Connection points and Tuning options
Upgrading my Swift's ICE system-5.-connections-tuning-options.jpg

Manuals (Installation and Owners manual)
Upgrading my Swift's ICE system-6.-manuals.jpg

MGA Wiring Harness (Plug & Play)
Upgrading my Swift's ICE system-7.-whole-harness.jpg

T-Joint connectors
Upgrading my Swift's ICE system-8.-t-joint.jpg

Wiring clearly marked for the individual speakers to be connected on the amp.
Upgrading my Swift's ICE system-9.-individual-speaker-connections.jpg

Power Wire
Upgrading my Swift's ICE system-10.-power-wire.jpg

Ground Wire with ring terminal connected and heat shrinked
Upgrading my Swift's ICE system-11.-ground-wire.jpg

Speaker level-in. Of the two connectors the "F-IN" is also acting as Amp turn on wire (So no need to add a separate Remote turn-on wire from HU to Amp)
Upgrading my Swift's ICE system-12.-speaker-level-inputs.jpg

Other items in the box for installation
Upgrading my Swift's ICE system-13.-items-box.jpg

Specification of the Amplifier
Upgrading my Swift's ICE system-amplifier-specification.jpg

PS: Sincere thanks to BHPian Keynote for helping me get the Amplifier. Thanks man!!

M.R.P (Post GST): ₹15,290/-

Discount (25%): ₹ 3,823/-

Final Price: ₹ 11,468/-

Last edited by a4anurag : 6th August 2017 at 02:02.
a4anurag is offline   (16) Thanks
Old 5th August 2017, 02:06   #3
BANNED
 
Join Date: Oct 2011
Location: Hyderabad
Posts: 12,350
Thanked: 21,411 Times
re: Upgrading my Swift's ICE system

2. Front Speakers: Components - Polk Audio dB+ 6502


The Packaging
Upgrading my Swift's ICE system-1.-upper-side-box.jpg

Contents in the box and the Specification of these components
Upgrading my Swift's ICE system-2.-contents-spec.jpg

M.R.P and the Importer of the item
Upgrading my Swift's ICE system-3.-mrp.jpg

Whole kit
Upgrading my Swift's ICE system-4.-whole-kit.jpg

Miscellaneous Contents in the package needed for the install
Upgrading my Swift's ICE system-5.-contents.jpg

Tweeter
Upgrading my Swift's ICE system-6.-tweeter.jpg

Crossover
Upgrading my Swift's ICE system-7.-crossover.jpg

Connections marked clearly on the Crossover
Upgrading my Swift's ICE system-8.-connections-crossover.jpg

Woofer with and without the plastic grille that is provided (No use to me actually)
Upgrading my Swift's ICE system-9.-speaker-without-grille.jpg

Bottom side of the Woofer
Upgrading my Swift's ICE system-10.-bottom-side-speaker.jpg

Terminals for the connection
Upgrading my Swift's ICE system-11.-terminals-connection.jpg

Coil and Cone of the Woofer
Upgrading my Swift's ICE system-component-speaker.png
a4anurag is offline   (15) Thanks
Old 5th August 2017, 02:24   #4
BANNED
 
Join Date: Oct 2011
Location: Hyderabad
Posts: 12,350
Thanked: 21,411 Times
re: Upgrading my Swift's ICE system

3. Rear Speakers: Coaxials - Polk Audio dB+ 652


The Packaging
Upgrading my Swift's ICE system-1.-upper-side-box.jpg

Contents in the box, Specification of the Speaker plus the MRP
Upgrading my Swift's ICE system-2.-contents-spec-plus-mrp.jpg

Whole Kit
Upgrading my Swift's ICE system-3.-whole-kit-contents.jpg

The Coaxials (Simple looking)
Upgrading my Swift's ICE system-4.-coaxials.jpg

Speaker with and without the plastic grille
Upgrading my Swift's ICE system-5.-speaker-without-grille.jpg

Bottom side of the speaker
Upgrading my Swift's ICE system-7.-bottom-side-speaker.jpg

Terminals for Connection
Upgrading my Swift's ICE system-8.-terminals-connection.jpg

Miscellaneous contents needed for installation
Upgrading my Swift's ICE system-9.-contents.jpg

After enquiring at a Car accessory store in a shop at Ministers Road, Hyderabad through Mr. Sandeep Thadani, got to know that there a lot of fakes being sold so I felt it is better to get them through the official dealer in Hyderabad. First thing done was, got in touch with Polk Audio guys through their FB page. I was re-directed to a company called Tekstar that imports the speakers into India. From Tekstar, I got the contact of the distributor located in Hyderabad who supplies stuff to dealers in the states of Andhra Pradesh and Telangana.

Was lucky to get a chance to audition the Polk speakers (Coaxials only) on their demo unit. Volume was '46' and no distortion of any cracking of output. Clear and smooth as if it's being played at 9 or 10 volume. Was happy with it. Tried a couple of songs at different volume levels (from 6 to 11). Loved it. He was pushing me for a HU change to JVC or Pioneer, I politely told him that these two are reserved for a Stage-II upgrade which will also invoice the subwoofer. He was smiling.

Sat down and bargained hard and got a decent deal on them. Initially he wasn't budging to give me anything more than 10% discount on the two speakers but I could squeeze another 15% from him totalling it to 25% discount. Not sure if it a decent deal of not.

MRP:
Components: ₹13,990
Coaxials: ₹6,990

Discount: 25%

Final Price (including G.S.T):
Components: ₹10,500
Coaxials: ₹5,300

Savings: ₹5,100

Last edited by a4anurag : 7th August 2017 at 08:08.
a4anurag is offline   (16) Thanks
Old 5th August 2017, 22:37   #5
BANNED
 
Join Date: Oct 2011
Location: Hyderabad
Posts: 12,350
Thanked: 21,411 Times
re: Upgrading my Swift's ICE system

Now let's begin with the installation:

Here are the items needed for the D.I.Y:

10 mm ring spanner
Upgrading my Swift's ICE system-10mm-ring-spanner.jpg

Screwdriver set (Both flat and star). I had a battery operated one so made my life much much easier
Upgrading my Swift's ICE system-battery-operated-screwdriver.jpg

MDF Rings (4 numbers) for the speaker installation
Upgrading my Swift's ICE system-mdf-rings.jpg

Speaker Wire - Quaden 16 gauge (99.99% OFC)
Upgrading my Swift's ICE system-quaden-speaker-wire-12-gauge.jpg

Connectors to plug into OE speaker connectors
Name:  Screenshot_20170725211720.png
Views: 26514
Size:  239.9 KB

Socket Set
Upgrading my Swift's ICE system-socket-set.jpg

Crimping tool
Upgrading my Swift's ICE system-stanley-crimping-tool.jpg

Trim panel opening tool set
Upgrading my Swift's ICE system-trimpanel-kit.jpg

Wire Connector/Terminals Set
Upgrading my Swift's ICE system-wire-connectors-terminals.jpg

Nylon Zip ties
Upgrading my Swift's ICE system-zip-ties.jpg


The following post will contain the two steps to required to proceed with the installation:

Step -1: Stereo / Head Unit Opening process

Step -2: Door Pad Opening process

Last edited by Aditya : 9th August 2017 at 08:24. Reason: As requested
a4anurag is offline   (15) Thanks
Old 5th August 2017, 22:46   #6
BANNED
 
Join Date: Oct 2011
Location: Hyderabad
Posts: 12,350
Thanked: 21,411 Times
re: Upgrading my Swift's ICE system

Step - 1: Stereo or Head unit Opening

A) Using the trim panel opening tool, lift the upper panel over the central A/C vents (Marked in Image 1);

B) Once removed, disconnect the hazard light coupler;

C) Using a start screwdriver (Preferably magnetic) to unscrew the head unit holding two screws on the either sides. Be careful as it may fall inside the panels underneath which will make it difficult to trace and get it later.

D) Hold the top part of the HU with one hand and pull it outwards gently to un-seat it from its clips.

E) Once free from the clips, pull out the 4 connectors at the rear of the Head Unit.

Job Done!!

Same is illustrated in the images below:


Using trim panel remover, insert and twist the tool to free the panel from its retaining clips (Areas marked where to insert the tool)
Upgrading my Swift's ICE system-1.-using-trim-panel-remover-tool-gently-insert-twist-lift-panel.jpg

Once free, lift the panel
Upgrading my Swift's ICE system-2.-lift-central-ac-vent-upper-panel.jpg

Disconnect the Hazard Light coupler
Upgrading my Swift's ICE system-3.-disconnect-hazard-light-switch-coupler.jpg

Remove the panel completely so working is easier plus scratches will be avoided
Upgrading my Swift's ICE system-4.-pull-out-expose-screws-holding-hu.jpg

Screws holding the HU are seen below
Upgrading my Swift's ICE system-5.-screws-holding-hu.jpg

Place the hand above and pull the unit outwards gently to free it from its retaining clips
Upgrading my Swift's ICE system-6.-hu-removed-its-holding-position.jpg

Hold the HU in one hand and remove the 4 connectors located behind the HU
Upgrading my Swift's ICE system-7.-hold-hu-gently-pull-outwards.jpg

Connectors removed (Blue one is what interests us!!)
Upgrading my Swift's ICE system-8.-remove-4-connectors-back-hu.jpg

Rear of the HU post connector removal
Upgrading my Swift's ICE system-9.-connections-removed.jpg


_____________________________________

Step - 2: Opening the Door Pads - Process remains same for both the door pads (Front and Rear ones)

In short we need to remove 2 star screws and 1 clip. The door pad is then held by clips which are pulled off by using the trim panel tool kit.

A) Using a star screwdriver, press on the clip located on the outward end of the door pad and then pull it out;

B) Using a panel remover tool, remove the plastic flap behind the door opening lever exposing the star screw. Remove that screw;

C) Use a flat head screwdriver and lift the plastic tab in the enclosure used to hold the door and pull for closing it. Opening that tab will expose a start screw underneath. Remove that screw.

D) Use a panel opening tool and insert it between the pad and the metal frame of the door. Yank the tool outwards gently to free the pad from the retaining clips.

E) Disconnect the coupler located behind and pull the pad outwards to free it completely exposing the speaker and the vapour barrier sheet.

Job Done!!

Same is illustrated in the images below:


Front Door Pad
Upgrading my Swift's ICE system-1.-front-door-pad.jpg

Rear Door Pad
Upgrading my Swift's ICE system-2.-rear-door-pad.jpg

Clip to be removed - Use a star screwdriver and press on the centre and pull the clip out
Upgrading my Swift's ICE system-3.-clip-removed.jpg

Using the panel remover tool, pull out this plastic flap to expose the star screw behind which needs to be removed
Upgrading my Swift's ICE system-4.-panel-opened-remove-screw.jpg

Panel removed exposing the screw to be removed
Upgrading my Swift's ICE system-5.-panel-opened-expose-screw.jpg

Use a flat-head screw driver and lift the plastic tab to expose the star screw underneath
Upgrading my Swift's ICE system-6.-plastic-tab-lifted-open-screw.jpg

Pull out the two couplers (Two in case of driver side whereas the rest 3 doors have 1 coupler).
Upgrading my Swift's ICE system-7.-pull-out-two-couplers.jpg

Using the trim panel remover tool, insert it between the pad and the metal part and yank it outwards till the whole door pad is free. Pull it out to free it completely.
Upgrading my Swift's ICE system-8.-door-pad-removed.jpg

Door pad off exposing the vapor barrier, Speaker and tweeter.
Upgrading my Swift's ICE system-9.-door-pad-removed-exposing-speaker-weather-proof-sheet.jpg

Last edited by a4anurag : 7th August 2017 at 08:10.
a4anurag is offline   (13) Thanks
Old 5th August 2017, 23:59   #7
BANNED
 
Join Date: Oct 2011
Location: Hyderabad
Posts: 12,350
Thanked: 21,411 Times
re: Upgrading my Swift's ICE system

Amplifier Connection:

Maruti has designed the wiring harness keeping the amplifier location in mind as 'Under passenger Seat' so that is the location I have installed the amplifier rather than behind the rear seat backrest as seen in many installs.

Step - 1: Disconnect the negative terminal of the battery before starting any connections (Very Important!!)

Step - 2: Connect the T-harness couplers to the OE coupler that was disconnected in the earlier post.

Step - 3: Remove the glove box which will help to route the wiring harness from the head unit area to the passenger seat via the steel beam that holds the dashboard.

Step - 4: Remove the inner doorstep panel, the kick panel and the passenger seat.

Step - 5: Route the wiring harness from the head unit point towards the door through the metal rod that holds the dashboard and then downwards to the kicker panel and through the doorstep inner cover passage finally to the passenger seat.

Step - 6: Remove the bolt located behind the kick panel using a 10mm socket and connect the ground wire (Black colour) ring terminal to it and re-tighten that bolt to make the connection secure. Route the wiring along the wiring as done in Step - 5. Using zip ties secure the cabling properly so it is tight and doesn't interfere with anything in the car.

Step - 7: Connect the ground wire to the amplifier and also the Power wire using the Ellen key.

Step - 8: Connect the output wires as labelled for each speaker in the wiring harness as mentioned in the installation manual. No need to run separate speaker wire since it is inbuilt in the T-Harness that was supplied with the Amplifier.

Step - 9: Turn to the other side and connect the "F-IN" and "R-IN" couplers into the Hi-IN just below the 'Auto turn On" button.

Step - 10: Place the amplifier underneath the seat, secure the wiring using zip ties and fit the inner doorstep cover, kick panel and the passenger seat.

We are done!!!

***************************************

Component & Coaxial Speakers Connection

Step - 1: After removing the door pad, remove the OE speaker and tweeter. The speaker is held by 3 screws. Disconnect the coupler located behind the speaker.

Step - 2: Place the MDF rind against the speaker hole and with the help of a marker, make the holes on the MDF rings which is needed to drill in holes to mount the rings on the door. Simultaneously mark the holes required to mount the speaker on the MDF ring. Drill the holes accordingly and mount them on the door.

Step - 3: Connect the tweeter, woofer and input from amplifier to the cross over as marked. I made a small wiring harness that will plug into the OE speaker connector which help me revert to stock when I sell. Mount the crossover securely on the door frame and mount the woofer on the MDF ring with the screws provided.

For Coaxial speakers it is just direct connecting to the OE speaker coupler. No crossover is present for the coaxials.

Last edited by a4anurag : 6th August 2017 at 17:21.
a4anurag is offline   (15) Thanks
Old 6th August 2017, 00:18   #8
BANNED
 
Join Date: Oct 2011
Location: Hyderabad
Posts: 12,350
Thanked: 21,411 Times
re: Upgrading my Swift's ICE system

Images of the Installation:


Negative terminal of the battery removed
Upgrading my Swift's ICE system-1.-battery-negative-terminal-removed.jpg

Doorstep inner cover to be removed
Upgrading my Swift's ICE system-2.-doorstep-inner-cover.jpg

Kick panel to be removed
Upgrading my Swift's ICE system-3.-kicker-panel.jpg

Glove box removed to route the Amplifier wiring harness
Upgrading my Swift's ICE system-4.-glove-box-removed-route-amp-wiring-harness.jpg

Wiring harness routed
Upgrading my Swift's ICE system-5.-wiring-harness-routed.jpg

10 mm bolt behind the kick panel used for connecting the ground wire (Black) for the amplifier connection
Upgrading my Swift's ICE system-6.-bolt-behind-kicker-panel-connect-ground-wire-amp.jpg

Ground wire connected
Upgrading my Swift's ICE system-7.-ground-wire-amp-connected.jpg

Amplifier T-Harness connected to the HU
Upgrading my Swift's ICE system-8.-amp-tharness-connected-hu.jpg

Stock Speaker
Upgrading my Swift's ICE system-9.-stock-speaker.jpg

Speaker removed from the door
Upgrading my Swift's ICE system-10.-stock-speaker-removed-door.jpg

Speaker is held by 3 screws
Upgrading my Swift's ICE system-11.-stock-speaker-held-3-screws.jpg

Connector on the front door is connections for both the speaker and Tweeter merged into 1 connector
Upgrading my Swift's ICE system-12.-front-door-connector-woofer-tweeter.jpg

Speaker Connector closeup
Upgrading my Swift's ICE system-13.-connector-oe-speakers.jpg

Tweeter connection removed
Upgrading my Swift's ICE system-13a.-tweeter-connector-removed.jpg

Wiring prepared to plug into OE speaker connector and the other end to the cross over
Upgrading my Swift's ICE system-14.-wiring-prepared-plug-into-oe-speaker-connector.jpg

Crossover with its connections (L to R: Input from Amplifier, Woofer and Tweeter)
Upgrading my Swift's ICE system-15.-crossover-connected-l-r-input-woofer-tweeter.jpg

Speakers connected using the wiring provided in the kit
Upgrading my Swift's ICE system-16.-speaker-connections-made-using-wiring-provided-kit.jpg

Woofer mounted on the door pad with the MDF ring
Upgrading my Swift's ICE system-17.-woofer-mounted-front-door-pad-mdf.jpg

Front door with the new speaker read woofer
Upgrading my Swift's ICE system-18.-front-door-speaker-mounted.jpg

Rear door with the MDF ring mounted
Upgrading my Swift's ICE system-19.-rear-door-pad-mdf-ring.jpg

Coaxial mounted on the MDF ring after connected
Upgrading my Swift's ICE system-20.-coaxial-mounted.jpg

Using the Ellen key in the amplifier kit, remove the top cover to facilitate easier connection
Upgrading my Swift's ICE system-22.-remove-cover-using-ellen-key-connect-wiring.jpg

Power Wire connected
Upgrading my Swift's ICE system-23.-power-wire-connected.jpg

Output from amplifier to individual speakers connected as marked
Upgrading my Swift's ICE system-24.-output-speaker-connected.jpg

Power, Ground and Speaker output wires all connected
Upgrading my Swift's ICE system-25.-power-earth-output-speakers-connected.jpg

Speaker level input connected (The F-IN also has a wire that switches the amplifier automatically when the HU is turned ON, just the Auto turn button must be kept pressed)
Upgrading my Swift's ICE system-26.-speaker-level-inputs-connected.jpg

Top cover of the amplifier refit post connections
Upgrading my Swift's ICE system-27.-top-cover-amp-replaced-after-connection.jpg

When the HU is turned ON, the amplifier also turns on. First Red light then it turns Green
Upgrading my Swift's ICE system-28.-when-hu-turned-amp-also-turns-.-red-green.jpg

Passenger seat removed to place the amplifier and secure the wiring
Upgrading my Swift's ICE system-29.-passeneger-seat-removed-place-amp-route-wires.jpg

Temporary arrangement done to hold the crossover (have secured it with screws but forgot to take an image of it)
Upgrading my Swift's ICE system-30.-temp-arrangement-mount-crossover.jpg

Post installation, fired up the system and played the songs I hear to normally and it evident at the start of every song that the clarity has increased plus output is crystal clear. Only downside is the lack of damping is causing some vibrations from the door pads when bass heavy songs are played. At the end of the day I am pretty much satisfied with the setup as it is delivering what I bought it for.

I am only going crazy imagining what will happen when the same setup is heard with proper damping done on the 4 doors using Dampmat!

Sorry as I am not able to write further since I am bad at the technicalities related to audio setup and how to review them.

Last edited by a4anurag : 6th August 2017 at 17:25.
a4anurag is offline   (21) Thanks
Old 6th August 2017, 01:20   #9
BANNED
 
Join Date: Oct 2011
Location: Hyderabad
Posts: 12,350
Thanked: 21,411 Times
re: Upgrading my Swift's ICE system

Issue faced during installation:

After the speakers (front and rear), tweeter and amplifier was connected, I went to reconnect the negative terminal that was disconnected to test the output, only 3 doors were giving the sound. No sound from the front right speaker + tweeter was heard so thought it was some mistake in the connections at the crossover. So rechecked but all fine. Puzzled, went to the amplifier. Was shocked to see one the 4 wires from the speaker level inputs hanging outside from the ATX Molex connector.

So called MGA Quality!!!

Frustrated, disconnected the amplifier and connected the speakers to the HU directly. Next morning ran to Maruti MGA to get warranty replacement but thy didn't entertain or accept warranty for the wiring harness since it was a "small" issue and asked me to go to any electrician. He would rectify it. Warranty is honoured IF the wiring is burnt. Checked with 5 more MGA outlets in Hyderabad and all of them were singing the same song. Tired went to the location in Hyderabad where these types of connectors and terminals are available.

Got 4 ATX Molex connectors and 16 AMP male + 16 AMP female terminals for ₹22.

Reached home and removed the terminal from that connector and did the same for the other 3 ones using the "Terminal extraction tool". Crimped the wired as designated using the open end barrel crimping tool and re-inserted into the new connector that I bought. Ran down straight to the car and tried connecting the amplifier to see if things worked or not. It did indeed!

Operation Successful!


The wire that came off the connector which hampered the front right speaker+tweeter output
Upgrading my Swift's ICE system-1.jpg

Maruti Accessory guys trying a hand on it but gave up
Upgrading my Swift's ICE system-1a.jpg

Terminal extraction tool Set
Upgrading my Swift's ICE system-2.jpg

New ATX Molex 4pin Connectors
Upgrading my Swift's ICE system-2a.jpg

New AMP Male and AMP Female Connectors
Upgrading my Swift's ICE system-2b.jpg

Wire with the AMP female terminal
Upgrading my Swift's ICE system-3.jpg

Open end barrel crimping tool
Upgrading my Swift's ICE system-4.jpg

New AMP terminal crimped onto the wire
Upgrading my Swift's ICE system-5.jpg

Reinserted into the ATX Molex connector
Upgrading my Swift's ICE system-6.jpg

Last edited by a4anurag : 6th August 2017 at 18:05.
a4anurag is offline   (18) Thanks
Old 6th August 2017, 01:37   #10
BANNED
 
Join Date: Oct 2011
Location: Hyderabad
Posts: 12,350
Thanked: 21,411 Times
re: Upgrading my Swift's ICE system

Miscellaneous Images


NO WARRANTY FOR ONLINE PURCHASES - BEWARE ALL!!!
Upgrading my Swift's ICE system-caution-online-sales.jpg

Factory Speaker Grille Badges x 4 nos
Upgrading my Swift's ICE system-speaker-grille-badges.jpg

Stock Nippon speakers vs Polk Speakers - Top Side
Upgrading my Swift's ICE system-stock-vs-polk-speaker-top-side.jpg

Stock Nippon speakers vs Polk Speakers - Bottom Side (Difference in Magnet size is enormous)
Upgrading my Swift's ICE system-stock-vs-polk-speaker-bottom-side.jpg

Stock Nippon Tweeters vs Polk Tweeters
Upgrading my Swift's ICE system-stock-vs-polk-tweeter.jpg

Stock Tweeters
Upgrading my Swift's ICE system-stock-tweeter.jpg

Connections for Components and Coaxials - Taken from Owners Manual
Upgrading my Swift's ICE system-components-coaxial-connection.jpg

Connection for Amplifier Auto Turn-ON - Taken from Owners Manual
Upgrading my Swift's ICE system-amp-turn-wire.jpg

Connections that are needed for Amplifier working - Taken from Owners Manual
Upgrading my Swift's ICE system-connectiosn-made-amp.jpg

Speaker wires Output Colour codes - Taken from Owners Manual
Upgrading my Swift's ICE system-speaker-output-connection-code-colour.jpg

Block Diagram for HCP 4 - Taken from Owners Manual (No idea what it means)
Upgrading my Swift's ICE system-block-diagram-hcp4.jpg

Warning from Maruti Suzuki to Customers to NOT fiddle with the settings on the Amplifier else no warranty and responsibility IF something goes wrong
Upgrading my Swift's ICE system-warning-ms.jpg

Last but not the Least, my Blue Streak after the Audio Install. Looks beautiful, no?!
Upgrading my Swift's ICE system-img_20170804_135957.jpg

Last edited by a4anurag : 6th August 2017 at 16:21.
a4anurag is offline   (35) Thanks
Old 7th August 2017, 08:12   #11
Team-BHP Support
 
Join Date: Feb 2004
Location: Mumbai
Posts: 17,841
Thanked: 77,072 Times
re: Upgrading my Swift's ICE system

Thread moved from the Assembly Line to the ICE Section. Thanks for sharing!

Last edited by GTO : 7th August 2017 at 09:43. Reason: ICE
Aditya is offline   (6) Thanks
Old 7th August 2017, 11:36   #12
BHPian
 
lovetorque's Avatar
 
Join Date: Sep 2015
Location: BLR, TRV, DMM
Posts: 125
Thanked: 132 Times
re: Upgrading my Swift's ICE system

Good to see DIY man has stretched his arms and legs into ICE pool! The ICE upgrade itch is non ending non stopping and I guess you are well prepared for a long swim.
Wonderful set of speakers and amplifier at the price. The detailed narration along with the pics will definitely help many for a DIY on ICE setups
Frankly I would like to see these moves into S Cross 1.6 than continuing in Swift . Keep updating.
lovetorque is offline   (1) Thanks
Old 7th August 2017, 17:25   #13
Senior - BHPian
 
Join Date: Apr 2008
Location: Bangalore
Posts: 2,774
Thanked: 1,272 Times
re: Upgrading my Swift's ICE system

Awesomely detailed write up with pics to boot!! Good to see you stepping into the ICE DIY too. As BHPian Lovetorque has mentioned, it is a never ending sea of options and your set up is perfect for Blue Streak. Once the Silver Lightning enters your garage (hopefully few months down the line), it will be good to move it there too!! Congrats on a well documented and executed DIY. Top notch stuff sirjee!!
abhinav.s is offline   (1) Thanks
Old 7th August 2017, 19:21   #14
Senior - BHPian
 
greenhorn's Avatar
 
Join Date: Apr 2007
Location: KL-01
Posts: 7,745
Thanked: 4,402 Times
re: Upgrading my Swift's ICE system

I hope you learnt something out of this!
You spend a ton buying an amp with a factory wiring harness, and ended up doing most of the hard parts yourself anyway
greenhorn is offline   (1) Thanks
Old 7th August 2017, 20:50   #15
BHPian
 
Keynote's Avatar
 
Join Date: Aug 2015
Location: Bangalore
Posts: 243
Thanked: 997 Times
re: Upgrading my Swift's ICE system

As always, excellent thread with detailed narration which could be of immense help to many. Congratulations on a very well executed DIY project inspite of hitting few road blocks during the course of this upgrade
Keynote is offline   (2) Thanks
Reply

Most Viewed


Copyright ©2000 - 2024, Team-BHP.com
Proudly powered by E2E Networks