Normally I listen to music in my car with the volume set at 'sane' levels. But once in a while I get this urge to crank up the volume towards the 'are you deaf?' mark for a song or two. I don't use a sub-woofer, but with a custom amp set-up and good speaker boxes, I get a good amount of bass; almost reaching SW levels.
The problem with all the bass in a Santro boot is that there was quite a lot of
jarring,
vibration and body panel
resonance (
JVR) that distorted the sound. All the 'drrrr..'s and 'brrrr..'s that accompanied the music ensured that I would quickly lower the volume. This went on for well over a year till one fine weekend in Dec 08 when I decided to do something about the JVR and went down to the car.
First thing was to take out everything from the boot, including the mats, toolkit, spare wheel etc. Next I loaded up a song which was guaranteed to produce the jarring and resonance. There is a tune called 'Thump of Daud' from the RGV movie 'Daud'. The song has no vocals, but has a variety of beats and low frequency sounds that produced some really great 'drrrr..'s and 'brrrr..'s :-)
I cranked up the volume till I started hearing the distortion, noted the volume level where the JVR was bad, put the song on 'repeat' and shut the door to start identifying the areas which were vibrating outside. First culprit was the number-plate, which was a quick fix. Just unscrew the number plate, apply double sided gum-tape liberally behind the plate, along the edges + some strips in the middle and stick it back to the car and tighten the screws well. Nothing else was vibrating outside.
Next I moved onto the rear-seat to check the boot area. [I dont use a parcel tray in my car].
The first thing I saw was that the plastic lid covering the high-mounted stop light inside the car was vibrating at some frequencies. Pulled it out and realized that it is not a 'must have' after all.
Next I saw that that plastic moulding on the inside of the boot hatch was vibrating. First I tried tightening all the screws holding it, but they were already fully tightened. So I unscrewed the moulding and took it off. By now there was a significant reduction in the JVR. The only vibrations I could still hear were from the boot hatch. The panel area around the number-plate depression was resonating with each beat. So I figured out that damping was required in two areas, one was for the plastic inside-moulding and secondly for the rear-door / hatch.
I researched on the damping materials available in the market and read-up on the related threads on T-bhp too. Depending on the extent of damping done and the type of material used, I found estimates of anywhere between 5k to 25k etc. So I thought about DynaMat, FonoMat etc., planned on getting the damping done some day. I was also interested in a fellow BHPian @adityamunshi's approach of using neoprene + natural rubber sheets and that was my inspiration for a DIY. A DIY that I had planned for some lazy weekend.
One evening we were shopping at MK Ahmed's in Indiranagar and I found rolls of 'Yoga Mat' put up on sale. MRP was around Rs.500 and they were on sale for Rs.249. It is made of some kind of rubberish-synthetic material and each roll is around 5ft x 2ft. It felt quite dense and heavy too. [I think it is made of either soft PVC or Polyurethane]
On a whim I picked up a roll of the material. I also picked up a tin of Fevicol SR998 synthetic-rubber adhesive and a brush for applying the same from a hardware shop.
Total cost of material used: Rs.249 for Yoga-Mat + Rs.145 for the gum + Rs.15 for the brush. = Rs.
409/-*
* Half a tin of the glue is still left over, so I should factor in some discount for that. :-)
Considered the pros & cons of this Yoga-Mat approach... if it worked, good! Else I would end up with this material stuck all over the insides of my boot door. Though it would be totally invisible from outside, it would be really tough to take out once stuck and render any further damping attempts difficult. But looking at it logically, it thought that it should work. It will absorb some amount of vibrations and in any case, it will add mass / weight to the body panel and the plastic moulding. It may not be as good as the bitumen based damping sheets, but should suffice for my purpose. Decided to take the plunge.
Used a news-paper to prepare some rough stencil-patterns of the plastic moulding insides and used the patterns to mark and cut the mat. Applied rubber gum liberally on both the mat + the moulding and stuck them when the gum was almost dry. [Read usage instructions on the gum box]. Apply pressure with a cloth and it sticks fast. Repeated the process again to add in a second layer of the material. The plastic moulding now felt heavier and produced a lot less noise when tapped on. Left it to dry and moved onto the car.
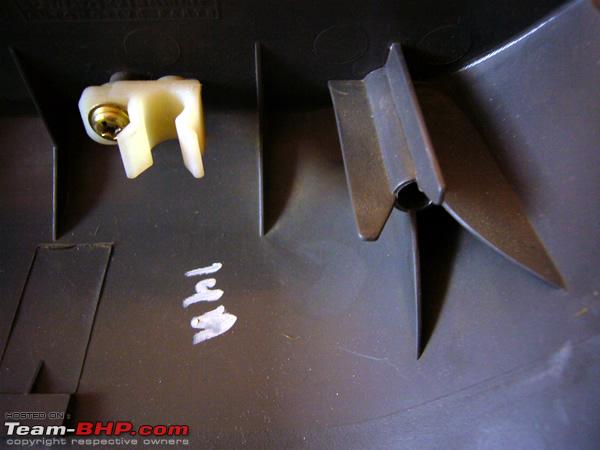
Before you start 'sticking around', take a good look and understand the wires, moving parts and any other electrical - mechanical components inside the hatch and ensure that you don't interfere with their movement or accessibility.
Since it is quite difficult to get a single stretch of sheet stuck along the insides, I decided to cut the mat into patches of around 5 inches x 10 inches and started covering the insides of the rear panel. Apply gum liberally on both surfaces and stick while the gum is still wet, this gives you opportunity to slide and correct the alignment of the strips. I continued the process till I completely used up the material. Wherever there is not enough space, cut the material into smaller strips. In the central areas around the number plate depression, I used two layers.
Let the gum to dry overnight with the windows slightly open (The solvents from the gum have to be let out of the car).
Next day I found the material was stuck fast, I fitted back the plastic moulding and tightened all the screws. With my fingers crossed I played the same 'Thump of Daud' song again at the same volume levels and viola! No JVR !!! I cranked up the volume a little further and I still did not notice anything. Stepped out of the car and there was no vibrations that I could hear from outside, only the song was audible.
Only when I cranked up the volume close to max, I could hear a little resonance from the outside, but it was from near the C-pillar / Roof areas. Besides, if I were to listen to music at these levels for more than a few minutes, I would be rendered deaf and the resonance / vibration problem would be solved permanently, wouldn't it? ;-)
My next thought was to repeat the Yoga-Mat treatment on the C-Pillars & Roof etc. But realized that it would be a pointless exercise since there was no JVR now at the volumes I wanted to crank up to and then some more. So why overdo it?
Some cons from this exercise:
[1] You will end up 'sniffing glue' for quite a while when doing the stick-up job and also for a couple of days thereafter till the glue in the car dries up completely. [Drove around with windows down for a couple of days]
[2] If you don't do a good job in the first shot, removing re-sticking the material is quite a pain.
[3] If some day you decide that you need to go in for all the Wurth / Dynamat stuff... the Yoga Mat will probably be quite difficult to get rid of.
[4] This will work only up to reasonable levels of JVR, if you are using a SW and believe in SPL over SQL, then you are probably better off with the professional stuff.
[5] With the additional weight added inside, the hatch will feel heavier, will not get pushed up automatically from the same levels as earlier and the hinges may creak a little at times.
Disclaimer: If you do decide to try this out in the spirit of DIY, I may not be held responsible for any negative after-effects, including and not limited to your car ending up with colorful hard-to-remove rubbery stuff stuck on the insides and erratic behavior by yourself / your passengers after sniffing all the glue for the next couple of days. :-)
Pics follow :
See this plastic hood that covers the High-Mounted-Stop-Light at the top of the rear glass? This was vibrating badly with every beat and singing its own song
It does not have any screws; it is just fixed with two Snap-clamps (white). Pulled it out horizontally. [The snap clamps had turned brittle with age and I broke one while playing around]

The Rear-stop light does not look bad without the cover

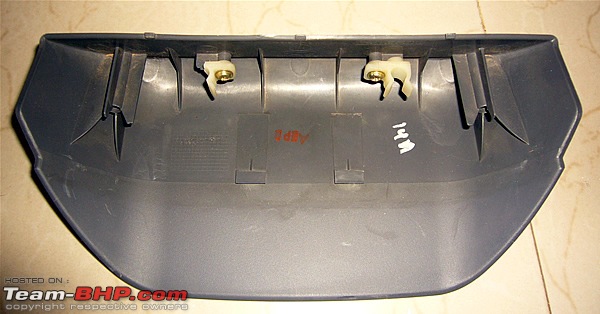
The hatch plastic moulding is fixed with 5 screws and two plastic press pins near the top. To remove, just depress the dot in the middle with a screwdriver, it will pop in by around 5mm then insert a screwdriver along the outer edge and pry the entire thing out. While putting it back, keep the middle plug out by around 5mm, press the pin into the hole completely using the outer edge and then press the middle dot till everything is at the same level.

Started with these

Use patterns made from news paper to ensure minimal wastage

The material can be cut easily with a scissors. You can also see the cross-section & thickness of the material

Clean both surfaces, apply gum on both surfaces, allow it to dry a little, stick and apply pressure with a cloth

One layer is done

Repeat previous steps for second layer.
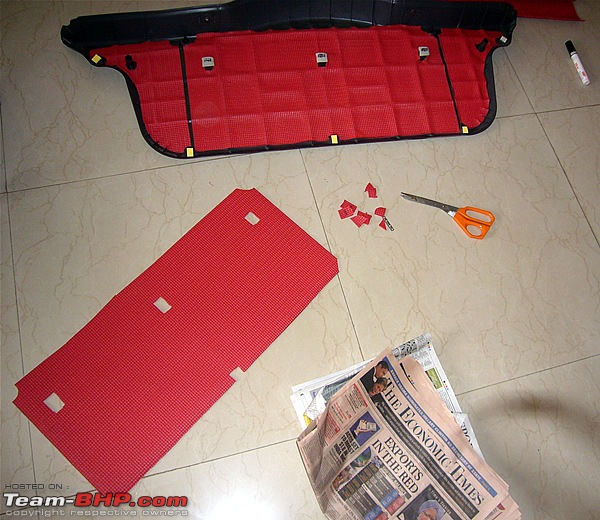
See how I have stuck patches of the material firmly all over the inside of the rear panel? I used a second layer in some places, overlaid equally over two underlying strips, ensuring that enough weight is added onto the panel. If you have any of the stuff leftover, use it to tightly stuff the gaps between the first and second layers of the body panel.

Let me warn you, working on the rear hatch is a pain in the neck, as you will have to open it out fully and work from below.
Next project for some other weekend
try the Yoga-Mat approach on the insides of the front doors, to get a heavier thunk when I shut the doors


 10th January 2009, 09:45

 (7)
Thanks
(7)
Thanks


 ) sucessfully took care of them both


