Team-BHP > Technical Stuff > DIY - Do it yourself
Register New Topics New Posts Top Thanked Team-BHP FAQ


Reply
  Search this Thread
25,156 views
Old 12th November 2013, 13:04   #1
BHPian
 
Join Date: Jun 2012
Location: India
Posts: 610
Thanked: 621 Times
DIY Detailing Journey. Starting with a rotary polisher

http://en.wikipedia.org/wiki/Car_detailing

I have been detailing for 20 months now and all of it has been by hand. During this exciting journey, I tried & tested several waxes/sealants/polishes by hand. I was happy till about a few months ago as the paint was in impeccable condition and anything I tried on it made me happy.

All of that started changing gradually as swirls and scratches started appearing in the last few months due to sheer neglect and lack of time to even clean the car. That lead to a catch 22 situation - the dirtier it got, the lesser I wanted to clean it. It was apparent that my car now required some form of machine correction so I started talking to a few local detailers in town and visited a few. Their lack of knowledge and passion quickly turned me away. Plan B was to rope in some of the existing machine polishing pros in town but the schedules never matched as all of us have families and jobs as well. Plan C was to visit Bangalore to get machine correction done by an absolutely reliable detailer. However, no time to travel due to commitments at work and home. And then it hit me, by looking elsewhere; I was just stalling my own growth as a DIY detailer. Hence, I had to own a machine and I had to own it Now! A little research on the two basic types of machines - DA and Rotary confused me for a bit and there is enough information on the internet to help one decide. So, I picked up a Dewalt DWP849X Rotary and it currently retails at about Rs. 9,500 in Chennai.

The machine came with a 7" Backing plate and an 8" Wool pad. Both of those are useless for a newbie as wool is the most aggressive pad and 7" is a little big for a BP to begin with. I also needed a few pads to begin with. Luckily, Pete's Automotive was running a discount so picked up a finishing black pad and a Paint Cleaner Blue pad in 5.5" size. Now I needed a good quality backing plate in 5" size. For reasons of my own, I have lately been obsessed with a brand called Scholl Concepts. A quick search and a few emails later, I received a Scholl Concepts Medium Backing Plate in 5" size via Royal Mail in UK. It cost me Rs. 1,500 including shipping as Spautopia ships smaller items like BPs, pads and towels at a nominal shipping charge of GBP 4.50. Plus they are an amazingly helpful bunch of people. I also required a good finishing polish to begin with that had very least amount of cut. Phew! All set, let the journey begin.

Wash - Optimum No Rinse
Clay - Ultima Elastrofoam
Clay Lube - Ultima Waterless Wash
Machine Polisher - Dewalt Rotary
Polishing Pad - Chemical Guys Hex Logic Blue Finishing pad in 5.5" size
Polish/Paint Cleanser - Dodo Juice Supernatural Micro Prime
IPA - Apollo Pharmacy IPA
Sealant - Duragloss 105 + Duragloss 601

(I have included a picture of each product used)

After washing and claying, the panel looked terrible. Please note the clay won't normally cause marring. I put undue pressure on it to check if it will cause any marring and secondly if I will be able to polish off such marring.


After 3 passes with the rotary, it cleansed the paint of clay marring, some tough to remove water spots, some very tough to remove fallout etching and surprisingly; most of the swirls. Excellent product and highly recommended for machine polishers. If using a Wax as LSP, you don't need an IPA wipe down and you can retain those lovely oils that will add to the massive gloss.
It is indeed good wisdom to start with the least aggressive polish/compound/AIO and then gradually move up the ladder.
Attached Thumbnails
DIY Detailing Journey. Starting with a rotary polisher-20131019_135150.jpg  

DIY Detailing Journey. Starting with a rotary polisher-20131019_135217.jpg  

DIY Detailing Journey. Starting with a rotary polisher-20131019_135233.jpg  

DIY Detailing Journey. Starting with a rotary polisher-dodomicroprime.jpg  

DIY Detailing Journey. Starting with a rotary polisher-dci0003_3.jpg  

DIY Detailing Journey. Starting with a rotary polisher-index.jpg  

DIY Detailing Journey. Starting with a rotary polisher-uww.jpg  

DIY Detailing Journey. Starting with a rotary polisher-elastrofoam.jpg  

DIY Detailing Journey. Starting with a rotary polisher-cg.jpg  

DIY Detailing Journey. Starting with a rotary polisher-20131019_142033.jpg  

DIY Detailing Journey. Starting with a rotary polisher-20131019_150057.jpg  

DIY Detailing Journey. Starting with a rotary polisher-.jpg  

DIY Detailing Journey. Starting with a rotary polisher-b.jpg  

DIY Detailing Journey. Starting with a rotary polisher-c.jpg  

DIY Detailing Journey. Starting with a rotary polisher-d.jpg  

DIY Detailing Journey. Starting with a rotary polisher-e.jpg  

DIY Detailing Journey. Starting with a rotary polisher-20131007-18.52.59.jpg  

DIY Detailing Journey. Starting with a rotary polisher-601.jpg  

DIY Detailing Journey. Starting with a rotary polisher-dg-105.jpg  


Last edited by Pedaltothefloor : 23rd November 2013 at 20:51.
Pedaltothefloor is offline   (29) Thanks
Old 12th November 2013, 16:23   #2
Senior - BHPian
 
el lobo 6061's Avatar
 
Join Date: Apr 2011
Location: Navi Mumbai
Posts: 2,064
Thanked: 2,256 Times
re: DIY Detailing Journey. Starting with a rotary polisher

Quote:
Originally Posted by Pedaltothefloor View Post
That lead to a catch 22 situation.....
Your post has just added the spark to my situation. Even I'm in a catch 22 situation. Since I own a deep black color car which is now nearing 3 years of ownership the paint has developed lots of scratches & swirls. Though it may look impeccable to an untrained eye, to me there are lots of correction needed.

The only way forward to removing swirls is compounding which by hand was just not cutting it. Given today's clear coat are harder, no matter how much I tried by hand I just couldn't get the required finish. Most of all my shoulder ached like hell.

So it was decided I too needed a good rotary or a DA. Given the cost of good DA like Flex going north of 35000+, it meant no value. Rotary on the other hand are quite affordable. DeWalt is a known brand and it came as front runner considering VFM.

I have a lots of Q's, hoping you could answer them.

1. How did you train yourself in the use of a rotary? Since they are more difficult to use in comparison to a DA.
2. Which compounding product did you use for swirls removal?
3. Which pad have you used for compounding and which one for applying DuraGloss product?
4. How many passes were required for compounding and for applying DG?
5. How much noise does the DeWalt make? Does it make quite unpleasant for the neighbors?
6. How long can you work with a rotary till the vibrations make your hands all tired?

Next time do upload a video of compounding with your DeWalt, which would give more insight how you go about starting the machine, till you stop it.

Great work.
el lobo 6061 is offline   (4) Thanks
Old 12th November 2013, 16:41   #3
BHPian
 
Join Date: Jun 2012
Location: India
Posts: 610
Thanked: 621 Times
Re: A detailing Journey

Quote:
Originally Posted by el lobo 6061 View Post

1. How did you train yourself in the use of a rotary? Since they are more difficult to use in comparison to a DA.
It isn't difficult at all as long as you understand your paint basics - there is a base coat, the color coat & the clear coat. Japanese paints are soft, paints like Fiat are medium and the VAG group paints are hard.
I trained myself by reading the rotary guides available on DW UK and watching youtube videos. Then I used the rotray with a combination of different pads and polishes on several home appliances like the Microwave oven, Refrigerator etc. As long as you know the type of paint you are working with, you will be able to choose the correct pad. As for polishes/compounds, start with the least aggressive and gradually move up the ladder.

Quote:
Originally Posted by el lobo 6061 View Post
2. Which compounding product did you use for swirls removal?
I started with a very mild product that has almost negligible abrasives and it chemically cleans the paint - Dodo Juice Supernatural Micro Prime. It took care of most of my swirls. I have not attempted to remove the scratches yet as that will require a more aggressive compound. I have recently used a more aggressive compound - Meguiar's 105 after gaining some experience with the rotary. I will post a review of that shortly. It is in fact, the most aggressive compound that Meguiar's offers at the moment.

Quote:
Originally Posted by el lobo 6061 View Post
3. Which pad have you used for compounding and which one for applying DuraGloss product?
Pick any good brand of pads either from Lake Country, Chemical Guys Hex Logic or Scholl Concepts and start with the least aggressive one. I picked up the CG Hex pads in Blue and Black. Blue is for using paint cleansers like Dodo Juice Supernatural Micro Prime and Black is for Finishing Polishes like Meguiar's 205 or Menzerna SF4500. You can read about all CG Hex Logic here http://www.chemicalguys.com/Chemical...fx_101hex5.htm
While it is important to pair the polish and the pad correctly, most polishes can be used with different pads to achieve a different result. For Example, you can use Meguiar's 105 with a Yellow pad to remove heavy defects and the same polish with an Orange pad for medium defects.

I applied the Dg 105 sealant by hand using a soft foam pad from Meguiar's.

Quote:
Originally Posted by el lobo 6061 View Post
4. How many passes were required for compounding and for applying DG?
I used six passes with the rotary using the Zenith point technique. First pass at 600RPM, second at 1,000 RPM and third at 1,500 RPM. Then the next three passes in the reverse manner from 1,500 to 1,000 to 600 RPM.

Quote:
Originally Posted by el lobo 6061 View Post
5. How much noise does the DeWalt make? Does it make quite unpleasant for the neighbors?
It is way quieter than you can imagine. The cheaper rotaries like Skil and Bosch are very noisy.

Quote:
Originally Posted by el lobo 6061 View Post
6. How long can you work with a rotary till the vibrations make your hands all tired?
Rotary heats up compared to a DA. It's not a bad thing as part of how it works is through heat also. The ideal way to use a rotary is to complete a section and then switch it off for 2 minutes. Both the machine and the human get a break and cool down.

Last edited by Pedaltothefloor : 12th November 2013 at 17:03.
Pedaltothefloor is offline   (8) Thanks
Old 12th November 2013, 16:43   #4
Senior - BHPian
 
blackasta's Avatar
 
Join Date: Aug 2009
Location: WB 26
Posts: 3,406
Thanked: 2,922 Times
Re: DIY Detailing Journey. Starting with a rotary polisher

@pedaltothefloor - nice shine there! Would you mind taking some sun shots next time?
Also - where did you source the dodo juice product from?

Guys - I have a DA and have used it a few times - very easy to pick up and use. It's a Kestrl Deltalyo DAS 6 power plus (same machine as Griots Garage 6inch 2nd gen), and I got it in India. Price is less than half of flex 3401. Let me know if you want details.
blackasta is offline   (2) Thanks
Old 12th November 2013, 17:13   #5
BHPian
 
Join Date: Jun 2012
Location: India
Posts: 610
Thanked: 621 Times
Re: DIY Detailing Journey. Starting with a rotary polisher

Quote:
Originally Posted by blackasta View Post
@pedaltothefloor - nice shine there! Would you mind taking some sun shots next time?
Also - where did you source the dodo juice product from?
Those shots have been taken under the sun, maybe not directly under sunlight. My photography skills aren't up to the mark and under direct sunlight, the flakes pop and I am unable to capture anything. Will try again though.

The Dodo product was gifted to me by a fellow member here @Linuxmanju.
Pedaltothefloor is offline   (1) Thanks
Old 12th November 2013, 18:18   #6
BHPian
 
Join Date: Jun 2012
Location: India
Posts: 610
Thanked: 621 Times
Second attempt with the rotary

The roof was crying for a cleanup after standing in the rains for 4 days gathering dust, bird droppings and what not. Some of the bird droppings had baked in and etched into the clear coat as I did not have time to deal with them for over 4 days. Washed with my favorite Duragloss Rinseless Wash, clayed with Ultima Elastrofoam, compounded with Meguair's 105 on a Scholl Orange Polishing pad and sealed with Duragloss 105 sealant plus Duragloss 601 polish bonding agent. An IPA wipe down was done after compounding. Surprisingly, the Scholl pad allowed good cutting but finished well in a single step. It is a closed cell structure unlike CG Hex pads that are open cell structure. The hood also got another coat of the sealant so now both the hood and the roof have 2 coats of DG 105.

Sorry, no "Before" pictures this time as I just couldn't stand how the roof looked.
Attached Thumbnails
DIY Detailing Journey. Starting with a rotary polisher-20131112-09.42.41.jpg  

DIY Detailing Journey. Starting with a rotary polisher-20131112-09.42.01.jpg  

DIY Detailing Journey. Starting with a rotary polisher-20131112-09.41.47.jpg  

DIY Detailing Journey. Starting with a rotary polisher-20131112-09.41.31.jpg  

DIY Detailing Journey. Starting with a rotary polisher-20131112-09.41.21.jpg  

Pedaltothefloor is offline   (11) Thanks
Old 13th November 2013, 12:16   #7
BHPian
 
Join Date: Jun 2012
Location: India
Posts: 610
Thanked: 621 Times
Re: DIY Detailing Journey. Starting with a rotary polisher

I used a different set of products for correcting the roof so here is the detail:

Wash - Duragloss Rinseless Wash
Clay & Lube - Ultima Elastrofoam & Ultima Waterless Wash
Polish - Meguiar's 105 Compound
Pad - Scholl Concepts Orange Foam Polishing Pad
Sealant - DG 105+ 601
Attached Thumbnails
DIY Detailing Journey. Starting with a rotary polisher-dg_0931500x500.jpeg  

DIY Detailing Journey. Starting with a rotary polisher-meguiarsultracutcompound105lg.jpg  

DIY Detailing Journey. Starting with a rotary polisher-pad_orangewl500x500.jpg  

DIY Detailing Journey. Starting with a rotary polisher-dg-105.jpg  

Pedaltothefloor is offline   (4) Thanks
Old 13th November 2013, 19:02   #8
BHPian
 
msaudf's Avatar
 
Join Date: Jan 2009
Location: Cochin
Posts: 269
Thanked: 164 Times
Re: DIY Detailing Journey. Starting with a rotary polisher

Great job!! @Pedaltothefloor
The car's paint finish is almost like glass.
No orange peel to be seen anywhere on the bonnet. With such a smoooth coat I think your car will slip through the air better than other punto's.
msaudf is offline   (1) Thanks
Old 17th November 2013, 23:28   #9
Senior - BHPian
 
PatienceWins's Avatar
 
Join Date: May 2007
Location: Bangalore
Posts: 2,427
Thanked: 834 Times
Re: DIY Detailing Journey. Starting with a rotary polisher

Nice. Have you experienced Duragloss 101 cleaner and polish?
It looks attractive as a 2 in 1 product.
PatienceWins is online now   (1) Thanks
Old 18th November 2013, 07:23   #10
BHPian
 
Join Date: Jun 2006
Location: Bangalore
Posts: 230
Thanked: 155 Times

Quote:
Originally Posted by Pedaltothefloor View Post
http://en.wikipedia.org/wiki/Car_detailing

I have been detailing for 20 months now and all of it has been by hand.
Great job, paint looks like glass. What about interiors? Which dashboard polish you use?
B747 is offline   (1) Thanks
Old 18th November 2013, 11:33   #11
BHPian
 
Join Date: Jun 2012
Location: India
Posts: 610
Thanked: 621 Times
Re: DIY Detailing Journey. Starting with a rotary polisher

Quote:
Originally Posted by B747 View Post
Great job, paint looks like glass. What about interiors? Which dashboard polish you use?
Thanks. I currently use Carpro PERL diluted to 1:3 for all interior and exterior trim including dashboard and leather.
Pedaltothefloor is offline  
Old 24th November 2013, 15:49   #12
BHPian
 
Join Date: Jun 2012
Location: India
Posts: 610
Thanked: 621 Times
Optimum Hyper Compound Tested

I started working on the rotary with very mild paint cleaner and then tried my first compound in my last detailing session (Meguiar's 105). This Friday was my third time with the rotary and I decided to try a different compound to be able to compare the results with M105. This time I chose Optimum Hyper Compound and a Yellow Foam cutting pad from Chemical Guys Hex Logic range. Both are aggressive - the compound and the pad. I finished with Menzerna SF4500 finishing polish on a Scholl Concepts Soft Black Finishing Pad.

DIY Detailing Journey. Starting with a rotary polisher-hyper-compound.jpg

DIY Detailing Journey. Starting with a rotary polisher-hex-yellow.jpg

DIY Detailing Journey. Starting with a rotary polisher-menzerna-sf-4500.jpg

DIY Detailing Journey. Starting with a rotary polisher-scholl.jpg

I made 3 passes on the compound with the rotary at 600, 1000 and 1500 RPM and then 3 passes at 1500, 1000 and 600. The compounds dusts very less and comes in a spray bottle so is very easy to work with. Very little is required to compound a panel. It is also versatile in the sense that you can increase or decrease the cut by using a different pad.

After compounding, I finished with Menzerna SF4500 finishing polish on a Black Finishing pad. Followed by an IPA wipe down and sealed with Duragloss 105 + Duragloss 601.

There are no "Before" pictures this time due to the sheer excitement to try a new compound and being tired from washing and claying the entire car.

Masked after claying and prior to polishing

DIY Detailing Journey. Starting with a rotary polisher-20131122-13.13.30.jpg

DIY Detailing Journey. Starting with a rotary polisher-20131122-13.13.36.jpg

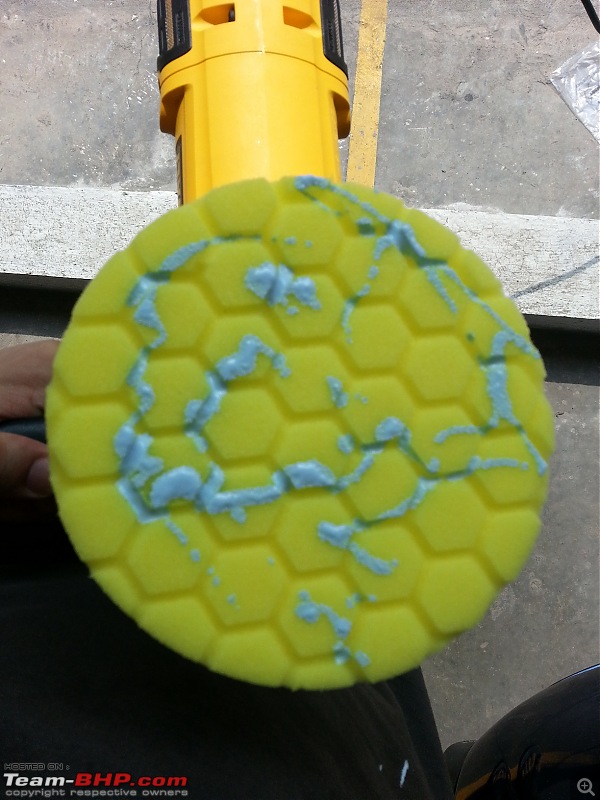
Primed pad ready to compound

DIY Detailing Journey. Starting with a rotary polisher-20131122-13.15.37.jpg

Kissing the finish prior to compounding

DIY Detailing Journey. Starting with a rotary polisher-20131122-13.16.38.jpg

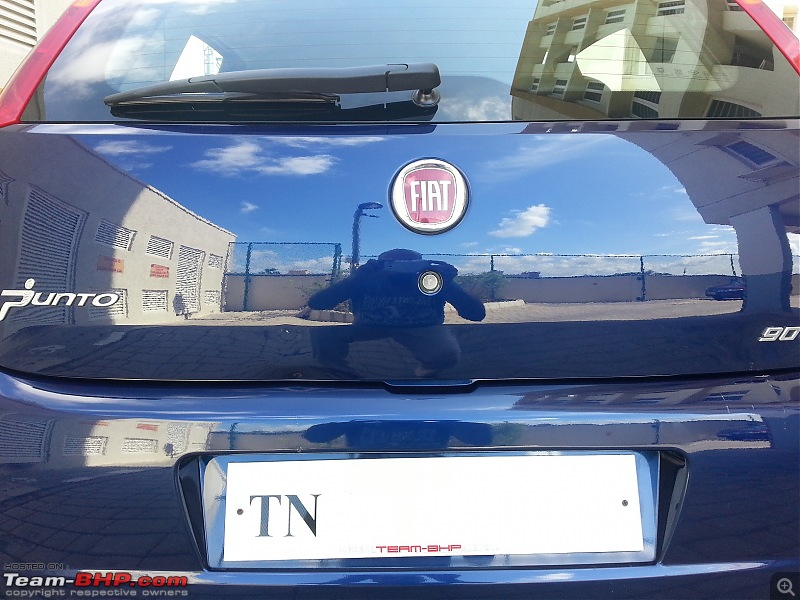
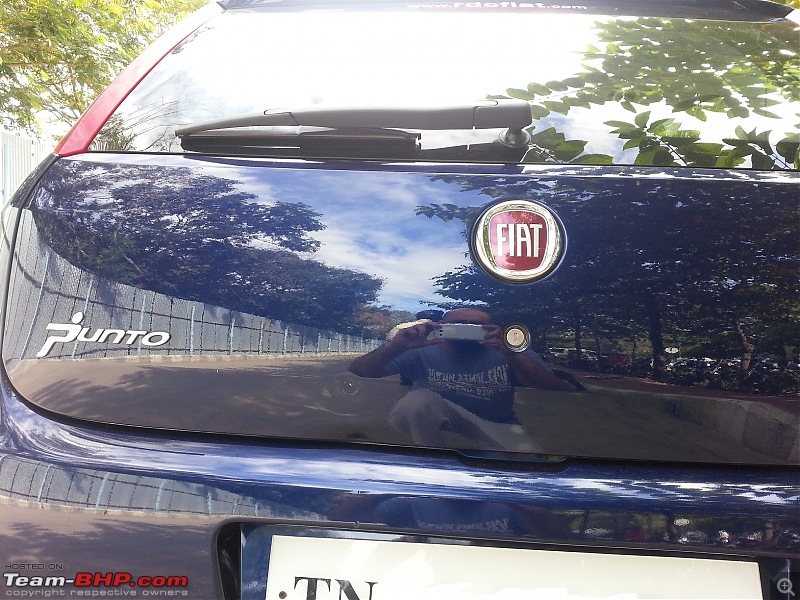
After Shots

DIY Detailing Journey. Starting with a rotary polisher-20131123-13.11.40.jpg

DIY Detailing Journey. Starting with a rotary polisher-20131123-14.32.37.jpg

DIY Detailing Journey. Starting with a rotary polisher-20131123-13.11.53.jpg

Last edited by Pedaltothefloor : 24th November 2013 at 19:52.
Pedaltothefloor is offline   (9) Thanks
Old 25th November 2013, 17:12   #13
GTO
Team-BHP Support
 
GTO's Avatar
 
Join Date: Feb 2004
Location: Bombay
Posts: 71,499
Thanked: 309,388 Times
Re: DIY Detailing Journey. Starting with a rotary polisher

Thread moved out from the Assembly Line. Thanks for sharing!
GTO is offline   (1) Thanks
Old 25th November 2013, 17:56   #14
BHPian
 
Join Date: Apr 2013
Location: Bangalore
Posts: 181
Thanked: 234 Times
Re: Optimum Hyper Compound Tested

@pedaltothefloor One question. Do you mind If I steal your car ?. Looks amazing.

Quote:
Originally Posted by Pedaltothefloor View Post
I started working on the rotary with very mild paint cleaner and then tried my first compound in my last detailing session (Meguiar's 105). This Friday was my third time with the rotary and I decided to try a different compound to be able to compare the results with M105.
How do you compare Optimum compound to M105 on a Rotary, which gives longer working time and better lubricity?. Am I correct in guessing that both are SMAT ?.

Quote:
I made 3 passes on the compound with the rotary at 600, 1000 and 1500 RPM and then 3 passes at 1500, 1000 and 600. The compounds dusts very less and comes in a spray bottle so is very easy to work with.
That's a very nice proven technique for a good finishing, which one finishes better (M105 or Optimum) ?.

Thanks for sharing.
linuxmanju is offline   (1) Thanks
Old 30th November 2013, 19:11   #15
BHPian
 
Join Date: Jun 2012
Location: India
Posts: 610
Thanked: 621 Times
Grey Swift Detailed

This gentleman in Chennai read my posts on detailing and asked me what can he do to protect the paint on his new Swift. He was considering spending around 5K at 3M Car Care and the thought of that killed me. Fortunately, he picked up basic DIY detailing very early on and invested in a Jopasu duster, a few good MF towels, Sonax shampoo etc. He doesn't have a covered car park at home or at work. This means his car is subjected to Chennai sun, dust, rain, bird droppings and everything else out there. He did some research and wanted to protect the paint with a good sealant so we explored his options. One thing he was very clear from the beginning was that he wanted maximum gloss and reflectivity. I explained to him about Waxes and Organic Sealants that can have a darkening effect on the paint but he insisted on gloss. He was an ideal candidate for traditional sealants that are famous (or notorious based on your car color) for the "Hard Candy" look. It had to be extremely glossy and extremely durable and I couldn't think of anything other than Duragloss 111.

We reached my place around 2pm this afternoon after a quick lunch at McDonalds. Here's the workflow:
  1. He washed the car thoroughly with shampoo prior to coming over
  2. We dusted the car with Jopasu before proceeding further
  3. Then clayed it with UWW and Ultima Elastrofoam (We managed to get rid of some tough to remove contaminants and he was shocked at the amount of dirt that the clay managed to pull)
  4. Cleaned the paint with the rotary using a Blue Hex pad and Dodo Juice Supernatural Micro prime (The car is just 3 months old with no swirls or scratches. The so called "detailers" would have at least used a medium abrasive polish. Absolutely not required given the condition of the paint and we took the least aggressive approach)
  5. Follow the polishing with a complete IPA wipe down
  6. I was in two minds if I should use my DG 601 before applying the sealant he got along. Though the 601 will reduce the curing time from 12 hours to 1 hour and it also increases the durability of the sealant, it is expensive to import it from the US. So I decided to go ahead & use it anyway and in return asked for a small 50ml sample of the DG111 to try side by side with DG105 on my car
  7. Finally sealed with DG111 and buffed it off. It is a lot of fun to detail when you have company. By the time I finished applying the sealant, he started removing it.
I absolutely loved the paint quality and the color but I never imagined that this color is capable of such reflectivity. Brilliant paint quality, brilliant sealant for this color. I learned a lot today working on a different paint and most importantly, I made a new friend. Some "After" pictures:
Attached Thumbnails
DIY Detailing Journey. Starting with a rotary polisher-20131130-16.53.11.jpg  

DIY Detailing Journey. Starting with a rotary polisher-20131130-16.53.15.jpg  

DIY Detailing Journey. Starting with a rotary polisher-20131130-16.53.35.jpg  

DIY Detailing Journey. Starting with a rotary polisher-20131130-16.53.45.jpg  

DIY Detailing Journey. Starting with a rotary polisher-20131130-16.53.51.jpg  

DIY Detailing Journey. Starting with a rotary polisher-20131130-16.53.57.jpg  

DIY Detailing Journey. Starting with a rotary polisher-20131130-16.55.01.jpg  

DIY Detailing Journey. Starting with a rotary polisher-20131130-16.55.17.jpg  

DIY Detailing Journey. Starting with a rotary polisher-20131130-16.55.37.jpg  

DIY Detailing Journey. Starting with a rotary polisher-20131130-16.55.49.jpg  

DIY Detailing Journey. Starting with a rotary polisher-20131130-16.57.59.jpg  

DIY Detailing Journey. Starting with a rotary polisher-20131130-18.23.22.jpg  

DIY Detailing Journey. Starting with a rotary polisher-20131130-18.23.35.jpg  

DIY Detailing Journey. Starting with a rotary polisher-20131130-18.23.43.jpg  

Pedaltothefloor is offline   (9) Thanks
Reply

Most Viewed


Copyright ©2000 - 2024, Team-BHP.com
Proudly powered by E2E Networks