Team-BHP
(
https://www.team-bhp.com/forum/)
I had recently swapped the radio whip antenna on my Polo to an OEM sharkfin antenna.


The process was fairly simple and took barely 10 minutes. I thought I’d quickly pen down a DIY-guide on how to replace the stock antenna without splicing or trimming any wires which may invalidate the warranty of the car. Unfortunately guys, I failed to click snaps during the process in the hurry and excitement that ensued. Really sorry about that but fret not, I have detailed it as much as I can using some reference images from Google and other sources.
Disclaimer: Please note that if you choose to attempt this DIY, you are doing so at your own risk and I shall not be held responsible for any loss (of warranty or otherwise) or damage incurred as a result of this procedure!
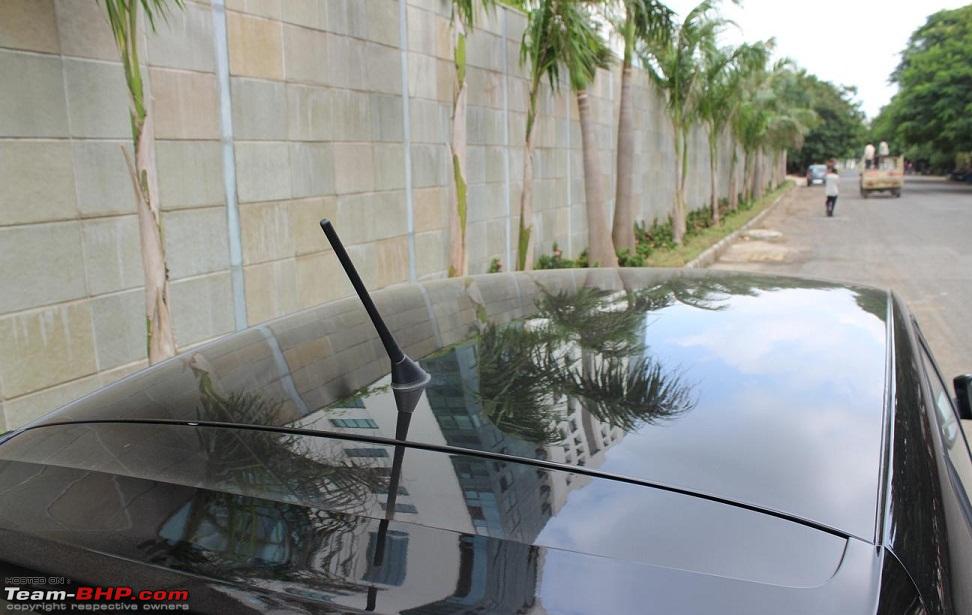
If you recall, the first gen. Polo (and the Vento) had a long radio aerial like this one:
 (Image courtesy: Polo - Team BHP Review)
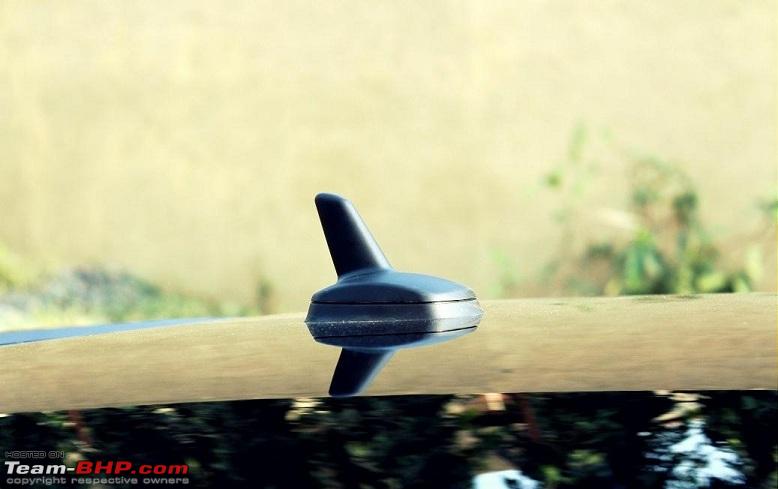
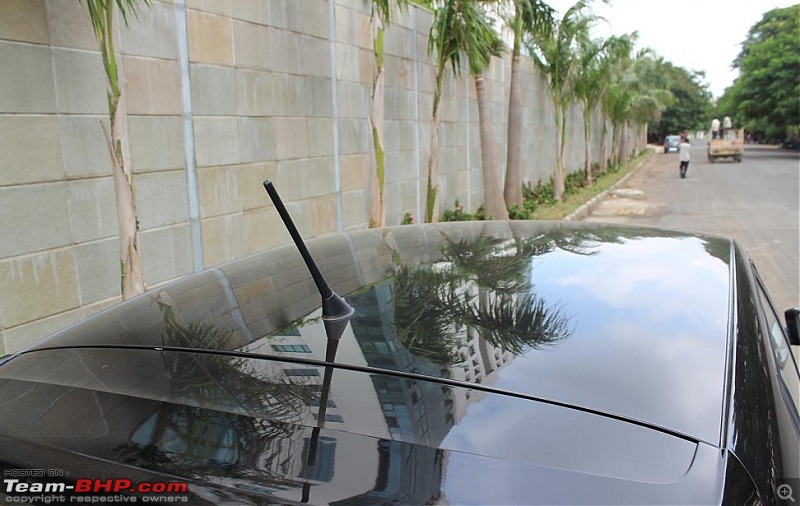
The more recent versions came with a stubby whip antenna like this one:
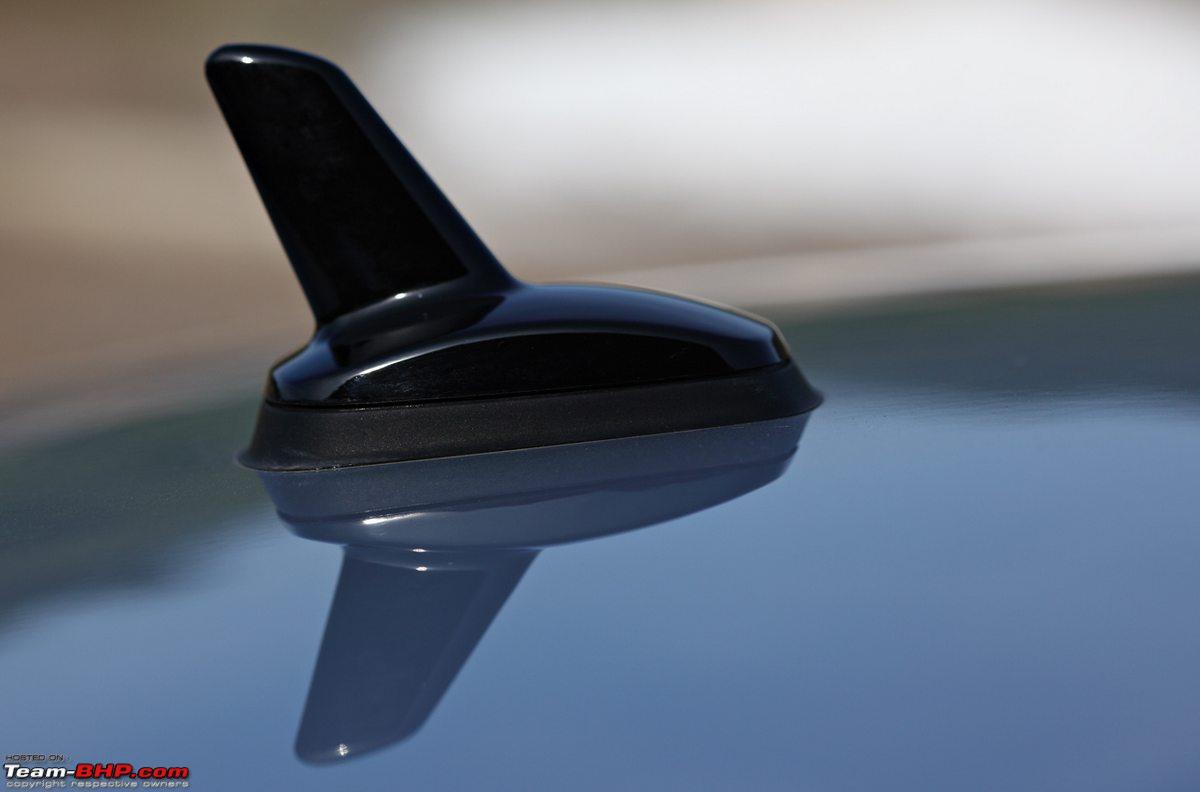
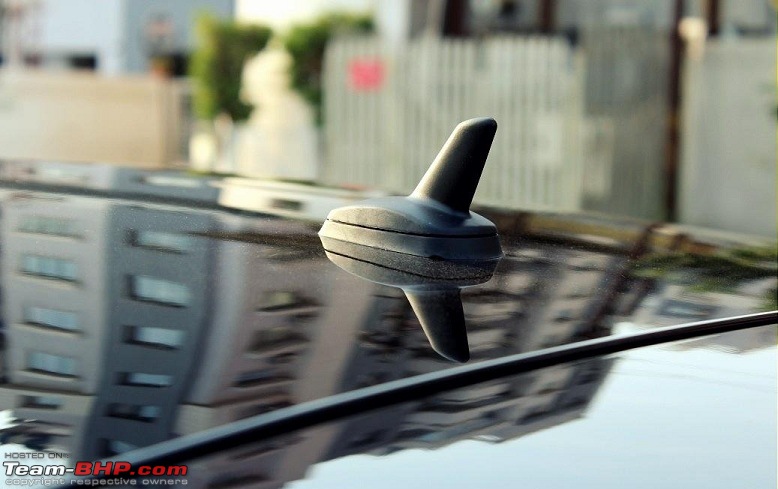
The Jetta comes with a glossy sharkfin antenna like this one:
 (Image courtesy: Jetta - Team BHP Review)
Without any iota of doubt, a sharkfin aerial looks much better than a long piece of plastic protruding out of the car. Most car manufacturers however provide one only on the top-end cars on their list and not the entry level variants probably owing to the exclusivity and the
marginally higher cost of the sharkfin aerial (although the difference is negligible compared to the total cost of the car).
Parts Required:
If you do a search for the sharkfin aerial by the VAG part numbers, there are several variants of the sharkfin aerial available for the VW/Skoda cars. The part number belongs to the
1K0 035 507 _ series where the dash denotes an alphabet. Enter an alphabet there and you have a different type of aerial! Heck, there's even a dummy aerial without any cable (part number: 1K0 035 507 D,
reference image). So which one should we choose for the Indian spec'd Polo/Vento for replacing the stock radio aerial?
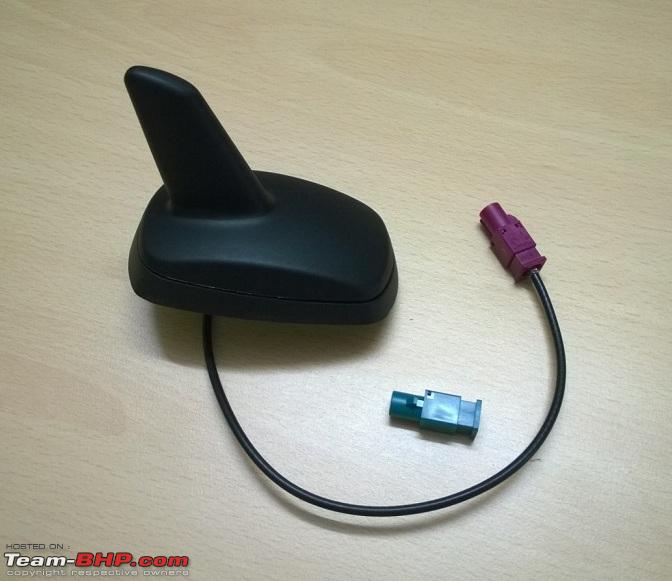
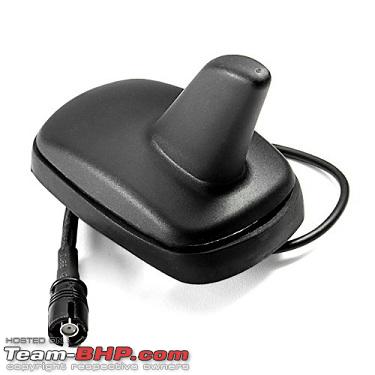
This one:
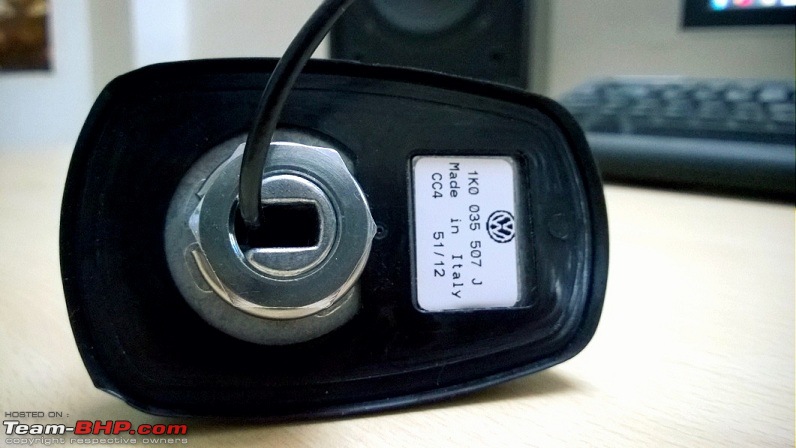

The part number of this aerial is:
1K0 035 507 J as indicated in the sticker. But hold on, you are going to need another part. The replacement FAKRA connector that bears the part number
6Q0 035 575 K. Why this connector you may ask? Without this FAKRA connector, you are going to need to splice/cut the wires because the FAKRA connector (purple) that comes with the sharkfin antenna will not properly mate with the FAKRA jack that came with your car. So these are the only two parts you would need to replace the whip antenna on your car. The total cost was roughly about Rs. 6000 but please note that shipping charges aren’t included in this price.
As luck would have it, one of my friends was posted in the US as a part of his on-site work and he was willing to bring down some stuff so long as it wouldn’t attract customs duties and the items are small so he could squeeze it inside his luggage. I logged into
ECS Tuning (a website that deals with Audi/VW aftermarket and tuning parts) and started my search. Quickly created an account there and when the website prompted me to enter my car but I couldn’t find a Polo there! Why? Because of this:

The Polo doesn't retail there! (But it looks like US may be getting one in the future -
link) And so I entered the Volkswagen Jetta V TDI (remember the gamble part I had mentioned before?!) and when I searched for the antenna, it came up with the results and there was one which matched my requirements and the note mentioned
‘Kit includes connector to replace your whip antenna.’ 
So that seemed more like it. I bit the deal and bought one. Since it was the Christmas weekend, they had sent me an intimation that shipping would take a couple of days more. When the store re-opened, they shipped it by road using FedEx and it reached my friend at Colorado on the 4th day. He sent me a few images. I couldn't wait to receive them in my hands!
Here's the link from ECS Tuning -
ES#12179 Tools required:
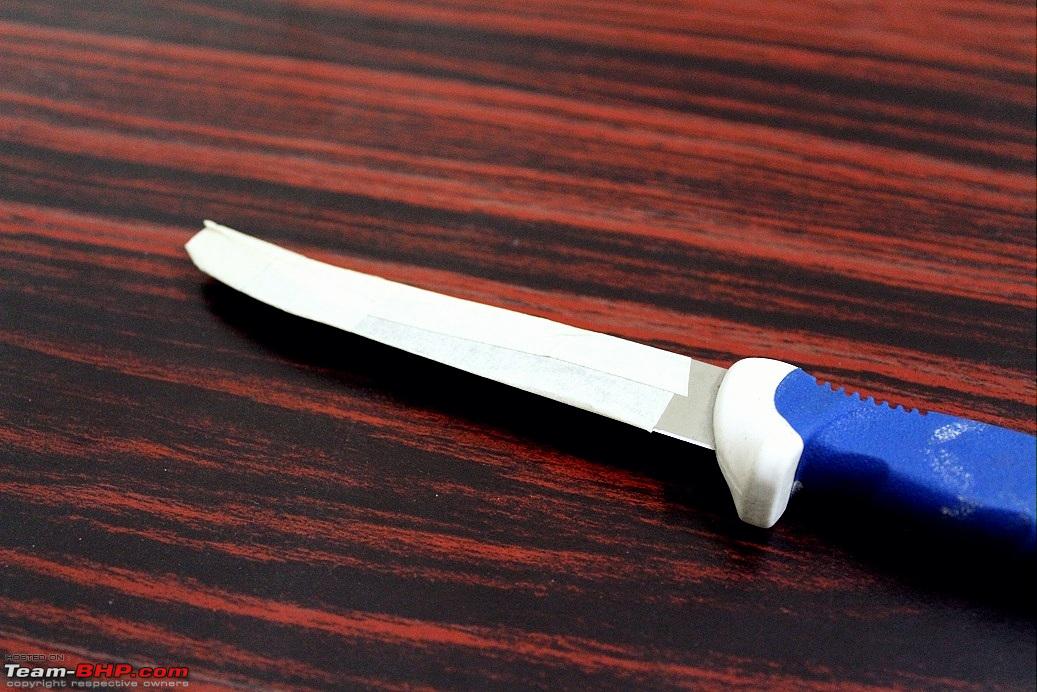
1. A prying tool:
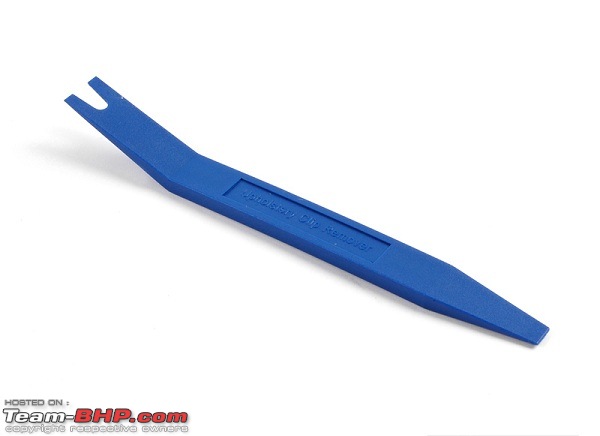
Ideally a plastic prying tool (like the one shown above) is required so as to not leave any marks or scuffs while removing the panels and trims. Otherwise a fine knife and some masking tape over it would do the job.

2. A 24-27 mm double-ended spanner/wrench OR an adjustable spanner.
An adjustable spanner will help in the future too in case you are buying one specifically for this job. Please note that
a box spanner or a ring spanner may not work if the cable from the aerial is routed through the nut. Taparia is a well-known brand for hand tools in India. The quality is top notch and the pricing is reasonable. Just a headsup in case you are in the market to buy one!
Steps:
Before beginning the work, it would be advisable to fold the rear seat (push the front seats ahead and then fold the rear seat-back) so it is easier to work and access the panels/trims. One can easily sit on the folded rear seat without dirtying the upholstery. It is not necessary to remove the parcel tray however. Let’s get to work!
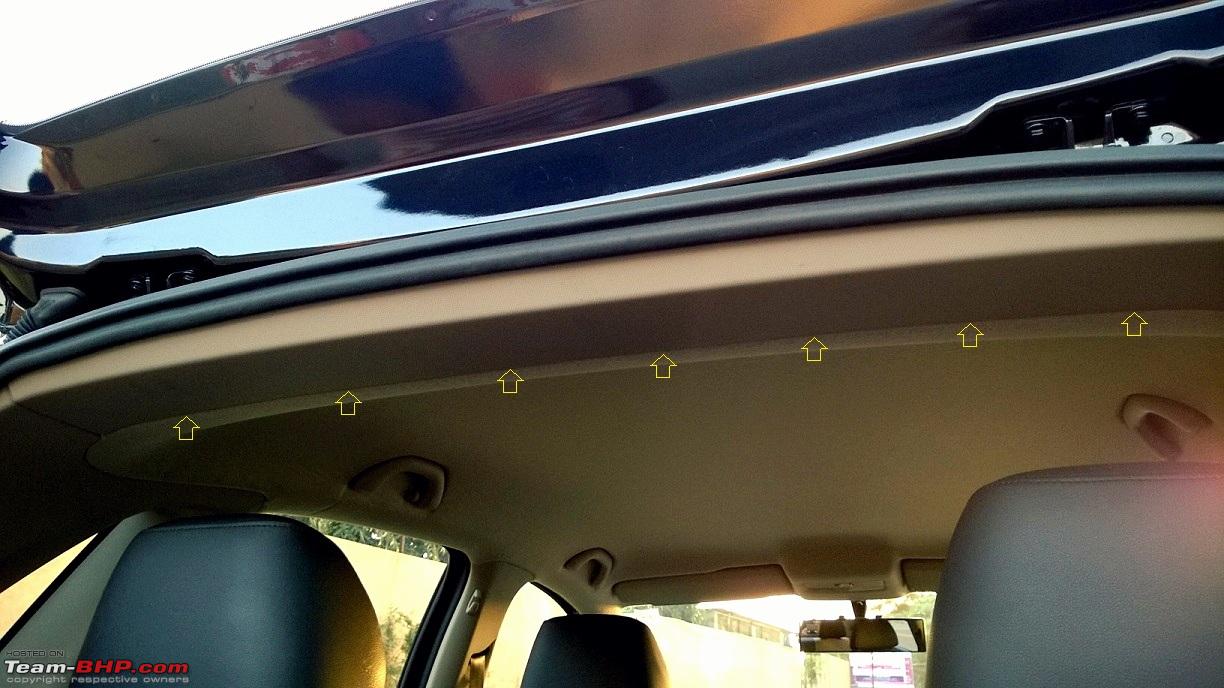
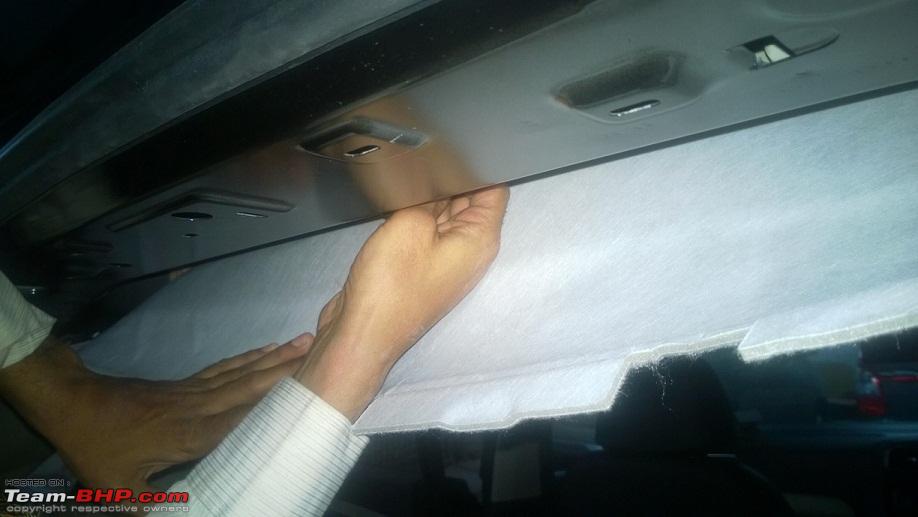
1. Removing the headliner trim:
Gently insert the tool into the gap and remove the headliner trim. This part:

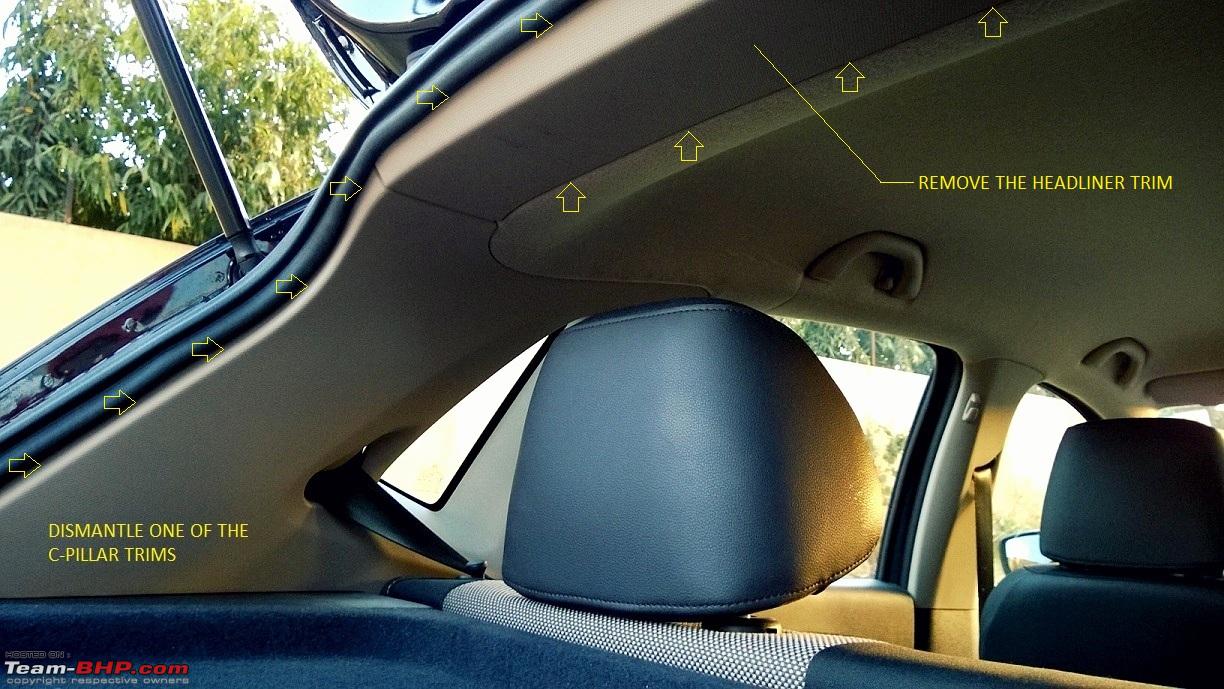
Removing the headliner trim exposes the headliner end and you can actually poke your hand through the gap between the roof of the car and the headliner but this gap isn’t sufficient to unscrew the antenna base. Thus, one of the C-pillar trims need to be dismantled.
2. Dismantling (NOT removing!) one of the C-pillar trims:
The headliner need not be removed completely! Pry open the C-pillar trim by inserting the tool into the gap:

The clips will come off with a ‘click’ sound - do not worry; they will not break easily.

Now pull the headliner down:
 NOTE: Pulling the headliner down will cause some crease to appear along the headliner at the corner of the C-pillar area. DO NOT WORRY, this crease is not permanent and will smoothen itself out within minutes of releasing the headliner.
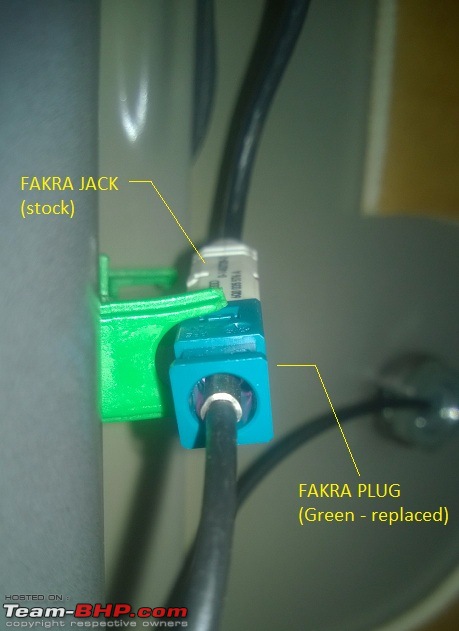
3. Disconnect the FAKRA connector from the jack.
The connector would be secured in place using a plastic U-clamp. Pull the connector off this clamp and disconnect the connector from the jack.
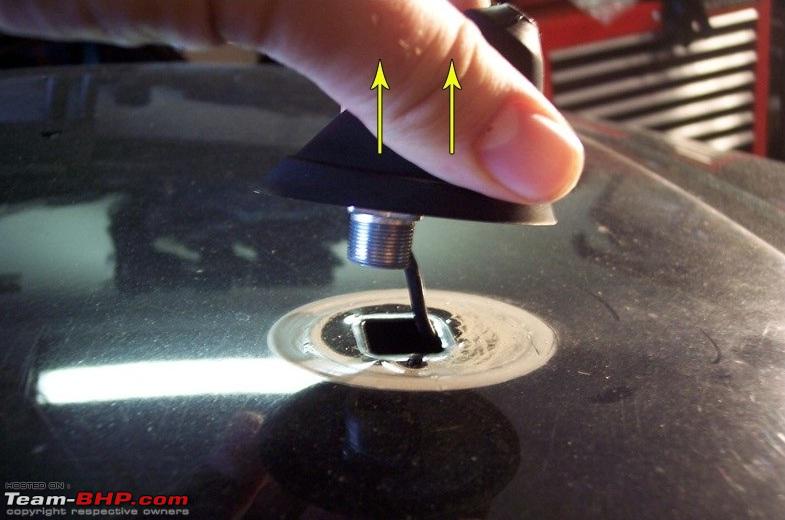
4. Remove the stock antenna base from the roof:
Now that the headliner can be lowered, the nut holding the antenna base is accessible:

Unscrew this nut using the spanner. Just a bit of force for the initial part and the nut can be loosened by hand. Once the nut is off, pull the antenna from the top of the roof:

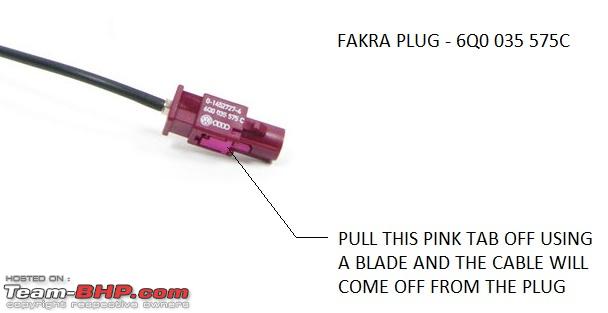
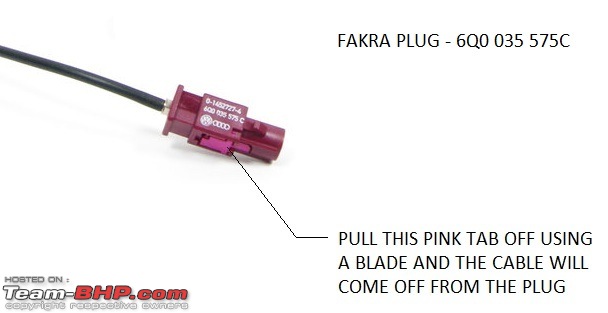
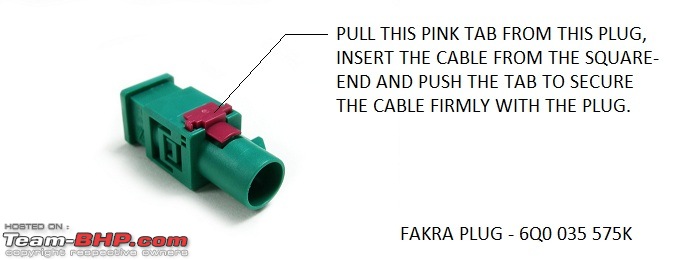
5. Replace the FAKRA connector on the sharkfin aerial:
The FAKRA connector (purple) provided on the sharkfin aerial will not mate properly with the FAKRA jack (purple-white) that came with the car. But that’s alright since the spare FAKRA connector (green) should resolve this issue.
Insert a blade into the tab of the FAKRA connector (purple) and pull it off. The cable should now come off freely:
Now insert the cable into the spare FAKRA connector (green) and replace the tab. It would lock with a ‘click’ sound.
6. Clean the aerial hole from dirt, dust and other debris.
You would notice that the region surrounding the hole has accumulated dust and other particles. Use a soft microfiber cloth and clean it. Use a damp cloth to wipe the region for any marks. Let it dry.

For those among the detailing-freaks, you may wax this area before inserting the sharkfin aerial. :)
7. Installing the sharkfin aerial:
Insert the sharkfin aerial into the square slot:
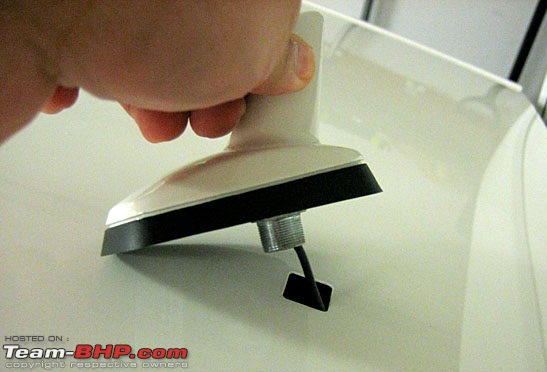
Tighten the nut from inside using the spanner. The aerial should firmly sit on the roof without any movement.
8. Plug the connector with the jack:
Having replaced the FAKRA connector, it should now mate with the jack properly. Connect it and let it lock with a ‘click’ sound. Secure the connector back in the U-tab.
9. Replace and lock the trims into place:
Lock the C-pillar trim and the headliner trims by snapping them back into place.
We are done! Test the reception by enabling the radio.
Please note that many e-commerce sites such as Ali Express and eBay retails similar antennae which are cheaper but without a proper FAKRA connector. Such as this one:

The connector indicated on this one will not mate with the FAKRA jack in the car. Moreover, the O-ring gasket at the bottom of the antenna may not be of good quality and may wear out soon compared to the OEM antenna. This will cause water to seep through the hole and spoil the headliner.
References for images:
1.
Golf Mk V Forums
2.
VW Vortex Forums
3.
Generation Dub Forums
4.
VW US Update on 22 September 2015: Some of the members had reported poor radio reception after swapping the stock aerial with the sharkfin aerial sold from ECS Tuning. Please be aware of this before attempting the swap. Thanks!
Thread moved from the Assembly Line to the Mods Section. Thanks for sharing!
A very clean, efficient and detailed DIY Gannu_1! You have executed & accomplished the DIY quite beautifully.
What I liked about your DIYs (another one on the OE Handrest for your Polo) is the fact that you have ensured zero damage to the factory fittings and hardly anyone would be able to tell if it is an aftermarket or an additional fitment.
Your analysis with the right part numbers is also excellent, considering that VW doesn't sell parts over the counter that you can go and check the catalog and buy the right one like it happens with MGP Dealers in Marutis.
I am sure you will have many such DIYs for your Polo in future that ardent DIY fans like me would be delighted to read.
Thank you Parag! Appreciate the feedback. :)
I just hope and pray that VW doesnt make an issue out of these mods especially the HU upgrade and the radio aerial. These were replaced with the authentic OEM parts unlike the cheap Chinese substitutes so I hope they will consider it in case I have to seek help from the service center for any future repairs/service.
We tried our best to minimize any damage to the components during the process but some things are inevitable in the process because we may not have the right tool at times and we are not used to these modifications and installations unlike a garage. I did not have the plastic prying tool nor could I source it anywhere so I had to make do with that jugaadu tool which actually helped! The aerial swap went without a hitch but we screwed up the hole in the arm-rest (by threading-unthreading the Gr. 8.8 bolt into the Aluminium block about 3 times which wore the internal threading and it came off!) so we had to visit a machining shop in our neighbourhood to fix a bush into this damaged hole.
Absolutely correct regarding the parts and part numbers for the VAG cars but the good thing is Google is always helpful when it comes to searching and hunting for specific parts.
Quote:
Originally Posted by Gannu_1
(Post 3373127)
Thank you Parag! Appreciate the feedback. :)
I just hope and pray that VW doesnt make an issue out of these mod.
|
Fabulous work gannuclap:
You are a master source for OE parts.
I am a big fan of shark fin myself but couldnt source one for the Ecosport so got a shotter , neat looking antenna
Quote:
Originally Posted by Gannu_1
(Post 3373127)
We tried our best to minimize any damage to the components during the process but some things are inevitable in the process because we may not have the right tool at times and we are not used to these modifications and installations unlike a garage. we had to visit a machining shop in our neighbourhood to fix a bush into this damaged hole.
|
Usually, the things I had problems with the most are the use of cheap Philips screws with heads that get stripped. I often try a flat-head screwdriver and if that doesn't work, it probably wasn't meant to be removed with the limited set of tools I have in India. It's times like those that I wish I had a dremel.
BTW, the shark fin antenna is a BMW thing. They're the ones that made it popular.
Quote:
Originally Posted by Gannu_1
(Post 3365958)
If you do a search for the sharkfin aerial by the VAG part numbers, there are several variants of the sharkfin aerial available for the VW/Skoda cars. The part number belongs to the 1K0 035 507 _ series where the dash denotes an alphabet. Enter an alphabet there and you have a different type of aerial! Heck, there's even a dummy aerial without any cable (part number: 1K0 035 507 D, reference image). So which one should we choose for the Indian spec'd Polo/Vento for replacing the stock radio aerial?
This one: Attachment 1206519 Attachment 1206607
The part number of this aerial is: 1K0 035 507 J as indicated in the sticker. But hold on, you are going to need another part. The replacement FAKRA connector that bears the part number 6Q0 035 575 K. Why this connector you may ask? Without this FAKRA connector, you are going to need to splice/cut the wires because the FAKRA connector (purple) that comes with the sharkfin antenna will not properly mate with the FAKRA jack that came with your car. So these are the only two parts you would need to replace the whip antenna on your car. The total cost was roughly about Rs. 6000 but please note that shipping charges arent included in this price.
|
I found this one more appealing. Will this be suitable to Vento?
http://www.ecstuning.com/Volkswagen-...enna/ES342594/
Quote:
Originally Posted by ambadan
(Post 3390585)
|
Shouldn't be a problem since they have mentioned 'For cars with normal radio, optional satellite radio not installed' in the description.
In case you are buying it from ECS, please buy this FAKRA connector
6Q0035575K for an additional 7 USD so you don't have to mess around with the cables by splicing. I could notice a small stub on the green connector bundled with this aerial - this may not mate with the stock FAKRA jack properly.


Don't take a chance. :)
This is brilliant, great DIY Gannu :)
Great DIY Gannu sir. clap: I have a Polo 1.2 (P) Highline, and have been dying to try out some DIYs on her. Your various DIY threads are an inspiration, but the fear of voiding my warranty is too great, given that my car is not even one year old yet...
:OT And I know it will be no DIY, but I am absolutely dying to get a DRL + Projector setup. The more I read up on it, the more confused I get. It is a lot of $$$ too at the end of the day. Someday...
Hi Gannu,
I'm looking for some advice on my VW Vento antenna. I got the Trendline from VW in order to fit my music system - combination of Pioneer + Soundstream + Polk + JBL. Got the stuff done, but the person who fitted the car antenna socket cut some extra portion off (since he said the original piece did not give quality reception). Now VW says that the last-mile of the wire is critical for radio reception, and they will have to order the entire antenna wiring which will cost about Rs. 35,000. Any ideas from your end on how to resolve this, in a better manner?
Thanks,
Vinod
Quote:
Originally Posted by vinodrkn
(Post 3462554)
Hi Gannu,
I'm looking for some advice on my VW Vento antenna. I got the Trendline from VW in order to fit my music system - combination of Pioneer + Soundstream + Polk + JBL. Got the stuff done, but the person who fitted the car antenna socket cut some extra portion off (since he said the original piece did not give quality reception). Now VW says that the last-mile of the wire is critical for radio reception, and they will have to order the entire antenna wiring which will cost about Rs. 35,000. Any ideas from your end on how to resolve this, in a better manner?
Thanks,
Vinod
|
Which part of the wire are we talking about here? The part of the OE wiring on the stereo end? Usually OE wiring would not have any extra length anywhere to be cut and removed.
Or are we talking about the antenna end? Have you changed the antenna?
If you have changed the antenna and facing reception problems, there are other solutions the OE way itself as VW and Skoda have original parts available for enhancing radio reception. These are small units which come in the antenna line. Sometimes when you swap antennas these have to be used to compensate for the reception quality as compared to the longer antenna that came with the car.
Could you elaborate more on what exactly is the situation please.
Quote:
Originally Posted by vinodrkn
(Post 3462554)
Got the stuff done, but the person who fitted the car antenna socket cut some extra portion off (since he said the original piece did not give quality reception).
|
Which part of the antenna cable exactly did the guy cut off? I am not sure why he did that because the stock radio aerial cable has a FAKRA connector at both ends - the head unit side and the antenna side. Unless he cut a portion somewhere in the middle to get rid of the excess cable, this was pointless IMO.
And what is this antenna socket you are referring to? Are you referring to the aerial itself? Did your installer remove the stock aerial and replace it with an aftermarket one?
Quote:
Originally Posted by vinodrkn
(Post 3462554)
Now VW says that the last-mile of the wire is critical for radio reception, and they will have to order the entire antenna wiring which will cost about Rs. 35,000.
|
That's bloody expensive! :Shockked:
Are you sure it wasn't Rs. 3,500 that they had quoted? Do you have a Pioneer HU in your Vento currently?
Yes, 35k... I've requested for a double check and should get to know in a couple of days. Pioneer HU is what I use. It's the same one I had in my Polo, which I moved to the Vento now. I will ping back as to what these guys say after checking with their procurement / accessory people.
Hi Gannu, quick update. VW does not sell the antenna wire separately. If there is a problem with the antenna wiring, one needs to buy the entire wiring kit which works out to 35k.
For me, they found a kit which was from a car involved in a burn! accident, and they spoke to the owner and requested if they could only take the antenna wiring out. They've done that and replaced the entire length of the antenna wiring in the Vento. Unfortunately, my radio reception continues to be bad. They say it could not be a HU-related problem (I use Pioneer's AVH-P2350DVD, 4-year old piece). So what we are doing next is to fit another system, and see if the output is okay - and if so, the problem indeed would be with the HU. If not - it would remain a puzzle.
| All times are GMT +5.5. The time now is 09:11. | |