Team-BHP
(
https://www.team-bhp.com/forum/)
There is one thing that we all drivers/riders hate during our daily drives especially at the night time is the cars/bikes/trucks/buses (especially Volvo 9400) tailgating with their headlights on High Beam. The inter-city buses are the worst of the lot with 6 - 8 headlights on high beam making it a pain to drive peacefully.
To tackle this issue, there is Day/Night mirror (Manual) in my car. This solved my problem by 50% but the rest 50% was still in question and how does one go about the ORVM change as it least done by many.
So checked the Polo Ownership thread by Gannu_1 where in he had replaced his OEM IRVM and ORVM with anti-glare mirrors. Looking at the ease of procuring the mirrors and installation, I decided of replacing both the mirrors in my car too. Getting the Anti-glare IRVM was not a problem as I contacted the same supplier who sold Gannu_1 the IRVM. It was a cake walk for me dealing with that seller.
I was then scouting and finding ways to get the anti-glare setup for the ORVM too so that the combination is fulfilled making the drive easier on my eyes. :)
In this DIY, I'll be putting down the procedure for installation of the Anti-Glare setup of both:
- The Inside Rear View Mirror and
- The Outside Rear View Mirror.
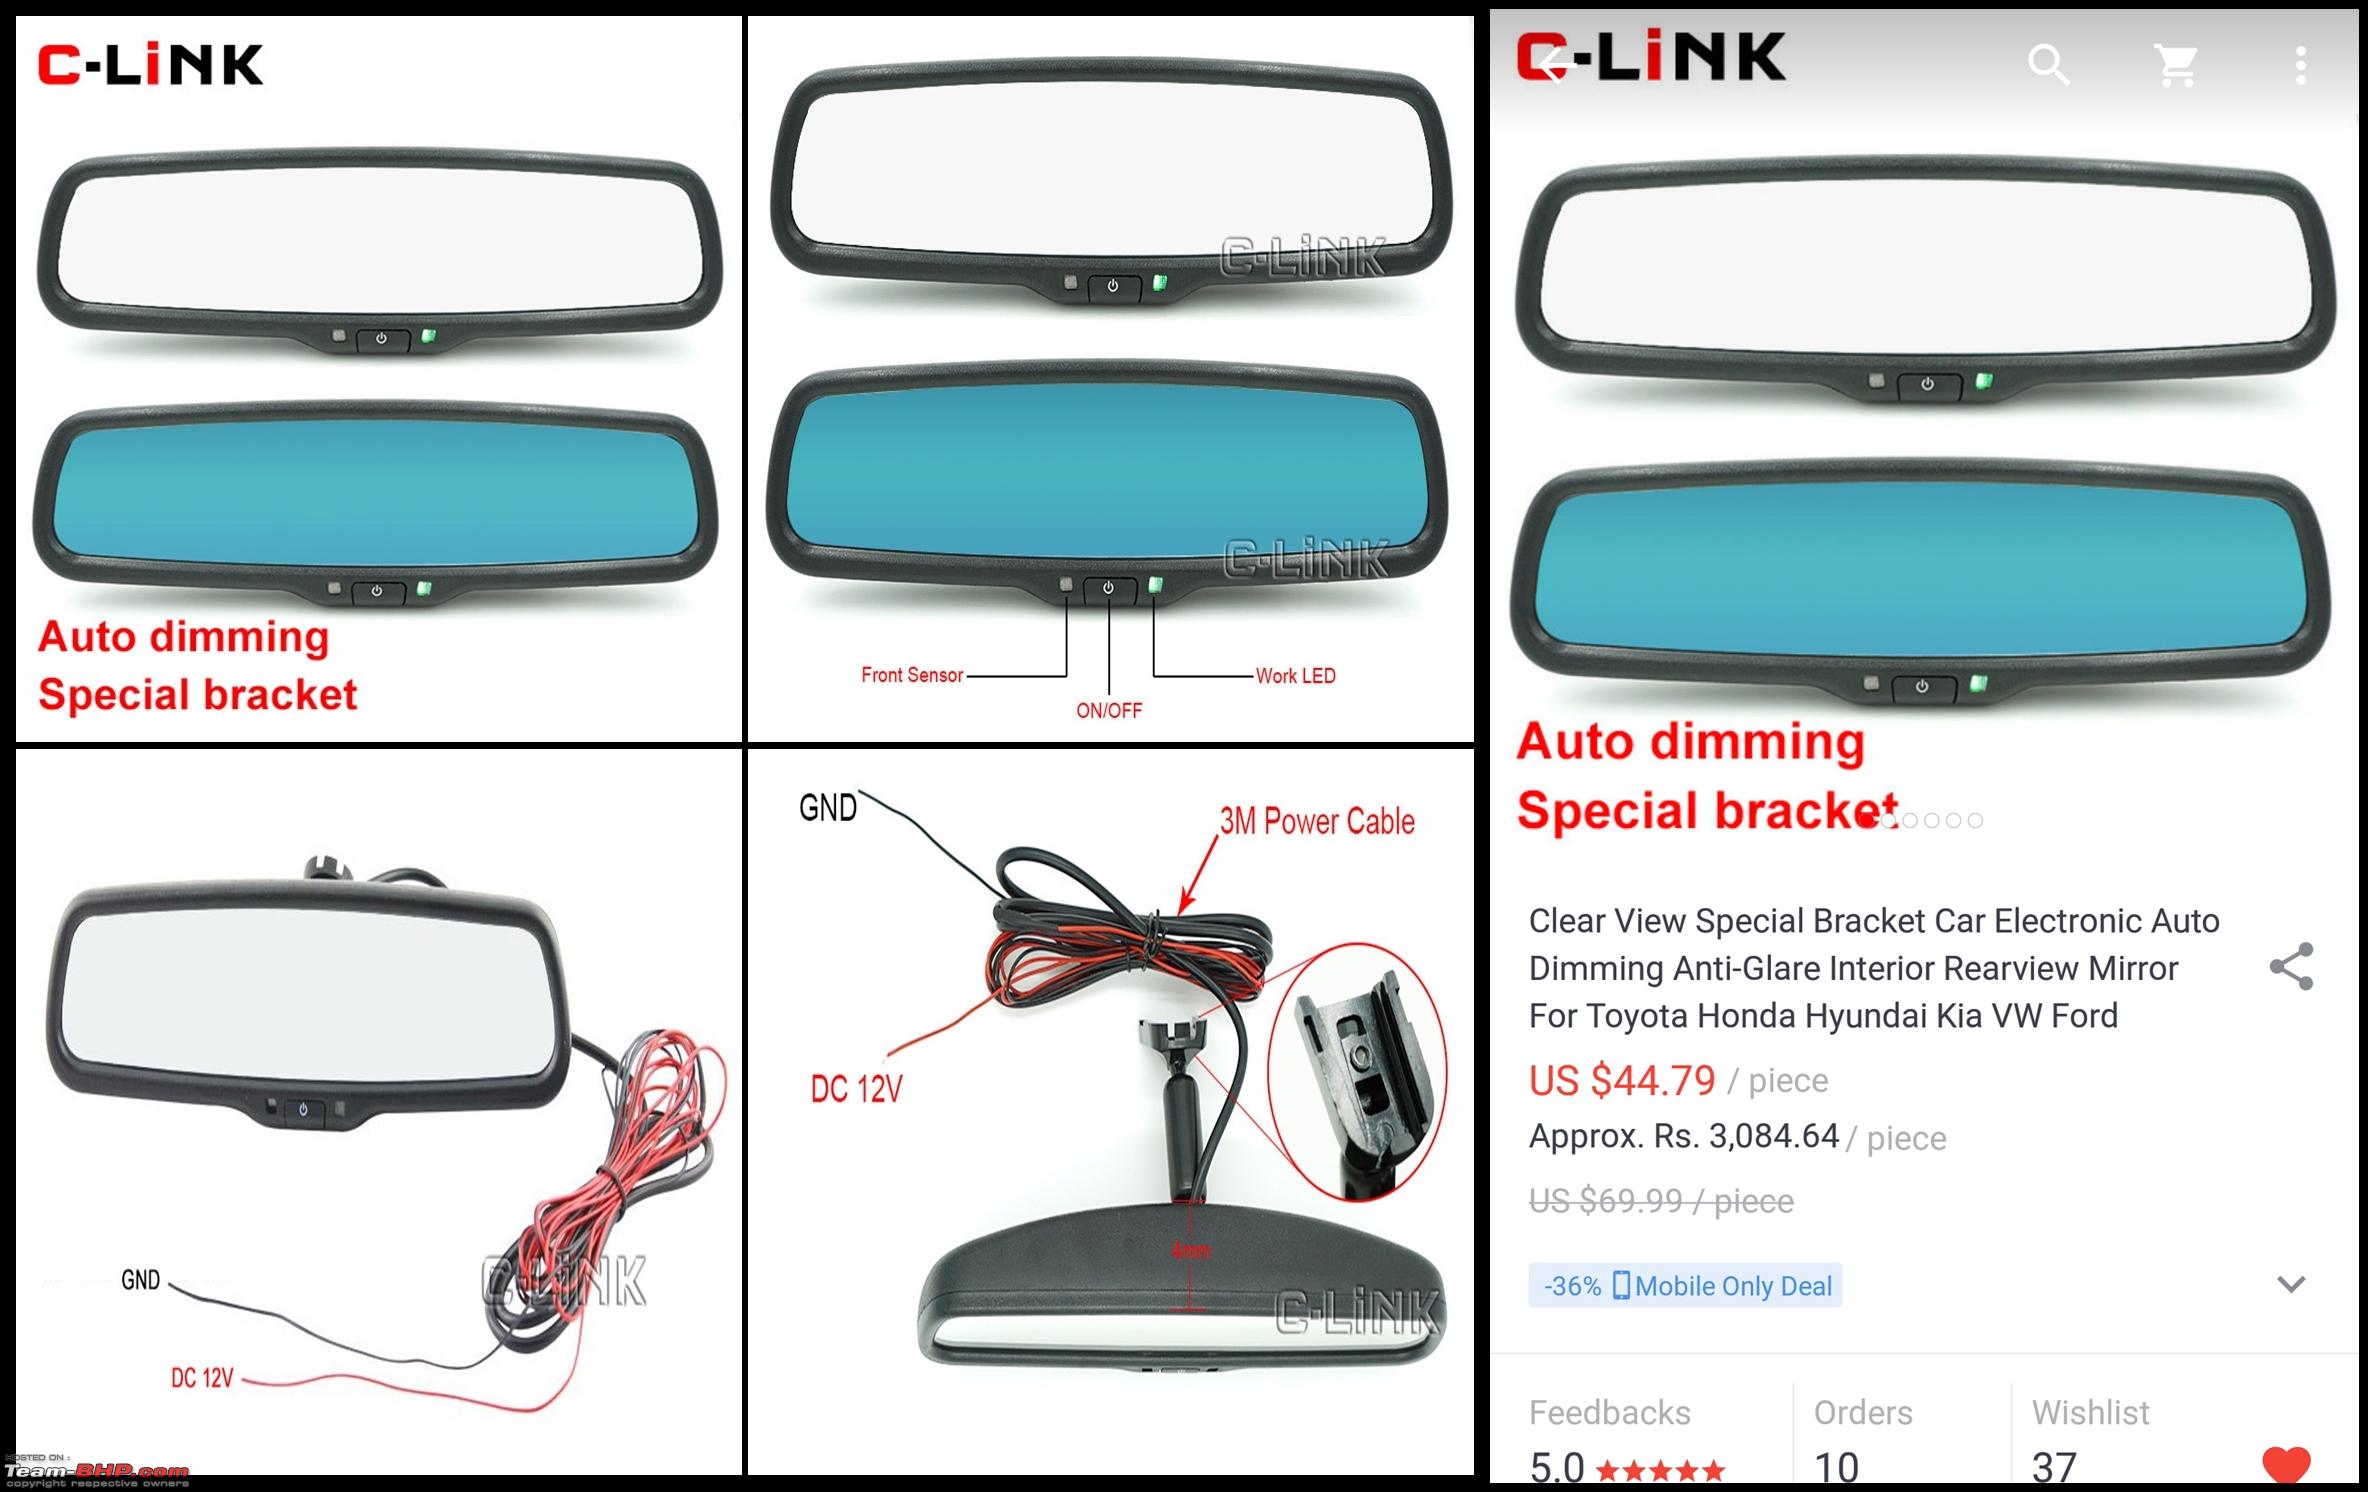
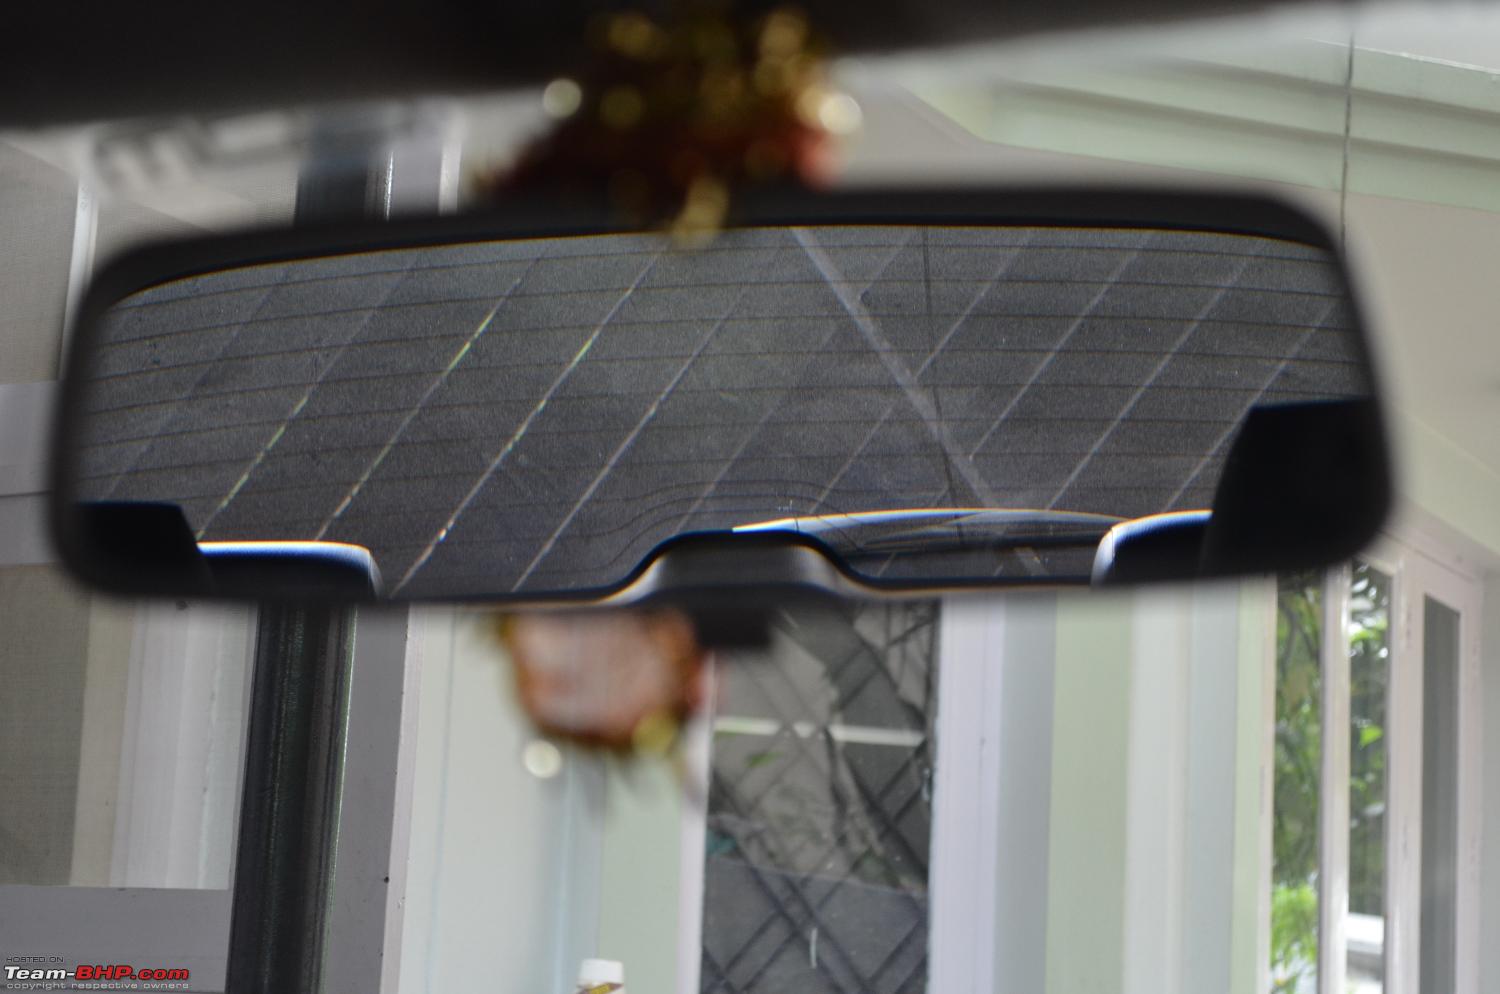
1) Inside Rear View Mirror – Changeover from Manual to Auto:
The Day/Night mirror in my car is a manually controlled mirror that needs a flip to change modes (Day or Night).
I enquire with the seller for the possibility of fitting the same on my Maruti Suzuki Swift. Contacted the seller @ AliExpress and immediately received a request from his end for asking for the picture showing the way the IRVM is mounted in the car. Went to my car, clicked couple of pictures and sent it. I received a response from him stating the suitable bracket (No. 26) for my Swift. All of this happened in 20 minutes – fantastic seller – No wonder he has highest feedback rating from all his buyers. Thanks
Gannu_1!
Here's the link to purchase:
http://www.aliexpress.com/item/2015-...307532815.html
Ordered the Auto-dimming mirror without any second thoughts and there was another advantage to the deal since I was browsing through the App, 25-08-2015 where many item were listed at high discounts. The same IRVM retails at $69.99 on any regular day which is ₹4820.21 but on that day I got it at $44.79 which is ₹3084.64 plus I got the discount of $10 by using a coupon which I offset using faster delivery option on $11.
So I finally paid is $45.79 which is ₹3153.55 and it took 6 days to reach me.
There are two ways to get through this installation:
1) Using power from the 12V socket that'll power the IRVM and
2) Hard wire the IRVM.
I went ahead with the Option 2 as it is the better one with cleaner installation and no need to splice OEM wires.
My heartfelt thanks to BHPian ArunPhilip for the DIY thread (
LINK) where I have drawn the inspiration for installation and the process to wire the ORVM correctly. Was initially taking the IRVM unit to an accessory shop to get it fixed as I didn't have any idea how to go about the installation even though I had the tools with me.
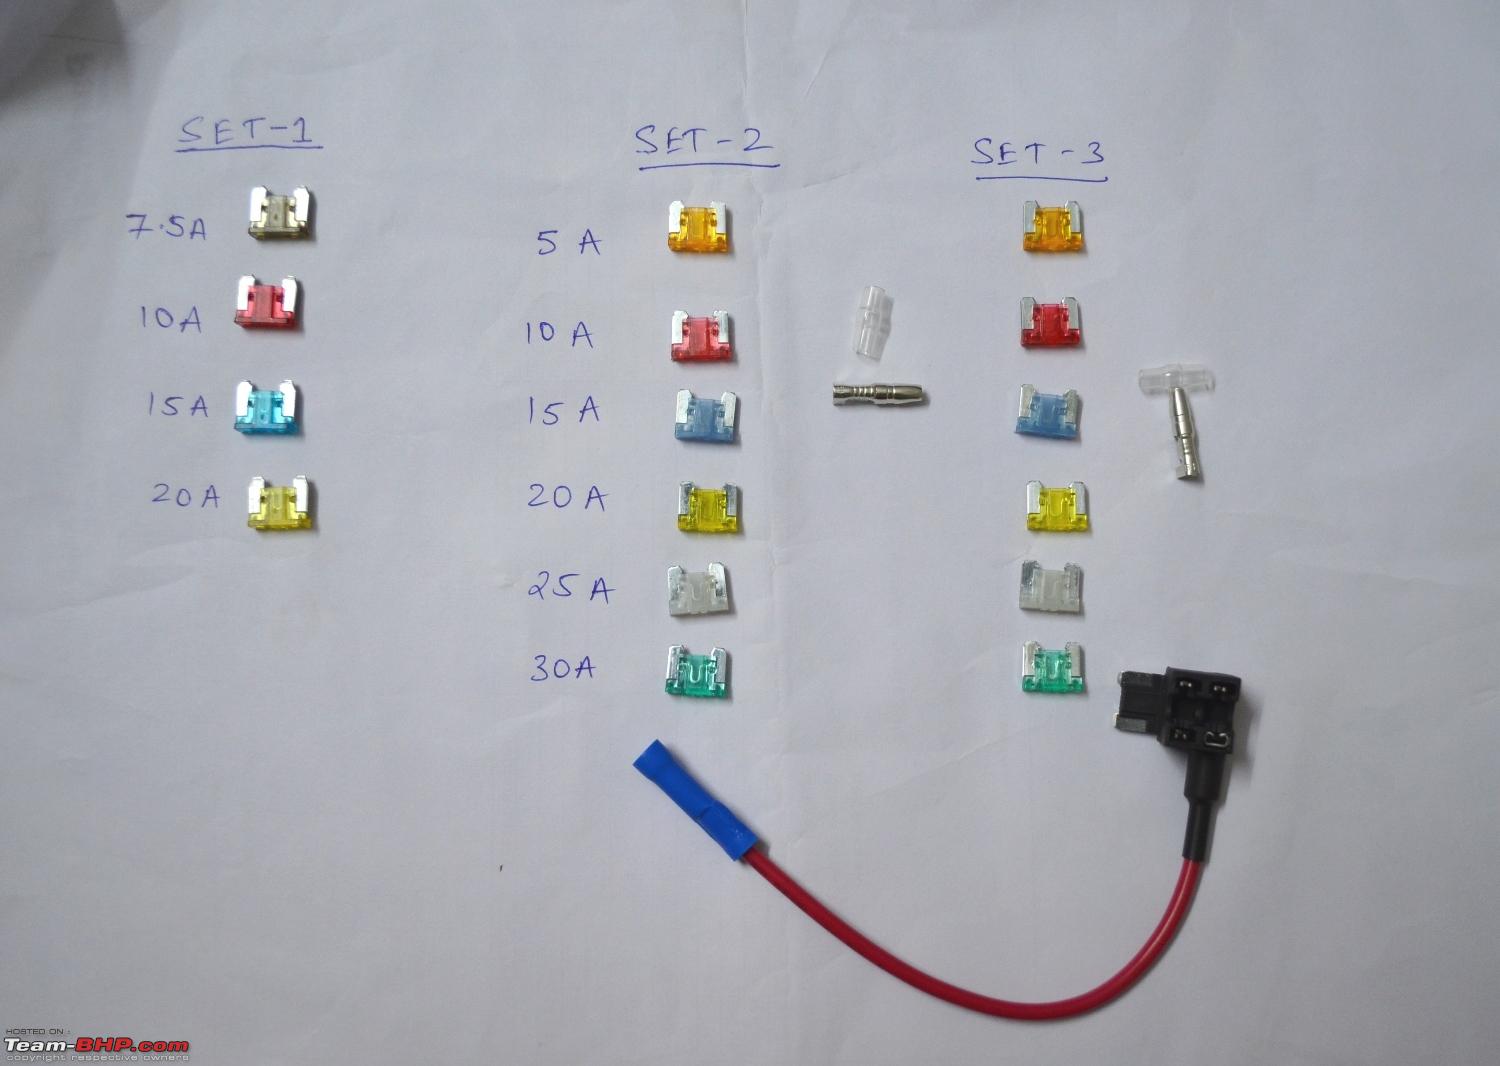
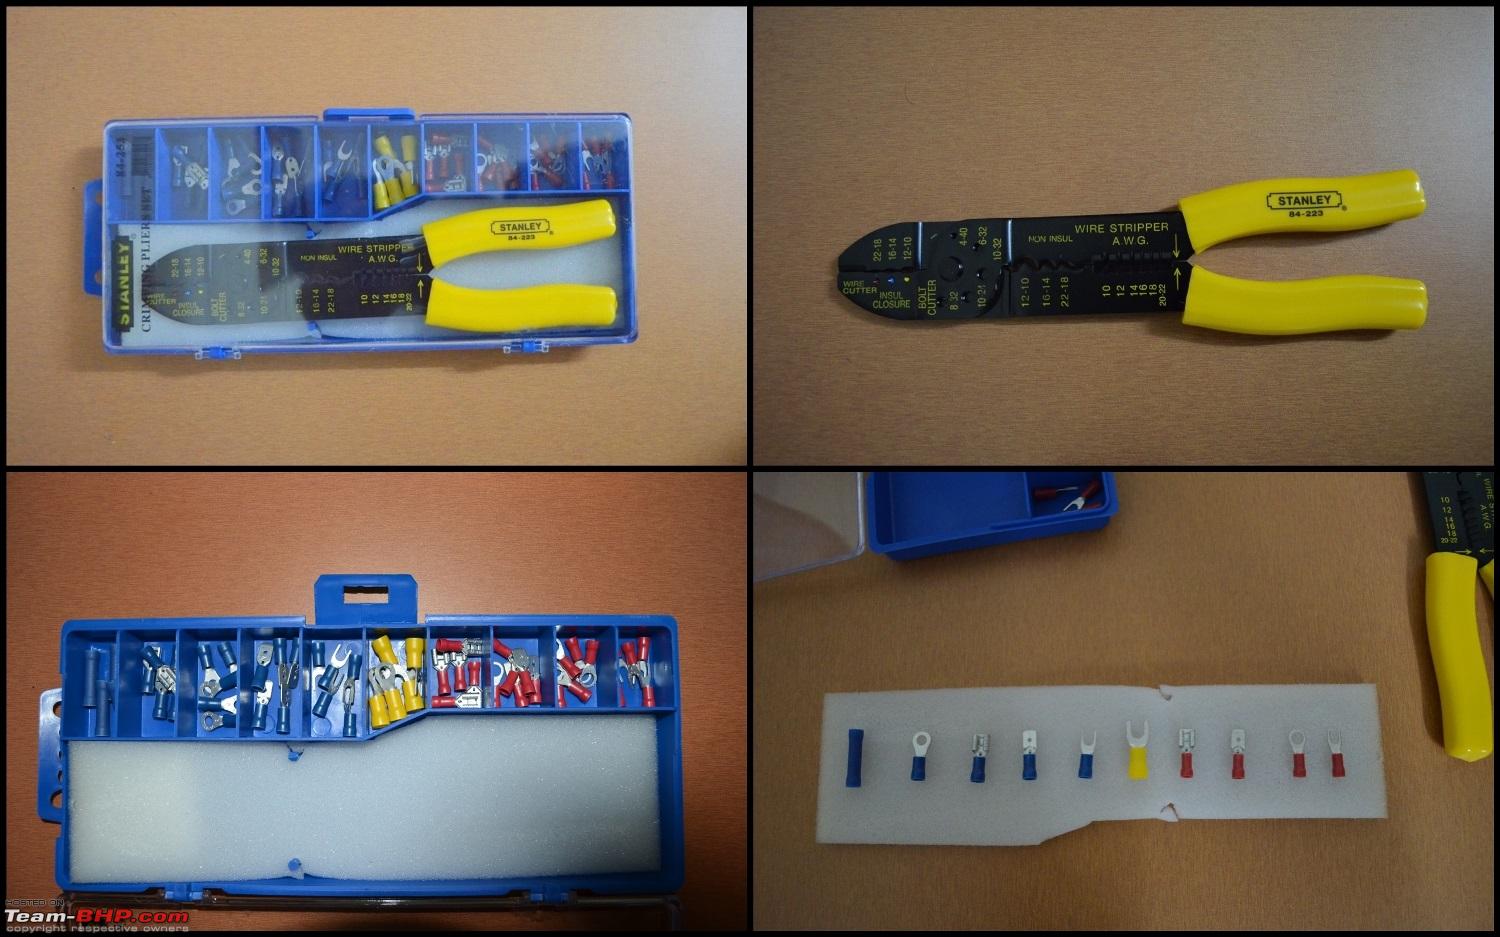
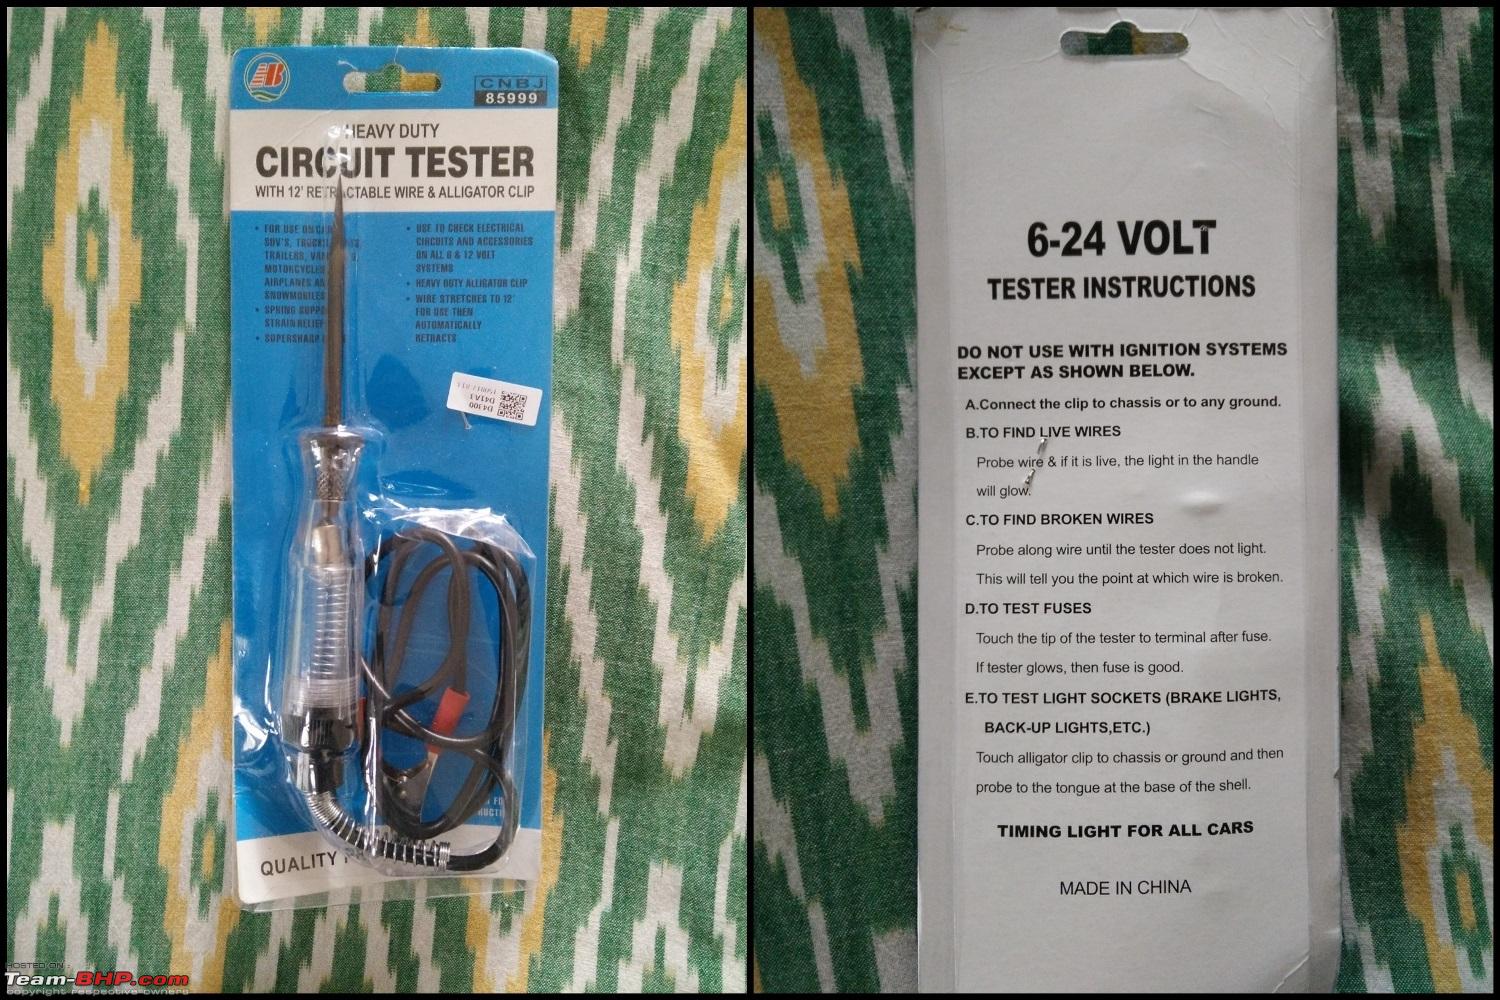
Now let's jump onto the installation part: What's Required: Auto dimming IRVM  Fuse tap cable
 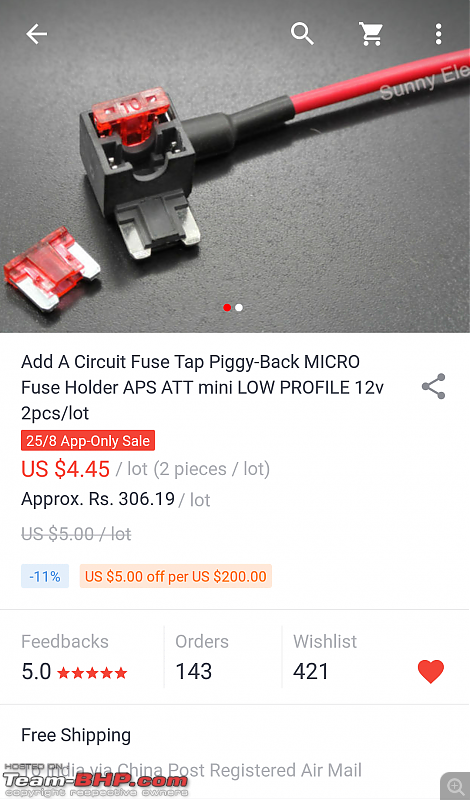 Fuses (Extra)
  Wiring for the routing (Extra)
SOURCE: Ebay India
Crimping Pliers set - With Terminal Connectors 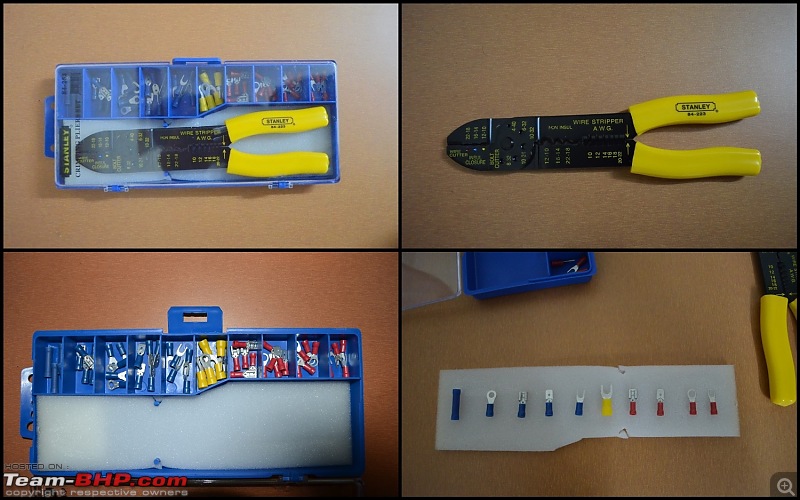 Heat Shrink tubes
  12V Car voltage test pen
  Hot air gun or a Hair dryer
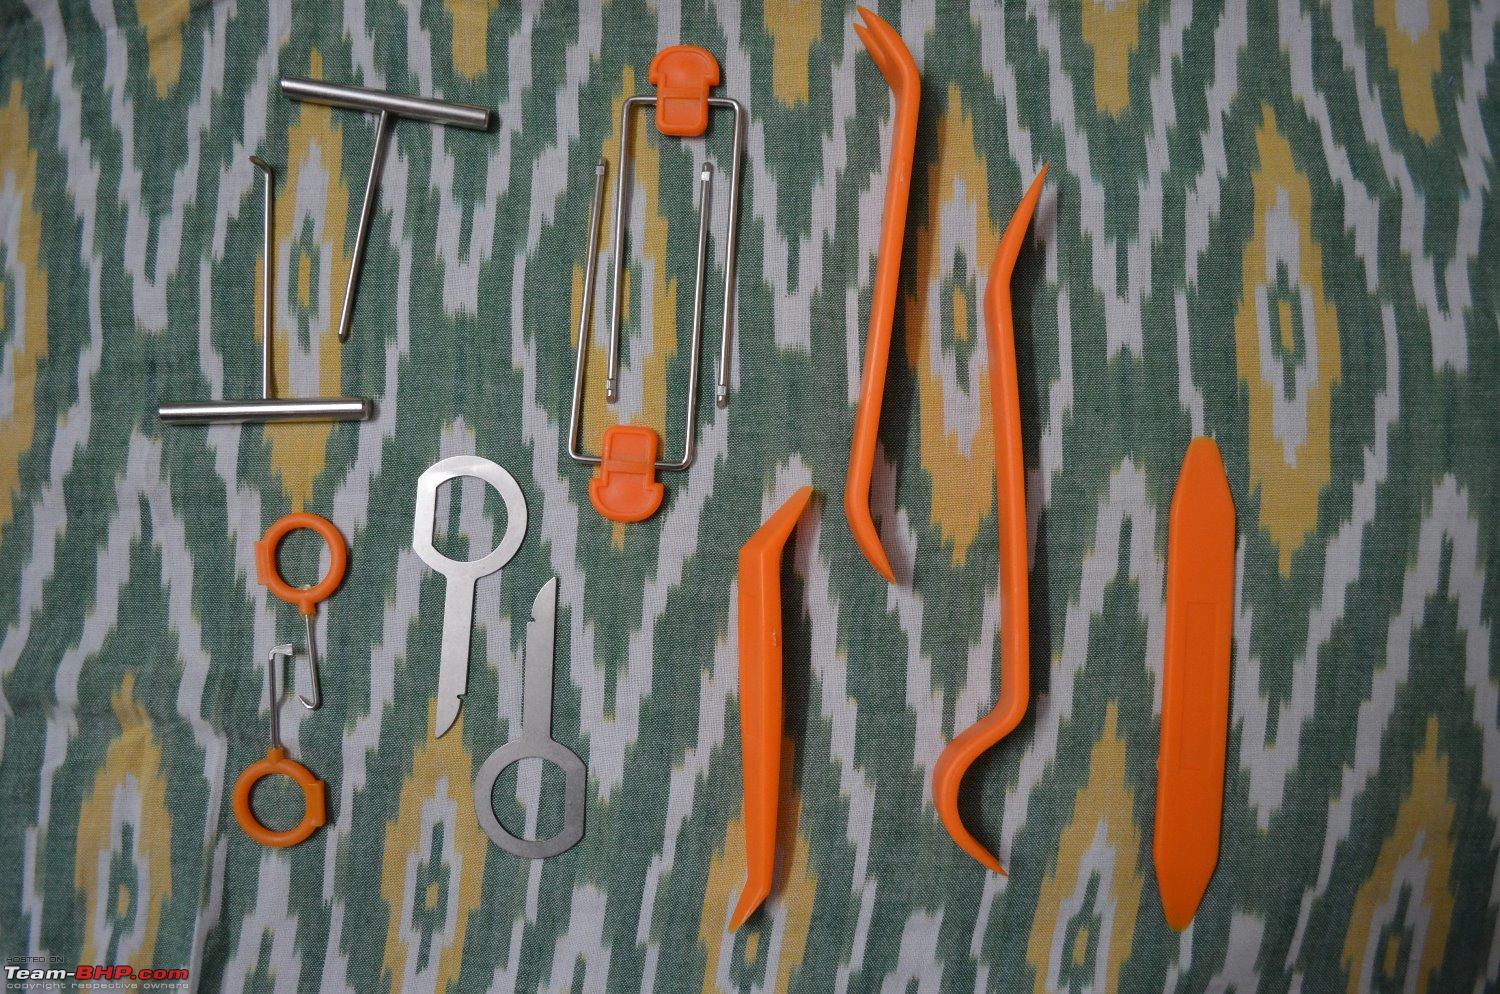
 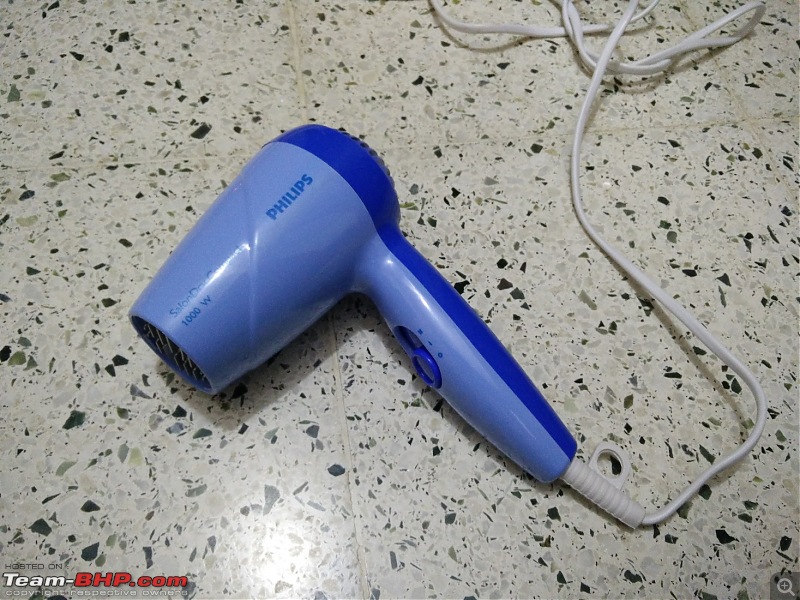 Interior trim removing kit
Will outline the procedure in the next post:
With all the items in hand, let's start putting them together. I'll briefly describe the steps for installation.
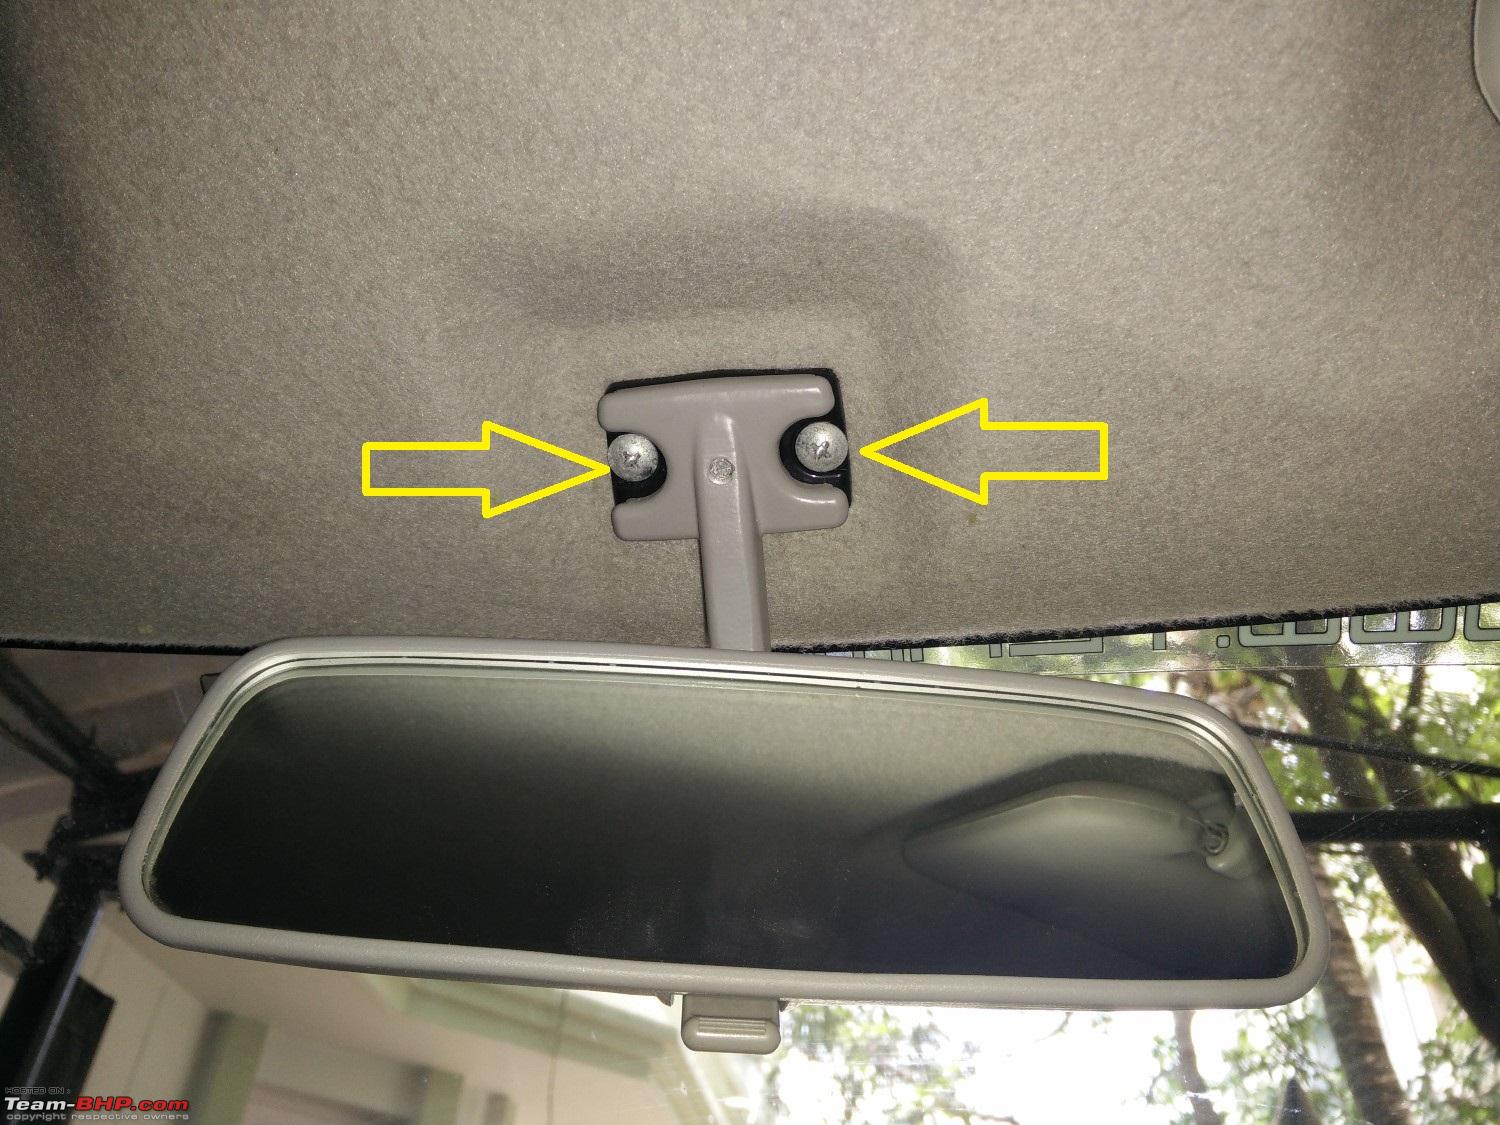
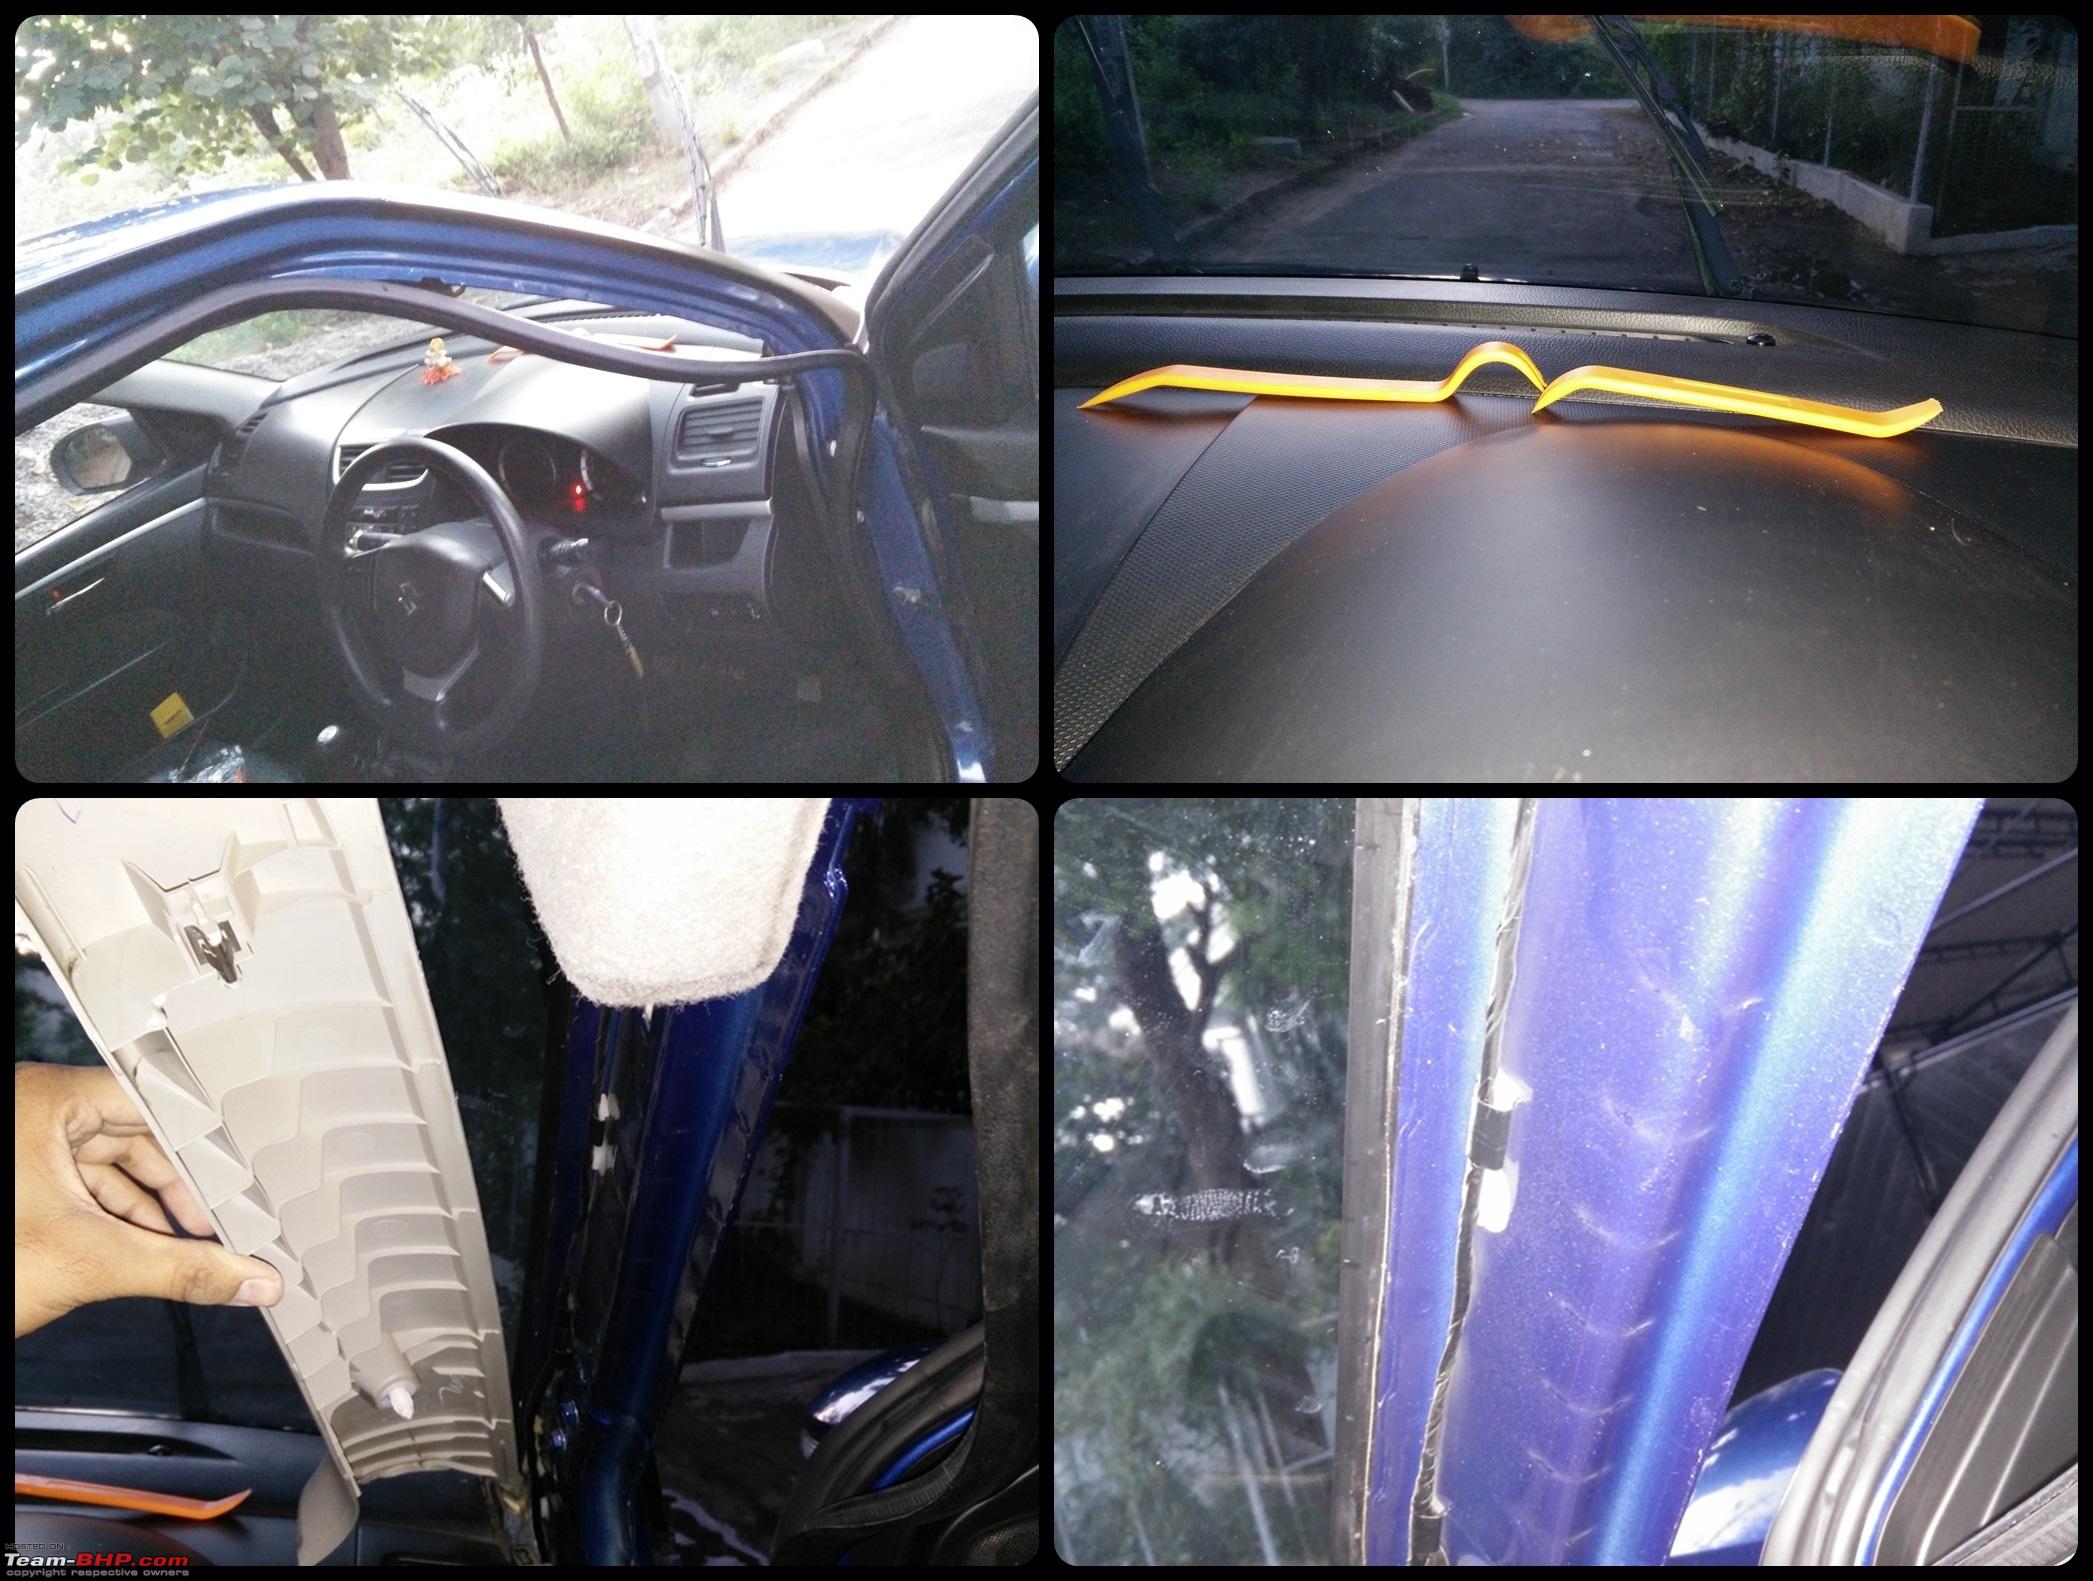
Step 1: With a
Star screw driver remove the 2 screws holding the OEM IRVM;
Step 2: Remove the Driver's side A-Pillar rubber beading and plastic trim carefully using the panel removing set. Two clips hold the A-Pillar.
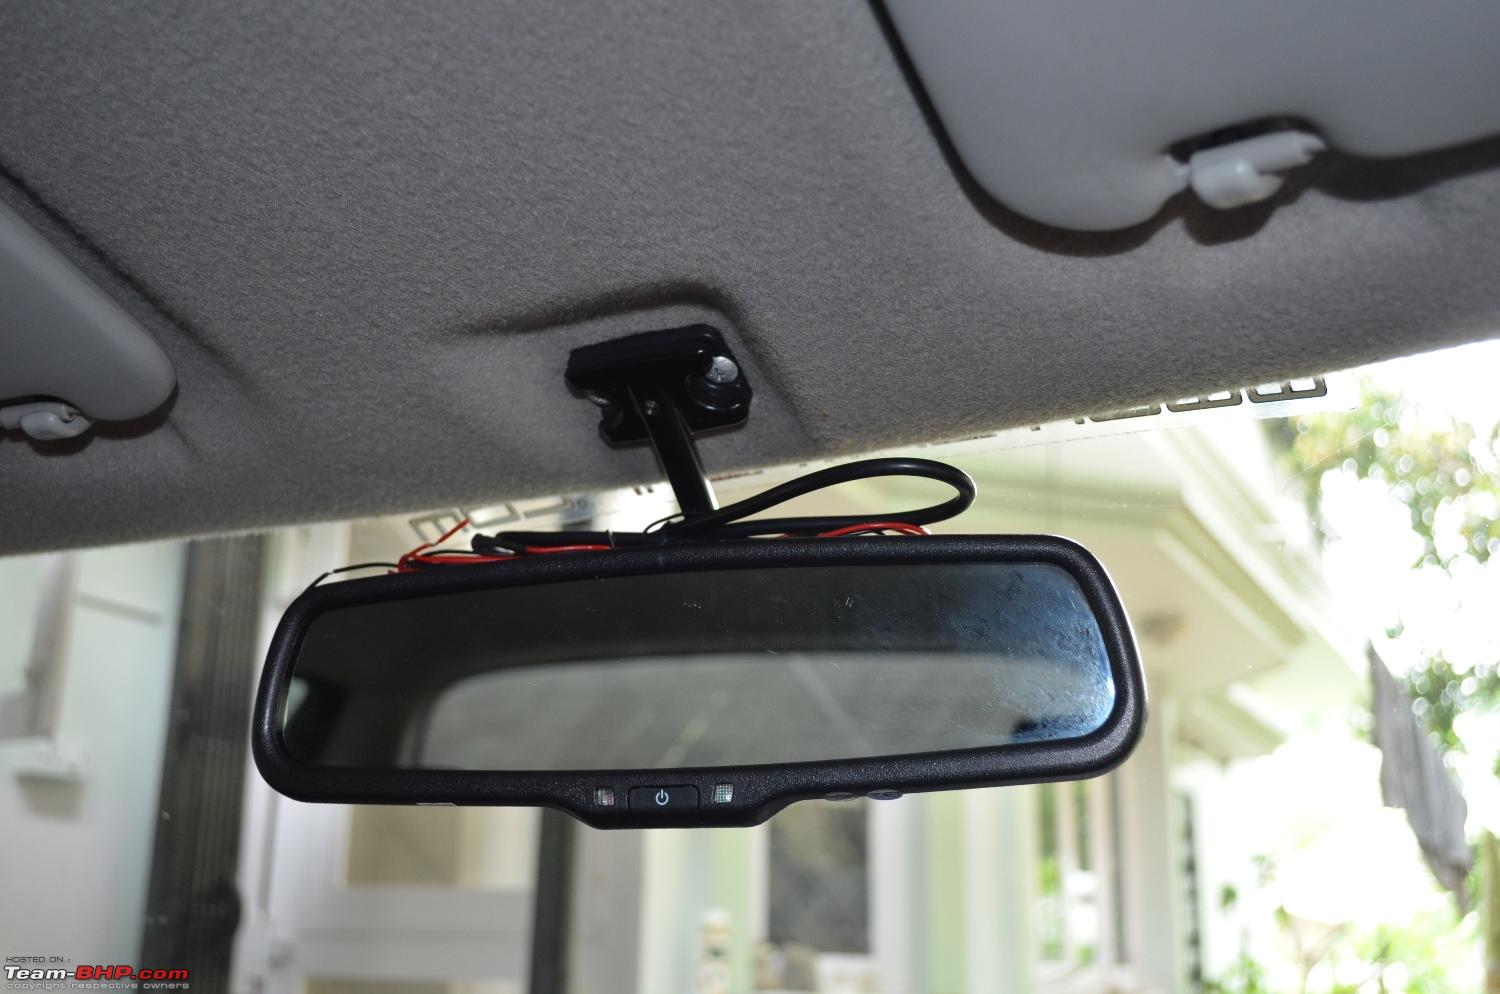
Step 3: Fit the Auto-dimming IRVM in place and tighten it - I have used rubber washers to dampen any vibrations. Placed them between the IRVM bracket and screws.;
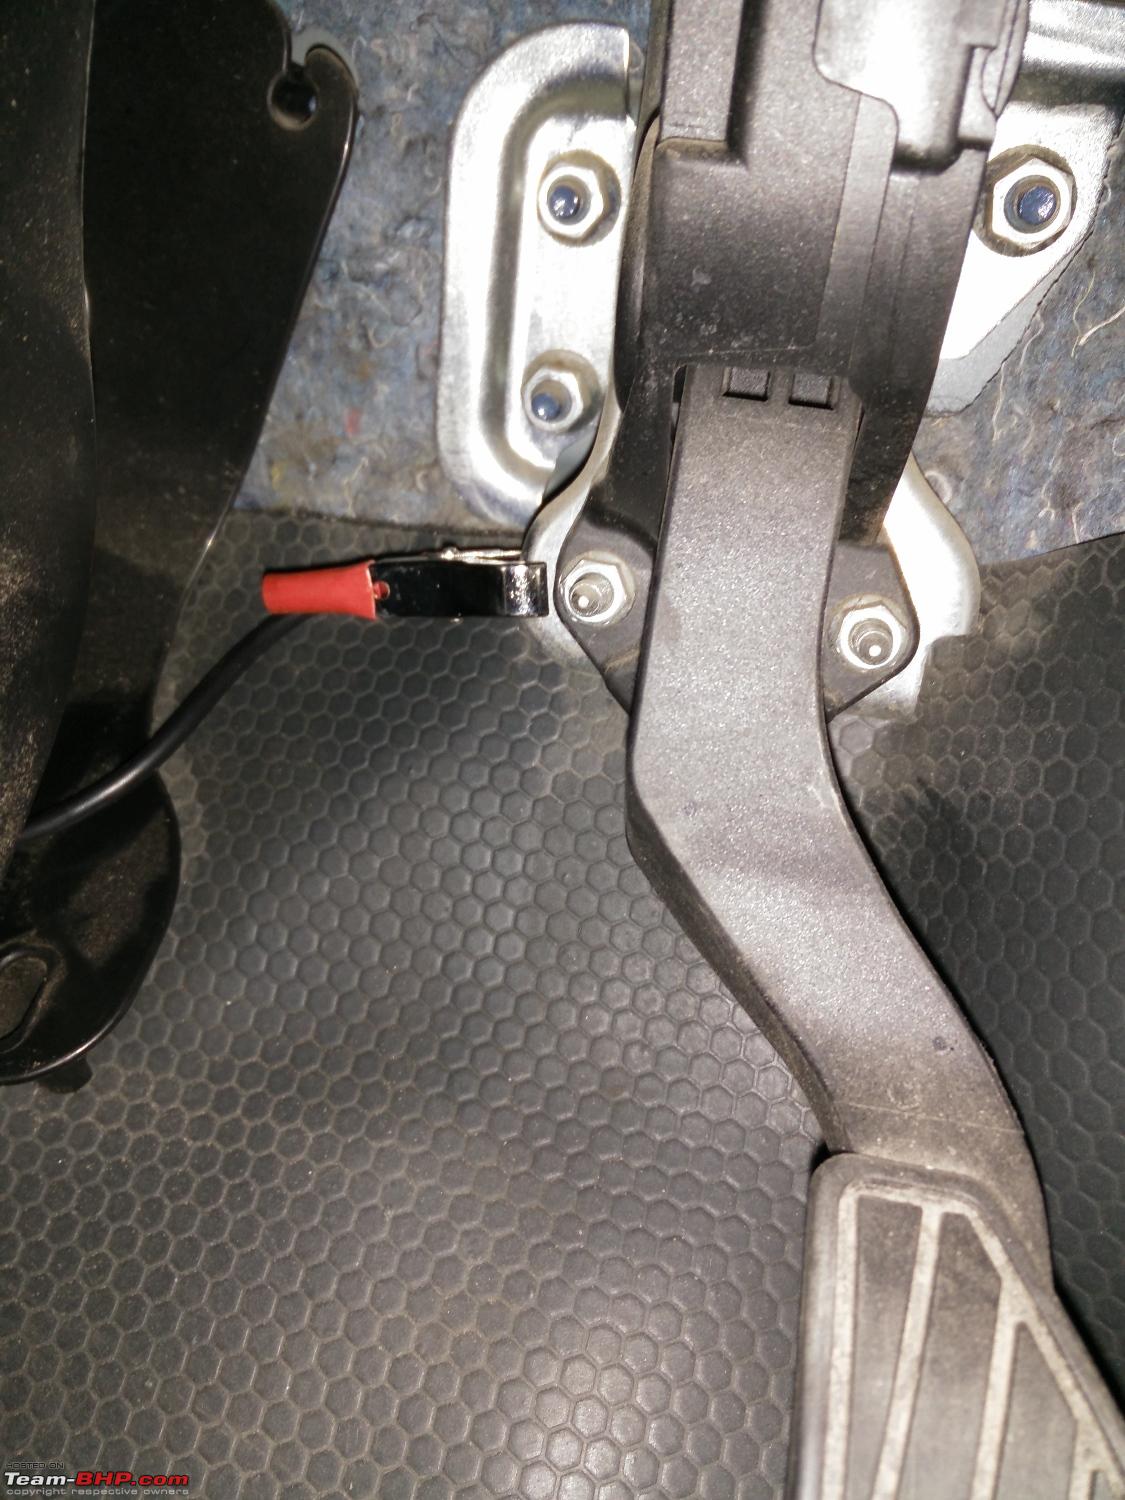
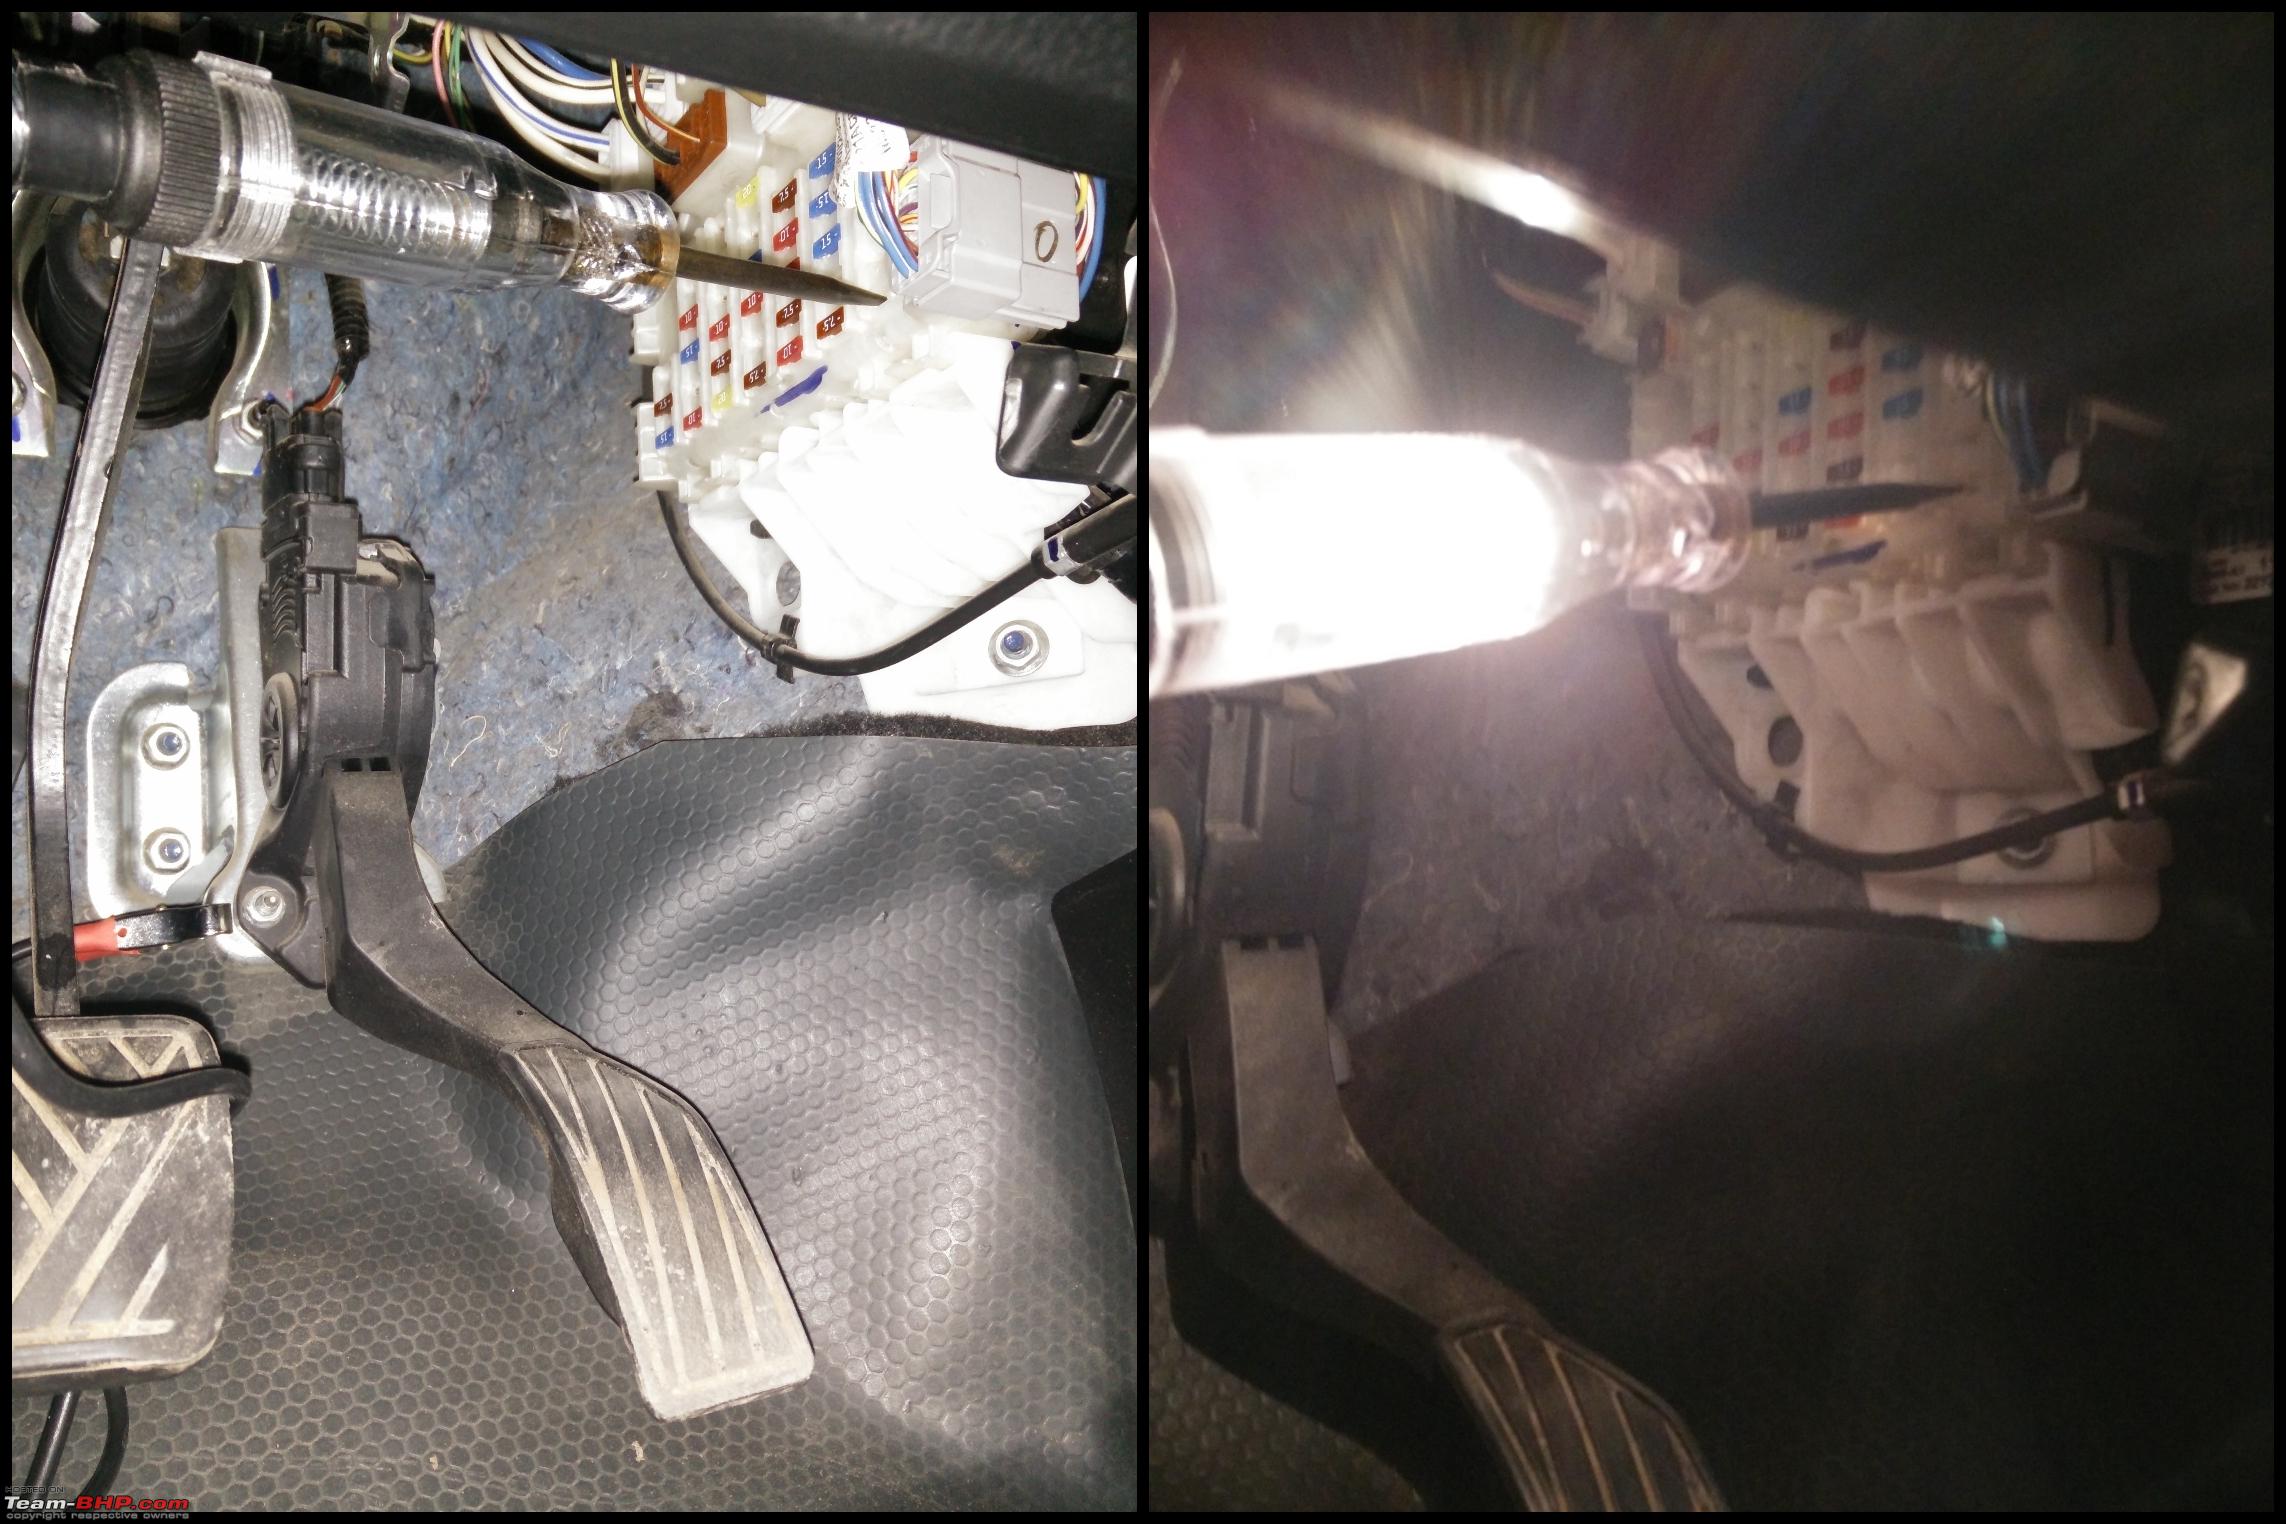
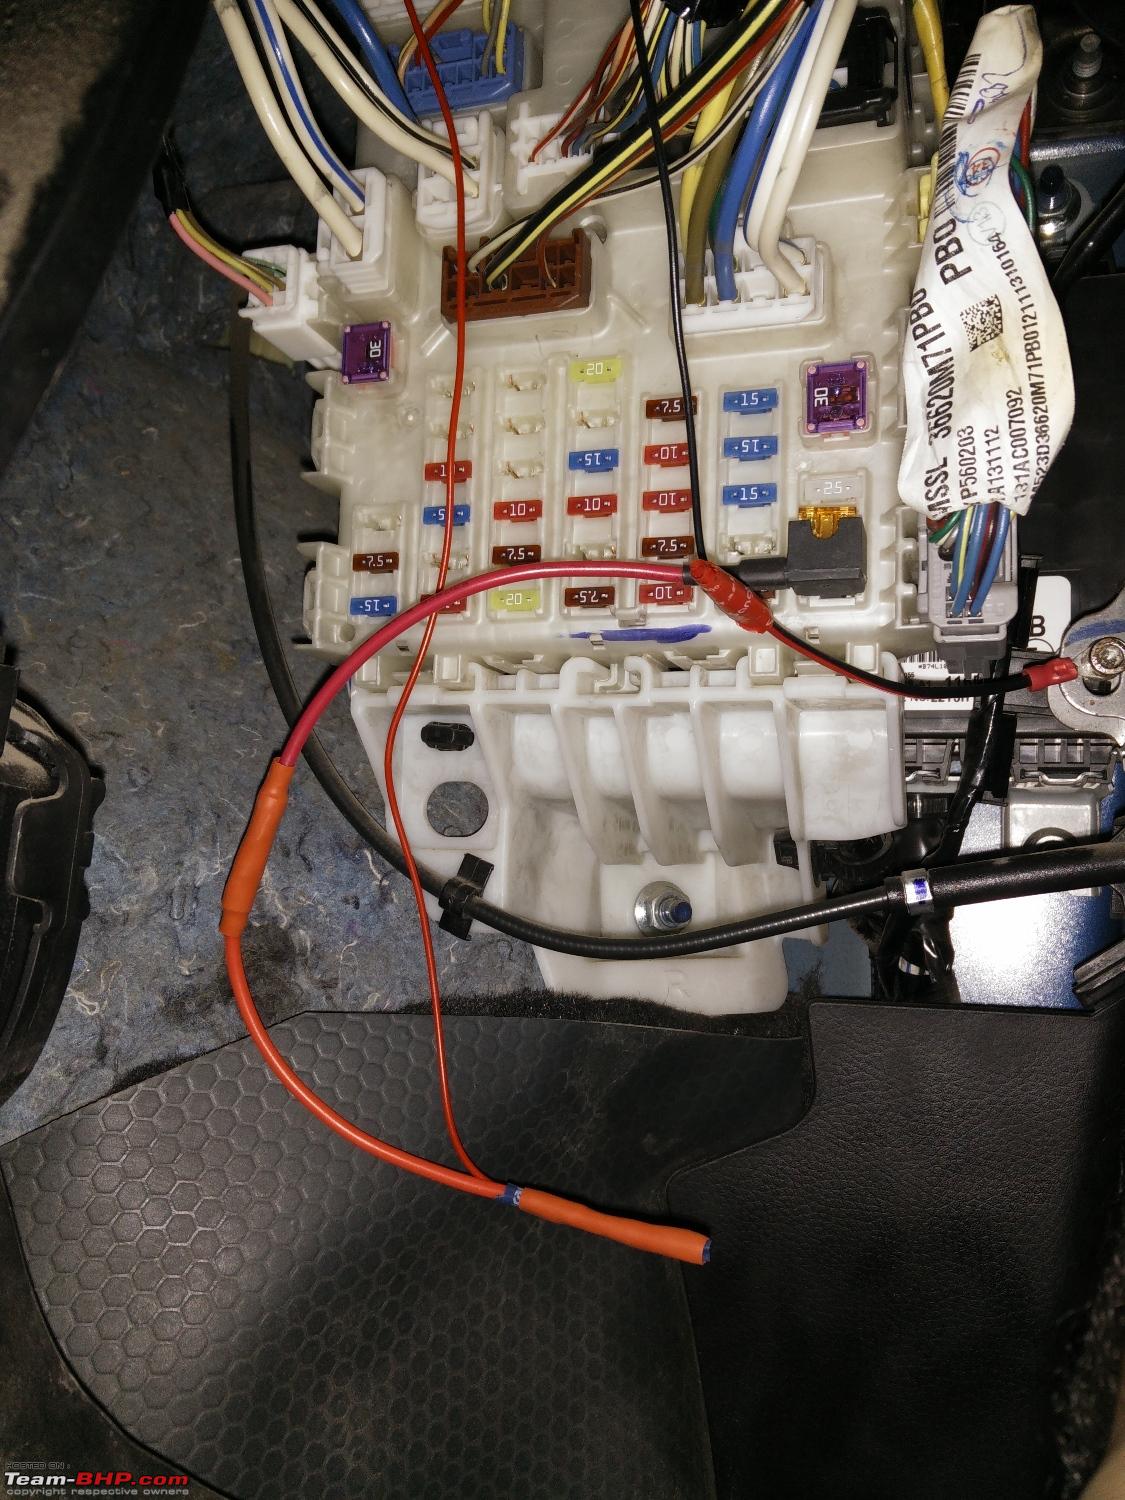
Step 4: Route the wiring from the IRVM through the headliner then through the drivers side A-Pillar to the fuse box below which is the power source for the IRVM. The fuse box is located above the accelerator pedal at a very inconvenient location (Just above the front right wheel well).
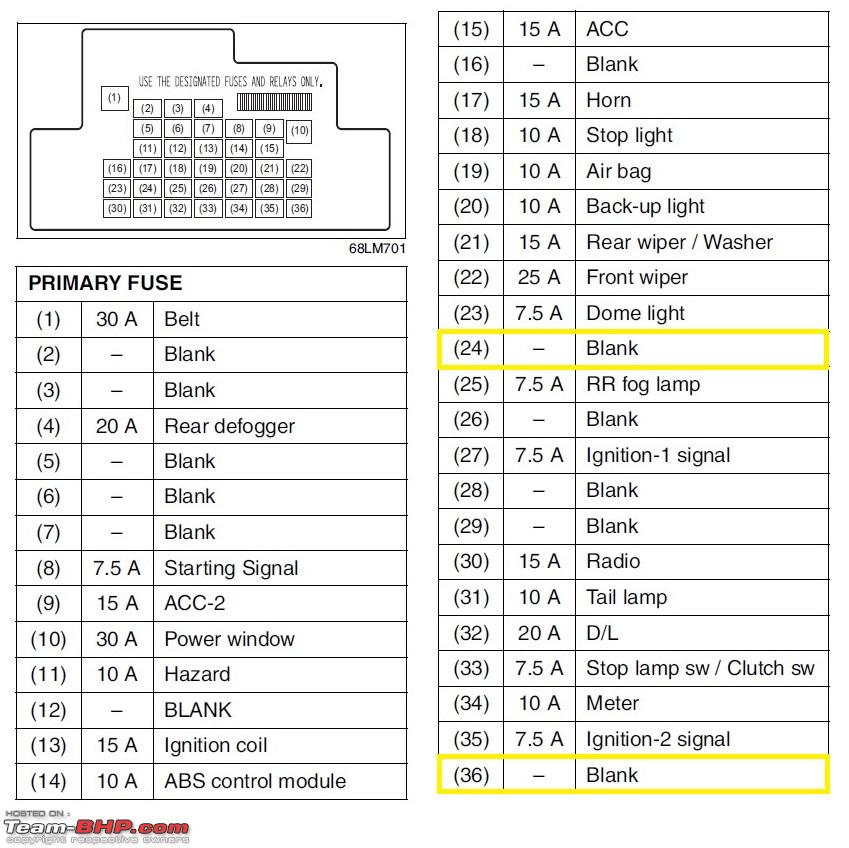
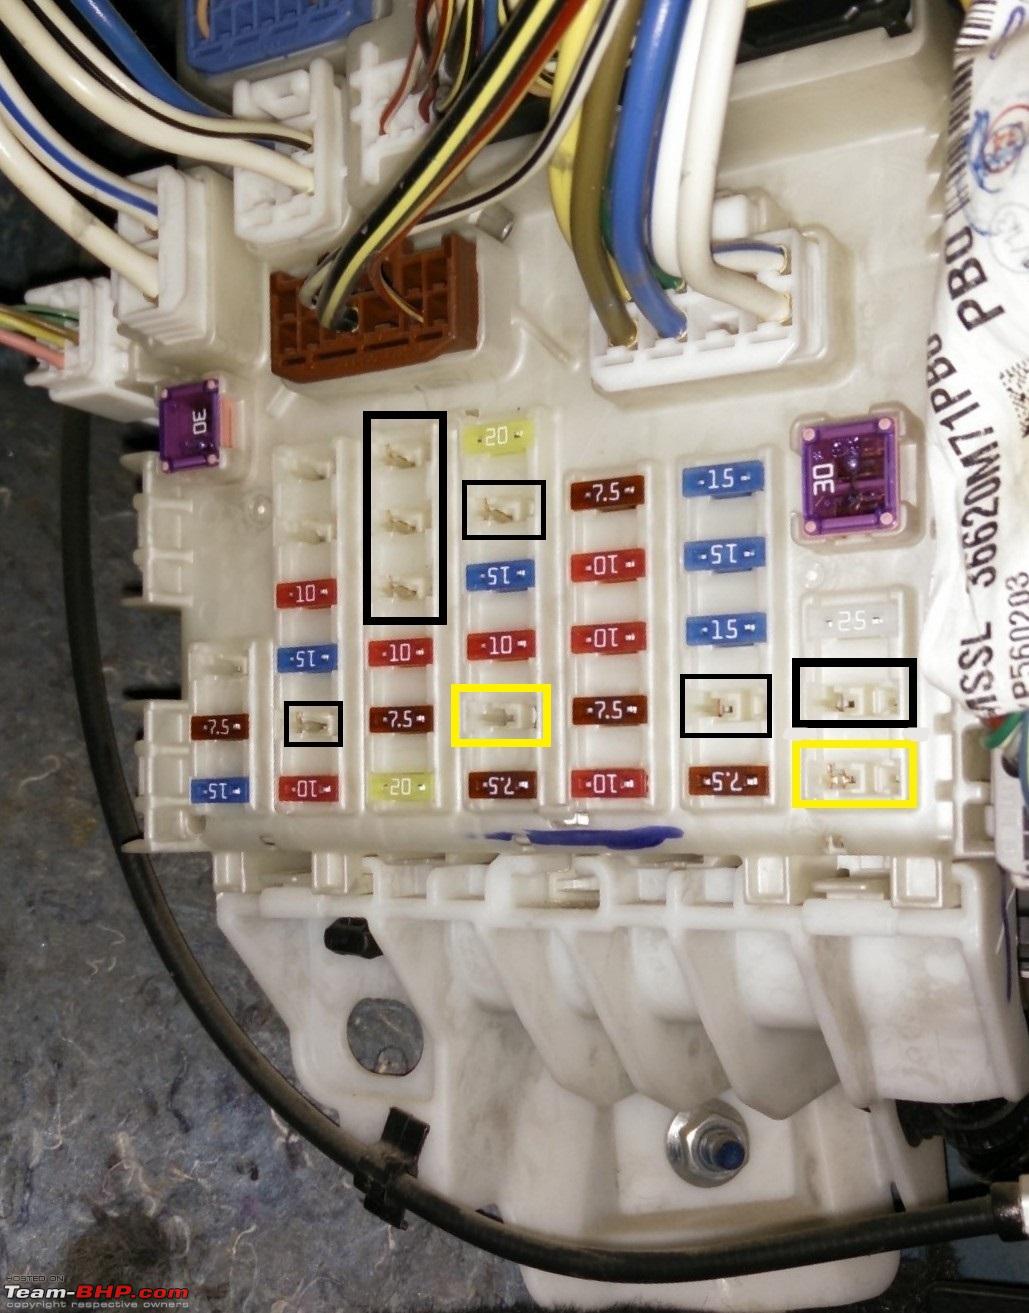
Step 5: In the fuse box, check for the ones that will be functioning ONLY when the ignition is ON as I didn't want the IRVM to draw power from the battery even when the car isn't in use or during day time where the auto-dimming function is of no use. Of the open fuses, found No. 36 to be working only when Ignition is ON.
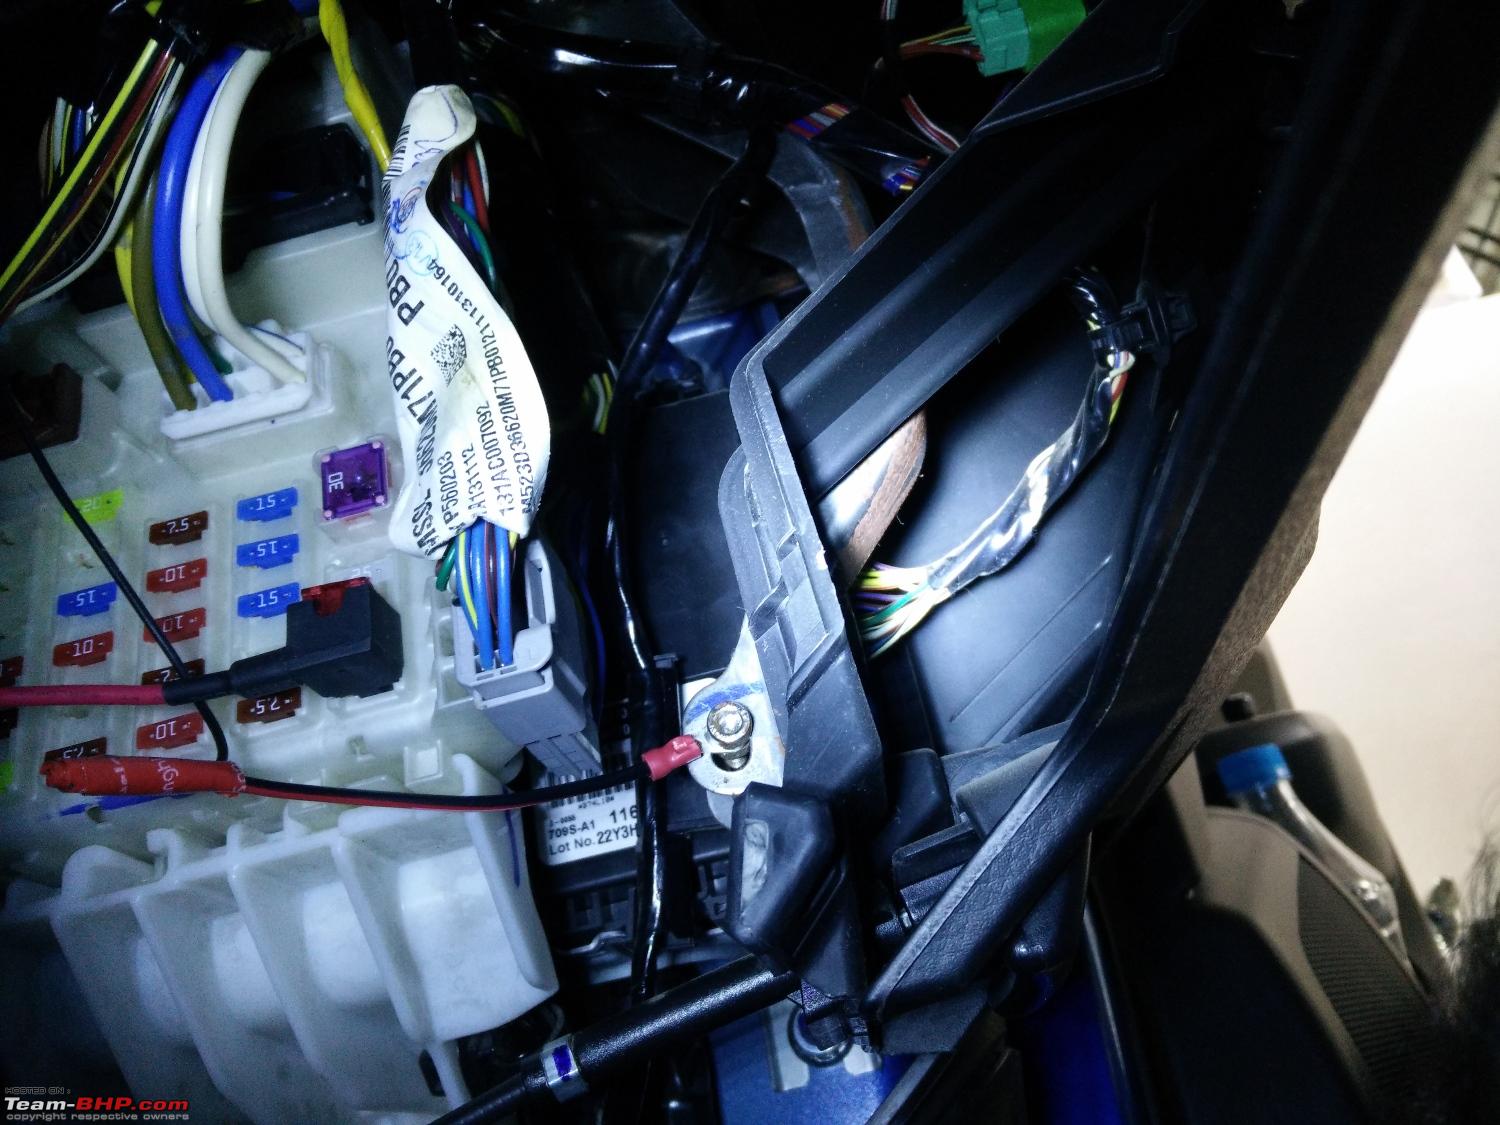
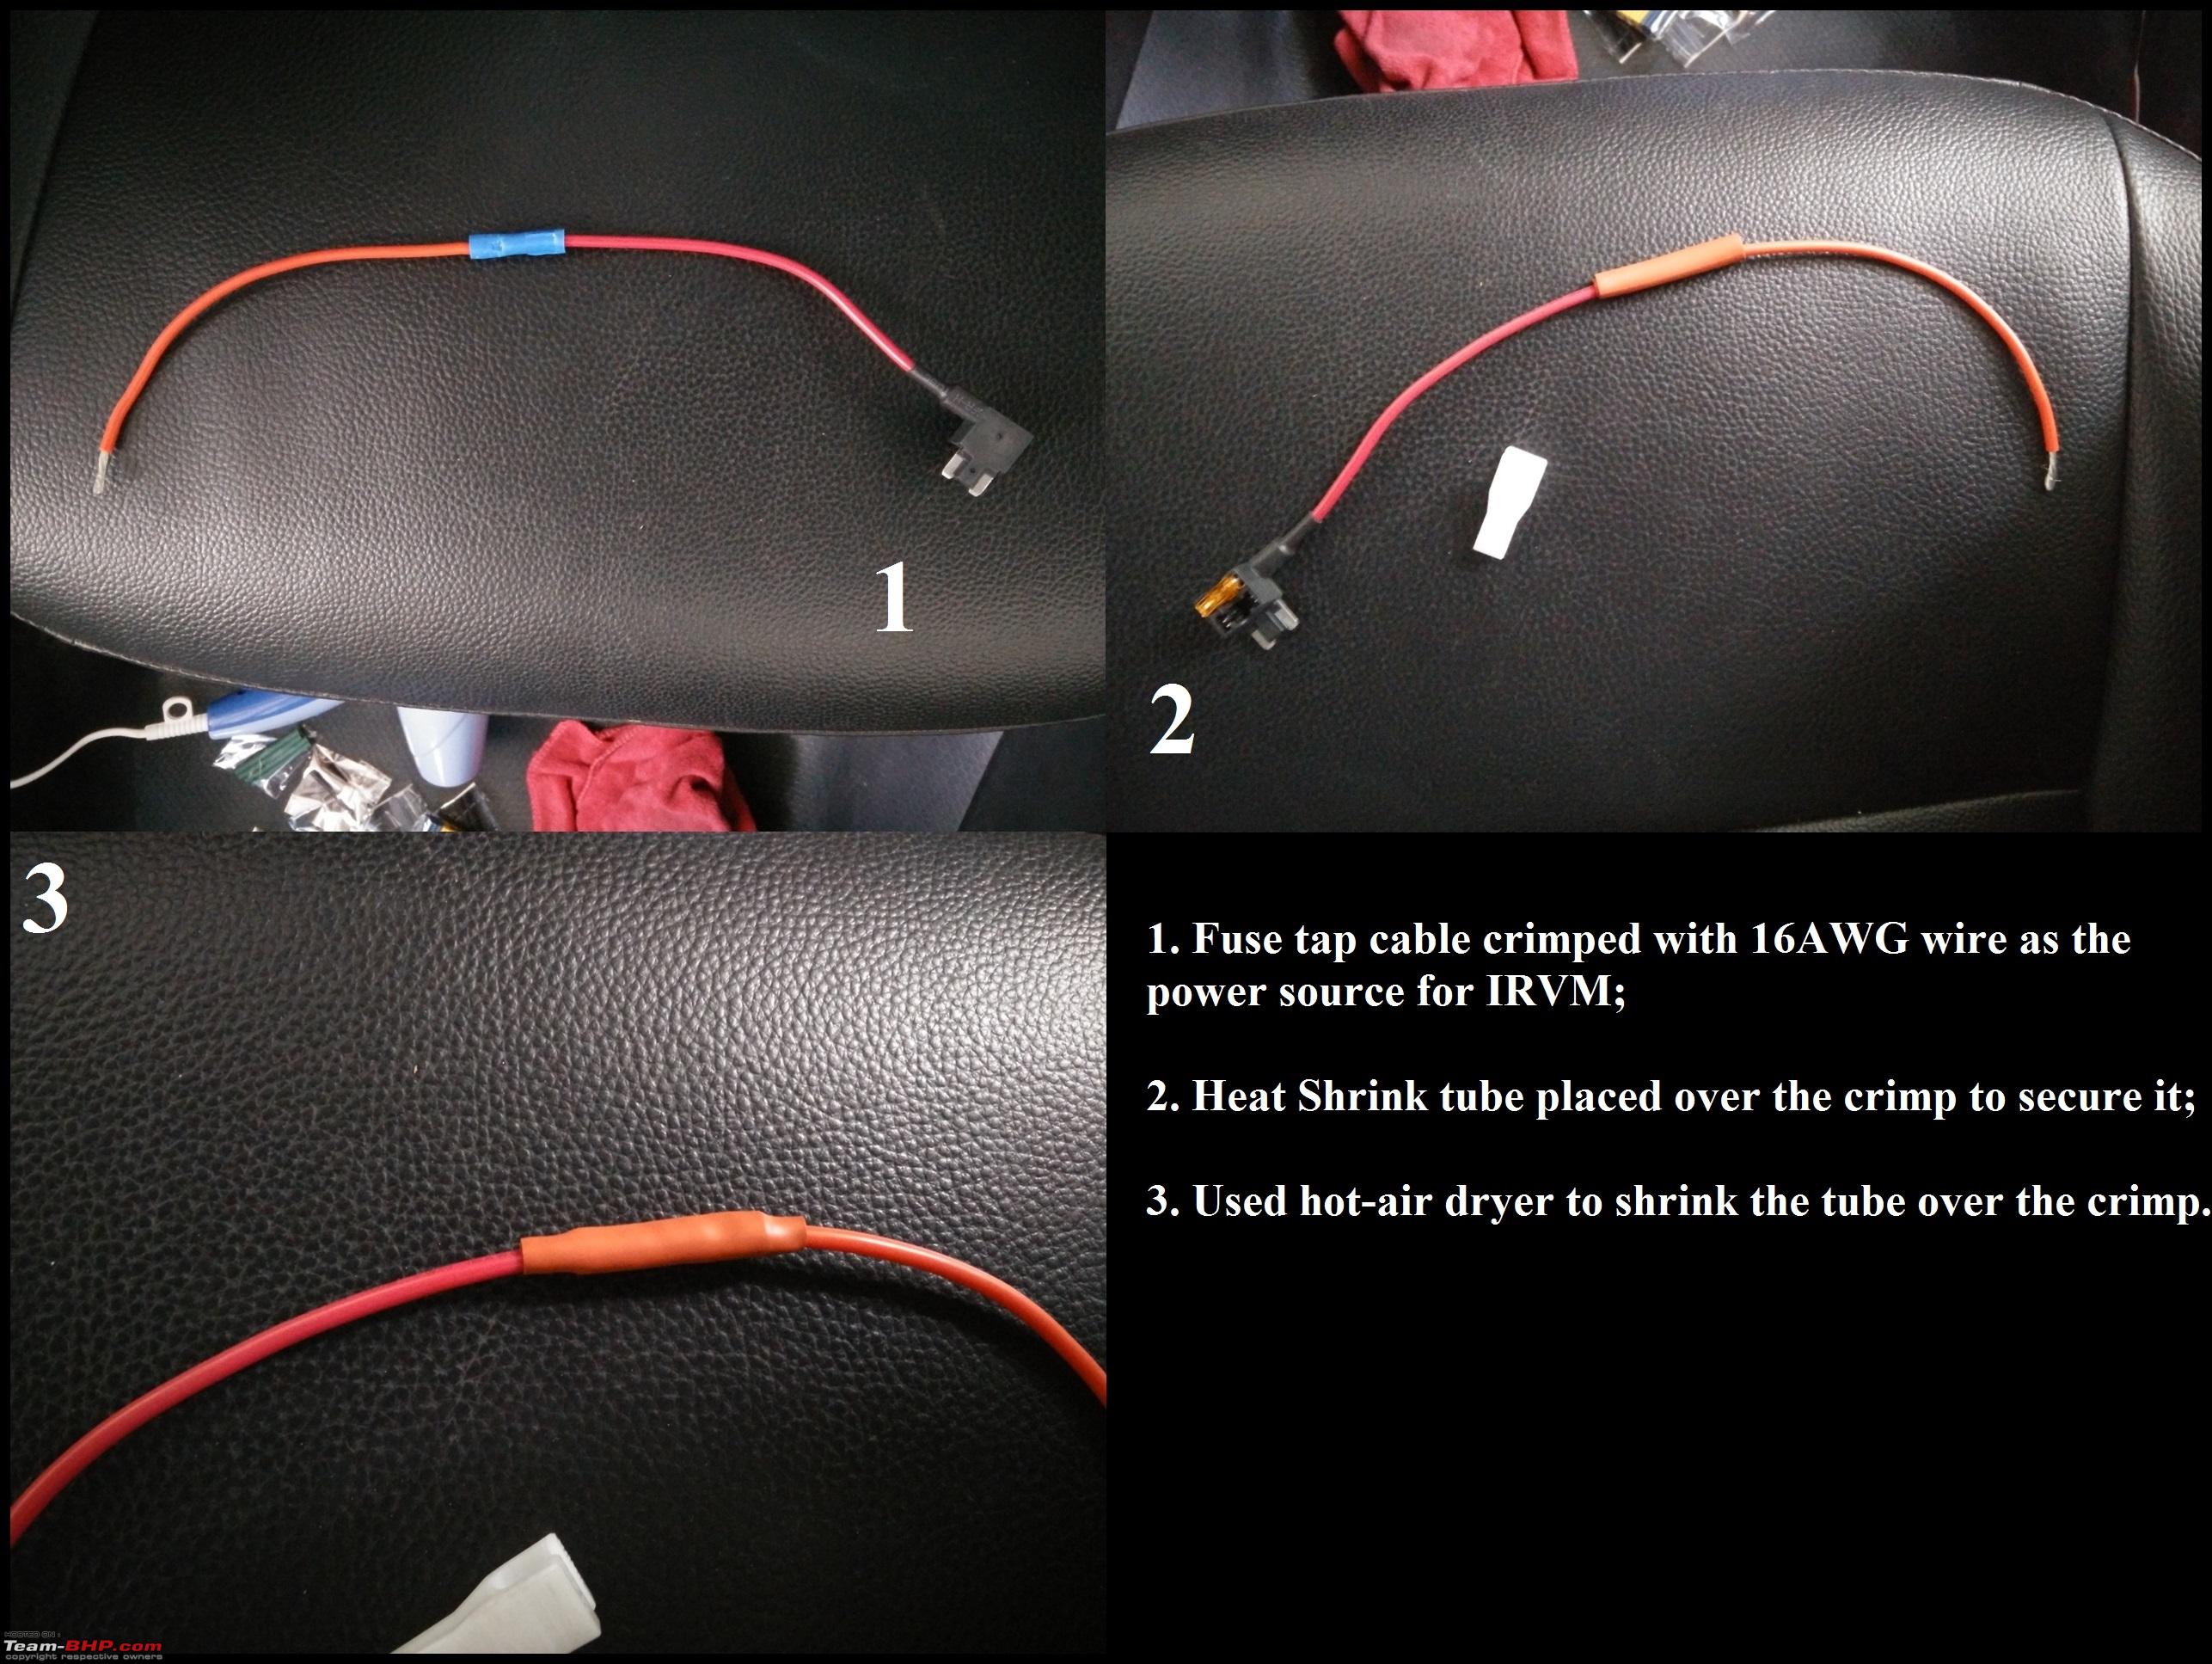
Step 6: With the Red wire acting as the power source, crimp it directly to the blue connector which is also called as butt connector that will be securely holding the connection after crimping. Insert the heat shrink tube prior to insulation the connections. After taping it, pull the heat shrink tube over the insulation and apply heat using the hair dryer to seal the connection properly.
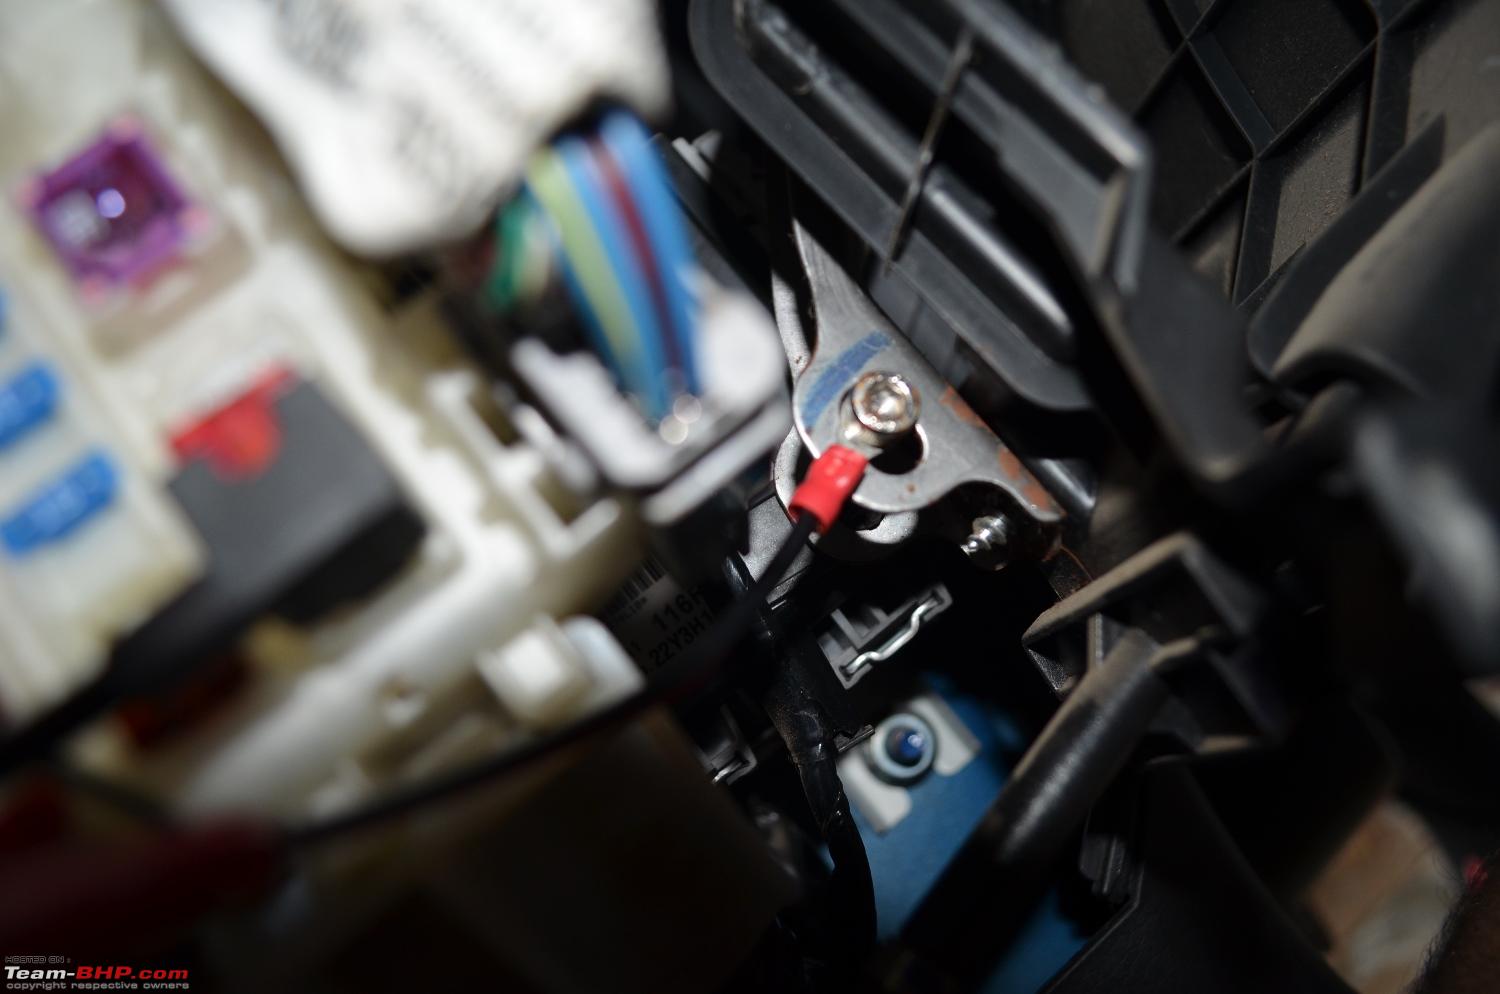
Step 7: One left is the Black Wire that is to be connected to Ground/Earthing. I chose a metal frame of the unit that holds the hood opener and fuse box frame holder after crimping. Insert the heat shrink tube prior to insulation the connections. After taping it, pull the heat shrink tube over the insulation and apply heat using the hair dryer to seal the connection properly.
Step 8: Add an appropriate fuse in the fuse tap unit to protect the circuit and the car electrical system. I chose to add a 5A fuse at the farther end of the fuse tap.
Voltage: 12V
Power drawn: 2W
Fuse required: 2W/12V = 0.16667A Thought if using a 2.5A but decided to be safe hence stuck to 5A.
Step 9: Refit the driver side A-pillar trim and beading after securing the wiring.
Step 10: Turn ON the ignition and check for the functioning of the IRVM.
__________________________________________________ ___________
Here is the pictorial description of the above steps for a better understanding:
OEM IRVM - Mounted by two star screws  OEM Bracket
 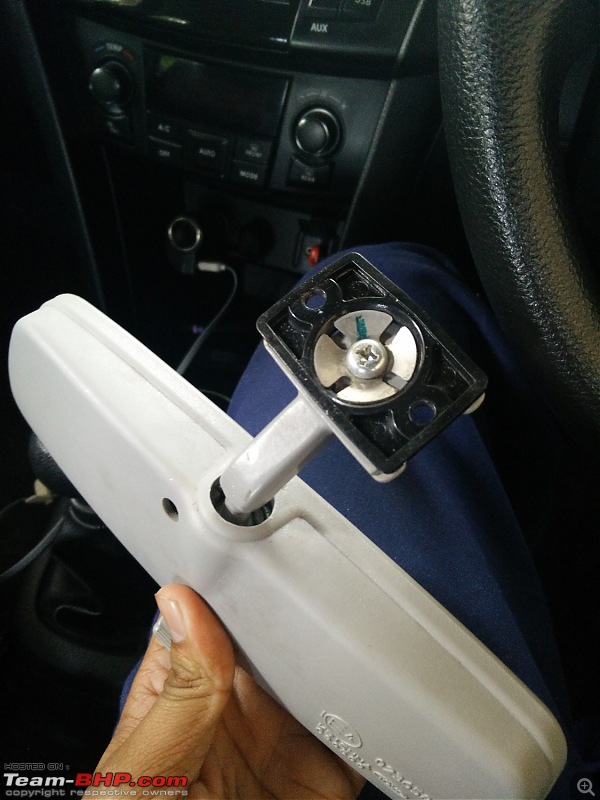 Driver side A-Pillar Trim Removal
  New IRVM in place
  Wire routing through A-pillar
  Fuse Box - Owners Manual
 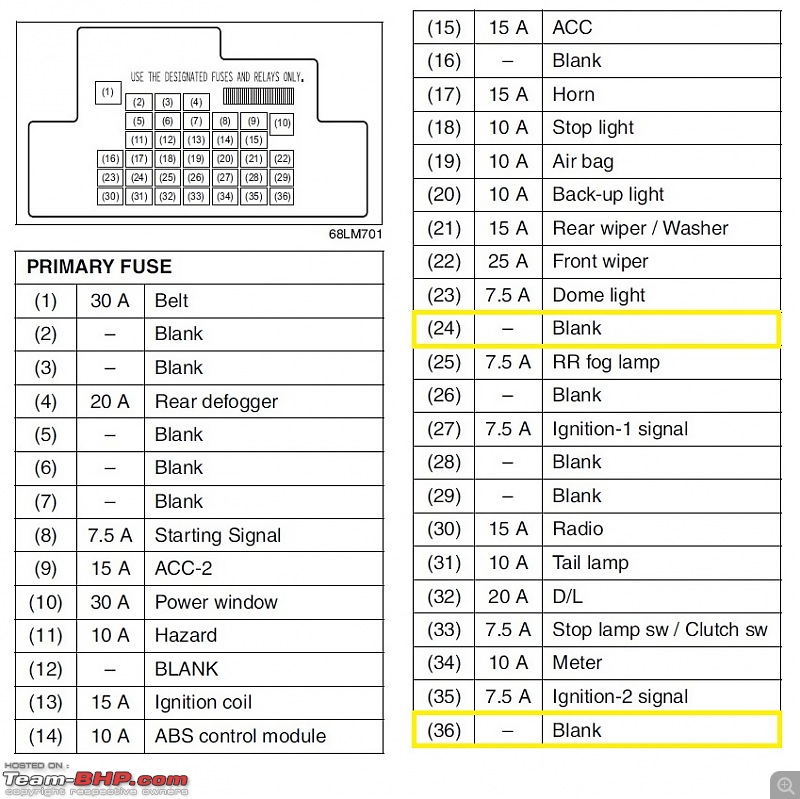 Open Fuses (Yellow ones)
 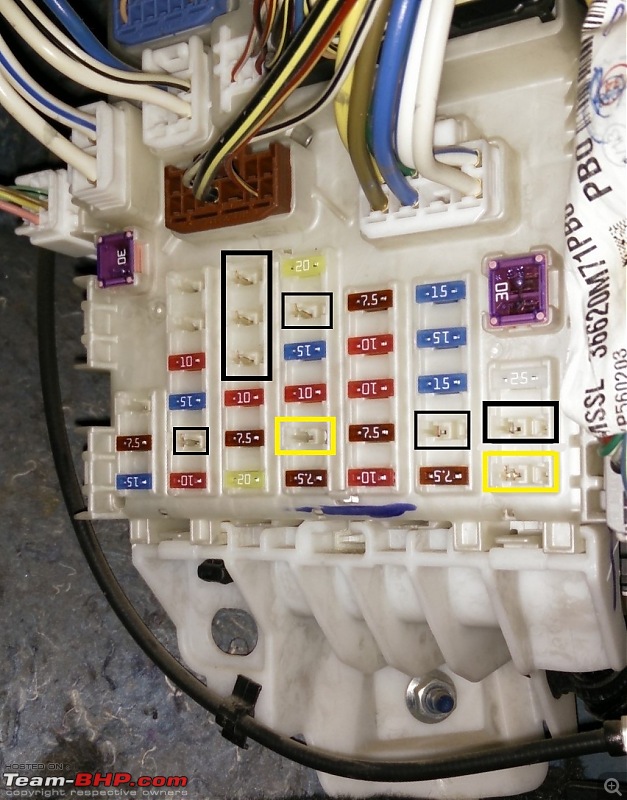 Fuse No.: 36 - The Chosen One
  Ground Connected to test the Fuse
  Fuse point Test (Left - Ignition OFF; Right - Ignition ON)
  Taped temporarily for Trial
  Earthing Point
  Power cable crimping
  Power cable fixed in the fuse box and heat shrink
 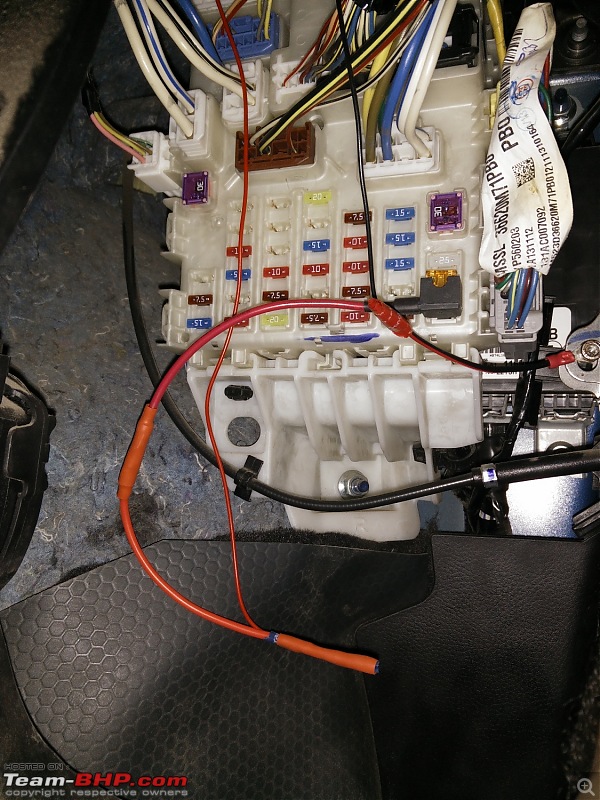 Earthing fixed and heat shrink
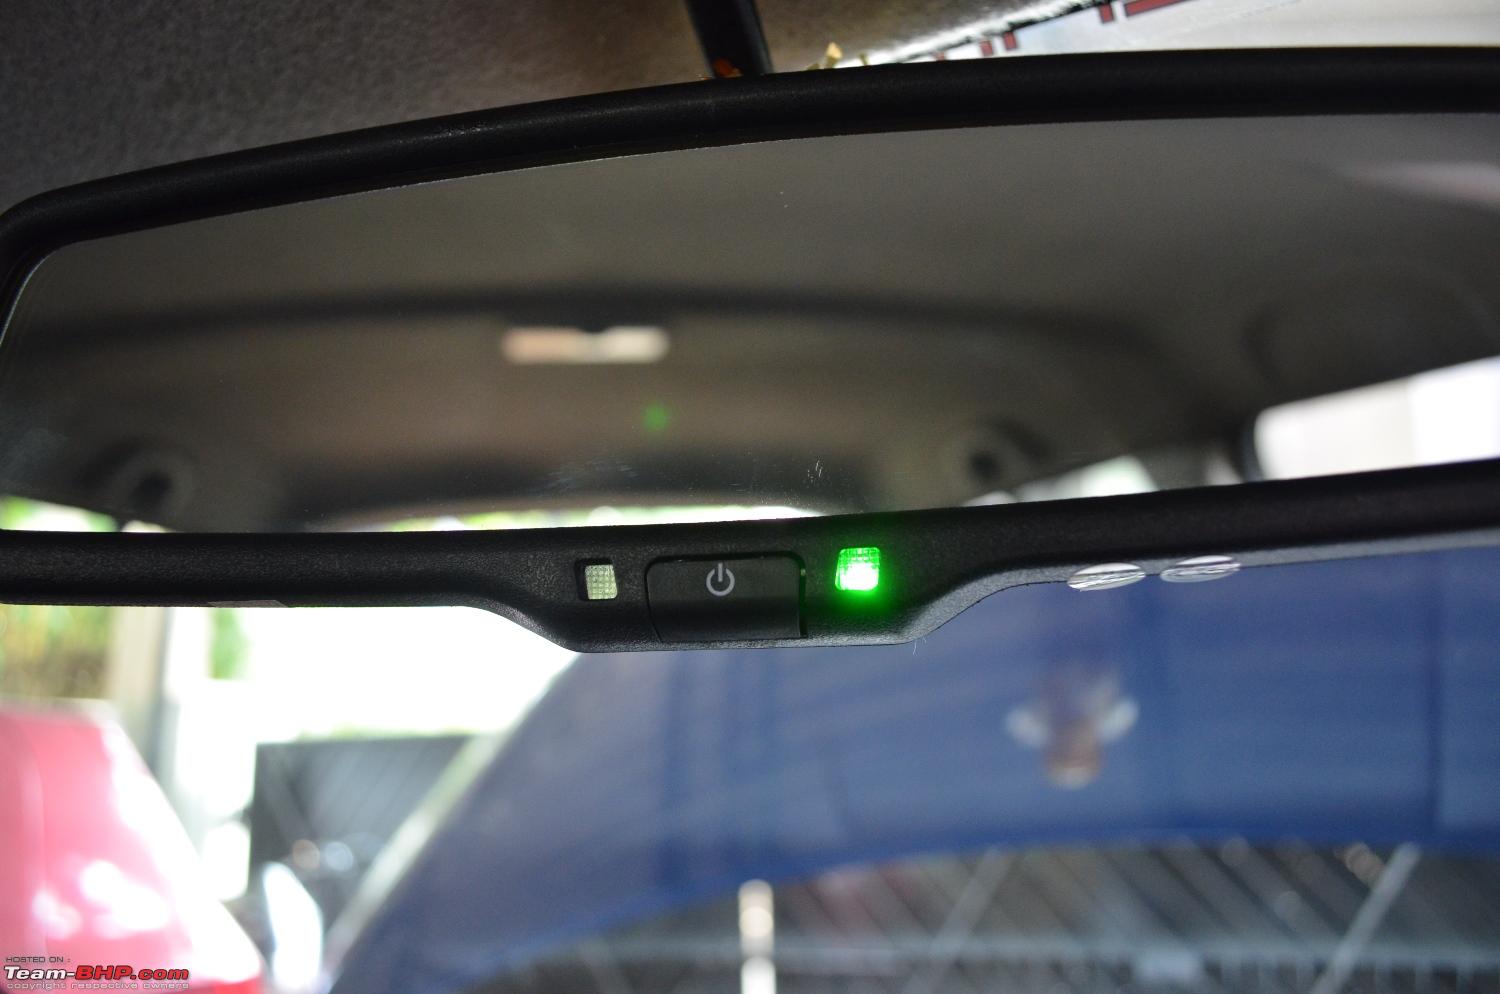
 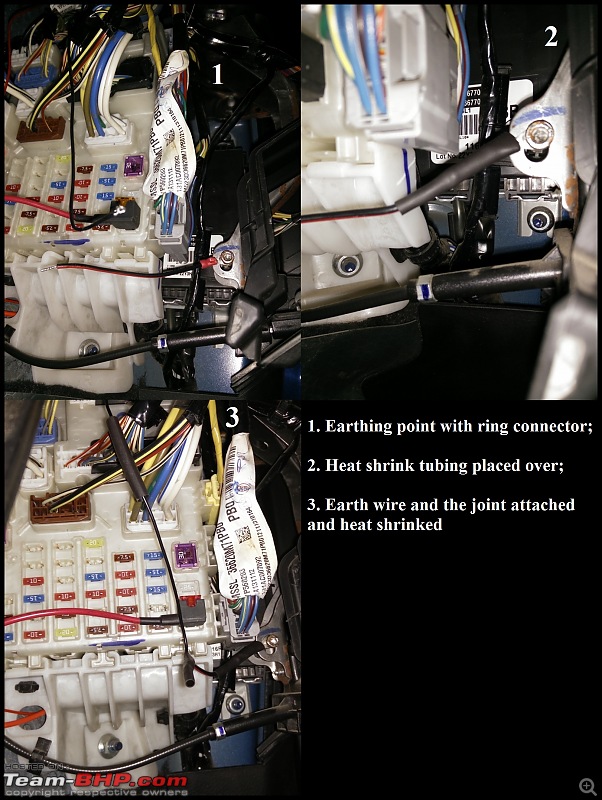 Sensors and Switch on the IRVM Unit
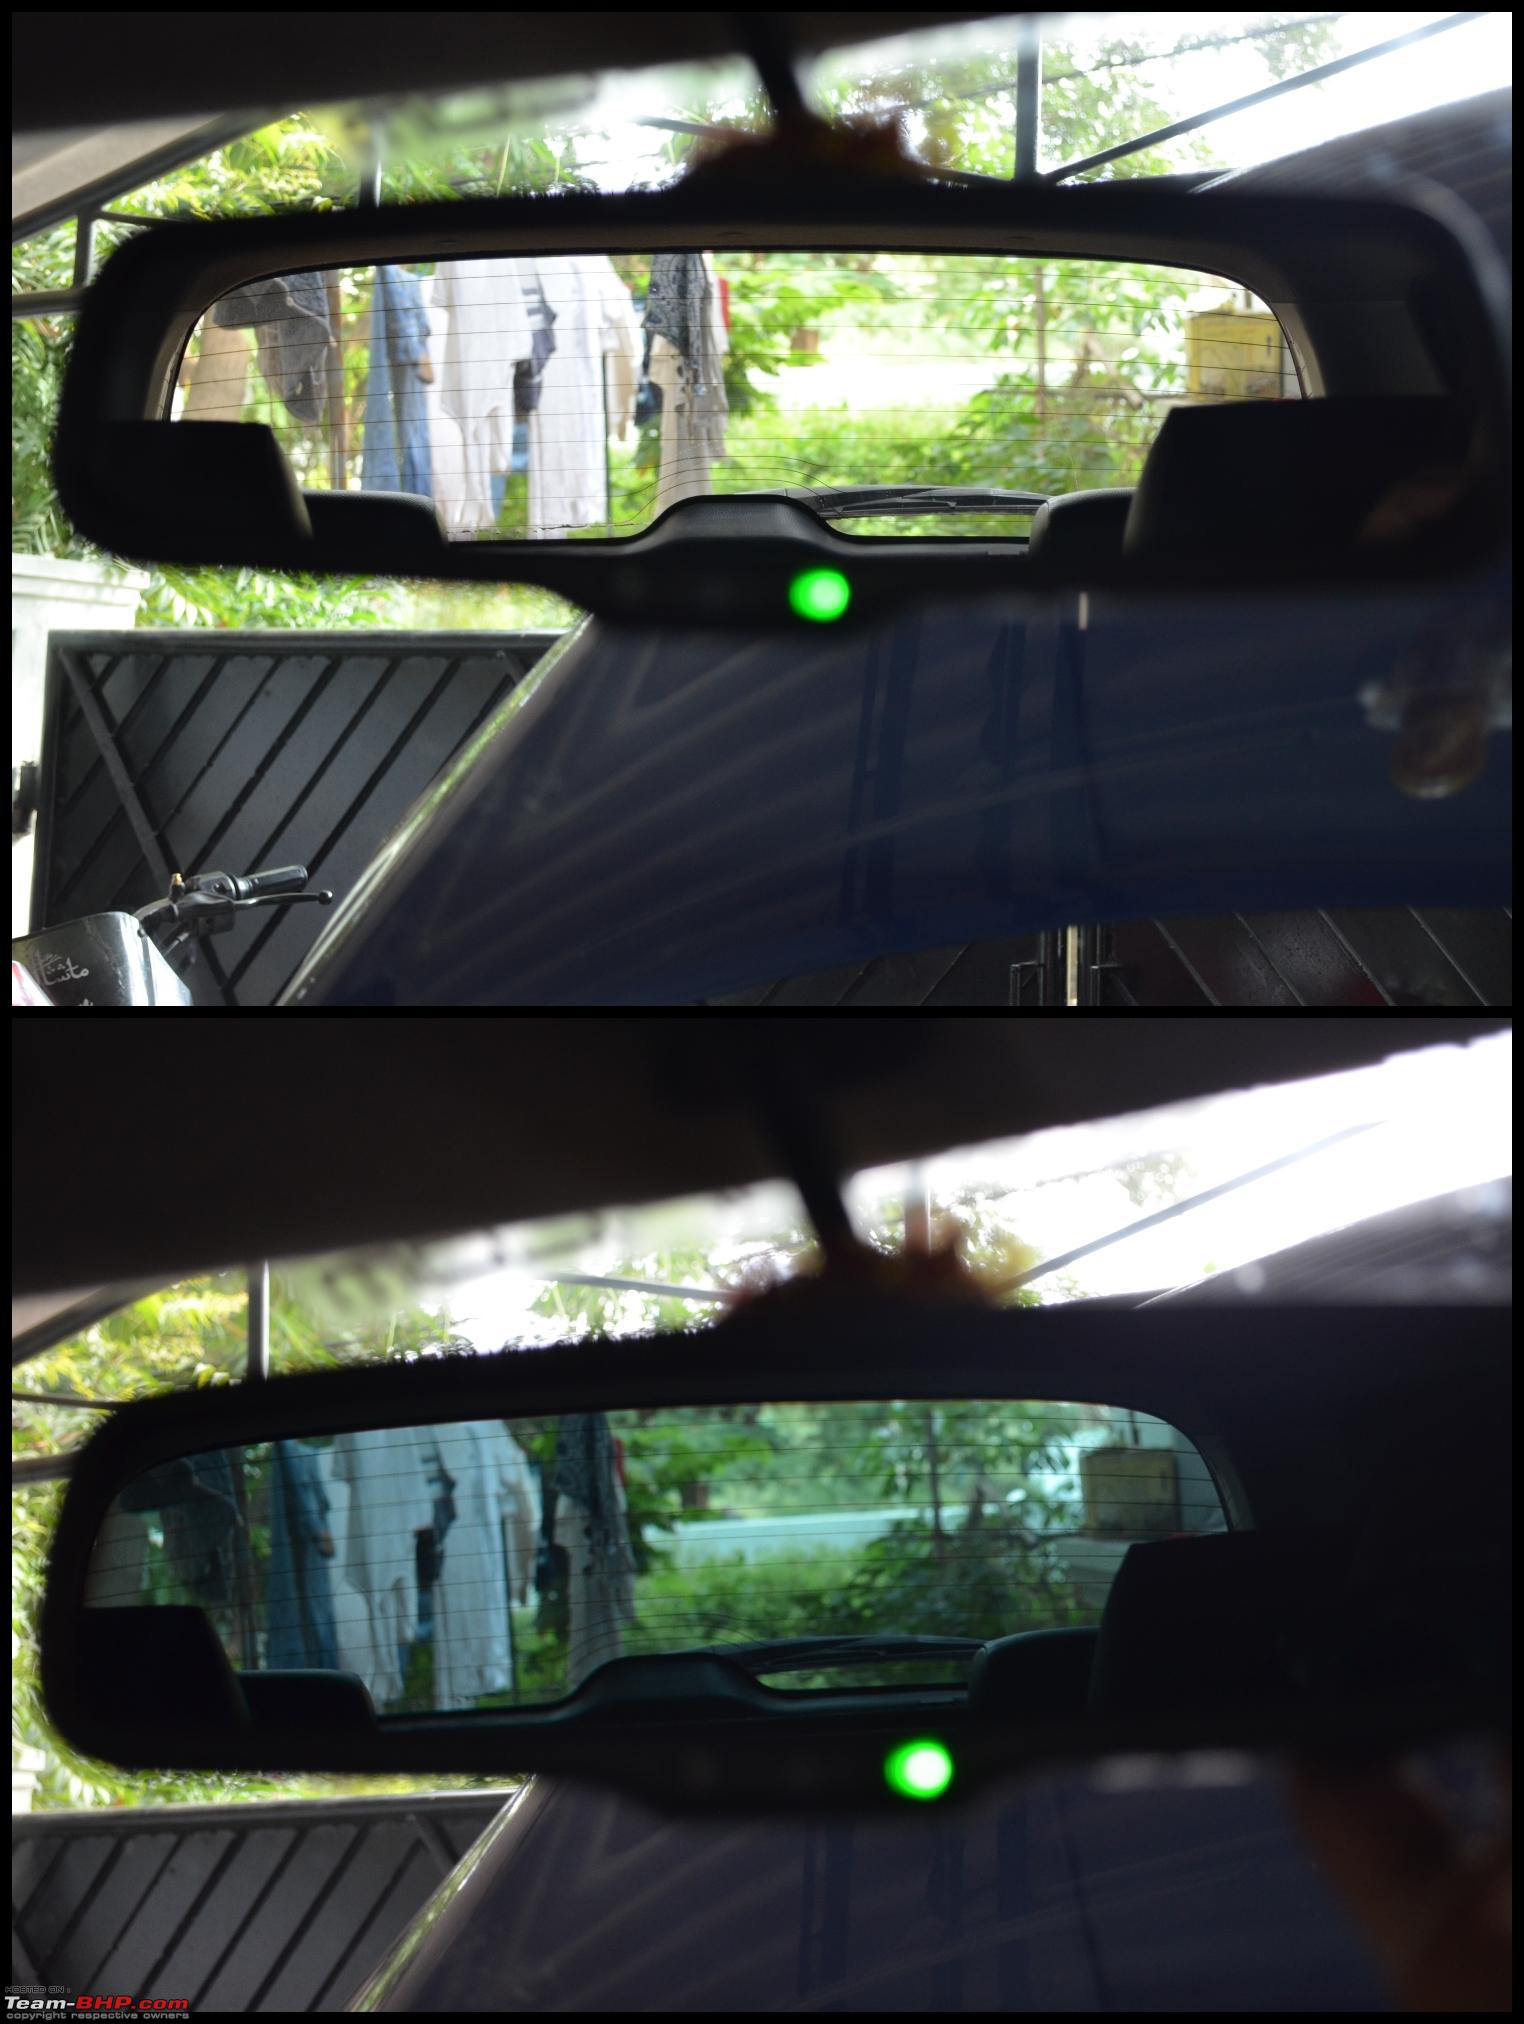
 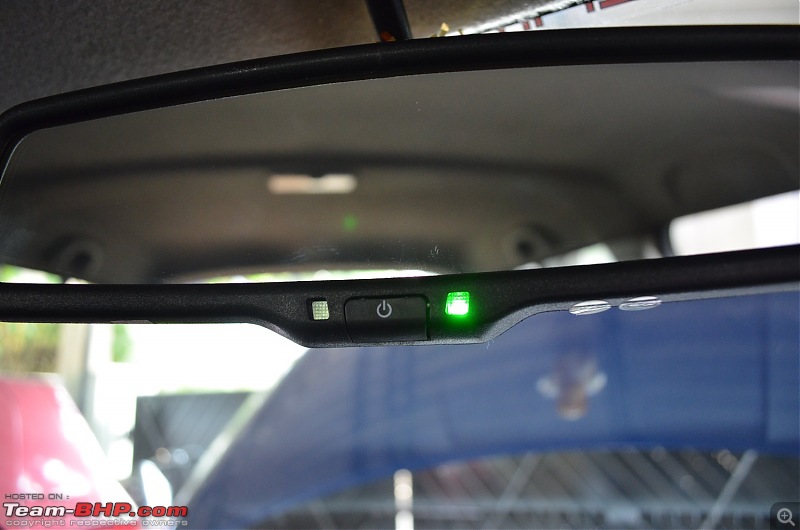 Trial Shot
2) Outside Rear View Mirror Changeover from Plain to Blue Tint a.k.a Anti-glare type
Getting the anti-glare type of mirror for the inside was pretty easy but getting the same for outside mirror was a literal pain. All the sellers that I had contacted on AliExpress had the anti-glare mirrors but that were specifically for the earlier model of the Swift and SX4. (Like the 2007 model Swift ORVM design).
I have been browsing many sites, email conversation but one fine day I landed on a search on Google Images for Anti-glare mirror for Swift 2013 model. Got a link of a YouTube video showing the outside rear view mirror with anti-glare setup integrated with an LED indicator too (Arrow shape).
Here's the link to that Video: Anti-glare ORVM on Swift
Shot an email to the seller for the same requirement. The M.O.Q (Minimum order quantity) was 500 pieces and the rates vary with the order quantity. All I mentioned in the email was a pair of the mirror for me car along with the picture of the ORVM on my Swift.
Received a reply the next day quoting the following:
Mirror cost: $91
Shipping: $25
Total: $116 = ₹7700/-
Seeing that price I dropped the plan of getting the mirrors as it was standing at 7.7K and not worth at all. Casually asked the seller what type of mirror is this and why is it so costly? He replied saying that the mirror comes incorporated with the an LED indicator (Arrow shape) along with the wiring and heating function too making the costs too high. I asked for a quote
WITHOUT the indicator and heating function for just a plain anti-glare mirror. I received the following quote:
Mirror cost: $40
Shipping: $15
Total: $55 = ₹3648/-
Thats almost 50% reduction in price so I went ahead with the deal and asked for mode of payment. He replied saying preferred method is PayPal and in-case that isn't feasible then the only other option is Western Union money transfer. I already had PayPal Account so it wasn't an issue. Emailed the seller and paid money for 2 pairs as a friend too went ahead with this modification.
Once the payment was made, within half an hour I got the images of the ORVM ready for shipping and also the seller sent an email stating the Tracking number and days it would take to reach me. It was shipped by Thailand Post and took 14 days. Pretty fast and better than shipments that I get from AliExpress.
Coming to the installation:
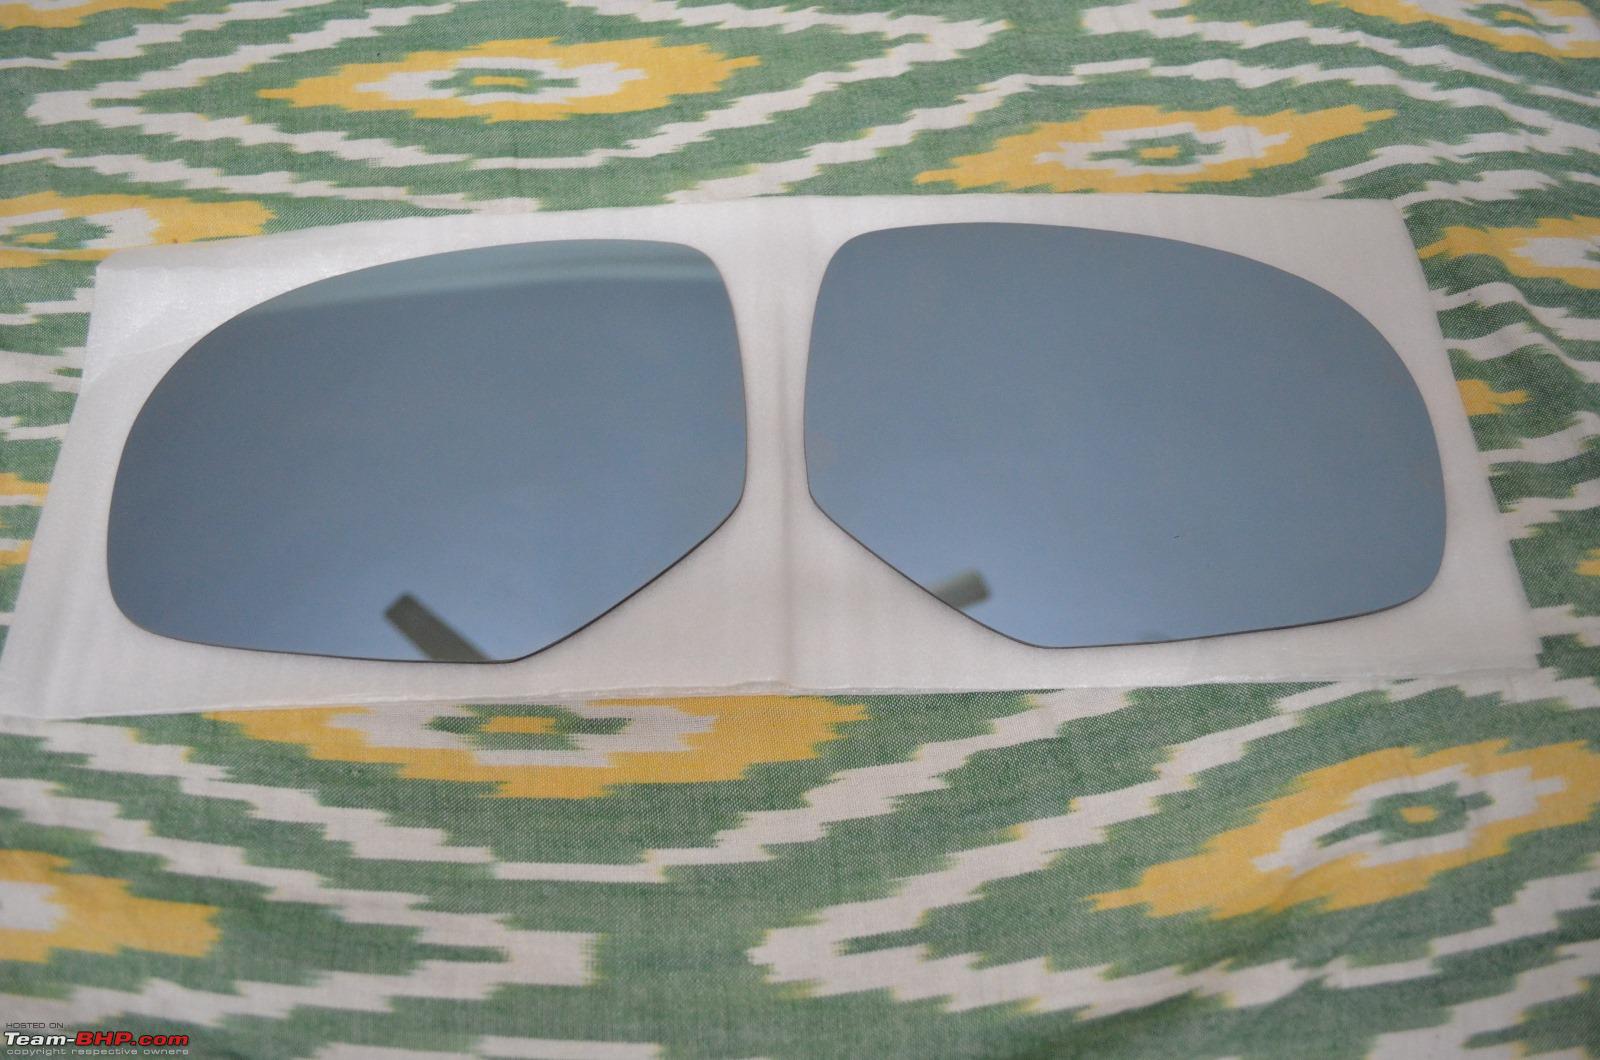
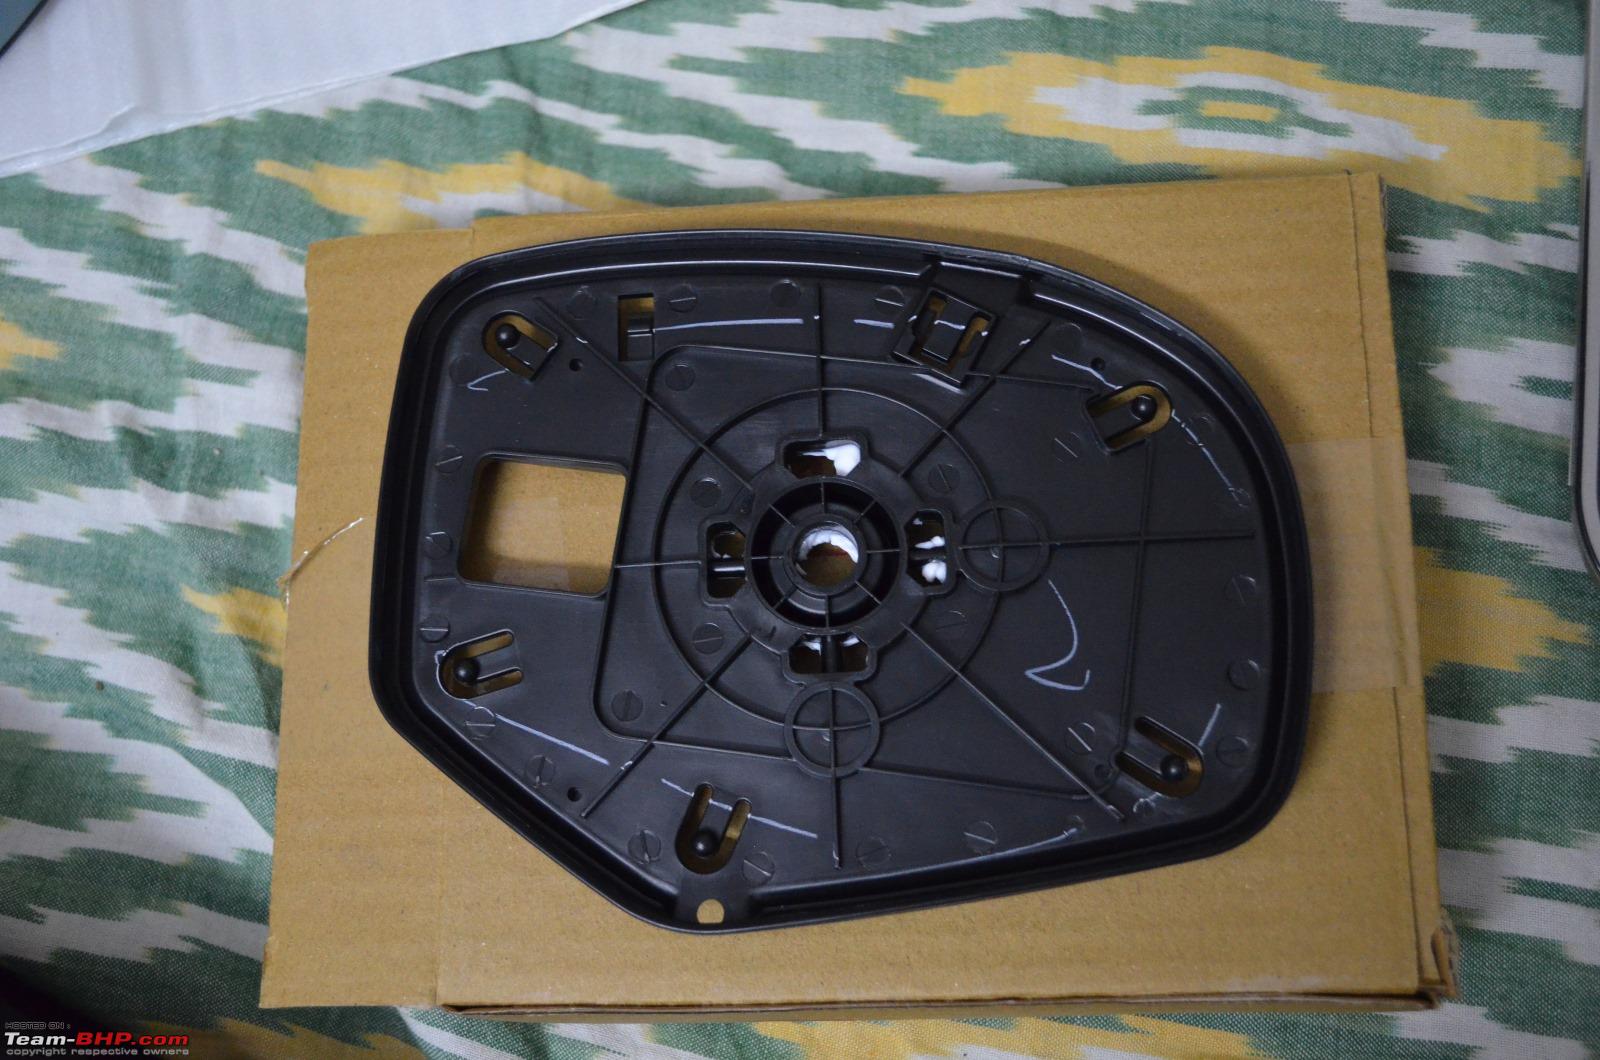
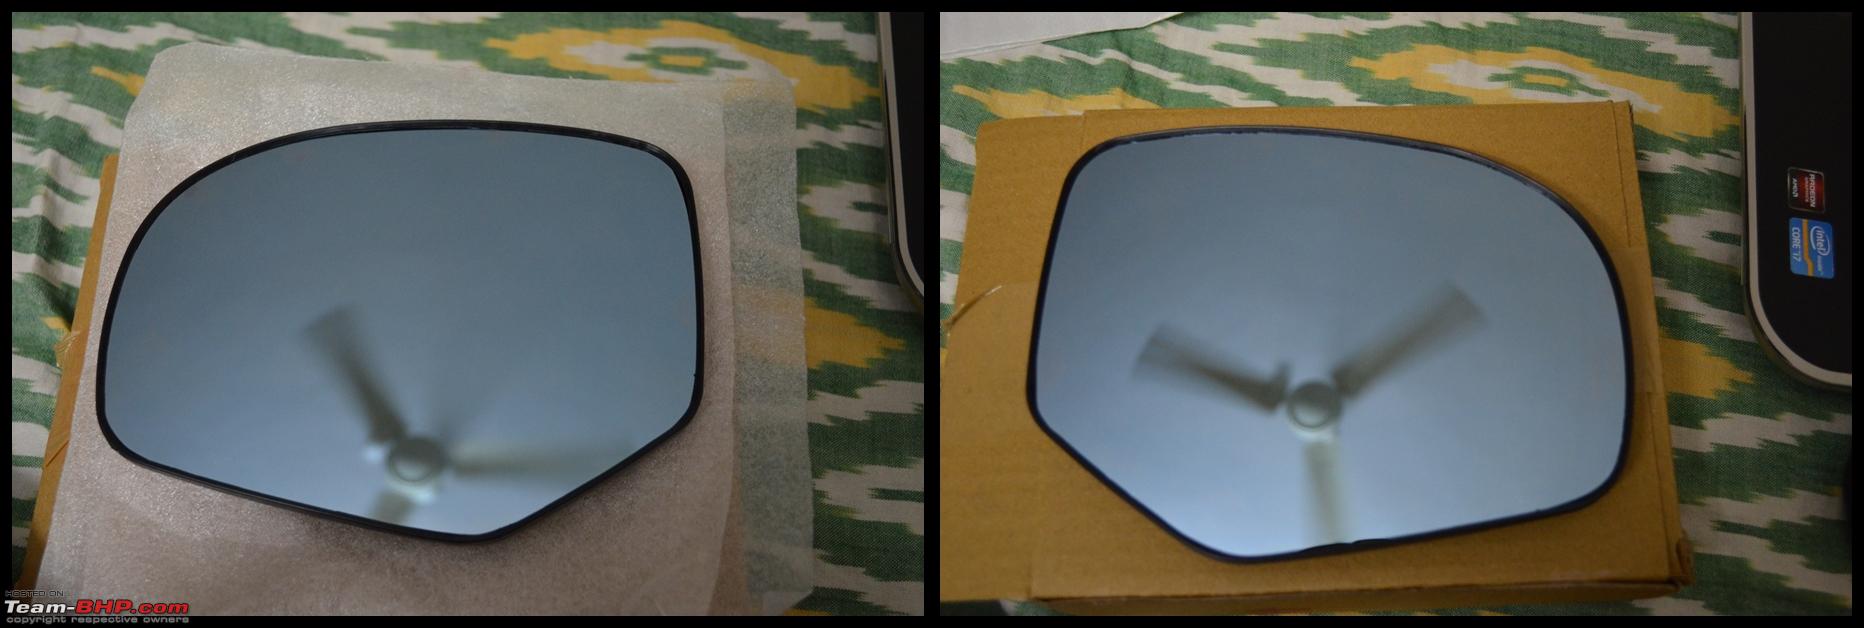
The item that is sent is
ONLY the glass that is fixed in the plastic cover (Glass Holder) which sits in the ORVM housing. I used my original ORVM plastic cover and kept aside the OEM transparent glass for later use.
Items required OEM plastic cover - Glass holder (Black)  Anti-glare tint glass
  Hot air gun (I used a Hair dryer)
  Lets move onto the procedure for completing the installation...
With all the items in hand, let's start put them together:
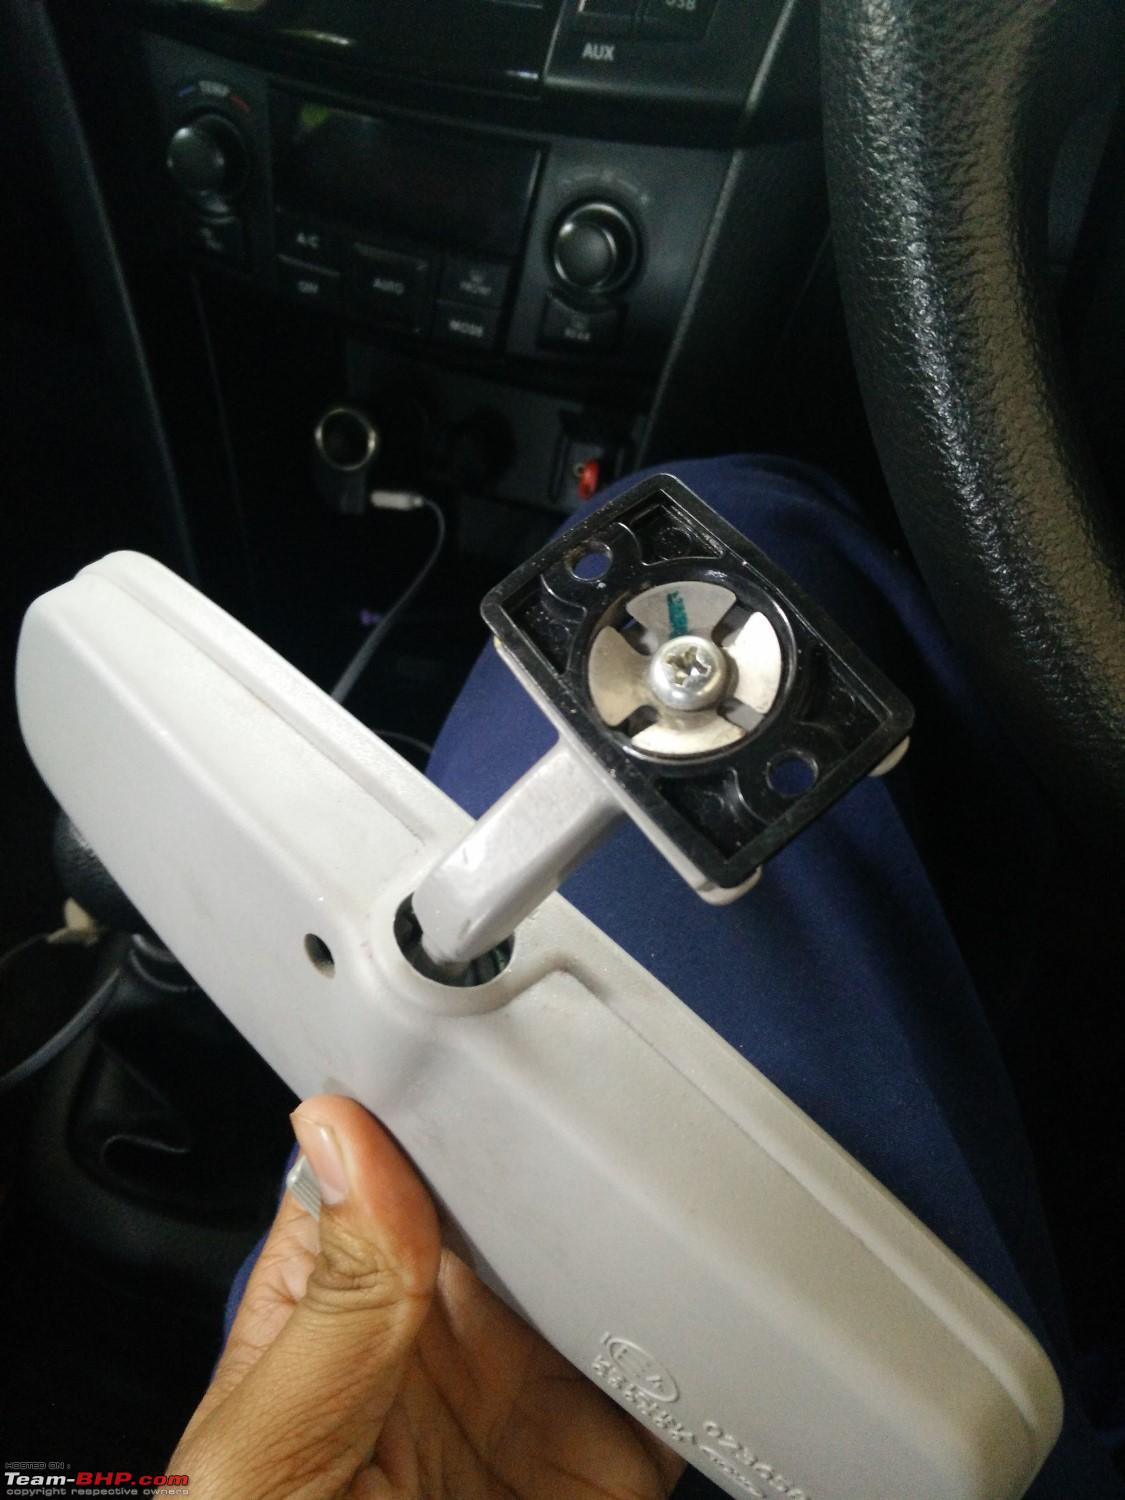
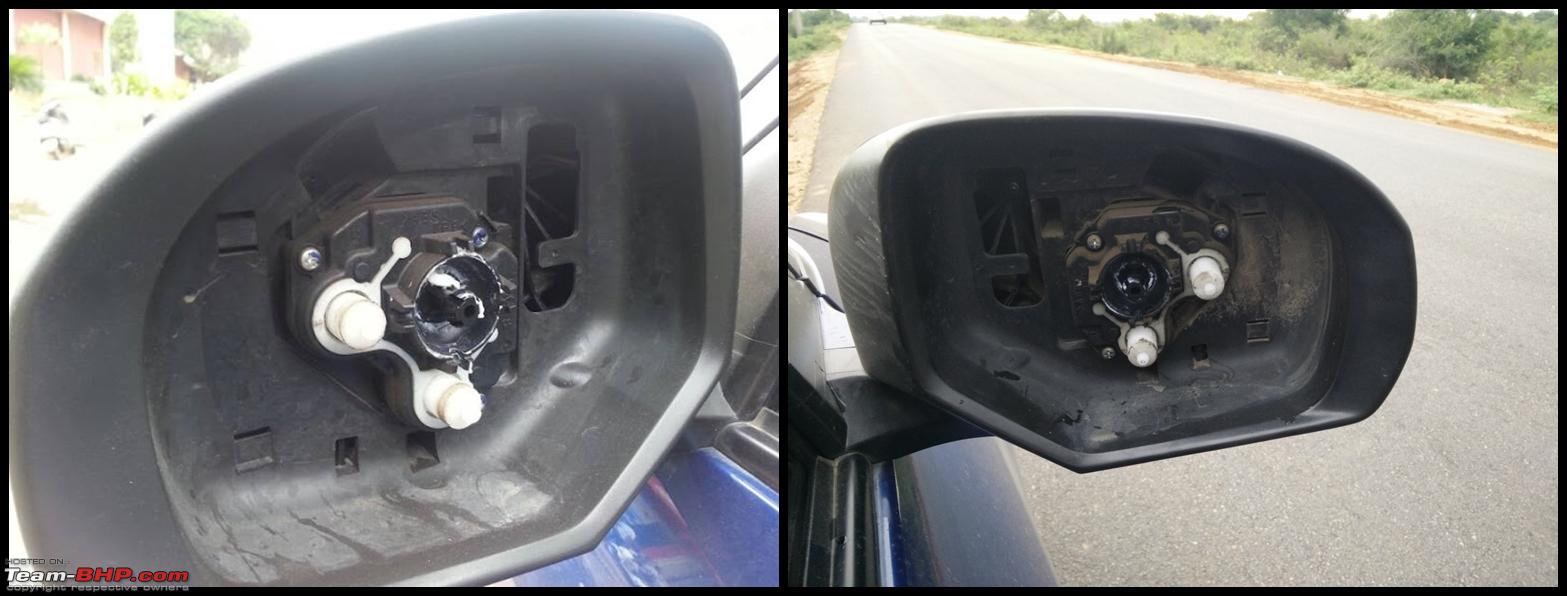
Step – 1: Using a flat-head screw driver, pull the ORVM glass out of the mounts from the mirror assembly
*. The glass holder is what is removed from ORVM unit.
Step – 2: Blow hot air using the hot air gun over the glass holder (plastic) so that it is easy to bend the cover to free the glass from the plastic holder
**.
Step – 3: Carefully push the plastic cover over from the glass to free it. The process is the same as used when a new tyre is required to be put on a wheel.
Step – 4: Once the OEM glass is free, blow hot air over the plastic cover again and fix the new anti-glare glass in its place.
Step – 5: After the glass is changed, fix it to the ORVM mounts carefully.
Step – 6: Test both the ORVM's for the electrical adjustments so as to ensure if they have seated fully-in or not. We are done and good to go!!
*NOTE: Exercise caution to be gentle or else the mounting pins will be damaged making the install useless (MASS will quote for a full ORVM replacement if it does happen).
**NOTE: Exercise caution as it is direct glass that is being pulled out. Wear gloves so that there no cuts / bleeding later on. The glass has sharp edges!
__________________________________________________ ______________________________
I’ll let the pictures do the talking so that things are understood easier:
Gannu's ORVM - Anti-Glare type 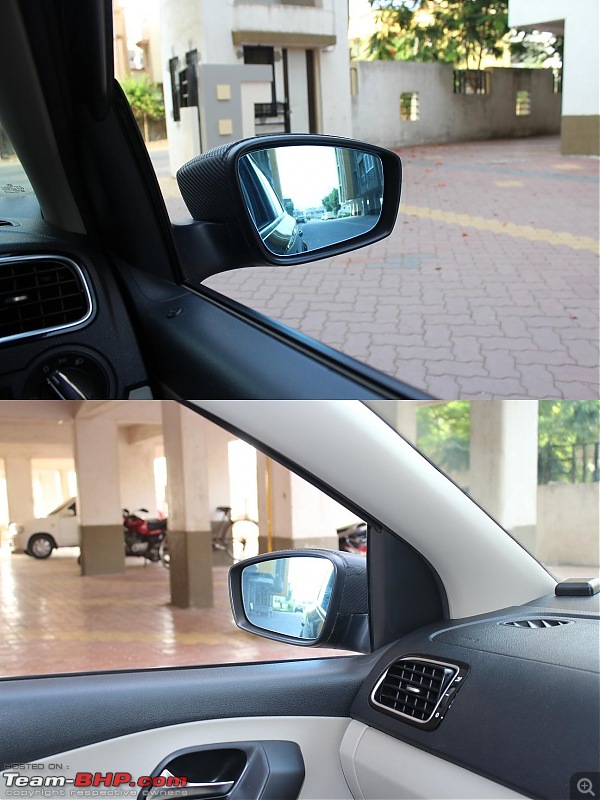 What the suppliers @ AliExpress had
  What type I was searching for
 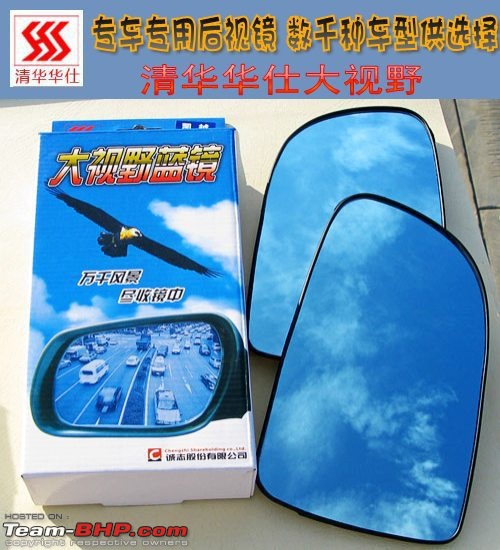 Choices that I was offered
  What I chose and got
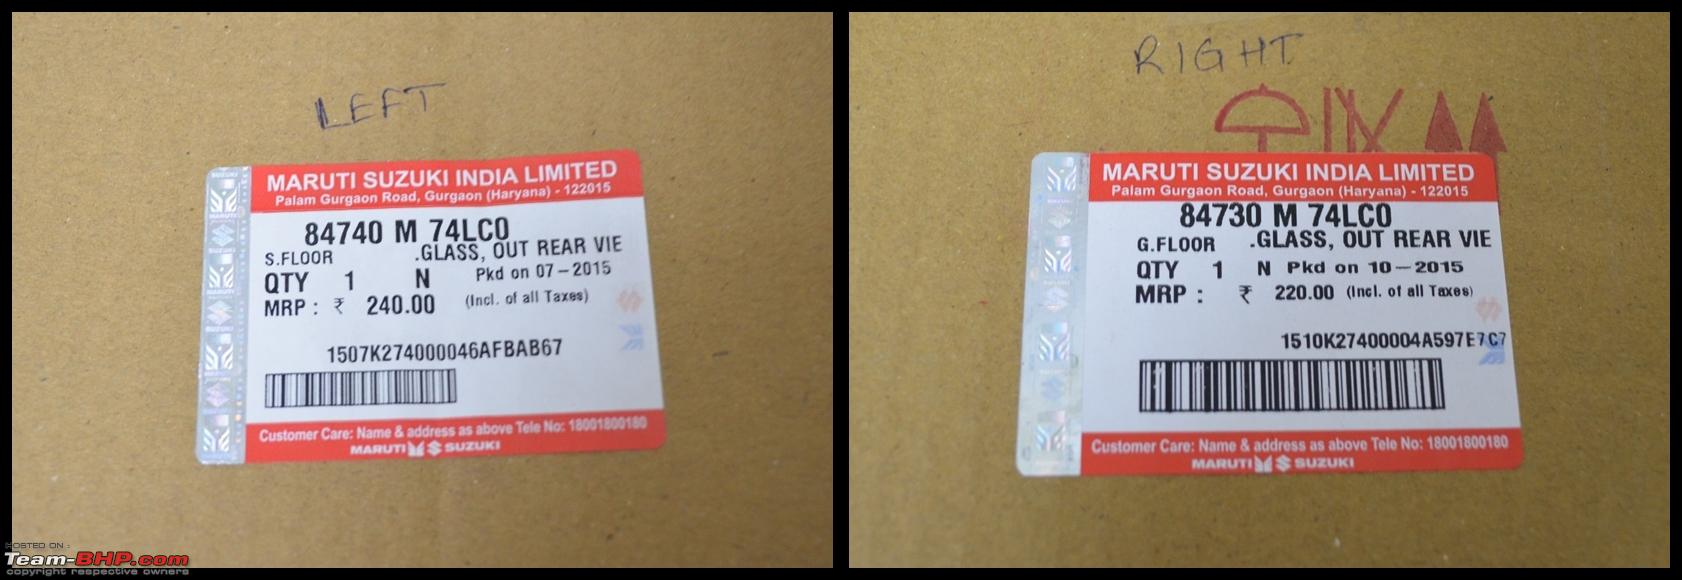
  OEM ORVM - Part Numbers
  ORVM Unit with the glass removed
  Glass Holder (Plastic)
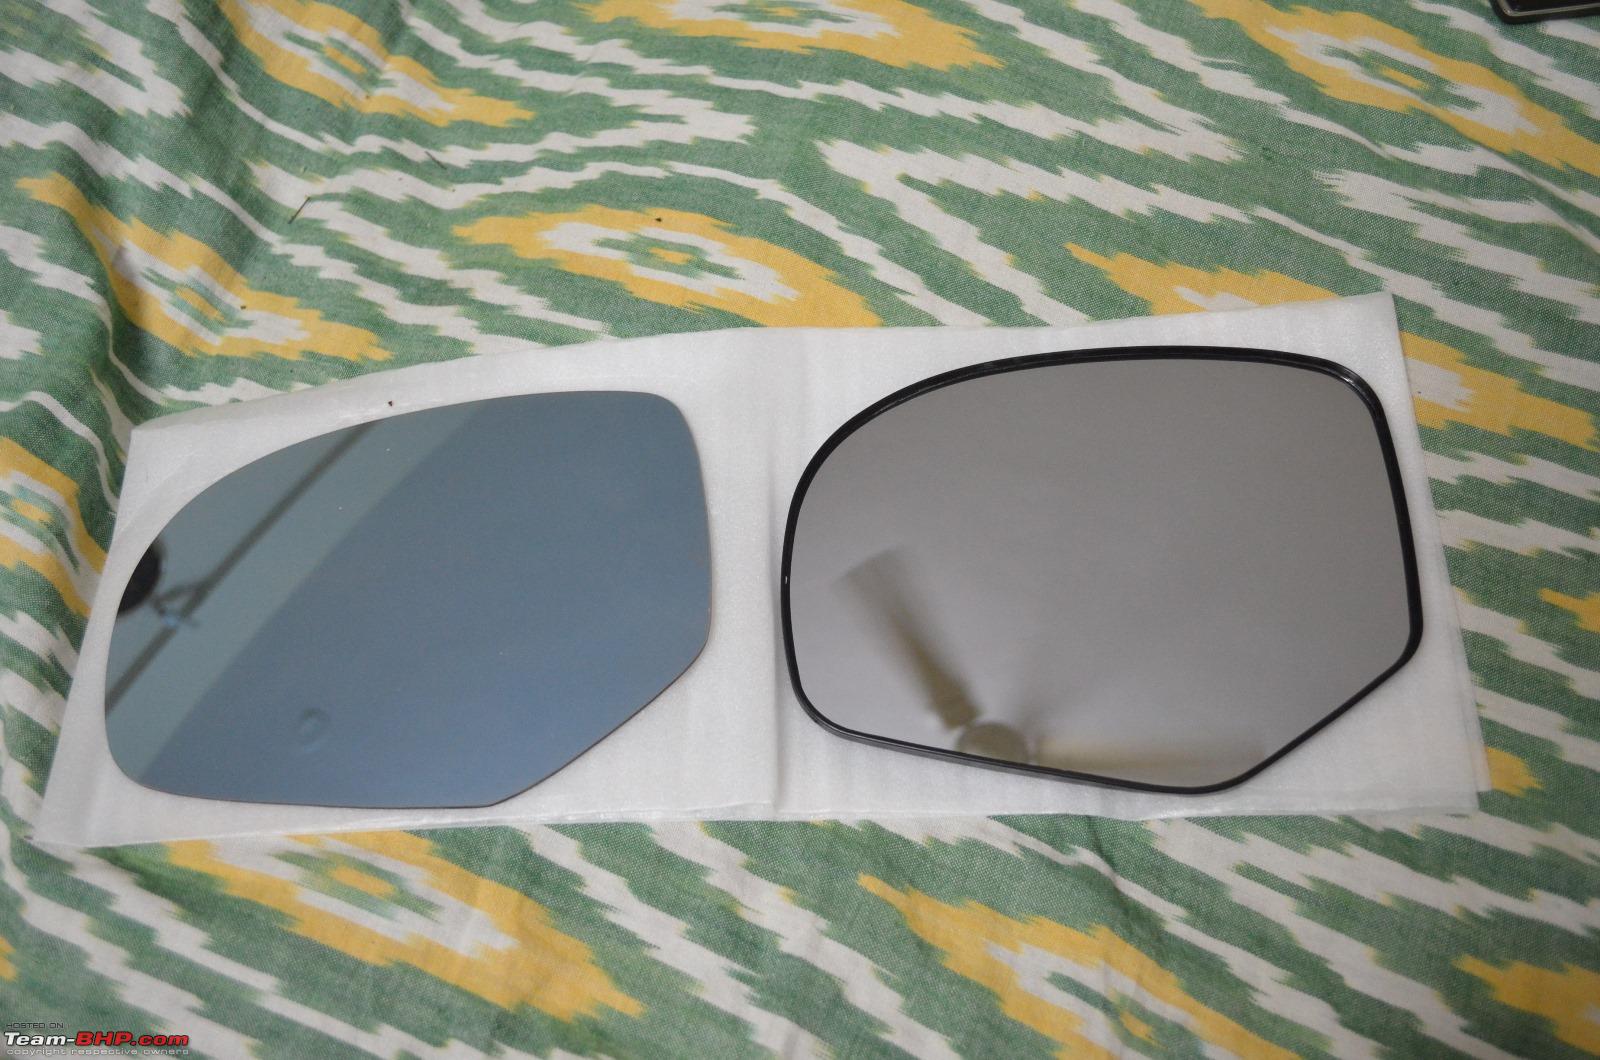
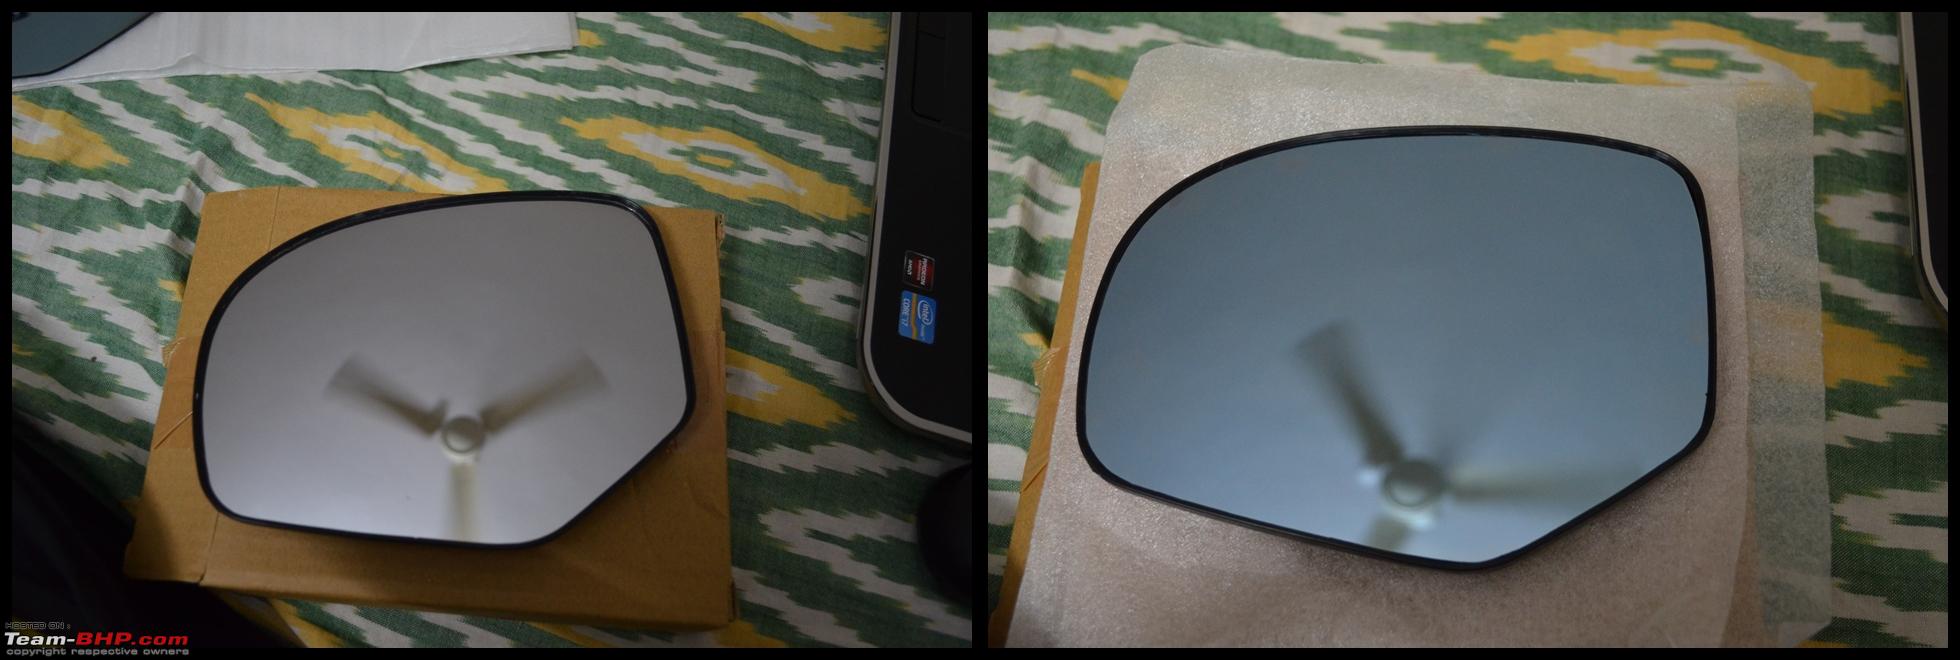
  Glass Comparison - (Left: Anti glare glass and Right: OEM Glass)
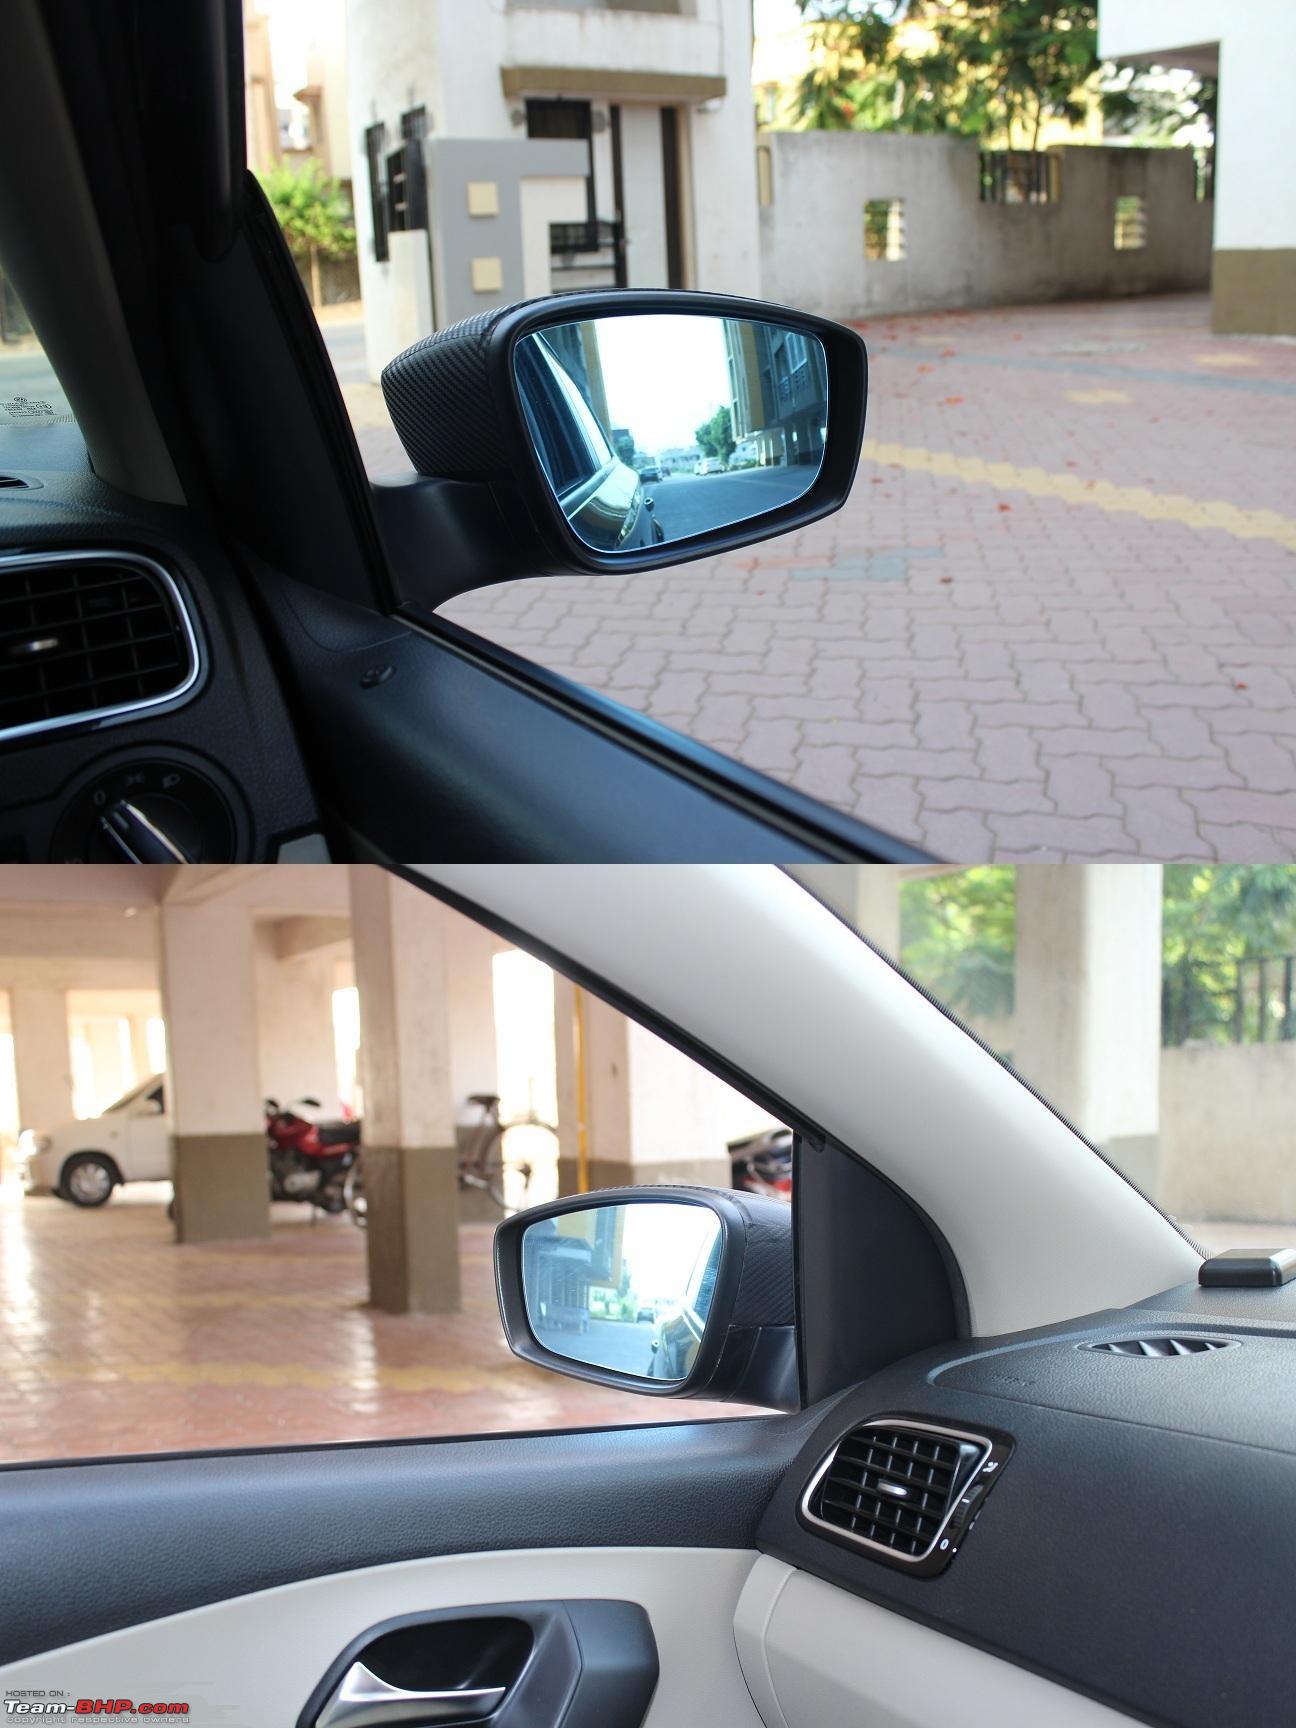
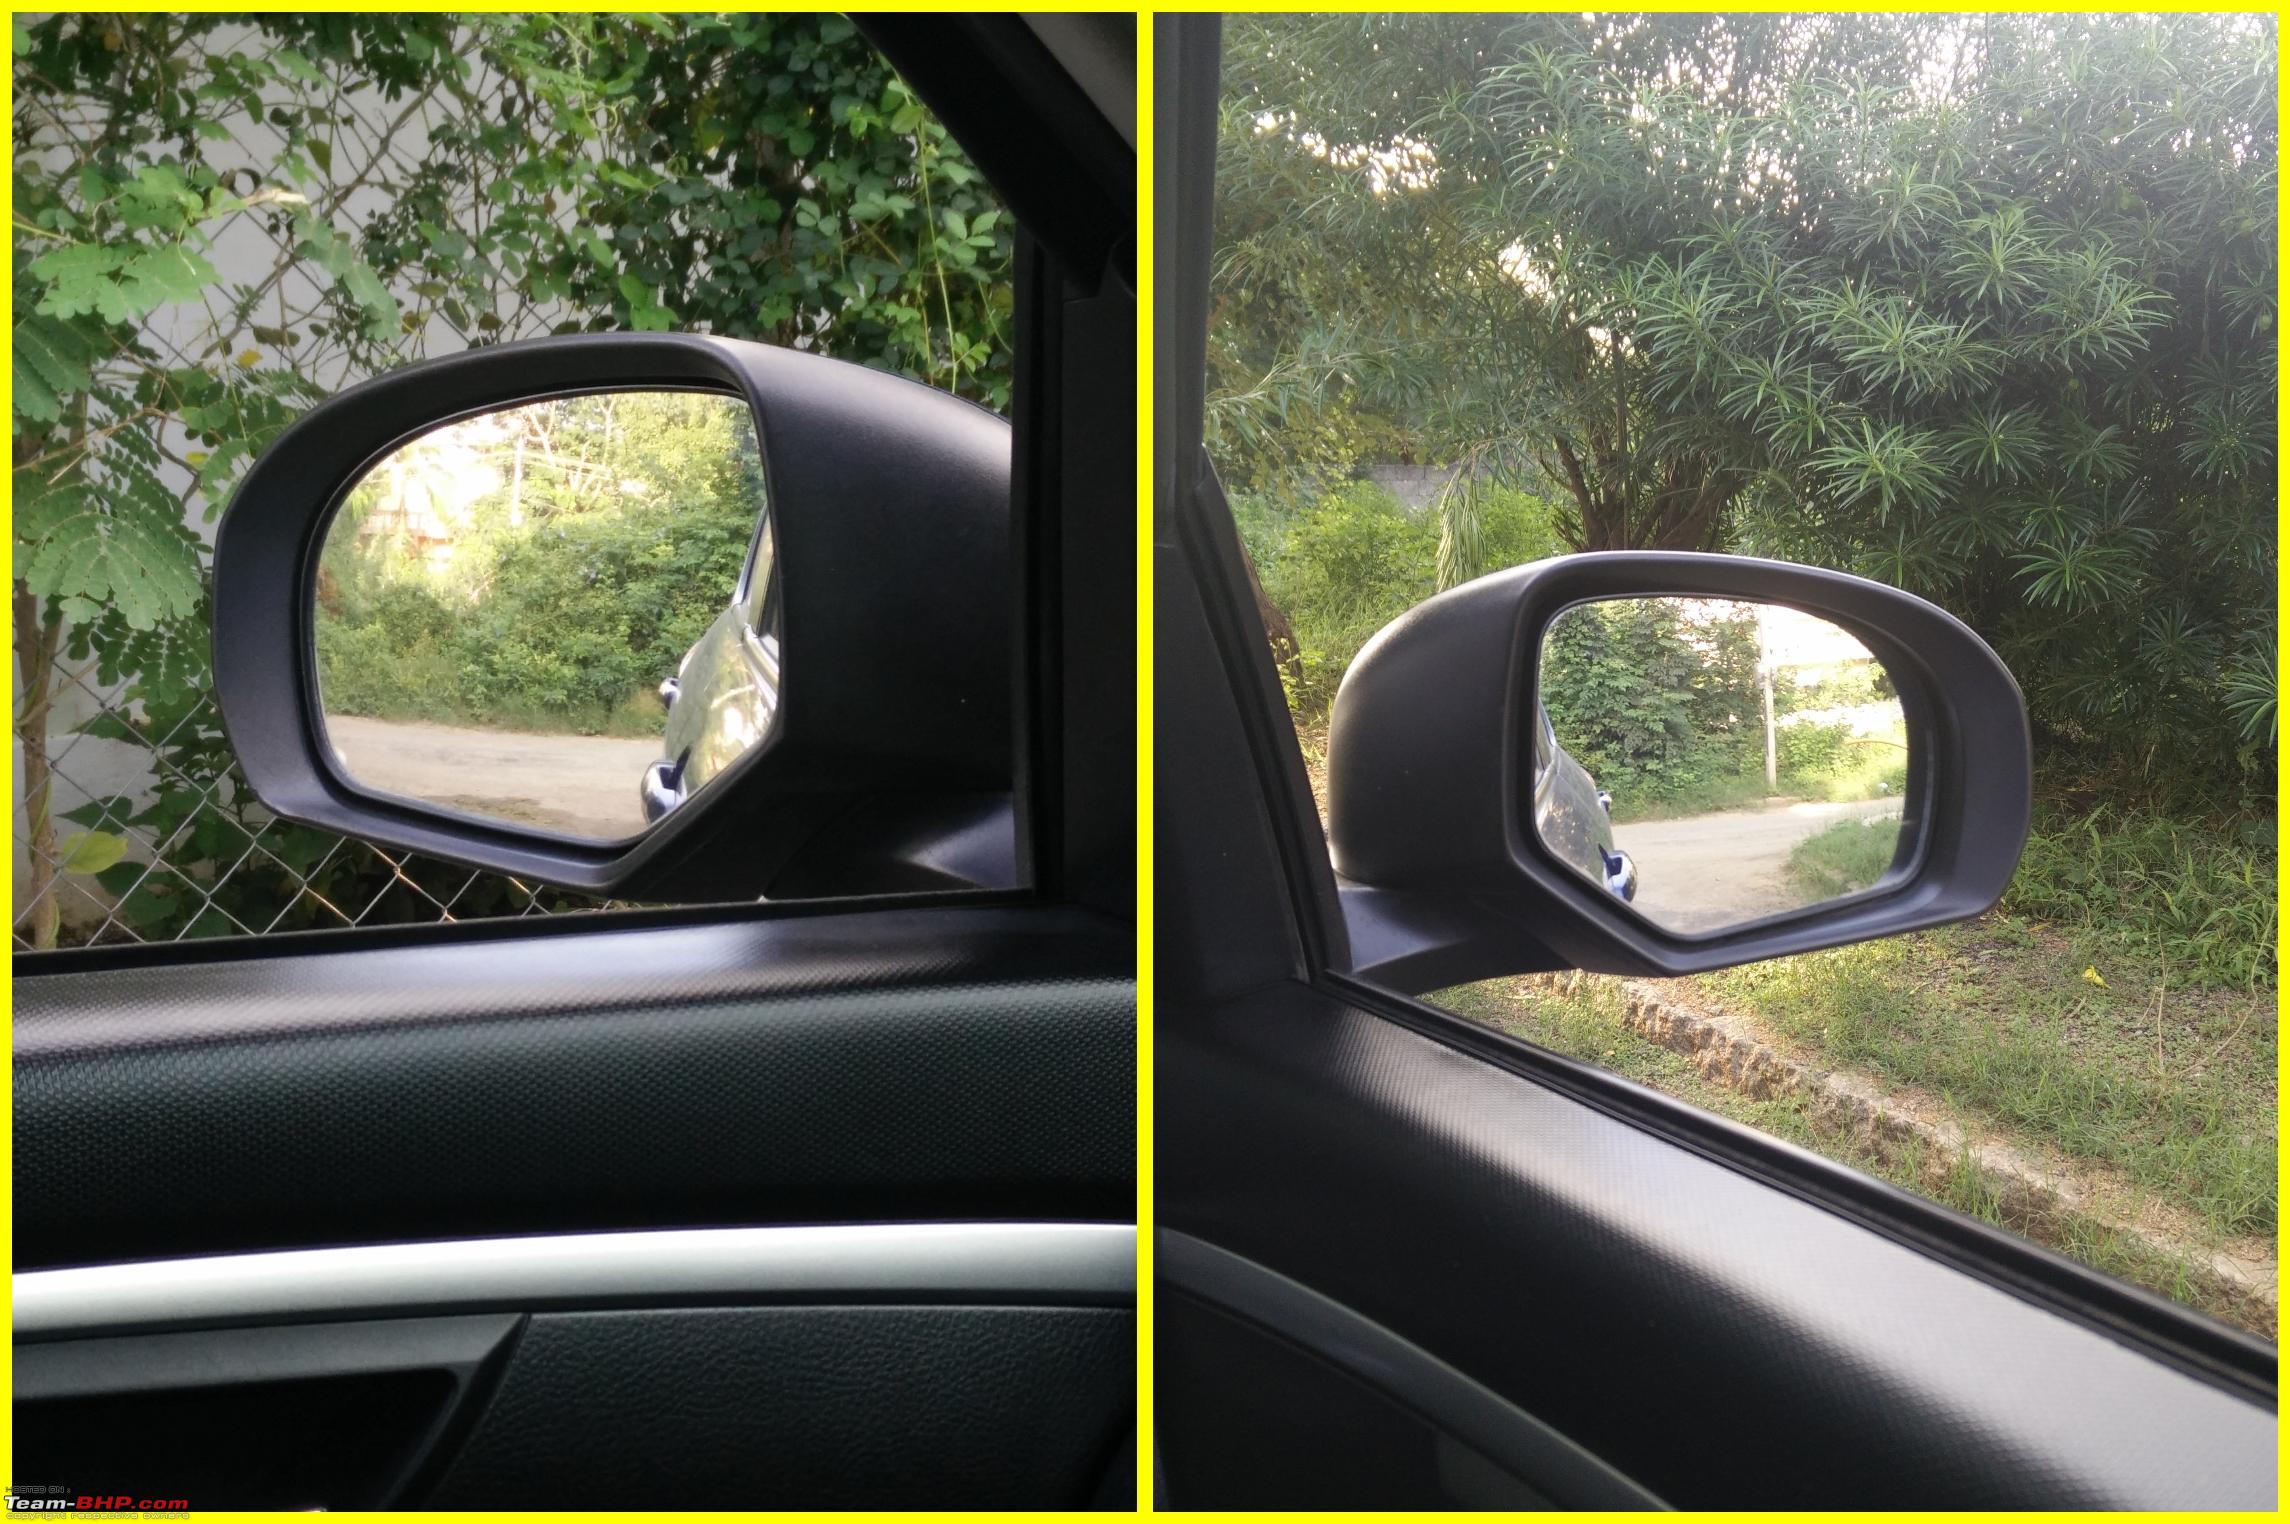
 LHS & RHS ORVM's changed to Anti glare glass
  Both Side OEM Glass
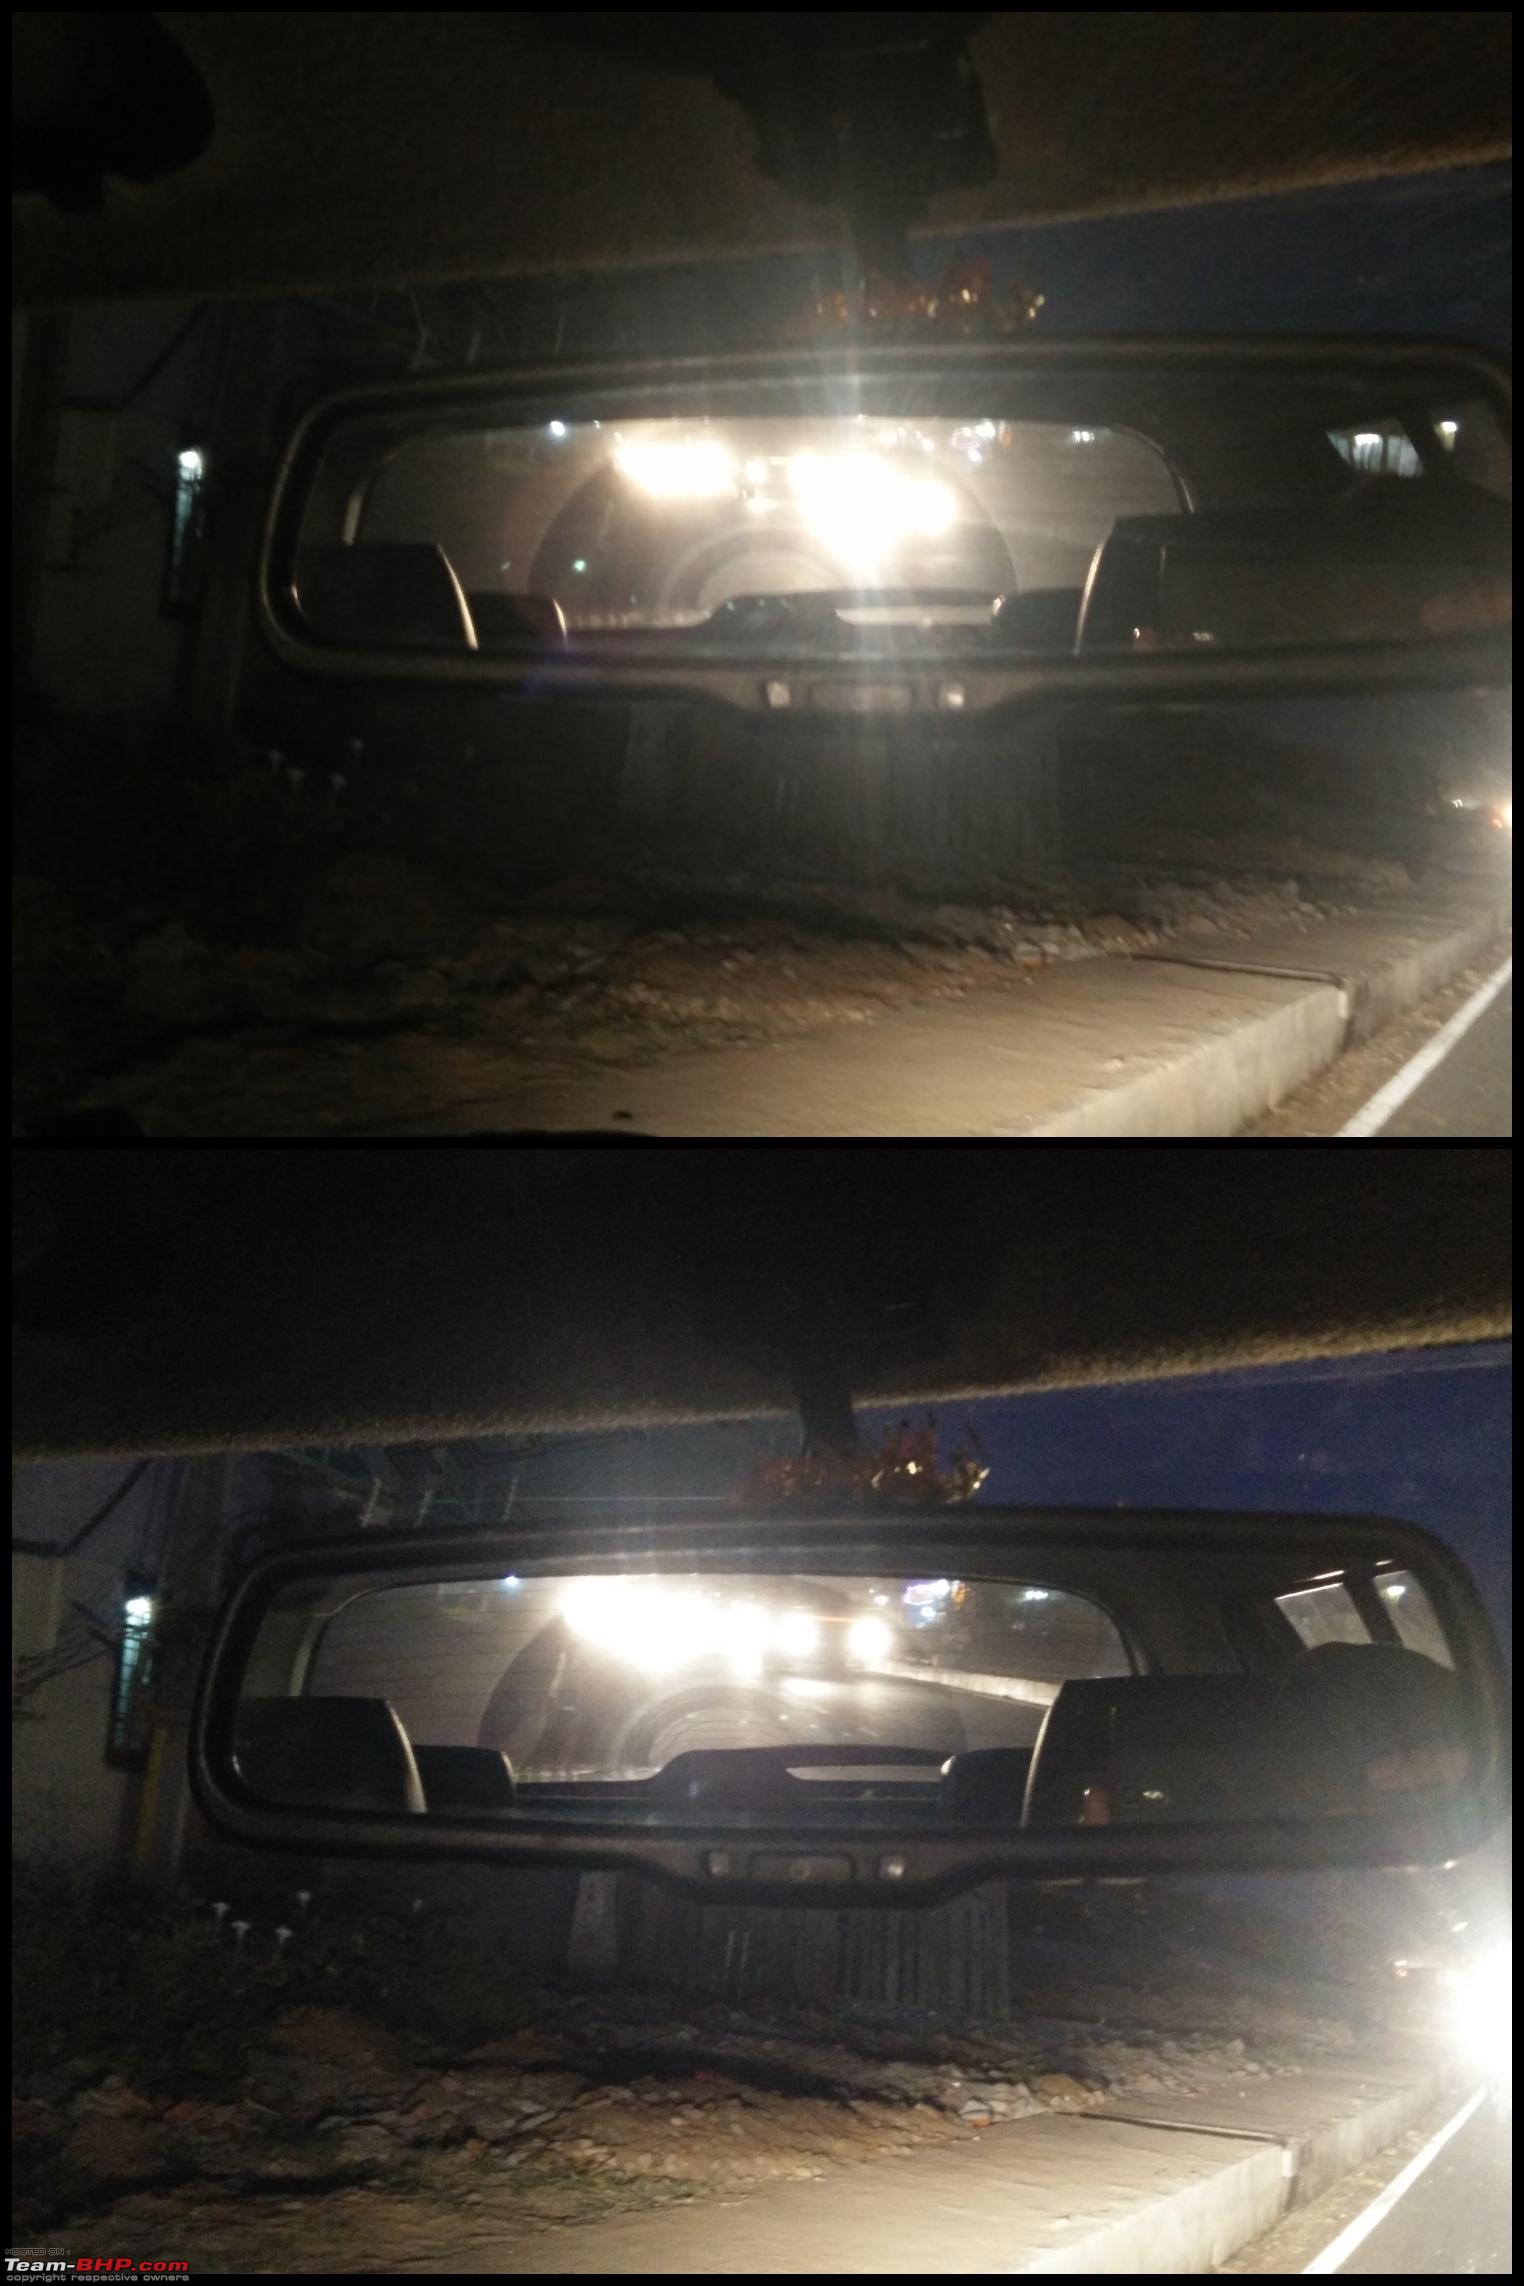
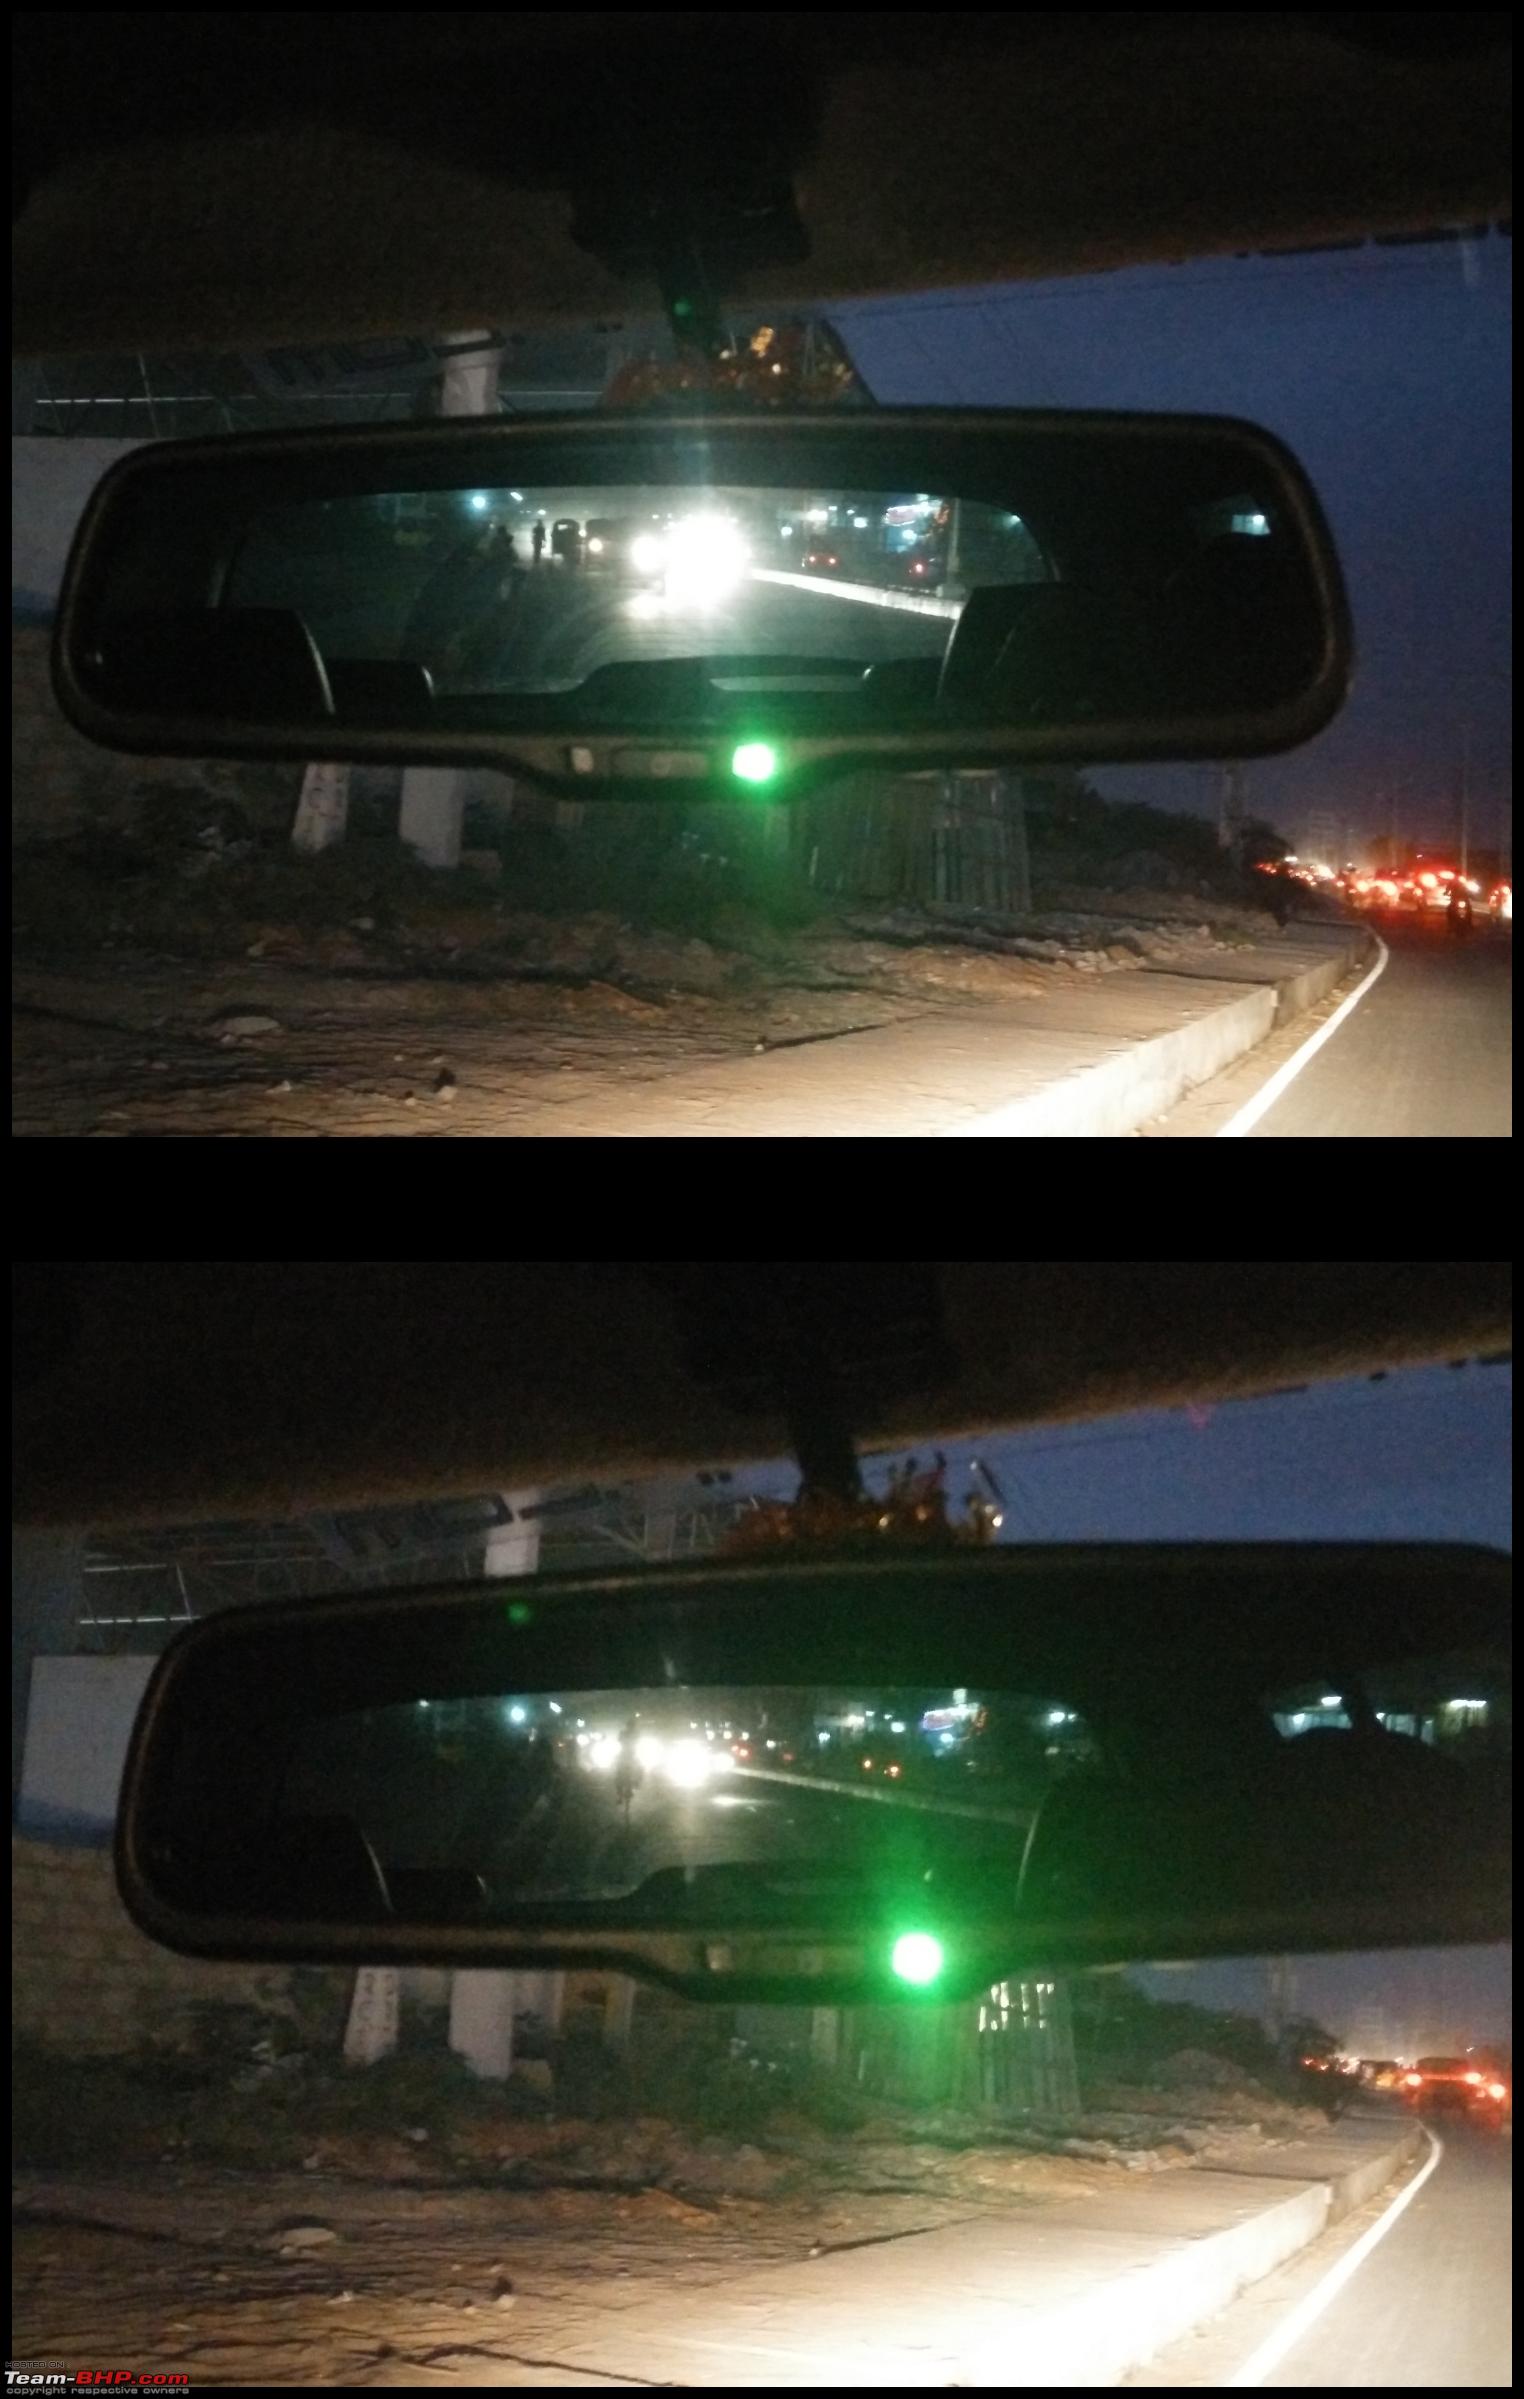
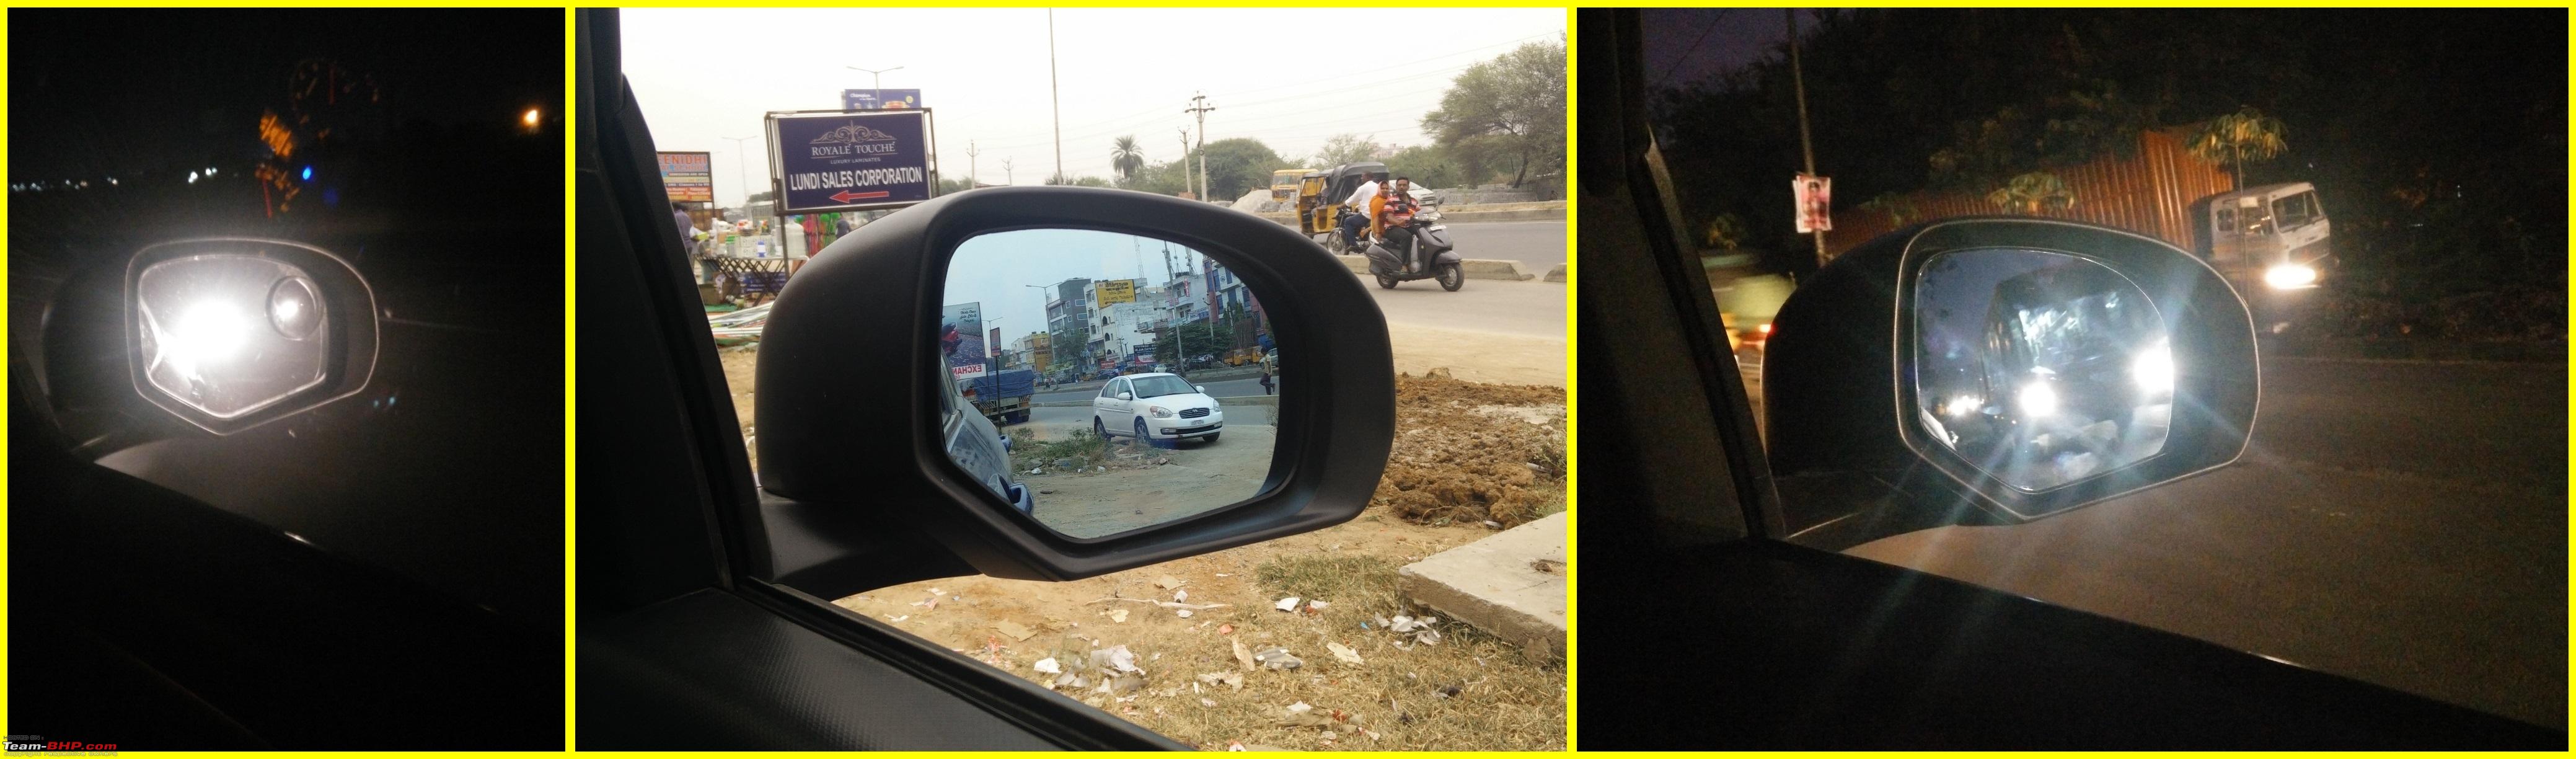
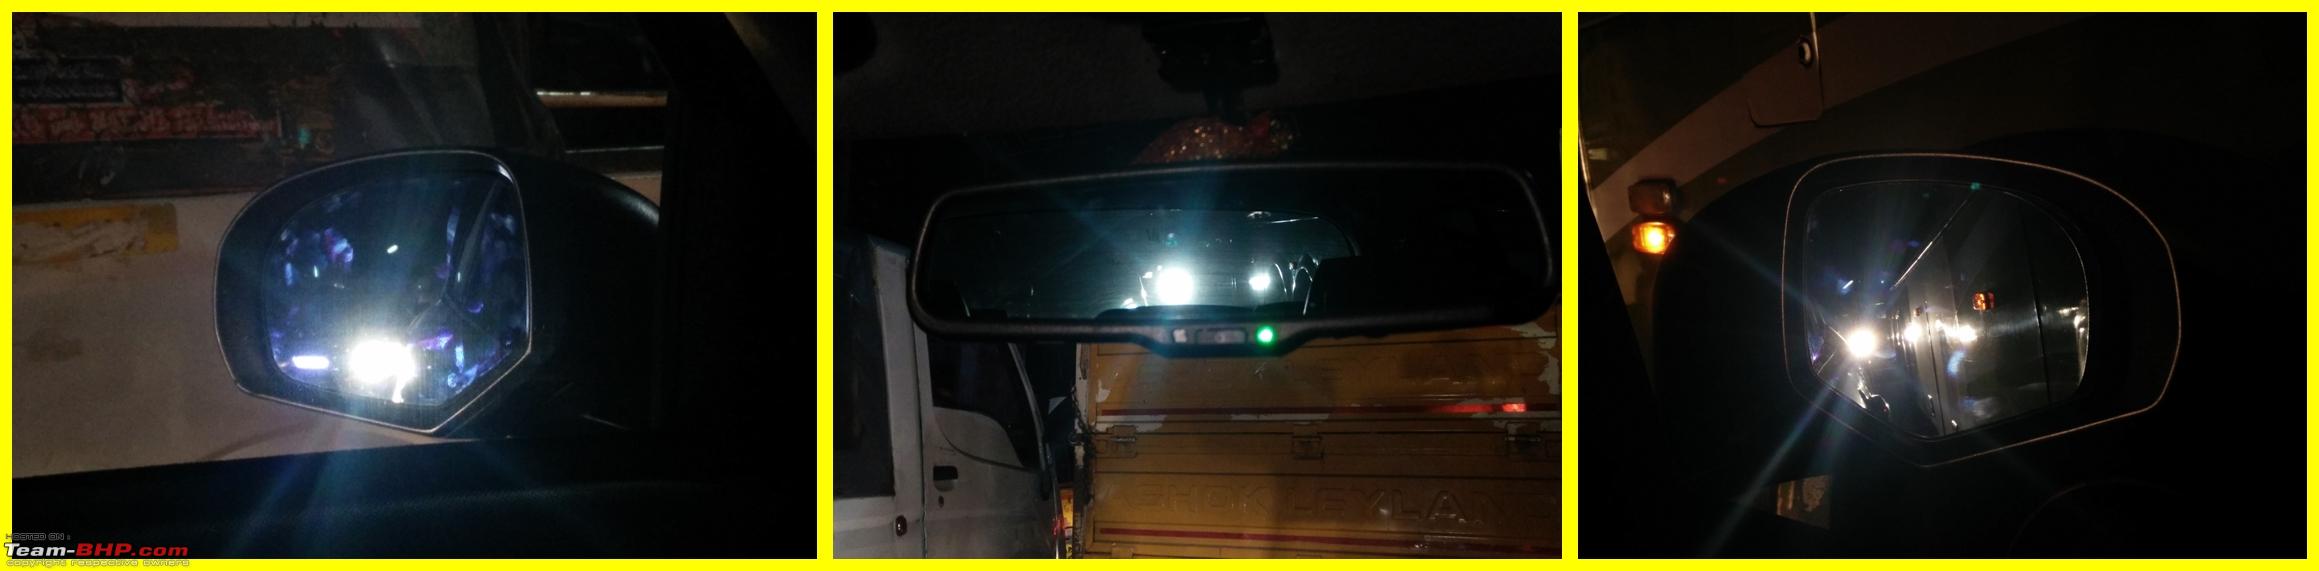
  Anti glare mirror - View at Day time
 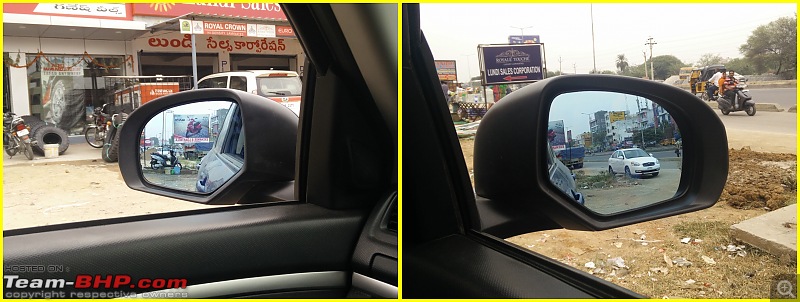 Glare - As seen from OEM Mirror
 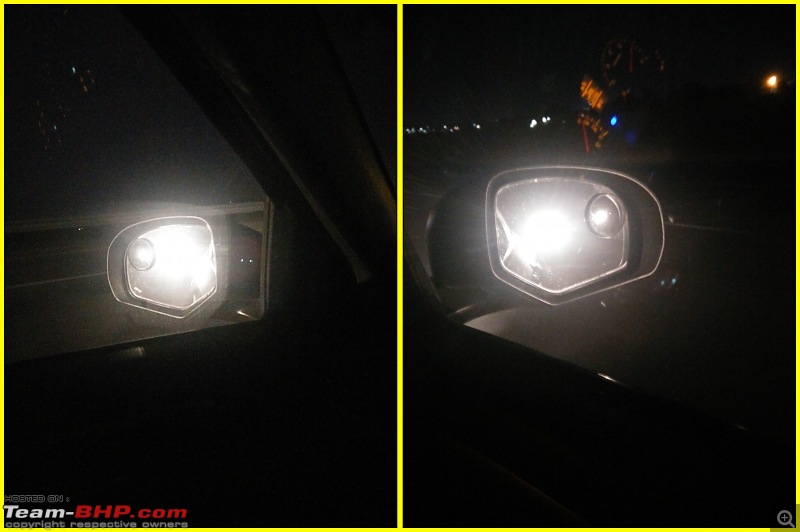 Glare Reduction - OEM to Anti-glare
Last but not the least, my sincere thanks to Gannu_1 for encouraging me indirectly to go ahead with this installation and Arun Philip for that in detail thread on Hardwiring that helped me the most also put my tools to use that were idle all these days. Thanks a lot guys!
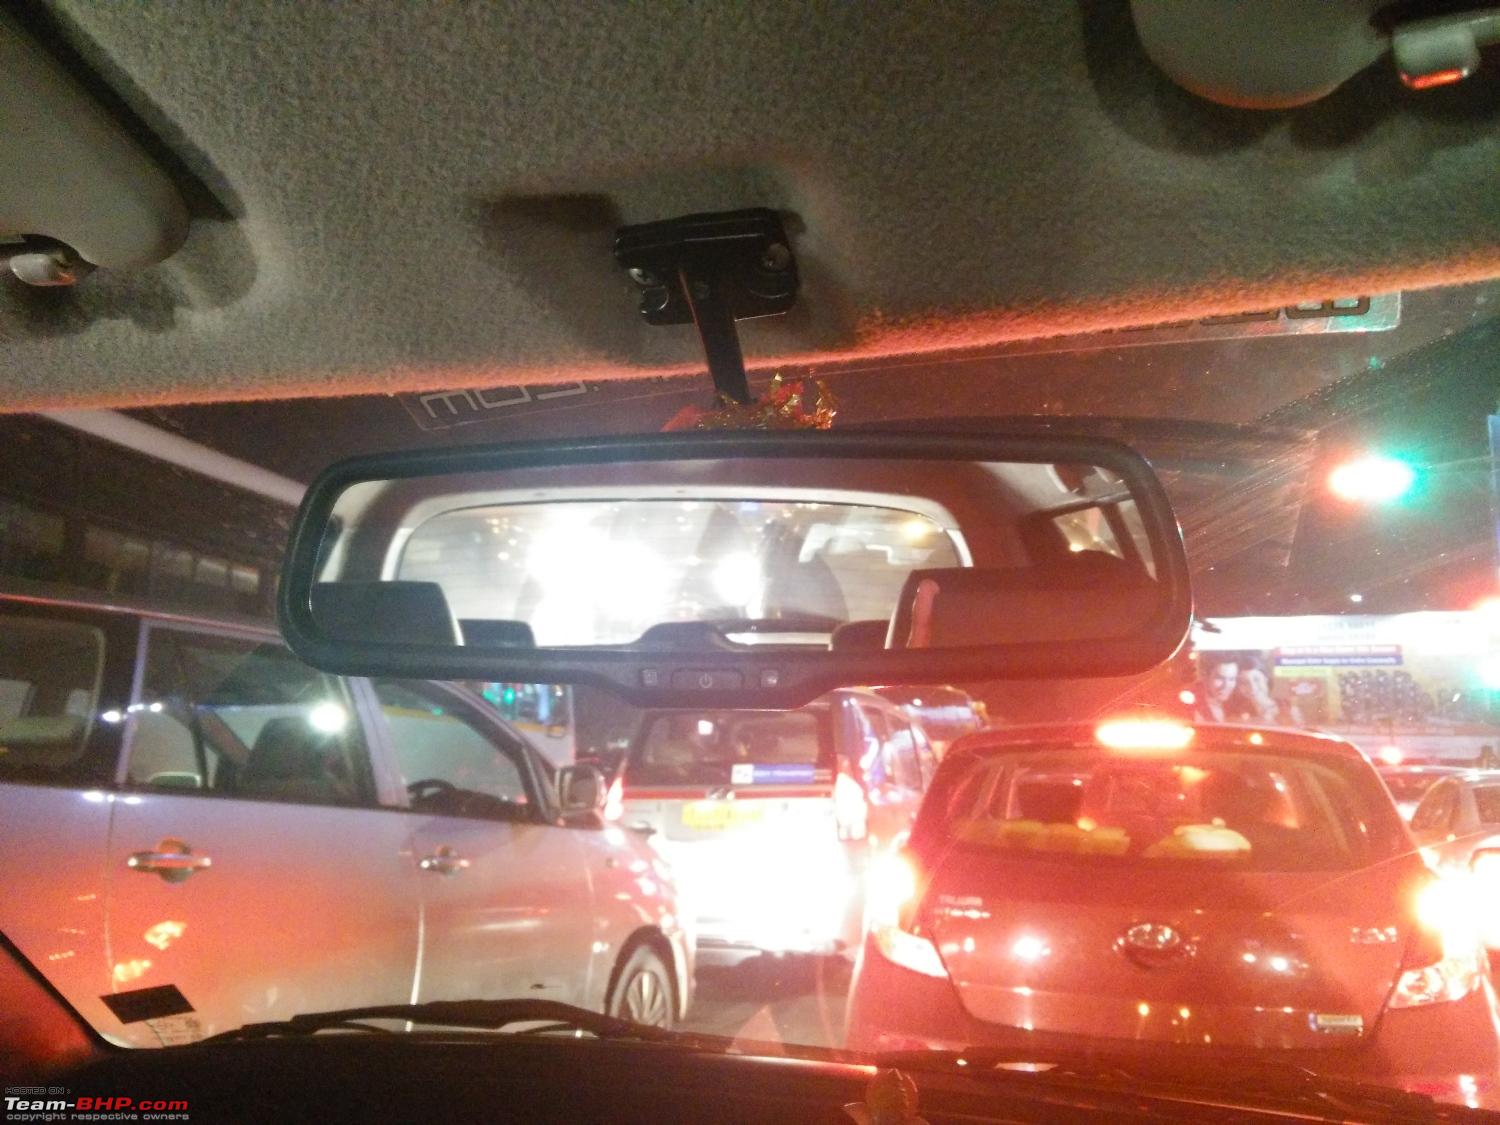
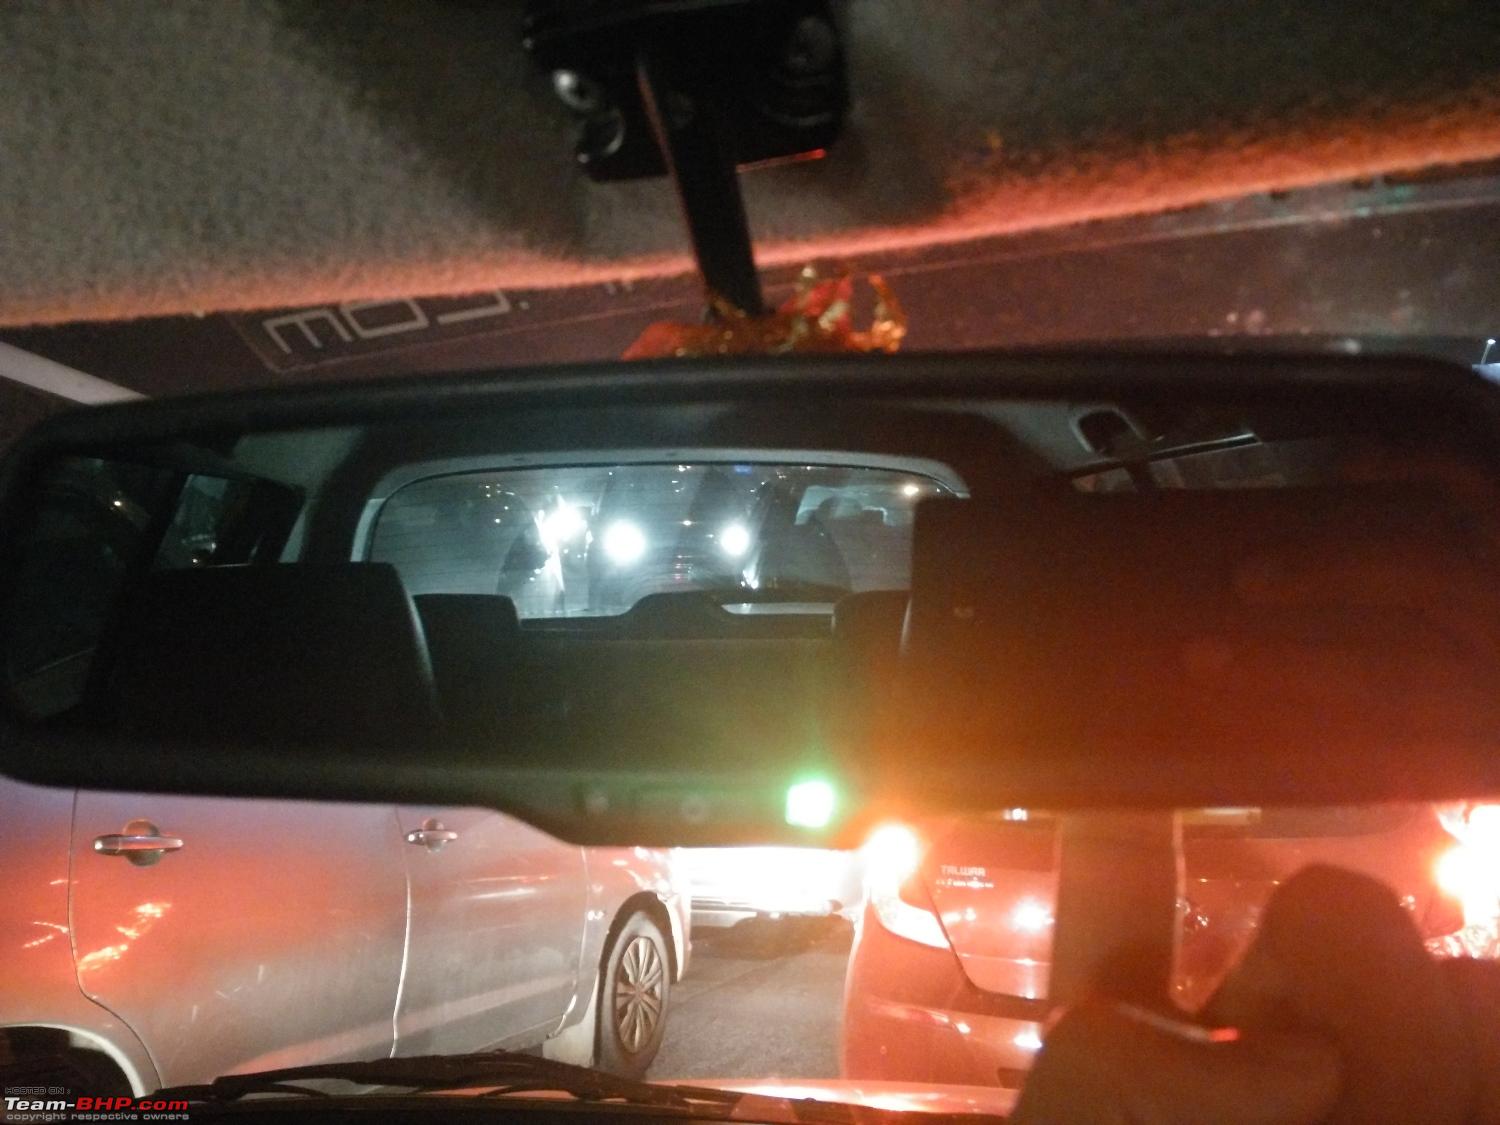
Finishing Touch - My view of the rear drama now a days:  Here's the link to the respective threads: 1) Gannu's Polo Ownership thread - Item 4 & 5: http://www.team-bhp.com/forum/test-d...ml#post3740721 2) Arun's thread on Hardwiring: Hardwiring Process
Thanks for Reading. :)
Thread moved from the Assembly Line to the Modifications Section. Thanks for sharing!
Very nice DIY thread. :thumbs up
Thank you for putting up better pictures than I did, for the removal of the beading and trim.
The anti-glare ORVMs are particularly tempting!
How do you find the performance of these mirrors when driving in rain (both day and night)? Does it attenuate light excessively?
Quote:
Originally Posted by arunphilip
(Post 3849530)
How do you find the performance of these mirrors when driving in rain (both day and night)? Does it attenuate light excessively?
|
Here in Hyderabad, It is dry weather. No rains at all so for me to answer that question, I would need time.
That's a wonderful DIY Anurag!
At times I contemplated with such a DIY for my Ertiga but then I realised one thing that happens with me when I drive through the nights. Whenever I even change the Day/Night setting to night in the current IRVM, I feel its too "Comfortable" for me on a highway and makes me think tailing traffic is way far away than it actually appears.Plus, feel my eyes are having a gala time with no glare and relaxing at ease.
Not the case when I instantly turn it back to day though. It instantly gives me a feeling that I am driving "with the traffic", all through the night. So basically, I feel I have company when I am driving at night and I think I will feel isolated with this dimming function :).
Even in my WagonR Lxi, I don't have manual Day/Night mirror and am so used to it and perhaps that is the reason why I have never seriously thought about dimming these.
For ORVM, my only grouse is the visibility through the side window when it rains. I look forward to install one with heaters in future.
Nevertheless, a fantastic DIY and what more, the IRVM which is in Black suits perfectly well for the Swift.
Thats a great DIY!! Thanks! I had a similar issue in my earlier car and i did consider all these but then just as i was in an auto accessory shop for some other work, i saw an unused window tint cut lying. I told the installation guy to cut it and apply on IRVM and ORVM's just to check; and the results were fantastic! Reduced glare during the day and night without any noticeable impact on visibility. I think i found that too be the most effective and painless way to get rid of the glare!! Plus you can even change the color of the tints!!
Wow. Very nice DIY there. Especially those ORVMs make much sense as with IRVM, at least we can use a manual tilt. But, with ORVMs we are basically helpless. I too am one of those people who suffered hundreds of irritated night drives just because of those ORVMs.
Even I want to install them on my car. But as you know, I'm selling my Swift to get the new Baleno. I will change the ORVMs of my Baleno as soon as I get the deliverystupid:
I would very much be interested in knowing how fm's deal with the rain issue.. I am literally blind in terms of orvm's when it rains as droplets on the windows as well as the orvm's render them useless..
Hi Anurag,
Thanks for this thread. Just curious to know if during your search for an internal RVM, did you find one that you can link to a reverse parking camera?
| All times are GMT +5.5. The time now is 01:58. | |