Team-BHP
(
https://www.team-bhp.com/forum/)
Related thread -
link The Problem
My Nissan Sunny is 4+ years old and I was struggling to see ANYTHING at night using my headlights. The bulbs were OSRAM nightbreakers but still the light intensity was terrible.
I decided to go for a HID setup, and although that improved the situation, it still wasn't as good as it should have been. I spoke to my friendly neighborhood garage and they pointed out that the lenses of my headlight has become scratched, yellowed and foggy. They recommended me to change my headlights, something which I was too stingy to do :)
My car is usually parked without a shade, so it takes the full brunt of the elements i.e. the sun and the rain etc. Couple that with a VERY soft and bad quality poly carbonate used by nissan, and my bulbs were basically shining through a
frosted glass. The Research
As with all things in life these days, it was Google Baba to the rescue. I basically understood the problem and the solution in theory first. I ll quickly summarize - Over the years, the top layer of plastic in the headlights, get scratched from the washing and gets oxidized from the environment. This leaves a dead layer of plastic on the surface which makes it dull and less transparent.
The solution, is to remove the old plastic layer, and get a fresh layer out. Easier said than done.
The first try.
I took some fine cutting compound and a microfiber cloth and went bananas on one headlight. One sore arm later, the shine was restored somewhat, but the yellowness and haziness remained. No Cigar. Back to the drawing board.
The Plan
It was time to take the professional approach. From my research on Google Baba - These were the Items required:
1) Wet and Dry Sandpaper 800 Grit
2) Wet and Dry Sandpaper 2000 Grit
3) Orbital Polisher/ Drill with buffing pad ( I just bought the pad)
4) Cutting Compound
5) Wax / Sealant
6) Microfiber Cloth
I do not have a orbital polisher and new headlights would be cheaper than buying a good one, but then I found another option. I could just get a buffing pad and attach it to my corded drill ! In fact Meguiar sells kits for headlight restoration with similar attachments. I already had a basic drill which is used to drill holes in walls. All I bought was a pad and the sandpapers (Had the rest at home)
The Process
1) Mask off the painted area near the headlight.
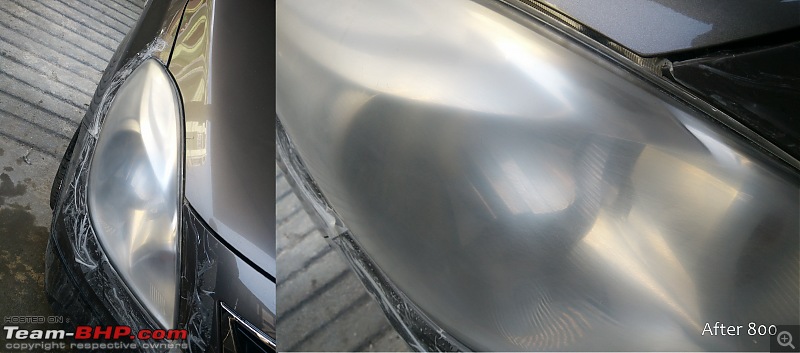
2) Wet Sand the headlights using a 800 grit paper to remove all dead, plastic, oxidation, scratches.
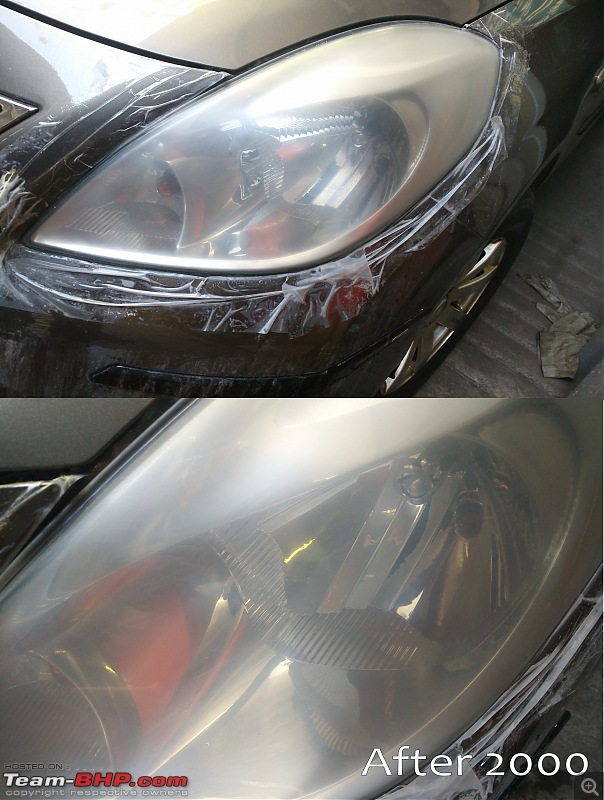
3) Wet Sand the headlights using a 2000 grit paper to remove the scratches you put in in step 2
4) Use cutting compound and a orbital polisher to buff the headlights into a shine.
5) Put Wax/ paint sealant to prolong the shine.
Tips:
*Understand the basics of wet-sanding.
*Be aggressive in step 2 and 3, even though its against your basic nature to put sandpaper on your own headlight!
*When using a rotary tool for buffing plastic, keep it in constant motion, unless you want melted headlights.
The Results
I would like to apologize in advance for not taking BEFORE pictures, but take my word for it, they were hazy, scratched and yellow.
After Stage 1 - 800 Grit Wet Sanding
After Stage 2 - 2000 Grit Wet Sanding
After Stage 3+4 - Cutting Compound and Waxing.

Any questions are welcome.
Excellent results! Though I am too chicken to try this myself, but am thoroughly impressed with the improvement
I used Scratch Out on my Santro headlights. Did a decent job. We were planning to sell it a few months. Now it seems they have a version (milder?) for car lights. So I will suggest use the 800 and 2000 grit stages, and then go over to scratch out. Simpler and easier.
Excellent DIY. I am facing a similar issue though my car is a lot older. An 11+ years old Corolla. Could you let me know where did you buy the buffing pad, cutting compound and wax/polish from? I would also want to try this DIY and improve the condition of the headlights. Nothing to lose really as I will anyway have to change the headlamps soon. But if it works, loads of money will be saved.
The pads are available on eBay/amazon
The wax/cutting compound online or at any automobile parts shop.
Quote:
Originally Posted by sgiitk
(Post 3999452)
I used Scratch Out on my Santro headlights. Did a decent job. We were planning to sell it a few months. Now it seems they have a version (milder?) for car lights. So I will suggest use the 800 and 2000 grit stages, and then go over to scratch out. Simpler and easier.
|
Isnt scratch out a mild cutting compound also?
Quote:
Originally Posted by AbhiJ
(Post 3999369)
2) Wet Sand the headlights using a 8000 grit paper to remove all dead, plastic, oxidation, scratches.
|
I meant 800 grit. Mods request you to edit the original post.
Quote:
Originally Posted by AbhiJ
(Post 3999457)
Isnt scratch out a mild cutting compound also?
|
It is. I expect the lights version to be even milder. There is a very thin line between where you damage, and when you polish (clear). This is why I said only after the 800, and 2000 grade wet and dry paper (more wet than dry).
Great results and a very good DIY AbhiJ!
One of the taillamps of my Zen has gone pale and yellowish after a smart bloke at the ASC cleaned it with brake fluid in over-enthusiasm some years ago. I did not press the charge thinking that it might affect his salary so let it go. But over time, it has become more pronounced and somewhat an eyesore.
I was thinking to give it a toothpaste treatment. I have 'scratch out' as well but haven't really tried as yet. What do you suggest keeping in mind that the headlamp and tail lamp plastics could be quite different?
Thanks in advance,
Saket.
Nice Job. I tried similar headlight polishing in a Matiz - a long time ago. I started with a wirebrush attachment to the drill and then buffed it with another attachment. The problem was it was shinier and clearer for some time. But then it deteriorated after a few days especially after the rains.
You used Wax or paint sealant. What was the sealant ? If it was only a wax, it will melt in the heat of the head lamps.
Quote:
Originally Posted by saket77
(Post 3999475)
I was thinking to give it a toothpaste treatment.
Thanks in advance,
Saket.
|
I tried this on my tucson. With a rotary polisher, and colgate visible white, it came out really well. Documented on the tooky thread.
I also read about people putting on a coat of clear coat right after all the rubbing and polishing. It looked about right where I saw it, haven't tried it though.
Should i try to apply a coat of clearcoat? What say guys?
I did a headlight restoration on my Pajero, results as below:
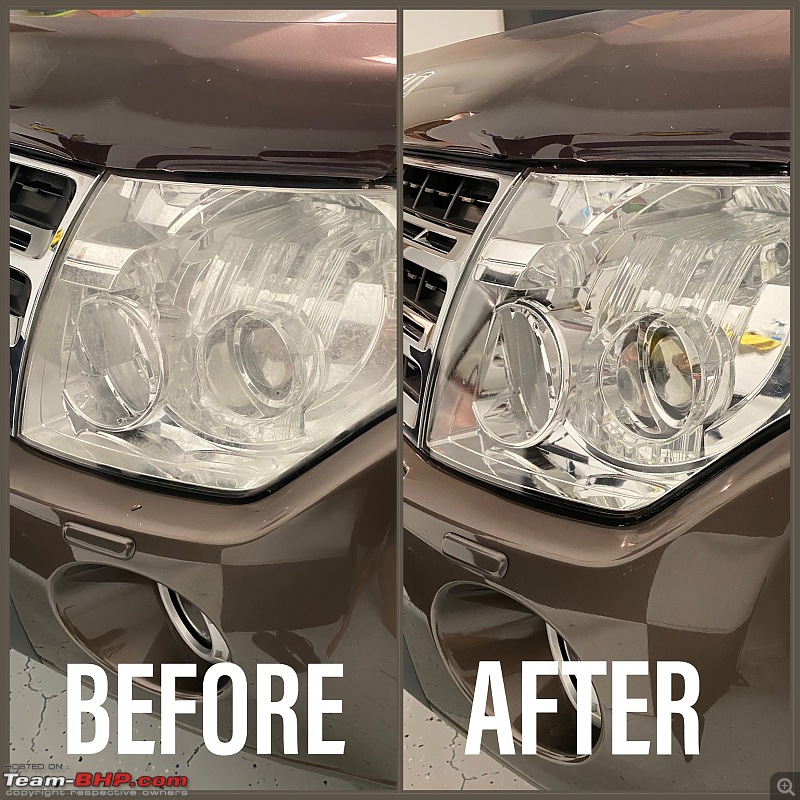
As the discolouration wasn’t extensive, the process was fairly straightforward.
| All times are GMT +5.5. The time now is 03:59. | |


