Team-BHP > Technical Stuff > DIY - Do it yourself
Register New Topics New Posts Top Thanked Team-BHP FAQ


Reply
  Search this Thread
62,570 views
Old 16th August 2016, 21:29   #1
BANNED
 
Join Date: Oct 2011
Location: Hyderabad
Posts: 12,346
Thanked: 21,451 Times
Maruti Swift DIY: DRL Installation

While browsing other automotive forums, I came across another Swift owner who had installed DRL without much alterations to the looks. I enquired and asked for the link of purchase plus how the fit and finish is of the product and if it was worth the effort and money. After I got some satisfactory answers, I too thought of going ahead. Before which let me check other websites for what they have on offer.

AliExpress was the first thing I visited for options but not one was good looking was found and worth installing on the car for the price they were demanding. On an average it was ranging between 4,000-7,000 for the a pair of DRL specific to my 2013 Swift. Checked Amazon.com too but couldn't get any so I decided to scout the local websites where I finally came across some options on eBay.in. It was a reasonable amount for what I was getting in all the options that I had. Enquired with all the sellers and placed an order for a pair. Wasn’t a pleasant experience this time shopping on eBay.

How the DRL Installation 'keeda' was given more food was: My colleague owns a 2015 model Swift ZDi had bought a DRL from eBay. Since I was the one who was going to install it on his car, he got it to me after he got the delivery. Once I opened the box I discovered it was the wrong item and it was for the pre-2014 models and not the 2015 one that has a ‘L’ shaped fog lamp bezel. The seller did not have a 2015 model specific DRL so return was not feasible. This is where I decided to negotiate so that I could install it on my car and he could get the compatible unit from the seller later on. I negotiated and bought it for ₹1500.

After I got it from him, I got busy at work and could not test fit and also check how it looks on my car and whether it would suit my car or no. Whatever it was I paid up the amount and bought it from him.

It is a simple kit that consists of fog lamp bezel and associated wiring. One needs to remove the OEM fog light cover (read bezel) and replace it with this DRL equipped bezel.

I was totally clueless on how one access this area and how to remove the fog light cover to interchange. I was in a thought that one needs to remove the bumper to get access to the fog light area but I was totally wrong. It is a simple press-fit type plastic cover. No need to open the bumper so half my tension was over.

************************************************** ***********

8 days back, when I get some free time, I get down fitting this DRL on my car. I open the OEM fog light cover using the trim opener kit and place the DRL fog light cover and I am shocked to see it a size larger than my what is on my car. Dejected, I reach up to my mobile I call my colleague asking him for the link of purchase. Within minutes I get the link and I am disappointed to see that the set is for Swift Dzire (2012 to 2014 model) and NOT Swift (2012 to 2014 model).

Wrong Item - DRL for Swift Dzire and not Swift
Maruti Swift DIY: DRL Installation-3.-wrong-item-dzire-drl.jpg

With no choice left, I contact the seller again for a return of the wrong item and a replacement that fits my car. With sellers approval, I proceed to file a eBay Guarantee claim – It is addressed quickly since the seller and I had communicated already so eBay customer cell didn't have much investigation to do thereby sending me a replacement within 3 days of filing the claim.

Correct Item Link: Maruti Swift LED DRL Fog Light Cover

Premium quality DRL
Maruti Swift DIY: DRL Installation-fof-light-cover-drl-embedded.jpg

Close up of the DRL shape that I liked a lot but...
Maruti Swift DIY: DRL Installation-closeup-drl.jpg

************************************************** ***********

... though the quality of the DRL was good, the design wasn’t appealing to my eyes which I could forgo, there was a main problem in that DRL that I was not accepting which drilling holes in the bumper to fit it. This one had no clips to fit into the OE holes which I was expecting as the description said it ‘replaces the OE cover with same fit and quality’. This attribute made me browse for some more DRL designs specific to my car model that did NOT require holes to be drilled into the bumper for installation and while doing so, I come across a product with a title – “Premium quality fog lamp DRL for Swift - 2012 to 2014 model”.

LINK: Premium Quality Fog Lamp DRL for Swift (2012 - 2014 model)

I shot a message to the seller enquiring for some real-time images and another assurance of it fitting my car. Half an hour later I get a message saying yes it fits so I buy the product. You guys are now thinking what I would do with two of these – I had a spare plan to send this DRL that I got replacement for to my relative in Mangalore who owns a Swift too (I did talk to him prior hand and keep him informed).

After work, once I reach home, I start fitting the DRL but once again I am dejected that the product only is premium by the name and no way related to premium when it comes to quality.

Useless quality of plastics
Maruti Swift DIY: DRL Installation-img_20160813_101042.jpg

Worst plastics and not one of the clips were stiff enough to press fit tight into the holes. Even with slightest pressure the clips were bending and the DRL was flickering upon connection. Lost my cool and I send a message to the seller on WhatsApp with pictures where I get a reply saying – “Till date we have never received any negative feedback about fit and quality of our products. If you aren’t satisfied, please return the item and get the refund”. I agreed and have repacked it for return that I’ll be doing on the Tuesday.

Now I am left with the first DRL that needs to drill holes in the bumper. After a full night’s thinking, I go ahead with the installation and decide to turn a blind eye to the holes in the bumper.

Cheap quality switch that just does the job
Maruti Swift DIY: DRL Installation-img_20160729_181214.jpg

Switch with associated wiring
Maruti Swift DIY: DRL Installation-imag8794.jpg

Wiring of the switch opened up (Red is Power Out; Black is Earth and Blue is Power In)
Maruti Swift DIY: DRL Installation-imag8795.jpg

Coupler for DRL functioning
Maruti Swift DIY: DRL Installation-img_20160729_181340.jpg

Hole for fitting using screws
Maruti Swift DIY: DRL Installation-img_20160729_181749.jpg

Last edited by a4anurag : 16th August 2016 at 22:22.
a4anurag is offline   (10) Thanks
Old 16th August 2016, 21:44   #2
BANNED
 
Join Date: Oct 2011
Location: Hyderabad
Posts: 12,346
Thanked: 21,451 Times
Process for the DRL Installation

Items required for installation:
  1. Fuse tap cable and set of fuses
  2. Wire stripper + crimping tool
  3. Heat shrink tubes
  4. Hot air gun
  5. Star screwdriver
  6. Sharp knife
  7. 12V tester pen
  8. Trim/panel removal kit

As all of my earlier DIY’s have these items used, I’ll not be giving the links of the purchase or any details as they are available there.

The kit comes with the following:

1. Fog lamp DRL cover

2. Wiring harness

3. Switch

4. Multiple pin mobile charger as a complimentary gift

Since the kit is Ready-to-fit' types, it is easy and doesn’t need much time or labour.

On the wiring harness side: Two couplers that get clipped into the fog light covers to light up the DRL. One female terminal (Red wire) that powers the DRL pair and one ring terminal that acts as earth for the whole setup.

On the Switch side: The connections are straightforward with One Red, One Blue and One black wire. The red one connects to the female terminal on the wiring harness. The Blue one is the 'Power-In' for the switch with Black wire (ring terminal again) acting as earth.

-x--x--x--x--x--x--x--x--x--x--x--x--x--x--x--x--x--x--x--x--x--x--x--x--x--x-

Now comes the other 50% of the worry -

"How pass the wiring from the passenger compartment where the switch will be located to the fog lamps that are in the engine bay?!".

While running around the car looking for passage to get the wiring, I found a place that helped solve my worry. It was the right side fender that was open to the engine bay where I could pass the wiring to get it into the cabin just above the fuse box via the driver’s side door beading through the dashboard end.

"How I located this area??!"

When I passed the torch light at the fender area, I could see the door pad through it. I went bonkers as it is not the case. I ran to the left side to see if it is the same but then I saw that the right side fender has no lining present...

Eh Confusing??!

Here's why: If you guys remember, my Swift had met with an accident where one buffalo ran into its path that made swerve where the horn of the bull had hit the right fender and part of right rear wheel well damage. When I had replaced the fender I didn’t get the fender lining replaced that seals the gap between the engine bay and the fender area.

It is this gap that I used to get the wiring in from the engine bay. Not a great idea but it did the job even though it looks crude.

-x--x--x--x--x--x--x--x--x--x--x--x--x--x--x--x--x--x--x--x--x--x--x--x--x--x-

Process of Installation:

Step – 1: Disconnect the negative (-ve) terminal of the battery;


Step – 2: Pass the wiring from the passenger cabin to the engine bay;


Step – 3: Bend down and remove the dummy near the Alarm switch located at the right side of the steering wheel


Step – 4: Crimp the Blue wire coming out from the switch to the fuse tap cable.


Step – 5: Insert the switch provided with the DRL along with the wiring.


Step – 6: Earth the ring terminal to any bolt inside the passenger cabin. This is the earth connection for the switch. There is another ring terminal for the DRL wiring that needs to be grounded anywhere in the engine bay.


Step – 7: Using the trim/panel remover, remove the OE fog lamp covers and pass the wiring to both these fog lamp areas.


Step – 8: Connect the DRL powering couplers to each of the fog lamp covers.


Step – 9: Using two screws fit the fog lamp covers for a form fit. Since this one comes without any clips I had to resort to screws to fit this on the car.


Step – 10: Connect the red wire male and female terminal


Step – 11: Re-connect the negative terminal and test the working of the DRL.


Step – 12: Using nylon cable ties, secure the extra wires around the engine bay and the passenger cabin.

As the DRL came with its own power control that doesn't let the DRL draw power even when engine is off, I did not bother to search for the fuse that powers itself only when ignition is ON as seen in my other DIY's done earlier. I used the Fuse No.: 03 which is BLANK as per the owner’s manual.

The switch comes with a light (Green colour) which comes when the DRL is ON. Nice to see the addition of a light to let the person operating it knows if the DRL is ON or no but it too bright.

Last edited by a4anurag : 16th August 2016 at 21:45.
a4anurag is offline   (9) Thanks
Old 16th August 2016, 22:01   #3
BANNED
 
Join Date: Oct 2011
Location: Hyderabad
Posts: 12,346
Thanked: 21,451 Times
Re: Maruti Swift DIY: DRL Installation

What I Like:
  • Nice quality of material used for the fog light cover.
  • Lifts the looks of the car with the subtle chrome border used on the cover and the DRL arrangement.
  • Dedicated switch for operation and a complete wiring harness with proper heat insulation and length.

What I don’t like:
  • Quality of the switch and its fit.
  • No fitment of the fog light cover in the same way the OE for light cover is mounted on the bumper that warrants the need to use screws in the body.
  • No instructions manual provided by the seller on how to go about the installation. When asked they say please visit an accessory dealer rather than venturing into DIY.

Here are some pictures to complete this DIY:

Right DRL that I installed: Packaging label
Maruti Swift DIY: DRL Installation-1.-packaging-label-drl.jpg

BCM
Maruti Swift DIY: DRL Installation-4.-bcm.jpg

BCM Fuses and its designation
Maruti Swift DIY: DRL Installation-3.-bcm-owners-manual.jpg

Use the trim/panel removing kit to remove the fog light cover. See the Arrows
Maruti Swift DIY: DRL Installation-2.-removing-oe-cover.jpg

OEM Fog Light Covers
Maruti Swift DIY: DRL Installation-5.-oem-fog-light-cover.jpg

Replaced with DRL LED Fog Light Covers
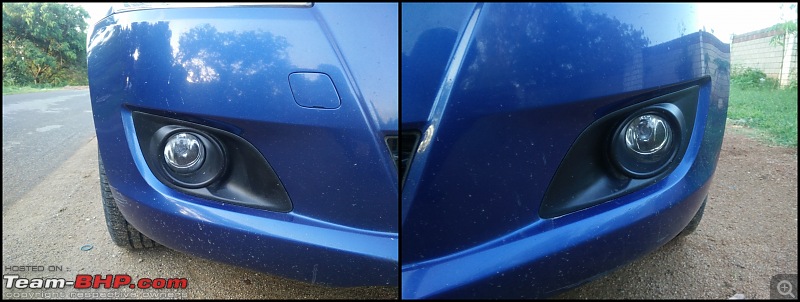
Maruti Swift DIY: DRL Installation-drl-fog-light-cover.jpg

Installed with DRL OFF
Maruti Swift DIY: DRL Installation-drl-off.jpg

DRL ON
Maruti Swift DIY: DRL Installation-drl-another-view.jpg

Head-on view with DRL ON
Maruti Swift DIY: DRL Installation-drl-closeup.jpg

Front look with DRL equipped fog light cover (Note the chrome lining)
Maruti Swift DIY: DRL Installation-drl-.jpg

OEM switch console with dummy beside the Alarm switch
Maruti Swift DIY: DRL Installation-dummy-beside-alarm-switch.jpg

Replaced the dummy with DRL controlling switch
Maruti Swift DIY: DRL Installation-drl-switch-beside-alarm-switch.jpg

Green light to indicate the DRL is ON
Maruti Swift DIY: DRL Installation-green-light.jpg

Fuse Tap Cable that I got from "Livelyresearcher"
Maruti Swift DIY: DRL Installation-fuse-tap-cable.jpg

Earthing done
Maruti Swift DIY: DRL Installation-earthing-done.jpg

Secured the extra wiring in the engine using nylon zip ties
Maruti Swift DIY: DRL Installation-secured-extra-wiring.jpg

Secured the wiring the going towards the left fog light cover through the radiator
Maruti Swift DIY: DRL Installation-secured-wire-passing-fog-lamps.jpg

Testing before finalising connection
Maruti Swift DIY: DRL Installation-testing.jpg

Wiring passed from right side fender
Maruti Swift DIY: DRL Installation-wire-passed-right-fender.jpg

With DRL ON + Low Beam ON
Maruti Swift DIY: DRL Installation-img_20160816_185536.jpg

Notice the light output with ONLY the DRL ON
Maruti Swift DIY: DRL Installation-img_20160816_192320.jpg

Last but not the least:
  • Sincere thanks to TAI'ian (FordFiesta1.6) for giving me the link and answering my doubts on the installation;
  • An 'Aspiring' BHPian Livelyreasecher for sending me a Fuse Tap Cable as I exhausted my stocks.

Two parting shots:

Maruti Swift DIY: DRL Installation-img_20160814_175159_1.jpg

Maruti Swift DIY: DRL Installation-img_20160815_090334.jpg

Thanks for reading guys. Awaiting your feedback and doubts (If Any)! on this installation.

Last edited by a4anurag : 16th August 2016 at 22:31.
a4anurag is offline   (31) Thanks
Old 16th August 2016, 22:57   #4
SDP
Team-BHP Support
 
SDP's Avatar
 
Join Date: Jan 2010
Location: Mumbai
Posts: 4,735
Thanked: 11,297 Times
Re: Maruti Swift DIY: DRL Installation

Thread moved out from the Assembly Line. Thanks for sharing!
SDP is offline   (1) Thanks
Old 17th August 2016, 07:40   #5
Distinguished - BHPian
 
paragsachania's Avatar
 
Join Date: Nov 2007
Location: Belur/Bangalore
Posts: 7,147
Thanked: 27,205 Times
Re: Maruti Swift DIY: DRL Installation

Let me be the first one to congratulate you for this simple but very useful DIY Anurag. Must say that the DRLs integrated into the fog lamp frame looks right in place, something that I always prefer than let them hang around elsewhere and spoil the original looks. Nice way to route the wire from the Engine bay inside the cabin too.

I am curious on how is the intensity of these DRLs during day time when you face them. In the pics, I notice that you have captured them from the side and I really want to know how they fare from front, with a distance no less than 100 meters?

Also - DRLs are better used as a safety feature which makes it easy for other road users not only spot your vehicle during the day but you also become more visible, distinctively in the IRVM of the car that you are tailing or approaching to overtake.

Just around dawn and before sunset are the right times they come to full use. Not to forget gloomy days with rain and fog, they are again useful too.

In one of the pictures I see you have used DRLs alone and the with your low beams at night or under darkness. I am sure you only wanted to show the intensity of these DRLs at night because DRLs and Headlights ON together is something that is not the preferred thing to do on road, especially nights.


The Switch to turn on the DRLs is nice because it has an indicator light that will remind you at night that they are ON and its time to turn them off. I have come across some brilliant (albeit expensive) products from renowned Automotive lighting product makers like OSRAM and Philips where the DRLs are connected first to a control unit that works something like this:
  • Ignition ON/Fog Lights OFF -> DRL ON
  • Ignition ON/Fog Lights ON - > DRL OFF
  • Ignition OFF/Fog Lights OFF -> DRL OFF
  • Ignition OFF/Fog Lights ON -> DRL OFF

There are T-Tap connectors provided along with the installation kit of these products that receive input based on whether you have turned your Fog/Parking on but the control unit decides when to power up these DRLs. So this completely rules out having a separate switch.

This will ensure that you as a driver need not be reminded to turn off the DRLs when either Headlights, Parking lights or Fog lights are in use. No switch as such and DRLs strictly function during the Day and when you think its time to use the Fog or Headlights, they just go off. Something that works as OE in most of the cars today that come equipped with DRLs as standard fitment.

Last edited by paragsachania : 17th August 2016 at 07:45.
paragsachania is offline   (5) Thanks
Old 17th August 2016, 09:26   #6
BANNED
 
Join Date: Oct 2011
Location: Hyderabad
Posts: 12,346
Thanked: 21,451 Times

Quote:
Originally Posted by paragsachania View Post
Let me be the first one to congratulate you for this simple but very useful DIY Anurag.
Thank you Parag bhai. Appreciate the reply and liking of the DIY.

I didn't want to mess around much so wanted a simple DRL type amd this is the closest I could find.

Quote:
Originally Posted by paragsachania View Post
In one of the pictures I see you have used DRLs alone and the with your low beams at night or under darkness.
It was just too show the intensity.

I have made it a habit to use the DRL ONLY during day time. Once I switch ON the headlight the DRL is switched OFF. I see no point in keeping the DRL On just for show off where it blinds the oncoming driver.

I'll click more day time pictures with DRL ON and post it here.
a4anurag is offline   (3) Thanks
Old 17th August 2016, 09:35   #7
Senior - BHPian
 
Join Date: Dec 2006
Location: pune
Posts: 2,397
Thanked: 2,736 Times
Re: Maruti Swift DIY: DRL Installation

One of the classy looking after-market DRLs; Subtle & 'not in your face' kind. Placement near fog lamps also means that space gets used effectively & non-continuous lights would be easy on eyes of opposite side driver.
sukiwa is offline   (3) Thanks
Old 17th August 2016, 11:26   #8
BHPian
 
soumobakshi's Avatar
 
Join Date: Jun 2007
Location: Bangalore
Posts: 379
Thanked: 1,439 Times
Re: Maruti Swift DIY: DRL Installation

Quote:
Originally Posted by paragsachania View Post
I have come across some brilliant (albeit expensive) products from renowned Automotive lighting product makers like OSRAM and Philips where the DRLs are connected first to a control unit that works something like this:
  • Ignition ON/Fog Lights OFF -> DRL ON
  • Ignition ON/Fog Lights ON - > DRL OFF
  • Ignition OFF/Fog Lights OFF -> DRL OFF
  • Ignition OFF/Fog Lights ON -> DRL OFF

There are T-Tap connectors provided along with the installation kit of these products that receive input based on whether you have turned your Fog/Parking on but the control unit decides when to power up these DRLs. So this completely rules out having a separate switch.
Have you come across a Stand Alone Controller Unit which performs this job ? I am in 2 minds in installing one on my Duster but want this functionality to be present. I have across couple of Aliexpress products which does this but then not sure about the life of the LED's hence a bit hesitant.
soumobakshi is offline  
Old 17th August 2016, 11:52   #9
Distinguished - BHPian
 
Join Date: Jun 2012
Location: BengaLuru
Posts: 5,956
Thanked: 21,233 Times
Re: Maruti Swift DIY: DRL Installation

Quote:
Originally Posted by soumobakshi View Post
Have you come across a Stand Alone Controller Unit which performs this job ? I am in 2 minds in installing one on my Duster but want this functionality to be present. I have across couple of Aliexpress products which does this but then not sure about the life of the LED's hence a bit hesitant.
If you are an electronics enthusiast/programmer you can realise this with any microcontroller board and program it the way you like it to be
audioholic is offline   (2) Thanks
Old 17th August 2016, 12:22   #10
BHPian
 
soumobakshi's Avatar
 
Join Date: Jun 2007
Location: Bangalore
Posts: 379
Thanked: 1,439 Times
Re: Maruti Swift DIY: DRL Installation

Quote:
Originally Posted by audioholic View Post
If you are an electronics enthusiast/programmer you can realise this with any microcontroller board and program it the way you like it to be
Well I am qualified in the similar field to do the job you mentioned and during college days have taken up similar projects.
Now IT has spoilt me and would like to get a Controller Unit
soumobakshi is offline  
Old 17th August 2016, 18:39   #11
BANNED
 
Join Date: Oct 2011
Location: Hyderabad
Posts: 12,346
Thanked: 21,451 Times
Re: Maruti Swift DIY: DRL Installation

Quote:
Originally Posted by paragsachania View Post
I am curious on how is the intensity of these DRLs during day time when you face them.
Just clicked 3 pictures with DRL ON. It is not eye-harming at all.

Maruti Swift DIY: DRL Installation-img_20160817_162959.jpg

Maruti Swift DIY: DRL Installation-img_20160817_163003.jpg

Maruti Swift DIY: DRL Installation-img_20160817_163007.jpg
a4anurag is offline   (4) Thanks
Old 17th August 2016, 18:45   #12
Distinguished - BHPian
 
paragsachania's Avatar
 
Join Date: Nov 2007
Location: Belur/Bangalore
Posts: 7,147
Thanked: 27,205 Times
Re: Maruti Swift DIY: DRL Installation

Quote:
Originally Posted by a4anurag View Post
Just clicked 3 pictures with DRL ON. It is not eye-harming at all.
Yes, I would call them pleasing. With the pic that you posted from the night, I feel these should be bright enough during the day too with the right intensity. A rare case that they will blind the oncoming traffic during the day as my interest was more on how good these were for the day than how bright are these to blind someone during the day!

Thanks for sharing the pics.
paragsachania is offline   (1) Thanks
Old 28th September 2016, 20:52   #13
BANNED
 
Join Date: Oct 2011
Location: Hyderabad
Posts: 12,346
Thanked: 21,451 Times
Re: Maruti Swift DIY: DRL Installation

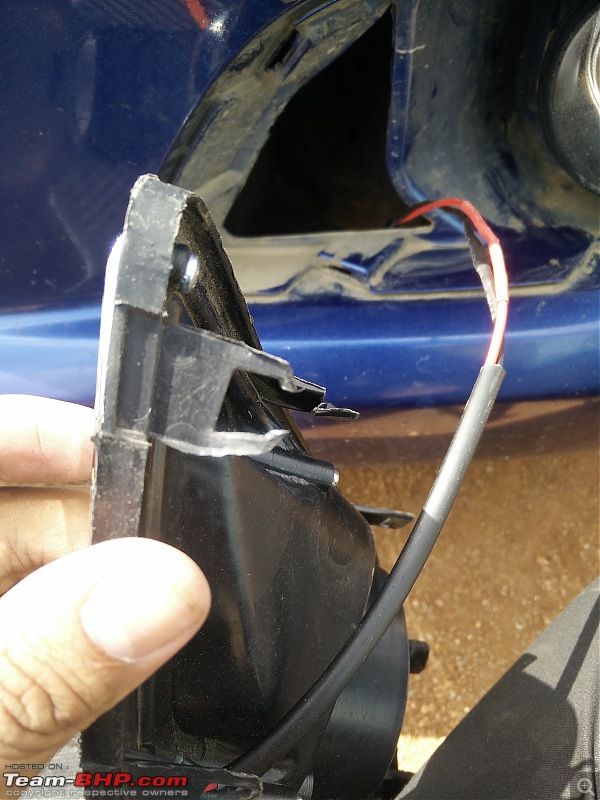
Sad Update to the thread:

Maruti Swift DIY: DRL Installation-img_20160927_064641.jpg

Maruti Swift DIY: DRL Installation-img_20160927_064645.jpg

Maruti Swift DIY: DRL Installation-img_20160928_183110.jpg

So it is now to OEM setup with the two DRL's and associated wiring has been removed completely from the car.

Last edited by a4anurag : 28th September 2016 at 20:54.
a4anurag is offline   (1) Thanks
Old 29th September 2016, 15:45   #14
Senior - BHPian
 
Vik0728's Avatar
 
Join Date: Feb 2010
Location: Bangalore
Posts: 2,070
Thanked: 3,306 Times
Re: Maruti Swift DIY: DRL Installation

Quote:
Originally Posted by a4anurag View Post

Sad Update to the thread:
That is quite a sad sight a4anurag

I guess your car was looking so good that you missed out on sticking a 'Beauty Mole' or something.

Any details on how this happened?
Vik0728 is offline  
Old 29th September 2016, 21:44   #15
BANNED
 
Join Date: Oct 2011
Location: Hyderabad
Posts: 12,346
Thanked: 21,451 Times
Re: Maruti Swift DIY: DRL Installation

Quote:
Originally Posted by Vik0728 View Post
Any details on how this happened?
Biker at ~60kph hits a pedestrian who was crossing the road. He falls down and leaves the bike to skid.

To my bad luck I see the biker fall so proactively I brake hard and stop earlier but as bad luck was on my side, the skidding bikes comes in my path and hits the car.
a4anurag is offline   (3) Thanks
Reply

Most Viewed


Copyright ©2000 - 2025, Team-BHP.com
Proudly powered by E2E Networks