Some updates:
1. I did the 105,000 km service last weekend at home and it was a great experience. Its a fairly easy job if one can source all the parts and tools and most importantly, has the time, patience and inclination to do it at home! I've penned down the steps briefly along with the tools, parts and consumables used.
Tools required: - 19 mm 1/2 socket (for removing the engine sump drain plug).
- 32 mm 1/2 socket (for removing the oil filter assembly).
- Ratcheting socket wrench with a 1/2" drive (for loosening the drain plug and oil filter assy).
- Torque wrench with a 1/2 drive (for tightening the drain plug and oil filter assy as per the manufacturer recommended torque values).
- 10 extension bar for the 1/2 socket (for accessing the engine oil filter assy).
- Screw driver with T20 and T25 Torx bits (for removing the air filter box and the sensor assembly).
- Plastic tray (for draining the stock engine oil from the sump).
- Measuring jar.
- Blower (to clean the innards of the air filter box).
Parts required: - Oil filter with o-rings (03L 115 562)
- Fuel filter (part number - 6RF 127 400A)
- Air filter (part number - 6RF 129 620)
- Dust and pollen filter (part number 6R0 820 367)
- Drain plug with washer (part number - N90 813 202)
Many thanks to my friend Prithviraj for sourcing the parts!
Consumables required: - Engine oil 5W40 grade - 4.3L (I sourced a 4L can and a 1L can of Motul Xcess 5W40 from Amazon)
 Procedure:
I couldnt click many snaps as the hands were getting dirty but Ive managed to click a few. Herere the steps in brief:
A. Replacing the dust and pollen filter: - The dust and pollen filter is located in a box below the glovebox accessed from the co-driver side footwell.
- Slide the locking lugs towards each other and pull out the frame.

(Pic credit: VW Workshop Manuals)
- Remove the old filter from the frame and replace the new filter observing the direction of flow of air.

(Pic credit: VW Workshop Manuals)
- Replace the frame back into the box and slide the locking lugs back in place.
B. Replacing the air filter:
BHPian thoma has shared a neat thread describing the process on his Vento TDI
Link. Do have a look.
- Unscrew the 6 Torx screws on the air filter box using the T20 screw driver and unplug the connector from the MAF sensor. Store the screws safely!

(Pic credit: VW Workshop Manuals)
- Pull the box and quarter-turn the filter to remove it from the assembly.

- Use a blower to clean the innards of the box.
- Replace the new air filter into the box, quarter turn to tighten it in place, place the box back into the assembly and replace the Torx screws.
- Plug the MAF sensors connector.
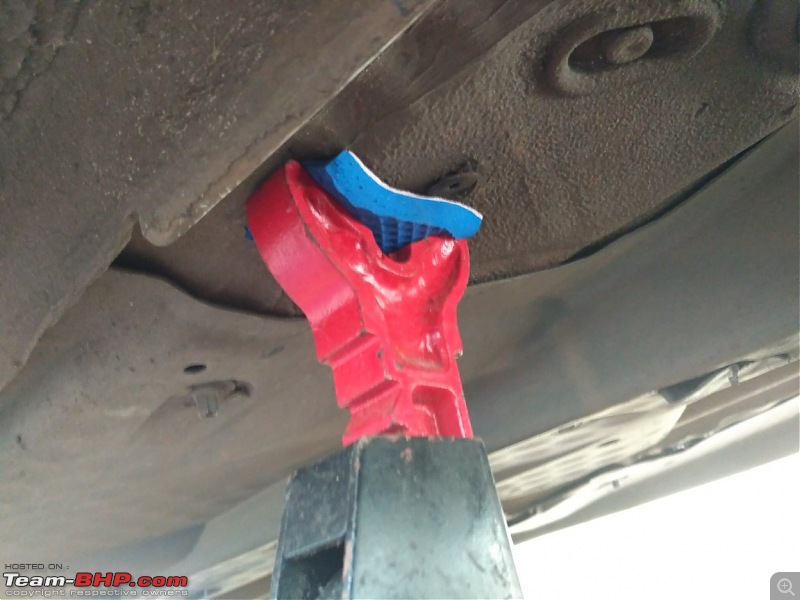
B. Draining the stock engine oil: - Jack up one side of the car using the floor jack. Place some cushioning material on top of the saddle of the jack.
- Place a jack stand at an appropriate location and use some cushioning material between the bottom of the car and the V-head of the jack stand (I had cut out some pieces from rubber sandals; will use some thicker neoprene sheets from the shipyard). Ensure that it is safe to crawl below the car.
- Pop the hood and remove the cap for pouring engine oil. Leave it on the inlet.
- Attach the ratchet with the 19 mm socket, crawl underneath the car along with the plastic tray and some rag clothes.

- Remove the drain plug from the oil sump.
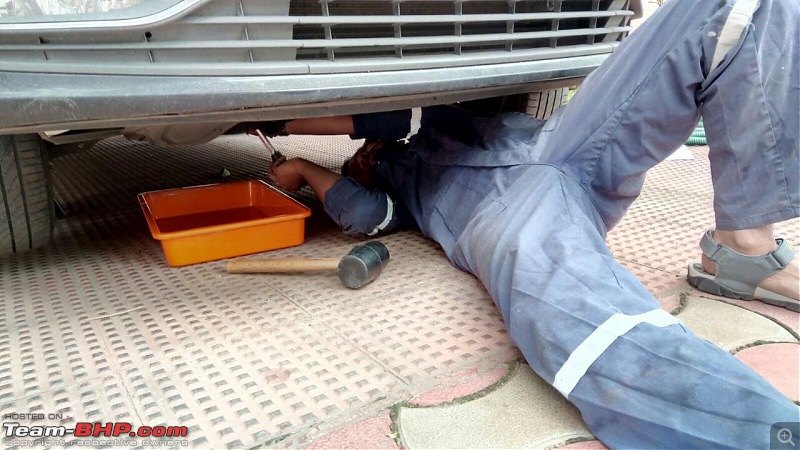
- Let the oil drain from the sump completely to the last drop. Crawl out of the bottom.

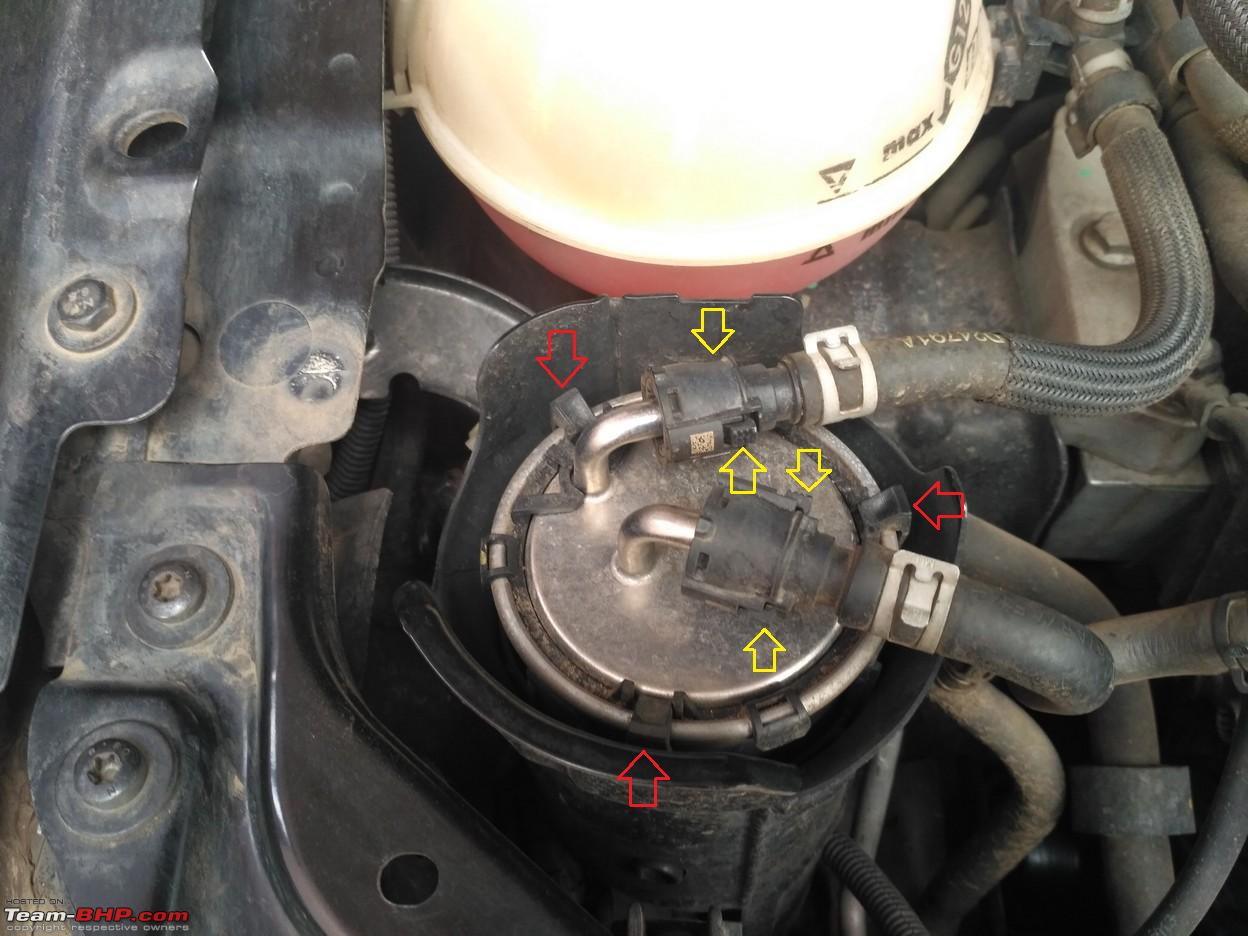
Replacing the fuel filter: - Disconnect the inlet and outlet fuel lines from the fuel filter - press the two tabs on the hose fitting and pull it out.
- Undo the three clips and pull out the fuel filter.

- Replace the new filter and reconnect the fuel lines.
D. Replacing the oil filter: - Remove the engine head protective cover.
- Unscrew the assembly holding the 2 air inlet lines and the sensor, and pull out the coolant tube to make space for removing the oil filter assembly. Replace the screw back in place.

- Attach the ratchet with the 32 mm socket and the 10 extension bar and unscrew the oil filter assembly.

- Pull out the filter from the housing and clean the external threading and the central stub thoroughly for the remnants of oil.
- Remove the 3 o-rings the main o-ring from the external threading of the housing and the 2 o-rings from the bottom of the stub.
- Pour some fresh engine oil in a measuring jar, dip the replacement o-rings in the oil and insert them on the housing in their respective slots.

(Pic credit: VW Workshop Manuals)
- Insert the replacement oil filter observing the orientation. It will lock in place only on one end.
- Replace the housing back into the oil cooler assembly, adjust the value of the micrometer scale on the torque wrench to 25 Nm, attach the 32 mm socket to the wrench along with the 10 extension bar and tighten the drain plug until the click sound is heard.
- Replace the air inlet lines assembly back in place and tighten the Torx screw.
- By now the engine oil must have drained completely. Crawl beneath the car, clean the drain hole threads thoroughly using some rag clothes.
- Screw the new drain plug into the hole and tighten it manually using hand.
- Adjust the value of the micrometer scale on the torque wrench to 30 Nm, attach the 19 mm socket to the wrench and tighten the drain plug until the click sound is heard. Stop at the first click! Crawl out of the car.
- Remove one of the jack stands on one side. Place the floor jack below the car and lower the car gradually by turning the valve on the jack gently.
- Repeat the step for the other side.
E. Pouring fresh engine oil: - Remove the cap from the inlet, place some rag clothes around the inlet, put a funnel inside the inlet and pour the engine oil gently from the 4L can. Empty the can to the last drop.

- Pour the measuring jar with 200 mL of engine oil from the 1L bottle. Pour it into the inlet.
- Check the dipstick for the oil level and do not overfill! An underfill isnt harmful but an overfill certainly is. The 1.6L CLNA engine takes 4.3L of engine oil. Pour an additional 100 mL observing the level on the dipstick. Tighten the oil cap.
- Replace the engine cover.
- Turn the key to ACC and turn it off to prime the fuel filter. Repeat the step 5-6 times to let the fuel filter soak in diesel.
- Start the engine and allow it to idle for a few minutes.
- Reset the service interval in the MID of the instrument cluster.
- Head out for a test drive to check if everything is in order. Do the wheel balancing and alignment.
The used engine oil was poured back into the 4L can and handed over to a nearby garage along with the old parts. Drove to a tire shop and they did the alignment. Balancing was fine so it wasnt done.
The junk that was left after all the used oil was poured back into the can:

Man, this tray and the measuring jar was a pain to clean in the end!
After the service, I drove around 800 km (including the return drive to Chennai) and there is a noticeable change in the performance esp. w.r.t. the reduced engine noise (as it is, the engine sounds like a tractor!) and the smoothness of the drive.
PS: Those are my company-supplied overalls.

2. The Liqui Moly Diesel Purge process
I tried to do the diesel purge process as indicated in this video:
Connected the fuel inlet and return lines from the engine into an old Horlicks bottle of diesel purge and a bypass tube for fuel supply from the fuel tank to the fuel filter and return fuel line from the engine but despite cranking the engine several times, it refused to start. Reconnected all the lines and the engine started in the first crank! I did it a second time as well, the engine refused to start again. The small inline fuel filter was oriented in the correct direction and the bottle was placed as low as possible not sure why the engine refused to start. Possibly there was air in the fuel inlet line from the bottle to the engine?

Anyway, I decided to pour the diesel purge solution directly into the fuel tank when the fuel level was at a quarter of the reserve level, started the engine and revved it for nearly 7-10 minutes in 3 different intervals (was creating quite a racket in the car park!). The exhaust also smelled (!) different compared to the normal exhaust. The whole process took more than half an hour.
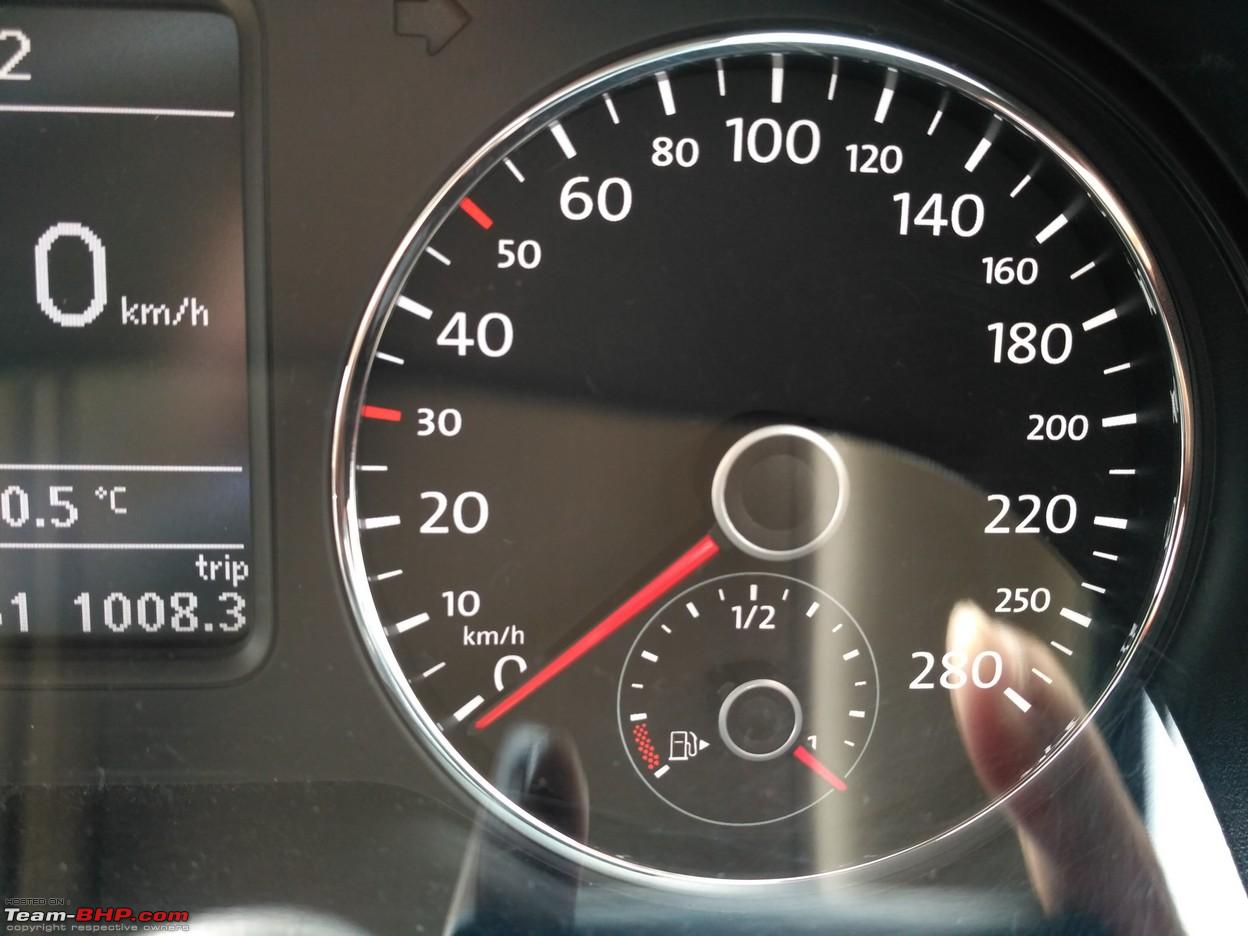
I am not sure what helped though if it was this or the servicing part, there was a marked difference after the process. The most perceivable change is, the engine now idles smoothly with lesser vibrations and the FE shows an improvement. I set my cruise control at 110 kmph during my Palakkad - Chennai drives and this time, I reached home with the fuel gauge indicating slightly less than half a tank. Usually, Id be left with a quarter tank of fuel once I reach home.
3. Retorquing the wheel bolts:
Since I got the torque wrench, I decided to retorque all the wheel bolts to the manufacturer recommended torque of 120 Nm. The bolts were previously tightened at the tire shop while doing the wheel balancing and alignment, and it was obviously overtightened. I had to stand atop the wheel wrenches to loosen them.
Attached a 5 extension bar and the 17 mm socket to the torque wrench, and tightened all the wheel bolts.
Must admit though, I was a bit paranoid after this and was checking if the bolts were in place when I took breaks during the return drive to Chennai.

4. The kerb weight mystery:
Quote:
Originally Posted by petroguzzler  Man, this is some news. |
Quote:
Originally Posted by McLaren Rulez Did you check if the weighbridge was zeroed correctly before you moved your car onto it? |
Quote:
Originally Posted by Vik0728 Woah Gannu, if that has any truth to it, we 1.6 GT TDI owners have been elevated to another esteemed club, with hatch that has astounding numbers |
Quote:
Originally Posted by AMG Power VW's kerb weight would be as per EU standards and would include the weight of 1 driver (assumed at 75 kg), full tank of fuel (think it's 90% full now), all fluids, tools and tyres as new. |
Quote:
Originally Posted by kpzen I guess something is not right, to re-confirm you can check again at another weighing bridge. |
Quote:
Originally Posted by graaja This could be a simple offset error. Did you check if the scale was showing zero before parking the car on the scale? |
Guys, sorry about the goof-up regarding the kerb weight of the car! It is indeed
1190 kg with a tankful of fuel and without the drivers weight.

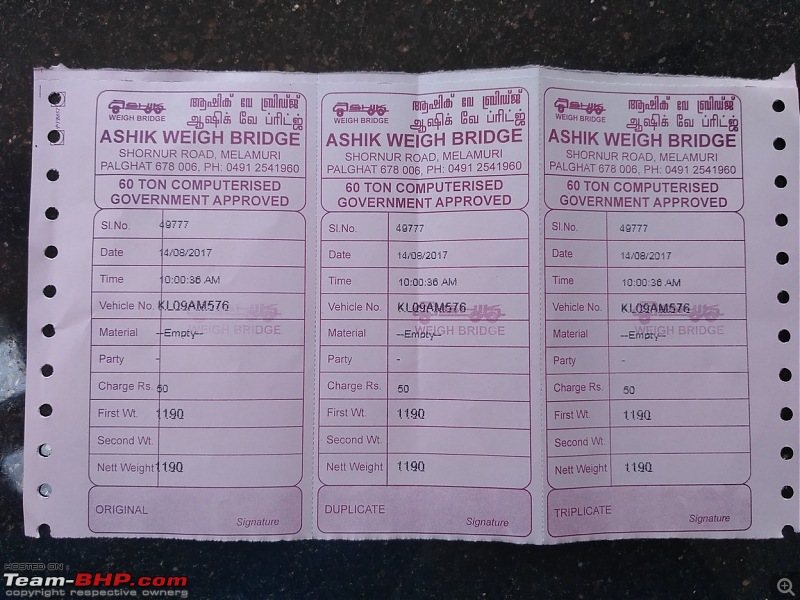
Tanked up the fuel on a morning and drove to the same weigh bridge this time. Not sure what exactly caused the error in the readout before but the operator said maybe the zero setting wasnt done.
Finally, after a round of wash and wipe using ONR (Optimum No Rinse):

That's all for now. Cheers!


 19th August 2017, 00:34


 (81)
Thanks
(81)
Thanks