| |||||||

| Search Forums |
| Advanced Search |
| Go to Page... |
 |
| Search this Thread |  41,640 views |
 2nd October 2017, 14:28
| #1 |
| Distinguished - BHPian  Join Date: Dec 2012 Location: India
Posts: 4,840
Thanked: 14,736 Times
| DIY: Honda Civic Brake overhaul (pistons & caliper lubrication) Dear readers, I would like to start with an disclaimer cum advice: Please do not indulge in this DIY unless you know what you are doing. Due to the critical nature of this DIY, please seek professional help in case you are not confident of pulling it yourself. So, here we go - I was noticing unusual heat build up in the front discs after every drive in my Civic coupled with a hint of brake drag. This was an indication that the brake pads were staying put against the rotors even while the brake pedal was not depressed, effectively producing brake drag. Running a car with this problem can result into overheating of parts which may result in brake failure, overheating rotors which can result into a warp, wastage of power and poor fuel efficiency. Needless to say, I would not love any of them. This long weekend due to festivals meant that HASS was closed, hence decided to get my own hands dirty. The Civic has disc brakes all around, hence the work needed to be carried on all 4 wheels. Coming to the most probable causes of disc brakes drag: 1. Jammed caliper which would not release and stay applied even after brake operation. 2. Jammed brake pistons - Again the brake piston which pushes the brake pads against the rotors may get rusted or just get jammed as they face lots of dirt and brake dust. This may prevent it from retracting inside after brake pedal has been released. This in turn would not free up the brake pads away from the rotor, leading to brake drag. 3. Under extreme circumstances, it could have been a completely seized brake piston or a failed master cylinder. There may be other various reasons but the above would be the foremost stuff to check. Now, tools that you would need: 1.Scissors Jack from the car tool kit  2. Lug nuts wrench, again from the car tool kit.  3. Ring wrenches - 14/15 (for front) and 12/13 (for rear) [Size may differ with cars]  4. Wrenches: 20/22 (for front) and 16/17 (for rear) [Size may differ with cars] 5. C Clamp (or G clamp)  6. Appropriate DOT brake fluid. [Refer to the wordings on the brake fluid reservoir cap]  7. Red rubber/ Silicone/ Brake Caliper grease.  8. Long and strong screw driver: Just in case you need to pry out stuck brake pads.  9. Clean rags/ cotton cloth to clean the dirt accumulated in the mechanicals. *Pictures of all tools and fluid have been taken from the internet (except the grease sachet) Last edited by saket77 : 2nd October 2017 at 18:42. |

|  (13)
Thanks (13)
Thanks
|
| The following 13 BHPians Thank saket77 for this useful post: | baby_antu, dailydriver, gpa, GTO, Leoshashi, paragsachania, R2D2, rahul4640, samabhi, sumitsinha0280, swamyzen, The Rationalist, vaasu |
| |
|
2nd October 2017, 16:50
| #2 |
| Distinguished - BHPian Join Date: Dec 2012 Location: India
Posts: 4,840
Thanked: 14,736 Times
| re: DIY: Honda Civic Brake overhaul (pistons & caliper lubrication) Servicing Front Disc Brakes: Step 1: Obviously most of the regular guys like us do not have the lift facility, hence we will do one wheel at a time. First Loosen the lug nuts of the front wheel. Do not remove them completely before jacking up the car. Just loosen them so that its easy to open them when the wheel is lifted. Apply the parking brakes and also secure the rear wheel by placing bricks/ blocks to prevent it from rolling accidentally to any direction. Step 2: Now that all lug nuts are loosened, turn the steering in the direction which makes more room to work with the calipers. Mostly right for working in the right side and vice versa. Step 3: Once done, place the scissors jack at the appropriate mounting point of the car and lift the wheel. The wheel on my car was very hard to rotate due to the brake drag. Finally took the wheel off. SAFETY TIP: In absence of jack stands, place the wheel that you just took off under the running board, just behind the jack as seen in the picture below. This gives you some safety cushion just in case the jack fails, or if accidentally the car comes off the jack for some reason.  The Right Wheel Caliper:  Step 4: Now that the brake caliper assembly and the rotor is in view, you will need to open the 2 bolts fastened on the caliper assembly to take out the brake caliper as in the picture. Depending on the design of your caliper, you may need one additional wrench to hold the caliper pin rotating with the bolt. Opening the Bolts:  Unfasten these 2 bolts completely:  Step 5: Once the bolts are removed, the caliper should come off by pulling it out with some effort. Those with jammed pistons may need more effort or even need to be pried out. Take care not to damage the hydraulics and hose pipes.  Step 6: Hang the removed caliper on the strut brackets to avoid any load stress on the hose pipes as in below demonstration.  Step 7: Take out the 2 caliper pins. They are the ones on which caliper bolts are fastened. They are secured under a rubber boot, hence remove carefully so that the rubber boot is not damaged. Take note of the size as some cars may have caliper pins of different lengths. You will need to re-insert them in their respective grooves. After taking them out, wipe them clean with a cloth as there would be old grease on them. After cleaning, apply red rubber grease/ silicone grease or brake caliper grease liberally on the pins.  IMPORTANT: It is important to use only silicone base grease as normal grease can deteriorate rubber components due to petroleum and mineral base contents. Normal grease can lead to cracked rubbers and if applied on rubber seals, they may give up resulting in failures. Also, normal/ lithium base grease cannot withstand the temperatures that braking components routinely reach and can melt away or turn sticky, affecting braking operation. Hence, it is strongly recommended to use Red Rubber Grease or silicone base grease which is especially formulated for application on rubber and have high temperature resistance. They can withstand sun and water exposure better as well. Coming back to lubricated caliper pins, reinsert them into the grooves. Push them in and out a few times to make sure they are moving freely. Step 8: Take out the brake pads and clean them with dry cotton cloth. Pry out brake dust from the centre groove of the brake pads. Inspect them for wear. Some cars have a 'squealer' on the inner brake pads which is an attached metal clip on the brake pads which rub against the rotor making a distinct squeal when the pads have wore to a certain low level, acting as an active brake pad level indicator. This picture should give you a good idea as how this squealer works:  After cleaning the pads, apply little grease on the 2 metal edges which act as a small pivot and it will help keeping them from sticking. Also clean the retainer springs/ metal plates. Use brake fluid in a cloth to clean them. Place the brake pads back in their brackets. Step 9: Now that the caliper pins are lubricated, you may need to lubricate the brake pistons as well. Do it only if necessary as it can be tricky to push back the pistons inside without proper tools. Since, mine was jammed, I had to clean & lubricate the brake pistons as well. For this, press the brake pedal a few times. This will push the piston outside the assembly exposing more of it. This will also result in brake fluid level going down in the reservoir under the hood. So, it is a good idea to top it up to avoid air getting sucked into the system from top. Now gently unseat the seals and push them inside just a bit so that you can clean the circumference of the steel piston. Use brake fluid to clean any accumulated dirt or even some rust build up on the circumference area of the piston. 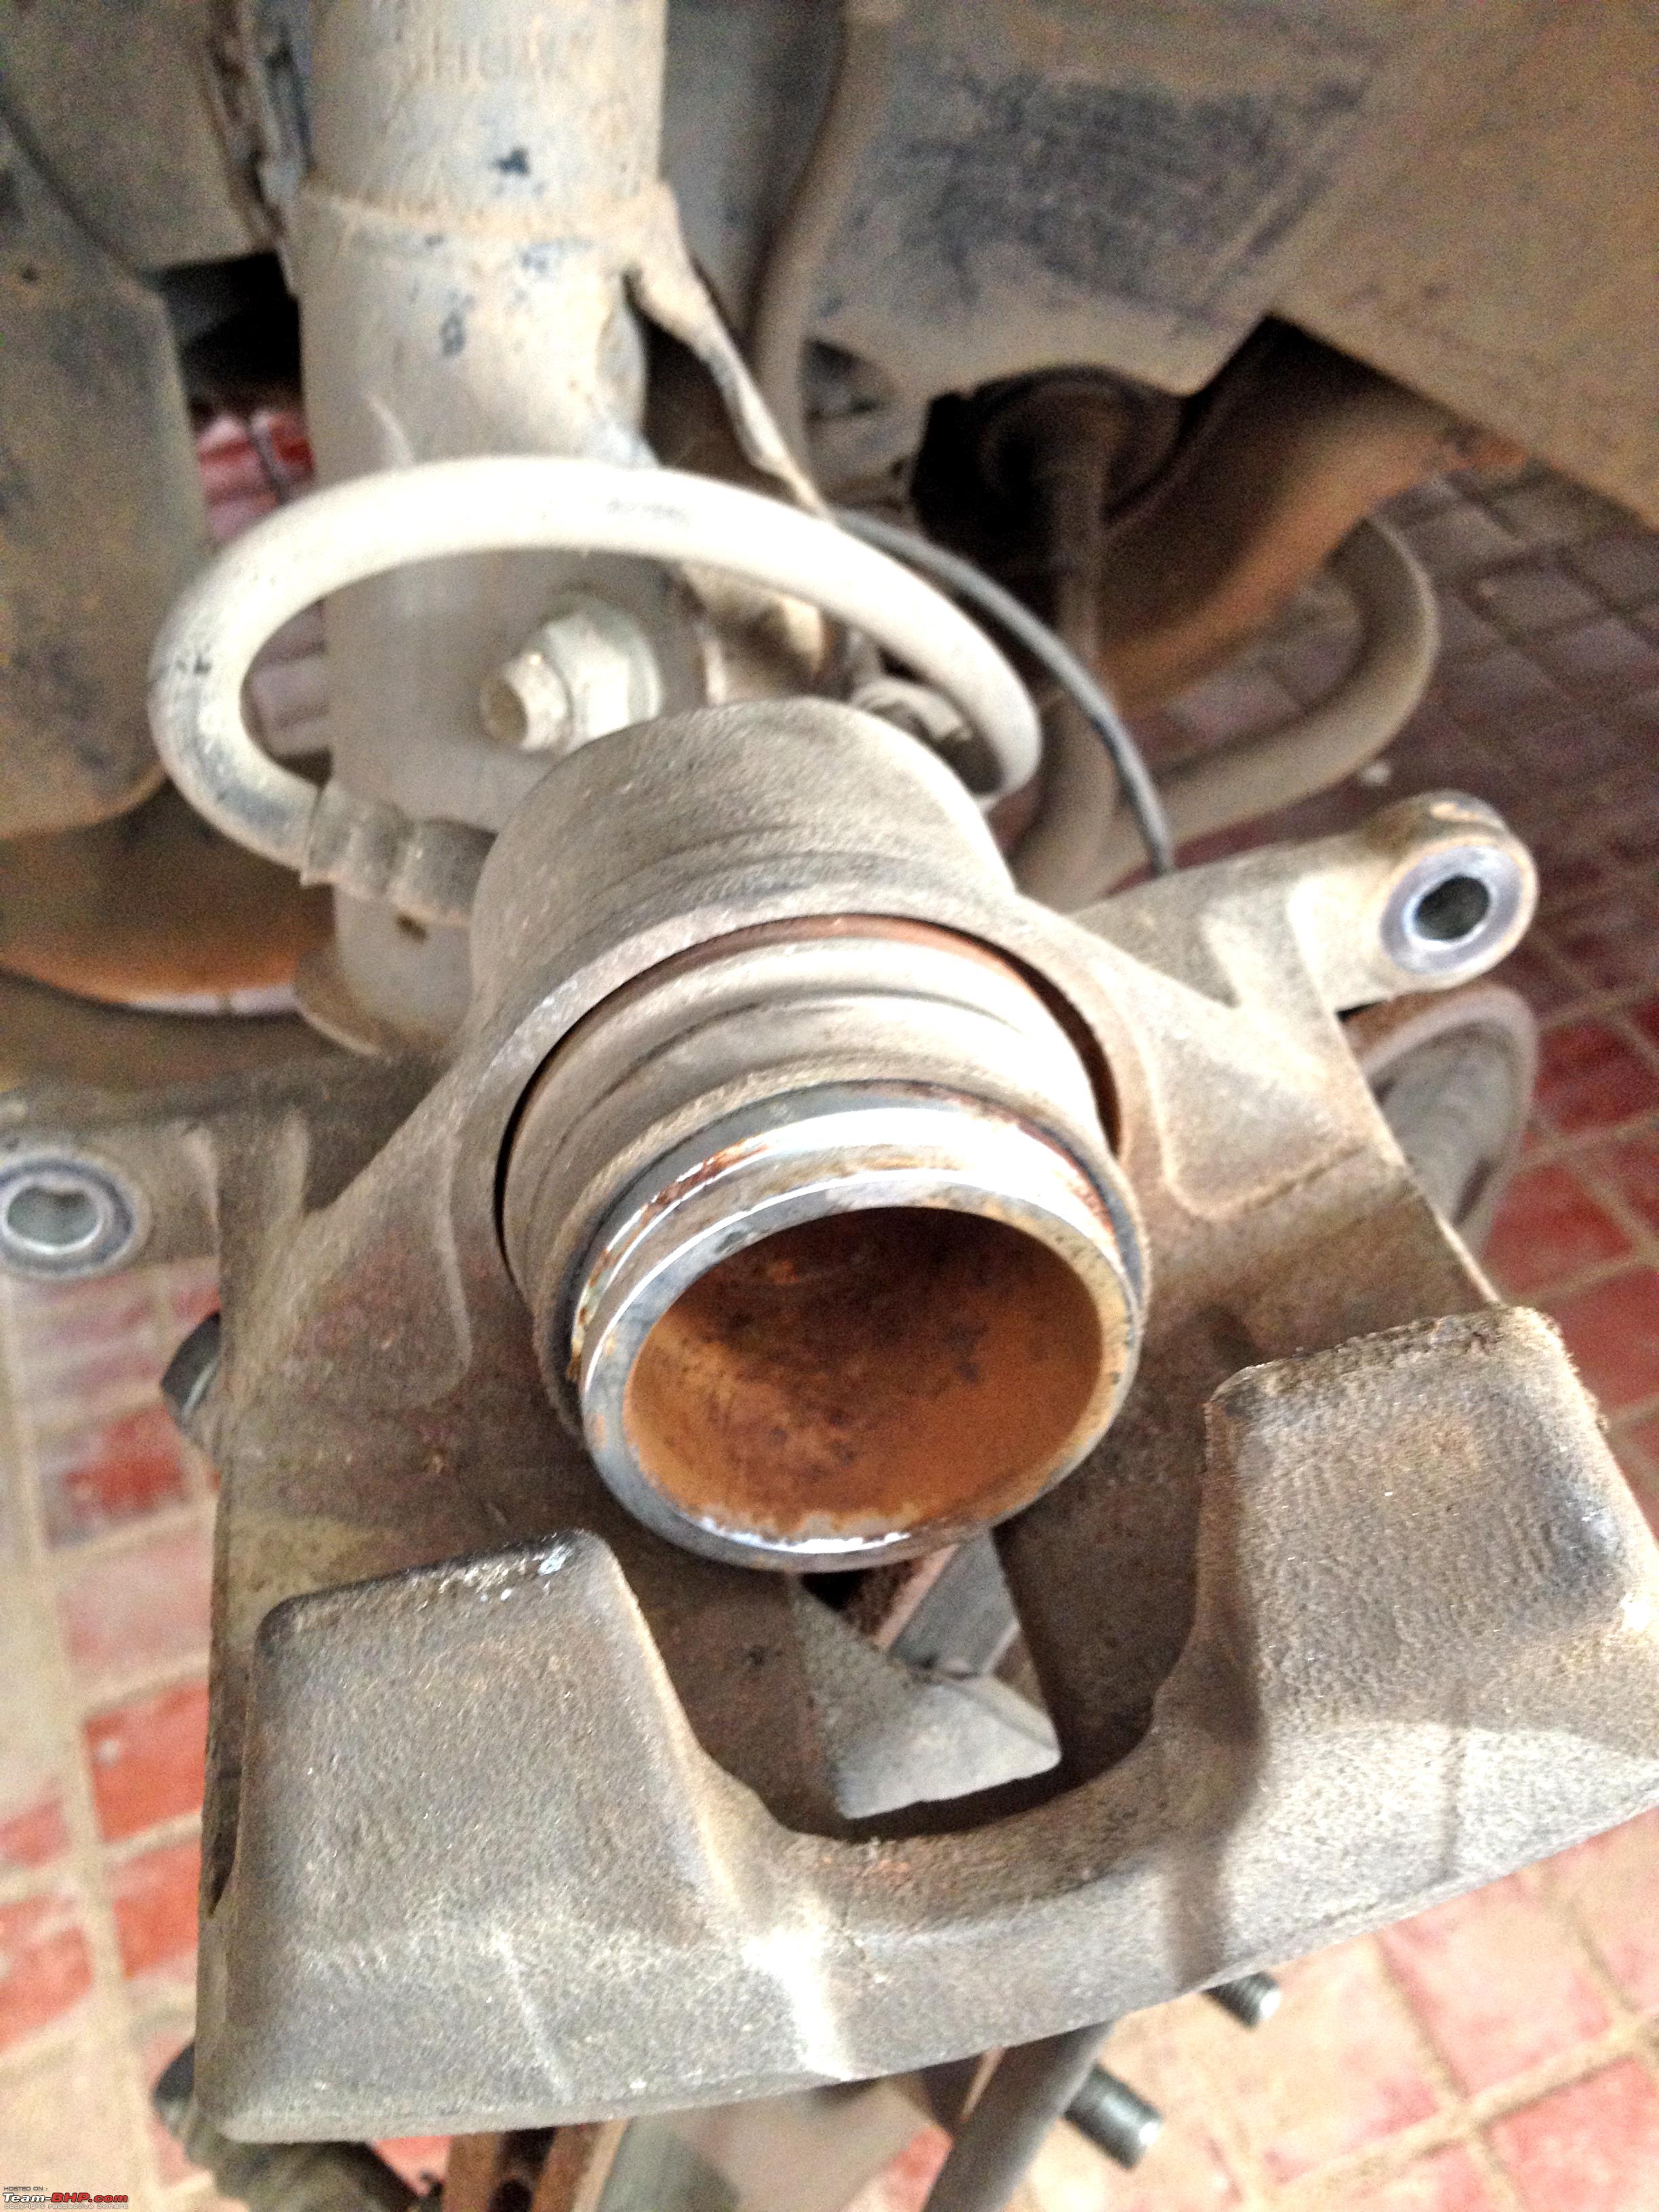 After cleaning the same, apply the silicone grease there as well. Once this is done, you will need to push back the piston inside the assembly. Do this using a C Clamp. This can involve some effort. Push the piston inside until it sits flush with the assembly. Make sure to seat the seal properly. Take this opportunity to inspect any leaks or cracks in the rubber seal. I found one and shall be heading to HASS soon to get it changed. Step 10: Re-assemble the system back in reverse. After fitting, move the caliper assembly right and left to make sure it is floating freely on the caliper pins. Apply the brake pedal a few times to re-level the brake piston back to proper level so that it can engage the pads. Servicing Rear Disc Brakes: Mostly steps remain same in-principle for servicing the rear brakes as well. However, there is a small 'twist' - literally. Many cars with rear disc brakes have a different kind of piston. The pistons in the front are hollow like a small cup but the rear ones are solid. This is true for most EU cars as well. These pistons are not compressible by C Clamp. These solid pistons have grooves on them. They are retracted by 'twisting' them. A clock-wise twist will push back the piston in gradually. The rear 'twistable' piston: 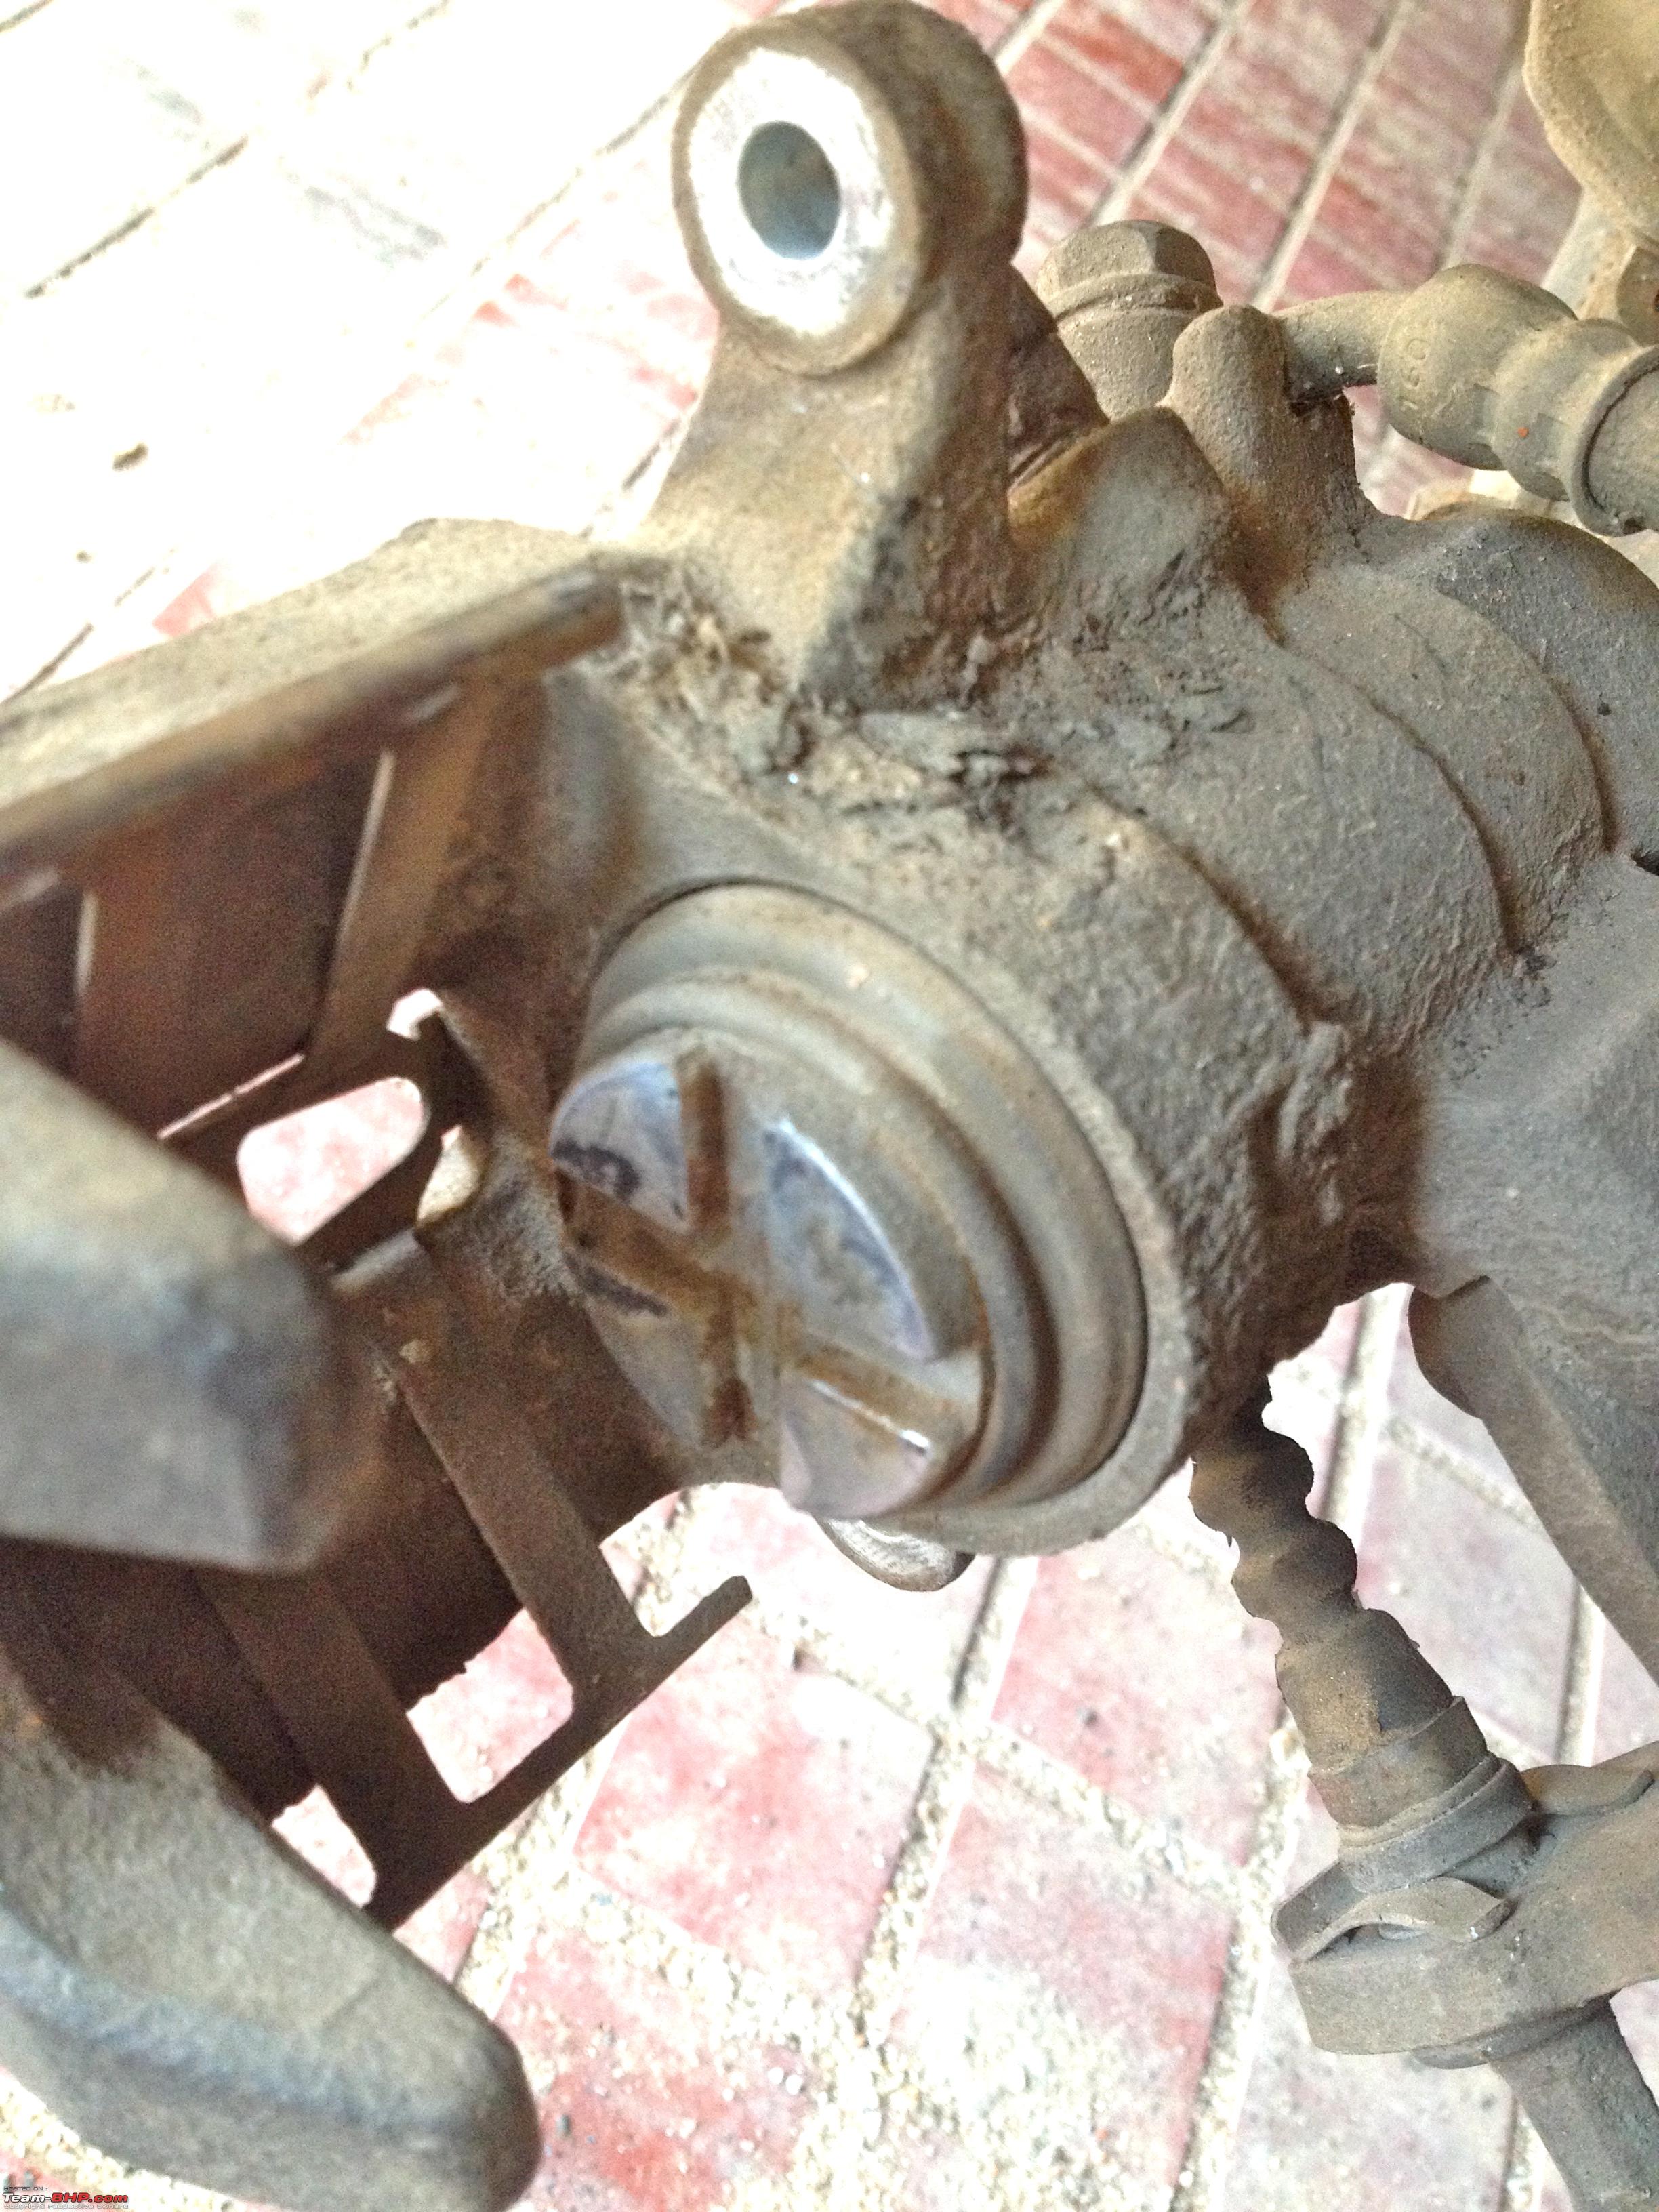 Since I did not have a specialized tool hence used a door's L-Drop as a desi jugaad [read: alternative] to rotate the piston. It worked nicely and I was able to push them back in eventually. Apart from this, you may need to un-fasten the bolt holding the rear hydraulic hose pipe to the frame for support. This will free up some clearance that the short hose pipe length would otherwise restrict. I also removed the parking brake cable which is hooked in the bracket but found that it wasn't necessary. REMINDER: After assembling back the entire system; ensure to tighten all lug nuts on the wheels. Ensure that all caliper bolts are fastened properly. Pump the brake pedal a few times so that the brake pistons advance to proper levels since you have retracted them.Do it repeatedly unless the pedal is firm. Check the brake fluid level in the reservoir. SAFETY TIP: Test the brakes at parking speed to make sure they are working properly. Press and hold the brake pedal to make sure it is not sinking down. A sinking pedal would mean a leak in hydraulics like in the hose pipe or caliper seals. It is good to bleed the brakes to get rid of any air that may have gotten inside the system. A spongy or a low brake pedal which depresses a bit too much is a sure shot indication that the system needs bleeding. I am not covering the bleeding procedure here though but I hope this DIY write up will help those reading it. Any questions, suggestions, additional information and your own experiences are most welcome in this thread. Thanks for reading. Stay safe guys! Regards. Last edited by saket77 : 2nd October 2017 at 18:51. |
|
| (14)
Thanks
|
| The following 14 BHPians Thank saket77 for this useful post: | baby_antu, Dr.Naren, gpa, GTO, itsmb, Leoshashi, manim, nilaykmrsr, paragsachania, R2D2, sagarpadaki, samabhi, swamyzen, vaasu |
|
3rd October 2017, 07:21
| #3 |
| Team-BHP Support  | re: DIY: Honda Civic Brake overhaul (pistons & caliper lubrication) Thread moved from the Assembly Line to the DIY Section. Thanks for sharing! |
|
| (3)
Thanks
|
| The following 3 BHPians Thank Aditya for this useful post: | GTO, Leoshashi, saket77 |
|
3rd October 2017, 13:56
| #4 | |
| BHPian Join Date: Sep 2015 Location: NBO,HYD,MAA
Posts: 235
Thanked: 511 Times
| Re: DIY: Honda Civic Brake overhaul (pistons & caliper lubrication) Quote:
Just a quick thought on Step 9: It's much easier to open the brake fluid reservoir cap in the engine bay before you do this service. The cap maintains the pressure/seal in the system which is why its incredibly tough to push the piston back into the piston housing. Also, I'm not so sure about topping up your reservoir with fluid; considering you have pushed the piston all the way out, the level would have come down. But once you push the piston back in with the C-clamp, the level will rise in the reservoir again. You normally don't add fluid in the system, unless its leaking. Please check your reservoir to make sure you haven't overfilled. Brake fluid is corrosive. | |
|
| (2)
Thanks
|

| The following 2 BHPians Thank qr20de for this useful post: | GTO, saket77 |
|
3rd October 2017, 14:58
| #5 |
| Distinguished - BHPian Join Date: May 2010 Location: Bengaluru
Posts: 4,455
Thanked: 6,797 Times
| Re: DIY: Honda Civic Brake overhaul (pistons & caliper lubrication) Saket, Red rubber grease has temperature range of 100 to 120 Celsius. The caliper assembly temperature goes beyond that temperature on hard/repeated braking. It is better to use dedicated caliper grease like the ones available as MGP. If you can get this then nothing like it https://www.permatex.com/products/lu...s-lubricant-2/ Top quality product. Last edited by sagarpadaki : 3rd October 2017 at 15:02. |
|
| (5)
Thanks
|
| The following 5 BHPians Thank sagarpadaki for this useful post: | a4anurag, GTO, Leoshashi, R2D2, saket77 |
|
3rd October 2017, 15:24
| #6 |
| BHPian Join Date: May 2010 Location: Chennai
Posts: 522
Thanked: 1,449 Times
| Re: DIY: Honda Civic Brake overhaul (pistons & caliper lubrication) Great DIY write up with pictures. I did the same on my recently bought used Civic, but you took the pain of putting it in the forum. I just wanted to add couple of things on point number 7 - Caliper pin greasing. Try to clean the inner side of the rubber boots as well because the old hardened grease will be stuck there. Take care not to puncture the same and be very careful. After inserting back the pin, ensure that the rubber boot lips fits in the slots near the caliper pin head so that there is no gap when the pin starts moving. Also as a tip if you just want to grease the pins and clean the pads - I removed only the lower caliper bolt for the front and lifted the caliper and removed the caliper sideways so that both bolts can be greased. But for the rear, you need to remove both the bolts. Just to simplify the process a bit.  , You may have to remove it fully if you want to do the piston as well it has been done in this process above. , You may have to remove it fully if you want to do the piston as well it has been done in this process above.Swami |

| (3)
Thanks
|
| The following 3 BHPians Thank swami69 for this useful post: | GTO, R2D2, saket77 |
|