Team-BHP > Technical Stuff > DIY - Do it yourself
Register New Topics New Posts Top Thanked Team-BHP FAQ


Reply
  Search this Thread
30,238 views
Old 
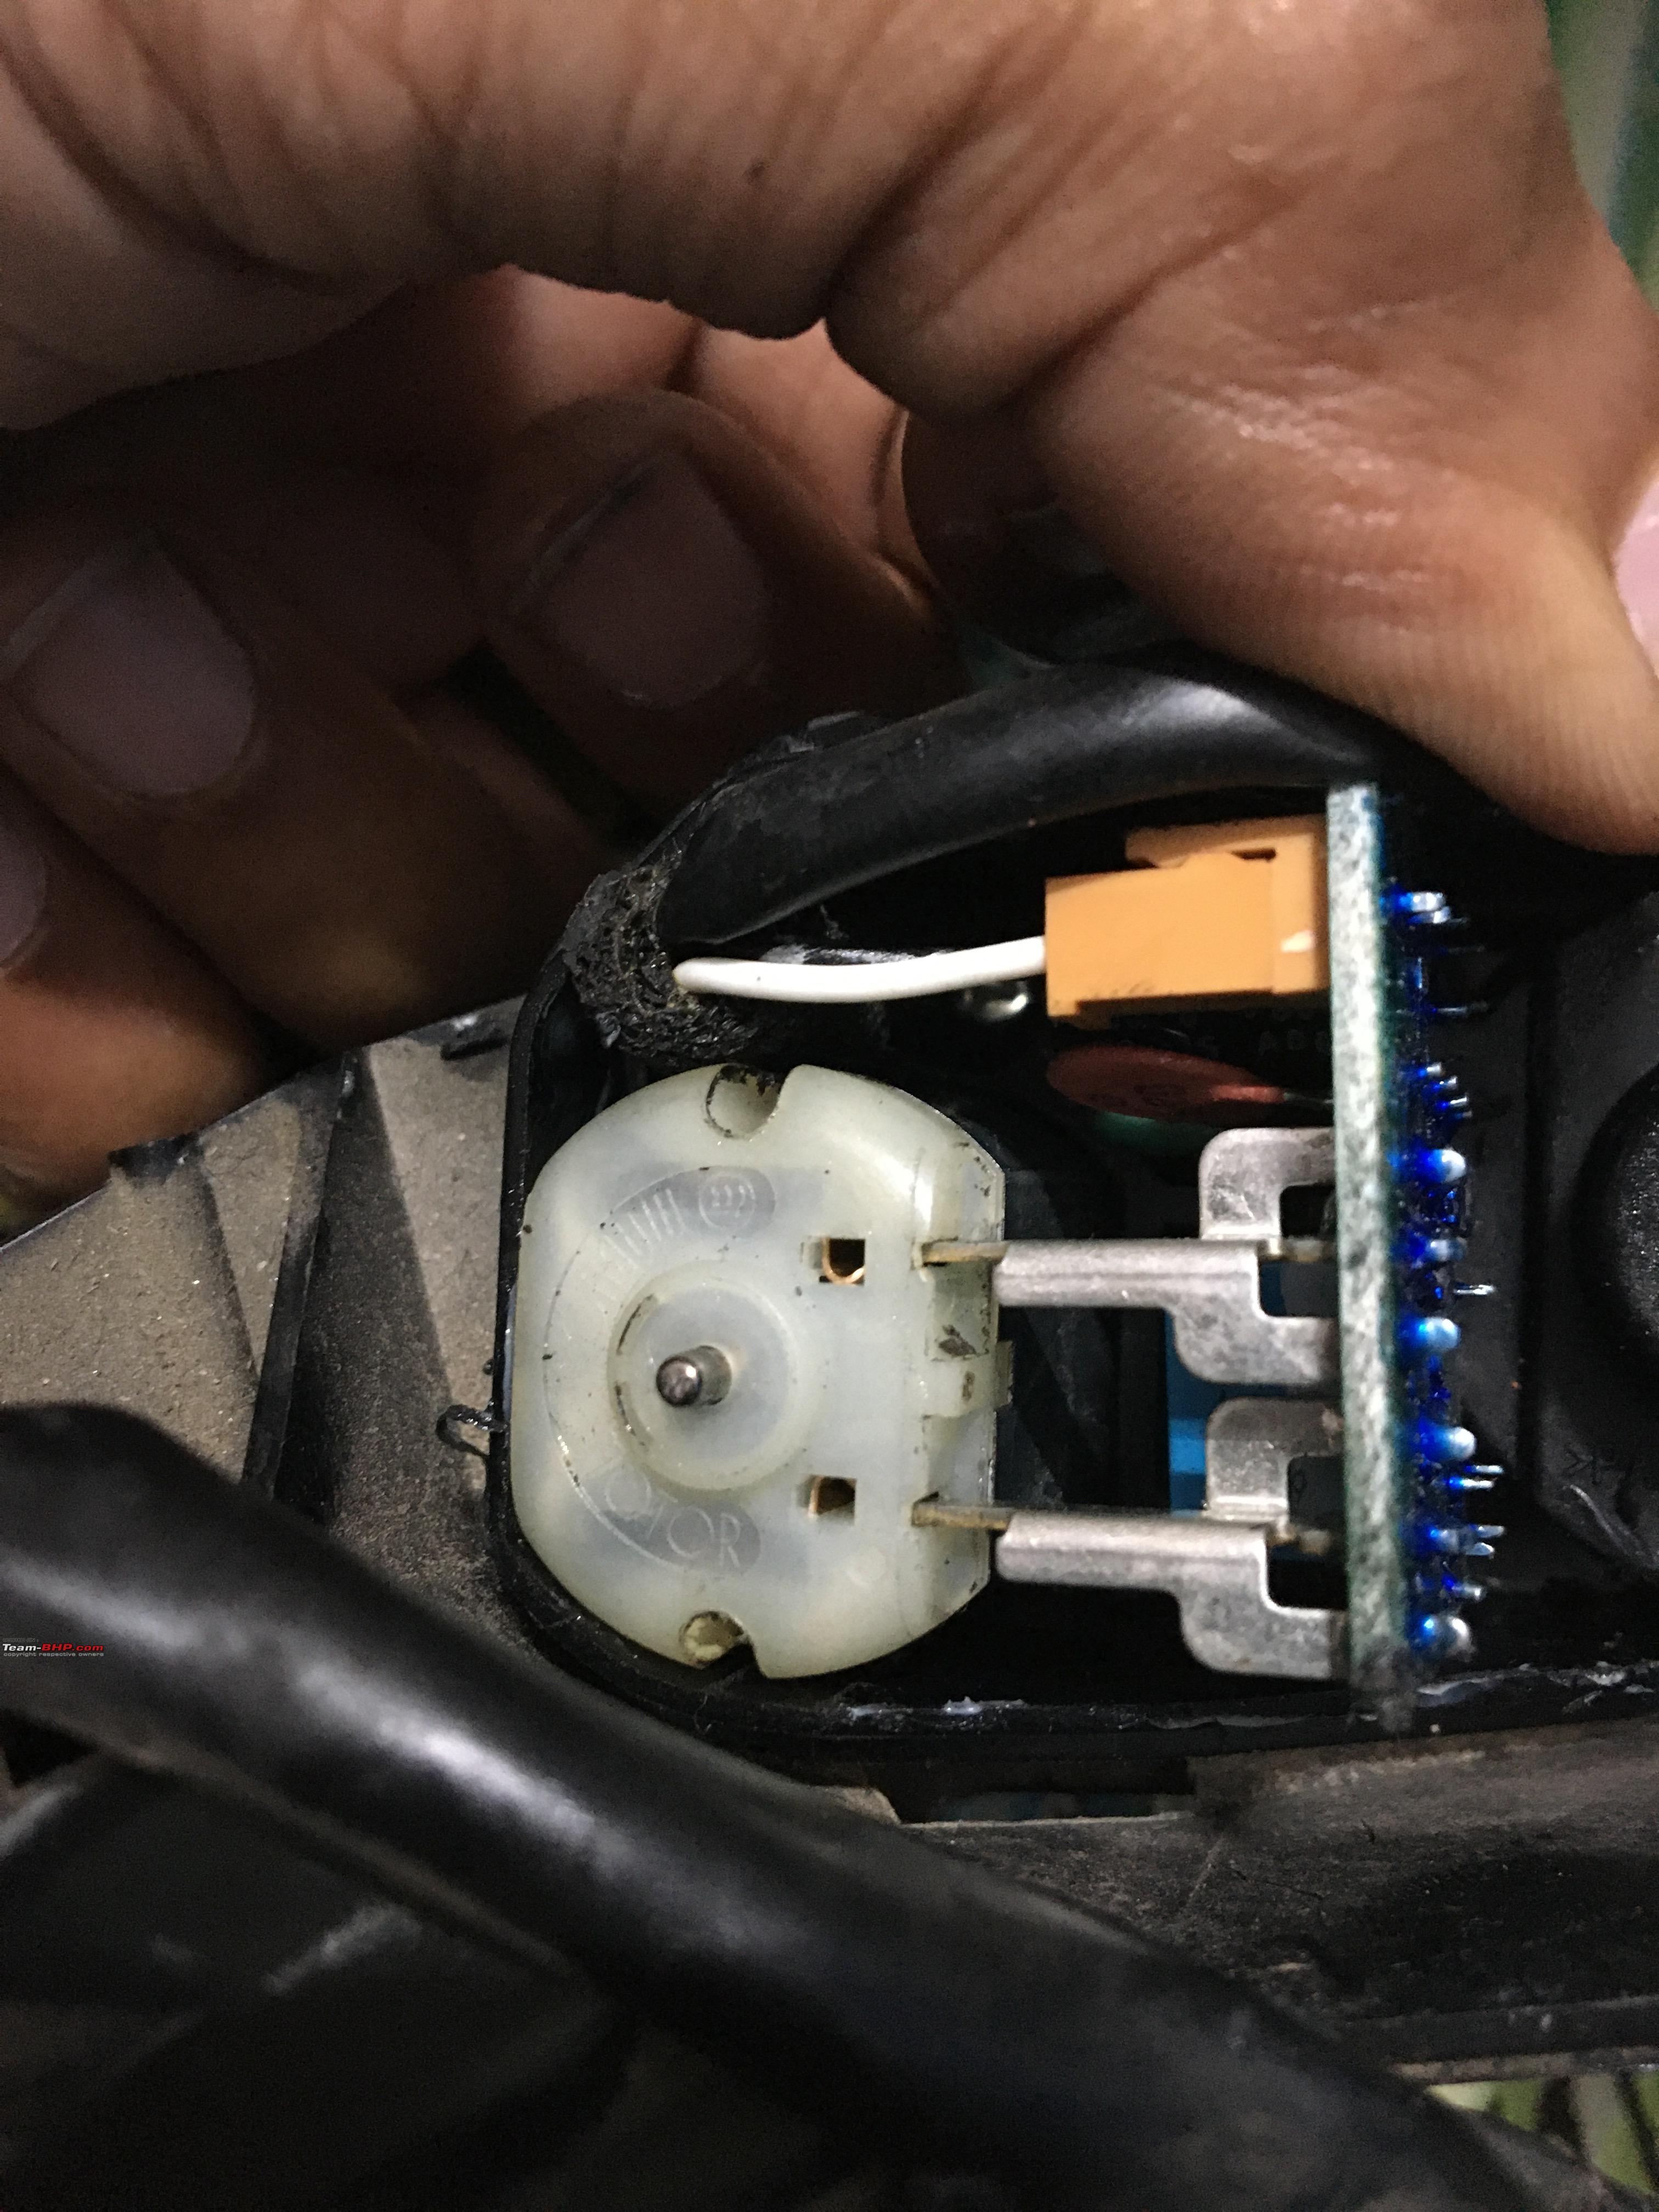
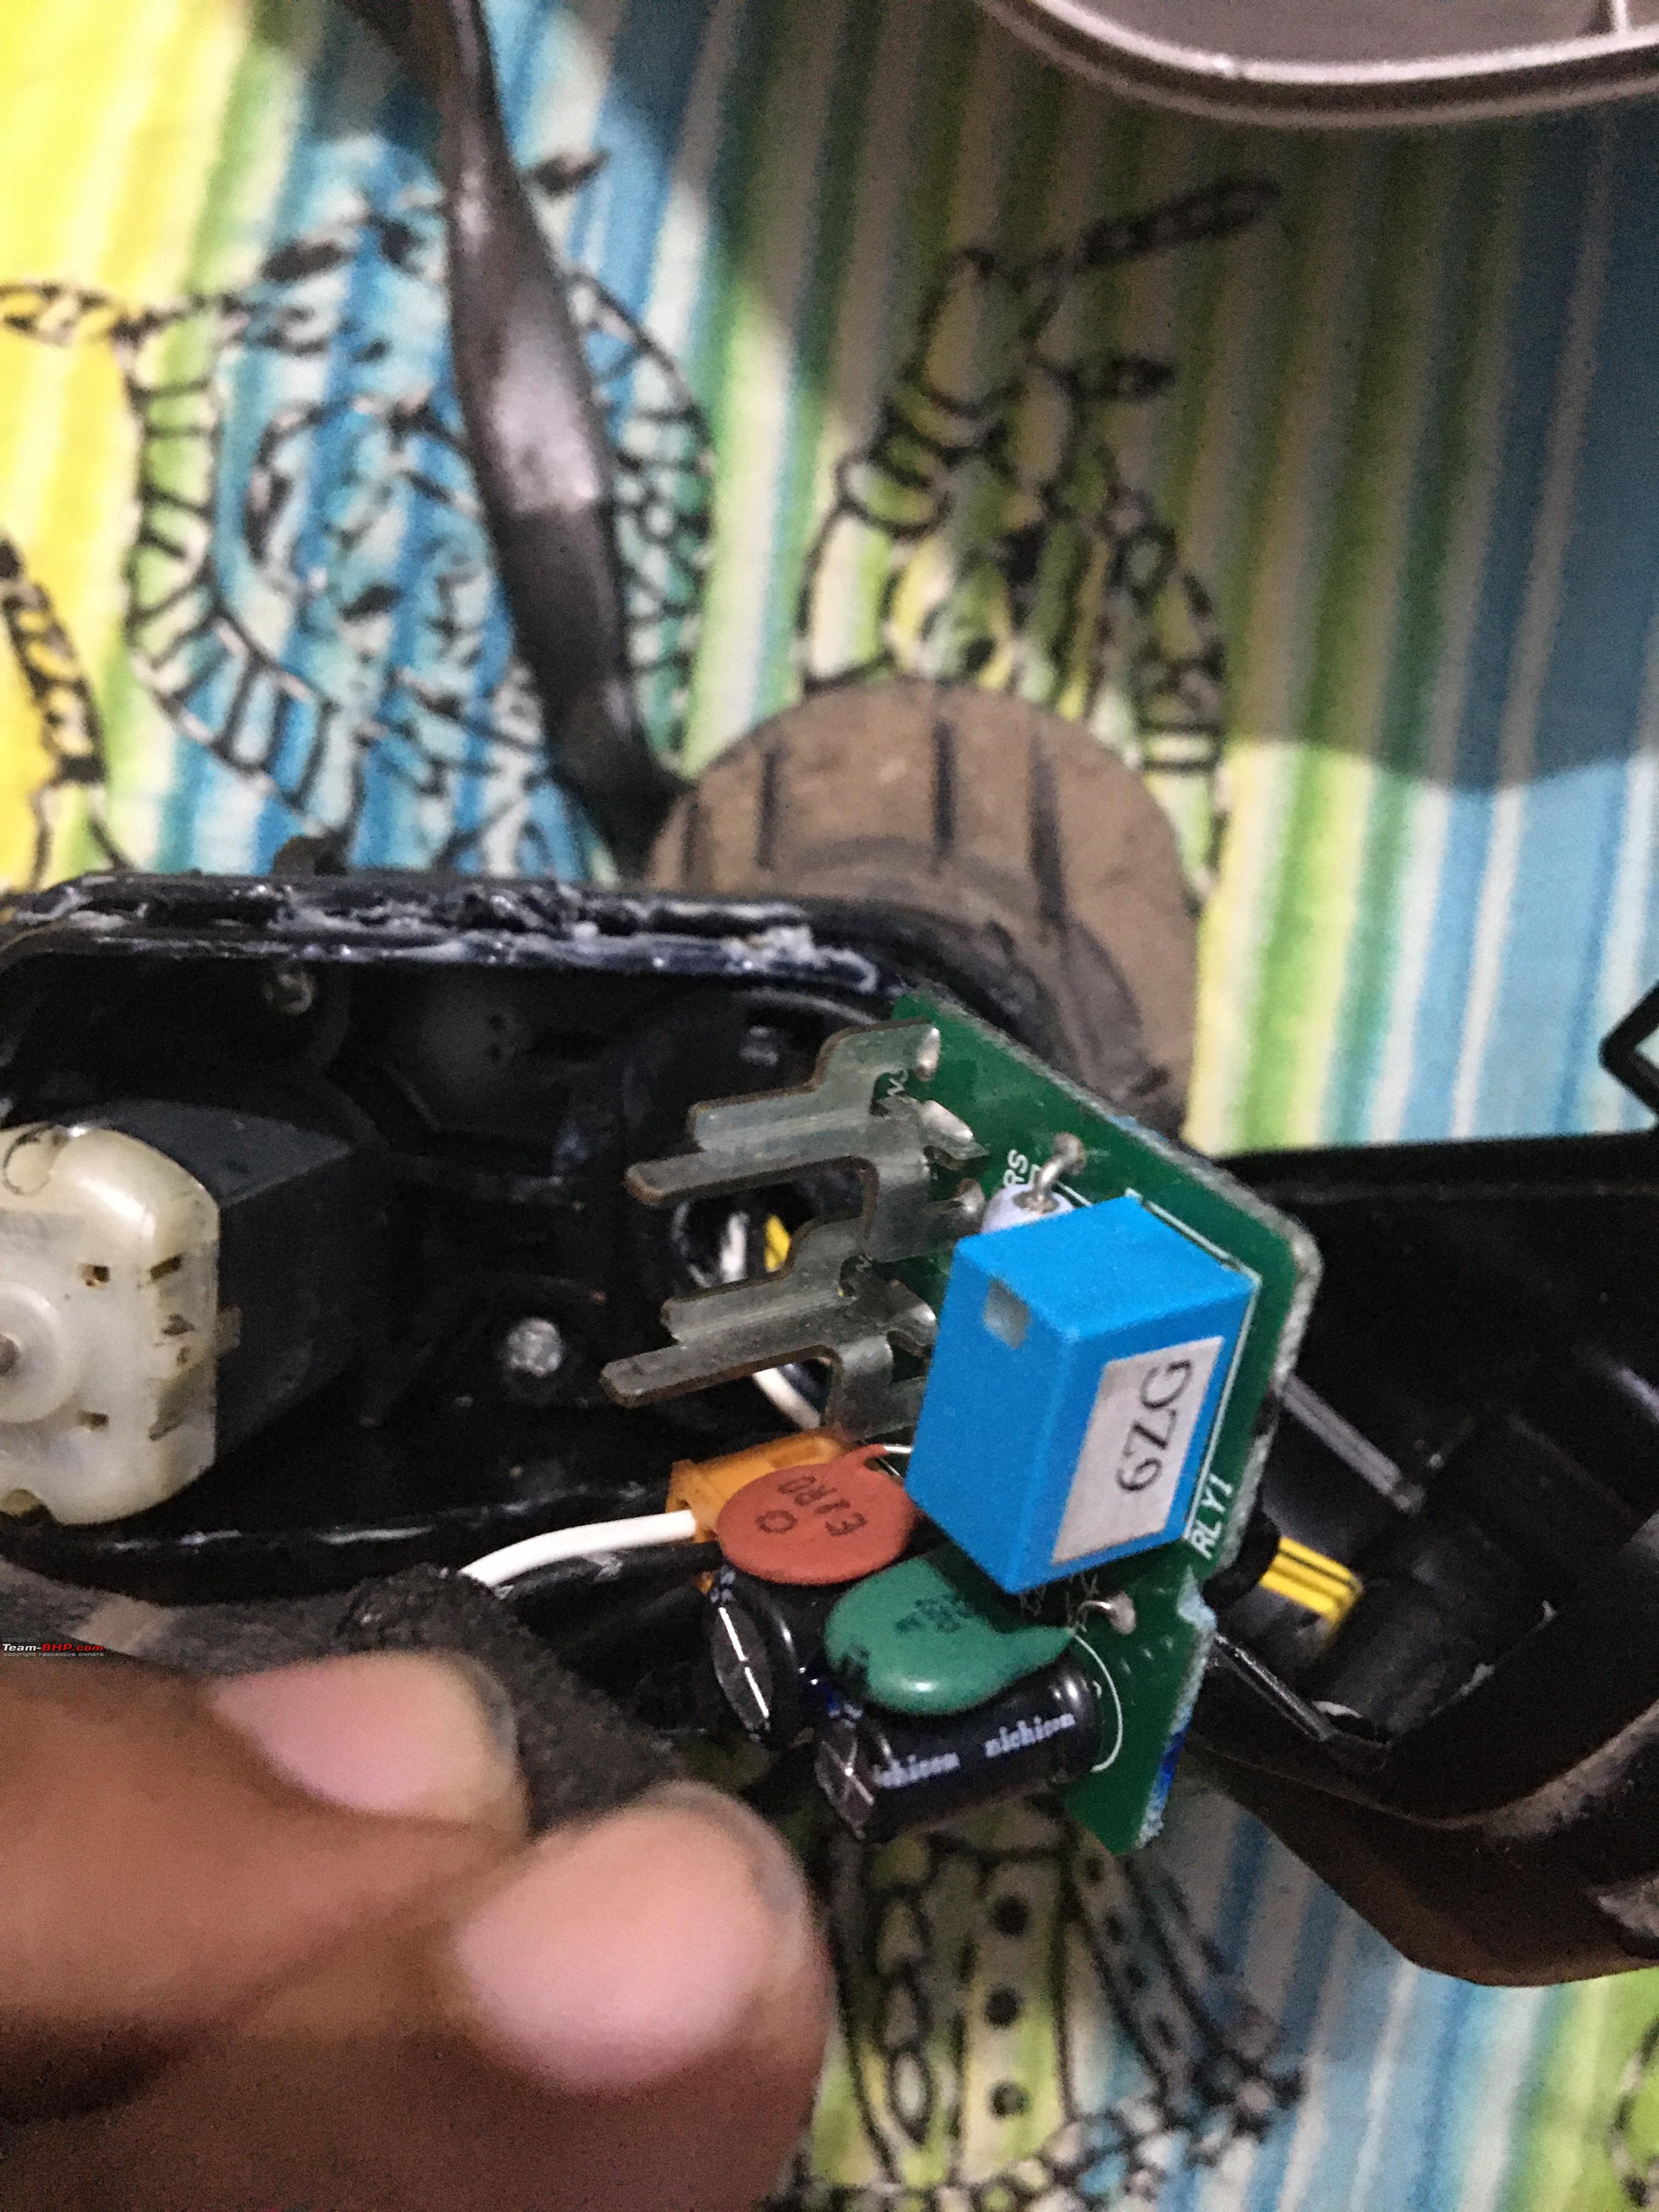
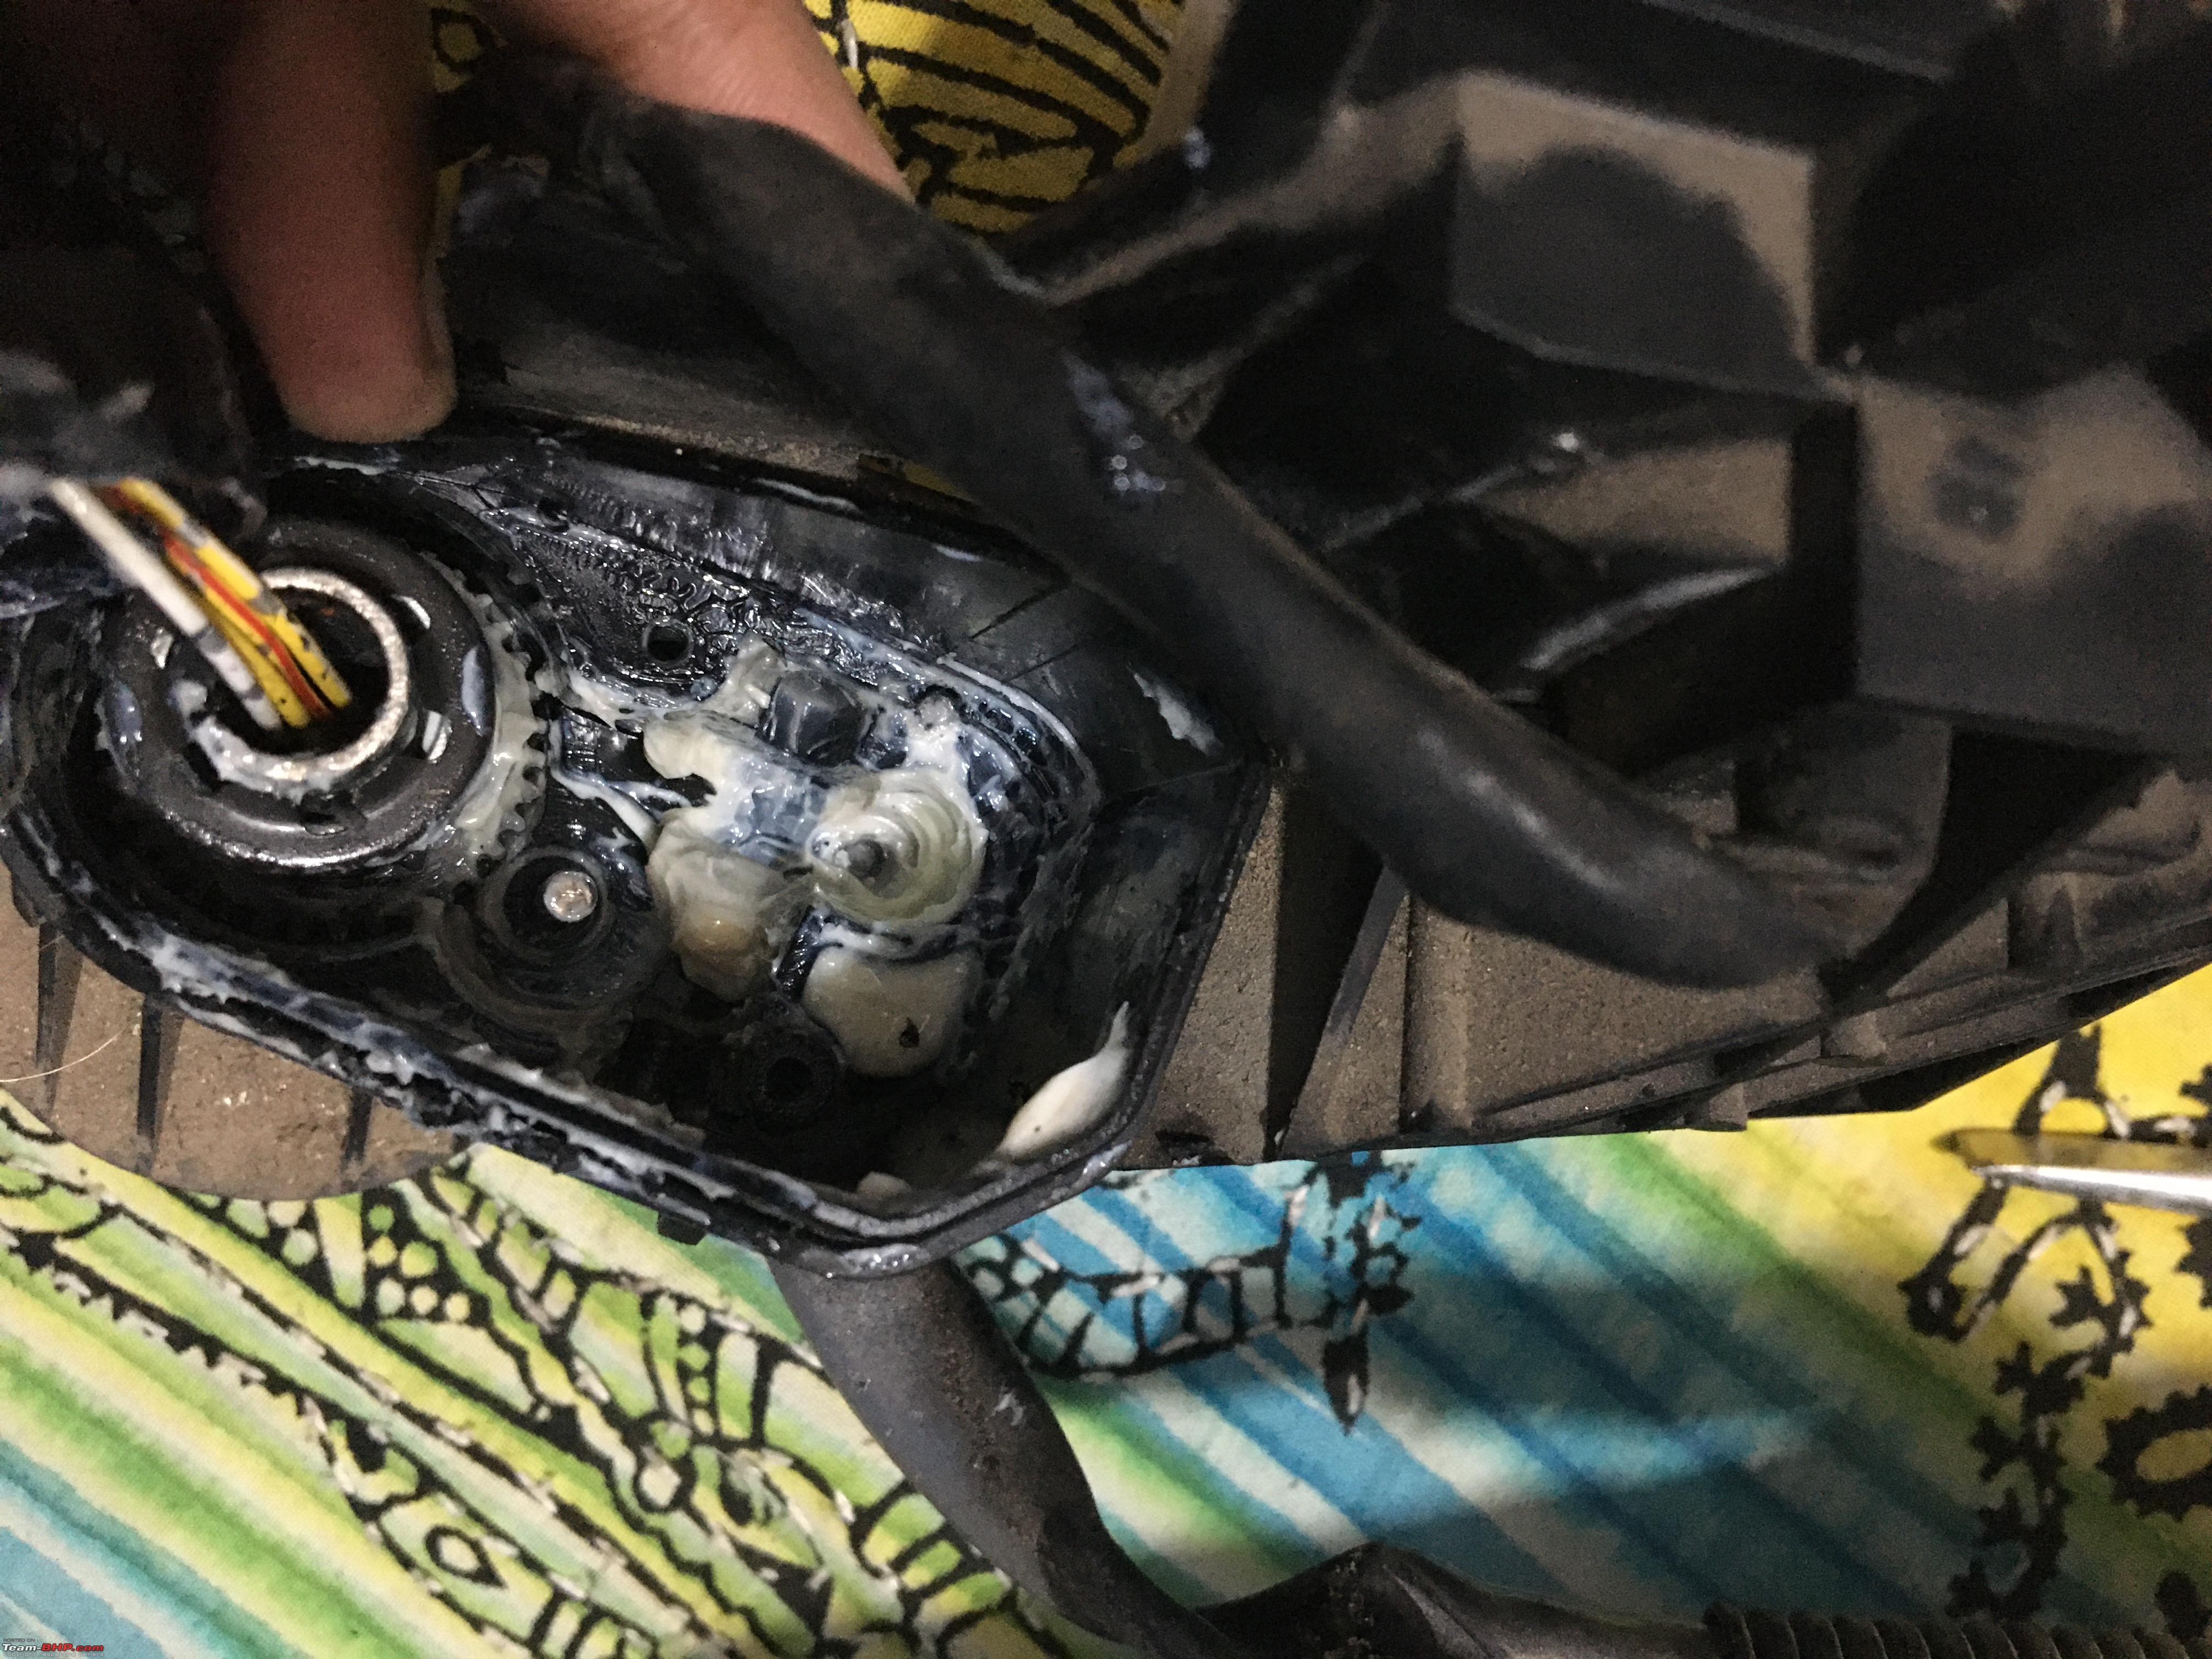
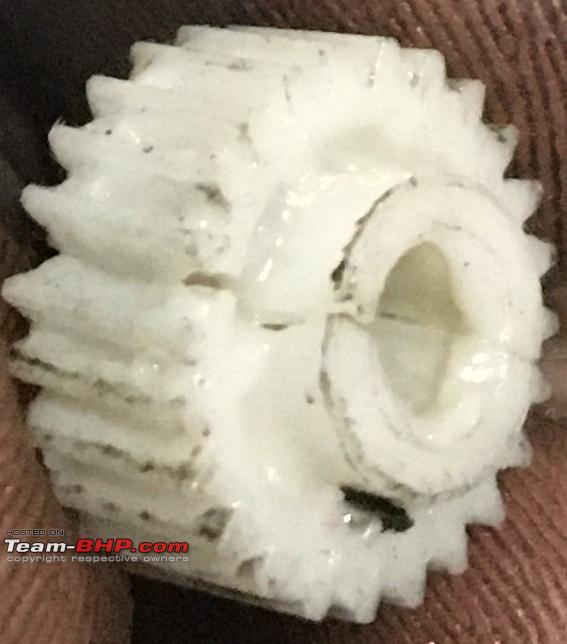
20th June 2020, 20:35   #1
Distinguished - BHPian
 
saket77's Avatar
 
Join Date: Dec 2012
Location: Ranchi
Posts: 4,396
Thanked: 12,028 Times
DIY: Fixing a broken automatic outside rear view mirror

DIY: Fixing a broken automatic outside rear view mirror-orvm.jpg


Dear Readers,

I posted a query in a car specific thread when my car's outer rear view mirror stopped retracting and opening automatically. I got to know from there that there are a lot of members who either got it repaired by their FNGs for unreasonable sums or some have even left it that way and use it like a manual ORVM. I decided to give it a try before heading to the ASC or ordering parts worth a few thousands. Thankfully I succeeded but only in the second try. So, read on to find how the automatic retractable mirror works and how to fix it; if it gets broken ever.

So, one fine evening while reversing from my parking lot, I heard a loud click from the left ORVM while operating and it stopped working thereafter. The mirror became 'free to move' from the hinge. Also, I could hear the motor whirring continuously even without any command from the switch. So, even if one intends to use the mirror manually after it breaks, they will need to disconnect the power supply to the ORVM; else you've got yourself a continuously whirring motor draining the battery and wasting power. In the next few posts, I will share how I repaired that thing at home and without spending big bucks on it.

Last edited by saket77 : 20th June 2020 at 22:43.
saket77 is offline   (12) Thanks
Old 20th June 2020, 21:08   #2
Distinguished - BHPian
 
saket77's Avatar
 
Join Date: Dec 2012
Location: Ranchi
Posts: 4,396
Thanked: 12,028 Times
re: DIY: Fixing a broken automatic outside rear view mirror

First step is of course to get the ORVM assembly out of the car so as to have access to its internals. The specific car we are talking here is an 8th Gen Honda Civic, but this DIY applies to most cars. A few steps may be little here and there for other cars but a DIY enthusiast can easily improvise through.

To remove the ORVM assembly, one needs to remove the doorpad. Further follow these steps:

1. Pry open the user control console housing the power window switch from the door pad. Open the connecting cables underneath to separate the console completely.

DIY: Fixing a broken automatic outside rear view mirror-img_1657.jpg

2. There is a screw hidden by that console and we need to undo that screw.

3.Open the plastic trim covering the screws and the cotter pin underneath the door opener handle. Remove the screw and the cotter pin as well.

DIY: Fixing a broken automatic outside rear view mirror-img_1658.jpg

4. Rest of the doorpad is held by clips and will come out by pulling them or prying them out.

5. There are two cables on the other side of the door pad- one for engaging the door lock and the other to open the door by the internal handle. You may or may not remove these cables. If you decide to remove them, then it will free your doorpad and you can keep it aside. If you decide to leave them on, then improvise a little to position your door pad and hang it on something as such that it enables access to the area under the ORVM.

6. Remove the plastic sheet liner partially that is stuck for insulation and waterproofing certain areas. Pry open plastic caps to expose the door holes.

DIY: Fixing a broken automatic outside rear view mirror-img_1659.jpg
DIY: Fixing a broken automatic outside rear view mirror-img_1660.jpg

7. Unplug the connector leading to the ORVM. Remove the wire support clip.

DIY: Fixing a broken automatic outside rear view mirror-img_1664.jpg
DIY: Fixing a broken automatic outside rear view mirror-img_1663.jpg

8. Once done, the ORVM is held by 3 nuts- all 10mm and can only be open by a socket wrench. Once those 3 nuts are removed, the ORVM may be removed by navigating a plastic clip which also lends some support to the assembly.


DIY: Fixing a broken automatic outside rear view mirror-img_1662.jpg

One we have that complete assembly out, we shall now move to the internals and working of ORVM.

Moving on...

Last edited by saket77 : 20th June 2020 at 22:58.
saket77 is offline   (8) Thanks
Old 20th June 2020, 21:25   #3
Distinguished - BHPian
 
saket77's Avatar
 
Join Date: Dec 2012
Location: Ranchi
Posts: 4,396
Thanked: 12,028 Times
re: DIY: Fixing a broken automatic outside rear view mirror

It will be safer to consider removing the mirror from the assembly to make sure it doesn't break accidentally. To remove just the mirror, just start clipping it away from the bottom and it will come out easily.

DIY: Fixing a broken automatic outside rear view mirror-img_1656.jpg

DIY: Fixing a broken automatic outside rear view mirror-img_1655.jpg

1. Now, on the underside of the ORVM assembly, there is a flap acting as a cover and a gasket which is held by one small 4-head screw. Unscrew it to remove the flap cover.

DIY: Fixing a broken automatic outside rear view mirror-img_1654.jpg

2. Once that flap is removed, it will reveal 3 more 4-head bolts which need to be removed to open the assembly further. 2 of these 3 bolts in my case were rusted and refused to give up. I used Zorrik but it still didn't help loosen them. When the heads of the bolts gave up, there was no option left other than widening the hole and removing the shoulder of the ORVM. Those stubborn bolts were removed by help of pliers later.

DIY: Fixing a broken automatic outside rear view mirror-img_1634.jpg
DIY: Fixing a broken automatic outside rear view mirror-img_1633.jpg
DIY: Fixing a broken automatic outside rear view mirror-img_1650.jpg


3. Undo 4 more screws holding the frame/ trim around the mirror and that will free the complete actuator assembly.

DIY: Fixing a broken automatic outside rear view mirror-img_1649.jpg

4. Locate the actuator and open the plastic cap held by clips.

5. Once the plastic cap is removed, you can see the actuator motor and a small electronic circuit. As you would imagine, this is the motor which helps open/ retract the ORVM. The function of this small electronic circuit is special. This cuts off power supply to the motor once it senses a resistance in the mechanism. This is why if the mechanicals inside the assemble break down, the motor would continue to run infinitely because there is not enough mechanical resistance in the assembly. We need to remove this circuit. It has 2 pins hooked to the motor. Sliding the circuit out will do the job.

DIY: Fixing a broken automatic outside rear view mirror-img_1648.jpg
DIY: Fixing a broken automatic outside rear view mirror-img_1647.jpg


6. Under the circuit, there are 2 screws waiting to be undone. Remove them and pull the sub-assembly out. This now reveals the mechanical gear arrangement. In the Civic, there are a total of 5 gears- one non-removable mounted on the hinge. One plastic spiral gear is mounted on the motor spindle and connects directly to a plastic helical cog gear. This helical cog gear is directly plugged on a metal worm gear which connects to another metal cog. All except 2 gears are made of plastic and most of the time, the larger plastic helical cog gear is the one which split-breaks and results in gear slippage and hence the issue. I found the same in my case.

DIY: Fixing a broken automatic outside rear view mirror-img_1645.jpg

DIY: Fixing a broken automatic outside rear view mirror-img_1642.jpg

DIY: Fixing a broken automatic outside rear view mirror-img_1643.jpg

DIY: Fixing a broken automatic outside rear view mirror-img_1646.jpg

DIY: Fixing a broken automatic outside rear view mirror-img_1636.jpg

DIY: Fixing a broken automatic outside rear view mirror-img_1637.jpg

DIY: Fixing a broken automatic outside rear view mirror-img_1638.jpg

DIY: Fixing a broken automatic outside rear view mirror-img_1644.jpg

7. Remove all gears and wipe clean the broken gear. As the entire internal mechanical arrangement is smeared with lithium grease; one needs to clean the gear thoroughly which needs to be pasted. If you can arrange a new part, so much better and convenient. But I am not sure if Honda or any ASC sells this as a child part. Most of the ASCs sell the entire actuator electro-mechanical assembly at the minimum. Some after market supplies from sites like Ali Express or e-Bay may save the day for you.

8. Since I didn't have the spare, I decided to glue the gear; but unfortunately just gluing the gear didn't help. If going for a paste-job; use a strong adhesive. I used Araldite. I not only glued the gear itself but to ensure proper mechanical strength, I had to glue the gear on the worm gear too. This would reduce the stress on the cracked gear, and it actually worked that way. Before gluing, I gave the gears a proper WD40/Zorrik bath followed by a soap solution wash to remove any traces of oil and grease that would affect the strength of gluing outcome. Also, I sanded the areas to be stuck to make the surfaces a little rough.

9. Since the epoxy/resin takes a considerably longer time to cure; I left the gears to dry out for a couple of days. Before the epoxy dries out completely, care to remove any excess glue to make sure you don't alter the gearing resistance accidentally by leaving glues between the teeth.

DIY: Fixing a broken automatic outside rear view mirror-img_1640.jpg
DIY: Fixing a broken automatic outside rear view mirror-img_1639.jpg
DIY: Fixing a broken automatic outside rear view mirror-download.jpg

So, after the epoxy resin cures completely, re-assemble the mechanism in reverse order. If you can bench-test the assembly- good; if not, just reattach the ORVM to your car and plug into the wiring harness and test it.
DIY: Fixing a broken automatic outside rear view mirror-img_1651.jpg
DIY: Fixing a broken automatic outside rear view mirror-img_1652.jpg

I would have ideally wanted to replace this cracked plastic gear but because of non-availability of this part made me go this way. I hope it holds on well. Right now, it is working perfectly since a week a now.

Trust that will be of help to someone in need.
Thanks.

Last edited by saket77 : 20th June 2020 at 23:42.
saket77 is offline   (25) Thanks
Old 22nd June 2020, 06:53   #4
Team-BHP Support
 
Join Date: Feb 2004
Location: Mumbai
Posts: 17,841
Thanked: 77,069 Times
re: DIY: Fixing a broken automatic outside rear view mirror

Thread moved out from the Assembly Line. Thanks for sharing!
Aditya is offline   (3) Thanks
Old 22nd June 2020, 07:39   #5
Distinguished - BHPian
 
vigsom's Avatar
 
Join Date: Feb 2006
Location: NSEW
Posts: 3,768
Thanked: 25,490 Times
Re: DIY: Fixing a broken automatic outside rear view mirror

Quote:
Originally Posted by saket77 View Post
There is a screw hidden by that console and we need to undo that screw.

Unplug the connector leading to the ORVM. Remove the wire support clip.
Quote:
Originally Posted by saket77 View Post
It will be safer to consider removing the mirror from the assembly to make sure it doesn't break accidentally. To remove just the mirror, just start clipping it away from the bottom and it will come out easily.

I used Araldite.
Appreciate the pains you've taken to do this, @Saket77.

Many years ago, I did something similar with a Mitsubishi aftermarket power window switch assembly in my Esteem.

I didn't know that the door pad screw is hidden beneath the console - in most cars, the screw is at the bottom of the door grip.

My 2 cents :

1. Use gloves because some metal edges can cut through one's skin without one realising.

2. Instead of removing the mirror sub assembly from.the mirror, just cover it with layers of bubble- wrap or some thick cloth. Removing the mirror sub assembly can sometimes cause another issue.

3. Although I rate it the best adhesive available, I doubt Araldite will go the distance. So getting a spare set of gears would be a good idea.

I am surprised at this rotten quality offering by Honda; I know two Corollas where the Koito mirrors go on and on and on ( a 2003 and another 2005 that I held for a few years and then sold, in which the mirrors work flawlessly even today)
vigsom is offline   (6) Thanks
Old 22nd June 2020, 08:57   #6
Distinguished - BHPian
 
saket77's Avatar
 
Join Date: Dec 2012
Location: Ranchi
Posts: 4,396
Thanked: 12,028 Times
Re: DIY: Fixing a broken automatic outside rear view mirror

Thank you for your observations and advice Vigsom. Using gloves is a good advice which can literally save you from those little but painful nicks

Using Araldite just on the gear will not take it too far. I tried that and the gear split broke again after a couple of operations. The trick is to stick the gear to the metal worm gear it attaches to. That provides the required strength.

Quote:
Originally Posted by vigsom View Post
I am surprised at this rotten quality offering by Honda; I know two Corollas where the Koito mirrors go on and on and on ( a 2003 and another 2005 that I held for a few years and then sold, in which the mirrors work flawlessly even today)
I’m surprised that this is such a common issue, esp in the Hondas; not only in India but also in models sold abroad. I fail to understand why they didn’t provide a metal cog; especially when some aftermarket replacements are made of metal!

Thanks.

Last edited by saket77 : 22nd June 2020 at 09:06.
saket77 is offline   (3) Thanks
Old 22nd June 2020, 12:35   #7
BHPian
 
Brumby's Avatar
 
Join Date: Jun 2017
Location: City of Lakes
Posts: 203
Thanked: 717 Times
Re: DIY: Fixing a broken automatic outside rear view mirror

That's a really good DIY and an effort worth taking the risk. I say risk because in worst case scenario, the whole assembly would require replacement.

Regarding the strengthening of the joint on the gear, thin metal rings (tight fit) glued on both sides around the boss would have helped.

The reason most manufacturers use plastic gears is because they function with very less noise and for the intended function there is very little torque that needs to be transmitted. Plastic looses strength when exposed to heat over a period of time and is prone to fracture, fortunately in your case the gear had cracked and split in two. If it was a case of broken teeth, it would not be possible to fix without a replacement of the part.

Metal gears though have a long life but will have a noisy operation.

Regards
Brumby is offline   (2) Thanks
Old 22nd June 2020, 17:23   #8
Distinguished - BHPian
 
saket77's Avatar
 
Join Date: Dec 2012
Location: Ranchi
Posts: 4,396
Thanked: 12,028 Times
Re: DIY: Fixing a broken automatic outside rear view mirror

Quote:
Originally Posted by Brumby View Post
Regarding the strengthening of the joint on the gear, thin metal rings (tight fit) glued on both sides around the boss would have helped.
That is a very neat idea. Though the worm gear on which this plastic cog fits has a slightly squarish spindle, but with some improvisation, this would strengthen the link.
saket77 is offline  
Old 22nd June 2020, 18:07   #9
//M
Distinguished - BHPian
 
//M's Avatar
 
Join Date: Oct 2009
Location: New Delhi
Posts: 6,201
Thanked: 22,920 Times
Re: DIY: Fixing a broken automatic outside rear view mirror

Wow incredible work, really appreciate you taking time out and putting such effort to get the ORVM fixed. Me, being me, had disconnected the motor of the mirror assembly on my erstwhile Honda CR-V 2.4. I used it as a manual mirror for almost six months, before the car found a new buyer.

The issue with such micro parts, the gear in your case, is that you do not get a replacement at the ASS or even at FNGs, the only solution is to replace the entire assembly which is unnecessarily expensive.

Thank You for sharing this DIY report with such detailed pictures, this is going to be very useful for a lot of us in the future.
//M is offline   (1) Thanks
Old 22nd June 2020, 21:46   #10
Newbie
 
Firoshg's Avatar
 
Join Date: Mar 2020
Location: Thrippunithura
Posts: 17
Thanked: 46 Times
Re: DIY: Fixing a broken automatic outside rear view mirror

Quote:
Originally Posted by saket77 View Post
I will share how I repaired that thing at home and without spending big bucks on it.
I did something similar in my Mk5 Jetta the other day. The right side mirror folding motor went kaput! And hence the left side too stopped working properly and only moves a bit (I think the right side motor is drawing too much electricity, not sure though). I removed the motor and only when i connected it directly to the battery it budged. I tried to source a replacement motor, but due to the COVID - situation, I was not able to procure it. So for now, I've freed the right side mirror motor a bit with WD-40 and fixed the mirror back. Now the left side mirror completely retracts, though the right side mirror only retracts partially (the rest has to be done manually). But I think I can fix it once I can get my hands on a replacement motor.
I was thinking about posting it once I made sure it works, but you have beaten me to it .
Firoshg is offline   (1) Thanks
Old 28th June 2020, 07:53   #11
Newbie
 
Join Date: Jan 2016
Location: Assam
Posts: 20
Thanked: 45 Times
Re: DIY: Fixing a broken automatic outside rear view mirror

I am not sure whether TBHP approves of mere appreciation posts. But, decided to post anyway.

Clicked on this thread, on just a whim. I haven't faced this issue yet. But, I am glad that I did. It is a perfect tutorial on how to fix things with whatever little resource we have here.

I am sure if it had been an ASS job, it would be either a shoddy "jugaad" , that would only last a few days, or an entire unit replacement, most probably the latter, that would have costed you a bomb.

The way you prepped the gears before gluing - proper de-greasing and sanding, for better adhesion, shows your technical acumen.

Thanks for posting this tutorial.
ElonSkum is offline   (2) Thanks
Old 30th June 2020, 12:37   #12
Distinguished - BHPian
 
R2D2's Avatar
 
Join Date: Oct 2008
Location: Pune
Posts: 3,231
Thanked: 5,742 Times
Re: DIY: Fixing a broken automatic outside rear view mirror

Quote:
Originally Posted by vigsom View Post
I am surprised at this rotten quality offering by Honda; I know two Corollas where the Koito mirrors go on and on and on ( a 2003 and another 2005 that I held for a few years and then sold, in which the mirrors work flawlessly even today)
I can attest to the quality of Toyota's SVMs. But I think the mirrors are made are made by Denso. Of course, that's a guess because I've never had to open the assembly till now (touch wood).

Quote:
Originally Posted by saket77 View Post
Since the epoxy/resin takes a considerably longer time to cure; I left the gears to dry out for a couple of days. Before the epoxy dries out completely, care to remove any excess glue to make sure you don't alter the gearing resistance accidentally by leaving glues between the teeth..I would have ideally wanted to replace this cracked plastic gear but because of non-availability of this part made me go this way. I hope it holds on well. Right now, it is working perfectly since a week a now.Trust that will be of help to someone in need.
Thanks for this DIY Saket, this will be most useful for owners of cars with powered mirrors.
R2D2 is offline   (1) Thanks
Old 23rd October 2022, 19:55   #13
Senior - BHPian
 
Join Date: Mar 2007
Location: Bangalore
Posts: 1,237
Thanked: 2,909 Times
Re: DIY: Fixing a broken automatic outside rear view mirror

Recently I ran into the right side power folding mirror issue as a motorcyclist brushed his handle against the ORVM at the traffic signal. There was no external damage and everything worked fine except the folding mechanism.

The OEM option was to change the full mirror assembly which I felt was unnecessary. I was tempted to open the mirror assembly but felt that the exercise would be futile if I didn't have the parts. I wanted a proper solution (replacement of the needed part inside the assembly)

So ended up getting the inner motor unit replaced at a local workshop. He was pretty good at it.
J M Side Mirror Specialist.
Location:https://goo.gl/maps/Ag8g116Kod2xUyhSA

Last edited by for_cars1 : 23rd October 2022 at 19:59.
for_cars1 is offline  
Reply

Most Viewed


Copyright ©2000 - 2024, Team-BHP.com
Proudly powered by E2E Networks