Team-BHP
(
https://www.team-bhp.com/forum/)
Quote:
Originally Posted by McLaren Roxx
(Post 5053701)
Boot release was especially essential ever since security checks at malls & offices became mandatory.
|
This is the reason why I did this mod 3 years ago.
Quote:
Originally Posted by Reinhard
(Post 5053765)
Welcome to TBHP Ptatyush. Thanks for sharing this DIY. Very useful bits both of them. Direct positive impact on driving experience every single day of ownership. Its really laughable that car makers actually skip (at least used to skip) on these features often on "base models" of cars. Thankfully due to rampant reuse of parts and bodies, its possible to retrofit some of these with minor effort as a DIY.
I hope a lot will find your thread useful & in fact will even get it done. Thanks again.
|
Many of the budget cars can be easily modified to make the ownership more rewarding. The more I work on my friend's cars, the more I realize this. I wish I could make detailed threads for newer cars but this is what I have right now.
Quote:
Originally Posted by carthick1000
(Post 5053899)
Welcome to team-bhp, PratyushJaya!
Very useful thread. When I see an itemised list with part numbers, costs etc. in a DIY thread, it gives me a good feeling that DIY section never ceases to amaze me. Keep up the good work. Though I don't have an Alto, I definitely can enjoy reading and learning from your experience. Thanks.
|
I had to spend a lot of time searching for information at different places and within Team-BHP itself to do these works. I hope my posts help people save a lot of that time.
Quote:
Originally Posted by surajspai
(Post 5053925)
More details of these please! especially parts numbers of the OEM parts.
I'm particularly interested in the fog lamps-How have you attached them? What about water and muck getting splashed into the fog area since the Alto has short fender liners?
I have a 2007 Std,which lacks even the minimum things the LX/LXi gets so I've added some subtle cosmetic changes and conveniences to it
1. Changed the stickered on badges to the chrome ones. I havent gone over the top like some owners do, just Maruti-Suzuki and Alto.
2. A DIY refinish of the front headlights to eliminate the scratches and haze.
3. Remote boot lid opener
4. Remote fuel lid opener. All these years I would get out of the car and open the lid myself with the key. The current situation made me get this done pronto.
5. A strut tower cap- https://boodmo.com/catalog/part-cap_strut_rod-38163102/
Clean looks for the engine bay and will prevent water from going into the struts.
|
Hi, from one mysorean to another!:Cheering:
Can you share details on how you have Installed the remote boot and fuel lid opener?
What was done to head lights , to eliminate haze and scratches?:thumbs up
Quote:
Originally Posted by surajspai
(Post 5053925)
|
I have been thinking about this since we bought the car. I didn't know there was a part for this! It's too late now though. I haven't changed the struts till now. I will definitely do this if I get new struts.
Quote:
Originally Posted by anoop.u
(Post 5053874)
Nice to bump into a new thread for the Alto. The only car in my garage that I have no intention of selling, ever.
Some of the changes / purchases I managed to add to mine over the years:
1. Internally adjustable ORVM (OEM/MGP).
2. Day / night mirror (OEM/MGP).
3. Boot opener (OEM/MGP).
4. Rear doors cabin light switch (OEM/MGP).
5. Clear side indicator lens (OEM/MGP).
6. Philips T10 leds x4 (front + back)
7. Sylvania T10 amber leds x2 (side)
8. Philips 100/90W H4 headlamps + wiring
9. Internal TPMS (Honda)
10. Alloy wheels x5 (NEO)
11. Celerio Fogs (OEM/MGP)
12. Custom art leather seats with blue stitching + leather adjustable (welded) front arm rest + leather door pads + leather steering wheel wrap.
13. Few other bits like audio upgrade, dashcam, noodle mats etc
Attaching a recent pic below: Attachment 2150450
PS: Apologies for hijacking your thread, wanted to pen down an long term ownership review, could never get down to it.
|
Alto gives decent mileage even compared to current models and is very cheap to maintain. I also wish to keep it for long but the 15 year expiry is approaching fast for my car.
Your list of mods seems exciting.
I am particularly interested in these:
2. Day / night mirror (OEM/MGP).
4. Rear doors cabin light switch (OEM/MGP).
There is a part for these?
5. Clear side indicator lens (OEM/MGP).
I am curious which Maruti car had clear lens indicators of the same design.
6. Philips T10 leds x4 (front + back)
7. Sylvania T10 amber leds x2 (side)
Did changing to LED change the flashing frequency since it is dependent on Bulb Resistance as far as I know.
8. Philips 100/90W H4 headlamps + wiring
Are your headlamp lens' alright after running hotter bulbs?
9. Internal TPMS (Honda)
That's so cool! how do you monitor it?
10. Alloy wheels x5 (NEO)
11. Celerio Fogs (OEM/MGP)
I so wanted to install fog lights myself but they no longer make the kit for Alto and none of the OEM parts from Maruti fit on old Alto. I am very interested in how you made it work. Another issue was the fog light switch, which, if going for OEM look requires replacement of Lights/Wiper Stalk entirely.
Quote:
Originally Posted by ash22
(Post 5053392)
Cant find details of this in this thread, Can you please share the details with pics?
|
I am working on that one right now. Just when I was ready to get AC overhauled, curfew happened. I hope I am able to get it done before peak summertime. This one will be long and will require the help of Friendly Neighborhood Garages since the AC lines will need to be purged and refilled completely. Not that it cannot be done at home. It won't be economical to purchase equipment for one time work.
Quote:
Originally Posted by Aditya
(Post 5053310)
|
Thanks a lot!
I am very happy to see my thread on the top of Team-BHP's front page. Especially since this is my first thread here.
I am unable to edit any post including the first one. I want to link each modification in the first page itself.
Quote:
Originally Posted by 1985Darkkid85
(Post 5054005)
Can you share details on how you have Installed the remote boot and fuel lid opener?
|
The process for installing the Fuel Lid Opener is similar to my second post:
https://www.team-bhp.com/forum/diy-d...ml#post5025079
You will need these additional components:
83360A79G52 CABLE , FUEL LID OPENER ₹107
76520-76G01 OPENER ASSY, FUEL LID ₹494
You will have to remove the left side of the carpet inside the boot area to access location for installing the opener.
You will also need to change the fuel lid door itself and since it comes in primer, you would have to get it painted in body colour.
I haven't done it myself so I won't be able to give detailed instructions but this is what I could understand by looking at the diagrams and my car itself.
Quote:
Originally Posted by anoop.u
(Post 5053874)
PS: Apologies for hijacking your thread, wanted to pen down an long term ownership review, could never get down to it.
|
No problem sir!
I would like people to post their procedures on this thread so that this can become a one stop shop for DIY maintenance and modifications.
Quote:
Originally Posted by PratyushJaya
(Post 5054007)
I have been thinking about this since we bought the car. I didn't know there was a part for this! It's too late now though. I haven't changed the struts till now. I will definitely do this if I get new struts.
2. Day / night mirror (OEM/MGP).
The process for installing the Fuel Lid Opener is similar to my second post: https://www.team-bhp.com/forum/diy-d...ml#post5025079
|
Strut cover-no need to! Its just a simple rubber cap, if you want it, get it.
mirror-
https://boodmo.com/catalog/part-mirr..._view-6788610/ Quote:
Originally Posted by 1985Darkkid85
(Post 5054005)
Hi, from one mysorean to another!
Can you share details on how you have Installed the remote boot and fuel lid opener?
What was done to head lights , to eliminate haze and scratches?
|
Namaskara!:Cheering:
Boot lid-follow the guide in the first post. Or is it that you need the fuel lid too?
headlights-
https://www.youtube.com/watch?v=UEJbKLZ7RmM
I can help you with the clear coat spray since I have more than I would use.
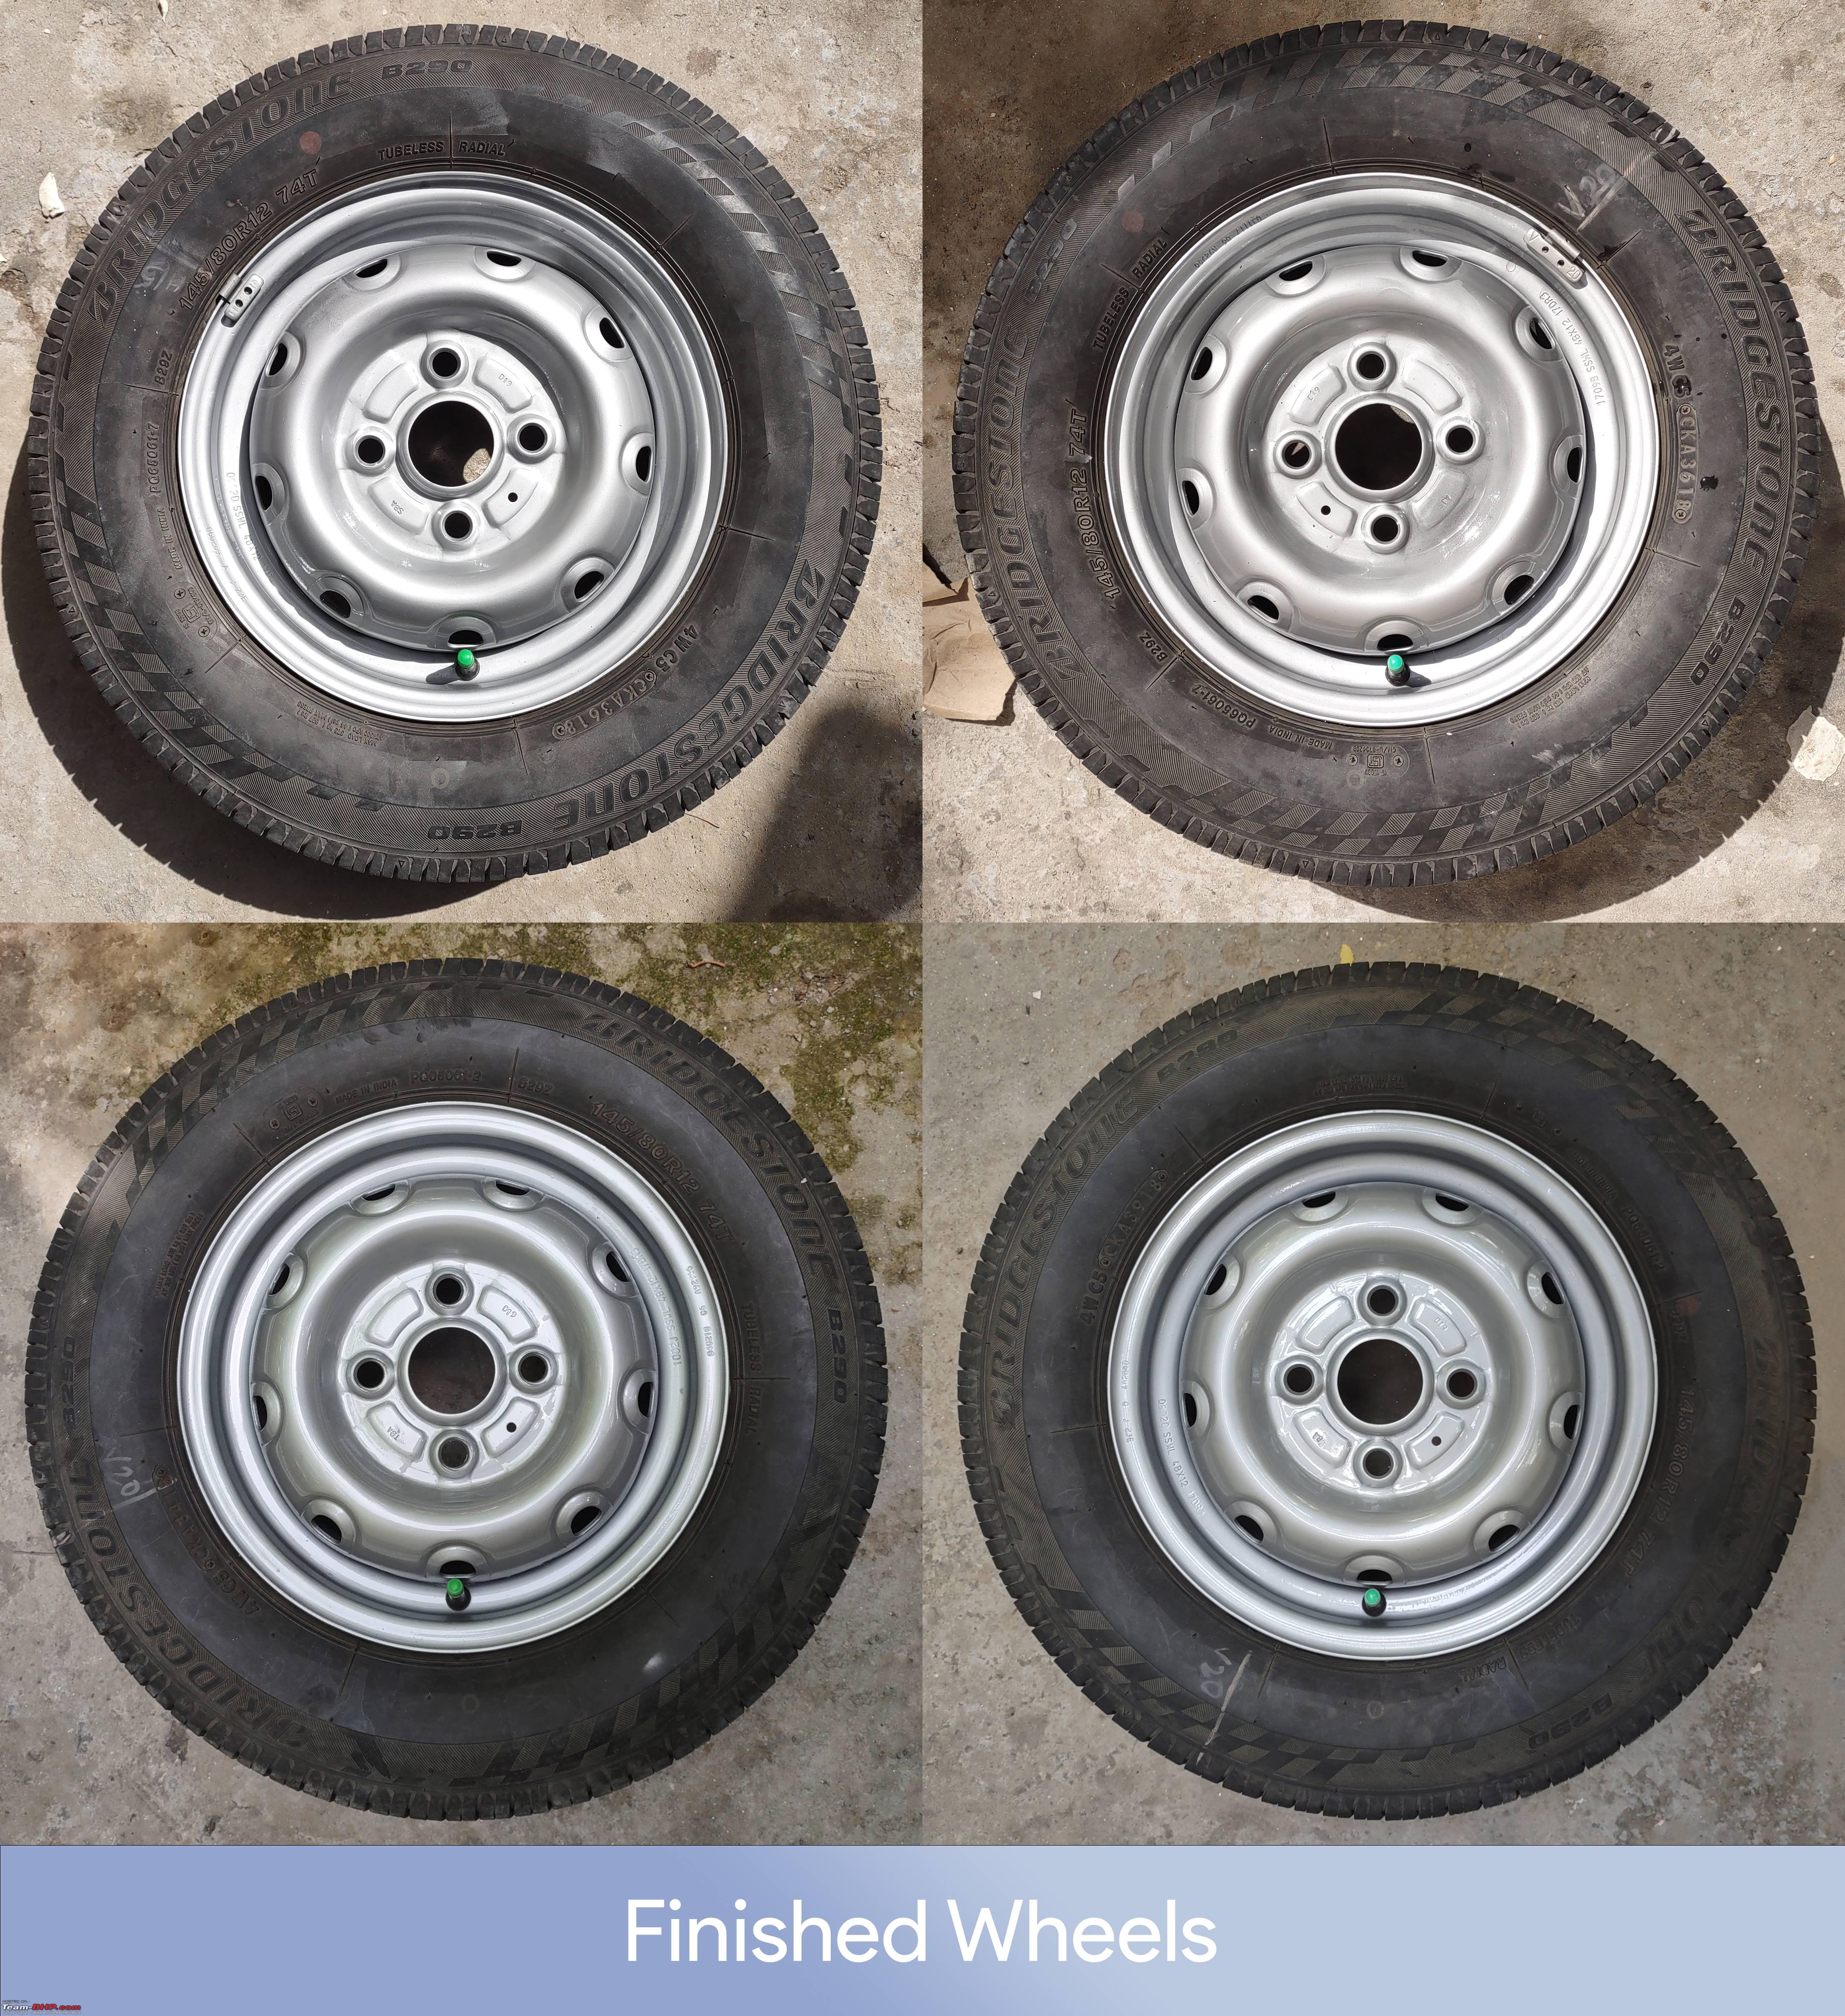
Maintenance: Repaint Wheel Rims
Consumables Needed:
- Iso-Propyl Alcohol (₹300) X1 Liter
- Nylon Scrub Pad (₹10) X1 Pad [Used pad from kitchen can be repurposed]
- Sand Paper 100, 320, 800, 1000 grits (₹25) X2 sheets each
- Liquid Dish Soap (₹15) X1 100mL
- Clean Rag (valueless-valuable)
Total cost of consumables: ₹375
Painting Supplies Needed:
- Silver Paint Spray Can 400mL (₹180-215) X2
- Lacquer Spray Can 400mL (₹200-245) X2
- Masking Tape 20meter (₹25) X1
Total cost of painting supplies: ₹785-945
Protective Equipment needed:
- Reusable Respirator with Cartridges appropriate for painting (₹2000) X1
- Safety Goggles (₹150) X1 Pair
- Nitrile Gloves (₹10) X4 Pieces
Total cost of protective equipment: ₹2190
Prices as of May, 2021
Tools Needed:
- Wheel Spanner of your car
- Car Jack for your car
- Cleaning Brush medium size
- Spray Bottle
Time Required: 3 Hours
Procedure:
- I will be outlining steps below for doing one wheel at a time at your home with minimal tools and I would suggest you start with the spare wheel first if you are new to spray painting. For doing all five rims repeat the steps given below for two wheels at a time. Remove two wheels, replace one with spare Tyre and support the other side on the car jack. Put some blocks underneath the suspended hub for support. The proper way to do this is to support the car on jack stands.
- Take a picture of your wheel and then remove the balancing weights attached to the rim. You can also mark the tyre with a coloured chalk to indicate its position.
- Wash your wheel with soap and water. Fill a spray bottle with dish soap and water. Spray it on the wheel and then use a brush to loosen the dirt. Brake dust sticks to the paint and wont go until you rub it out properly. Make sure to put the dust cap on the valve while cleaning or cover it with some masking tape. Use an old toothbrush to reach narrow portions of the rim. Make sure to clean the dirt stuck inside the embossing made on the rim. This is also a good time to give your tyre a nice cleaning if your wish to.
- Let the wheel dry in the sun. You can work on the other wheel for the time being if you are working on two wheels at time. The best way would have been to remove the tyres off the rims but that would be difficult to do at home and not economical to get it done from a tyre shop.
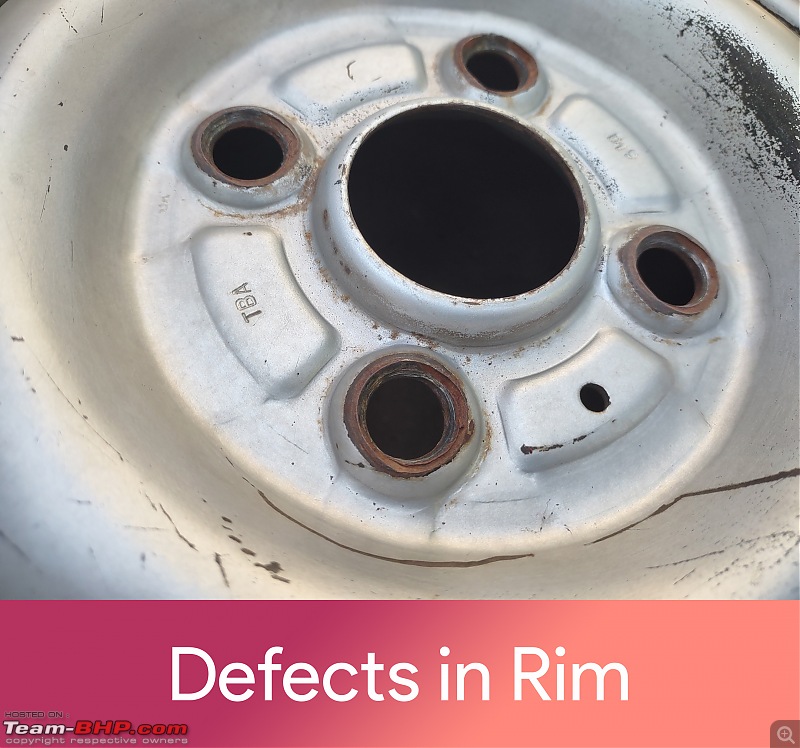
- Inspect the damage, rust and scratches on the rim before you start sanding. If your rim is severely bent out of shape or it has rusted such that its flaking, then it is a futile effort to paint the rims considering the cost of brand-new rims. If you observe rust near the valve stem then it is probably rusted from the inside too and would leak air if you are running tubeless tyres. Cover the valve stem with masking tape after you have inspected the rims to be paint-able. I will only be painting the front side of the rim. The insides are usually not painted from the factory and the front portion is what takes up most of the beating.
- Put nitrile gloves on your hands for sanding.
- Start sanding the rim with 100 grit sand-paper. Begin with the scratched up and rusted areas first and sand till you see bare metal. Do not put too much pressure while sanding and do not sand in tiny patches. Feather out the area that requires sanding. You do not need to remove the entire paint on the rim. If the scratches have dug into the metal, then you might have to sand till the surface has evened. The surface will not be smooth at this step, so dont worry.
- Blow off the dust from previous sanding. Sand with 320 grit sand-paper on the areas where you previously sanded. Feather out the sanded area into the painted areas. You can also sand the stained areas of the paint at this stage. Blow off the dust and inspect for any area that needs attention.
- Sand the mounting holes and the hole where the hub cap is installed. They usually have surface rust. Sand all the crevices and make sure there is no dirt stuck on the rim.
- Sand the entire rim lightly with 320 grit sand-paper. Clear the dust and repeat this step if you find any imperfections. Any imperfections or deep scratches on the surface will show up when you paint the rim.
- Blow off the dust from the rim and the tire too. No dust should be left on the surface or near to the surface to be painted.
- Remove the nitrile gloves used for sanding. You can keep it aside for sanding the next rim.
- Masking of the wheel will be necessary since we are not removing the tyre from the rim. I used an old cloth to cover the tyre from getting over sprayed. One end of the cloth was pushed inside the gap between the rim and the tyre. This will require you to remove the air from the tyre so that you can tuck the cloth buy pushing it into the tyre. The other end of the cloth was tucked below the tyre. Another method is to use masking tape along the edges of the tyre where it meets the rim. Use 2-3 inches of tape at a time to mask around the edge of the rim. Then attach large pieces of paper on this tape line using masking tape to cover the tyre. Do not forget to mask the valve stem and the cap.

- Place the tyre on a stable surface and make sure that you wont end up kicking dust while painting.
- This step is not necessary if done during very hot weather. If the ambient temperature is below 25°C then put the Paint Spray Can in hot water before you start spraying with it. I would recommend you to do this anyway as some cans might be low on propellant.
- Put some Iso-Propyl Alcohol on the Nylon Scrub Pad and wipe down properly the portion of the rim that is going to be painted. Any dirt stuck on the surface will come off on the pad. Repeat again if necessary. Do not take too much Alcohol at a time. It will dry out by the time you finish wiping the entire rim. Do small portions at a time.

- Put a new pair of nitrile gloves on your hands for painting.
- Take a clean cloth and put some Iso-Propyl Alcohol on it. Wipe down the surface to be painted with it.
- Take out the paint can from hot water and wipe the water on the can. Shake it for 1 minute or follow the instructions given on the can.
- Take another clean rag and wipe down the surface to remove any traces of lint or dirt that might be still left on the surface. Technically you should use a tack cloth but any clean cotton cloth will do.
- Start spraying from outside the rim and move side to side. Press the nozzle and move from one side to other side and when you reach the end release the nozzle. Repeat the technique in the opposite direction. Do not press and hold the spray nozzle continuously. Sometimes the spray isnt uniform when you start pressing the nozzle so starting from the outside will prevent drips on the material you are painting. Do not try to cover the entire rim with paint on first go. Just cover the rim with one light coat.
- Do another coat by standing in a different location to cover portion that was missed. Repeat this step once more to cover the entire rim with paint. This is the first coat.
- Take off the gloves you used for painting. You can reuse them for painting next time.
- Wait for at least an hour for the paint to dry. You can work on the other rim during this time. Take your time to learn the process if you are doing it for the first time. Some patience is required or the paint will start to drip or pool.
- Examine the paint surface for any imperfections like drips or dust/insects embedded on the paint. If your surface ended up with orange peel or heavy drip, you might have to sand it down with 320 grit sandpaper and start with painting process again. Proceed to next step if the rim only has minor imperfections.
- Spray the 800 and 1000 grit sanding paper with water using a spray bottle.
- Start with major imperfections like drips first. Sand the area with an 800-grit sandpaper. Sand till surface is uniform. Sand other areas with 1000 grit sandpaper. Keep spraying the painted surface with water while sanding. Do not over do this sanding process. If there were no major issues on the first coat then light sanding with 1000 grit is enough to proceed with the painting process.
- Spray the rim with water and wash off the residues left from sanding. Clean the rim with an old rag to dry it off and remove any loose paint sticking on the surface. Do not worry if you ended up with patches of bare metal. Clean the rim again with a dry cloth to remove any dust.
- Put the can in hot water again if needed. Analise why previous mistakes happened. Paint in a different location if there was too much dust or insects stuck on the paint.
- Clean the rim with Iso-Propyl Alcohol again like it was done before the first coat of paint was applied.
- Put on the gloves you used for painting previously or use a fresh pair of gloves.
- Clean the rim with a clean cloth or tack cloth. Take out your spray can and dry it off. Shake the can well before you start painting.
- Spray a thick coat of paint this time. It is achieved by moving the can slowly over the surface to be painted. Same side by side motion will be repeated but a bit slowly so that more paint lays on the surface. Repeat from different locations around the rim to cover the entire surface. Play close attention to tight spots.
- Allow it to dry for 10 minutes or the minimum time mentioned on your paint can. Make sure nothing falls on the rim since there is no sanding process before applying next coat. This is the second coat.
- Spray a light coat of paint now. This will be the final coat of paint. Be sure to cover all of the rim. Aim from different directions if required.
- If you end up with a smooth finish then cover the rim so that no trash lands on it. If not, then you will have to wait for an hour for the paint to dry and wet sand it with 1000 grit again to remove the imperfections. Only make light coats after paint corrections and do not forget to clean it with alcohol before painting.
- Check the rim after 30 minutes. If there is some dust on the surface then try to blow it off or pick it with some forceps. If the surface has no trash, then proceed with next step, otherwise repeat the previous step. Do not touch the painted surface or use alcohol to clean the surface.
- Put the can of clear lacquer in hot water if needed. Wait for 2 minutes before taking the can out and drying the water around it.
- Paint a light coat of lacquer over the entire rim surface. Clear coat is laid in a similar manner as paint. Do not try to cover the entire surface with lacquer on first coat.
- Wait for 10 minutes for first coat to dry. Cover the rim to avoid trash laying on its surface while drying. This is the first coat.
- Lay a thick coat of lacquer this time and spray from different directions to ensure complete coverage. Shake the can well before painting to avoid splatters and get the paint to mix well with the propellant.
- Wait for 15 minutes for second coat to dry. Cover the rim to avoid trash laying on its surface.
- Lay a very light final coat of lacquer on the rim by quickly moving across the surface while holding the nozzle engaged. This is the final coat of lacquer.

- Painting process is now over. Cover the rim properly to avoid trash laying on drying paint. You can wet sand clear coat lightly and lay another coat if required but I wont recommend doing that unless you end up with some issues on the clear coat.
- After 60 minutes, remove the masking tape and the material used to mask the tyre. Any paint sticking to the tape line will peel off if you try to remove it after the paint completely dries. Be careful not to touch the rim or let dust fall onto the rim while doing this. Do not remove the masking tape covering the valve stem as you might end up scratching the drying surface.

- Let the rim dry overnight. A 3-coat process was recommended for base coat and clear to avoid imperfections, ensure proper coverage and use least amount of paint. You can develop your own process by experimenting with the thickness and number of coats. I am far from an expert and I learnt by experience and watching many videos on spray can painting. I have linked a video on spray painting a steel rim by ChrisFix in the references section. You may watch it for better understanding.
- Usually, the paint dries completely after 24 hours. I kept a plastic chair over it while drying to prevent anything falling over the paint. Do 2 wheels at a time to completely finish one can of paint and lacquer.


Notes:
- The write-up seems very lengthy but the process is fairly simple and short. If done properly it will certainly last long.
- I am not sure if it is economical to paint old rims instead of replacing all of them with new rims costing ₹800 apiece. I already had the protective equipment used for painting so I didnt factor in its cost for this work.
- The materials mentioned in the guide will be enough to paint all five wheel-rims of size R12.
- The durability and the appearance of the finish compared to factory finish is also debatable. Although I would say it looks and feels better than factory. I wanted to keep the factory look so I used silver paint and it was a close match to my eyes.
- I laid 3 coats of clear coat to achieve a glossier finish to the paint. Spray can paint is a bit soft in my experience and chips away easily compared to proper automotive paint and painting process. 3 coats of paint and clear was suggested to address this issue.
- I have attached high resolution pictures of the process and the finished part. Open them individually to observe the details.
References:
- https://youtu.be/u-TNsO33eqQ
- https://youtu.be/hdAz1pNn4yQ
Maintenance: Replace PCV Hose
Symptoms:
- Oil residue around PCV valve
- Poor fuel economy
Issue:
- Positive Crank Case Ventilation Leak
Parts Needed:
- 11192M79F00 - Hose PCV (₹35) X1
- 09401M13432 - Clip (₹8) X2 [Optional]
- 11198M79F00 - Seal, PCV Valve (₹15) X1 [Optional]
- 18118-73G10 - Valve, PCV (₹517) X1 [Optional]
Total cost of parts: ₹35-₹583
Prices as of June, 2021 
Tools Needed:
- Combination Pliers
- Flat Head Screw Driver
Time Required: 10 Minutes
Procedure:
- Identify the PCV hose first. It is connected between the throttle body and head cover, towards the left-hand side of the engine when viewing the car from the front. Needless to say, do not work on a running engine. Wait for 30 minutes after last engine shutdown to avoid getting burnt by hot components.
- Locate the clips at both ends of the hose. Lets start with the clip attached on the throttle body end.

- Use combination pliers to pinch on the tabs on the clips. This will broaden the clip diameter and you can now slide it towards the center of the hose.
- Repeat the same on the clip attached at the head cover end of the hose. If you were unable to pinch on the clips using the pliers, try to rotate hose using your hands such that the tabs on the clip are accessible for the pliers to grip on.
- Pull the hose away from the throttle body to remove it from the nozzle.
- Pull the hose away from the head cover to remove it from the PCV valve.
- Take out the hose and compare it with the new hose purchased. Make sure the replacement is correct.

- If the clips were rusted too much then use new clips. Otherwise, you can clean them with some soap and water. A little bit of surface rust is fine. Skip to step 12 if you dont need to install PCV and its seal.
- In my case, the PCV valve seal had worn out and was replaced at the service centre. But it is easy to replace. Pull out the PCV valve out of the head cover. Use a flat head screwdriver to pry out the rubber seal installed on the head cover. Be careful not insert the screwdriver deep inside the head cover or poke something else with it. If the PCV valve came out while removing the hose then that is an indication of worn seal.
- Install the new seal with the flat side of the seal facing out.
- If you are also replacing the PCV valve then install the new PCV valve with the correct side out. The wider nozzle will go into the head cover. The hose attaches to the narrow nozzle on the valve. Check references for how to diagnose a faulty PCV valve.
- Connect the hose to the throttle body first. Carefully push in the hose over the nozzle until it seats properly over the nozzle. When fully seated the metal nozzle wont be visible.
- Connect the hose to the PCV valve next. Carefully push in the hose over the nozzle until it seats properly over the nozzle. When fully seated the plastic nozzle wont be visible.
- Now slide the clips back into original position. The clips are used to pinch the hose at the location between the open end of the nozzle and the body it is attached to. There is a slight bulge at the end of the nozzle. Do not install the clip over it. Install the clip over the uniform portion of the nozzle. Do it at both ends of the hose. Pinch the tabs of the clip to loosen it. Slide it using the pliers and then release it at the location you want to install.
- Compare with old photos to ensure that you have installed the part properly.
- Start the engine and observe if anything is amiss. Installation is now complete.

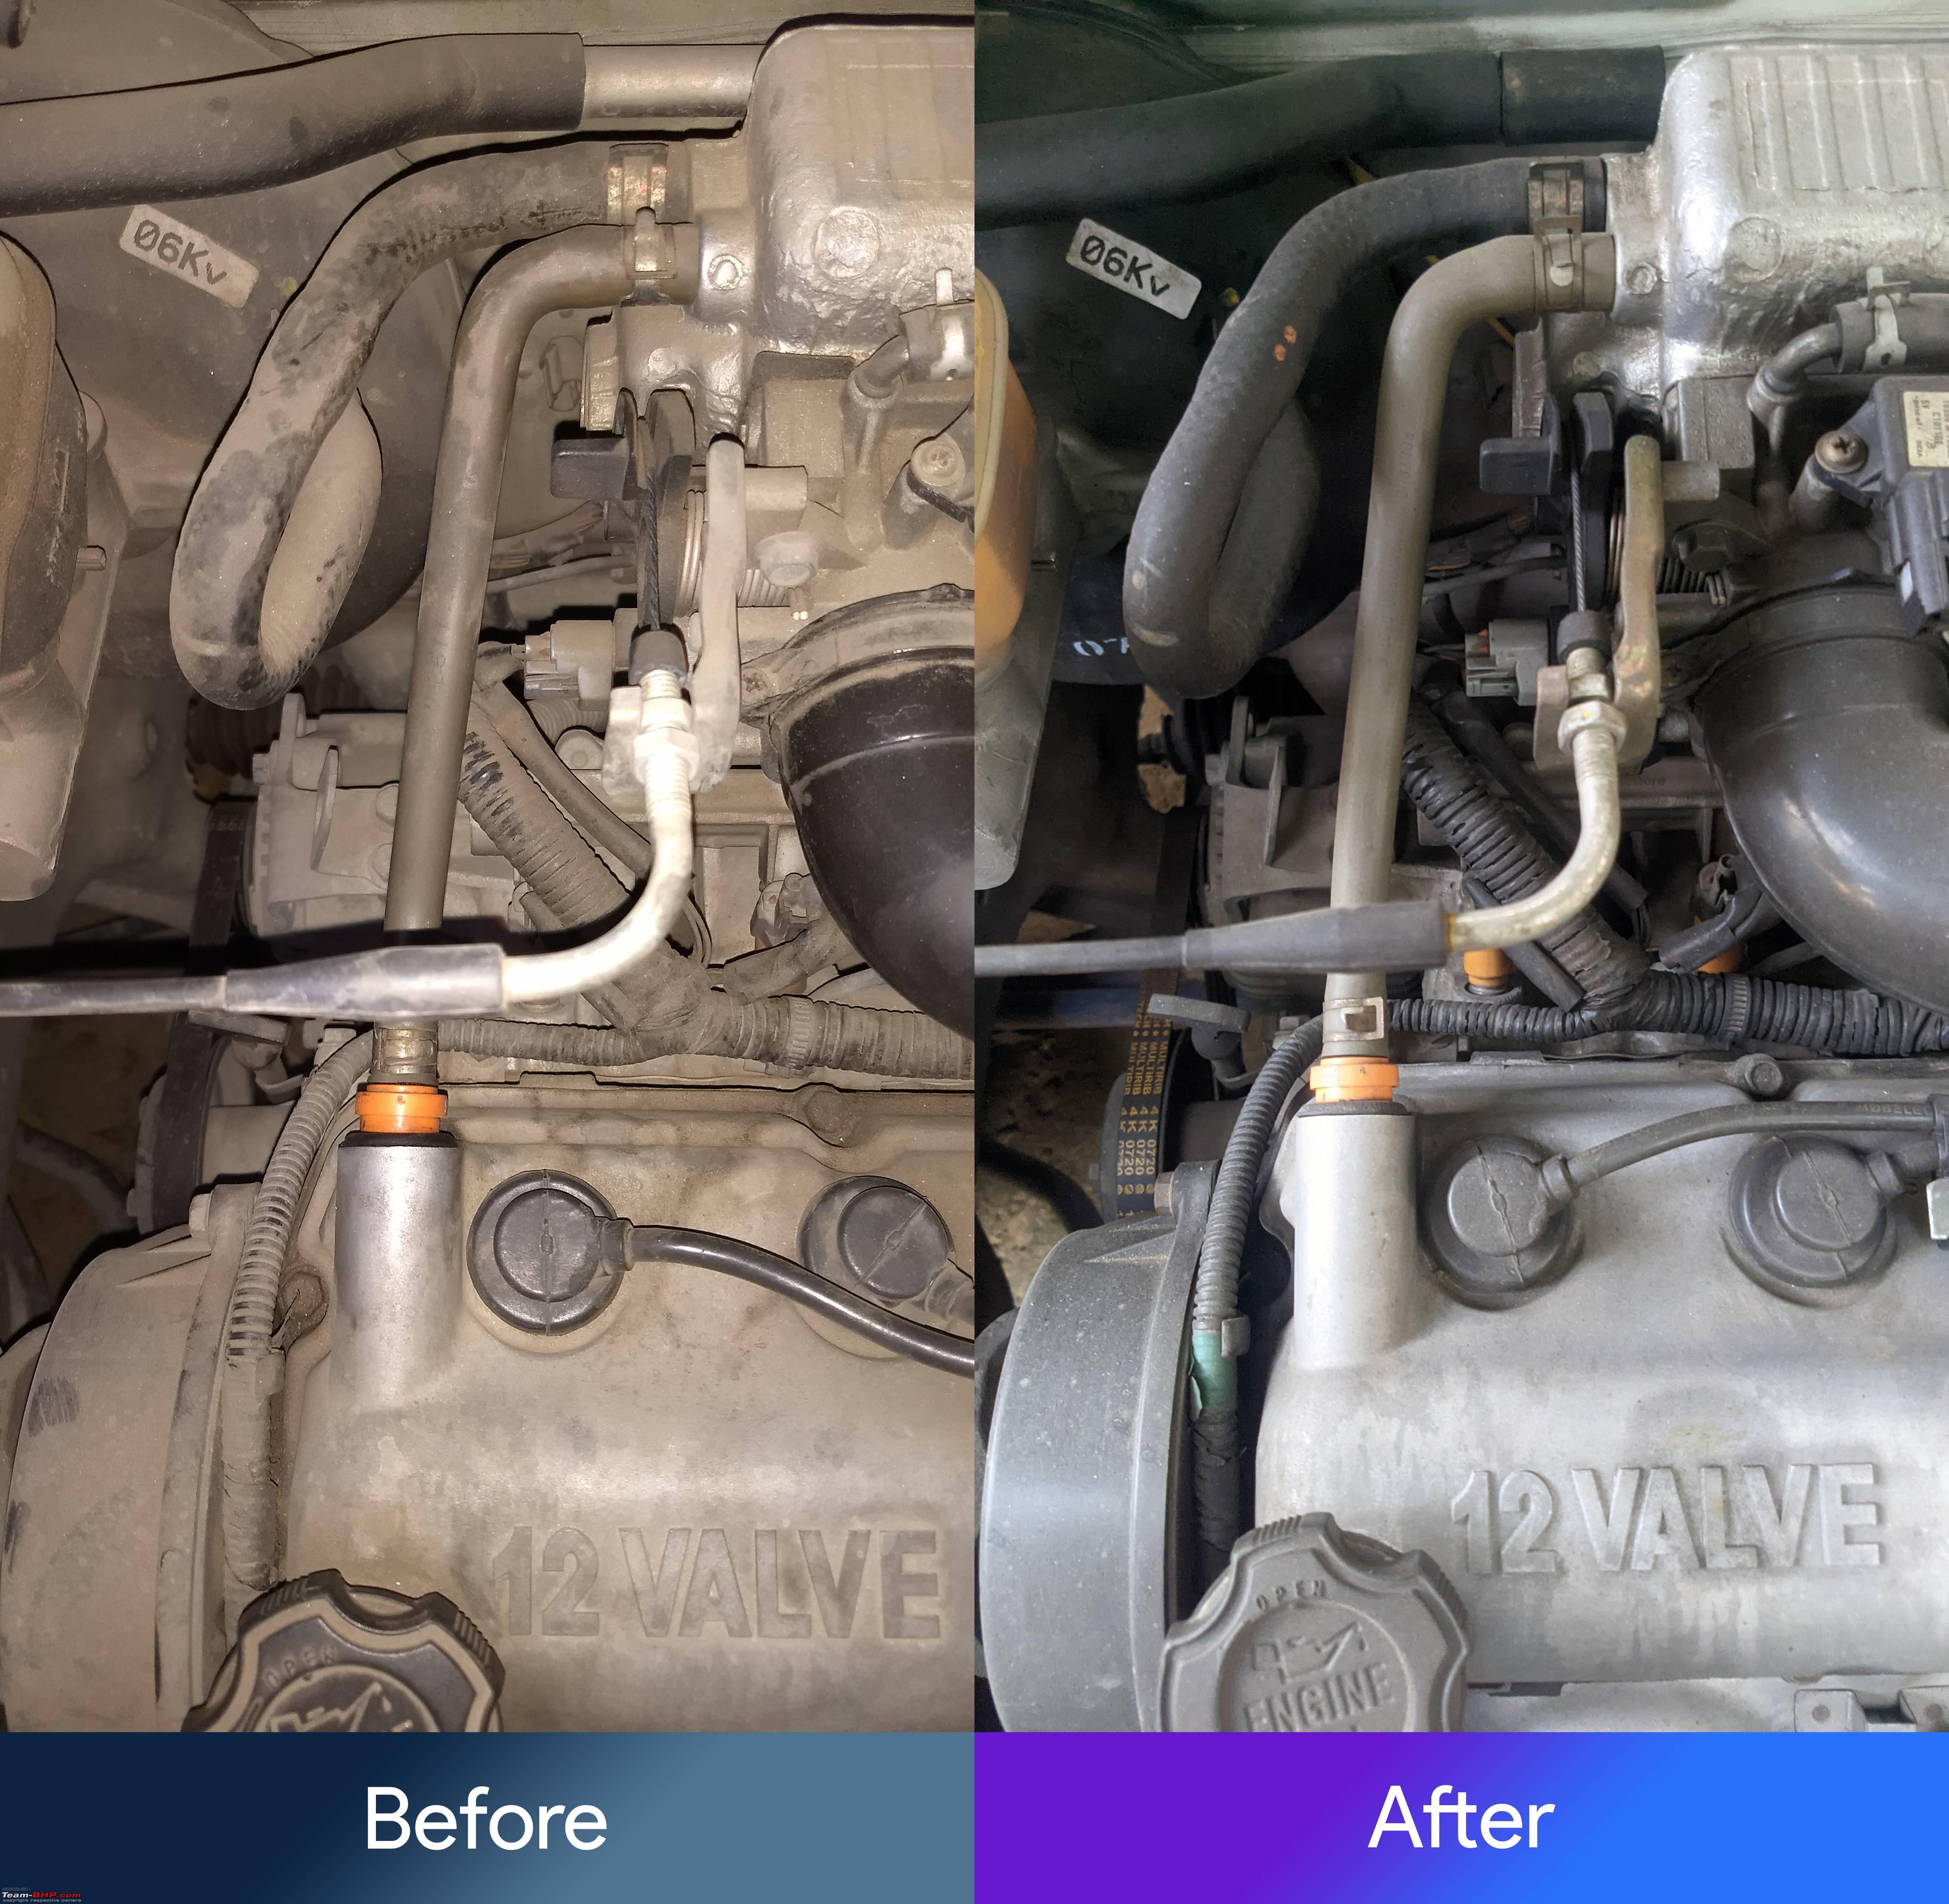
Backstory: The engine has been leaking oil around the PCV valve area for more than 5 years. The PCV hose had shrunk a bit (or it was like that from factory) and it was pulling on the PCV valve. This also resulted in the seal getting loose over the years. Now I am not sure if this was the reason for dropping fuel efficiency but I came across this issue when diagnosing hunting of engine RPM at idle. So, as a pre-emptive measure I changed the PCV hose and got the seal replaced from the Maruti Service Centre. They also checked the PCV valve operation in my presence before getting the seal replaced. You can see from the before and after images how much the valve is jutting out of the seal. The hose was also developing some cracks so I figured I will have to replace it down the line anyway. The minor leak around the PCV valve region is fixed now. I had to replace it myself since the service centre I visit always denied that this issue needs to be addressed. It is also recommended to inspect the breather hose since it is part of the Crankcase Ventilation system. It is covered in the next post.
References:
- https://youtu.be/5Kt5ubcQaK0
Maintenance: Replace Breather Hose
Symptoms:
- RPM hunting at idle
- Poor fuel economy
Issue:
- Positive Crank Case Ventilation Leak
Parts Needed:
- 11191M79F00- Hose Breather (₹77) X1
- 11199M68K00- Clip (₹11) X2 [Optional]
Total cost of parts: ₹77-₹103
Prices as of June, 2021 
Tools Needed:
- Combination Pliers
Time Required: 10 Minutes
Procedure:
- Identify the Breather Hose first. It is connected between the air cleaner box and head cover, towards the right-hand side of the engine when viewing the car from the front. Needless to say, do not work on a running engine. Wait for 30 minutes after last engine shutdown to avoid getting burnt by hot components.

- Locate the clips at both ends of the hose. Lets start with the clip attached on the air cleaner box.
- Use combination pliers to pinch on the tabs on the clips. This will broaden the clip diameter and you can now slide it towards the center of the hose.
- Repeat the same on the clip attached at the head cover end of the hose. If you were unable to pinch on the clips using the pliers, try to rotate hose using your hands such that the tabs on the clip are accessible for the pliers to grip on.
- Pull the hose away from the air cleaner box to remove it from the nozzle.
- Pull the hose away from the head cover to remove it from the breather nozzle.
- Take out the hose and compare it with the new hose purchased. Make sure the replacement is correct.

- If the clips were rusted too much then use new clips. Otherwise, you can clean them with some soap and water. A little bit of surface rust is fine.
- Connect the hose to the air cleaner box first. Carefully push in the hose over the nozzle until it seats properly over the nozzle. When fully seated the plastic nozzle wont be visible.
- Connect the hose to the head cover next. Carefully push in the hose over the nozzle until it seats properly over the nozzle. When fully seated the hose is around 1cm far from the bend.
- The hose rubs on a metal support bracket on the engine and over time a portion of the hose gets shaved off. So, after installing the hose rotate it a bit so that it stays far from the bracket. Once the clips are installed at the proper location, it wont move or touch the bracket due to vibrations hence preventing damage to the breather hose.
- Now slide the clips back into original position. The clips are used to pinch the hose at the location between the open end of the nozzle and the body it is attached to. There is a slight bulge at the end of the nozzle. Do not install the clip over it. Install the clip over the uniform portion of the nozzle. Do it at both ends of the hose. Pinch the tabs of the clip to loosen it. Slide it using the pliers and then release it at the location you want to install.
- Compare with old photos to ensure that you have installed the part properly.
- Start the engine and observe if anything is amiss. Installation is now complete.

Backstory: My car was experiencing hunting of RPM while at idle and the fuel efficiency had dropped significantly. The throttle has been eating up dust because of a crack on the air cleaner box that even service center somehow missed. After installing a new air cleaner box, I noticed that the breather hose had cracks at one end. It was also rubbing on an engine bracket and was pretty scraped at that location. To ensure that the issue is not caused by a fault in the Crankcase Ventilation system I decided to replace the components in the loop. It is also recommended to inspect the PCV hose since it is part of the Crankcase Ventilation system. Its covered in the previous post.
References:
- https://www.gatestechzone.com/en/new...ly-replacement
Maintenance: Replace Exhaust Resonator
Applicable Models: Type-2 Alto STD, LX, LXi, some versions of first generation WagonR and first-generation Zen Estilo
Symptoms:
- Excessive exhaust noise from the front side of the underbody
- Visible exhaust leak from the front side of the underbody
Issue:
- Exhaust resonator damaged
Parts Needed:
- 14190M79G10 - Pipe Compexhalto E (₹1895) X1
- 14183M79G00 - Ringseal Exh Pipe (₹255) X1
- 14492M844M0 - Spring Exh Pipe (₹38) X2
- 09119M10056 - Bolt (₹49) X2
- 14182M78180 - Gasket Exhaust Pipe (₹20) X1
- 09159M10049 - Nut, Catalyst Case Lock (₹11) X2
Total cost of parts: ₹2290-₹2366
Installation Charges: ₹500
Prices as of June, 2021 
Tools Needed:
- Socket and wrench Set
- Jack
- Jack Stand
- Wire Brush/320 grit sandpaper
- Torque Wrench
Time Required: 30 Minutes
Procedure:
- Identify the issue first. If your exhaust is making excessive noise then there might be a leak at the muffler or the resonator or anywhere along the exhaust pipe. This guide is for the resonator and its pipe only.
- It is best to do this on a cold car. Exhaust components are very hot and take at least an hour to completely cool down. Even though the process is fairly simple, the car needs to be lifted up to change the part easily. At least 2 jack stands are required. I didnt have, so I got it installed from a friendly neighbourhood garage. So, lift up the car from the front and put two jack stands on the left and right sides. Block of the wheels at the back to prevent it from rolling.
- Loosen the 2 bolts attaching the pipe to the catalytic convertor first. They might be fairly tight and rusted too. Use some penetrating oil or WD40 on the threads to help in loosening the bolts.
- Loosen the 2 nuts which attaches the resonator to the muffler downpipe. Again, use penetrating oil if required.
- Completely remove the 2 bolts at the catalytic convertor. They are spring loaded. Keep the springs safely if you are re-using them. It is not advisable to re-use the bolts.
- Completely remove the nuts from the resonator end and detach it from the downpipe. Pull the resonator away from the pipe to remove the bolt studs from the holes on the downpipe. If you were unable to detach it then you might also have to detach the muffler from its support bracket.
- The resonator with its pipe is now dangling on the support bracket near its centre. Pull it out from the bracket. Its not that heavy but be careful. There might be harmful dust inside the pipe. Wear a mask.
- Remove the old gasket from the catalytic convertor exit, if it didnt come off with the pipe. Clean the mating surface with a wire brush or sandpaper.
- Remove the old gasket from the start of the muffler pipe, if it didnt come off with the resonator. Clean the mating surface with a wire brush or sandpaper.
- Prepare the new part to be installed. Clean the mating surfaces at both ends. Additionally, you can also paint the weld points with a spray can. The silver paint applied by MGP came off with just rubbing alcohol, so I put a coat of acrylic paint an hour before the install process.
- Put the ring seal gasket the pipe end of the part. The metal portion interfaces with catalytic converter. The gasket is shaped such that you cannot put it the wrong way.
- Take the resonator end and mate it with the muffler downpipe by aligning the studs into the holes. Slip in the ring-shaped gasket(14182M78180) between the mating surfaces. Hand-tighten the new nuts.
- Attach the part on to its hanger at the centre.
- The front end of the pipe will now be roughly aligned with the catalytic converter. Make sure the ring seal gasket is installed properly and then mate it with the catalytic convertor. Hand-tighten the two bolts along with the tensioner springs. The spring goes first and then the bolt threads through the spring into the catalytic converter.
- Make sure the resonator and the pipe are seated correctly. If you had to remove the muffler from its hanger then install it back properly.
- Tighten both nuts at the resonator end to 50N-m.
- Tighten both bolts at the catalytic convertor end to 50N-m.
- Start the engine. Spray soapy water at the joints to check for leaks. If tightening doesnt fix the leak, then you will have to remove the part and inspect the reason for leaks.
- The part is now installed. Jack up the car and remove the jack stands. Lower the vehicle on to the ground gently.
Backstory: One fine day my car started to sound throatier. The resonator had developed a hole on the seam welds and it was leaking exhaust gases. The smell would sometimes come inside the car when the windows were rolled down and the noise inside the cabin had increased considerably. I initially got it welded but there was another small hole below the heatshield which opened up after few months. Cutting the heatshield and fixing the hole is just impractical and I had observed metal pieces falling out the resonator back when it was removed. Luckily, it didnt go inside the muffler as it would have resulted in rattling noises for which the only fix is to change the muffler. Alto isnt a well-insulated car and getting the exhaust as quiet as possible is always better.
Note:
- The diagrams on the parts catalogue are conflicting with what is installed on my car. The resonator is a separate part according to the catalogue but on my car the resonator is welded to the pipe coming from the catalytic converter.
- I have seen that the exhaust system is same on 2008 WagonR too and looking at the diagrams it might be similar for first generation Zen Estilo also. So, check your car and the picture of the resonator before making the purchase. If the resonator has bolts on both ends of it then the part mentioned on the guide wont work for you.
- Removing the resonator and plugging the hole by welding may fix the issue for a while and it did work for me but then another hole opened below the heatshield. It was not worth to cut the heat shield, fix the hole and re-attach it back. Rusted pieces may break off and go into the muffler and create further issues.
So, I got myself a harrier XZA last week and now the very less run family Alto K10 Vxi (2017) is sort of a backup car and that got me thinking into modifying it. Our alto has been so sparsely used that it has run like only 6500 kms so far !
I looked online - not many alto threads of recent times here and nearly all the YouTube videos reminded me of Pimp of ride creations. I want to make sure that the modifications look tasteful and are subtle, more like a sleeper car.
Here is what my initial thoughts are - let's divide the mods into two categories
Aesthetics only
1. Upgrade Headlights
2. Add fog lights
3. Maybe black out tail lights or replace them with something better?
4. Alloys - 13 inchers guess
5. Upgrade to a touch screen infotainment plus speaker upgrade (nothing too over the top)
6. Seat Covers - this is a maybe as the factory fitted ones still look super new
Performance Mods:
1. Air Filter upgrade
What else can be done on the engine without it being much of a major work as I don't want to open up the engine too much
So, if anyone has any ideas please do feel free to advise.
Quote:
Originally Posted by masoomdon
(Post 5342556)
So, I got myself a harrier XZA last week and now the very less run family Alto K10 Vxi (2017) is sort of a backup car and that got me thinking into modifying it. Our alto has been so sparsely used that it has run like only 6500 kms so far !
I looked online - not many alto threads of recent times here and nearly all the YouTube videos reminded me of Pimp of ride creations. I want to make sure that the modifications look tasteful and are subtle, more like a sleeper car.
Here is what my initial thoughts are - let's divide the mods into two categories
Aesthetics only
1. Upgrade Headlights
2. Add fog lights
3. Maybe black out tail lights or replace them with something better?
4. Alloys - 13 inchers guess
5. Upgrade to a touch screen infotainment plus speaker upgrade (nothing too over the top)
6. Seat Covers - this is a maybe as the factory fitted ones still look super new
Performance Mods:
1. Air Filter upgrade
What else can be done on the engine without it being much of a major work as I don't want to open up the engine too much
So, if anyone has any ideas please do feel free to advise.
|
KPR already provided the links with detailed instructions for infotainment, fog lamps and sensor installment. I will just add some things I know about.
It is easy to procure good fog lamps for newer cars as the mounts are common or at least easy to procure. If you really want to go the extra mile, you can take the switch assembly cluster from a VXi Alto K10 1st Gen and swap out the ones in your Alto. The part number is 37400M67K60. This one will have the fog lamp switch built in.
Please don't black out the tail lamps. It is dangerous and will make your car less visible on the road at night or low visibility conditions like rain, fog, etc.
The headlamps are designed for halogen bulbs, so doing an LED swap won't be fruitful as the mirror is not designed for any other lamp type. You can go for Phillips Extreme Vision, although I am not sure whether they are that good for the extra price. Installing a higher wattage lamp will require you to install a better wiring harness that piggybacks on the signal from the factory harness. It is the safest way to do so and there are many kits in the market for that. But then, I am not sure whether the headlamp assembly and lens will be able to handle the extra heat produced by these bulbs. So, research well.
I have tried different air filters of the same type and the only difference I noticed is because of the filter being new and clean. You may try the K&N filter but I don't think there will be any significant gains in engine performance.
You can try installing better spark plugs the next time you need to replace them. That is an easy upgrade.
Clean out the throttle body yourself and you will see much better performance gain than what the service center does.
If you really want to improve the engine performance then you might have to port your intake and exhaust manifolds. Expensive affair and complicated process. Definitely cannot be a DIY project as it needs good expertise.
Use some fuel additive to get your injectors cleaned. It significantly improved mileage of my old alto.
Quote:
Originally Posted by KPR
(Post 5342664)
|
Thanks a lot for the super helpful reply - planning to start working on this by end of this month . will post updates once they are done
| All times are GMT +5.5. The time now is 03:35. | |