Team-BHP > Technical Stuff > DIY - Do it yourself
Register New Topics New Posts Top Thanked Team-BHP FAQ


Reply
  Search this Thread
45,682 views
Old 11th March 2021, 13:59   #1
Newbie
 
Join Date: Feb 2021
Location: Delhi
Posts: 23
Thanked: 152 Times
Maruti Suzuki Alto | Useful Modifications & Maintenance

Maruti Suzuki Alto Modifications and Maintenance


This thread is dedicated to some practical mods and part replacements that were be done on Maruti Suzuki Alto Type-2. A few of these mods weren't part of my "top model" back then and the rest are maintenance works that were not readily found on the internet. I would like to share these with fellow Alto owners. I don't have photos for everything so I will try to explain in depth where required.

This thread will only cover the procedure and parts required and most of these can be done at home with a toolkit. I enjoy doing work on my machines and some money was saved in the process. A few of these were carried out in a Friendly Neighbourhood Garage because I didn't have the required tools or experience.

Why I had to do some of these works will be talked about in another thread.

Each work is split into different posts and listed them on the first post. Click on the desired item to jump to the particular post.

Modifications:
  1. Install Latch Release for Boot/Tailgate/Dicky
  2. Install Adjustable OSVRM (Outside Rear View Mirror)
  3. Install cabin filter

Maintenance:
  1. Replace Air Conditioner Control Unit back-light Bulbs
  2. Replace A/C button
  3. Service A/C blower unit
  4. Replace Speedometer back-light Bulbs
  5. Replace battery tray and repair corrosion
  6. Change wiper arms
  7. Replace PCV Hose
  8. Replace Breather Hose
  9. Replace Exhaust Resonator
  10. Replace Steering Rack
  11. Clean Coolant Reservoir Tank
Most of the parts used are from the OEM or aftermarket parts of equal or better specifications.

Some of the parts weren't properly catalogued in the Service Booklet and not much information was available online so I thought my posts might help someone save time and effort.

If you see an item without a hyperlink to the post, it is because I am compiling the photos and the written material.

These works were done on Alto Type-2 but may also be done on Alto Type-1 and even Alto K10 Type-1 with slight part changes if any.

Disclaimer: Some of the pictures used in the thread are taken from the internet and do not belong to me. I am not affiliated to those companies. Those images are used for illustrative purposes only.

Last edited by Aditya : 29th April 2021 at 21:24. Reason: Spacing
PratyushJaya is offline   (30) Thanks
Old 18th March 2021, 19:26   #2
Newbie
 
Join Date: Feb 2021
Location: Delhi
Posts: 23
Thanked: 152 Times
Modification: Install Latch Release for Boot/Tailgate/Dicky

Modification
1. Install Latch Release for Boot/Tailgate/Dicky

Parts Needed:
  1. 83310M76G50 - Lever Compfuel Lid Opener (₹51) X1
  2. 82650M79G00 - Striker Back Door (₹38) X1
  3. 83350M79G20 - Cable Comp Back Door Opener (₹116) X1
  4. 75411M76G20 - Clamp for Cable (₹2) [Optional] X3

Maruti Suzuki Alto | Useful Modifications & Maintenance-sj0n5cz.png

Total cost of parts: ₹205-₹211
Prices as of March, 2021

Tools Needed:
  1. Phillips Screw Driver (Socket and Ratchet would be better)
  2. Hex Head Socket Set and Ratchet
  3. Combination Pliers
  4. Penetrating fluid (WD-40 might also work)

Time Required: 3 Hours
Procedure:
• Spray penetrating fluid on the four bolts of the driver seat. Good time to check which socket will you need to remove them.

• Remove the clips for the driver side dash trim. Then remove the trim. To remove the clip push on the button at the centre till it depresses a bit and clicks into place. Do not push it further. Then pull out the clip body entirely along with the button. You may use a flat-head screwdriver to push on the button and then for prying out the clip body.

• Remove driver side door sill trim. Carefully pull it out by placing fingers towards the inside of the trim and pulling it upwards.
Maruti Suzuki Alto | Useful Modifications & Maintenance-7f5xyjq.jpg

• Remove the rear seat cushion by pressing on the tabs at the both ends of the seat and pulling the cushion upwards while holding the tab pressed. Pull the seat out of the car.

• Remove your parcel tray. Unscrew the parcel tray support on the driver side of the vehicle and remove the trim.

• Remove the clips holding the tail end trim. Then remove the trim.
Maruti Suzuki Alto | Useful Modifications & Maintenance-z6wozmb.jpg

• Remove the clips holding the carpet in place on the driver side of the car. They are located along the pillar near the taillamp and along the cabin side of wheel well.

• Once all the clips are removed, pull out carpet gently. They are held in place by Velcro strips on the pillars.

• Remove the 4 bolts holding the driver seat to the chassis. Penetrating fluid would have done the job by now. They are often quite tight. Use longer ratchet if needed. Remove the seat and place it outside the car.

• Now remove the clips on the door sill trim on the back door of the car. Slide out the trim.
Maruti Suzuki Alto | Useful Modifications & Maintenance-dijer3m.jpg

• Lift the floor carpeting on the driver side carefully. Over the years the carpet gets stuck to the compacted sound deadening material and if you pull out too fast the layers will separate. I was unable to remove my driver seat as it was interfering with gear lock installed by the dealership. If you face such an issue, do remove the chair and lift as much carpet as you can under the driver seat and on the rear seat footwell.

• Remove the Fuel Lid opened Lever attached to the frame. You will need a Phillips head screw driver. Do not remove the fuel lid cable yet.

• Remove the old latch striker screwed on to the tail end member. They are pretty tight and I had to use my ratchet with Philips head attachment to break free the 2 screws. I didn’t want to strip the screw heads. You may use a Phillips head screw driver.

• The cable has different ends. The ball end of the cable attaches to the striker. Take the new cable and push it through the hole on the tail end member till it emerges on the spare tyre wheel well. Pull it out till you are left with a foot of cable hanging out of the tail end member.

• Attach the cable to the striker. I don’t have images for it. It was pretty straight forward.

• Now screw the striker to the tail end member. When standing at the rear end of the car the cable will come out to the driver side. You will notice a small lever on your boot latch. The striker hits the lever to unlock the boot. So, install it accordingly. Do not tighten the screw yet. Just screw them enough to keep it in place
Maruti Suzuki Alto | Useful Modifications & Maintenance-9zn20ma.jpg

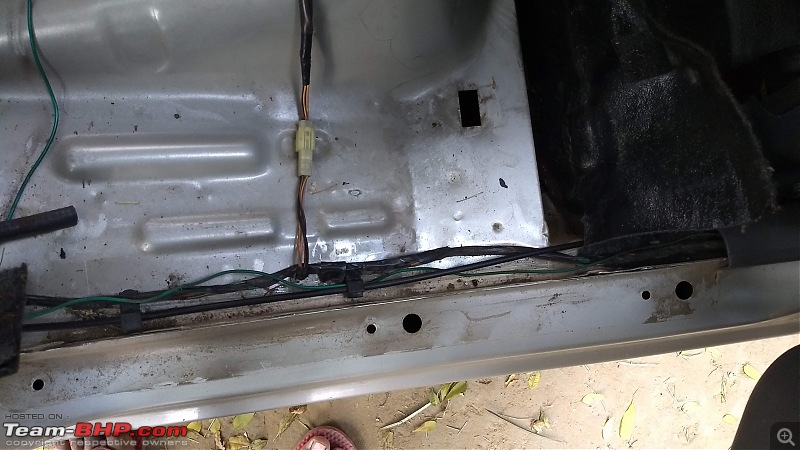
• Now route the cable alongside the wires running along the driver side of the rear wheel well. You might notice that the clamp for boot door cable has already been installed from factory. It was pre-installed on mine. If you don’t want to take a chance, you can buy the clamp for cable. 3 pieces are required as per parts manual. I would suggest you buy at least 5. Pop the cable into those clamps. For those who didn’t have the clamps, you will know where to install them when route the cable.
Maruti Suzuki Alto | Useful Modifications & Maintenance-sz4f1pv.jpg

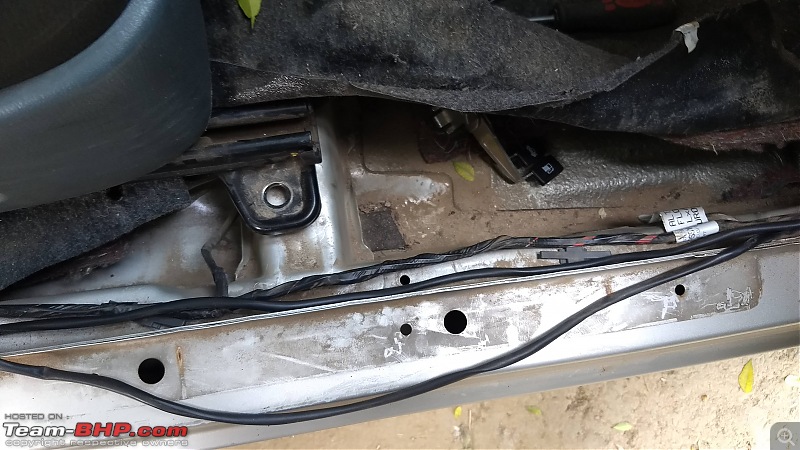
• Next, the cable travels along the rear seats and then takes a turn to the passenger side after the seats. There’s ridge running along the middle. The cable needs to be routed along this till it hits the cross member below the driver seat.

• Thread the cable through this cross member. Have a look the fuel lid cable going towards the lever. Do it accordingly. I was unable to remove the seats so I figured it out by running my hands over the floor pan.

• Observe how the fuel lid cable is connected to the old Lever. Remove it and connect the new Lever to the fuel lid cable and then the boot cable. The cylindrical end of the cable is attached to the levers. Make sure that the cables are not intertwined.
Maruti Suzuki Alto | Useful Modifications & Maintenance-d8vgmcu.png

• Attach the new Lever to the frame by its single screw. There’s also a tab that keeps it in place. Make sure it is positioned properly. Now test the operation of the fuel lid door and boot opener by pulling on the levers and verifying if the striker is moving and the fuel lid opener pin is being pulled.

• Tighten the 2 screws on the striker completely. Make sure the cable is routed properly and pushed into the clamps.

• Close the boot and fuel lid and test the levers. I had to bend the striker a bit with combination pliers to make it move the lever sticking out of the latch.

• Attach the carpets back into place staring with boot and moving forward to the driver side. Make sure the carpet is laid flat and in its original position.

• Now push on the buttons on the clips from the other side so it sticks out a bit from the clips. Clip the carpet in place inside the boot. Push on the buttons sticking out to lock the clip in place.

• Attach driver side door sill trim piece. Make sure to slide it under the pillar trim.

• Attach the driver side dash trim. Push the clips in and lock it in place. Make sure this trim goes over the door sill trim.

• Attach the rear door sill trim and install the clips holding it in place.

• Attach the parcel tray holder trim piece.

• Attach the tail end member trim piece and install all the clips holding it in place.

• Inspect the carpet for any kinks or irregularities. Install the driver seat and bolt down the 4 bolts securely.

• Install the rear seat with back end into the frame first. Then push the rectangular hooks into the frame till the seat is affixed firmly.

• Installation complete! Clean your car, keep your sockets back in your toolkit.

Last edited by Aditya : 30th April 2021 at 06:15. Reason: Spacing
PratyushJaya is offline   (41) Thanks
Old 28th April 2021, 13:31   #3
Newbie
 
Join Date: Feb 2021
Location: Delhi
Posts: 23
Thanked: 152 Times
re: Maruti Suzuki Alto | Useful Modifications & Maintenance

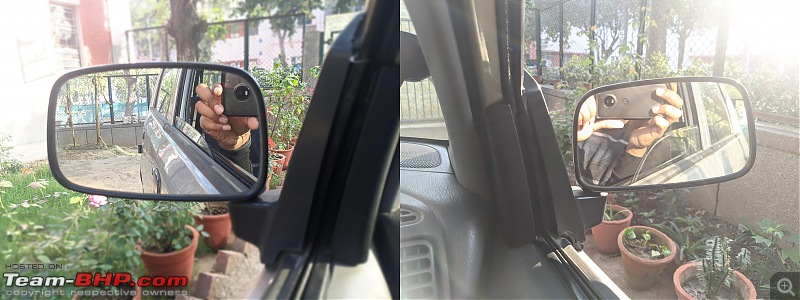
Modification: Install Adjustable OSVRM (Outside Rear View Mirror)

Parts Needed:
  1. 84702M79G41- Mirror Out Rear View LH (₹1067) X1
  2. 84790M79G10 - Garnish Compsash Brkt INRLH (₹72) X1
  3. 84701M79G41 - Mirror Out Rear View RH (₹1067) X1
  4. 84750M79G10 - Garnish Compsash Brkt INRRH (₹72) X1
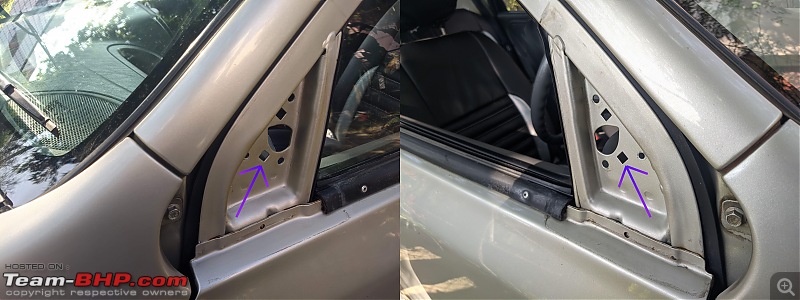
  5. 71851M70F00 – Nut Plastic (₹1) X1
  6. 02142M0512A – Screw (₹1) X2

Maruti Suzuki Alto | Useful Modifications & Maintenance-icndrdm.png

Total cost of parts: ₹2280
Prices as of March, 2021

Tools Needed:
  1. Phillips Screw Driver (Socket and Ratchet would be better)
  2. Hex Head Socket Set and Ratchet or spanner
Time Required: 3 Hours

Procedure:
• Starting from driver side outside mirror. Roll down the window completely.
Maruti Suzuki Alto | Useful Modifications & Maintenance-7b8oyez.jpg

• Put your fingers in the gap between the inside trim and the mirror assembly. Pull out the trim.

• Loosen the 3 screws holding the rear-view mirror using hex head and wrench. You can also use a spanner.

• Completely unscrew the bolts starting with the lower two bolts. Hold the mirror while removing the last upper bolt and then remove the mirror. You can use a Phillips head screwdriver to quickly unscrew the bolts.

• This is a good time to clean the portion where the mirror is fixed. You can also roll up the mirror and clean the portion that is generally inaccessible.
Maruti Suzuki Alto | Useful Modifications & Maintenance-jpttqq5.jpg

• Insert the plastic nut at the bottom square hole from the inside of the vehicle.

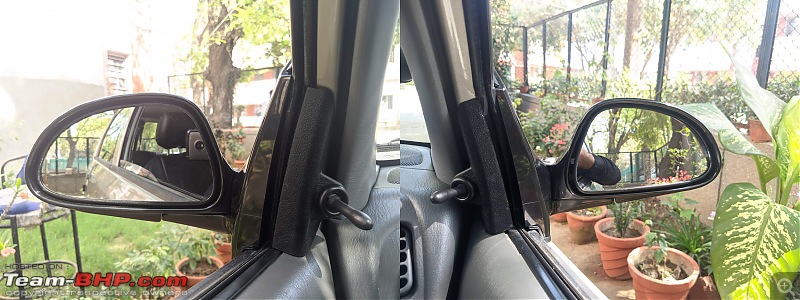
• Remove the plastic locking nut screwed on the adjustment lever of the driver side rear view mirror. Affix the driver side mirror on to the mounting place by inserting the adjustment lever carefully into the hole first.

• There is a metal tab on the door which needs to go under the tab on the inside of the garnish. Affix the driver side garnish by carefully inserting that tab first and then pressing the pointed end of the part onto the door. Check if the adjustment lever is centred inside the hole on the garnish. If not, remove the garnish and the mirror from its mounting place. Loosen the screw holding the lever in place. Adjust the position as needed and repeat step 7. Might need to repeat again to get it properly aligned with the garnish. You can ask another person to hold the mirror or tighten just the top bolt if you find it difficult to hold the mirror while doing this step.

• Once you are satisfied with the alignment of the mirror and the garnish, remove the garnish and tighten the bolts holding the mirror in place. Hand-tighten all the bolts and then tighten the rest with a spanner or ratchet. Do not tighten a bolt completely on the first go. Keep tightening each bolt gradually to help seat the new mirror evenly on its mounting place.

• Install the garnish and tighten the locking nut of the adjustment lever.

• Install the screw into the hole on the garnish using a Phillips head screwdriver. You might have to push down on the screwdriver to make the screw thread into the plastic nut for the first time.

• Verify that the adjustment lever is working and the mirror is affixed properly.

• Install the small black cap that came with the garnish into the screw hole to cover it. There is a small notch on the cap which will point downwards when installed.

• Repeat the entire procedure for passenger side mirror.
Maruti Suzuki Alto | Useful Modifications & Maintenance-qjmestg.jpg[/list]

Last edited by Aditya : 30th April 2021 at 06:17. Reason: Spacing
PratyushJaya is offline   (47) Thanks
Old 29th April 2021, 06:26   #4
Team-BHP Support
 
Join Date: Feb 2004
Location: Mumbai
Posts: 17,835
Thanked: 77,054 Times
re: Maruti Suzuki Alto | Useful Modifications & Maintenance

Thread moved out from the Assembly Line. Thanks for sharing!
Aditya is offline   (4) Thanks
Old 29th April 2021, 08:38   #5
BHPian
 
Join Date: Mar 2012
Location: KA03
Posts: 809
Thanked: 2,855 Times
Re: Maruti Suzuki Alto | Useful Modifications & Maintenance

Wow! Extensive list. Alto Type 2, is that the old Alto? A picture would help. Hope to see more on this thread. Do you plan on adding any sound deadening panels?
mvadg is offline   (1) Thanks
Old 29th April 2021, 09:42   #6
BHPian
 
ash22's Avatar
 
Join Date: Jul 2019
Location: Chennai
Posts: 208
Thanked: 480 Times
Re: Maruti Suzuki Alto | Useful Modifications & Maintenance

Quote:
Install cabin filter
Cant find details of this in this thread, Can you please share the details with pics?
ash22 is offline  
Old 29th April 2021, 12:08   #7
Senior - BHPian
 
v1p3r's Avatar
 
Join Date: Feb 2005
Location: BLR / DXB / LON
Posts: 5,334
Thanked: 6,896 Times
Re: Maruti Suzuki Alto | Useful Modifications & Maintenance

Incredible stuff. Very detailed and well documented. I often use threads like these as guides when working on my own cars.
v1p3r is offline   (2) Thanks
Old 29th April 2021, 12:59   #8
KPR
BANNED
 
Join Date: Oct 2019
Location: Dholakpur
Posts: 828
Thanked: 2,529 Times
Re: Maruti Suzuki Alto | Useful Modifications & Maintenance

Alto means cheap to experiment and DIY potential. Great to see many DIYs here. Such works will give immense satisfaction than a new gizmo car for me.
KPR is offline   (3) Thanks
Old 29th April 2021, 14:09   #9
BHPian
 
Join Date: Sep 2006
Location: Chennai
Posts: 187
Thanked: 481 Times
Re: Maruti Suzuki Alto | Useful Modifications & Maintenance

Bravo. If not for the competition Maruti would have kept these as "premium features" even in a 15 lac car till date.

Last edited by kpkeerthi : 29th April 2021 at 14:13.
kpkeerthi is offline   (2) Thanks
Old 29th April 2021, 15:07   #10
BHPian
 
McLaren Roxx's Avatar
 
Join Date: Jun 2007
Location: MAA,COK,BOM,THN
Posts: 305
Thanked: 1,179 Times
Re: Maruti Suzuki Alto | Useful Modifications & Maintenance

Wow, this made me nostalgic, for sure! I owned a first-generation Alto 0.8 (bought in 2001 & still regret not buying the 1.1) and the ORVM along with the boot release were my very first two mods as well. Inexpensive, but with high benefits.
Boot release was especially essential ever since security checks at malls & offices became mandatory.
McLaren Roxx is online now   (1) Thanks
Old 29th April 2021, 16:34   #11
Distinguished - BHPian
 
Reinhard's Avatar
 
Join Date: Nov 2010
Location: Pune
Posts: 4,854
Thanked: 17,732 Times
Re: Maruti Suzuki Alto | Useful Modifications & Maintenance

Welcome to TBHP Ptatyush. Thanks for sharing this DIY. Very useful bits both of them. Direct positive impact on driving experience every single day of ownership. Its really laughable that car makers actually skip (at least used to skip) on these features often on "base models" of cars. Thankfully due to rampant reuse of parts and bodies, its possible to retrofit some of these with minor effort as a DIY.

I hope a lot will find your thread useful & in fact will even get it done. Thanks again.
Reinhard is offline   (2) Thanks
Old 29th April 2021, 19:16   #12
BHPian
 
anoop.u's Avatar
 
Join Date: Dec 2017
Location: KL07-MH04-OD02
Posts: 50
Thanked: 143 Times
Re: Maruti Suzuki Alto | Useful Modifications & Maintenance

Nice to bump into a new thread for the Alto. The only car in my garage that I have no intention of selling, ever.

Some of the changes / purchases I managed to add to mine over the years:

1. Internally adjustable ORVM (OEM/MGP).
2. Day / night mirror (OEM/MGP).
3. Boot opener (OEM/MGP).
4. Rear doors cabin light switch (OEM/MGP).
5. Clear side indicator lens (OEM/MGP).
6. Philips T10 leds x4 (front + back)
7. Sylvania T10 amber leds x2 (side)
8. Philips 100/90W H4 headlamps + wiring
9. Internal TPMS (Honda)
10. Alloy wheels x5 (NEO)
11. Celerio Fogs (OEM/MGP)
12. Custom art leather seats with blue stitching + leather adjustable (welded) front arm rest + leather door pads + leather steering wheel wrap.
13. Few other bits like audio upgrade, dashcam, noodle mats etc

Attaching a recent pic below:

Maruti Suzuki Alto | Useful Modifications & Maintenance-alto34.jpg

PS: Apologies for hijacking your thread, wanted to pen down an long term ownership review, could never get down to it.
anoop.u is offline   (15) Thanks
Old 29th April 2021, 19:49   #13
BHPian
 
carthick1000's Avatar
 
Join Date: Nov 2006
Location: CJB-Driel
Posts: 693
Thanked: 2,861 Times
Re: Maruti Suzuki Alto | Useful Modifications & Maintenance

Welcome to team-bhp, PratyushJaya!

Very useful thread. When I see an itemised list with part numbers, costs etc. in a DIY thread, it gives me a good feeling that DIY section never ceases to amaze me. Keep up the good work. Though I don't have an Alto, I definitely can enjoy reading and learning from your experience. Thanks.
carthick1000 is offline   (1) Thanks
Old 29th April 2021, 20:43   #14
BHPian
 
Join Date: May 2019
Location: Mysore
Posts: 28
Thanked: 43 Times
Re: Maruti Suzuki Alto | Useful Modifications & Maintenance

Quote:
Originally Posted by anoop.u View Post
Nice to bump into a new thread for the Alto. The only car in my garage that I have no intention of selling, ever.

Some of the changes / purchases I managed to add to mine over the years:

4. Rear doors cabin light switch (OEM/MGP).
5. Clear side indicator lens (OEM/MGP).

11. Celerio Fogs (OEM/MGP)
12. leather adjustable (welded) front arm rest + leather door pads
More details of these please! especially parts numbers of the OEM parts.

I'm particularly interested in the fog lamps-How have you attached them? What about water and muck getting splashed into the fog area since the Alto has short fender liners?

I have a 2007 Std,which lacks even the minimum things the LX/LXi gets so I've added some subtle cosmetic changes and conveniences to it

1. Changed the stickered on badges to the chrome ones. I havent gone over the top like some owners do, just Maruti-Suzuki and Alto.
2. A DIY refinish of the front headlights to eliminate the scratches and haze.
3. Remote boot lid opener
4. Remote fuel lid opener. All these years I would get out of the car and open the lid myself with the key. The current situation made me get this done pronto.
5. A strut tower cap-
https://boodmo.com/catalog/part-cap_strut_rod-38163102/
Clean looks for the engine bay and will prevent water from going into the struts.
surajspai is offline   (2) Thanks
Old 29th April 2021, 21:57   #15
Newbie
 
Join Date: Feb 2021
Location: Delhi
Posts: 23
Thanked: 152 Times

Quote:
Originally Posted by mvadg View Post
Wow! Extensive list. Alto Type 2, is that the old Alto? A picture would help. Hope to see more on this thread. Do you plan on adding any sound deadening panels?
The Alto that preceded the first Alto K10. Production years 2005-2012.

I was thinking about it just last month when I was driving Spark for a week and noticed how silent it was compared to Alto. The Chevrolet was under consideration back when we were buying the humble Alto.

I have no idea how to go about it though. There seems to be no production version of Alto with sound deadening.

Quote:
Originally Posted by v1p3r View Post
Incredible stuff. Very detailed and well documented. I often use threads like these as guides when working on my own cars.
It is a joy when I find detailed threads of something I want to undertake. I am happy to contribute in the same manner.

Quote:
Originally Posted by KPR View Post
Alto means cheap to experiment and DIY potential. Great to see many DIYs here. Such works will give immense satisfaction than a new gizmo car for me.
Partly the reason we are still running the car after a decade and I am allowed to tinker with it.

Quote:
Originally Posted by kpkeerthi View Post
Bravo. If not for the competition Maruti would have kept these as "premium features" even in a 15 lac car till date.
This is the reason why I got encouraged to do these works on my car.
Most of these modifications should have been done a decade ago, but I enjoy doing this.

Last edited by Zappo : 29th April 2021 at 22:49. Reason: All back to back posts merged.
PratyushJaya is offline   (3) Thanks
Reply

Most Viewed


Copyright ©2000 - 2024, Team-BHP.com
Proudly powered by E2E Networks