Team-BHP > Technical Stuff > DIY - Do it yourself
Register New Topics New Posts Top Thanked Team-BHP FAQ


Reply
  Search this Thread
18,236 views
Old 19th June 2021, 23:30   #1
BHPian
 
saisailendra's Avatar
 
Join Date: Oct 2019
Location: Hyderabad
Posts: 158
Thanked: 1,228 Times
DIY: How I improved my car's footwell lights with LED Strips

Hello everyone. Hope you are coping up well in these difficult times of Covid-19. In this thread, I shall write about how I tried to improvise the cabin lighting, specifically foot-well lights in my Vento 2017 model.

My Vento comes with the following lights from factory :-
  1. Front cabin light – 1 bulb – festoon type – 10 watts
  2. Rear cabin lights – 2 bulbs – festoon type – 5 watts each
  3. Front foot-well lights – 1 bulb each side – T10 - 5 watts each
That is pretty much it. And all the bulbs are halogen bulbs. These lights barely lighten up the cabin and the end-result is a gloomy, orange-yellow cabin.

What I have done earlier, pretty much within the first 6 months of ownership is, I’ve swapped the halogen bulbs in all the interior lights with LEDs. Went with good quality branded (Philips and Osram) LEDs. They consumed very little electricity, say 20% of the original halogen bulbs, made the cabin much brighter than earlier and changed the overall cabin lighting to a cooler color temperature (6000K). I was satisfied then, seeing a good improvisation over the original lighting. But still, that light is nowhere close to being called “Bright” or even “Adequate”. So, the wish for a brighter cabin was always there, but that wish slowly calmed down and went dormant.

DIY: How I improved my car's footwell lights with LED Strips-stock-halogen-led.jpg

Now coming to the foot-well lights, I must thank a fellow T-BHPian viXit, for making my interest in LEDs and cabin lights come to life again after two and a half years of dormancy. His discussion regarding cabin lighting, LED strips acted as a stimulus for me taking up this DIY project.

I have no experience or expertise with soldering and engineering projects. So, I have my share of goof-ups 
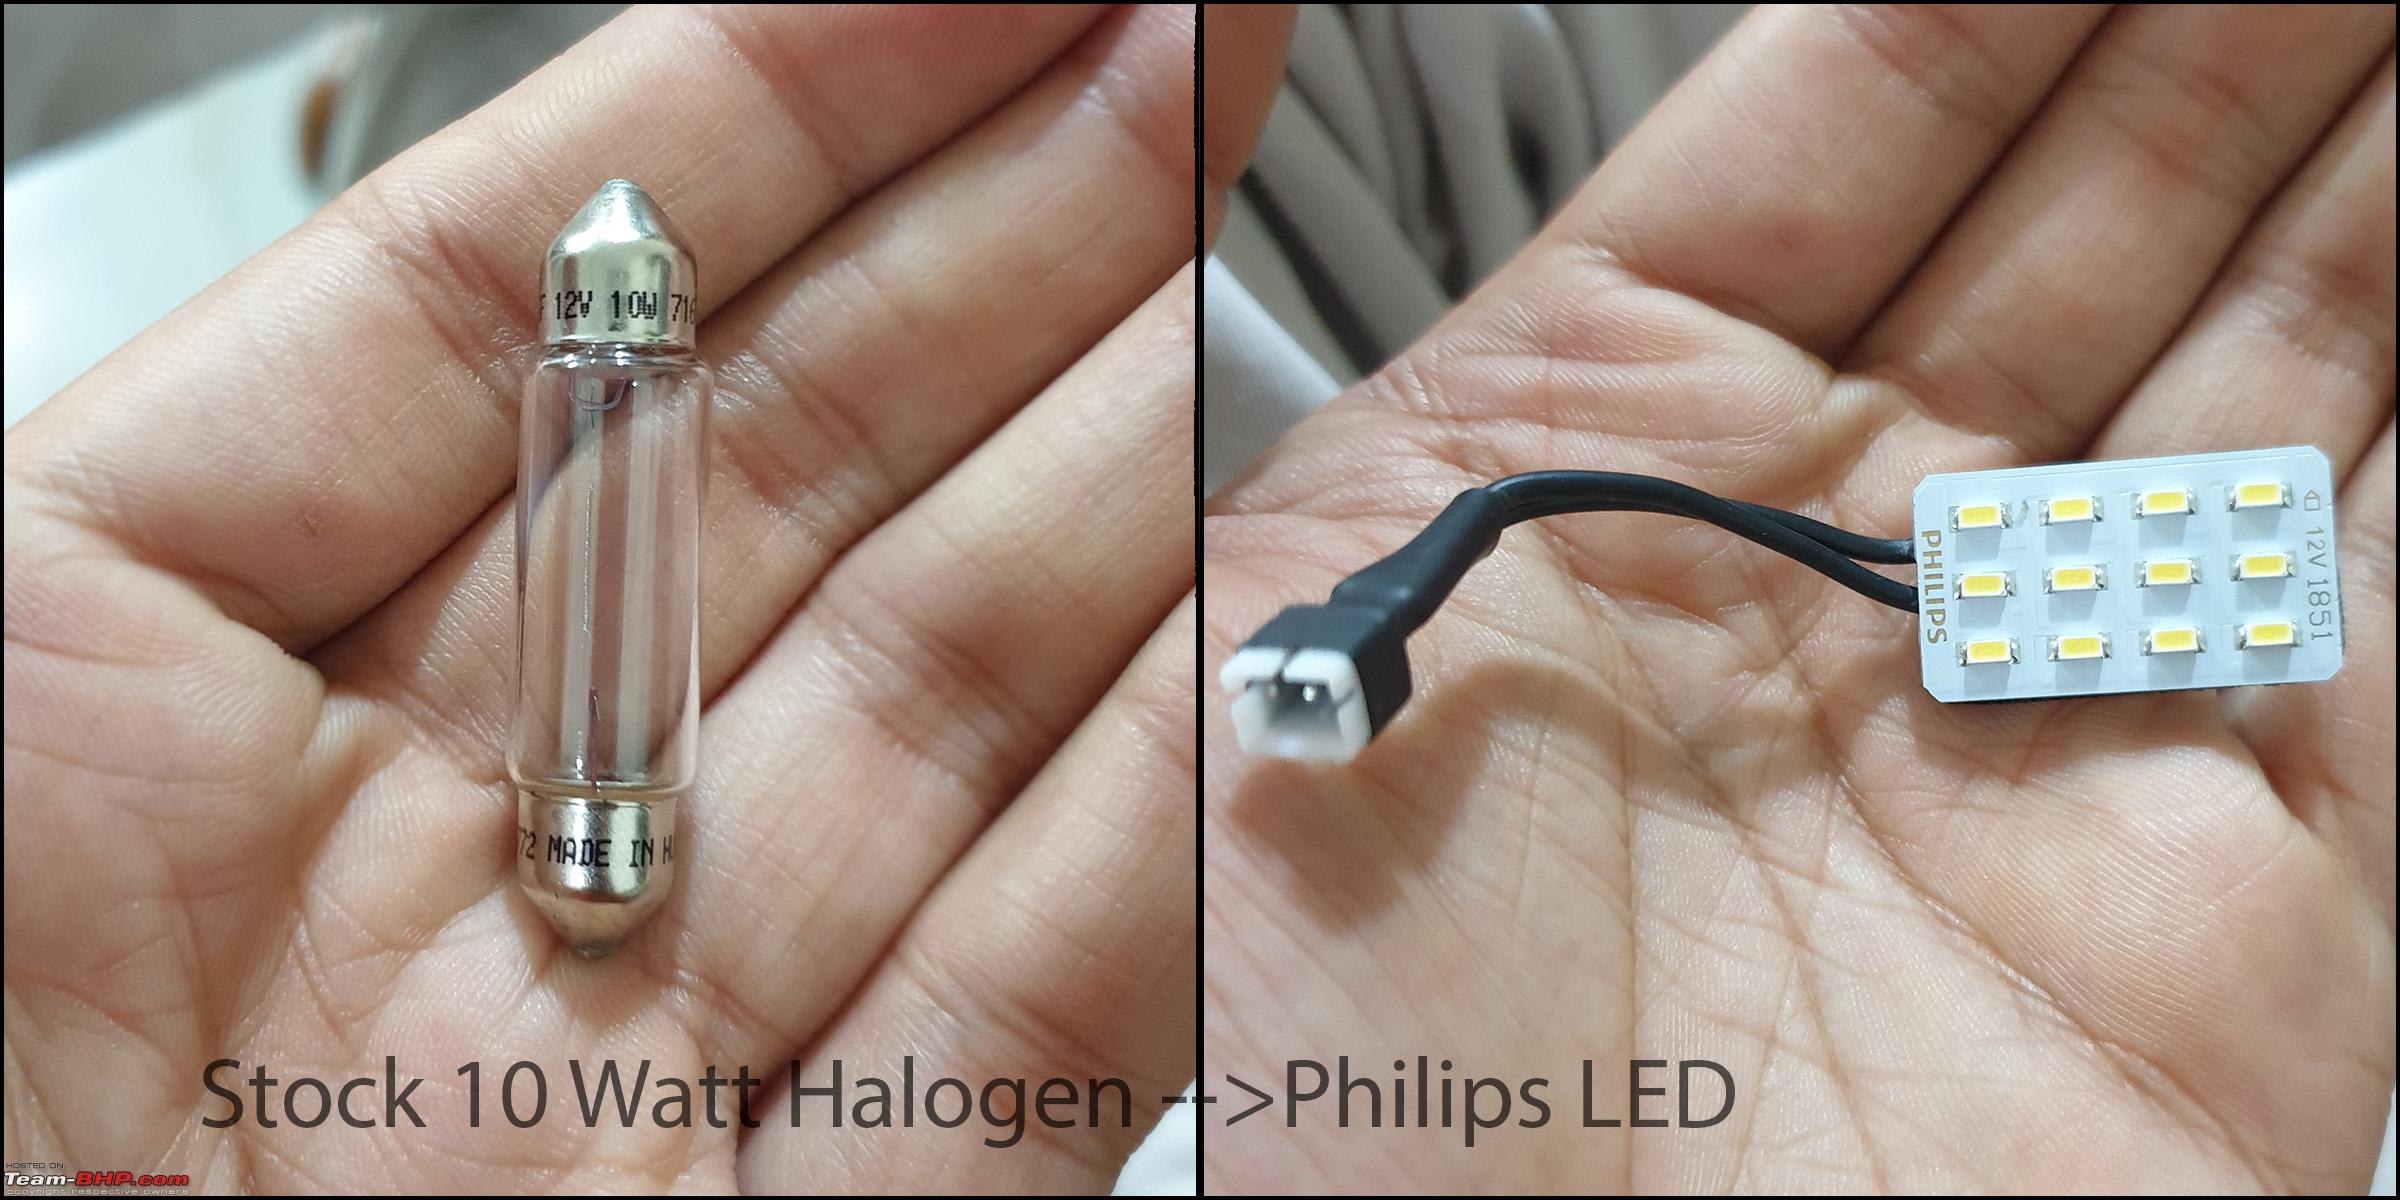
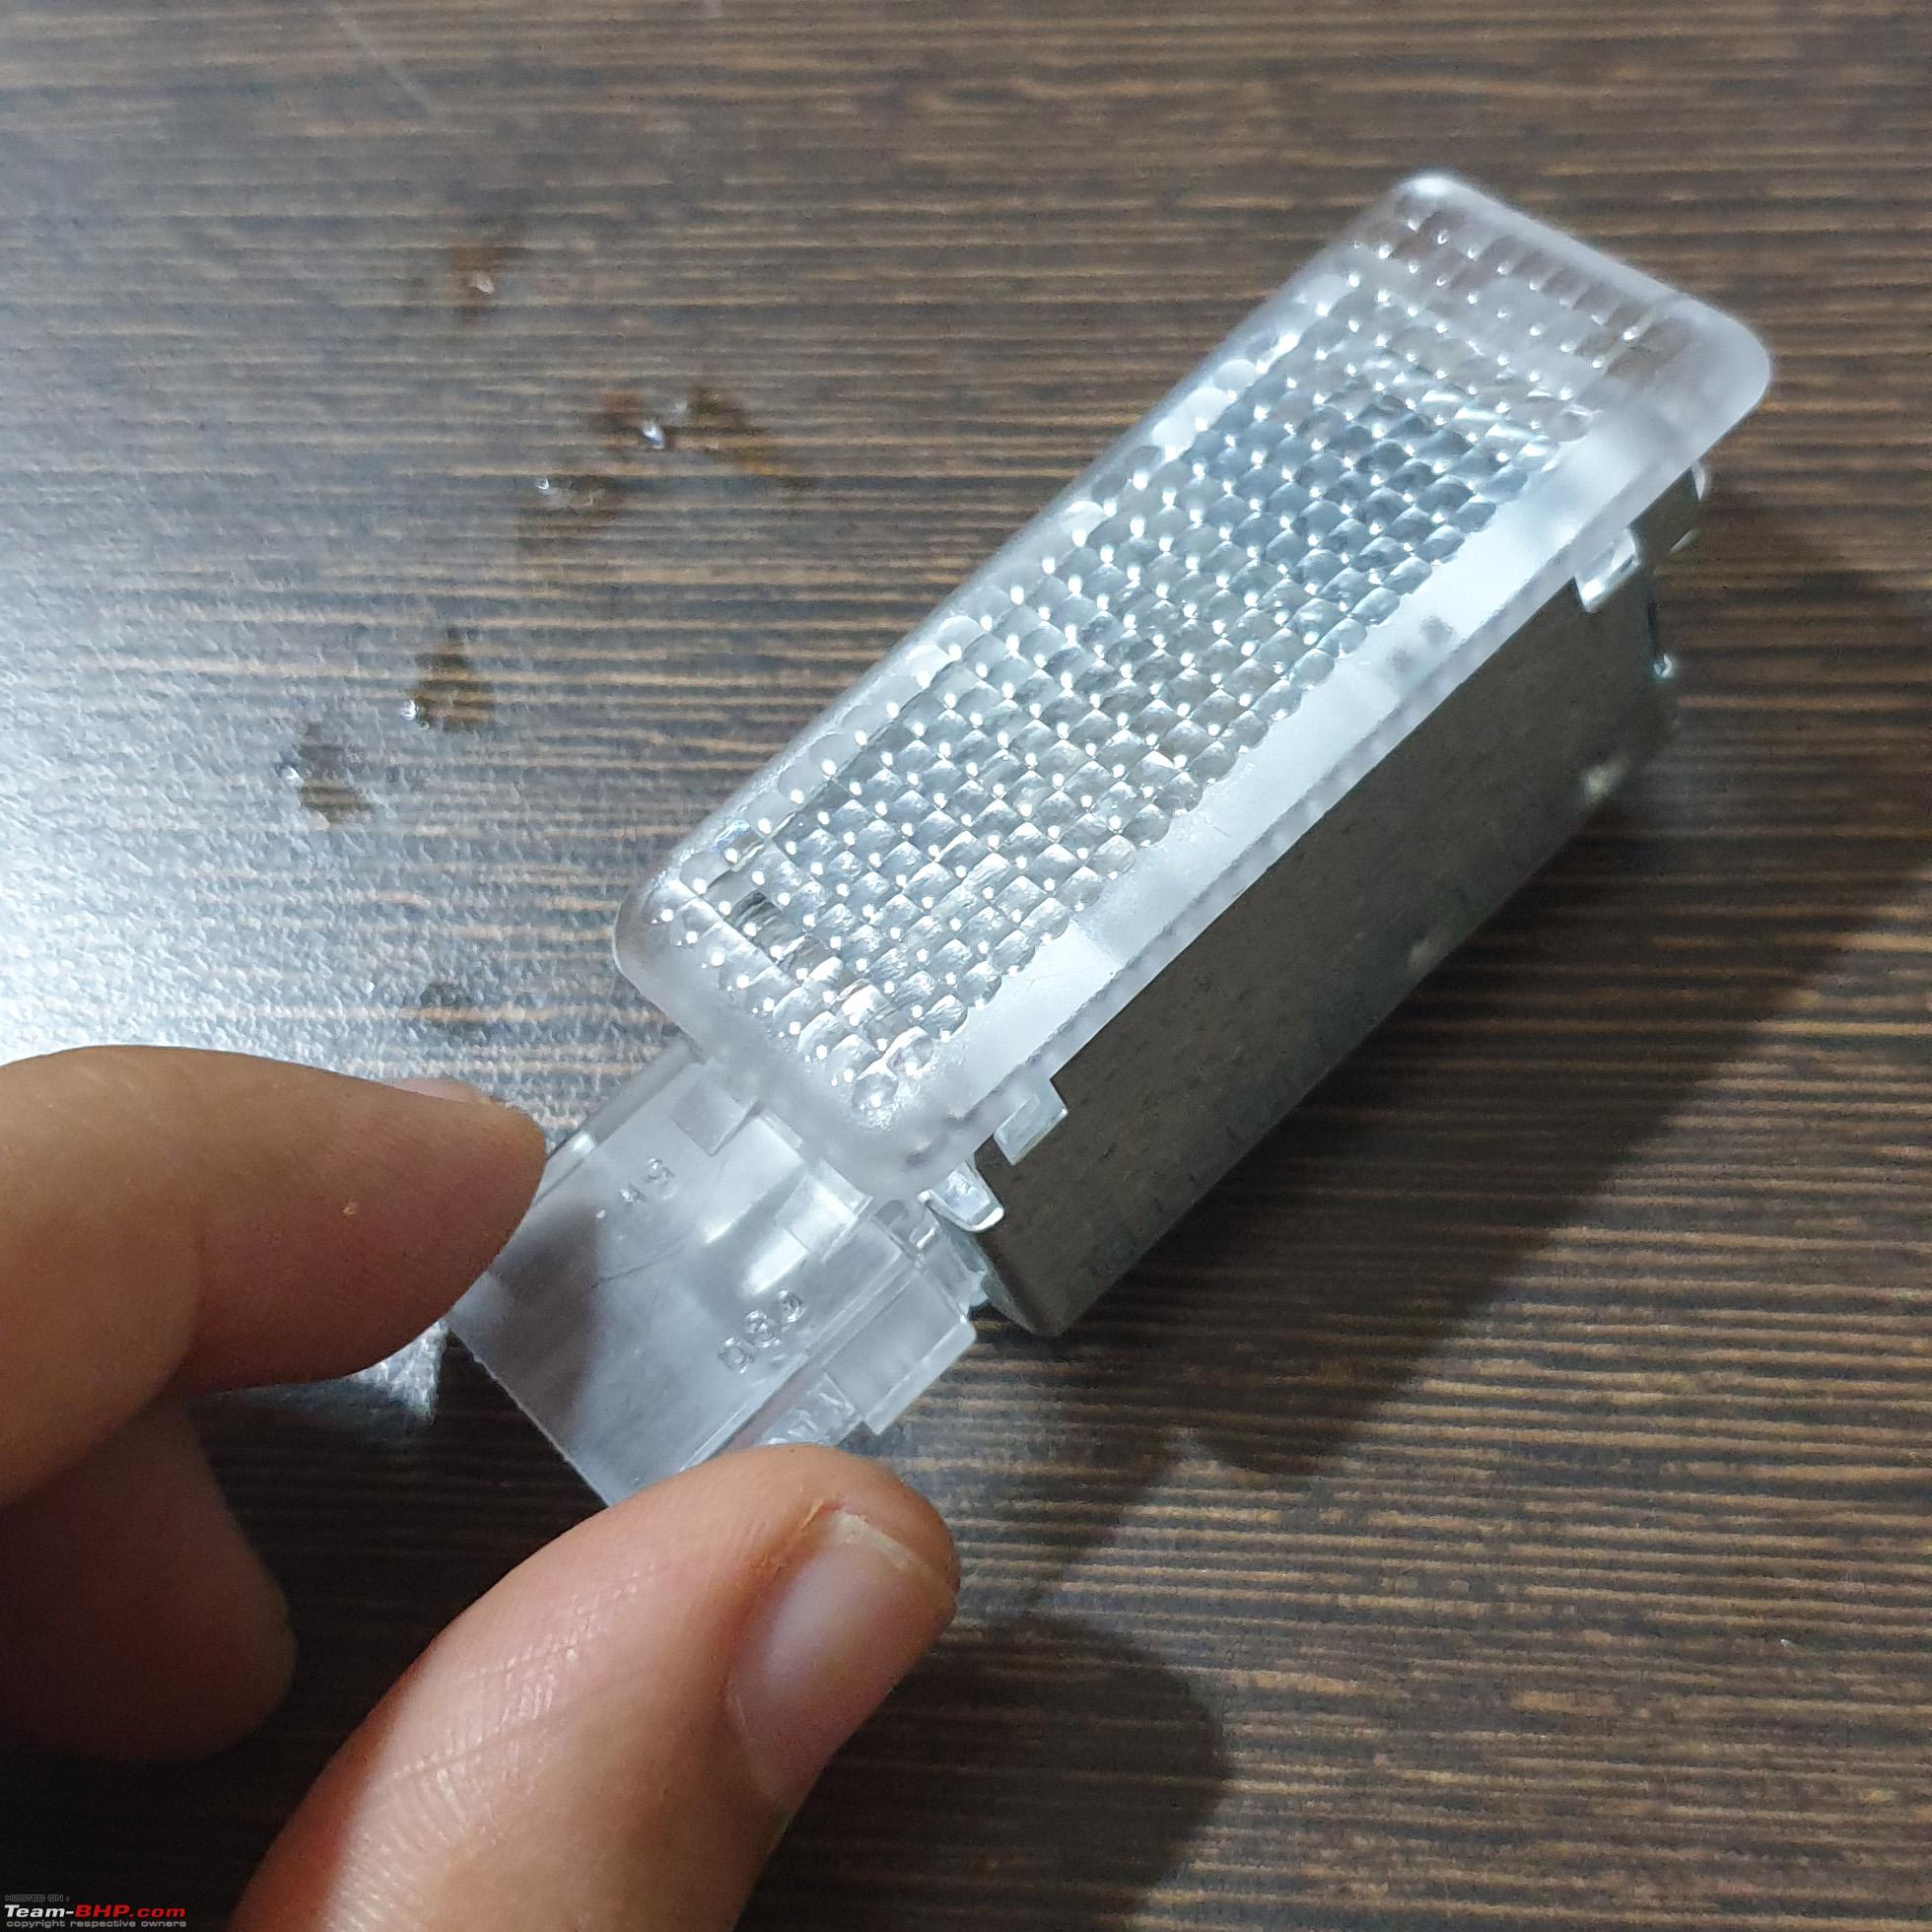
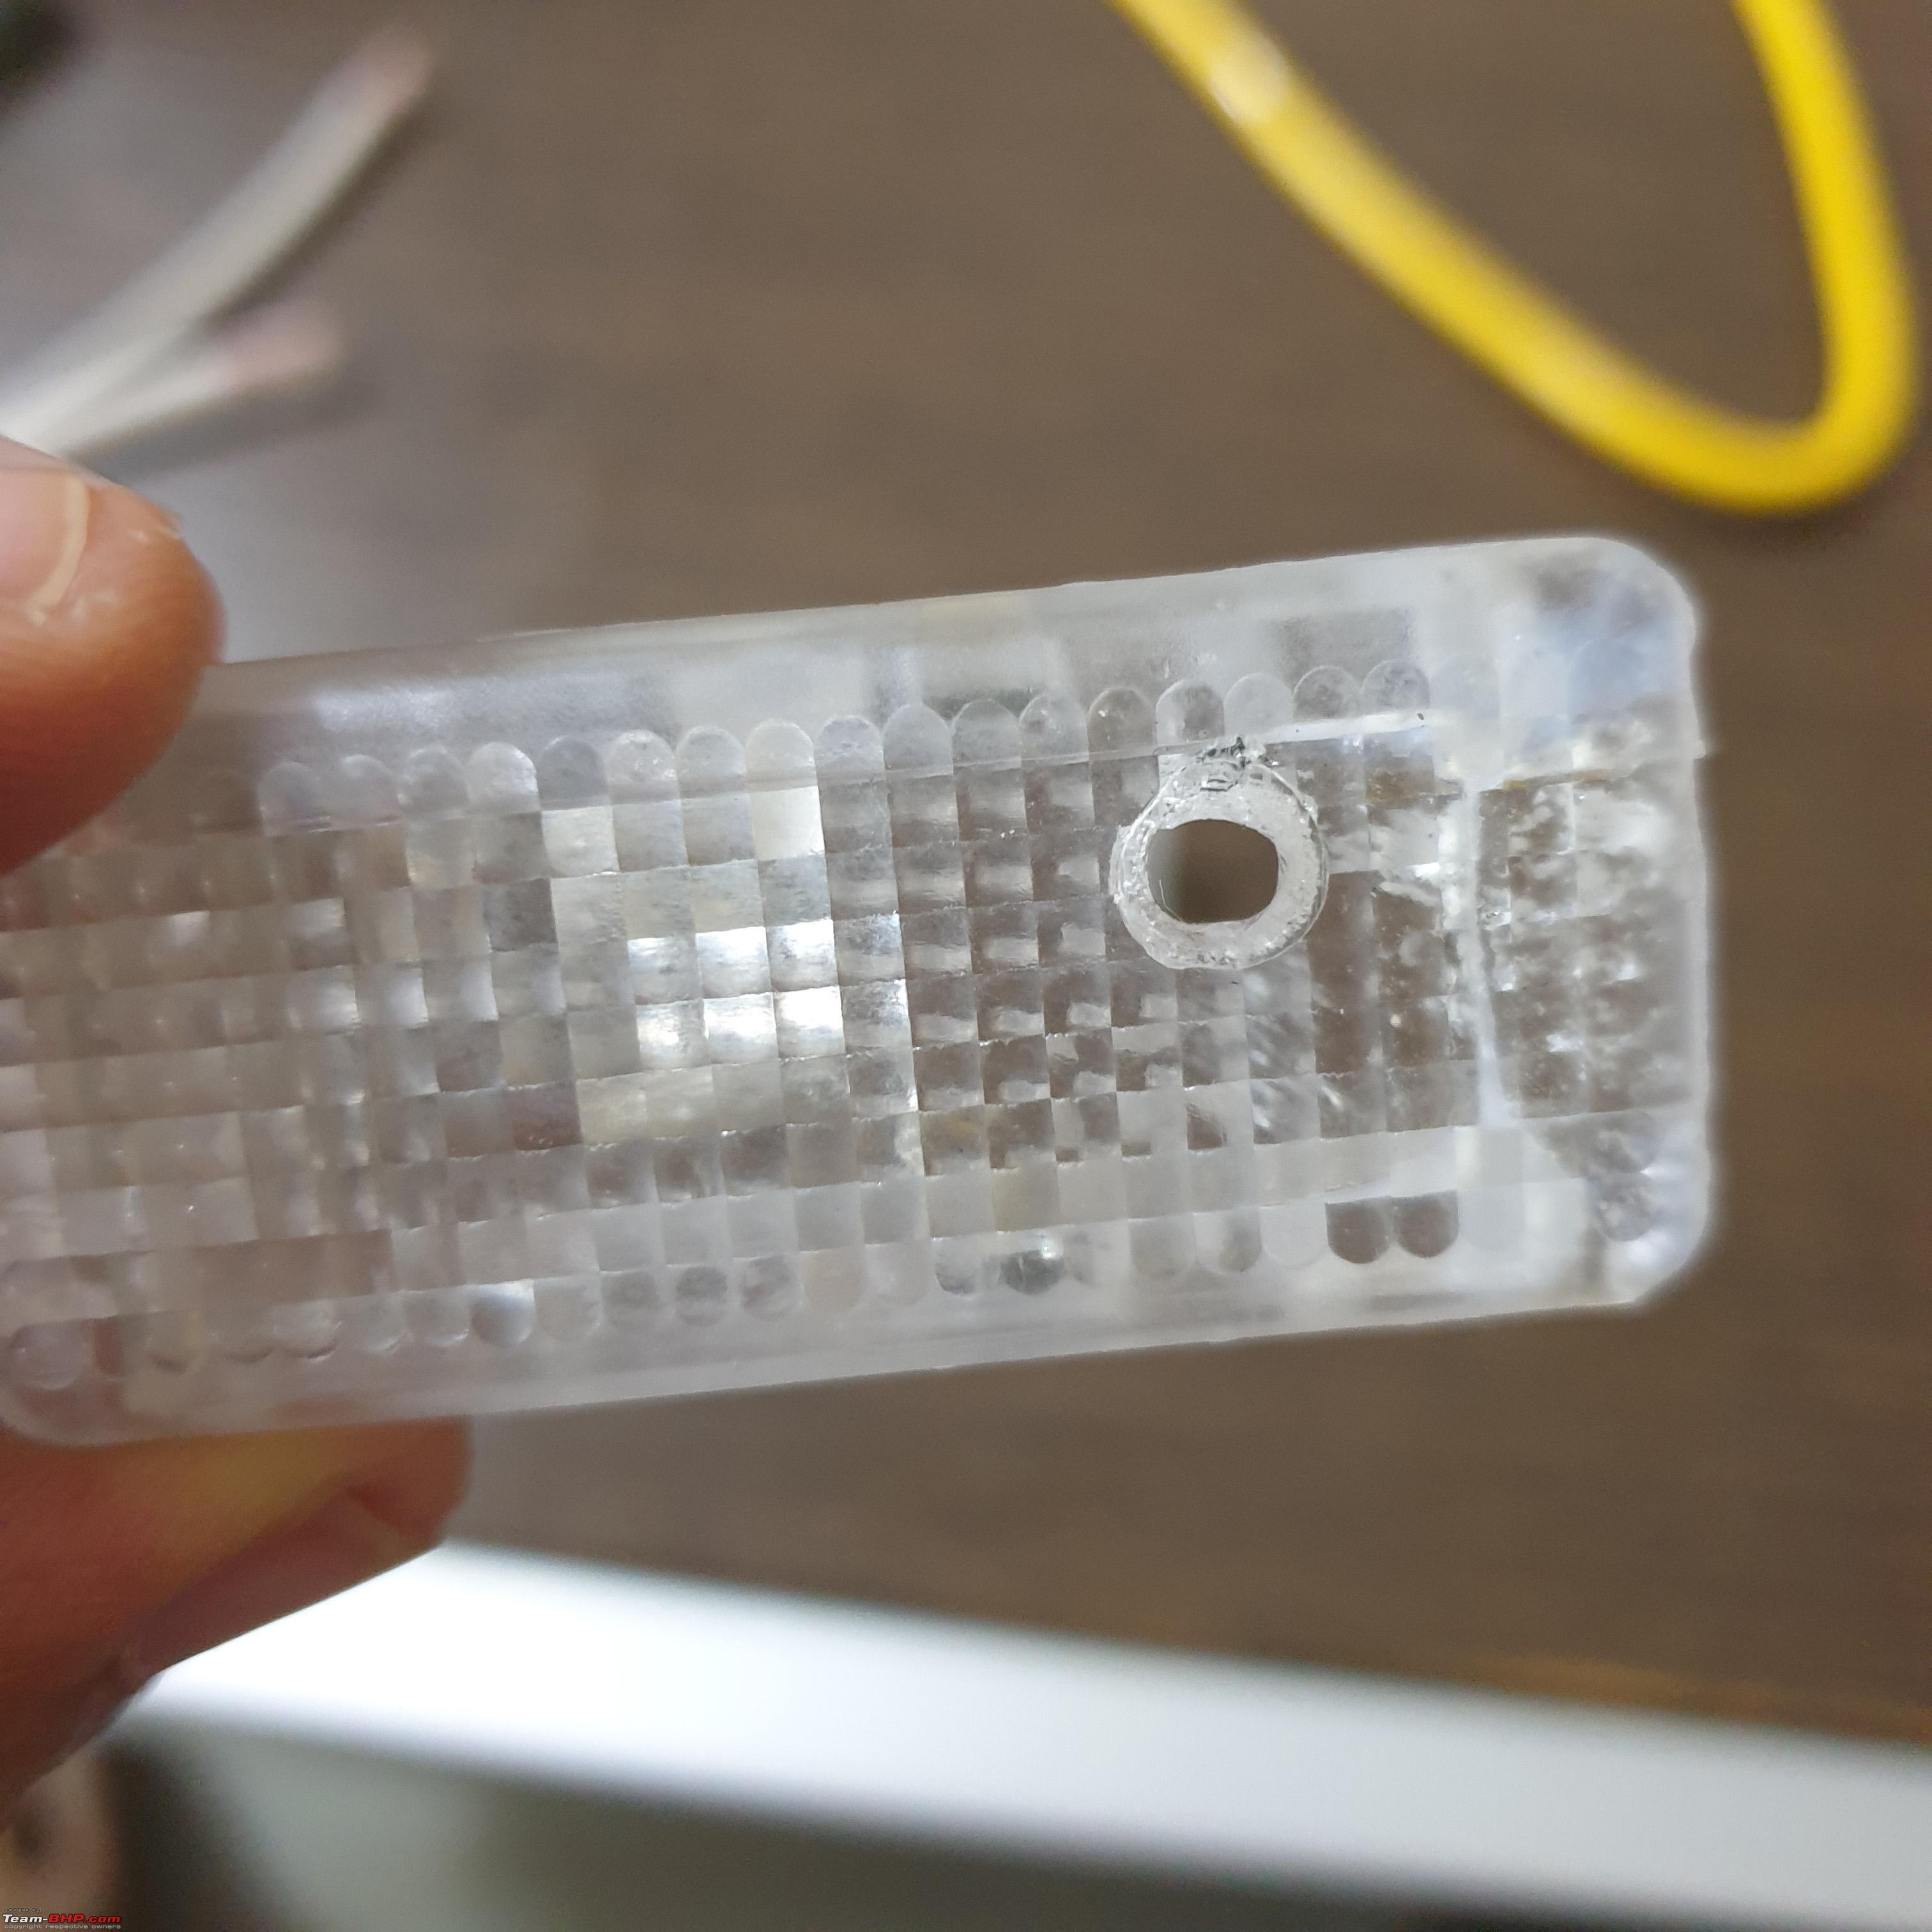
and this is a project that I did by my own thought. So, please excuse the not-so-nice-looking final fixture and feel free to make your own modifications which you deem fit, if you choose to do such a project. I hope this write-up provides few ideas for similar projects to readers .

Last edited by saisailendra : 20th June 2021 at 02:32.
saisailendra is offline   (23) Thanks
Old 19th June 2021, 23:32   #2
BHPian
 
saisailendra's Avatar
 
Join Date: Oct 2019
Location: Hyderabad
Posts: 158
Thanked: 1,228 Times
re: DIY: How I improved my car's footwell lights with LED Strips

My Vento comes with two stock foot-well lights, both front, one left and one right. They come as an OEM fixture, which has a T10 socket.

My objectives & limitations -
  • Must be bright
  • Can’t splice stock wires
  • Power consumption must be ≤ stock
  • Must be able to undo/swap with OEM fixture in case of service or warranty claims


What tools I needed :
  • Spare OEM Fixtures
  • Minus Head screwdriver
  • LED Strip light
  • Scissors
  • Soldering Iron
  • Soldering wire
  • Flux
  • Wire stripper
  • Wire
  • Connectors
  • Hot glue gun
  • Hot glue sticks
  • Blade/ Cutter
An outline of what I did -
  1. Bought LED Strip light
  2. Bought spare OEM fixtures
  3. Electricity calculations
  4. Mounting equipment for LED strips
  5. Cut and prepare LED strip
  6. Remove Light fixture from car
  7. Modify the light fixture
  8. Fix it

Last edited by saisailendra : 19th June 2021 at 23:58.
saisailendra is offline   (13) Thanks
Old 19th June 2021, 23:34   #3
BHPian
 
saisailendra's Avatar
 
Join Date: Oct 2019
Location: Hyderabad
Posts: 158
Thanked: 1,228 Times
re: DIY: How I improved my car's footwell lights with LED Strips

Explanation –


1.Bought LED Strip light : Wipro Cool White 5 meter LED Strip

- Branded vs Non-Branded : After reading reviews and going through
  • several light strips on amazon, what I have come to conclude is
  • Branded ones are definitely brighter than the non-branded LEDs.
  • Branded LED strips are almost twice the price of generic ones.
  • Branded LEDs have an overall better color temperature.
  • Non-Branded ones can last or even outlast branded ones. (personal experience)
  • Branded ones can fail quicker than the non branded ones too.
- Color Temperature :
  • Warm white (2700K) are yellowish orange ones. When used diligently, can give a nice comforting look.
  • Cool white (6000K) is the kind of white that our typical CFLs, tube lights emit. I’s say it looks more functional than elegant.
  • Natural/Neutral white (4000K) is the white we see outside on a cloudy day. It is the best of both worlds.

- I went with cool white for few reasons :
  • I already bought them
  • Uniformity, as my cabin lights had cool white LEDs
  • Availability online was low and needed in-person shop searching for natural white.

- Advantages of LED strips :
  • They’re bright
  • Low energy consumption
  • Versatile, can be cut between 3 LEDs and connected as per requirement.

- Length and Power : 5 meters , 25 watts.

- Price : Rs.865 inclusive of a driver for AC to DC


2. Spare OEM Fixtures : 6L0947415
  • This is the actual OEM fixture that is present for foot-well lights in the Vento. Most probably polo, rapid, ameo would also have the same fixture if they have stock foot-well lights.
  • As I would be making irreversible changes to the original ones, I bought two of these, so that I can simply swap the modified ones with these in case of sending my car for service or any warranty claims.
  • Price : Rs.1284 each. This is the most expensive part of my project.

Quote:
Buying these OEM Fixtures is neither mandatory nor essential for the project. The complete mod can be undone within an hour or even less than an hour, more on this in post #4. The reason I bought these were only as an insurance, that if anytime, god forbid, any need arises that the car be sent to workshop immediately, I will be able to swap the modified fixture with these within five minutes.

OEM Foot-Well light fixture :
DIY: How I improved my car's footwell lights with LED Strips-oem-fix-front.jpg


3. Electricity Calculations :

Stock Provision :
  • Stock bulbs were 5 watts on each side. So, that will be the limit of what I can draw on each side.
  • So speaking of one side, 2.5 Watts for front and 2.5 watts for the rear (in future).
LED Strip Length that can be used :
  • 5 Meters of LED Strip consumes 25 Watts, so each Meter consumes 5 Watts.
  • 0.5 Meter(50 Cm) strip consumes 2.5 watts and can be used for each compartment.

Ultimately, maximum length of LED Strip that can be used for each foot-well is 50 cm.


4. Mounting equipment for LED strips : 15 cm plastic scales
  • I need something to stick the LED strips to, since there isn’t enough or appropriate space to stick the LEDs in the foot-wells.
    P.S, there is enough space to stick a single LED strip of 15~20 cm at the foot-well. I wanted to stick more than 1 strip and so went with this setup.
  • The short scales are of perfect length, can be easily accommodated.
  • They’re of perfect width, can stick up to 3 strips, side by side.
  • Material – Non conductive, slightly flexible, sticks well to the strips’ adhesive
  • Price – Rs.5 per scale

DIY: How I improved my car's footwell lights with LED Strips-15cm-scales.jpg


5. Cut and prepare LED Strip:
  • Each scale can accommodate 9 LEDs worth of strip lengthwise (14~15 cm), 3 strips side by side.
  • That is a bit less than 45 cm(15cm*3 strips) total strip length which is perfect for us.
  • So, I’ve cut 3 strips of 15 cm and stuck them side by side on the flat side of the scale.
  • Now, I’ve carefully soldered the terminals of the strips, positive to positive and negative to negative.
  • Solder a wire, with length ~20 cm to terminals of one of the strips.
  • The strip is now pretty much ready.

Caution : 3 strips side by side, in the end was too bright.
If you want ultimate brightness, 3 strips will do.
But if you’re looking for elegance, I’d say, stop at less than length wise, say, 20~25 cm max.


Each strip in this pic is ~14~15cm

DIY: How I improved my car's footwell lights with LED Strips-led-strips-cut.jpg


The LED strips are stuck to the flat side of scales

DIY: How I improved my car's footwell lights with LED Strips-2-scales-led-strips.jpg


The back side of scales

DIY: How I improved my car's footwell lights with LED Strips-scales-back-side.jpg


Connections made among the strips

DIY: How I improved my car's footwell lights with LED Strips-internal-soldered-led-strips.jpg


6. Modify the OEM Light fixture :

We need electricity to power the LEDs. Since I already have stock light fixtures, I decided to modify them to draw current from the fixtures.

However, there are few other options available :
  • Tapping the cabin lights – This will give us control over the lights with cabin light switch. The wires have to be directed through the door beading, A-pillar, etc. This can be seen in Moderator Gannu_1 post (VW Polo DIY: Upgrading cabin light, headlight switch & installing footwell lights).
  • Making a connection from the fuse box : This will need knowledge about fuse-diagram and will also need installation of a switch. Also, having to find a location to ground the wire is another requirement. This can also be seen in our Moderator Gannu_1 post (VW Polo DIY: Adding a lamp to the glovebox).
  • Using the 12V socket. This is relatively easy, just buy an adaptor and put it in the socket whenever needed. But the adaptor will be a sore view to the eyes.


So, here is what I have done. This is the actual fixture :

DIY: How I improved my car's footwell lights with LED Strips-oem-fix-front-top-v.jpg

  • Delicate Part ! On one side of fixture, is the provision for male end of power cable. On the other end is a plastic tab, which needs to be slightly maneuvered to remove the fixture. I broke this tab while removing the fixtures first time itself, to change halogens to LEDs. Managed to stick the broken piece with feviquik, but later realized, even without that piece, the fixture will remain in its place pretty well. Anyway, if it doesn’t we always have our good hot glue.
  • Removing the metal tab : We first need to remove the metal tab. To remove it, needs quite a lot of energy and patience. Find the four plastic clips holding the tab in place. One can try to press in the clips hard and simultaneously pull the metal tab. But due to the placement of clips, the thickness of plastic and them being 4 in number, makes this a bit difficult. I found prying the metal with a screwdriver to be easier.
  • Once that is done, the T10 holder with its halogen bulb will be visible. LED in my case, as I changed earlier.
  • Removing Bulb : To remove the bulb, simply push it from the back with a screw-driver and the bulb should pop out, to the front, from the holder. Then carefully remove it.
  • I’ve soldered wires to the terminals as I already bought spare fixtures.
  • One can use a T10 adapter alternately.
  • When the end which receives the male power adapter is kept to the left, the top metal terminal is the positive terminal.
  • Burning a hole : Because this particular fixture is covered with a metal tab, there was no way to direct the wire out. The fixture for trunk light is pretty much similar, but has no metal tab, so the wire can be pulled from the back/top. But in this case, I have put a hole in the plastic part using the soldering iron and pulled the soldered wire out.
  • Once that’s done, the metal tab can be installed again.
  • Connect the end of wires to a connector.

Now, I have stuck the scale and wire using hot-glue to the front plastic fascia of the fixture.


This little clip is quite delicate, which I broke when changing halogen bulb to LED bulb.
Even without this clip, the fixture fits and stays well in its place.
We can use a zip-tie in the worst case.
Or use hot-glue in the worst worst case.
DIY: How I improved my car's footwell lights with LED Strips-oem-fix-broken-tab.jpg

DIY: How I improved my car's footwell lights with LED Strips-oem-fix-broke.jpg


DIY: How I improved my car's footwell lights with LED Strips-oem-fix-back.jpg


Try to gently pry the metal tab with a screwdriver from the sides (edge). The metal tab is little flexible. So, once two or three clips are dislodged from their place by prying, the rest can be removed by pulling.

DIY: How I improved my car's footwell lights with LED Strips-oem-fix-side.jpg


DIY: How I improved my car's footwell lights with LED Strips-oem-fix-other-side.jpg


This is the T10 holder and LED light I've replaced the halogen with.

DIY: How I improved my car's footwell lights with LED Strips-oem-fix-w-led-light.jpg


To remove the bulb, push the screwdriver as in the pic. Please note the polarity.

DIY: How I improved my car's footwell lights with LED Strips-removing-light.jpg


Hole made by hot soldering iron in the plastic front, for wire to come out.

DIY: How I improved my car's footwell lights with LED Strips-hole-oem.jpg


DIY: How I improved my car's footwell lights with LED Strips-hole-closeup.jpg


DIY: How I improved my car's footwell lights with LED Strips-hole-other-side.jpg


Soldered wire to the T10 holder and directed wire through the hole to the outside.

DIY: How I improved my car's footwell lights with LED Strips-wire-through-hole.jpg

DIY: How I improved my car's footwell lights with LED Strips-wire-other-side.jpg


7. Fix it:
  • Connect the wires of LED strip too, to the connector.
  • Now the fixture can be installed in its original place. First connect it to the male power adaptor and insert the part with adaptor first into the holder. Then carefully manipulate and push the rest of it into its place. It takes some fiddling and force to go into its place.
  • I know, it looks ugly, but it does what it is intended to, perfectly.


The permanent one.

DIY: How I improved my car's footwell lights with LED Strips-wire-strip.jpg


DIY: How I improved my car's footwell lights with LED Strips-two-fixtures-strips.jpg


This is how it would sit in it's place when installed back in the car.

DIY: How I improved my car's footwell lights with LED Strips-final-strip.jpg

I later undid the soldering and added more wire and a connector to make the whole project flexible and modular.
You may use these connectors or luster terminals.
I know I have gone overboard with the hot-glue thing, but I wanted things to be firm and not vibrate & rattle.

DIY: How I improved my car's footwell lights with LED Strips-connector.jpg

Last edited by saisailendra : 20th June 2021 at 08:21.
saisailendra is offline   (25) Thanks
Old 19th June 2021, 23:37   #4
BHPian
 
saisailendra's Avatar
 
Join Date: Oct 2019
Location: Hyderabad
Posts: 158
Thanked: 1,228 Times
re: DIY: How I improved my car's footwell lights with LED Strips

Additional Suggestions / Points :

- No extra power is consumed with these LED strips than the stock halogen bulbs. And the light output is multifold brighter. So, this should have no negative effects on the battery or other electronic components of the vehicle.

- The foot-well lights come on in my car, by default only in 3 scenarios. First is when a door is opened, second is when a door is closed without key in ignition, third is when the key is removed after a drive/ from ignition. The foot-well lights can’t be switched on using the cabin light switch. So, the lights do not come on when driving and so there is no risk of bright lights being a distraction while driving.

- The theatrical dimming effect does work even with the LED strips, both while coming on and going off.


- Rear foot-well lights can be installed in a similar fashion :
  • just stick two 15 cm strips to a plastic scale,
  • solder the strips,
  • solder a long wire,
  • place the scale as per your convenience and liking under the front seat, such that the light is directed towards the rear foot-wells,
  • pull the wire through a hole in the seat bracket
  • neatly tuck it under the plastic trim beside gearbox.
  • Now this wire can be connected to the connectors we used in the front lights.


- Hot-glue, I have used good quantities though it looks ugly, because it sticks well, insulates the soldered terminals, and can be removed with some effort later on, if we want to change anything. Should see how it copes with the summer though.

- I’ve used the same LED strip in the front cabin light and it works pretty well too. The only limitation is space. There is not enough space to put many strips in there. Space is the same limitation in the rear cabin lights too.

- The soldering wires to the fixture part can be skipped if one can get their hands on something like this :

DIY: How I improved my car's footwell lights with LED Strips-t10-adaptors.jpg
(Copyright respective owners, source :google)


The strips I made for rear foot-wells.
Only two because more wasn't necessary.

DIY: How I improved my car's footwell lights with LED Strips-rear-strips.jpg

I've fixed the strips (scale) using zip-ties and directed the wire through a hole that was already present in the seats bracket and then tucked it under the trim.

DIY: How I improved my car's footwell lights with LED Strips-left-side-rear-light-w-text.jpg


DIY: How I improved my car's footwell lights with LED Strips-left-side-rear-light.jpg


Undoing the modification :


  • Disconnect the rear light wires, if installed, from the connector. This is where the luster-terminals or push type connectors come in handy.
  • Pull out the OEM fixture from its slot.
  • Disconnect the power adaptor.
  • In my case, I can pull out the scale easily with little force from the fixture to separate it, thanks to hot-glue, If we use fevicol/feviquik or such adhesives, separation of the scale from the fixture will be destructive or impossible in some cases.
  • Pull out the hot-glue residue, if any.
  • Remove the metal tab.
  • Undo the soldering.
  • Plug the hole we made with hot-glue or put a tape on both sides.
  • Put in the stock bulb.
  • Re-install the metal tab.
  • The fixture is good to go to its own place.


Pics of final lights, taken using a mobile :


DIY: How I improved my car's footwell lights with LED Strips-20210619_152459.jpg

DIY: How I improved my car's footwell lights with LED Strips-passenger-side-night-view.jpg

DIY: How I improved my car's footwell lights with LED Strips-rear-lights.jpg

DIY: How I improved my car's footwell lights with LED Strips-rear-front-light.jpg


Few more pics, taken with a DSLR, showing various angles :


DIY: How I improved my car's footwell lights with LED Strips-vento-footwell-light-project1.jpg

DIY: How I improved my car's footwell lights with LED Strips-vento-footwell-light-project2.jpg

DIY: How I improved my car's footwell lights with LED Strips-vento-footwell-light-project3.jpg

DIY: How I improved my car's footwell lights with LED Strips-vento-footwell-light-project12.jpg

DIY: How I improved my car's footwell lights with LED Strips-vento-footwell-light-project4.jpg

DIY: How I improved my car's footwell lights with LED Strips-vento-footwell-light-project8.jpg

DIY: How I improved my car's footwell lights with LED Strips-vento-footwell-light-project9.jpg

DIY: How I improved my car's footwell lights with LED Strips-vento-footwell-light-project11.jpg

DIY: How I improved my car's footwell lights with LED Strips-vento-footwell-light-project5.jpg

DIY: How I improved my car's footwell lights with LED Strips-vento-footwell-light-project6.jpg

DIY: How I improved my car's footwell lights with LED Strips-vento-footwell-light-project7.jpg


A final parting pic.
DIY: How I improved my car's footwell lights with LED Strips-vento-footwell-light-project10.jpg


Thanks for reading
Have a nice day.

Last edited by saisailendra : 20th June 2021 at 10:21.
saisailendra is offline   (58) Thanks
Old 20th June 2021, 12:49   #5
GTO
Team-BHP Support
 
GTO's Avatar
 
Join Date: Feb 2004
Location: Bombay
Posts: 70,534
Thanked: 300,734 Times
Re: DIY: How I improved my car's footwell lights with LED Strips

Thread moved from the Assembly Line to the DIY section. Thanks for sharing!

I respect your meticulous nature . Will go to our homepage tomorrow .
GTO is offline   (9) Thanks
Old 20th June 2021, 14:40   #6
BHPian
 
Join Date: Aug 2014
Location: KA, TS
Posts: 620
Thanked: 880 Times
Re: DIY: How I improved my car's footwell lights with LED Strips

Very detailed DIY. And the end result looks neat and clean.
shifu is offline   (1) Thanks
Old 20th June 2021, 16:22   #7
BHPian
 
viXit's Avatar
 
Join Date: Apr 2020
Location: Hyd
Posts: 804
Thanked: 2,876 Times
Re: DIY: How I improved my car's footwell lights with LED Strips

BHPians,
You will not find a cleaner car interior anywhere else in the world. I have terrible anxiety about riding in this car because everything from resting my arms on the super neat armrests, to putting my shoes on those pristine mats feels like a cringe.

Surprised to see this thread up so soon, didn't you finish this like two minutes ago?

You've done this job just like you maintain your cars' paintjobs. With ultimate perfection. Superbly detailed too. But pls remove or tint the 3 strips in the front, you can replace the bad headlights of the vento with that kind of firepower.

Pleasantly surprised to see my name.
Glad you put those strips to some use, doctor.
viXit is offline   (9) Thanks
Old 20th June 2021, 17:10   #8
Senior - BHPian
 
TrackDay's Avatar
 
Join Date: Oct 2020
Location: Magic land
Posts: 1,056
Thanked: 4,414 Times
Re: DIY: How I improved my car's footwell lights with LED Strips

Nice job White lights are any day better than warm colored lights for smaller spaces such as car cabins.

Had to believe that is a 2017 Vento. Although the pandemic must have reduced driving significantly, that car is still way too clean for a four year old car. Even the portion below the seat, floor carpets, mats, the seat track rail are all looking like the car was delivered today morning. Better hope my car doesn't see those pictures . Congrats on maintaining your ride so well.

Last edited by TrackDay : 20th June 2021 at 17:14.
TrackDay is offline   (2) Thanks
Old 21st June 2021, 10:41   #9
BANNED
 
Join Date: Nov 2016
Location: Dehradun
Posts: 948
Thanked: 8,332 Times
Re: DIY: How I improved my car's footwell lights with LED Strips

Nice DIY, thanks for sharing. I will also give this one a try.

While looking at the pics, I was wondering if this car is ever driven or not. I have never seen such a clean set of mats, rails - entire interior in fact. Then I scrolled down and realized that I am not alone, others are also in a surprised state. Props for you mate for maintaining the car so meticulously!
VKumar is offline   (3) Thanks
Old 21st June 2021, 11:22   #10
Senior - BHPian
 
Join Date: Jul 2020
Location: Hyderbad
Posts: 1,007
Thanked: 3,532 Times
Re: DIY: How I improved my car's footwell lights with LED Strips

Very well explained. For a moment, I thought I was in an electronics class! Very detailed and all nuances explained. The output is very good, just looks like factory finish. You have a very neatly maintained car. Thank you.
Raghu M is offline   (2) Thanks
Old 21st June 2021, 12:05   #11
BHPian
 
RedTerrano's Avatar
 
Join Date: Jan 2015
Location: Pune
Posts: 973
Thanked: 7,642 Times
Re: DIY: How I improved my car's footwell lights with LED Strips

What a lovely well explained DIY. I absolutely loved the scale idea. Simple, economical but just as effective.

I would have loved to see the before and after pics, but I suppose that's not possible now.
RedTerrano is offline   (1) Thanks
Old 21st June 2021, 17:45   #12
BHPian
 
Join Date: Mar 2021
Location: Bangalore
Posts: 88
Thanked: 270 Times
Re: DIY: How I improved my car's footwell lights with LED Strips

This is so cool! I have a 7 year old Honda City to which I have done absolutely nothing except keep it clean and regularly serviced. These threads and stories are very inspiring. Think I may just spend a little bit of money to redo the vehicle's interiors and even the scratched alloy rims.
anandavinash is offline   (1) Thanks
Old 22nd June 2021, 16:01   #13
BHPian
 
kalyan_hyd's Avatar
 
Join Date: Nov 2009
Location: Hyderabad
Posts: 545
Thanked: 882 Times
Re: DIY: How I improved my car's footwell lights with LED Strips

Absolutely delighted to read the detailed process. For a moment, it felt like we were going through the same process as you.

My car has the footwell lights and they are pretty good out of the box so no plans to replace at the moment. But, I was thinking I will need a LED bar on the outside esp for low light visibility when there's no natural or augmented lighting so this thread might come-in handy sometime in the future.

--Kalyan
kalyan_hyd is offline   (1) Thanks
Old 22nd June 2021, 21:21   #14
BHPian
 
Join Date: Jan 2021
Location: Mumbai
Posts: 477
Thanked: 1,096 Times
Re: DIY: How I improved my car's footwell lights with LED Strips

Quote:
Originally Posted by saisailendra View Post
That is pretty much it. And all the bulbs are halogen bulbs. These lights barely lighten up the cabin and the end-result is a gloomy, orange-yellow cabin.
Great DIY! As a fellow Vento owner from the same generation, I can totally relate to this statement. At night the cabin lighting looks like something out of medieval Europe because of the orange-redish hue from the lights!

Definitely planning on doing this DIY sometime soon, such an LED upgrade can also massively benefit the otherwise dim lighting in the trunk. Puzzles me that VW could generously install LEDs in so many places with the 2015 facelift version (e.g. Number Plate lights, turn signals etc), but they didn't install LEDs where the passengers would spend the most amount of time in which is the interior of course.

On a sidenote, fabulous-looking floor mats, where were they sourced from?

Last edited by AKSarkar1 : 22nd June 2021 at 21:23.
AKSarkar1 is offline   (1) Thanks
Old 22nd June 2021, 22:58   #15
Newbie
 
Join Date: Apr 2019
Location: UK04/TS13
Posts: 14
Thanked: 104 Times
Re: DIY: How I improved my car's footwell lights with LED Strips

Very well written DIY, loved it. Just an observation: your floor mats are rubber and have a very nice glossy finish (because they're so clean) and it probably makes you feel the 3 LED strips in the front are too many but for someone whose car has dark coloured fabric floor mats and/or are a bit dirty, 3 strips might just be perfect.
wr10forever is offline   (1) Thanks
Reply

Most Viewed


Copyright ©2000 - 2024, Team-BHP.com
Proudly powered by E2E Networks