Team-BHP > Technical Stuff > DIY - Do it yourself
Register New Topics New Posts Top Thanked Team-BHP FAQ


Reply
  Search this Thread
32,787 views
Old 5th March 2022, 17:56   #1
BHPian
 
Join Date: Jan 2021
Location: Bangalore
Posts: 57
Thanked: 197 Times
DIY: Carpentry & woodwork for converting Car Audio to Home Audio System

DIY: Carpentry for converting Car Audio to Home Audio System

Few months ago while selling my old car, I had removed the Pioneer head unit and four Sony X-plod speakers which I had installed in it. With some interest in carpentry, I decided to make the enclosures for them and build a DIY home sound system. The work was done basically on weekends, half-day each on Saturday and Sunday, stretching over many weeks.

Photo: Pioneer head unit and four Sony X-plod dual-speakers.
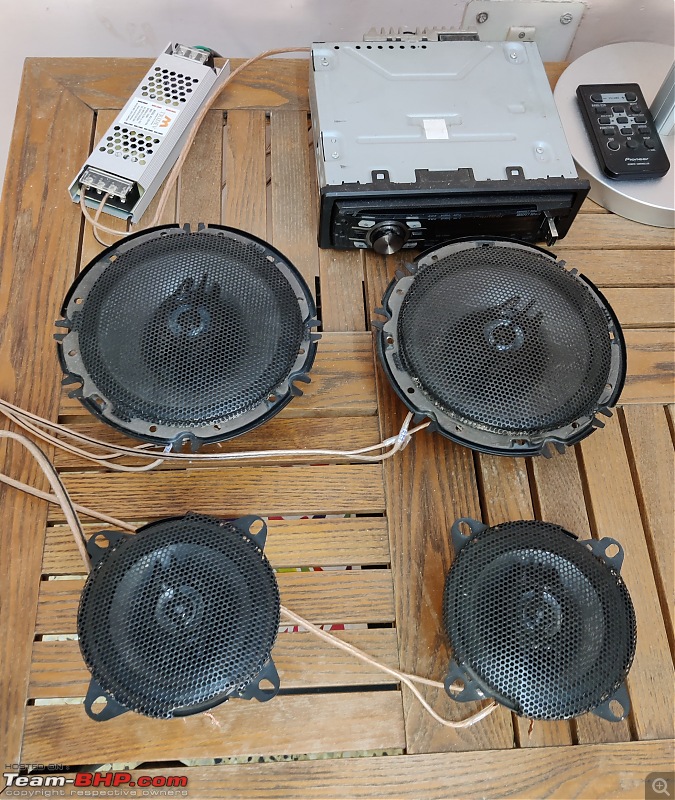
DIY: Carpentry & woodwork for converting Car Audio to Home Audio System-speaker.jpg

Decided on the following essential requirements for the home audio: (i) Four separate small boxes for the 4 speakers, instead of combining a pair of speakers in a single box, (ii) The speaker boxes to be made of wood, with the wood pattern showing out, and not plywood or MDF. (iii) Provide a projecting rim on the frontside of the speaker boxes, instead of a flat front. (iv) Mount/fix the audio connectors on a support at the base of the speaker box/ head-unit, and not directly on the back-panel, (v) Not to buy expensive woodwork tools, like electric-saw, vice, electric-sander, etc, and manage with simple tools, hand-saw, plane, chisel, sandpaper-holder, etc.

Gathered information from 2 sites;
(i)for speaker box design: https://audiojudgement.com/speaker-b...d-diffraction/. After reading this, I decided not to follow many of the described guiding principles, to avoid ending up with very large sized enclosures. Besides, the speakers I am planning to use may not be of such quality to warrant these designs.
(ii)for woodworking tips: You-tube videos by Steve Ramsey

Then the process started:

(i). The standard wooden planks available in saw mills are thick, large in size and expensive. Hence purchased 7mm thick, 8cm x 30cm pinewood planks from Amazon,

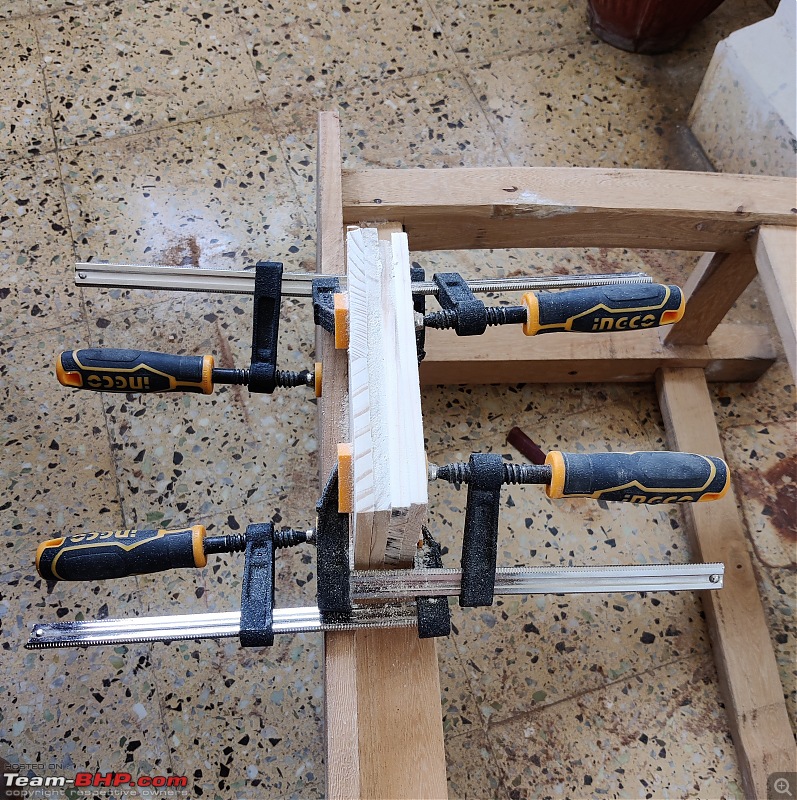
(ii). These pine planks can be joined together with wood-glue to make larger size planks. All that is needed is a flat platform (a wooden stool), few flat bars (plywood strips), and minimum 4 clamps. The strength of the wood-glue is such that, when you break a joint, the wood will not separate along the joint, but rather cleave along the wood-fibres away from the joint.

Photo: Pine wood planks, Glue and Clamps
DIY: Carpentry & woodwork for converting Car Audio to Home Audio System-wood.jpg

https://www.amazon.in/gp/product/B09...?ie=UTF8&psc=1
https://www.amazon.in/gp/product/B08...?ie=UTF8&psc=1
https://www.amazon.in/gp/product/B01...?ie=UTF8&psc=1

Photo: Clamps holding the pinewood planks joined with glue.
DIY: Carpentry & woodwork for converting Car Audio to Home Audio System-wood-joining.jpg

(iii). The joined pinewood planks can be cut into the required sizes necessary for the speaker box, using a simple hand-saw. Mark lines on plank with pencil, mount on a flat platform/stool, hold them to the platform/stool with clamps, and cut with a handsaw along the pencil mark. It is reasonably quick, and you get near perfect cuts. While I could manage all the straight cuts, for the final circular opening for the speaker front, I went to a neighbourhood carpenter.

Photo: Cutting the pine plank with hand-saw
DIY: Carpentry & woodwork for converting Car Audio to Home Audio System-wood-cutting.jpg

https://www.amazon.in/gp/product/B00...?ie=UTF8&psc=1

(iv). The cut pieces can be further fine-sized again to the final size, using a plane or sand paper. Mount the cut wood pieces on a platform with clamp, and use a plane or sandpaper-mounted on a holder, and size them (mount multiple pieces together, if they require identical dimensions). I found it easier to do this using sand paper (100grit) mounted on a holder. The reason for this was; a plane can easily remove material from wood in the direction of wood fibre, but in the perpendicular direction it has no use, while emery paper mounted on a sand paper holder works nicely in both the orientations.

Photo: Final sizing of the wood planks with sand-paper holder
DIY: Carpentry & woodwork for converting Car Audio to Home Audio System-wood-planing.jpg


https://www.amazon.in/gp/product/B07...?ie=UTF8&psc=1
https://www.amazon.in/gp/product/B08...?ie=UTF8&psc=1
https://www.amazon.in/gp/product/B00...?ie=UTF8&psc=1

(v). Now sand the surface of the final sized wooden planks with 180grit sandpaper, the wood patterns will become visible. Finish finally with 240grit sand paper. This part of the process takes time and tests patience.

Photo: Sized wooden pieces for the head unit
DIY: Carpentry & woodwork for converting Car Audio to Home Audio System-wood-sized.jpg

(vi). Join the finished planks together with glue to make the boxes. I did not use nails/screw for joining these, since they will be visible on the sides. (The 8mm thick pinewood was good for all the other sides of speaker box, except for the front face of the speaker-box which has to hold the weight of the speaker, and also cannot accommodate a 10mm length screw. Hence, pasted a 2.5mm thick mdf-sheet over the wood on inner-side using glue, to create a 10mm thick front panel). Finally fix small cubes of wood on the corners, on the back-end of the box, so that the back-panel can be fixed using screws.

(vii). Tried staining sample pieces of the wood with Sheenlac wood-stainer, available in hardware stores. It left dark brown colors on the wood pattern, and also darkening the exposed wood glue. Tried linseed oil, which leave a lighter yellowish shade on the wood. But, finally decided not to use these, just cleaned the polished wood with turpentine oil (which was old and had acquired brownish in color because of some dirt there).
https://www.amazon.in/gp/product/B08...?ie=UTF8&psc=1

(viii) Ordered the posts and banana plugs for speaker from a Indian battery accessory manufacturer at site robiu.in. These parts seem to be of excellent quality. Ordered a Switch, RCA male & female connectors from site called Wish. They were of Chinese origin, and while the switch was sturdy, the RCA connectors were flimsy. The AC to DC converter was the most difficult to choose. The power rating written on the Pioneer head unit was 14V, 20Amp(max). Though the conventional lap-top power adapters supply 12V, the current rating is always less than 5amp. After many iterations finalized on 12V, 15Amp, SMPS from Tridev. It gives a mild hissing audible sound (seems the reason is its switching frequency is the audio range), but that was the best I could find.

https://www.amazon.in/gp/product/B08...?ie=UTF8&psc=1

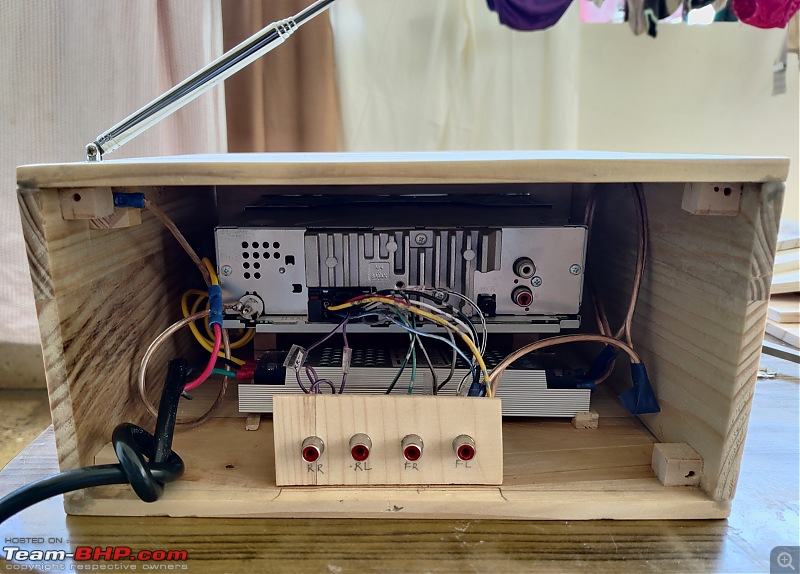
(ix). Fixed the audio connectors on small L-shaped base and then mounted them on the base pane of the boxes. Also added, an old antenna removed an old transistor, to the head unit. And then covered the rear-sides with back panel.

Photo: The rear-side of the boxes for speaker and head-unit, with audio connectors fixed.
DIY: Carpentry & woodwork for converting Car Audio to Home Audio System-speaker-inside.jpg
DIY: Carpentry & woodwork for converting Car Audio to Home Audio System-head-unit-inside.jpg

Photo: The back-panel and front-face of the speakers and head-unit.
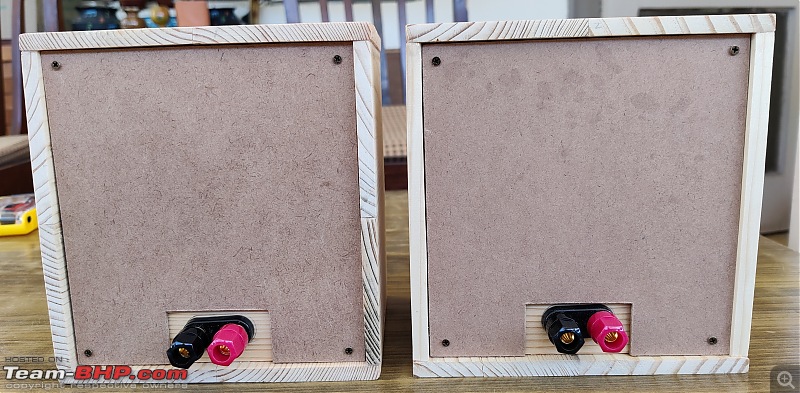
DIY: Carpentry & woodwork for converting Car Audio to Home Audio System-speaker-back-panel.jpg
DIY: Carpentry & woodwork for converting Car Audio to Home Audio System-head-unit-backpanel.jpg
DIY: Carpentry & woodwork for converting Car Audio to Home Audio System-speaker-front.jpg
DIY: Carpentry & woodwork for converting Car Audio to Home Audio System-head-unit-front.jpg

Finally, the home audio system done, giving out the melody; ‘Mayakkama Kalakkama’ by PB.Srinivas. The sound emanating is of decent quality, and pleasant for a bed-room. Each speaker being a dual-speaker, it covers a wider range of frequencies.

And, the happiness of creating something and seeing it performing.

Photo: The home audio system
DIY: Carpentry & woodwork for converting Car Audio to Home Audio System-audio-system.jpg

PS: I will update again, with one more picture, after completing the boxes for the rear speakers. Also, will try filling the inside of speaker boxes with polyfill to to reduce the resonance. Ideally the speaker rim, should have been mounted on the front side of the front panel, and may try that for the rear speakers. The speakers feel very light, maybe I will add some weight at the base (!).
jkrkrish is offline   (98) Thanks
Old 5th March 2022, 18:28   #2
Distinguished - BHPian
 
BoneCollector's Avatar
 
Join Date: Apr 2011
Location: BIHAR
Posts: 3,203
Thanked: 10,815 Times
re: DIY: Carpentry & woodwork for converting Car Audio to Home Audio System

Good job done.

It makes me feel nostalgic. During the late 80's and early 90's, we didn't have Philips and Sony and other audio systems available here. This was the most common way the home audio setup was done. A car cassette deck and speakers, fixed on their respective boxes and connected to a converter to play on AC.
BoneCollector is offline   (9) Thanks
Old 5th March 2022, 23:22   #3
BHPian
 
Join Date: Apr 2006
Location: TN38
Posts: 229
Thanked: 778 Times
re: DIY: Carpentry & woodwork for converting Car Audio to Home Audio System

Very nice I love the DIY which resonates with my minimal wastage philosophy... Like they say in Tamil, சிறு துரும்பும் பல் குத்த உதவும், meaning even a small waste stick can be used as a toothpick!
pandabear is offline   (6) Thanks
Old 7th March 2022, 17:07   #4
Team-BHP Support
 
navin's Avatar
 
Join Date: Mar 2004
Location: Mumbai
Posts: 25,199
Thanked: 9,307 Times
Re: DIY: Carpentry & woodwork for converting Car Audio to Home Audio System

Quote:
Originally Posted by jkrkrish View Post
DIY: Carpentry for converting Car Audio to Home Audio System
Many many moons ago I decided to build an iPod Dock (using those old 30 pin connectors) with LM3886 chip amplifiers etc.

I called a friend (famous on this forum for wearing orange shorts and having a laugh that would wake the dead) up while I was building this and he laughed at me "Navin" he said "you know you can buy a nice JBL dock for less than the cost of your experiment" then he asked, "WHY?". I thought for a bit and answered "Because I can".

This project reminded me of my own mad experiment. Awesome work.
navin is offline   (23) Thanks
Old 7th March 2022, 21:09   #5
BHPian
 
Join Date: Jan 2021
Location: Bangalore
Posts: 57
Thanked: 197 Times
Re: DIY: Carpentry & woodwork for converting Car Audio to Home Audio System

Quote:
Originally Posted by navin View Post
Many many moons ago I decided to build an iPod Dock (using those old 30 pin connectors) with LM3886 chip amplifiers etc.

I called a friend (famous on this forum for wearing orange shorts and having a laugh that would wake the dead) up while I was building this and he laughed at me "Navin" he said "you know you can buy a nice JBL dock for less than the cost of your experiment" then he asked, "WHY?". I thought for a bit and answered "Because I can".

This project reminded me of my own mad experiment. Awesome work.
Thanks Navin, for the appreciation.
My wife too was wondering, whether the tools and effort/time I had put in was worth it.
Now, I am looking forward to my next project, a pooja- shelf made at home.
jkrkrish is offline   (1) Thanks
Old 8th March 2022, 00:19   #6
BHPian
 
Amrik Singh's Avatar
 
Join Date: Aug 2010
Location: New Delhi
Posts: 660
Thanked: 3,371 Times
Re: DIY: Carpentry & woodwork for converting Car Audio to Home Audio System

The rear of the Speaker boxes should preferably have some holes to allow Speaker diaphragm does not strain when vibrating. Just because, it is a small enclosure. Although, there may no major issues.
I have made from scrap pieces of Plywood and Laminate during construction of my house.


DIY: Carpentry & woodwork for converting Car Audio to Home Audio System-20200723_103554.jpg


DIY: Carpentry & woodwork for converting Car Audio to Home Audio System-20200723_103612.jpg

It is a pair of speakers.
Amrik Singh is offline   (27) Thanks
Old 8th March 2022, 05:26   #7
BHPian
 
GutsyGibbon's Avatar
 
Join Date: Mar 2008
Location: Southern Calif.
Posts: 756
Thanked: 4,551 Times
Re: DIY: Carpentry & woodwork for converting Car Audio to Home Audio System

Looks awesome jkrkrish. I am sure no-one you know have anything like this, that must make you feel special, and your efforts worthwhile.

What sealer/finish did you use? Air has a lot of moisture, and causes wood to warp across the direction of the grain over the next 4 seasons. You can use Johnson's baby oil if you dont want to spend too much time looking for things like linseed oil, or danish oil. You can also use things like lacquer and varnish, but that would have some odor.

Amrik Singh makes a great point about not creating a vacuum inside the speaker box. A few holes at the back should take care of this.
GutsyGibbon is offline   (2) Thanks
Old 8th March 2022, 07:04   #8
BHPian
 
Join Date: Jan 2021
Location: Bangalore
Posts: 57
Thanked: 197 Times
Re: DIY: Carpentry & woodwork for converting Car Audio to Home Audio System

Quote:
Originally Posted by GutsyGibbon View Post
Looks awesome jkrkrish. I am sure no-one you know have anything like this, that must make you feel special, and your efforts worthwhile.

What sealer/finish did you use? Air has a lot of moisture, and causes wood to warp across the direction of the grain over the next 4 seasons. You can use Johnson's baby oil if you dont want to spend too much time looking for things like linseed oil, or danish oil. You can also use things like lacquer and varnish, but that would have some odor.

Amrik Singh makes a great point about not creating a vacuum inside the speaker box. A few holes at the back should take care of this.
Thank you Gutsy.
I had tried linseed oil on some sample pieces. It gives a yellowish tint. Probably will try adding a little quantity of oil dissolvable dye in it, and then use in on the finished structures.
Plan to have a reflex hole on the front, it gives a nice appearance too.
jkrkrish is offline   (1) Thanks
Old 8th March 2022, 07:32   #9
BHPian
 
Amrik Singh's Avatar
 
Join Date: Aug 2010
Location: New Delhi
Posts: 660
Thanked: 3,371 Times
Re: DIY: Carpentry & woodwork for converting Car Audio to Home Audio System

How do you manage 12V DC supply?
I have installed a Local Laptop Charger which had a variable Voltage supply /output. There is ample void for heat dissipation in Deck besides fully open rear end.
Amrik Singh is offline   (1) Thanks
Old 8th March 2022, 07:42   #10
BHPian
 
Join Date: Jan 2021
Location: Bangalore
Posts: 57
Thanked: 197 Times
Re: DIY: Carpentry & woodwork for converting Car Audio to Home Audio System

Quote:
Originally Posted by Amrik Singh View Post
How do you manage 12V DC supply?
I have installed a Local Laptop Charger which had a variable Voltage supply /output. There is ample void for heat dissipation in Deck besides fully open rear end.
The power of most laptop chargers are inadequate to get the best out of the sound system. I had used a compact 12V, 15amp, SMPS from Tridev, which has some kind of heat exchanger on it, and mounted it inside the head unit enclosure with nearly 3mm air-gap from base.
jkrkrish is offline   (1) Thanks
Old 8th March 2022, 07:47   #11
BHPian
 
Amrik Singh's Avatar
 
Join Date: Aug 2010
Location: New Delhi
Posts: 660
Thanked: 3,371 Times
Re: DIY: Carpentry & woodwork for converting Car Audio to Home Audio System

Mine is from the era when Laptops were power hungry and serves me well.
Amrik Singh is offline   (1) Thanks
Old 8th March 2022, 09:19   #12
BHPian
 
sgmuser's Avatar
 
Join Date: Sep 2006
Location: Chennai
Posts: 755
Thanked: 1,124 Times
Re: DIY: Carpentry & woodwork for converting Car Audio to Home Audio System

Quote:
Originally Posted by jkrkrish View Post
DIY: Carpentry for converting Car Audio to Home Audio System
PS: I will update again, with one more picture, after completing the boxes for the rear speakers.
Wow, usually, I tend to feel the car receivers and the speakers do sound better than equivalent home audio, so, you should hear better sounding system for sure. Yes, add some weight and polyfill and that will make the low range far better and tighter. I did a DYI stereo speaker MTM configuration just for the fun of it. They are my PC speakers for now on stand mounts. I always had some fascination for the DIY speakers but my carpentry skills are my week point. Keep fiddling with it and the quality will keep improving. Thumbs up for this effort.
sgmuser is offline   (1) Thanks
Old 8th March 2022, 12:25   #13
BHPian
 
speedmunster's Avatar
 
Join Date: Apr 2009
Location: Hyderabad
Posts: 218
Thanked: 327 Times
Re: DIY: Carpentry & woodwork for converting Car Audio to Home Audio System

Loved what you have done with the speakers and the head-unit, all enclosed in wood. I have a similar setup at home powered by an old PC smps putting out 240w Connected to a Pioneer head-unit. The setup pushes 2 Akai Bush speakers from the 1980s. Will try to share a pic when I get home today.

Cheers
speedmunster is offline   (2) Thanks
Old 8th March 2022, 12:44   #14
BHPian
 
Join Date: Oct 2008
Location: Calicut
Posts: 83
Thanked: 283 Times
Re: DIY: Carpentry & woodwork for converting Car Audio to Home Audio System

Well Done, JkrKrish!!

It brings back fond memories of my own experimentation and folly, 30 years ago. Having just started my career and subsisting in a cramped labor accommodation in Saudi Arabia, space was at a premium and I brought a Sharp Head Unit and Pioneer Triaxial's to go with it.

Given my uninformed self (and with no Google Search to rescue) I just wired it and much to my dismay, there was NO BASS; just the cacophony from the tweeter and midrange.

A fellow inmate with a working brain told me of the role played by the Speaker Enclosure and in just a week, I was listening to divine sound from the speakers firing upward from the top two edges of my iron cot.
KANNURAN is offline   (2) Thanks
Old 8th March 2022, 12:58   #15
BHPian
 
Join Date: Mar 2020
Location: KL 01
Posts: 63
Thanked: 339 Times
Re: DIY: Carpentry & woodwork for converting Car Audio to Home Audio System

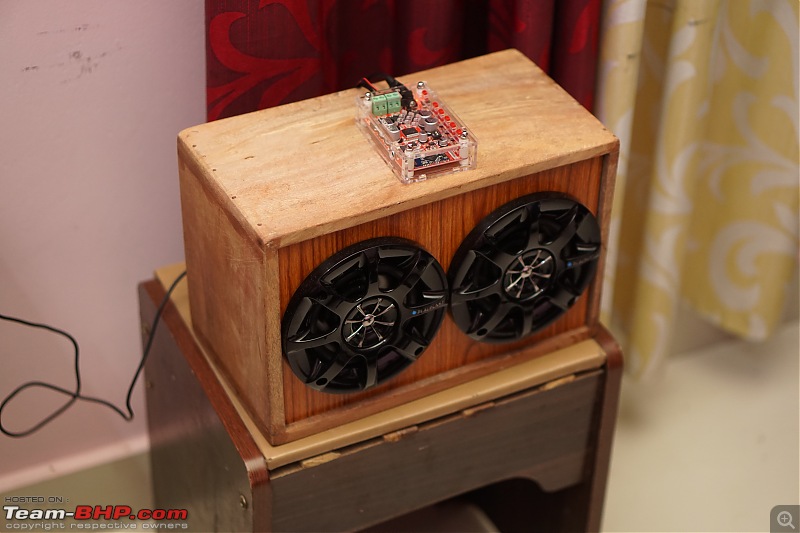
Nice and clean build. Didn't know pinewood planks were available on amazon. I built this basic setup few years ago from two blaupunkt speakers I had lying around and a 6 inch woofer on the back, with the whole unit being driven by a super-powerful yet mini class D amplfier sitting on the top. A basic diy bluetooth speaker.
DIY: Carpentry & woodwork for converting Car Audio to Home Audio System-dsc06297.jpg
jothishX is offline   (13) Thanks
Reply

Most Viewed


Copyright ©2000 - 2024, Team-BHP.com
Proudly powered by E2E Networks