Team-BHP > Technical Stuff > DIY - Do it yourself
Register New Topics New Posts Top Thanked Team-BHP FAQ


Reply
  Search this Thread
18,184 views
Old 25th March 2022, 10:50   #1
Team-BHP Support
 
Gannu_1's Avatar
 
Join Date: Apr 2013
Location: Madras
Posts: 7,174
Thanked: 20,220 Times
DIY: RCD 330, 340 head units - Adding a rear USB cable

The RCD 330, 340 series head units have a USB port at the front. Android Auto and Apple CarPlay users would connect their smartphones to this front USB port. But the USB cable connected to the unit is an eyesore especially if you have the entire cable dangling this way:

DIY: RCD 330, 340 head units - Adding a rear USB cable-083c0a490de34effa82b4499d56e0b13.jpeg

There is a workaround for this - solder a USB terminal to the same port on the PCB, lead it to the rear of the unit and connect the USB/Lightning cable to your smartphone. That way the cable is hidden and the dashboard looks a lot cleaner:

DIY: RCD 330, 340 head units - Adding a rear USB cable-cac2fc85efe5444994c3894bd62aedfa.jpeg

If you can source the OE USB port and the cable, you can even have the port installed in front of the gear lever like this:

DIY: RCD 330, 340 head units - Adding a rear USB cable-usb-port_console.jpg

Parts required:
  1. Micro USB cable - A charging cable bundled with a device like Amazon Echo. Don’t rely on 4 or 5 thin bare cables as they may not work due to the lack of the braided shielding which reduces noise and EMI.

  2. Female USB A screw terminal - You can get these locally from electronic spares shops. The terminals are numbered and you have to strip the insulation of the cables and screw it down.

Tools required:
  1. Torx T8 bit/screw driver - To remove all the Torx screws from the head unit.

  2. Mini Phillips screwdriver - For the screw terminal unit.

  3. Soldering iron - For soldering the cables to the board’s terminals. A pointed bit will be helpful.

  4. Soldering iron stand

  5. Wire cutter and stripper

  6. Hot glue gun - To pour hot glue over the soldered terminals to prevent wire movement and dislodging later.

  7. Heat gun (optional) - To melt the hot glue poured over the soldered terminal so as to melt the glue evenly. If you can achieve this with the glue gun itself, you don’t need a heat gun.

  8. Bench power supply - To test the functionality at home before installing it in the car.

Consumables required:
  1. Solder lead

  2. Soldering flux

  3. Cable tie

  4. Glue stick

Procedure:
  1. Remove the head unit from the car and take it to your bench:

    DIY: RCD 330, 340 head units - Adding a rear USB cable-bench.jpg

  2. Using the T8 Torx bit, remove the Torx screws holding the top plate. There are 7 screws - 2 on each side and 3 at the rear.

    DIY: RCD 330, 340 head units - Adding a rear USB cable-screws-side.jpg

    DIY: RCD 330, 340 head units - Adding a rear USB cable-screws-back.jpg

    Remove the top plate:

    DIY: RCD 330, 340 head units - Adding a rear USB cable-top-plate-removed.jpg

    Since there are several variants of the RCD 330 and 340 manufactured by different OEMs, this may vary depending on the unit you have.

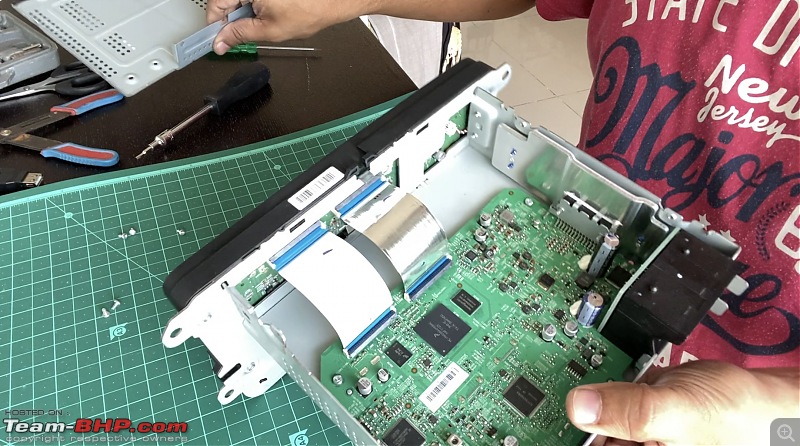
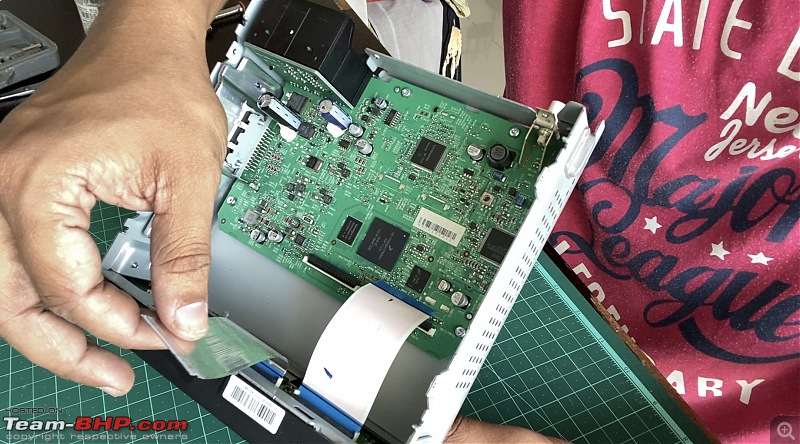
  3. Once the top plate is removed, you have to detach the LCD unit from the main unit. For this, you need to remove the 2 flat ribbon cables connecting the motherboard to the LCD board.

    DIY: RCD 330, 340 head units - Adding a rear USB cable-ribbon-cables.jpg

    Push the tab on the ribbon connectors to the top and gently detach the ribbon cables.

    DIY: RCD 330, 340 head units - Adding a rear USB cable-ribbon-cables-detached.jpg

  4. The LCD unit is screwed to the main body with 2 screws on each side.

    DIY: RCD 330, 340 head units - Adding a rear USB cable-lcd-unit-side-screws.jpg

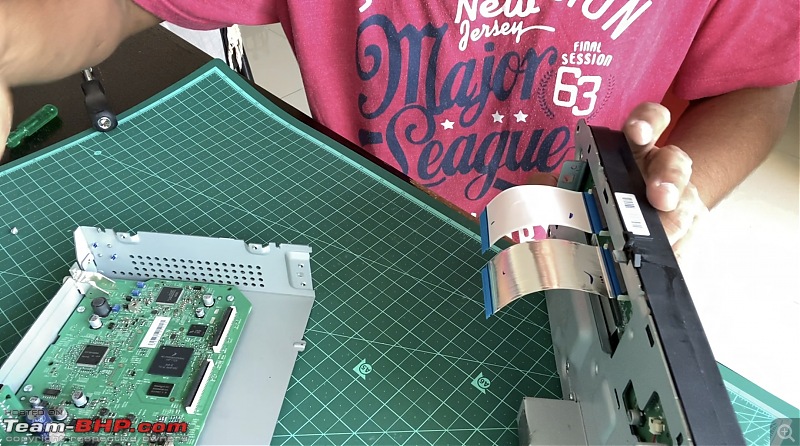
    Undo the screws and gently separate the LCD unit from the main body.

    DIY: RCD 330, 340 head units - Adding a rear USB cable-lcd-unit-detached.jpg

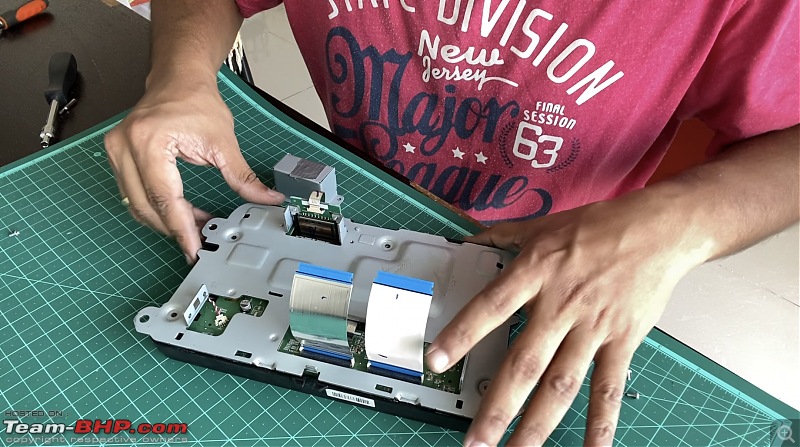
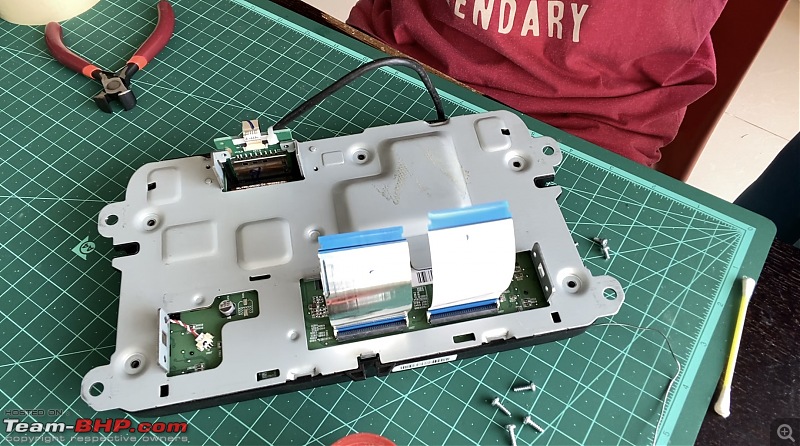
  5. Remove the metal backplate from the LCD unit. 5 Torx screws hold the back plate to the main board:

    DIY: RCD 330, 340 head units - Adding a rear USB cable-lcd-unit-backplate.jpg

    Undo the 2 screws and detach the SD card board’s metal enclosure:

    DIY: RCD 330, 340 head units - Adding a rear USB cable-sd-card-enclosure-removed.jpg

    And lastly, 2 screws holding the back plate with the SD card board:

    DIY: RCD 330, 340 head units - Adding a rear USB cable-sd-card-board-screws.jpg

    Gently pry open the metal enclosure from the LCD unit:

    DIY: RCD 330, 340 head units - Adding a rear USB cable-lcd-unit-backplate-removed.jpg

    By now you’ve removed about 20 screws. Keep all the screws safe and segregated based on their size (there are only 2 sizes going by my experience).

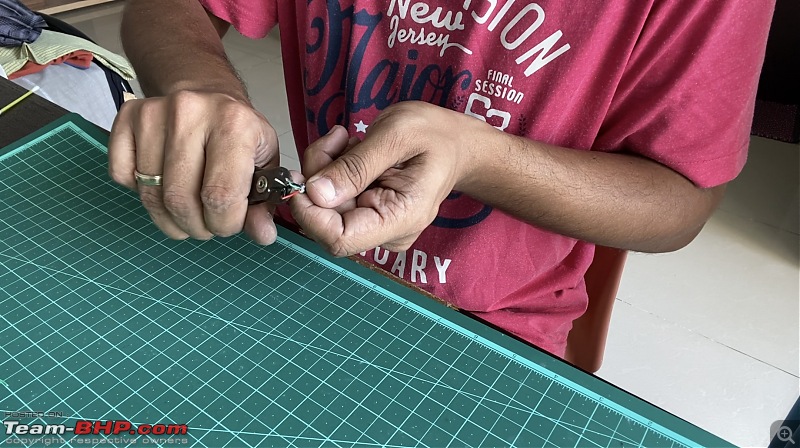
  6. Cut the 2 ends of the micro USB cable, shorten the length of the cable based on your requirement and strip the insulation of the 4 cables at both ends.

    DIY: RCD 330, 340 head units - Adding a rear USB cable-usb-cable.jpg

    DIY: RCD 330, 340 head units - Adding a rear USB cable-usb-cable-stripped.jpg

    A good quality USB cable will have a braided shielding around the 4 cables which acts as a shield to cut down the electrical noise and EMI. The cables will be usually color coded red, white, green and black.

    Red - +5V
    White - Data -
    Green - Data +
    Black - GND

  7. This is the rear of the USB port soldered to the LCD board:

    DIY: RCD 330, 340 head units - Adding a rear USB cable-0815183d041d4d5da10419d00f85e91e.png

    They are numbered this way:

    DIY: RCD 330, 340 head units - Adding a rear USB cable-dcf8fb40908a438f8d3f90d724e6f3da.png

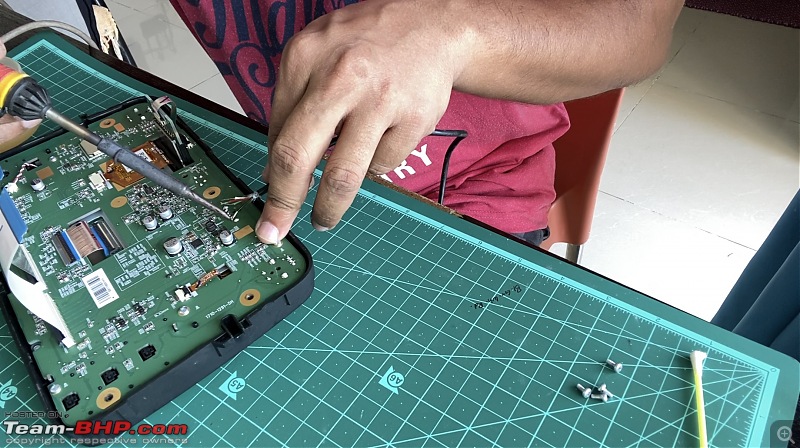
    Solder the leads of the USB cable to the port:

    DIY: RCD 330, 340 head units - Adding a rear USB cable-soldering-board.jpg

    This was incredibly hard for me because the solder would just not stick to the cables and the heat from the soldering iron would melt the thin insulation over the cables! Took a few tries and the end result wasn’t the best but it passed my test.

    DIY: RCD 330, 340 head units - Adding a rear USB cable-soldered.jpg

  8. The other end is connected to the female USB A screw terminal:

    DIY: RCD 330, 340 head units - Adding a rear USB cable-usb-screw-connector.jpg

    The terminal is numbered this way:

    DIY: RCD 330, 340 head units - Adding a rear USB cable-f7feb60486f24643955884a353203afd.png

    Connect the leads and screw it down properly:

    Click image for larger version

Name:	USB screw connector.jpg
Views:	67
Size:	697.6 KB
ID:	2288645
  9. After the USB cable is connected, do a quick bench test to check if it is working as it should (Android Auto/CarPlay):

    DIY: RCD 330, 340 head units - Adding a rear USB cable-bench-test-1.jpg

    DIY: RCD 330, 340 head units - Adding a rear USB cable-bench-test-2.jpg

    DIY: RCD 330, 340 head units - Adding a rear USB cable-bench-testing.jpg

  10. After confirming that the modification is working, add some hot melt glue over the soldered joint to prevent the wire(s) getting dislodged from the board due to the cable movement or pulling:

    DIY: RCD 330, 340 head units - Adding a rear USB cable-hot-glue.jpg

    Optional: Use a heat gun to spread the glue evenly over the joint but be careful not to melt the plastic like I did! Luckily it isn’t visible after the head unit is installed in the car.

  11. Drill a hole at the back of the SD card board’s enclosure and route the USB cable the hole:

    DIY: RCD 330, 340 head units - Adding a rear USB cable-usb-cable-through-hole.jpg

    Use a cable tie to secure the cable with the SD card board’s hole:

    DIY: RCD 330, 340 head units - Adding a rear USB cable-usb-cable-zip-tied.jpg

    This will prevent the cable from getting pulled from the soldered joint too.

  12. Secure the SD card board’s metal enclosure back to the LCD board (2 screws) and secure the metal backplate of the LCD unit (5 + 2 screws):

    DIY: RCD 330, 340 head units - Adding a rear USB cable-back-plate-secured.jpg

  13. Secure the main unit with the LCD unit (2 screws on each side):

    DIY: RCD 330, 340 head units - Adding a rear USB cable-lcd-unit-secured.jpg

  14. Connect the 2 ribbon connectors of the LCD unit with the board:

    DIY: RCD 330, 340 head units - Adding a rear USB cable-ribbon-cable-secured.jpg

  15. Secure the top plate back (2 screws on each side + 3 at the rear):

    DIY: RCD 330, 340 head units - Adding a rear USB cable-top-plate-secured.jpg

  16. Secure the unit back in the car, connect the USB C/Lightning cable to the female USB port and route the cable suitably. Test the working:

    DIY: RCD 330, 340 head units - Adding a rear USB cable-installed-car.jpg

    The result is a cleaner dashboard:

    Click image for larger version

Name:	CAC2FC85EFE5444994C3894BD62AEDFA.jpeg
Views:	200
Size:	2.81 MB
ID:	2289203

For those who prefer a video tutorial, here it is:


Thanks for reading guys. Trust this was useful. Let me know if you have any comments or feedback.

Last edited by Gannu_1 : 27th March 2022 at 20:45.
Gannu_1 is offline   (57) Thanks
Old 29th March 2022, 05:00   #2
Team-BHP Support
 
Join Date: Feb 2004
Location: Mumbai
Posts: 17,844
Thanked: 77,082 Times
Re: DIY: RCD 330, 340 head units - Adding a rear USB cable

Thread moved out from the Assembly Line. Thanks for sharing!
Aditya is offline   (2) Thanks
Old 30th March 2022, 09:22   #3
BHPian
 
Ashtoncastelino's Avatar
 
Join Date: Aug 2021
Location: Manipal
Posts: 255
Thanked: 2,061 Times
Re: DIY: RCD 330, 340 head units - Adding a rear USB cable

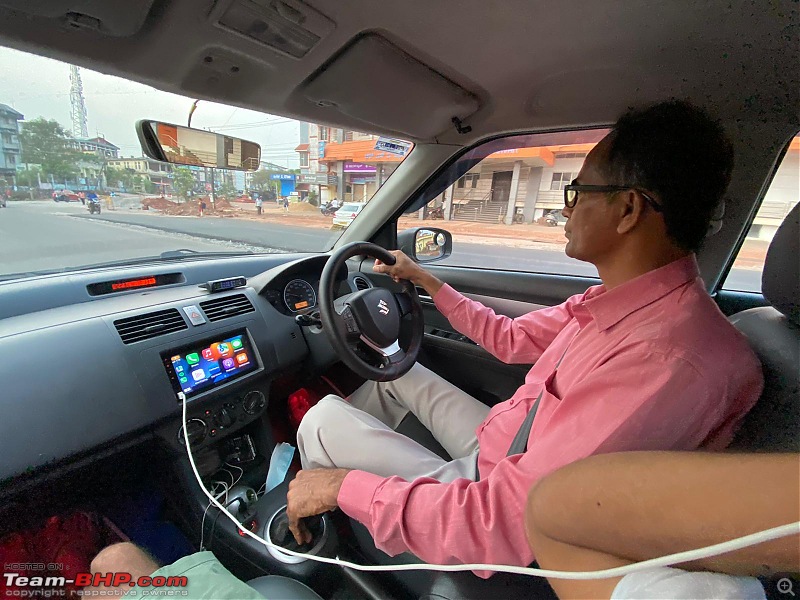
Thanks a lot for sharing this DIY Ganesh! This is truly awesome, you have executed it in a brilliant manner. I too would love to do this on my Head unit (Blaupunkt new York 750). It has 2 USB ports, one at the front (Android auto and carplay) and another one at the rear which doesn't support them .

Will try this DIY once my exams are done.

DIY: RCD 330, 340 head units - Adding a rear USB cable-img20220329wa0034.jpg

Notice how irritating how the wire keeps dangling here and there. Yes that's my dad driving

Regards
Ashton Castelino

Last edited by Gannu_1 : 1st April 2022 at 14:40. Reason: Dropping the sir part. :)
Ashtoncastelino is offline   (6) Thanks
Old 30th March 2022, 12:55   #4
BHPian
 
TheLizardKing's Avatar
 
Join Date: Jul 2013
Location: Mumbai
Posts: 428
Thanked: 1,321 Times
Re: DIY: RCD 330, 340 head units - Adding a rear USB cable

A DIY thread from you after a long time, Gannu. As usual, it is both very useful and very well-documented, and as usual I'm tempted to execute it on my GT TSI right away because I use Android Auto a lot and the dangling wire is really irritating. The only problem is that my soldering skills are next to non-existent, and I know I'll make a mess of it.
TheLizardKing is offline   (1) Thanks
Old 31st March 2022, 03:18   #5
BHPian
 
SuperSuri's Avatar
 
Join Date: Nov 2019
Location: Dilli
Posts: 146
Thanked: 447 Times
Re: DIY: RCD 330, 340 head units - Adding a rear USB cable

AMAZING is the word, & the work!

Hats off to Gannu for executing this mod. Will help us getting a clean dashboard with no wires dangling.

Kudos!
SuperSuri is offline   (2) Thanks
Old 31st March 2022, 19:03   #6
BHPian
 
Join Date: Oct 2021
Location: New Delhi
Posts: 116
Thanked: 161 Times
Re: DIY: RCD 330, 340 head units - Adding a rear USB cable

Another great DIY from Gannu. Even I don't like wire dangling near the gear lever but I highly doubt my soldering skills. Need some expert like you for this one
Sahil00090 is online now   (1) Thanks
Old 1st April 2022, 14:46   #7
Team-BHP Support
 
Gannu_1's Avatar
 
Join Date: Apr 2013
Location: Madras
Posts: 7,174
Thanked: 20,220 Times
Re: DIY: RCD 330, 340 head units - Adding a rear USB cable

Thanks guys.

Soldering the leads is indeed tricky since I couldn't get solder to stick to the cable leads in the first place and by the time I wanted the leads to stick to the terminals on the board, the insulation would have melted!

If you're not confident, take this to the repair shops that deal with audio equipment. They'll do it quickly.

Oh and someone pinged expressing doubts about the USB cable not working with OE Visteon systems. It works perfectly as this Russian owner has shown -

https://www.drive2.ru/l/567989566040966375/

Hope this helps!
Gannu_1 is offline   (4) Thanks
Old 26th April 2022, 12:16   #8
BHPian
 
TheLizardKing's Avatar
 
Join Date: Jul 2013
Location: Mumbai
Posts: 428
Thanked: 1,321 Times
Re: DIY: RCD 330, 340 head units - Adding a rear USB cable

As is my habit of many years now, whenever Gannu (whom I consider my DIY guru) puts up a new DIY thread, I drop everything else and copy it too.

DIY: RCD 330, 340 head units - Adding a rear USB cable-visteon_with_rear_usb.jpg

Not sharing pictures, since Gannu has already covered that in his posts. Here are the major differences in my effort:
  1. I have a Visteon unit made in India, and was slightly apprehensive about whether this DIY would work. Happy to report that it works perfectly with no problems at all.
  2. In place of using a USB screw terminal which I was not able to source, I purchased a Type C to USB 2.0 cable from Amazon (link) and cut the Type C end off. Please note that the length of this particular cable is a bit short, so please cut it as close as possible to the Type C end. Also, please ensure that you buy a USB 2.0 cable and not a USB 3.0 one.
  3. After trying for almost an hour and slightly melting one of the ribbon connectors (which, I will admit, stopped my heart for a few seconds), I gave up on the soldering and got it done at a car audio repair shop in my neighborhood. He took exactly five minutes to do a neat and beautiful job, and wouldn't even tell me how much I should pay him. I was so happy with the job that I paid him Rs. 200.
  4. I cut a rectangular hole in the metal cap to get it to pass over the USB socket.

Last edited by TheLizardKing : 26th April 2022 at 12:37. Reason: Added tip to not buy USB 3.0 cable.
TheLizardKing is offline   (2) Thanks
Old 24th June 2022, 07:36   #9
BHPian
 
SuperSuri's Avatar
 
Join Date: Nov 2019
Location: Dilli
Posts: 146
Thanked: 447 Times
Re: DIY: RCD 330, 340 head units - Adding a rear USB cable

Hello Gannu, can we use the following USB cable for this retrofit:

Limited-time deal: Amazon Brand - Solimo Charging Braided Micro USB Data Cable, Suitable For All Supported Mobile Phones (2 Meter, Black) https://amzn.eu/d/ah7Ze4O

And I found a link for the USB female connector too:

SDEPL USB 2.0 A Female Plug to 5 Pin/Way Female Bolt Screw Shield terminals Pluggable Type Adapter https://amzn.eu/d/5OjW2Jo


Will these work? Or if you could share a suitable link for the USB Cable, and the USB port please. This would be of great help to all wanting to perform this mod.

Thanks in advance. 🙏🏻
SuperSuri is offline  
Old 24th June 2022, 08:04   #10
Team-BHP Support
 
Gannu_1's Avatar
 
Join Date: Apr 2013
Location: Madras
Posts: 7,174
Thanked: 20,220 Times
Re: DIY: RCD 330, 340 head units - Adding a rear USB cable

Quote:
Originally Posted by SuperSuri View Post
Hello Gannu, can we use the following USB cable for this retrofit:

Limited-time deal: Amazon Brand - Solimo Charging Braided Micro USB Data Cable, Suitable For All Supported Mobile Phones (2 Meter, Black) https://amzn.eu/d/ah7Ze4O

And I found a link for the USB female connector too:

SDEPL USB 2.0 A Female Plug to 5 Pin/Way Female Bolt Screw Shield terminals Pluggable Type Adapter https://amzn.eu/d/5OjW2Jo


Will these work? Or if you could share a suitable link for the USB Cable, and the USB port please. This would be of great help to all wanting to perform this mod.

Thanks in advance. 🙏🏻
Both would work but Amazon grossly overprices some of the products.

Get this from Robu instead - Link

And solder 4 cables from this unit to the motherboard on the RCD unit. A 5th cable for the grounding would be good too. You must use a good quality shielded USB cable (say from the Fire TV stick or a mobile charger cable) for this purpose.

Be mindful that the front USB port on the unit would be disabled once you do the modification and connect the cable.
Gannu_1 is offline  
Old 24th June 2022, 18:32   #11
BHPian
 
SuperSuri's Avatar
 
Join Date: Nov 2019
Location: Dilli
Posts: 146
Thanked: 447 Times
Re: DIY: RCD 330, 340 head units - Adding a rear USB cable

Quote:
Originally Posted by Gannu_1 View Post
Both would work but Amazon grossly overprices some of the products.

Get this from Robu instead - Link

And solder 4 cables from this unit to the motherboard on the RCD unit. A 5th cable for the grounding would be good too. You must use a good quality shielded USB cable (say from the Fire TV stick or a mobile charger cable) for this purpose.

Be mindful that the front USB port on the unit would be disabled once you do the modification and connect the cable.
Thanks for the help Gannu.

Can we use the charging cables from the ERD brand or some other local brand chargers? This is easily available in delhi.
SuperSuri is offline  
Reply

Most Viewed


Copyright ©2000 - 2024, Team-BHP.com
Proudly powered by E2E Networks